


nginx 可以使用各平台的默认包来安装,本文是介绍使用源码编译安装,包括具体的编译参数信息。
准备工作:
1、安装必备工具:
编译环境gcc g++ 开发库之类的需要提前装好
$ yum -y install gcc gcc-c++ autoconf automake
安装过程中如果出现如下图错误:
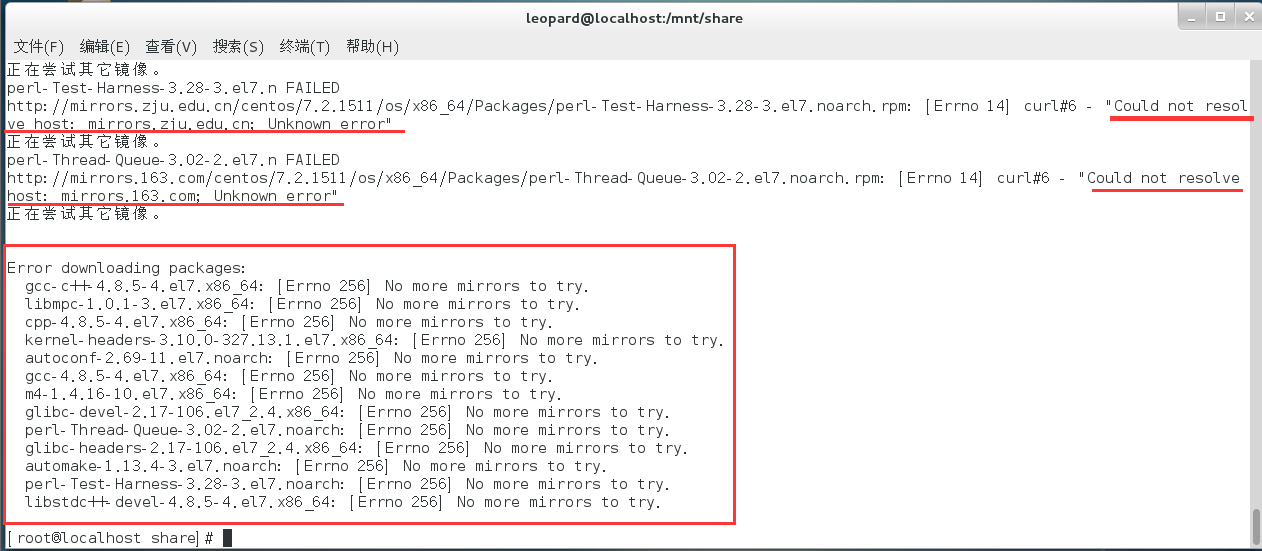
原因:
dns服务器没有配置正确
解决办法:
①、打开文件/etc/resolv.conf在其中添加:
 nameserver 8.8.8.8
 nameserver 8.8.4.4
 search localdomain
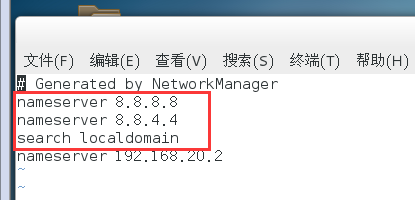
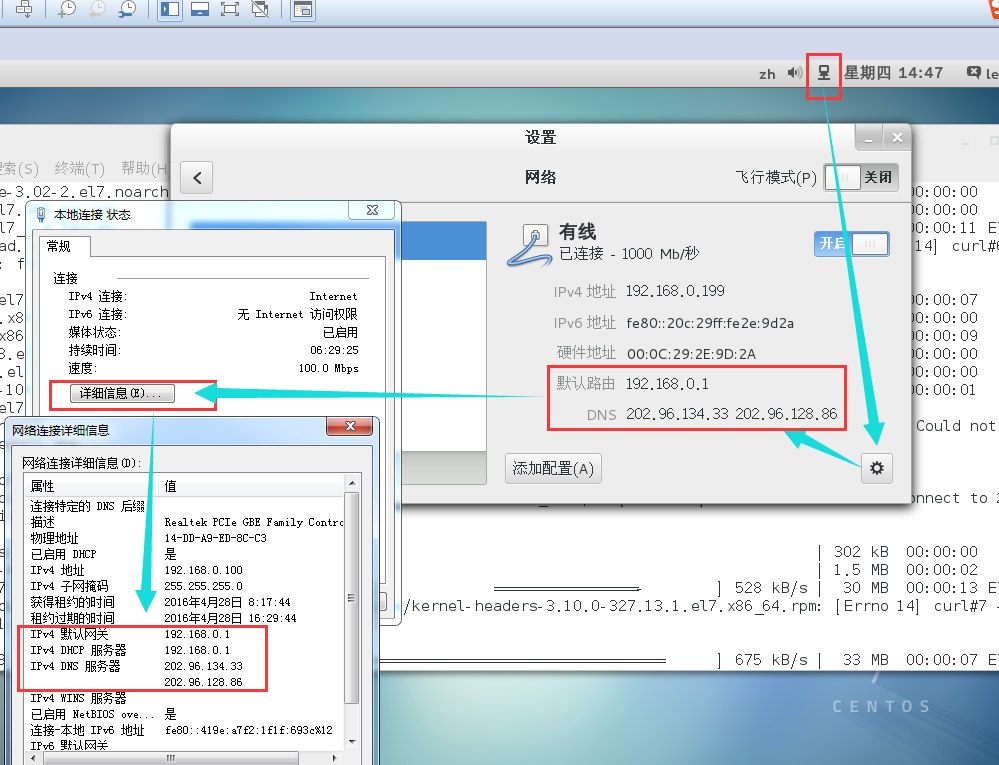
②、然后重启网卡:使用命令: service network restart
如果是在虚拟机配置,那要把路由设置成和主机一致
$ yum -y install zlib zlib-devel openssl openssl-devel pcre-devel
说明:
pcre: 用来作地址重写的功能。
zlib:nginx 的gzip模块,传输数据打包,省流量(但消耗资源)。
openssl:提供ssl加密协议。
也可以先在线下下载:
pcre:ftp://ftp.csx.cam.ac.uk/pub/software/programming/pcre/
zlib:http://zlib.net/
openssl:http://www.openssl.org/source/
2、新建一个系统级用户组和匿名用户,以及下面编译时使用
$ sudo groupadd -r nginx

$ sudo useradd -s /sbin/nologin -g nginx -r nginx-user
查看用户组及其成员
groups nginx-user

Nginx编译安装:
1、下载Nginx:http://nginx.org/en/download.html
2、下载sticky:http://download.csdn.net/detail/u014799292/9506315
在 usr/local/src 目录下创建 nginx 文件夹
mkdir nginx
将下载好的 nginx-1.9.15.tar.gz 放到 /mnt/share资源目录并复制到 /usr/local/src/nginx 文件夹下并解压,并进入解压后的nginx-1.9.15文件夹下
nginx-sticky-module-1.1.tar.gz 的做法也一样
cp /mnt/share/nginx-sticky-module-1.1.tar.gz /usr/local/nginx/
tar -zxvf nginx-sticky-module-1.1.tar.gz
mv nginx-sticky-module-1.1.tar.gz nginx-sticky-module-up
注意事项 --> nginx-1.9.x和nginx-sticky-module-1.1编译会有点问题,应该是nginx新版本没有相应的nginx-sticky-module,解决办法是把nginx-sticky-module-up/ngx_http_sticky_misc.c的281行修改为:
digest->len = ngx_sock_ntop(in,sizeof(struct sockaddr_in), digest->data, len, 1);
cd nginx-sticky-module-up
vi ngx_http_sticky_misc.c
显示行号
:set number
然后再编辑 nginx-sticky-module-up/ngx_http_sticky_module.c
第6行添加

#include <nginx.h>
第340行添加
#if defined(nginx_version) && nginx_version >= 1009000
		iphp->rrp.current = peer;
#else
 		iphp->rrp.current = iphp->selected_peer;
#endif
接下来解压 nginx-1.9.15

cp /mnt/share/nginx-1.9.15.tar.gz /usr/local/nginx/
tar -zxvf nginx-1.9.15.tar.gz
cd nginx-1.9.15/

./configure 参数配置信息详情,可以通过 --help 查询
$ ./configure \					#nginx启动
--prefix=/usr/local/nginx \				# 设定安装目录,默认使用 /usr/local/nginx。
--sbin-path=/usr/local/nginx/nginx \	# 设置nginx的可执行文件的路径,默认为prefix/sbin/nginx.
--conf-path=/etc/nginx/nginx.conf \		# 设置在nginx.conf配置文件的路径。nginx允许使用不同的配置文件启动,通过命令行中的-c选项。默认为prefix/conf/nginx.conf.
--error-log-path=/var/log/nginx/error.log \		# 设置主错误,警告,和诊断文件的名称。安装完成后,可以随时改变的文件名 ,在nginx.conf配置文件中 使用 的error_log指令。默认情况下,文件名 为prefix/logs/error.log.
--http-log-path=/var/log/nginx/access.log \		# 设置主请求的HTTP服务器的日志文件的名称。安装完成后,可以随时改变的文件名 ,在nginx.conf配置文件中 使用 的access_log指令。默认情况下,文件名 为prefix/logs/access.log.
--pid-path=/var/run/nginx.pid \			# 设置nginx.pid文件,将存储的主进程的进程号。安装完成后,可以随时改变的文件名 , 在nginx.conf配置文件中使用 PID指令。默认情况下,文件名 为prefix/logs/nginx.pid.
--lock-path=/var/run/nginx.lock \		# 设定lock文件(nginx.lock)目录
--http-client-body-temp-path=/var/cache/nginx/client_temp \	# 设置客户端请求临时文件路径
--http-proxy-temp-path=/var/cache/nginx/proxy_temp \		# 设置http proxy临时文件路径
--http-fastcgi-temp-path=/var/cache/nginx/fastcgi_temp \	# 设置http fastcgi临时文件路径
--http-uwsgi-temp-path=/var/cache/nginx/uwsgi_temp \		# 设置路径存储http uwsgi临时文件路径
--http-scgi-temp-path=/var/cache/nginx/scgi_temp \			# 设置路径存储http scgi临时文件路径
--user=nginx \		#  设置nginx工作进程的用户。安装完成后,可以随时更改的名称在nginx.conf配置文件中 使用的 user指令。默认的用户名是nobody。
--group=nginx \		# 设置nginx工作进程的用户组。安装完成后,可以随时更改的名称在nginx.conf配置文件中 使用的 user指令。默认的为非特权用户。
--with-http_ssl_module \		# 使用https协议模块。默认情况下,该模块没有被构建。建立并运行此模块的OpenSSL库是必需的。
--with-http_realip_module \		# 允许ngx_http_realip_module模块(mod_rpaf)
--with-http_addition_module \	# ..模块(mod_layout)
--with-http_sub_module \		# ..模块
--with-http_dav_module \		# ..模块(mod_dav)
--with-http_flv_module \		# ..(mod_flvx)
--with-http_mp4_module \		# ..模块(mod_mp4)
--with-http_gunzip_module \		# ..模块(mod_gunzip)
--with-http_gzip_static_module \		# ..模块(mod_dflate)
--with-http_random_index_module \		# ..模块(mod_autoindex)
--with-http_secure_link_module \		# ..模块
--with-http_stub_status_module \		# ..模块(mod_status)通过web界面查看时Nginx需要开启status模块
--with-http_auth_request_module \		# 允许ngx_http_auth_request_module模块
--with-http_xslt_module 		# 允许ngx_http_xslt_module模块
--with-mail \		# 允许POP3/IMAP4/SMTP代理模块
--with-mail_ssl_module \		# 允许ngx_mail_ssl_module模块
--with-file-aio \	# 允许文件AIO支持
--with-ipv6 \		# 允许IP6代理支持
--with-http_spdy_module \  	# 允许ngx_http_spdy_module模块1.9.5开始要把把--with-http_spdy_module换成--with-http_v2_module,不然报错
--with-cc-opt='-O2 -g -pipe -Wp,-D_FORTIFY_SOURCE=2 -fexceptions -fstack-protector --param=ssp-buffer-size=4 -m64 -mtune=generic'  # 设置C编译器参数
--without-http_charset_module 		# 不使用ngx_http_charset_module模块
--without-http_gzip_module 			# 不使用ngx_..模块
--without-http_ssi_module 			# 不使用ngx_..模块
--without-http_userid_module 		# 不使用ngx_..模块
--without-http_access_module 		# 不使用ngx_..模块
--without-http_auth_basic_module 	# 不使用ngx_..模块
--without-http_autoindex_module 	# 不使用ngx_..模块
--without-http_geo_module 			# 不使用ngx_..模块
--without-http_map_module 			# 不使用ngx_..模块
--without-http_referer_module 		# 不使用ngx_..模块
--without-http_rewrite_module 		# 不使用ngx_..模块
--without-http_proxy_module 		# 不使用ngx_..模块
--without-http_fastcgi_module 		# 不使用ngx_..模块
--without-http_memcached_module 	# 不使用ngx_..模块
--without-http_limit_zone_module 	# 不使用ngx_..模块
--without-http_empty_gif_module 	# 不使用ngx_..模块
--without-http_browser_module 		# 不使用ngx_..模块
--without-http_upstream_ip_hash_module 		# 不使用ngx_..模块
--with-http_perl_module 		# 允许ngx_..模块
--with-perl_modules_path=PATH 	# 设置perl模块路径
--with-perl=PATH 		# 设置perl库文件路径
--http-log-path=PATH 	# 设置access log文件路径
--without-http 			# 不使用HTTP server功能
--without-mail_pop3_module 		# 不允许ngx_..模块
--without-mail_imap_module 		# 不允许ngx_..模块
--without-mail_smtp_module 		# 不允许ngx_..模块
--with-google_perftools_module 		# 允许ngx_..模块(调试用)
--with-cpp_test_module 	# 允许ngx_..模块
--add-module=PATH 		# 允许使用外部模块,以及路径
--with-cc=PATH 			# 设置C编译器路径
--with-cpp=PATH 		# 设置C预处理路径
--with-ld-opt=OPTIONS 	# 设置连接文件参数
--with-cpu-opt=CPU 		# 为指定CPU优化,可选参数有:
          pentium, pentiumpro, pentium3, pentium4,
          athlon, opteron, sparc32, sparc64, ppc64
--without-pcre 			# 不使用pcre库文件
--with-pcre=DIR 		# 设定PCRE库路径
--with-pcre-opt=OPTIONS # 设置PCRE运行参数
--with-md5=DIR 			# 设定md5库文件路径
--with-md5-opt=OPTIONS 	# 设置md5运行参数
--with-md5-asm 			# 使用md5源文件编译
--with-sha1=DIR 		# 设定sha1库文件路径
--with-sha1-opt=OPTIONS # 设置sha1运行参数
--with-sha1-asm 		# 使用sha1源文件编译
--with-zlib=DIR 		# 设定zlib库文件路径
--with-zlib-opt=OPTIONS # 设置zlib运行参数
--with-zlib-asm=CPU 	# 使zlib对特定的CPU进行优化,可选参数:
          pentium, pentiumpro
--with-openssl=DIR 		# 设定OpenSSL库文件路径
--with-openssl-opt=OPTIONS 	# 设置OpenSSL运行参数
--with-debug 			# 允许调试日志
--builddir=DIR 			# 设定程序编译目录
--with-rtsig_module 	# 允许rtsig模块
--with-select_module 	# 允许select模块(一种轮询模式,不推荐用在高载环境)
--without-select_module # 不使用select模块
--with-poll_module 		# 允许poll模块(一种轮询模式,不推荐用在高载环境)
--without-poll_module 	# 不使用poll模块
nginx编译时不是功能加的越多越好,应该尽可能少编译模块,不用的最好不要加入。
编译好的nginx可通过 /usr/local/nginx/sbin/nginx -V 查看编译时的参数(具体路径更具实际情况而定)
现将下列参数加入 #文件夹要自己创建
./configure
--with-http_ssl_module \
--with-http_stub_status_module \
--sbin-path=/usr/local/nginx/nginx \
--conf-path=/usr/local/nginx/nginx/nginx.conf \
--pid-path=/usr/local/nginx/nginx/nginx.pid \
--with-openssl=/usr/local/src/openssl/openssl-1.0.1s/ \
--with-zlib=/usr/local/src/zlib/zlib-1.2.8/ \
--with-pcre=/usr/local/src/pcre/pcre-8.38/ \
--add-module=/usr/local/src/nginx/nginx-sticky-module-up/ \
( 自己备用 )
./configure \
--prefix=/usr/local/nginx \
--pid-path=/var/run/nginx/nginx.pid \
--lock-path=/var/lock/nginx.lock \
--error-log-path=/var/log/nginx/error.log \
--http-log-path=/var/log/nginx/access.log \
--with-http_gzip_static_module \
--http-client-body-temp-path=/var/temp/nginx/client \
--http-proxy-temp-path=/var/temp/nginx/proxy \
--http-fastcgi-temp-path=/var/temp/nginx/fastcgi \
--http-uwsgi-temp-path=/var/temp/nginx/uwsgi \
--http-scgi-temp-path=/var/temp/nginx/scgi
注意:上边将临时文件目录指定为/var/temp/nginx,需要在/var下创建temp及nginx目录
# mkdir /var/temp/nginx -p
随后执行 (以下所有的启动目录都是在上面 --sbin-path 中配置的存放路径)
make && make install
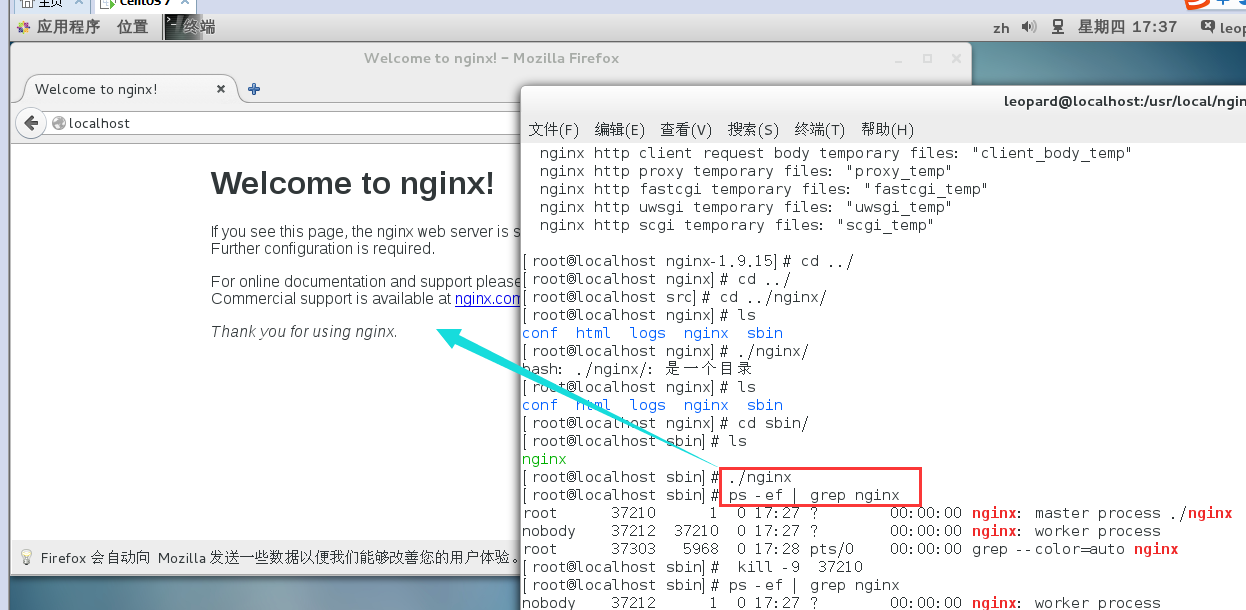
启动 nginx ,进入 /usr/local/nginx/nginx 目录 运行 并查看是否启动
./nginx
ps -ef | grep nginx
通过web界面查看时Nginx需要开启status模块,加入
–with-http_stub_status_module
然后配置Nginx.conf,在server点里面加入如下内容
location /status {
	stub_status on;
	access_log /usr/local/nginx/logs/status.log;
	auth_basic "NginxStatus";
}
配置完后重新启动Nginx后我们可以通过浏览器访问http://localhost/status 查看
启动成功
判断配置文件是否正确,并重启nginx
cd  /usr/local/nginx/nginx
./nginx -t
./nginx -s reload
知识小插曲
nginx建立虚拟主机,通过一台主机绑定多个IP地址
1、将/etc/sysconfig/network-scripts/ifcfg-eth0文件复制一份,命名为ifcfg-eth0:1
修改其中内容:
DEVICE=eth0:1
IPADDR=192.168.25.103
其他项不用修改
2、重启系统
配置文件下,http是主请求,server是虚拟主机,一个server表示一台
通过增加server 并更改其下的 server_name xxx.xxx.xxx.xxx; 可以绑定到不同的IP服务器
end
如果启动成功,开始下一步 激活 sticky 模块
在上面,我们已经通过 --add-module 为nginx安装了 sticky 模块,在 upstream块中添加 sticky; 即可激活Session Sticky模块。
在 nginx.conf 中 http 下添加
upstream leo_test{
  sticky;
  server 127.0.0.1:80;
}
sticky [name=route] [domain=.foo.bar] [path=/] [expires=1h] [hash=index|md5|sha1] [no_fallback];
name: 可以为任何的string字符,默认是route
domain:哪些域名下可以使用这个cookie
path:哪些路径对启用sticky,例如path/test,那么只有test这个目录才会使用sticky做负载均衡
expires:cookie过期时间,默认浏览器关闭就过期,也就是会话方式。
no_fallbackup:如果设置了这个,cookie对应的服务器宕机了,那么将会返回502(bad gateway 或者 proxy error),建议不启用
并在 local 下配置
location / {
	proxy_pass http://leo_test;
    include proxy.conf;
    add_header Cache-Control no-store;
}
再次检验是否正常,并重启nginx
cd  /usr/local/nginx/nginx
./nginx -t
./nginx -s reload
关闭
查询nginx主进程号
ps -ef | grep nginx
从容停止 kill -QUIT 主进程号
快速停止 kill -TERM 主进程号
强制停止 kill -9 nginx
若nginx.conf配置了pid文件路径,如果没有,则在logs目录下
kill -信号类型 ‘/usr/local/nginx/logs/nginx.pid’
升级
1、先用新程序替换旧程序文件
2、kill -USR2 旧版程序的主进程号或者进程文件名
此时旧的nginx主进程会把自己的进程文件改名为.oldbin,然后执行新版nginx,此时新旧版本同时运行
3、kill -WINCH 旧版本主进程号
4、不重载配置启动新/旧工作进程
kill -HUP 旧/新版本主进程号
从容关闭旧/新进程
kill -QUIT 旧/新进程号
快速关闭旧/新进程
kill -TERM 旧/新进程号
附:
如果报 “500 Internal Server Error”可能是设置的空间不够
最快方式–先检查
$ ulimit -n
如果过于小更改为 51200
ulimit -SHn 51200
其他方式 ↓↓↓↓↓
nginx.conf 文件改为
worker_processes 2
worker_cpu_affinity 0001 0010;
假如是8 cpu 分配如下:
worker_cpu_affinity 00000001 00000010 00000100 00001000 00010000
00100000 01000000 10000000
linux 2.6内核下开启文件打开数为65535,worker_rlimit_nofile就相应
应该填写65535
worker_rlimit_nofile 102400;
worker_connections 65535;
开启gzip
gzip on;
gzip_min_length 1k;
gzip_buffers 4 16k;
gzip_http_version 1.0;
gzip_comp_level 2;
gzip_types text/plain application/x-javascript text/css
application/xml;
gzip_vary on;
缓存静态文件:
location ~* ^.+\.(swf|gif|png|jpg|js|css)$ {
	root /usr/local/ku6/ktv/show.ku6.com/;
	expires 1m;
}
优化Linux内核参数
vi /etc/sysctl.conf
Add
net.ipv4.tcp_max_syn_backlog = 65536
net.core.netdev_max_backlog = 32768
net.core.somaxconn = 32768
net.core.wmem_default = 8388608
net.core.rmem_default = 8388608
net.core.rmem_max = 16777216
net.core.wmem_max = 16777216
net.ipv4.tcp_timestamps = 0
net.ipv4.tcp_synack_retries = 2
net.ipv4.tcp_syn_retries = 2
net.ipv4.tcp_tw_recycle = 1
#net.ipv4.tcp_tw_len = 1
net.ipv4.tcp_tw_reuse = 1
net.ipv4.tcp_mem = 94500000 915000000 927000000
net.ipv4.tcp_max_orphans = 3276800
#net.ipv4.tcp_fin_timeout = 30
#net.ipv4.tcp_keepalive_time = 120
net.ipv4.ip_local_port_range = 1024 65535
配置keepalived 实现 nginx 高可用(展示还未了解清楚,待定)
原理:nginx至少要配置两台服务器,一主一备,备用服务器时刻监听主体信息,如果主体信息一挂,立马启用备用。


 6923
6923

 被折叠的 条评论
为什么被折叠?
被折叠的 条评论
为什么被折叠?
 到【灌水乐园】发言


