


-
54
-
55
-
56
-
57
-
58
-
59
-
60
-
61
-
62
-
63
-
64
-
65
-
66
-
67
-
68
-
69
-
70
-
71
-
72
-
73
-
74
-
75
-
76
-
77
-
78
-
79
-
80
-
81
-
82
-
83
-
84
-
85
-
86
-
87
-
88
-
89
-
90
-
91
-
92
-
93
-
94
-
95
-
96
-
97
-
98
整个过程就是根据不同的标签解析不同的元素,首先会解析include元素,然后再解析被include进来的布局的root view元素。在我们的例子中对应的root view就是id为my_title_parent_id的RelativeLayout,然后再解析root view下面的所有元素,这个过程是从上面注释的2~4的过程,然后是设置布局参数。我们注意看注释5处,这里就解释了为什么include标签和被引入的布局的根元素都设置了id的情况下,通过被引入的根元素的id来查找子控件会找不到的情况。我们看到,注释5处的会判断include标签的id如果不是View.NO_ID的话会把该id设置给被引入的布局根元素的id,即此时在我们的例子中被引入的id为my_title_parent_id的根元素RelativeLayout的id被设置成了include标签中的id,即RelativeLayout的id被动态修改成了”my_title_ly”。因此此时我们再通过“my_title_parent_id”这个id来查找根元素就会找不到了!
所以结论就是: 如果include中设置了id,那么就通过include的id来查找被include布局根元素的View;如果include中没有设置Id, 而被include的布局的根元素设置了id,那么通过该根元素的id来查找该view即可。拿到根元素后查找其子控件都是一样的。
我们先看看官方的说明:
ViewStub is a lightweight view with no dimension and doesn’t draw anything or participate in the layout. As such, it’s cheap to inflate and cheap to leave in a view hierarchy. Each ViewStub simply needs to include the android:layout attribute to specify the layout to inflate.
其实ViewStub就是一个宽高都为0的一个View,它默认是不可见的,只有通过调用setVisibility函数或者Inflate函数才会将其要装载的目标布局给加载出来,从而达到延迟加载的效果,这个要被加载的布局通过android:layout属性来设置。例如我们通过一个ViewStub来惰性加载一个消息流的评论列表,因为一个帖子可能并没有评论,此时我可以不加载这个评论的ListView,只有当有评论时我才把它加载出来,这样就去除了加载ListView带来的资源消耗以及延时,示例如下 :
<ViewStub android:id="@+id/stub_import" android:inflatedId="@+id/stub_comm_lv" android:layout="@layout/my_comment_layout" android:layout_width="fill_parent" android:layout_height="wrap_content" android:layout_gravity="bottom" /
-
1
-
2
-
3
-
4
-
5
-
6
-
7
-
1
-
2
-
3
-
4
-
5
-
6
-
7
my_comment_layout.xml如下:
<?xml version="1.0" encoding="utf-8"?> <ListView xmlns:android="http://schemas.android.com/apk/res/android" android:layout_width="match_parent" android:id="@+id/my_comm_lv" android:layout_height="match_parent" > </ListView>
-
1
-
2
-
3
-
4
-
5
-
6
-
7
-
1
-
2
-
3
-
4
-
5
-
6
-
7
在运行时,我们只需要控制id为stub_import的ViewStub的可见性或者调用inflate()函数来控制是否加载这个评论列表即可。示例如下 :
public class MainActivity extends Activity { public void onCreate(Bundle b){ // main.xml中包含上面的ViewStub setContentView(R.layout.main); // 方式1,获取ViewStub, ViewStub listStub = (ViewStub) findViewById(R.id.stub_import); // 加载评论列表布局 listStub.setVisibility(View.VISIBLE); // 获取到评论ListView,注意这里是通过ViewStub的inflatedId来获取 ListView commLv = findViewById(R.id.stub_comm_lv); if ( listStub.getVisibility() == View.VISIBLE ) { // 已经加载, 否则还没有加载 } } }
-
1
-
2
-
3
-
4
-
5
-
6
-
7
-
8
-
9
-
10
-
11
-
12
-
13
-
14
-
15
-
16
-
17
-
1
-
2
-
3
-
4
-
5
-
6
-
7
-
8
-
9
-
10
-
11
-
12
-
13
-
14
-
15
-
16
-
17
通过setVisibility(View.VISIBILITY)来加载评论列表,此时你要获取到评论ListView对象的话,则需要通过findViewById来查找,而这个id并不是就是ViewStub的id。
这是为什么呢 ?
我们先看ViewStub的部分代码吧:
@SuppressWarnings({"UnusedDeclaration"}) public ViewStub(Context context, AttributeSet attrs, int defStyle) { TypedArray a = context.obtainStyledAttributes(attrs, com.android.internal.R.styleable.ViewStub, defStyle, 0); // 获取inflatedId属性 mInflatedId = a.getResourceId(R.styleable.ViewStub_inflatedId, NO_ID); mLayoutResource = a.getResourceId(R.styleable.ViewStub_layout, 0); a.recycle(); a = context.obtainStyledAttributes(attrs, com.android.internal.R.styleable.View, defStyle, 0); mID = a.getResourceId(R.styleable.View_id, NO_ID); a.recycle(); initialize(context); } private void initialize(Context context) { mContext = context; setVisibility(GONE);// 设置不可教案 setWillNotDraw(true);// 设置不绘制 } @Override protected void onMeasure(int widthMeasureSpec, int heightMeasureSpec) { setMeasuredDimension(0, 0);// 宽高都为0 } @Override public void setVisibility(int visibility) { if (mInflatedViewRef != null) {// 如果已经加载过则只设置Visibility属性 View view = mInflatedViewRef.get(); if (view != null) { view.setVisibility(visibility); } else { throw new IllegalStateException("setVisibility called on un-referenced view"); } } else {// 如果未加载,这加载目标布局 super.setVisibility(visibility); if (visibility == VISIBLE || visibility == INVISIBLE) { inflate();// 调用inflate来加载目标布局 } } } /** * Inflates the layout resource identified by {@link #getLayoutResource()} * and replaces this StubbedView in its parent by the inflated layout resource. * * @return The inflated layout resource. * */ public View inflate() { final ViewParent viewParent = getParent(); if (viewParent != null && viewParent instanceof ViewGroup) { if (mLayoutResource != 0) { final ViewGroup parent = (ViewGroup) viewParent;// 获取ViewStub的parent view,也是目标布局根元素的parent view final LayoutInflater factory = LayoutInflater.from(mContext); final View view = factory.inflate(mLayoutResource, parent, false);// 1、加载目标布局 // 2、如果ViewStub的inflatedId不是NO_ID则把inflatedId设置为目标布局根元素的id,即评论ListView的id if (mInflatedId != NO_ID) { view.setId(mInflatedId); } final int index = parent.indexOfChild(this); parent.removeViewInLayout(this);// 3、将ViewStub自身从parent中移除 final ViewGroup.LayoutParams layoutParams = getLayoutParams(); if (layoutParams != null) { parent.addView(view, index, layoutParams);// 4、将目标布局的根元素添加到parent中,有参数 } else { parent.addView(view, index);// 4、将目标布局的根元素添加到parent中 } mInflatedViewRef = new WeakReference<View>(view); if (mInflateListener != null) { mInflateListener.onInflate(this, view); } return view; } else { throw new IllegalArgumentException("ViewStub must have a valid layoutResource"); } } else { throw new IllegalStateException("ViewStub must have a non-null ViewGroup viewParent"); } }
-
1
-
2
-
3
-
4
-
5
-
6
-
7
-
8
-
9
-
10
-
11
-
12
-
13
-
14
-
15
-
16
-
17
-
18
-
19
-
20
-
21
-
22
-
23
-
24
-
25
-
26
-
27
-
28
-
29
-
30
-
31
-
32
-
33
-
34
-
35
-
36
-
37
-
38
-
39
-
40
-
41
-
42
-
43
-
44
-
45
-
46
-
47
-
48
-
49
-
50
-
51
-
52
-
53
-
54
-
55
-
56
-
57
-
58
-
59
-
60
-
61
-
62
-
63
-
64
-
65
-
66
-
67
-
68
-
69
-
70
-
71
-
72
-
73
-
74
-
75
-
76
-
77
-
78
-
79
-
80
-
81
-
82
-
83
-
84
-
85
-
86
-
87
-
88
-
89
-
90
-
91
-
92
-
1
-
2
-
3
-
4
-
5
-
6
-
7
-
8
-
9
-
10
-
11
-
12
-
13
-
14
-
15
-
16
-
17
-
18
-
19
-
20
-
21
-
22
-
23
-
24
-
25
-
26
-
27
-
28
-
29
-
30
-
31
-
32
-
33
-
34
-
35
-
36
-
37
-
38
-
39
-
40
-
41
-
42
-
43
-
44
-
45
-
46
-
47
-
48
-
49
-
50
-
51
-
52
-
53
-
54
-
55
-
56
-
57
-
58
-
59
-
60
-
61
-
62
-
63
-
64
-
65
-
66
-
67
-
68
-
69
-
70
-
71
-
72
-
73
-
74
-
75
-
76
-
77
-
78
-
79
-
80
-
81
-
82
-
83
-
84
-
85
-
86
-
87
-
88
-
89
-
90
-
91
-
92
可以看到,其实最终加载目标布局的还是inflate()函数,在该函数中将加载目标布局,获取到根元素后,如果mInflatedId不为NO_ID则把mInflatedId设置为根元素的id,这也是为什么我们在获取评论ListView时会使用findViewById(R.id.stub_comm_lv)来获取,其中的stub_comm_lv就是ViewStub的inflatedId。当然如果你没有设置inflatedId的话还是可以通过评论列表的id来获取的,例如findViewById(R.id.my_comm_lv)。然后就是ViewStub从parent中移除、把目标布局的根元素添加到parent中。最后会把目标布局的根元素返回,因此我们在调用inflate()函数时可以直接获得根元素,省掉了findViewById的过程。
还有一种方式加载目标布局的就是直接调用ViewStub的inflate()方法,示例如下 :
public class MainActivity extends Activity { // 把commLv2设置为类的成员变量 ListView commLv2 = null; // public void onCreate(Bundle b){ // main.xml中包含上面的ViewStub setContentView(R.layout.main); // 方式二 ViewStub listStub2 = (ViewStub) findViewById(R.id.stub_import) ; // 成员变量commLv2为空则代表未加载 if ( commLv2 == null ) { // 加载评论列表布局, 并且获取评论ListView,inflate函数直接返回ListView对象 commLv2 = (ListView)listStub2.inflate(); } else { // ViewStub已经加载 } } }
-
1
-
2
-
3
-
4
-
5
-
6
-
7
-
8
-
9
-
10
-
11
-
12
-
13
-
14
-
15
-
16
-
17
-
18
-
19
-
20
-
21
-
22
-
1
-
2
-
3
-
4
-
5
-
6
-
7
-
8
-
9
-
10
-
11
-
12
-
13
-
14
-
15
-
16
-
17
-
18
-
19
-
20
-
21
-
22
注意事项
-
判断是否已经加载过, 如果通过setVisibility来加载,那么通过判断可见性即可;如果通过inflate()来加载是不可以通过判断可见性来处理的,而需要使用方式2来进行判断。
-
findViewById的问题,注意ViewStub中是否设置了inflatedId,如果设置了则需要通过inflatedId来查找目标布局的根元素。
首先我们看官方的说明:
The tag helps eliminate redundant view groups in your view hierarchy when including one layout within another. For example, if your main layout is a vertical LinearLayout in which two consecutive views can be re-used in multiple layouts, then the re-usable layout in which you place the two views requires its own root view. However, using another LinearLayout as the root for the re-usable layout would result in a vertical LinearLayout inside a vertical LinearLayout. The nested LinearLayout serves no real purpose other than to slow down your UI performance.
其实就是减少在include布局文件时的层级。标签是这几个标签中最让我费解的,大家可能想不到,标签竟然会是一个Activity,里面有一个LinearLayout对象。
/** * Exercise <merge /> tag in XML files. */ public class Merge extends Activity { private LinearLayout mLayout; @Override protected void onCreate(Bundle icicle) { super.onCreate(icicle); mLayout = new LinearLayout(this); mLayout.setOrientation(LinearLayout.VERTICAL); LayoutInflater.from(this).inflate(R.layout.merge_tag, mLayout); setContentView(mLayout); } public ViewGroup getLayout() { return mLayout; } }
-
1
-
2
-
3
-
4
-
5
-
6
-
7
-
8
-
9
-
10
-
11
-
12
-
13
-
14
-
15
-
16
-
17
-
18
-
19
-
20
-
21
-
1
-
2
-
3
-
4
-
5
-
6
-
7
-
8
-
9
-
10
-
11
-
12
-
13
-
14
-
15
-
16
-
17
-
18
-
19
-
20
-
21
使用merge来组织子元素可以减少布局的层级。例如我们在复用一个含有多个子控件的布局时,肯定需要一个ViewGroup来管理,例如这样 :
<FrameLayout xmlns:android="http://schemas.android.com/apk/res/android" android:layout_width="fill_parent" android:layout_height="fill_parent"> <ImageView android:layout_width="fill_parent" android:layout_height="fill_parent" android:scaleType="center" android:src="@drawable/golden_gate" /> <TextView android:layout_width="wrap_content" android:layout_height="wrap_content" android:layout_marginBottom="20dip" android:layout_gravity="center_horizontal|bottom" android:padding="12dip" android:background="#AA000000" android:textColor="#ffffffff" android:text="Golden Gate" /> </FrameLayout>
-
1
-
2
-
3
-
4
-
5
-
6
-
7
-
8
-
9
-
10
-
11
-
12
-
13
-
14
-
15
-
16
-
17
-
18
-
19
-
20
-
21
-
22
-
23
-
24
-
25
-
1
-
2
-
3
-
4
-
5
-
6
-
7
-
8
-
9
-
10
-
11
-
12
-
13
-
14
-
15
-
16
-
17
-
18
-
19
-
20
-
21
-
22
-
23
-
24
-
25
将该布局通过include引入时就会多引入了一个FrameLayout层级,此时结构如下 :

使用merge标签就会消除上图中蓝色的FrameLayout层级。示例如下 :
<merge xmlns:android="http://schemas.android.com/apk/res/android"> <ImageView android:layout_width="fill_parent" android:layout_height="fill_parent" android:scaleType="center" android:src="@drawable/golden_gate" /> <TextView android:layout_width="wrap_content" android:layout_height="wrap_content" android:layout_marginBottom="20dip" android:layout_gravity="center_horizontal|bottom" android:padding="12dip" android:background="#AA000000" android:textColor="#ffffffff" android:text="Golden Gate" /> </merge>
-
1
-
2
-
3
-
4
-
5
-
6
-
7
-
8
-
9
-
10
-
11
-
12
-
13
-
14
-
15
-
16
-
17
-
18
-
19
-
20
-
21
-
22
-
23
-
1
-
2
-
3
-
4
-
5
-
6
-
7
-
8
-
9
-
10
-
11
-
12
-
13
-
14
-
15
-
16
-
17
-
18
-
19
-
20
-
21
-
22
-
23
效果图如下 :
那么它是如何实现的呢,我们还是看源码吧。相关的源码也是在LayoutInflater的inflate()函数中。
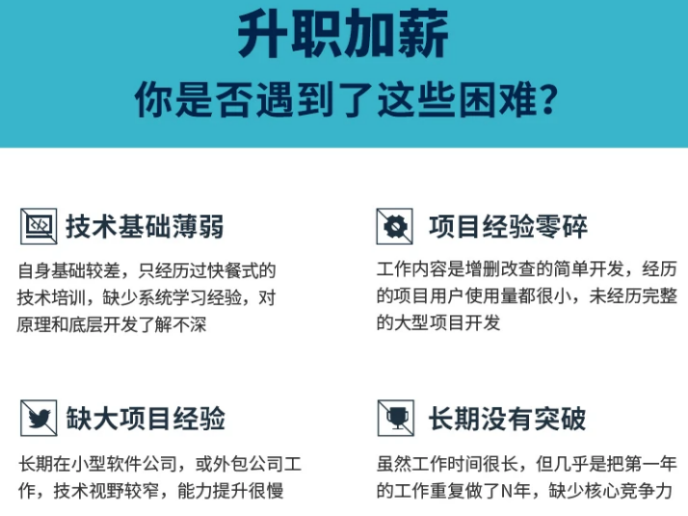
自我介绍一下,小编13年上海交大毕业,曾经在小公司待过,也去过华为、OPPO等大厂,18年进入阿里一直到现在。
深知大多数初中级安卓工程师,想要提升技能,往往是自己摸索成长,但自己不成体系的自学效果低效又漫长,而且极易碰到天花板技术停滞不前!
因此收集整理了一份《2024年最新Android移动开发全套学习资料》送给大家,初衷也很简单,就是希望能够帮助到想自学提升又不知道该从何学起的朋友,同时减轻大家的负担。
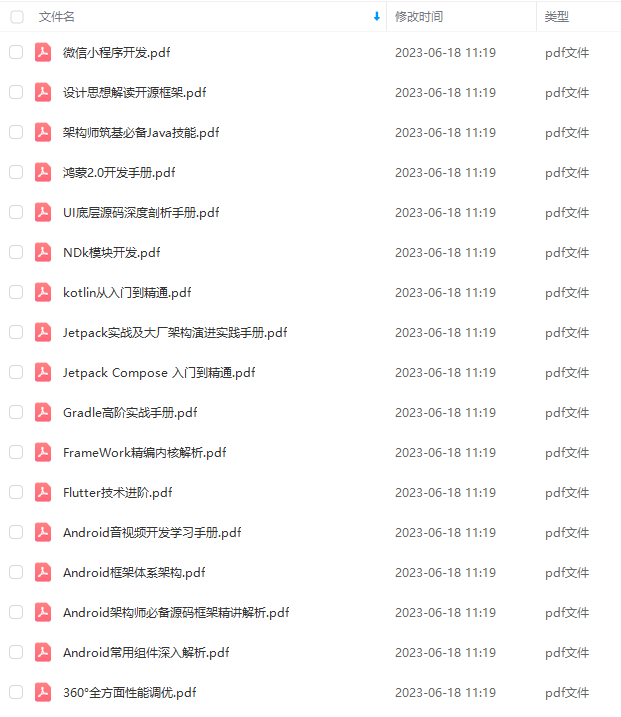
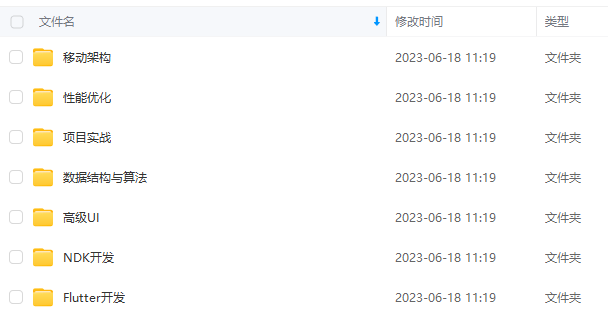

由于文件比较大,这里只是将部分目录截图出来,每个节点里面都包含大厂面经、学习笔记、源码讲义、实战项目、讲解视频
如果你觉得这些内容对你有帮助,可以添加下面V无偿领取!(备注Android)

结尾
我还总结出了互联网公司Android程序员面试涉及到的绝大部分面试题及答案,并整理做成了文档,以及系统的进阶学习视频资料,免费分享给大家。
(包括Java在Android开发中应用、APP框架知识体系、高级UI、全方位性能调优,NDK开发,音视频技术,人工智能技术,跨平台技术等技术资料),希望能帮助到你面试前的复习,且找到一个好的工作,也节省大家在网上搜索资料的时间来学习。
领取方式:关注+点赞+点击我的GitHub 免费获取!
-
20
-
21
-
22
-
23
-
1
-
2
-
3
-
4
-
5
-
6
-
7
-
8
-
9
-
10
-
11
-
12
-
13
-
14
-
15
-
16
-
17
-
18
-
19
-
20
-
21
-
22
-
23
效果图如下 :
[外链图片转存中…(img-Bbk4lc79-1710825436322)]
那么它是如何实现的呢,我们还是看源码吧。相关的源码也是在LayoutInflater的inflate()函数中。
自我介绍一下,小编13年上海交大毕业,曾经在小公司待过,也去过华为、OPPO等大厂,18年进入阿里一直到现在。
深知大多数初中级安卓工程师,想要提升技能,往往是自己摸索成长,但自己不成体系的自学效果低效又漫长,而且极易碰到天花板技术停滞不前!
因此收集整理了一份《2024年最新Android移动开发全套学习资料》送给大家,初衷也很简单,就是希望能够帮助到想自学提升又不知道该从何学起的朋友,同时减轻大家的负担。
[外链图片转存中…(img-KUPE8oAL-1710825436322)]
[外链图片转存中…(img-pJ6dh0O2-1710825436323)]
[外链图片转存中…(img-qC52z9MT-1710825436323)]
[外链图片转存中…(img-7jK82xrb-1710825436324)]
由于文件比较大,这里只是将部分目录截图出来,每个节点里面都包含大厂面经、学习笔记、源码讲义、实战项目、讲解视频
如果你觉得这些内容对你有帮助,可以添加下面V无偿领取!(备注Android)
[外链图片转存中…(img-S6ilvTqx-1710825436324)]
结尾
我还总结出了互联网公司Android程序员面试涉及到的绝大部分面试题及答案,并整理做成了文档,以及系统的进阶学习视频资料,免费分享给大家。
(包括Java在Android开发中应用、APP框架知识体系、高级UI、全方位性能调优,NDK开发,音视频技术,人工智能技术,跨平台技术等技术资料),希望能帮助到你面试前的复习,且找到一个好的工作,也节省大家在网上搜索资料的时间来学习。
领取方式:关注+点赞+点击我的GitHub 免费获取!


 842
842


 被折叠的 条评论
为什么被折叠?
被折叠的 条评论
为什么被折叠?
 到【灌水乐园】发言


