表格
来自慕课网
表格是Bootstrap的一个基础组件之一,Bootstrap为表格提供了1种基础样式和4种附加样式以及1个支持响应式的表格。在使用Bootstrap的表格过程中,只需要添加对应的类名就可以得到不同的表格风格。bootstrap.css文件中第1402行~第1630行中可以查阅到所有有关于table的样式代码。
Bootstrap为表格不同的样式风格提供了不同的类名,主要包括:
☑ .table:基础表格
☑ .table-striped:斑马线表格(隔行变色)
☑ .table-bordered:带边框的表格
☑ .table-hover:鼠标悬停高亮的表格(隔行变色)
☑ .table-condensed:紧凑型表格
☑ .table-responsive:响应式表格(宽度不够自动添加滚动条)
同样的,如果你对CSS预处理器熟悉,你可以使用Bootstrap提供的预处理版本:
☑ LESS版本,对应的文件是 tables.less
☑ Sass版本,对应的文件是 _tables.scss
表格 行
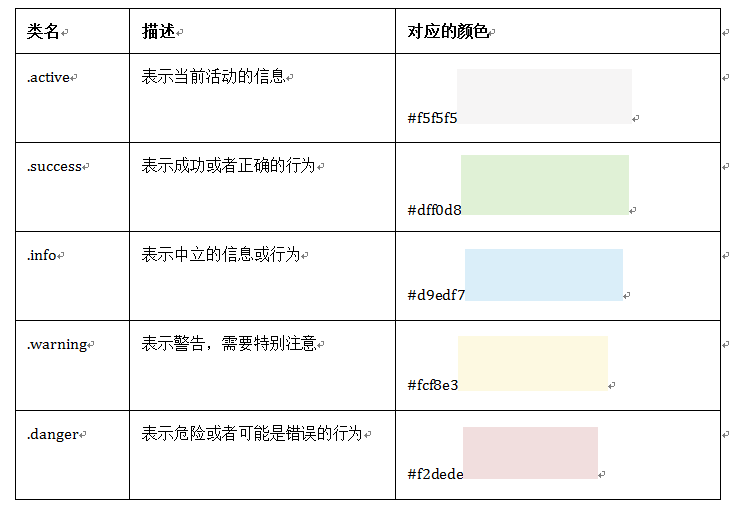
Bootstrap还为表格的行元素<tr>提供了五种类名,每种类名控制了行的不同背景颜色:

使用(bootstrap.css文件中第1484行~第1583行。):
<tr class="active">
    <td>…</td>
</tr>特别提示:除了”.active”之外,其他四个类名和”.table-hover”配合使用时,Bootstrap针对这几种样式也做了相应的悬浮状态的样式设置,所以如果需要给tr元素添加其他颜色样式时,在”.table-hover”表格中也要做相应的调整。
注意要实现悬浮状态,需要在<table>标签上加入table-hover类。
<table class="table-hover">1-1. 基础表格
Bootstrap的基础表格,bootstrap.css文件第1402行~第1441行。

“.table”主要有三个作用:
☑ 给表格设置了margin-bottom:20px以及设置单元内距
☑ 在thead底部设置了一个2px的浅灰实线
☑ 每个单元格顶部设置了一个1px的浅灰实线
1-2. 斑马线表格
来自慕课网
将表格制作成类似于斑马线的效果。简单点说就是让表格带有背景条纹效果。在Bootstrap中实现这种表格效果并不困难,只需要在<table class="table">的基础上增加类名“.table-striped”即可:
<table class="table table-striped">
…
</table>其效果与基础表格相比,仅是在tbody隔行有一个浅灰色的背景色。其实现原理也非常的简单,利用CSS3的结构性选择器“:nth-child”来实现,所以对于IE8以及其以下浏览器,没有背景条纹效果。
源码请查看bootstrap.css文件第1465行~第1468行:
.table-striped > tbody > tr:nth-child(odd) > td,
.table-striped > tbody > tr:nth-child(odd) > th {
background-color: #f9f9f9;
}
1-3. 带边框的表格
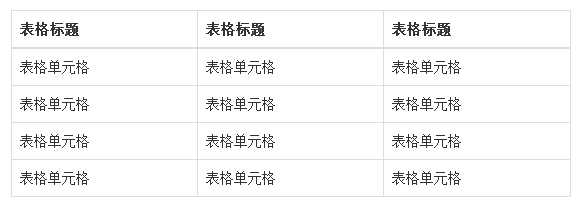
Bootstrap中带边框的表格使用方法和斑马线表格的使用方法类似,只需要在基础表格<table class="table">基础上添加一个“.table-bordered”类名即可:
<table  class="table table-bordered">
  …
</table>
样式如下图所示:

其源码可以查看bootstrap.css文件第1450行~第1464行:
.table-bordered {
  border: 1px solid #ddd;/*整个表格设置边框*/
}
.table-bordered > thead > tr > th,
.table-bordered > tbody > tr > th,
.table-bordered > tfoot > tr > th,
.table-bordered > thead > tr > td,
.table-bordered > tbody > tr > td,
.table-bordered > tfoot > tr > td {
  border: 1px solid #ddd; /*每个单元格设置边框*/
}
.table-bordered > thead > tr > th,
.table-bordered > thead > tr > td {
  border-bottom-width: 2px;/*表头底部边框*/
}
1-4. 鼠标悬浮高亮的表格
当鼠标悬停在表格的行上面有一个高亮的背景色,仅需要<table class="table">元素上添加类名“table-hover”即可:
<table class="table table-hover">
…
</table>
效果:

鼠标悬浮高亮的效果主要是通过“hover”事件来实现,设置了“tr:hover”时的th、td的背景色为新颜色。
其源码请查看bootstrap.css文件中第1469行~第1472行:
.table-hover > tbody > tr:hover > td,
.table-hover > tbody > tr:hover > th {
background-color: #f5f5f5;
}注:其实,鼠标悬浮高亮表格,可以和Bootstrap其他表格混合使用。简单点说,只要你想让你的表格具备悬浮高亮效果,你只要给这个表格添加“table-hover”类名就好了。例如,将前面介绍的几种表格结合使用:
<table class="table table-striped table-bordered table-hover">
…
</table>
1-5. 紧凑型表格
来自慕课网
何谓紧凑型表格,简单理解,就是单元格没内距或者内距较其他表格的内距更小。在Bootstrap中,通过类名“table-condensed”重置单元格内距值。

紧凑型表格的运用,也只是需要在<table class="table">基础上添加类名“table-condensed”:
<table class="table table-condensed">
…
</table>
Bootstrap中紧凑型的表格与基础表格差别不大,因为只是将单元格的内距由8px调至5px。
源码请查看bootstrap.css文件第1442行~第1449行:
.table-condensed > thead > tr > th,
.table-condensed > tbody > tr > th,
.table-condensed > tfoot > tr > th,
.table-condensed > thead > tr > td,
.table-condensed > tbody > tr > td,
.table-condensed > tfoot > tr > td {
padding: 5px;
}在使用Bootstrap表格时,千万注意,你的<table>元素中一定不能缺少类名“table”。
1-6. 响应式表格
来自慕课网
Bootstrap提供了一个容器,并且此容器设置类名“.table-responsive”,此容器就具有响应式效果,然后将<table class="table">置于这个容器当中,这样表格也就具有响应式效果。
Bootstrap中响应式表格效果表现为:当你的浏览器可视区域小于768px时,表格底部会出现水平滚动条。当你的浏览器可视区域大于768px时,表格底部水平滚动条就会消失。示例如下:
<div class="table-responsive">
<table class="table table-bordered">
   …
</table>
</div>


 513
513

 被折叠的 条评论
为什么被折叠?


