


在上篇文章中:Android自定义View01,我们创建了一个CustomTextView,自定义的TextView,但是上篇文章主要是介绍自定义View的关键步骤,这个CustomTextView并不能显示文本。
本篇,将在上篇的基础上,让我们的自定义TextView显示出文本内容来。
自定义TextView的完整代码,下面我会对每个方法一一讲解。
package com.example.view_day01;

import android.content.Context;
import android.content.res.TypedArray;
import android.graphics.Canvas;
import android.graphics.Color;
import android.graphics.Paint;
import android.graphics.Rect;
import android.util.AttributeSet;
import android.util.TypedValue;
import android.view.MotionEvent;
import android.view.View;

import androidx.annotation.Nullable;

public class TextView extends View {

    private String text;
    private int textColor = Color.BLACK;
    private int textSize = 15;

    private Paint mPaint;
    /**
     * 调用时机:
     * 在Java代码中TextView tv = new TextView(context)时 调用
     */
    public TextView(Context context) {
        this(context, null);
    }

    /**
     * 调用时机:
     * 在时xml中使用Textview调用
     * <com.example.view_day01.TextView
     *         android:layout_width="wrap_content"
     *         android:layout_height="wrap_content"
     *         android:text="Hello World!" />
     */
    public TextView(Context context, @Nullable AttributeSet attrs) {
        this(context, attrs, 0);
    }

    /**
     * 调用时机:
     * 在时xml中使用Textview调用,并且使用了自定义style
     * .res/values/styles
     * <style name="detTextAtr">
     *         <item name="android:layout_weight">wrap_content</item>
     *         <item name="android:layout_height">wrap_content</item>
     *         <item name="android:textColor">@color/black</item>
     *     </style>
     *
     * <com.example.view_day01.TextView
     *         style="@style/detTextAtr" />
     *
     */
    public TextView(Context context, @Nullable AttributeSet attrs, int defStyleAttr) {
        super(context, attrs, defStyleAttr);
        //获取自定义属性
        TypedArray typedArray = context.obtainStyledAttributes(attrs, R.styleable.TextView);

        text = typedArray.getString(R.styleable.TextView_text);
        textColor = typedArray.getColor(R.styleable.TextView_textColor, textColor);
        // 15 到底是什么?15px 15sp
        textSize = typedArray.getDimensionPixelSize(R.styleable.TextView_textSize, px2sp(textSize));

        //回收
        typedArray.recycle();

        //初始化画笔
        mPaint = new Paint();
        mPaint.setAntiAlias(true);
        //设置字体的大小和颜色
        mPaint.setTextSize(textSize);
        mPaint.setColor(textColor);
    }

    private int px2sp(int size) {
        return (int) TypedValue.applyDimension(TypedValue.COMPLEX_UNIT_SP, size,getResources().getDisplayMetrics());
    }

    /**
     * 自定义view的测量方法
     * @param widthMeasureSpec
     * @param heightMeasureSpec
     */
    @Override
    protected void onMeasure(int widthMeasureSpec, int heightMeasureSpec) {
        super.onMeasure(widthMeasureSpec, heightMeasureSpec);
        //布局的宽和高都是由这个方法指定
        //获取宽高的模式Mode
        int widthMode = MeasureSpec.getMode(widthMeasureSpec);
        int heightMode = MeasureSpec.getMode(heightMeasureSpec);

        //获取宽高的值Size
        int widthSize = MeasureSpec.getSize(widthMeasureSpec);
        int heightSize = MeasureSpec.getSize(heightMeasureSpec);

        //一共有三种模式               对应
        //MeasureSpec.AT_MOST       wrap_content
        //MeasureSpec.EXACTLY       100dp\match_parent\fill_patent
        //MeasureSpec.UNSPECIFIED   尽可能的大,在ScrollView\ListView测量子布局会用到

        //1.如果是确定的值,这个时候不用计算,给的多少就是多少
        int width = MeasureSpec.getSize(widthMeasureSpec);

        //2.给的是 wrap_content 需要计算
        if(widthMode == MeasureSpec.AT_MOST) {
            //计算的宽度和 字体的长度有关 与字体的大小有关 需要用画笔来测量
            Rect bounds = new Rect();
            mPaint.getTextBounds(text, 0, text.length(), bounds);
            width = bounds.width();
        }

        int height = MeasureSpec.getSize(heightMeasureSpec);

        if(heightMode == MeasureSpec.AT_MOST) {
            //计算的宽度和 字体的长度有关 与字体的大小有关 需要用画笔来测量
            Rect bounds = new Rect();
            mPaint.getTextBounds(text, 0, text.length(), bounds);
            height = bounds.height();
        }
        setMeasuredDimension(width, height);
    }

    /**
     * 用于绘制
     * @param canvas
     */
    @Override
    protected void onDraw(Canvas canvas) {
        super.onDraw(canvas);

        //画文字text x y paint,让字体能竖直居中显示
        //x 就是开始的位置
        //y 是基线baseLine

        Paint.FontMetricsInt fontMetricsInt = mPaint.getFontMetricsInt();

        int dy = (fontMetricsInt.bottom - fontMetricsInt.top)/2 - fontMetricsInt.bottom;
        int baseLine = getHeight()/2 + dy;
        canvas.drawText(text, 0, baseLine, mPaint);
    }

    /**
     * 处理更用户交互的,手指触摸等等
     * @param event
     * @return
     */
    @Override
    public boolean onTouchEvent(MotionEvent event) {
        switch (event.getAction()) {
            case MotionEvent.ACTION_DOWN:
                //手指按下
                break;
            case MotionEvent.ACTION_MOVE:
                //手指移动
                break;
            case MotionEvent.ACTION_UP:
                //手指抬起
                break;

        }
        return super.onTouchEvent(event);
    }
}
x m l布局
<com.example.view_day01.TextView
android:layout_width="wrap_content"
android:layout_height="wrap_content"
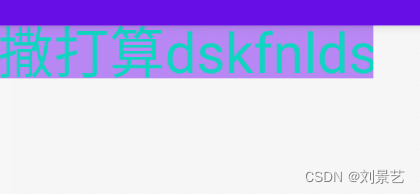
app:text="撒打算dskfnlds"
app:textSize="30sp"
android:background="@color/purple_200"
app:textColor="@color/teal_200"
/>
1.分析构造函数
所有的构造函数都会执行到这个构造函数
public TextView(Context context, @Nullable AttributeSet attrs, int defStyleAttr) {
        super(context, attrs, defStyleAttr);
        //获取自定义属性
        TypedArray typedArray = context.obtainStyledAttributes(attrs, R.styleable.TextView);

        text = typedArray.getString(R.styleable.TextView_text);
        textColor = typedArray.getColor(R.styleable.TextView_textColor, textColor);
        // 15 到底是什么?15px 15sp
        textSize = typedArray.getDimensionPixelSize(R.styleable.TextView_textSize, px2sp(textSize));

        //回收
        typedArray.recycle();

        //初始化画笔
        mPaint = new Paint();
        mPaint.setAntiAlias(true);
        //设置字体的大小和颜色
        mPaint.setTextSize(textSize);
        mPaint.setColor(textColor);
    }
TypedArray:是用来获取xml布局文件中的控件设置信息的
TypedArray typedArray = context.obtainStyledAttributes(attrs, R.styleable.TextView);
要和
typedArray.recycle();
一起使用
在这里,我获取了TextView在xml里设置的文本、字号、字体颜色属性。在构造函数中拿到这些属性后,用这些属性去设置画笔,这样画笔画出来的就是你想要的效果。
 //初始化画笔
        mPaint = new Paint();
        mPaint.setAntiAlias(true);//抗锯齿,显示更细腻
        //设置字体的大小和颜色
        mPaint.setTextSize(textSize);
        mPaint.setColor(textColor);
在设置textSize的时候,我设置了字号默认值
 // 15 到底是什么?15px 15sp
        textSize = typedArray.getDimensionPixelSize(R.styleable.TextView_textSize, px2sp(textSize));
private int px2sp(int size) {
        return (int) TypedValue.applyDimension(TypedValue.COMPLEX_UNIT_SP, size, getResources().getDisplayMetrics());
    }
一开始我直接使用的textSize = 15 当作默认值,发现显示的字体太小,根本看不清字体。
写了一个设置单位的方法,会将默认值15变成15sp。
这样的显示效果才可以。
构造方法的讲解就这么多。
2.onMeasure()方法测量TextView的大小
 @Override
    protected void onMeasure(int widthMeasureSpec, int heightMeasureSpec) {
        super.onMeasure(widthMeasureSpec, heightMeasureSpec);
        //布局的宽和高都是由这个方法指定
        //获取宽高的模式Mode
        int widthMode = MeasureSpec.getMode(widthMeasureSpec);
        int heightMode = MeasureSpec.getMode(heightMeasureSpec);

        //获取宽高的值Size
        int widthSize = MeasureSpec.getSize(widthMeasureSpec);
        int heightSize = MeasureSpec.getSize(heightMeasureSpec);

        //一共有三种模式               对应
        //MeasureSpec.AT_MOST       wrap_content
        //MeasureSpec.EXACTLY       100dp\match_parent\fill_patent
        //MeasureSpec.UNSPECIFIED   尽可能的大,在ScrollView\ListView测量子布局会用到

        //1.如果是确定的值,这个时候不用计算,给的多少就是多少
        int width = MeasureSpec.getSize(widthMeasureSpec);

        //2.给的是 wrap_content 需要计算
        if(widthMode == MeasureSpec.AT_MOST) {
            //计算的宽度和 字体的长度有关 与字体的大小有关 需要用画笔来测量
            Rect bounds = new Rect();
            mPaint.getTextBounds(text, 0, text.length(), bounds);
            width = bounds.width();
        }

        int height = MeasureSpec.getSize(heightMeasureSpec);

        if(heightMode == MeasureSpec.AT_MOST) {
            //计算的宽度和 字体的长度有关 与字体的大小有关 需要用画笔来测量
            Rect bounds = new Rect();
            mPaint.getTextBounds(text, 0, text.length(), bounds);
            height = bounds.height();
        }
        setMeasuredDimension(width, height);
    }
我在xml里给TextView的宽高都设置的wrap_content包裹内容。
在上一篇文章中,我讲过,wrap_content对应的模式Mode是MeasureSpec.AT_MOST,计算方式为
 if(widthMode == MeasureSpec.AT_MOST) {
            //计算的宽度和 字体的长度有关 与字体的大小有关 需要用画笔来测量
            Rect bounds = new Rect();
            mPaint.getTextBounds(text, 0, text.length(), bounds);
            width = bounds.width();
        }
先创建一个矩形Rect bounds = new Rect();
调用画笔的getTextBounds()方法,获取文本边界
传入text文本,起点位置0、终点位置text.length()、一个矩形bounds, 执行后,矩形bounds就存储了text的边界信息,
想获取text的宽度,直接调用bounds.width();实现文本的宽度获取。
高度和宽度的处理一样。
最后还要将获取的宽高设置进去
setMeasuredDimension(width, height);
3.onDraw()方法绘制文本内容
测量结束之后,就可以绘制了。
/**
     * 用于绘制
     * @param canvas
     */
    @Override
    protected void onDraw(Canvas canvas) {
        super.onDraw(canvas);

        //画文字text x y paint,让字体能竖直居中显示
        //x 就是开始的位置
        //y 是基线baseLine

        Paint.FontMetricsInt fontMetricsInt = mPaint.getFontMetricsInt();

        int dy = (fontMetricsInt.bottom - fontMetricsInt.top)/2 - fontMetricsInt.bottom;
        int baseLine = getHeight()/2 + dy;
        canvas.drawText(text, 0, baseLine, mPaint);
    }
绘制,直接调用canvas.drawText()方法
canvas.drawText(text, 0, baseLine, mPaint);
/**
     * Draw the text, with origin at (x,y), using the specified paint. The origin is interpreted
     * based on the Align setting in the paint.
     *
     * @param text The text to be drawn
     * @param x The x-coordinate of the origin of the text being drawn
     * @param y The y-coordinate of the baseline of the text being drawn
     * @param paint The paint used for the text (e.g. color, size, style)
     */
    public void drawText(@NonNull String text, float x, float y, @NonNull Paint paint) {
        super.drawText(text, x, y, paint);
    }
分别传入文本内容、文本开始的位置、文本基线、画笔
目前就文本基线不清楚传什么,其他的都清楚了
我来讲解一下如何计算baseline(参考文章)
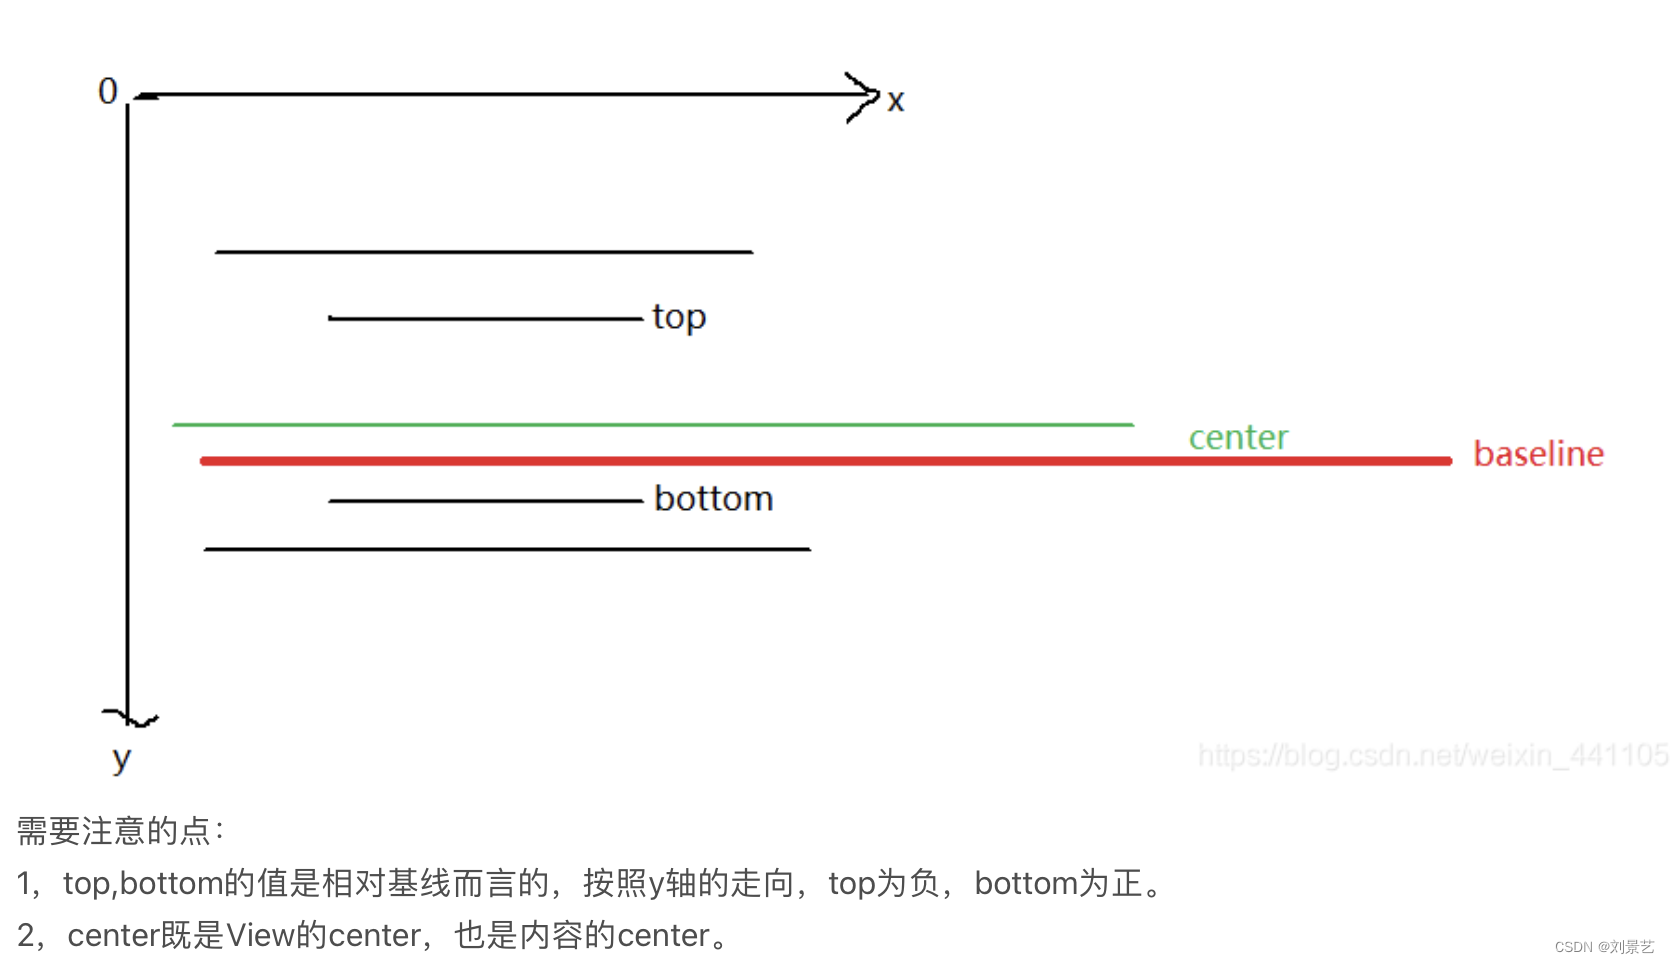
baseline = center + (baseline - center)
= getHeight/2 + ((bottom - top)/2 - bottom)
也就是
 Paint.FontMetricsInt fontMetricsInt = mPaint.getFontMetricsInt();

        int dy = (fontMetricsInt.bottom - fontMetricsInt.top)/2 - fontMetricsInt.bottom;
        int baseLine = getHeight()/2 + dy;
源码中对属性的讲解
/**
     * Convenience method for callers that want to have FontMetrics values as
     * integers.
     */
    public static class FontMetricsInt {
        /**
         * The maximum distance above the baseline for the tallest glyph in
         * the font at a given text size.
         */
        public int   top;
        /**
         * The recommended distance above the baseline for singled spaced text.
         */
        public int   ascent;
        /**
         * The recommended distance below the baseline for singled spaced text.
         */
        public int   descent;
        /**
         * The maximum distance below the baseline for the lowest glyph in
         * the font at a given text size.
         */
        public int   bottom;
        /**
         * The recommended additional space to add between lines of text.
         */
        public int   leading;

        @Override public String toString() {
            return "FontMetricsInt: top=" + top + " ascent=" + ascent +
                    " descent=" + descent + " bottom=" + bottom +
                    " leading=" + leading;
        }
    }
显示效果


 3190
3190


 被折叠的 条评论
为什么被折叠?
被折叠的 条评论
为什么被折叠?
 到【灌水乐园】发言


