


HarmonyOS4.0应用开发-学习笔记
整理自B站黑马程序员的HarmonyOS4.0教程
黑马程序员HarmonyOS4+NEXT星河版入门到企业级实战教程,一套精通鸿蒙应用开发
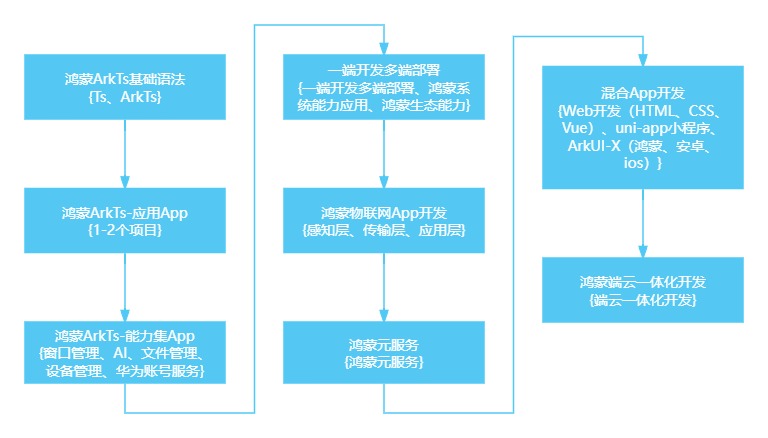
零、学习路线
一、了解ArkTS语言
ArkTS语言的特点
-
开发效率高、开发体验好
-
性能优越
-
有多系统适配,接入能力
声明式UI前端
-
方舟编译器:统一字节码、AOT、GC机制
-
UI后端引擎:布局,动效,事件、内存管理、渲染总线
-
高效渲染引擎
-
平台适配层&平台桥阶层
操作系统
-
声明式UI:我需要什么,直接去声明(创建)
-
方舟编译器(将js编译成字节码运行,把编译动作,从运行期->编译期(AOT技术),统一的UI后端引擎,将不同的页面渲染提交到渲染总线,给到操作系统底层高效的渲染引擎,进行优化,提高页面渲染的效率)
-
平台适配层和平台桥接层,进行多系统适配,接入能力
HarmonyOS开发套件

HarmonyOS底层
HarmonyOS与OpenHarmony的关系
二、TypeScript基础语法
// 基本数据类型
// 布尔值(boolean)、数字(number,浮点数)、字符串(str)、数组(类型[]、Array<类型>)
// 元组([类型,类型])、枚举(enum 枚举名{值,值,值..})、不确定类型(unknown)
// 空(null)、未定义(undefined)、联合类型(Union Types,类型|类型)
let a: number = 7;
console.log(a);
let b: boolean = true;
console.log(b);
let nums: number[] = [1,2,3,4];
let str: string = "钝子生";
console.log(str);
let array: Array<number> = [1,2,3,4,5,6];
let map: [string, number];
map = ["一",1];
map = ["二",2];
map = ["三",3];
map = ["四",4];
enum Color {Red, Green, Blue};
let c: Color = Color.Green;
console.log(c);
let un: unknown = 4;
console.log(un);
un = "我不知道我是什么类型";
console.log(un);
let u: undefined = undefined;
console.log(u);
let n: null = null;
console.log(n);
let myFavoriteNumber: string | number;
myFavoriteNumber = 'seven';
console.log(myFavoriteNumber);
myFavoriteNumber = 7;
console.log(myFavoriteNumber);

// 条件语句
var num:number = 5
if (num > 0) {
   console.log('数字是正数')
}

if (num % 2 !== 0) {
    console.log(num + "是奇数");
} else {
    console.log(num + "是偶数");
}

if (num > 0) {
    console.log(num + "大于0");
} else if (num < 0) {
    console.log(num + "小于0");
} else {
    console.log(num + "等于0");
}

let grade: string = 'A';
switch(grade){
    case 'A': {
        console.log("优");
        break;
    }
    case 'B': {
        console.log("良");
        break;
    }
    case 'C': {
        console.log("及格");
        break;
    }
    case 'D': {
         console.log("不及格");
        break;
    }
    default : {
        console.log('非法输入');
        break;
    }
}

// 函数

/**
 * 有名函数
 * @x 加数
 * @y 加数
 * @return x+y的和
 */
function add(x: number, y: number): number {
    return x + y;
}
console.log("有名函数:" + add(7,8));

/**
 * 匿名函数
 * @x 加数
 * @y 加数
 * @return x+y的和
 */
let fun = function(x: number, y: number): number {
    return x + y;
}
console.log("匿名函数:" + add(1,8));

/**
 * 可选参数
 * ?所持有的参数可填可不填
 */
function buildName(firstName: string, lastName?: string): void {
    if (lastName === null) {
        console.log("firstName: " + firstName);
    } else {
        console.log("firstName: " + firstName);
        console.log("lastName: " + lastName);
    }
}
buildName("钝");
buildName("钝","生");

/**
 * 剩余参数(可变长参数)
 */
function getName(firstName: string, ...middleName: string[]): void {
    console.log(firstName + " " + middleName);
}
getName("我", "你", "🐎");
getName("我");

let lambda = (num: number) => {
    if (num % 2 !== 0) {
        console.log(num + "是奇数");
    } else {
        console.log(num + "是偶数");
    }
}
lambda(8);
// 类
class Person {
    private name: string;
    private age: number;

    constructor(name: string, age: number) {
        this.name = name;
        this.age = age;
    }

    public getName(): string{
        return this.name;
    }

    public getAge(): number{
        return this.age;
    }

    public toString(): string{
        return `我叫${this.getName()}, 我今年${this.getAge()}岁!`;
    }
}

let person = new Person("钝子生",21);
console.log(person.toString());

class Student extends Person {
    private major: string;

    constructor(name: string, age: number, major: string) {
        super(name,age);
        this.major = major;
    }

    public getMajor(): string{
        return this.major;
    }

    public toString(): string{
        return super.toString() + `我的专业是${this.getMajor()}!`;
    }
}

let student = new Student("尖子生", 22 ,"软件工程");
console.log(student.toString());

// 导出
export class NewsData {
    title: string;
    content: string;
    imagesUrl: Array<Student>;
    source: string;

    constructor(title: string, content: string, imagesUrl: Array<Student>, source: string) {
    this.title = title;
    this.content = content;
    this.imagesUrl = imagesUrl;
    this.source = source;
    }
}

// 导入
import { NewsData } from '../common/bean/NewsData';

// 迭代器
let array: Array<String> = ["钝子生", "尖子生", "中子生"];

// for in 迭代下标
for (let arr in array) {
    console.log(arr);
}
// for of 迭代内容
for (let arr of array) {
    console.log(arr);
}
三、Hello ArkTs
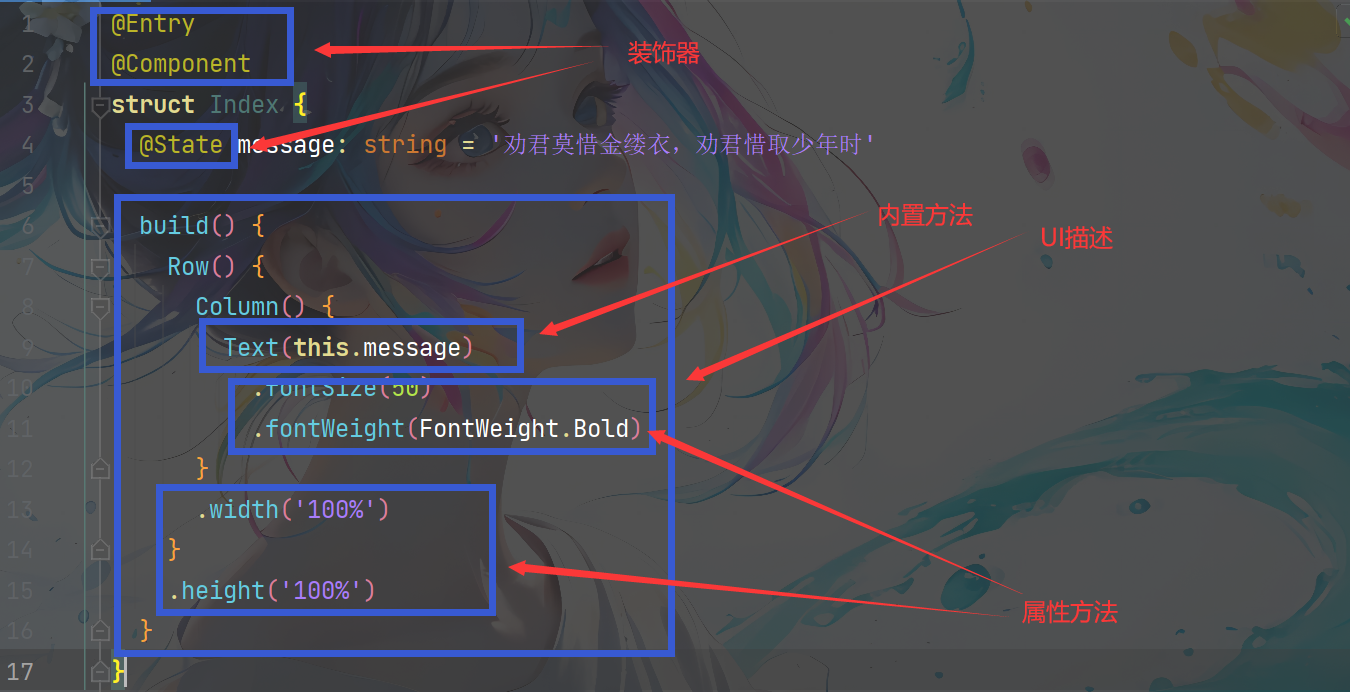
@Entry // 入口组件(可以被独立访问)
@Component // 标记自定义组件
  // 自定义组件,可复用的UI单元
  // 声明式UI特点:状态数据的变更,驱动页面UI自动刷新
struct Index {
  // 标记状态变量,值变化会触发UI刷新
  @State message: string = 'Hello World'
  // 声明式描述UI结构
  build() {
    // 容器组件 用来完成页面布局
    Row() {
      Column() {
        // 基础组件 自带样式和功能的页面元素
        Text(this.message)
          // 属性方法 设置组件的UI样式
          .fontSize(50)
          .fontWeight(FontWeight.Bold)
          .fontColor('#36D')
            // 事件方法 设置组件的事件回调
          .onClick(() => {
            this.message = '我是钝子生'
          })
      }
      .width('100%')
    }
    .height('100%')
  }
}
四、ArkUI组件-Image组件
- 声明Image组件并设置图片源:Image(src: string|PixelMap|Resource)
- string格式,通常用来加载网络图片,需要申请网络权限:ohpm.permission.INTERNET
Image('https://xxx.png')
- PixelMap格式,可以加载像素图,常用在图片编辑中
Image(pixelMapObject)
- Resource格式,加载本地图片,推荐使用
Image($r('app.media.xxx')
Image($rawfile('xxx.png')
- 添加图片属性
Image($r('app.media.icon')
  .width(100) // 宽
  .height(120) // 高
  .borderRadius(10) // 边框圆角
  .interpolation(ImageInterpolation.High) // 图片插值
五、ArkUI组件-Text组件
- 声明Text组件并设置文本内容:Text(content?: string|Resource)
- string格式,直接写文本内容
Text('我是text组件')
- Resource格式,读取本地资源文件
Text($r('app.string.text_label')
- 添加文本属性
Text('我是text组件')
  .lineHeight(32) // 行高
  .fontSize(20) // 字体大小
  .fontColor('#36D') // 字体颜色
  .fontWeight(FontWeight.Bold) // 字体粗细
六、ArkUI组件-TextInput组件
- 声明式TextInput组件:TextInput({placeholder?: ResourceStr, text?: ResourceStr})
- placeholder,输入框无输入时的提示文本
TextInput({placeholder: '请输入用户名'})
- text,输入框当前的文本内容
TextInput({text: '小生中的钝子生'})
- 添加属性和事件
TextInput({text: '小生中的钝子生'})
  .width(150)
  .height(30)
  .backgroundColor('#FFF')
  .type(InputType.Normal)
  .onChange((value) => {
    // value是用户输入的文本内容
  })
七、ArkUI组件-Button组件
- 声明Button组件,label是按钮文字:Button(label?: ResourceStr)
- 文字型按钮
Button('点')
- 自定义按钮,在Button内嵌套其他组件
Button(){
    Image($r('app.media.search')
      .width(20)
      .margin(10)
}
- 添加属性和事件
Button('点我')
  .width(100)
  .height(30)
  .type(ButtonType.Normal)
  .onClick(() => {
      // 处理点击事件
  })
八、ArkUI组件-Slider滑动条组件
- Slider滑动条组件:Silder(options?: SliderOptions)
Slider({
    min: 0, // 最小值
    max: 100, // 最大值
    value: 40, // 当前值
    step: 10, // 滑动步长
    style: SliderStyle.OutSet // 滑动按钮在外面
    direction: Axis.Horizontal, // Vertical
    reverse: false // 是否反向滑动
})
  .width('90%')
  .showTips(true) // 是否显示百分比
  .blockColor('#36d') // 滑动条颜色
  .onChange((value) => {
    // value就是当前滑块值
})
九、ArkUI组件-Column组件和Row组件
-
Column容器的主轴是从上到下,交叉轴是从左到右
-
Row容器的主轴是从左到右,交叉轴是从上到下
-
纵向布局使用Column容器,横向布局采用Row容器
| 属性方法名 | 说明 | 参数 |
|---|---|---|
| justifyContent | 设置子元素在主轴方向的对齐格式 | FlexAlign枚举 |
| alignItems | 设置子元素在交叉轴方向的对齐格式 | Row容器使用VerticalAlign枚举 Column容器使用HorizontalAlign枚举 |
容器内边距:padding、容器外边距:margin、{space: 20}可以控制元素之间的距离
十、ArkUI组件-渲染控制
- ForEach:循环遍历数组,根据数组内容渲染页面组件
ForEach(
    arr: Array, // 要遍历的数据数组
    (item: any, index?: number) => {
       // 页面组件
    },
    keyGenerator?: (item: any, index?: number): string => {
      // 键生成函数,为数组每一项生成一个唯一标示,组件是否重新渲染的判断标准
    }
)
- if/else:条件控制,根据数据状态的不同,渲染不同的页面组件
if(条件判断){
    // 内容
} else {
    // 内容
}
十一、ArkUI组件-List组件
列表(List)是一个复杂容器,有以下特点
-
列表项(ListItem)数量过多超出屏幕后,会自动提供滚动功能
-
列表项(ListItem)既可以纵向排列,也可以横向排列
List({space: 10}){
    ForEach([1,2,3,4], item => {
      ListItem(){
       // 列表项内容,只能包含一个根组件
       Text('ListItem')
      }
    })
}
.width('100%')
.listDirection(Axis.Vertical) // 列表方向,默认纵向(垂直)
十二、ArkUI组件-自定义组件
- 自定义组件(可以写在同一个页面,也可以写在新的ets文件里,需要export)
@Component
struct MyComponent {
    private title: string
    build() {
       // 组件UI描述
       Text(this.title)
    }
}


@Entry
@Component
struct XxxPage {
    build() {
       // 引入组件
       MyComponent({title: '订单列表'})
    }
}
- 自定义构建函数,可以定义在全局或组件内
// 全局自定义构建函数
@Builder function XxxBuilder() {
    // UI描述
}


@Component
struct XxxComponent() {
    // 组件内自定义构建函数
    @Builder YyyBuilder(){
       // UI描述
    }
    build() {
      XxxBuilder()
      this.YyyBuilder()
    }
}
- @Styles装饰器,仅可封装组件通用属性
// 全局公共样式
@Styles function fillScreen() {
    .width('100%')
    .height('100%')
}
@Entry
@Component
struct XxxPage{
    // 组件内公共样式
    @Styles normalBackground() {
      .backgroundColor('#EFEFEF')
      .padding(14)
    }
    build() {
       RoW() {// ...}
       .fillScreen()
       .normalBackground()
    }
}
- @Extend装饰器,尽可定义在全局,可以设置组件特有属性
@Extend(Text) function priceText() {
    .fontColor('#F36')
    .fontSize(18)
}
注意:在装饰器里也可以写事件方法
十三、ArkTs-状态管理-@State装饰器
在声明式UI中,是以状态驱动视图更新:状态渲染视图,视图互动事件状态
-
状态(State):指驱动视图更新的数据(被装饰器标记的变量)
-
视图(View):基于UI描述渲染得到用户界面
说明
-
@State装饰器标记的变量必须初始化,不能为空值
-
@State支持Object、Class、string、number、boolean、enum类型以及这些类型的数组
-
嵌套类型以及数组中的对象属性无法触发视图更新
@Entry
@Component
struct Index{
    @State message: string = 'Hello World'
    Build() {
        Column() {
            Text(this.message)
            .fontSize(50)
            .onClick(() => {
                this.message = 'Hello ArkTs'
            })
        }
        .width('100%')
        .height('100%')
    }
}
注意:可以使用额外变量,实现数组对象里的number类型数据被监听
class Person {
  name: string
  age: number
  gf: Person

  constructor(name: string, age: number, gf?: Person) {
    this.name = name
    this.age = age
    this.gf = gf
  }
}


@Entry
@Component
struct StatePage2 {
  idx: number = 1
  @State p: Person = new Person('余弓',21)
  @State gfs: Person[] = [
    new Person('你好',18),
    new Person('我好',18)
  ]
  build() {
    Column() {
      Text(`${this.p.name} : ${this.p.age}`)
        .fontSize(50)
        .fontWeight(FontWeight.Bold)
        .onClick(() => {
          this.p.age++
        })
      Button('添加')
        .onClick(() => {
          this.gfs.push(new Person('女友' + this.idx++, 20))
        })
      Text('=女友列表=')
        .fontSize(50)
        .fontWeight(FontWeight.Bold)
      ForEach(
        this.gfs,
        (p, index) => {
          Row() {
            Text(`${p.name} : ${p.age}`)
              .fontSize(30)
              .onClick(() => {
                this.gfs[index] = new Person(p.name, p.age+1)
              })
            Button('删除')
              .onClick(() => {
                this.gfs.splice(index,1)
              })
          }
.width('100%')
          .justifyContent(FlexAlign.SpaceAround)
        }
      )

    }
    .width('100%')
    .height('100%')
    .padding(20)
  }
}
十四、ArkTs-状态管理-@Prop@Link@Provide@Consume
前序:将功能分成不同的模块,减少入口组件的代码
// 任务类
class Task {
  // 静态变量,类内部,所有对象共享的变量
  static id: number = 1
  // 任务名称
  name: string = `任务${Task.id++}`
  // 任务状态:是否完成
  finished: boolean = false
}

// 统一卡片样式
@Styles function card() {
  .width('95%')
  .padding(20)
  .backgroundColor(Color.White)
  .borderRadius(15)
  .shadow({ radius: 6, color: '#1F000000', offsetX: 2, offsetY: 4 })
}

// 任务完成样式
@Extend(Text) function finishedTask() {
  .decoration({ type: TextDecorationType.LineThrough })
  .fontColor('#B1B2B1')
}

@Entry
@Component
struct PropPage {
  // 总任务数量
  @State totalTask: number = 0
  // 已经完成任务数量
  @State finishTask: number = 0
  // 任务数组
  @State tasks: Task[] = []

  handleTaskChange() {
    // 让任务总数等于任务数组的长度
    this.totalTask = this.tasks.length
    // 更新已完成任务数量
    this.finishTask = this.tasks.filter(item => item.finished).length
  }

  build() {
    Column({ space: 10 }) {
      // 1.任务进度卡片
      Row() {
        Text('任务进度:')
          .fontSize(30)
          .fontWeight(FontWeight.Bold)
        // 堆叠容器
        Stack() {
          // 进度条
          Progress({
            value: this.finishTask,
            total: this.totalTask,
            type: ProgressType.Ring
          })
            .width(100)
          Row() {
            Text(this.finishTask.toString())
              .fontSize(24)
              .fontColor('#36D')
            Text(' / ' + this.totalTask.toString())
              .fontSize(24)
          }
        }

      }
      .card()
      .margin({ top: 20, bottom: 10 })
      .justifyContent(FlexAlign.SpaceEvenly)
      // 2.新增任务按钮
      Button('新增任务')
        .width(200)
        .onClick(() => {
          // 新增任务数组
          this.tasks.push(new Task())
          this.handleTaskChange()
        })
      // 3.任务列表
      List({ space: 10 }) {
        ForEach(
          this.tasks,
          (item: Task, index) => {
            ListItem() {
              Row() {
                Text(item.name)
                  .fontSize(20)
                Checkbox()
                  .select(item.finished)
                  .onChange((val) => {
                    // 更新当前任务状态
                    item.finished = val
                    this.handleTaskChange()
                  })
              }
              .card()
              .justifyContent(FlexAlign.SpaceBetween)
            }
            .swipeAction({ end: this.DeleteButton(index) })
          }
        )
      }
      .width('100%')
      .layoutWeight(1)
      .alignListItem(ListItemAlign.Center)
    }
    .width('100%')
    .height('100%')
    .backgroundColor('#F1F2F3')
  }

  @Builder DeleteButton(index: number) {
    Button() {
      Image($r('app.media.ic_public_delete_filled'))
        .fillColor(Color.White)
        .width(20)
    }
    .width(40)
    .height(40)
    .type(ButtonType.Circle)
    .backgroundColor(Color.Red)
    .margin(5)
    .onClick(() => {
      this.tasks.splice(index,1)
      this.handleTaskChange()
    })
  }
}
状态管理
当父子组件之间需要数据同步时,可以使用@Prop和@Link装饰器
| @Prop | @Link | |
|---|---|---|
| 同步类型 | 单项同步 | 双向同步 |
| 允许装饰的变量类型 | @Prop只支持string、number boolean、enum类型 父组件对象类型、子组件是对象属性 不可以是数组、any | 父子类型一致:string、number、boolean、enum、object、class,以及他们的数组 数组中元素增、删、替换会引起刷新 嵌套类型以及数组中的对象属性无法触发视图更新 |
| 初始化方式 | 不允许子组件初始化 | 父组件传递,禁止子组件初始化 |
// 任务类
class Task {
  // 静态变量,类内部,所有对象共享的变量
  static id: number = 1
  // 任务名称
  name: string = `任务${Task.id++}`
  // 任务状态:是否完成
  finished: boolean = false
}

// 统一卡片样式
@Styles function card() {
  .width('95%')
  .padding(20)
  .backgroundColor(Color.White)
  .borderRadius(15)
  .shadow({ radius: 6, color: '#1F000000', offsetX: 2, offsetY: 4 })
}

// 任务完成样式
@Extend(Text) function finishedTask() {
  .decoration({ type: TextDecorationType.LineThrough })
  .fontColor('#B1B2B1')
}

// 任务统计信息
class StateInfo{
  // 总任务数量
  totalTask:number = 0
  // 已经完成任务数量
  finishTask: number = 0
}

@Entry
@Component
struct PropPage {
  @State state: StateInfo = new StateInfo()

  build() {
    Column({ space: 10 }) {
      // 1.任务进度卡片
      TaskStatistics({finishTask: this.state.finishTask, totalTask: this.state.totalTask})
      // 2.任务列表(@Link使用的时候,必须传引用,$)
      TaskList({state: $state})
    }
    .width('100%')
    .height('100%')
    .backgroundColor('#F1F2F3')
  }
}

// 任务进度组件
@Component
struct TaskStatistics {
  @Prop finishTask: number
  @Prop totalTask: number

  build() {
    // 1.任务进度卡片
    Row() {
      Text('任务进度:')
        .fontSize(30)
        .fontWeight(FontWeight.Bold)
      // 堆叠容器
      Stack() {
        // 进度条
        Progress({
          value: this.finishTask,
          total: this.totalTask,
          type: ProgressType.Ring
        })
          .width(100)
        Row() {
          Text(this.finishTask.toString())
            .fontSize(24)
            .fontColor('#36D')
          Text(' / ' + this.totalTask.toString())
            .fontSize(24)
        }
      }
    }
    .card()
    .margin({ top: 20, bottom: 10 })
    .justifyContent(FlexAlign.SpaceEvenly)
  }
}

@Component
struct TaskList{
  // // 总任务数量
  // @Link totalTask: number
  // // 已经完成任务数量
  // @Link finishTask: number

  @Link state: StateInfo
  // 任务数组
  @State tasks: Task[] = []

  handleTaskChange() {
    // 让任务总数等于任务数组的长度
    this.state.totalTask = this.tasks.length
    // 更新已完成任务数量
    this.state.finishTask = this.tasks.filter(item => item.finished).length
  }

  build() {
    Column() {
      // 2.新增任务按钮
      Button('新增任务')
        .width(200)
        .onClick(() => {
          // 新增任务数组
          this.tasks.push(new Task())
          this.handleTaskChange()
        })
      // 3.任务列表
      List({ space: 10 }) {
        ForEach(
          this.tasks,
          (item: Task, index) => {
            ListItem() {
              Row() {
                Text(item.name)
                  .fontSize(20)
                Checkbox()
                  .select(item.finished)
                  .onChange((val) => {
                    // 更新当前任务状态
                    item.finished = val
                    this.handleTaskChange()
                  })
              }
              .card()
              .justifyContent(FlexAlign.SpaceBetween)
            }
            .swipeAction({ end: this.DeleteButton(index) })
          }
        )
      }
      .width('100%')
      .layoutWeight(1)
      .alignListItem(ListItemAlign.Center)
    }
  }

  @Builder DeleteButton(index: number) {
    Button() {
      Image($r('app.media.ic_public_delete_filled'))
        .fillColor(Color.White)
        .width(20)
    }
    .width(40)
    .height(40)
    .type(ButtonType.Circle)
    .backgroundColor(Color.Red)
    .margin(5)
    .onClick(() => {
      this.tasks.splice(index,1)
      this.handleTaskChange()
    })
  }
}
注意:@Provide和@Consume可以跨组件提供类似于@State和@Link的双向同步
// 任务类
class Task {
  // 静态变量,类内部,所有对象共享的变量
  static id: number = 1
  // 任务名称
  name: string = `任务${Task.id++}`
  // 任务状态:是否完成
  finished: boolean = false
}

// 统一卡片样式
@Styles function card() {
  .width('95%')
  .padding(20)
  .backgroundColor(Color.White)
  .borderRadius(15)
  .shadow({ radius: 6, color: '#1F000000', offsetX: 2, offsetY: 4 })
}

// 任务完成样式
@Extend(Text) function finishedTask() {
  .decoration({ type: TextDecorationType.LineThrough })
  .fontColor('#B1B2B1')
}

// 任务统计信息
class StateInfo{
  // 总任务数量
  totalTask:number = 0
  // 已经完成任务数量
  finishTask: number = 0
}

@Entry
@Component
struct PropPage {
  @Provide state: StateInfo = new StateInfo()

  build() {
    Column({ space: 10 }) {
      // 1.任务进度卡片
      TaskStatistics()
      // 2.任务列表(@Link使用的时候,必须传引用,$)
      TaskList()
    }
    .width('100%')
    .height('100%')
    .backgroundColor('#F1F2F3')
  }
}

// 任务进度组件
@Component
struct TaskStatistics {
  @Consume state: StateInfo

  build() {
    // 1.任务进度卡片
    Row() {
      Text('任务进度:')
        .fontSize(30)
        .fontWeight(FontWeight.Bold)
      // 堆叠容器
      Stack() {
        // 进度条
        Progress({
          value: this.state.finishTask,
          total: this.state.totalTask,
          type: ProgressType.Ring
        })
          .width(100)
        Row() {
          Text(this.state.finishTask.toString())
            .fontSize(24)
            .fontColor('#36D')
          Text(' / ' + this.state.totalTask.toString())
            .fontSize(24)
        }
      }
    }
    .card()
    .margin({ top: 20, bottom: 10 })
    .justifyContent(FlexAlign.SpaceEvenly)
  }
}

@Component
struct TaskList{
  @Consume state: StateInfo
  // 任务数组
  @State tasks: Task[] = []

  handleTaskChange() {
    // 让任务总数等于任务数组的长度
    this.state.totalTask = this.tasks.length
    // 更新已完成任务数量
    this.state.finishTask = this.tasks.filter(item => item.finished).length
  }

  build() {
    Column() {
      // 2.新增任务按钮
      Button('新增任务')
        .width(200)
        .onClick(() => {
          // 新增任务数组
          this.tasks.push(new Task())
          this.handleTaskChange()
        })
      // 3.任务列表
      List({ space: 10 }) {
        ForEach(
          this.tasks,
          (item: Task, index) => {
            ListItem() {
              Row() {
                Text(item.name)
                  .fontSize(20)
                Checkbox()
                  .select(item.finished)
                  .onChange((val) => {
                    // 更新当前任务状态
                    item.finished = val
                    this.handleTaskChange()
                  })
              }
              .card()
              .justifyContent(FlexAlign.SpaceBetween)
            }
            .swipeAction({ end: this.DeleteButton(index) })
          }
        )
      }
      .width('100%')
      .layoutWeight(1)
      .alignListItem(ListItemAlign.Center)
    }
  }

  @Builder DeleteButton(index: number) {
    Button() {
      Image($r('app.media.ic_public_delete_filled'))
        .fillColor(Color.White)
        .width(20)
    }
    .width(40)
    .height(40)
    .type(ButtonType.Circle)
    .backgroundColor(Color.Red)
    .margin(5)
    .onClick(() => {
      this.tasks.splice(index,1)
      this.handleTaskChange()
    })
  }
}
十五、ArkTs-状态管理-@Observed和@ObjectLink
@ObjectLink和@Observed装饰器用于在涉及嵌套对象或数组元素为对象的场景中进行双向数据同步
// 任务类
@Observed
class Task {
  // 静态变量,类内部,所有对象共享的变量
  static id: number = 1
  // 任务名称
  name: string = `任务${Task.id++}`
  // 任务状态:是否完成
  finished: boolean = false
}

// 统一卡片样式
@Styles function card() {
  .width('95%')
  .padding(20)
  .backgroundColor(Color.White)
  .borderRadius(15)
  .shadow({ radius: 6, color: '#1F000000', offsetX: 2, offsetY: 4 })
}

// 任务完成样式
@Extend(Text) function finishedTask() {
  .decoration({ type: TextDecorationType.LineThrough })
  .fontColor('#B1B2B1')
}

// 任务统计信息
class StateInfo{
  // 总任务数量
  totalTask:number = 0
  // 已经完成任务数量
  finishTask: number = 0
}

@Entry
@Component
struct PropPage {
  @Provide state: StateInfo = new StateInfo()

  build() {
    Column({ space: 10 }) {
      // 1.任务进度卡片
      TaskStatistics()
      // 2.任务列表(@Link使用的时候,必须传引用,$)
      TaskList()
    }
    .width('100%')
    .height('100%')
    .backgroundColor('#F1F2F3')
  }
}

// 任务进度组件
@Component
struct TaskStatistics {
  @Consume state: StateInfo

  build() {
    // 1.任务进度卡片
    Row() {
      Text('任务进度:')
        .fontSize(30)
        .fontWeight(FontWeight.Bold)
      // 堆叠容器
      Stack() {
        // 进度条
        Progress({
          value: this.state.finishTask,
          total: this.state.totalTask,
          type: ProgressType.Ring
        })
          .width(100)
        Row() {
          Text(this.state.finishTask.toString())
            .fontSize(24)
            .fontColor('#36D')
          Text(' / ' + this.state.totalTask.toString())
            .fontSize(24)
        }
      }
    }
    .card()
    .margin({ top: 20, bottom: 10 })
    .justifyContent(FlexAlign.SpaceEvenly)
  }
}

@Component
struct TaskList{
  @Consume state: StateInfo
  // 任务数组
  @State tasks: Task[] = []

  handleTaskChange() {
    // 让任务总数等于任务数组的长度
    this.state.totalTask = this.tasks.length
    // 更新已完成任务数量
    this.state.finishTask = this.tasks.filter(item => item.finished).length
  }

  build() {
    Column() {
      // 2.新增任务按钮
      Button('新增任务')
        .width(200)
        .onClick(() => {
          // 新增任务数组
          this.tasks.push(new Task())
          this.handleTaskChange()
        })

      // 3.任务列表
      List({ space: 10 }) {
        ForEach(
          this.tasks,
          (item: Task, index) => {
            ListItem() {
              TaskItem({item: item,onTaskChange: this.handleTaskChange.bind(globalThis)})
            }
            .swipeAction({ end: this.DeleteButton(index) })
          }
        )
      }
      .width('100%')
      .layoutWeight(1)
      .alignListItem(ListItemAlign.Center)
    }
  }

  @Builder DeleteButton(index: number) {
    Button() {
      Image($r('app.media.ic_public_delete_filled'))
        .fillColor(Color.White)
        .width(20)
    }
    .width(40)
    .height(40)
    .type(ButtonType.Circle)
    .backgroundColor(Color.Red)
    .margin(5)
    .onClick(() => {
      this.tasks.splice(index,1)
      this.handleTaskChange()
    })
  }
}

@Component
struct TaskItem {
  @ObjectLink item: Task
  onTaskChange: () => void

  build() {
    Row() {
      if (this.item.finished) {
        Text(this.item.name)
          .fontSize(20)
          .finishedTask()
      } else {
        Text(this.item.name)
          .fontSize(20)
      }
      Checkbox()
        .select(this.item.finished)
        .onChange((val) => {
          // 更新当前任务状态
          this.item.finished = val
          // 更新已完成任务数量
          this.onTaskChange
        })
    }
    .card()
    .justifyContent(FlexAlign.SpaceBetween)
  }
}
十六、ArkTs-页面路由
-
页面路由是指在应用程序中实现不同页面之间的跳转和数据传递
-
页面栈的最大容量上限为32个页面,使用router.clear()方法可以清空页面栈,释放内存
-
router.pushUrl():目标页不会替换当前页,而是压入页面栈,因此可以用router.back()返回当前页
-
router.replaceUrl():目标页替换当前页,当前页会被销毁并释放资源,无法返回当前页
- Router有两种页面实例模式,分别是:
-
Standard:标准实例模式,每次跳转都会新建一个目标页并压入栈顶。默认就是这种模式
-
Single:单实例模式,如果目标页已经在栈中,则离栈顶最近的同Url页面会被移动到栈顶并重新加载
- 首先要导入HarmonyOS提供的Router模块:
import router from '@ohos.router';
- 然后利用router实现跳转、返回等操作:
// 跳转到指定路径,并传递参数
router.pushUrl({
        url: 'pages/ImagePage',// 目标页面路径
        params: {id: 1} // 传递的参数(可选)
    },
    router.RouterMode.Single, // 页面实例模式
    err => { // 异常响应回调函数
        if() {
            console.log('路由失败')
        }
    }
)
常见错误码:
-
100001:内部错误,可能渲染失败
-
100002:路由地址错误
-
100003:路由栈中页面超过32
params: any = router.getParams()
// 返回确认提示
router.showAlertBeforeBackPage({
    message: '您的支付还未完成,确定要返回嘛?'
})
// 返回上一页
router.back()
// 返回到指定页,并携带参数
router.back({
    url: 'pages/Index',
    params: {id: 10}
})
注意:页面跳转的路径,需要在resources/base/profile/main_pages.json中配置
十七、ArkTS-属性动画和显式动画
- 属性动画是通过设置组件animation属性来给组件添加动画,当组件的width、height、Opacity、backgroundColor、scale、rotate、translate等属性变更时,可以实现渐变过渡效果。
| 名称 | 参数类型 | 必填 | 描述 |
|---|---|---|---|
| duration | number | 否 | 设置动画时长 默认值:1000,单位:毫秒 |
| tempo | number | 否 | 动画播放速度,数值越大,速度越快 默认值:1 |
| curve | string|Curve | 否 | 设置动画曲线 默认值:Curve.EaseInOut,平滑开始和结束 |
| delay | number | 否 | 设置动画延迟执行的时长 默认值:0,单位:毫秒 |
| iterations | number | 否 | 设置播放次数 默认值:1,取值范围:[-1,+∞) 说明:设置为-1时表示无限次播放 |
| playMode | PlayMode | 否 | 设置动画播放模式,默认播放完成后重头开始播放 默认值:PlayMode.Normal |
| onFinish | ()=>{},void | 否 | 状态回调,动画播放完成时触发 |
import router from '@ohos.router'

@Entry
@Component
struct AnimationPage {
  // 小鱼坐标
  @State fishX: number = 200
  @State fishY: number = 180
  // 小鱼角度
  @State angle: number = 0
  // 小鱼图片
  @State src: Resource = $r('app.media.fish')
  // 是否开始游戏
  @State isBegin: boolean = false

  build() {
    Row() {
      // 堆叠容器
      Stack() {
        // 返回按钮
        Button('返回')
          .position({ x: 0, y: 0 })
          .backgroundColor('#20101010')
          .onClick(() => {
            // 返回上一页
            router.back()
          })

        if (!this.isBegin) {
          // 开始游戏
          Button('开始游戏')
            .onClick(() => {
              // 点击后显示小鱼
              this.isBegin = true
            })
        } else {
          // 小鱼图片
          Image(this.src)
            .position({ x: this.fishX - 20, y: this.fishY - 20 })
            // 旋转角度 旋转中心
            .rotate({ angle: this.angle, centerX: '50%', centerY: '50%' })
            .width(40)
            .height(40)
          .animation({duration: 500})

          // 操作按钮
          Row() {
            Button('←')
              .backgroundColor('#20101010')
            .onClick(() => {
              this.fishX -= 20
              this.src = $r('app.media.fish_rev')
            })
            Column({ space: 40 }) {
              Button('↑')
                .backgroundColor('#20101010')
                .onClick(() => {
                  this.fishY -= 20
                })
              Button('↓')
                .backgroundColor('#20101010')
                .onClick(() => {
                  this.fishY += 20
                })
            }
            Button('→')
              .backgroundColor('#20101010')
              .onClick(() => {
                this.fishX += 20
                t .height(240)
          .width(240)
          .justifyContent(FlexAlign.Center)
          .position({x:0, y: 120})
        }
      }
      .height('100%')
      .width('100%')
    }
    .height('100%')
    .width('100%')
    .backgroundImage($r('app.media.sea'))
    .backgroundImageSize({height: '105%', width: '100%'})      }
    }
    .height('100%')
    .backgroundImage($r('app.media.sea'))
  }
}
- 显式动画是通过全局animateTo函数来修改组件属性,实现属性变化时的渐变过渡效果
import router from '@ohos.router'

@Entry
@Component
struct AnimationPage {
  // 小鱼坐标
  @State fishX: number = 200
  @State fishY: number = 180
  // 小鱼角度
  @State angle: number = 0
  // 小鱼图片
  @State src: Resource = $r('app.media.fish')
  // 是否开始游戏
  @State isBegin: boolean = false

  build() {
    Row() {
      // 堆叠容器
      Stack() {
        // 返回按钮
        Button('返回')
          .position({ x: 0, y: 0 })
          .backgroundColor('#20101010')
          .onClick(() => {
            // 返回上一页
            router.back()
          })

        if (!this.isBegin) {
          // 开始游戏
          Button('开始游戏')
            .onClick(() => {
              // 点击后显示小鱼
              this.isBegin = true
            })
        } else {
          // 小鱼图片
          Image(this.src)
            .position({ x: this.fishX - 20, y: this.fishY - 20 })
            // 旋转角度 旋转中心
            .rotate({ angle: this.angle, centerX: '50%', centerY: '50%' })
            .width(40)
            .height(40)

          // 操作按钮
          Row() {
            Button('←')
              .backgroundColor('#20101010')
            .onClick(() => {
              animateTo({duration: 500}, () => {
                this.fishX -= 20
                this.src = $r('app.media.fish_rev')
              })
            })
            Column({ space: 40 }) {
              Button('↑')
                .backgroundColor('#20101010')
                .onClick(() => {
                  animateTo({duration: 500}, () => {
                    this.fishY -= 20
                  })
                })
              Button('↓')
                .backgroundColor('#20101010')
                .onClick(() => {
                  animateTo({duration: 500}, () => {
                    this.fishY += 20
                  })
                })
            }
            Button('→')
              .backgroundColor('#20101010')
              .onClick(() => {
                animateTo({duration: 500}, () => {
                  this.fishX += 20
                  this.src = $r('app.media.fish')
                })
              })
          }
          .height(240)
          .width(240)
          .justifyContent(FlexAlign.Center)
          .position({x:0, y: 120})
        }
      }
      .height('100%')
      .width('100%')
    }
    .height('100%')
    .width('100%')
    .backgroundImage($r('app.media.sea'))
    .backgroundImageSize({height: '105%', width: '100%'})
  }
}
十八、ArkTS-组件转场动画
组件转场动画是在组件插入或移除时的过渡动画,通过组件的transition属性来配置
| 参数名称 | 参数类型 | 必填 | 参数描述 |
|---|---|---|---|
| type | TranssitionType | 否 | 类型,默认包括组件新增和删除,默认是All |
| opacity | number | 否 | 不透明度,为插入时起点和删除时终点的值,默认值:1,取值范围:[0,1] |
| translate | { x?:number|string, y?:number|string, z?:number|string } | 否 | 平移效果,为插入时起点和删除时终点的值 - x:横向的平移距离 - y:纵向的平移距离 - z:竖向的平移距离 |
| scale | { x?:number, y?:number, z?:number, centerX?:number|string, centerY?:number|string } | 否 | 缩放效果,为插入时起点和删除时终点的值 - x:横向缩放倍数 - y:纵向缩放倍数 - z:当前为二维显示,该参数无效 - centerX、centerY指缩放中心点,centerX和centerY默认值是“50%” - 中心点为0时,默认的是组件的左上角 |
| rotate | { x?:number, y?:number, z?:number, angle:number|string, centerX?:number|string, centerY?:number|string } | 否 | 旋转效果,angle是旋转角度,其他参数与scale类似 |
import router from '@ohos.router'

@Entry
@Component
struct AnimationPage {
  // 小鱼坐标
  @State fishX: number = 200
  @State fishY: number = 180
  // 小鱼角度
  @State angle: number = 0
  // 小鱼图片
  @State src: Resource = $r('app.media.fish')
  // 是否开始游戏
  @State isBegin: boolean = false

  build() {
    Row() {
      // 堆叠容器
      Stack() {
        // 返回按钮
        Button('返回')
          .position({ x: 0, y: 0 })
          .backgroundColor('#20101010')
          .onClick(() => {
            // 返回上一页
            router.back()
          })

        if (!this.isBegin) {
          // 开始游戏
          Button('开始游戏')
            .onClick(() => {
              animateTo({duration: 1500}, () =>{
                // 点击后显示小鱼
                this.isBegin = true
              })
            })
        } else {
          // 小鱼图片
          Image(this.src)
            .position({ x: this.fishX - 20, y: this.fishY - 20 })
            // 旋转角度 旋转中心
            .rotate({ angle: this.angle, centerX: '50%', centerY: '50%' })
            .width(40)
            .height(40)
          .transition({
            type: TransitionType.Insert,
            opacity: 0,
            translate: {x: -250}
          })
        }
        // 操作按钮
        Row() {
          Button('←')
            .backgroundColor('#20101010')
            .onClick(() => {
              animateTo({duration: 500}, () => {
                this.fishX -= 20
                this.src = $r('app.media.fish_rev')
              })
            })
          Column({ space: 40 }) {
            Button('↑')
              .backgroundColor('#20101010')
              .onClick(() => {
                animateTo({duration: 500}, () => {
                  this.fishY -= 20
                })
              })
            Button('↓')
              .backgroundColor('#20101010')
              .onClick(() => {
                animateTo({duration: 500}, () => {
                  this.fishY += 20
                })
              })
          }
          Button('→')
            .backgroundColor('#20101010')
            .onClick(() => {
              animateTo({duration: 500}, () => {
                this.fishX += 20
                this.src = $r('app.media.fish')
              })
            })
        }
        .height(240)
        .width(240)
        .justifyContent(FlexAlign.Center)
        .position({x:0, y: 120})
      }
      .height('100%')
      .width('100%')
    }
    .height('100%')
    .width('100%')
    .backgroundImage($r('app.media.sea'))
    .backgroundImageSize({height: '105%', width: '100%'})
  }
}
十九、ArkTs-实现遥感功能
import router from '@ohos.router'
import curves from '@ohos.curves'

@Entry
@Component
struct AnimationPage {
  // 小鱼坐标
  @State fishX: number = 200
  @State fishY: number = 180
  // 小鱼角度
  @State angle: number = 0
  // 小鱼图片
  @State src: Resource = $r('app.media.fish')
  // 是否开始游戏
  @State isBegin: boolean = false
  // 遥感中心区域坐标
  private centerX: number = 120
  private centerY: number = 120

  // 大、小圆半径
  private maxRadius: number = 100
  private radius: number = 20
  // 遥感小圆球初始化位置
  @State positionX: number = this.centerX
  @State positionY: number = this.centerY
  // 角度正弦和余弦
  sin: number = 0
  cos: number = 0

  // 小鱼移动速度
  speed: number = 0
  // 任务id
  taskId: number = -1

  build() {
    Row() {
      // 堆叠容器
      Stack() {
        // 返回按钮
        Button('返回')
          .position({ x: 0, y: 0 })
          .backgroundColor('#20101010')
          .onClick(() => {
            // 返回上一页
            router.back()
          })

        if (!this.isBegin) {
          // 开始游戏
          Button('开始游戏')
            .onClick(() => {
              animateTo({ duration: 1500 }, () => {
                // 点击后显示小鱼
                this.isBegin = true
              })
            })
        } else {
          // 小鱼图片
          Image(this.src)
            .position({ x: this.fishX - 20, y: this.fishY - 20 })
              // 旋转角度 旋转中心
            .rotate({ angle: this.angle, centerX: '50%', centerY: '50%' })
            .width(40)
            .height(40)
            .transition({
              type: TransitionType.Insert,
              opacity: 0,
              translate: { x: -250 }
            })
        }
        // 遥杆
        Row() {
          Circle({ width: this.maxRadius * 2, height: this.maxRadius * 2 })
            .fill('#20101010')
            .position({ x: this.centerX - this.maxRadius, y: this.centerY - this.maxRadius })
          Circle({ width: this.radius * 2, height: this.radius * 2 })
            .fill('#403A3A3A')
            .position({ x: this.positionX - this.radius, y: this.positionY - this.radius })
        }
        .height(240)
        .width(240)
        .justifyContent(FlexAlign.Center)
        .position({ x: 0, y: 120 })
        .onTouch(this.handleTouchEvent.bind(this))
      }
      .height('100%')
      .width('100%')
    }
    .height('100%')
    .width('100%')
    .backgroundImage($r('app.media.sea'))
    .backgroundImageSize({ height: '105%', width: '100%' })
  }

  // 处理手指移动事件
  handleTouchEvent(event: TouchEvent) {
    switch (event.type) {
      case TouchType.Up:
      //还原小鱼速度
        this.speed = 0
      // 清除定时任务
        clearInterval(this.taskId)
        animateTo(
          { curve: curves.springMotion() },
          () => {
            // 还原摇杆小球坐标
            this.positionX = this.centerX
            this.positionY = this.centerY
            this.angle = 0
          }
        )
        break
      case TouchType.Down:
        // 开始定时任务
        this.taskId = setInterval(() => {
          this.fishX += this.speed * this.cos
          this.fishY += this.speed * this.sin
        }, 40)
        break
      case TouchType.Move:
      // 1. 获取手指的位置坐标
        let x: number = event.touches[0].x
        let y: number = event.touches[0].y
      // 2. 手指坐标和中心点的坐标的差值
        let vx: number = x - this.centerX
        let vy: number = y - this.centerY
      // 3. 计算手指与中心点连线和x轴正半轴的夹角 , 单位是弧度
        let angle = Math.atan2(vy, vx)
      // 4. 计算手指与中心点的距离
        let distance = this.getDistance(vx, vy)
      // 5. 计算遥感小球的坐标
        this.sin = Math.sin(angle)
        this.cos = Math.cos(angle)
        animateTo(
          {
            curve: curves.responsiveSpringMotion()
          },
          () => {
            this.positionX = this.centerX + distance * this.cos
            this.positionY = this.centerY + distance * this.sin
            // 6. 修改小鱼的坐标和角度
            if(Math.abs(angle * 2) < Math.PI) {
              this.src = $r('app.media.fish')
            } else {
              this.src = $r('app.media.fish_rev')
              if (angle < 0) {
                angle += Math.PI
              } else {
                angle -= Math.PI
              }
            }
            this.speed = 5
            this.angle = angle * 180 / Math.PI
          }
        )
        break
    }
  }

  getDistance(x: number, y: number) {
    let d = Math.sqrt(x * x + y * y)
    return Math.min(d, this.maxRadius)
  }
}
二十、ArkTs-Stage模型-基本概念
-
entry模块:里面包含了代码、资源、配置文件等,像entry一样的模块,称为Ability Module
-
在开发entry模块过程中,有一些通用的资源,代码等,如果重复去写,是一种重复和浪费,因此把重复的东西抽象出来,放到一个模块里,这样的模块叫做Library Module
编译期
总体项目在编译期会被打包成APP,而Ability Module可以独立打包成HAP,Library Module可以独立打包成HSP,HAP包在运行中会引用和依赖HSP包,一个项目会有很多HAP,但是只有一个EntryHAP,其他的HAP称为FeatureHAP,合并在一起的HAP,称为Bundle,Bundle的名称是整个应用的唯一标识,整个Bundle合并打包,会变成一个APP。
采用多个HAP的原因:
-
降低代码之间的耦合
-
应用在下载安装时,可以选择性安装,减少安装应用时,所占用的体积
运行期
AbilityStage:应用组件的“舞台”
UIAbility:包含UI界面的应用组件,是系统调度的基本单元
WindowStage:组件内窗口的“舞台”
Window:用来绘制UI页面的窗口
ArkUI Page
注意:正是因为Stage模型,把页面和窗口分离,在跨设备应用开发时,就可以根据窗口单独的裁剪,去适应不同的设备。
二十一、ArkTs-Stage模型-应用配置文件
AppScope包下,app.json5:应用的全局配置信息
resources包下,module.json5:Module的配置信息
注意:更多,请从官方文档查看
二十二、ArkTs-Stage模型-UIAbility生命周期
UIAbility的生命周期: 当用户点击桌面应用后,会创建(Create)一个EntryAbility,虽然创建好了,但是页面元素等仍然在幕后,需要Foreground放到前台,才可以展示,然后用户才可以点击页面上的菜单等。当用户点击了菜单里扩展的应用后,会新建一个Ability,再去执行一次上述的流程,同时,原来的应用会进入后台(Background),可以通过任务列表进行查看。而当用户在次切换回原来的应用时,原来的应用又从后台回到前台。当用户清除任务列表里的任务后,这些应用就被销毁了(Destory),以上就是UIAbility的生命周期。
WindowStage的生命周期: UIAbility从创建到进入前台的过程中,会先把WindowsStage创建出来(WindowsStageCreate),然后在切换到前台,此时WindowsStage会从不可见变到可见(Visible),并且获取焦点(Active),应用在切换到后台的时候,会失焦(InActive),然后从可见变不可见(InVisible),在应用销毁之前,先销毁WindowsStageDestory,在去销毁应用。
EntryAbility.ts的代码:
import UIAbility from '@ohos.app.ability.UIAbility';
import hilog from '@ohos.hilog';
import window from '@ohos.window';

export default class EntryAbility extends UIAbility {
  onCreate(want, launchParam) {
    // 日志,参数1:domain域,用于标识,参数2:功能模块标记,参数3:日志内容%{public}s,public表示日志内容是否公开
    hilog.info(0x0000, 'testTag', '%{public}s', 'Ability onCreate');
  }

  onDestroy() {
    hilog.info(0x0000, 'testTag', '%{public}s', 'Ability onDestroy');
  }

  onWindowStageCreate(windowStage: window.WindowStage) {
    // Main window is created, set main page for this ability
    hilog.info(0x0000, 'testTag', '%{public}s', 'Ability onWindowStageCreate');
    // 默认加载首页
    windowStage.loadContent('pages/Index', (err, data) => {
      if (err.code) {
        hilog.error(0x0000, 'testTag', 'Failed to load the content. Cause: %{public}s', JSON.stringify(err) ?? '');
        return;
      }
      hilog.info(0x0000, 'testTag', 'Succeeded in loading the content. Data: %{public}s', JSON.stringify(data) ?? '');
    });
  }

  onWindowStageDestroy() {
    // Main window is destroyed, release UI related resources
    hilog.info(0x0000, 'testTag', '%{public}s', 'Ability onWindowStageDestroy');
  }

  onForeground() {
    // Ability has brought to foreground
    hilog.info(0x0000, 'testTag', '%{public}s', 'Ability onForeground');
  }

  onBackground() {
    // Ability has back to background
    hilog.info(0x0000, 'testTag', '%{public}s', 'Ability onBackground');
  }
}
二十三、ArkTs-Stage模型-页面及组件生命周期
组件要加载,首先要把组件对应的实例创建出来,接着执行build()函数,只有build()函数全部执行完成,页面才算全部加载出来,执行build()函数时,如果有子组件,则创建子组件实例,执行子组件的build()函数,全部执行完后,才会展示页面,当进行页面跳转后,隐藏页面,当组件存在时,页面也存在,当页面被销毁,组件也被销毁。
组件:生命周期函数
aboutToAppear:在组件实例创建之后,执行build()函数之前,可以在里面完成数据的初始化
aboutToDisappear:在组件销毁之前,可以在里面完成数据持久化的操作
页面:生命周期函数
onPageShow:页面展示后
onPageHide:页面隐藏前
onBackPress:页面在返回时
注意:页面生命周期函数,只能在加了@Entry装饰器的组件执行,普通的组件不能使用;而组件生命周期函数则都可以使用
import router from '@ohos.router'

class RouterInfo {
  // 页面路径
  url: string
  // 页面标题
  title: string

  constructor(url: string, title: string) {
    this.url = url
    this.title = title
  }
}

@Entry // 入口组件(可以被独立访问)
@Component // 标记自定义组件
  // 自定义组件,可复用的UI单元
  // 声明式UI特点:状态数据的变更,驱动页面UI自动刷新
struct Index {
  // 标记状态变量,值变化会触发UI刷新
  @State message: string = '页面列表'
  private routers: RouterInfo[] = [
    new RouterInfo('pages/ImagePage', '图片查看案例'),
    new RouterInfo('pages/ItemPage', '商品列表案例'),
    new RouterInfo('pages/StatePage', 'State状态案例'),
    new RouterInfo('pages/PropPage', '任务列表案例'),
    new RouterInfo('pages/AnimationPage', '小鱼动画案例'),
    new RouterInfo('pages/LifeCirclePage', '生命周期案例1'),
    new RouterInfo('pages/TestPage1', '生命周期案例2'),
  ]

  tag: string = 'Index Page'

  aboutToAppear(){
    console.log(this.tag, 'about to appear')
  }

  onPageShow(){
    console.log(this.tag, 'on page show')
  }

  onBackPress(){
    console.log(this.tag, 'on Back Press')
  }

  onPageHide(){
    console.log(this.tag, 'on page hide')
  }

  aboutToDisappear(){
    console.log(this.tag, 'about to disappear')
  }


  // 声明式描述UI结构
  build() {
    Column() {
      // 基础组件 自带样式和功能的页面元素
      Text(this.message)
        // 属性方法 设置组件的UI样式
        .fontSize(50)
        .fontWeight(FontWeight.Bold)
        .height(80)

      List({ space: 15 }) {
        ForEach(
          this.routers,
          (router: RouterInfo, index) => {
            ListItem() {
              this.RouterItem(router, index + 1)
            }
          }
        )
      }
      .layoutWeight(1)
      .alignListItem(ListItemAlign.Center)
      .width('100%')
    }
    .width('100%')
    .height('100%')
  }

  @Builder
  RouterItem(r: RouterInfo, i: number) {
    Row() {
      Text(i + '.')
        .fontSize(20)
        .fontColor(Color.White)
      Blank()
      Text(r.title)
        .fontSize(20)
        .fontColor(Color.White)
    }
    .width('90%')
    .padding(12)
    .backgroundColor('#38f')
    .borderRadius(20)
    .shadow({ radius: 6, color: '#4F000000', offsetX: 2, offsetY: 4 })
    .onClick(() => {
      router.pushUrl({
        url: r.url,
        params: { id: i }
      },
        router.RouterMode.Single,
        (err) => {
          if (err) {
            console.log(`路由失败:errCode:${err.code},errMsg:${err.message}`)
          }
        }
      )
    })
  }
}
import { Header } from '../components/CommonComponents'
@Entry
@Component
struct LifeCirclePage {
  @State show: boolean = false
  @State arr: string[] = []

  tag: string = 'Life Circle Page'

  aboutToAppear(){
    console.log(this.tag, 'about to appear')
  }

  onPageShow(){
    console.log(this.tag, 'on page show')
  }

  onBackPress(){
    console.log(this.tag, 'on Back Press')
  }

  onPageHide(){
    console.log(this.tag, 'on page hide')
  }

  aboutToDisappear(){
    console.log(this.tag, 'about to disappear')
  }

  build() {
      Column({space: 20}) {
        // 顶部标题
        Header({title: '测试组件生命周期'})

        // 按钮
        Button('切换显示')
          .onClick(() => {
            this.show = !this.show
          })

        Row() {
          if (this.show) {
            MyText({message: 'Hello World'})
          }
        }
        .height(30)

        // 新增按钮
        Button('新增数据')
          .onClick(() => this.arr.push('user_' + this.arr.length))
        ForEach(this.arr, (item,index) => {
          MyText({message: item, index: index,delete: this.delete.bind(this)})
        })
      }
    .width('100%')
    .height('100%')

  }

  delete(index: number = -1){
    if (index > -1) {
      this.arr.splice(index,1)
    }
  }
}

@Component
struct MyText {
  message: string
  index?: number
  delete?: (index:number) => void

  tag: string = 'My Test Page'

  aboutToAppear(){
    console.log(this.tag, 'about to appear')
  }

  onPageShow(){
    console.log(this.tag, 'on page show')
  }

  onBackPress(){
    console.log(this.tag, 'on Back Press')
  }

  onPageHide(){
    console.log(this.tag, 'on page hide')
  }

  aboutToDisappear(){
    console.log(this.tag, 'about to disappear')
  }

  build() {
    Row() {
      Text(this.message)
        .fontSize(20)
      if (this.delete) {
        Image($r('app.media.ic_public_delete'))
          .width(20)
          .onClick(()=> this.delete(this.index))
      }
    }
    .width('100%')
  }
import router from '@ohos.router'
@Entry
@Component
struct TestPage1 {
  @State show: boolean = false
  tag: string = 'TestPage1'

  aboutToAppear(){
    console.log(this.tag, 'about to appear')
  }

  onPageShow(){
    console.log(this.tag, 'on page show')
  }

  onBackPress(){
    console.log(this.tag, 'on Back Press')
  }

  onPageHide(){
    console.log(this.tag, 'on page hide')
  }

  aboutToDisappear(){
    console.log(this.tag, 'about to disappear')
  }


  build() {
    Row() {
      Column({space: 20}) {
        Text(this.tag)
          .fontSize(50)
          .fontWeight(FontWeight.Bold)

        Row() {
          Button('push page2')
            .onClick(() => {
              router.pushUrl({
                url: 'pages/TestPage2'
              })
            })

          Button('replace page2')
            .onClick(() => {
              router.replaceUrl({
                url: 'pages/TestPage2'
              })
            })
        }
      }
      .width('100%')
    }
    .height('100%')
  }
}
import router from '@ohos.router'
@Entry
@Component
struct TestPage2 {
  @State show: boolean = false
  tag: string = 'TestPage2'

  aboutToAppear(){
    console.log(this.tag, 'about to appear')
  }

  onPageShow(){
    console.log(this.tag, 'on page show')
  }

  onBackPress(){
    console.log(this.tag, 'on Back Press')
  }

  onPageHide(){
    console.log(this.tag, 'on page hide')
  }

  aboutToDisappear(){
    console.log(this.tag, 'about to disappear')
  }


  build() {
    Row() {
      Column({space: 20}) {
        Text(this.tag)
          .fontSize(50)
          .fontWeight(FontWeight.Bold)

        Row() {
          Button('push page1')
            .onClick(() => {
              router.pushUrl({
                url: 'pages/TestPage1'
              })
            })

          Button('replace page1')
            .onClick(() => {
              router.replaceUrl({
                url: 'pages/TestPage1'
              })
            })
        }
      }
      .width('100%')
    }
    .height('100%')
  }
}
二十四、ArkTs-Stage模型-UIAbility的启动模式
- singleton启动模式
每一个UIAbility只存在唯一实例,是默认启动模式,任务列表中会存在一个相同的UIAbility
- standard启动模式
每次启动UIAbility都会创建一个新的实例,在任务列表中可能存在一个或多个相同的UIAbility
- multiton启动模式
每次启动UIAbility会创建一个新的实例,将以前的实例销毁
- specified启动模式
每个UIAbility实例可以设置Key标示启动UIAbility时,需要指定Key,存在Key相同实例直接被拉起,不存在则创建新实例
// 1. 当前UiAbility调用startAbility方法拉起目标UIAbility

// 1.1 获取上下文
context = getContext(this) as common.UIAbilityContext

// 1.2 指定要跳转到的UIAbility的信息
le want = {
    devideId: '', // devideId为空表示本设备
    bundleName: 'com.yugong', // AppScope目录下的app.json5文件里
    abilityName: 'DocumentAbility', // 自己创建的UIAbility
    moduleName: 'entry', // moduleName非必选
    // specified模式需要指定,其他模式不需要
    parameters: {
        // getInstanceKey:自定义方法,生成目标UIAbility实例的key
        instanceKey: this.getInstanceKey()
    }
}

// 1.3 尝试拉起目标UIAbility实例
this.context,startAbility(want)
// 2.在AbilityStage的生命周期回调中目标UIAbility实例生成Key
import AbilityStage from '@ohos.app.ability.AbilityStage';
import Want from '@ohos.app.ability.Want';

export default class MyAbilityStage extends AbilityStage{
  onAcceptWant(want: Want): string {
    // 判断当前要拉取的是否时DocumentAbility
    if ('DocumentAbility' === want.abilityName) {
        // 根据参数中的instanceKey参数拼接生成一个key值并返回
        return `DocAbilityInstance_${want.parameters.instanceKey}`
    }
    return ''
  }
}
// 3.在module.json5配置文件中,通过srcEntry参数指定AbilityStage路径
{
    "module": {
      // 模块名称
      "name": "entry",
      // 模块类型
      "type": "entry",
      "srcEntry": "./ets/myabilitystage/MyAbilityStage.ts",
     ...
    }
}
二十五、ArkTs-网络连接-Http请求数据
Http数据请求
-
导入http模块
-
使用http模块发送请求,处理响应
-
创建一个http请求对象,不可复用
-
发送网络请求
-
处理响应结果
HttpRequestOptions-Http请求类型
| 名称 | 类型 | 描述 |
|---|---|---|
| method | RequestMethod | 请求方式,GET、POST、PUT、DELETE等 |
| extraData | string|Object | 请求参数 |
| header | Object | 请求头字段 |
| connectTimeout | number | 连接超时时间,单位毫秒,默认是60000ms |
| readTimeout | number | 读取超时时间,同上 |
HttpResponse-Http响应类型
| 名称 | 类型 | 描述 |
|---|---|---|
| responseCode | ResponseCode | 响应状态码 |
| header | Object | 响应头 |
| cookies | string | 响应返回的cookies |
| result | string|Object | 响应体,默认是JSON字符串 |
| resultType | HttpDataType | 返回值类型 |
/**
 * 页面视图渲染需要的数据,放到viewmodel包下,用ts
 */
export default class ShopInfo {
  id: number
  name: string
  images: string[]
  area: string
  address: string
  avgPrice: number
  comments: number
  score: number
  openHours: string
}
export default shopModel as ShopModel;
import ShopInfo from '../viewmodel/ShopInfo';
import http from '@ohos.net.http';

/**
 * 数据查询、数据操作的代码,放到model包下,用ts
 */
class ShopModel {
  baseURL: string = "http://localhost:3000"
  pageNo: number = 1

  getShopList(): Promise<ShopInfo[]> {
    return new Promise((resolve, reject) => {
      // 1.创建Http请求对象
      let httpRequest = http.createHttp()
      // 2.发送请求
      httpRequest.request(
        `${this.baseURL}/shops?pageNo=${this.pageNo}&pageSize=3`,
        {
          method: http.RequestMethod.GET
        }
      )
        .then(resp => {
          if (resp.responseCode === 200) {
            // 将json字符串转成js对象
            // 查询成功
            console.log("查询商铺成功,", resp.result)
            resolve(JSON.parse(resp.result.toString()))
          } else {
            console.log("查询商铺信息失败!error:", JSON.stringify(resp))
            reject("查询商铺失败")
          }
        })
        .catch(error => {
          reject("查询商铺失败")
          console.log("查询商铺信息失败!error:", JSON.stringify(error))
        })
    })
  }
}

const shopModel = new ShopModel();

export default shopModel as ShopModel;
import ShopInfo from '../viewmodel/ShopInfo'

/**
 * 页面视图中的部分组件,不是通用的,放到views包下,用arkTs
 */
@Component
export default struct ShopItem {
  shop: ShopInfo

  build() {
    Column({ space: 5 }) {
      Row() {
        Text(this.shop.name)
          .fontSize(20)
          .fontWeight(FontWeight.Bold)
          .ellipsisTextOverFlow()
      }.width('100%')

      Row() {
        Text(this.shop.address)
          .fontColor('#a3a3a3')
          .ellipsisTextOverFlow()
      }.width('100%')

      Row({ space: 5 }) {
        Rating({ rating: this.shop.score / 10, indicator: true }).stars(5).stepSize(0.1)
        Text(`${this.shop.score / 10}`).fontColor('#ffb04d')
        Text(`${this.shop.comments}条`).fontColor('#222')
        Blank()
        Text(`¥${this.shop.avgPrice}/人`)
      }.width('100%')

      List({ space: 10 }) {
        ForEach(this.shop.images, (image) => {
          ListItem() {
            Column() {
              Image(image)
                .width(150).aspectRatio(1.1).borderRadius(5)
            }
          }
        })
      }
      .listDirection(Axis.Horizontal)
      .width('100%')
    }
    .width('100%')
    .height(240)
    .padding(12)
    .backgroundColor(Color.White)
    .borderRadius(15)
    .shadow({ radius: 6, color: '#1F000000', offsetX: 2, offsetY: 4 })
  }
}

// 文本超出时的统一样式处理
@Extend(Text) function ellipsisTextOverFlow(line: number = 1) {
  .textOverflow({ overflow: TextOverflow.Ellipsis })
  .maxLines(line)
}
import { Header } from '../components/CommonComponents'
import ShopInfo from '../viewmodel/ShopInfo'
import ShopItem from '../views/ShopItem'
import ShopModel from '../model/ShopModel'

@Entry
@Component
struct ShopPage {
  @State shops: ShopInfo[] = []
  // 是否加载
  isLoading: boolean = false
  // 是否还有数据
  isMore: boolean = true

  aboutToAppear() {
    // 加载商品数据
    this.loadShopInfo()
  }

  build() {
    Column({ space: 10 }) {
      Header({ title: '商铺列表' })

      List({ space: 10 }) {
        ForEach(this.shops, shop => {
          ListItem() {
            ShopItem({ shop: shop })
          }
        })
      }
      .width('100%')
      .layoutWeight(1)
      // 触底事件
      .onReachEnd(() => {
        console.log("触底啦")
        if (!this.isLoading && this.isMore) {
          this.isLoading = true
          console.log("加载数据")
          // 翻页
          ShopModel.pageNo++
          this.loadShopInfo()
        }
      })
    }
    .width('100%')
    .height('100%')
    .padding(10)
    .backgroundColor('#e1e2e3')
  }

  loadShopInfo() {
    // 加载数据
    ShopModel.getShopList()
      .then(shops => {
        // 给图片加上服务器地址前缀
        shops.forEach(s => {
          s.images.forEach((src, i) => {
            s.images[i] = 'http://localhost:3000' + src
          })
        })
        // 把新数据和旧数据进行拼接
        this.shops = this.shops.concat(shops)
        this.isLoading = false
        // 判断是否还有数据
        if (!shops || shops.length === 0) {
          this.isMore = false
        }
      })
  }
}
二十六、ArkTs-网络连接-第三方库Axios
使用步骤:
- 下载和安装ohpm
-
下载ohpm工具包,
-
解压工具包,执行初始化命令
# windows环境
init.bat

# linux或mac环境
./init.sh
- 将ohpm配置到环境变量
# windows环境,直接在我的电脑里配置即可

# linux或mac环境,其中OHPM的路径请替换为ohpm的安装路径
export OHPM_HOME=/xx/ohpm
export PATH=${OHPM_HOME}/bin:${PATH}
- 下载和安装axios
- 下载axios
# 进入项目目录,然后输入下面命令
ohpm install @ohos/axios
- 开放网络权限
# 在模块的module.json5文件中配置网络权限
{
    "module":{
        "requestPermissions":[
            {
                "name": "ohos.permission.INTERNET"
            }
        ]
    }
}
- 使用axios
- 导入axios
// 导入axios模块
import axios from '@ohos/axios'
- 发送请求并处理响应
axios.get( // 请求方式,不同方式使用不同方法
    'url', // 请求路径
    {
        params:{'param1': 'value1'}, // 请求选项
        data:{'param2': 'value2'} // post,put请求里
    }
)
.then(resp => { // 响应结果,AxiosResponse
    if(resp.status !== 200) {
        console.log('查询失败')
    }
    console.log('查询成功')
})
.catch(error => {
    console.log('查询失败',JSON.stringify(error)
})
| 名称 | 类型 | 描述 |
|---|---|---|
| status | number | 响应状态码 |
| headers | Object | 响应头 |
| data | any | 服务端返回的响应体 |
import ShopInfo from '../viewmodel/ShopInfo';
import axios form '@ohos/axios'

class ShopModel {
  baseURL: string = "http://localhost:3000"
  pageNo: number = 1

  getShopList(): Promise<ShopInfo[]> {
    return new Promise((resolve, reject) => {
      axios.get(
        `${this.baseURL}/shops`,
        {
          params: {pageNo: this.pageNo, pageSize: 3}
        }
      )
        .then(resp => {
          if (resp.status === 200) {
            // 将json字符串转成js对象
            // 查询成功
            console.log("查询商铺成功,", JSON.stringify(resp.data))
            resolve(resp.data)
          } else {
            console.log("查询商铺信息失败!error:", JSON.stringify(resp))
            reject("查询商铺失败")
          }
        })
        .catch(error => {
          reject("查询商铺失败")
          console.log("查询商铺信息失败!error:", JSON.stringify(error))
        })
    })
  }
}

const shopModel = new ShopModel();

export default shopModel as ShopModel;
二十七、ArkTs-数据持久化-用户首选项
用户首选项(Preference)为应用提供Key-Value键值型的数据处理能力,支持应用持久化轻量级数据。
首选项的基本原理
在应用里面,如果想用首选项,需要创建首选项的实例,而一个应用内部,可以创建多个首选项实例,这样,可以在应用里,不同模块创建不同的首选项,避免相互之间干扰,每一个用户首选项实例都会对应应用沙箱里的一个持久化文件,当我们去调用用户首选项的相关接口做数据读写的时候,它就会操作持久化文件,从而实现数据的持久化和读写操作。
使用首选项的具体步骤
- 导入首选项模块
import dataPreference from '@ohos.data.preferences'
- 获取首选项的实例,读取指定文件
// this.context -> UIAbilityContext
// 'MyAppPreferences' -> Preferences实例名称
dataPreference.getPreferences(this.context,'MyAppPreferences')
.then(preferences => {
// 获取成功
})
.catch(reason => {
// 获取失败
})
- 数据操作
// 3.1 写入数据,如果已经存在则会覆盖,可利用.has()判断是否存在
preferences.put("key", val)
.then(() => preferences.flush) // 刷到磁盘
.catch(reason => {}) // 异常处理
// 3.2 删除数据
preferences.delete('key')
.then(() => {}).catch(reason => {})
// 3.3 查询数据
preferences.get('key','defaultValue')
.then(value => console.log('查询成功'))
.catch(reason => console.log('查询失败'))
说明
-
key为string类型,要求非空且长度不超过80字节
-
Value可以是string、number、boolean及以上类型数组,大小不超过8192字节
-
数据量建议不超过一万条
import preferences from '@ohos.data.preferences';

class PreferencesUtil {
  prefMap: Map<string, preferences.Preferences> = new Map()

  /*
     异步写法
  */
  // loadPreference(context, name: string){
  //   preferences.getPreferences(context,name)
  //     .then(pref => {
  //       this.prefMap.set(name,pref)
  //       console.log('testTag',`加载Preferences[${name}]成功`)
  //     })
  //     .catch(reason => {
  //       console.log('testTag',`加载Preferences[${name}]失败`,JSON.stringify(reason))
  //     })
  // }

  /*
    同步写法
   */
  async loadPreference(context, name: string) {
    try {
      let pref: preferences.Preferences = await preferences.getPreferences(context, name)
      this.prefMap.set(name, pref)
      console.log('testTag', `加载Preferences[${name}]成功`)
    } catch (e) {
      console.log('testTag', `加载Preferences[${name}]失败`, JSON.stringify(e))
    }
  }

  /**
   * 存数据
   * @param name
   * @param key
   * @param value
   */
  async putPreferenceValue(name: string, key: string, value: preferences.ValueType) {
    if (!this.prefMap.has(name)) {
      console.log('testTag', `Preferences[${name}]尚未初始化!`)
      return
    }
    try {
      let pref: preferences.Preferences = this.prefMap.get(name)
      // 写入数据
      await pref.put(key, value)
      //刷盘
      await pref.flush()
      console.log('testTag', `保存Preferences[${name}.${key} = ${value}]成功`)
    } catch (e) {
      console.log('testTag', `保存Preferences[${name}.${key} = ${value}]失败`,JSON.stringify(e))
    }
  }

  /**
   * 读取数据
   * @param name
   * @param key
   * @param defaultValue
   * @returns
   */
  async getPreferenceValue(name: string, key: string, defaultValue: preferences.ValueType) {
    if (!this.prefMap.has(name)) {
      console.log('testTag', `Preferences[${name}]尚未初始化!`)
      return
    }
    try {
      let pref: preferences.Preferences = this.prefMap.get(name)
      // 读数据
      let value = await pref.get(key, defaultValue)
      console.log('testTag', `读取Preferences[${name}.${key} = ${value}]成功`)
      return value
    } catch (e) {
      console.log('testTag', `读取Preferences[${name}.${key} ]失败`,JSON.stringify(e))
    }
  }

  async deletePreferenceValue(name: string,key: string) {
    if (!this.prefMap.has(name)) {
      console.log('testTag', `Preferences[${name}]尚未初始化!`)
      return
    }
    try {
      let del: boolean = this.prefMap.delete(key)
      preferences.delete()
      console.log('testTag', `删除Preferences[${name}.${key}]成功`)
      return del
    } catch (e) {
      console.log('testTag', `删除Preferences[${name}.${key} ]失败`,JSON.stringify(e))
    }

  }
}

const preferencesUtil = new PreferencesUtil()

export default preferencesUtil as PreferencesUtil
import RouterInfo from '../viewmodel/RouterInfo'
import IndexFontSizePanel from '../views/IndexFontSizePanel'
import RouterItem from '../views/RouterItem'
import PreferencesUtil from '../common/util/PreferencesUtil'

const routers: RouterInfo[] = [
  new RouterInfo('pages/ImagePage', '图片查看案例'),
  new RouterInfo('pages/ItemPage', '商品列表案例'),
  new RouterInfo('pages/StatePage', 'Jack和他的女友案例'),
  new RouterInfo('pages/PropPage', '任务列表案例'),
  new RouterInfo('pages/AnimationPage', '小鱼动画案例摇杆版'),
  new RouterInfo('pages/LifeCirclePage', '生命周期案例1'),
  new RouterInfo('pages/TestPage1', '生命周期案例2'),
  new RouterInfo('pages/DocumentListPage', 'UIAbility启动模式案例'),
  new RouterInfo('pages/ShopPage', '查询商铺案例'),
  new RouterInfo('pages/TaskManagePage', '任务列表持久化案例'),
  new RouterInfo('pages/NotificationPage', '通知案例'),
]

@Entry
@Component
struct Index {
  @State message: string = '页面列表'
  @State showPanel: boolean = false
  @Provide fontSize: number = 16

  async aboutToAppear(){
    this.fontSize = await PreferencesUtil.getPreferenceValue('MyPreferences', 'IndexFontSize', 16) as number
  }

  build() {
    Column() {
      // 顶部标题
      this.Title()

      // 导航列表
      this.RouterList()

      // 字体修改面板
      if(this.showPanel){
        IndexFontSizePanel()
          .transition({
            translate: { y: 115 }
          })
      }
    }
    .width('100%')
    .height('100%')
  }

  @Builder
  Title() {
    Row() {
      Text(this.message)
        .fontSize(50)
        .fontWeight(FontWeight.Bold)
        .height(80)
      Image($r('app.media.ic_public_settings'))
        .width(30)
        .onClick(() => {
          animateTo({ duration: 500, curve: Curve.EaseOut }, () => this.showPanel = !this.showPanel)
        })
    }
    .justifyContent(FlexAlign.SpaceAround)
    .width('100%')
  }

  @Builder
  RouterList() {
    List({ space: 15 }) {
      ForEach(
        routers,
        (router, index) => {
          ListItem() {
            RouterItem({ r: router, i: index + 1 })
          }
        }
      )
    }
    .layoutWeight(1)
    .alignListItem(ListItemAlign.Center)
    .width('100%')
  }
}
import UIAbility from '@ohos.app.ability.UIAbility';
import hilog from '@ohos.hilog';
import window from '@ohos.window';
import preferencesUtil from '../common/util/PreferencesUtil'

export default class EntryAbility extends UIAbility {
  async onCreate(want, launchParam) {
    // 日志,参数1:domain域,用于标识,参数2:功能模块标记,参数3:日志内容%{public}s,public表示日志内容是否公开
    hilog.info(0x0000, 'testTag', '%{public}s', 'Ability onCreate');
    // 加载Preferences
    await preferencesUtil.loadPreference(this.context,"MyPreferences")
  }

  onDestroy() {
    hilog.info(0x0000, 'testTag', '%{public}s', 'Ability onDestroy');
  }

  onWindowStageCreate(windowStage: window.WindowStage) {
    // Main window is created, set main page for this ability
    hilog.info(0x0000, 'testTag', '%{public}s', 'Ability onWindowStageCreate');
    // 默认加载首页
    windowStage.loadContent('pages/Index', (err, data) => {
      if (err.code) {
        hilog.error(0x0000, 'testTag', 'Failed to load the content. Cause: %{public}s', JSON.stringify(err) ?? '');
        return;
      }
      hilog.info(0x0000, 'testTag', 'Succeeded in loading the content. Data: %{public}s', JSON.stringify(data) ?? '');
    });
  }

  onWindowStageDestroy() {
    // Main window is destroyed, release UI related resources
    hilog.info(0x0000, 'testTag', '%{public}s', 'Ability onWindowStageDestroy');
  }

  onForeground() {
    // Ability has brought to foreground
    hilog.info(0x0000, 'testTag', '%{public}s', 'Ability onForeground');
  }

  onBackground() {
    // Ability has back to background
    hilog.info(0x0000, 'testTag', '%{public}s', 'Ability onBackground');
  }
}
二十八、ArkTs-数据持久化-关系型数据库
关系型数据库(RDB)是基于SQLite组件提供的本地数据库,用于管理应用中的结构化数据。例如:记账本、备忘录。
关系型数据库的原理
每一个数据库都有一个自己的数据库文件,一个应用可以创建多个数据库,就会有多个数据库文件,当我们操作关系型数据库时,可以直接调用ArkTs提供的数据操作接口,它就会基于SQLite引擎对于数据库文件的读写操作,实现数据持久化。
使用关系型数据库的步骤
- 初始化数据库
- 导入关系型数据库模块
import relationStore from '@ohos.data.relationalStore'
- 初始化数据库表
// 2.1 rdb配置
const config = {
    name: 'MyApplication.db', // 数据库文件名
    securityLevel: relationalStore.SecurityLevel.S1 // 数据库安全级别
}
// 2.2 初始化表的SQL
const sql = `create table if not exists task(
            id integer primary key,
            name text not null,
            finished bit
            )`
// 2.3 获取rdb
relationlStore.getRdbStore(this.context,config,(err,rdbStore) => {
  // 2.4 执行Sql,后续的所有增删改查都是使用rdbStore对象
  rdbStore.executeSql(sql)
})
- 增、删、改
- 新增数据
// 1.1 准备数据
let task = {id: 1, name: '任务1', finished: false};
// 1.2 新增
this.rdbStore.insert(this.tableName, task)
- 修改数据
// 2.1 要更新的数据
let task = {'finished': true};
// 2.2 查询条件,RdbPredicates就是条件谓词
let predicates = new relationalStore.RdbPredicates(this.tableName)
predicates.equalTo('id', id)
// 2.3 执行更新
this.rdbStore.update(task,predicates)
- 删除数据
// 3.1 查询条件
let predicates = new relationalStore.RdbPredicates(this.tableName)
predicates.equalTo('id',id)
// 3.2 执行删除
this.rdbStore.delete(predicates)
- 查询数据
- 查询数据
// 1.1 查询条件
let predicates = new relationalStore.RdbPredicates(this.tableName)
// 1.2 执行查询
let result = await this.rdbStore.query(predicates,['id','name','finished'])
- 解析结果
// 2.1 准备数组保存结果
let tasks: any[] = []
// 2.2 循环遍历结果集,判断是否结果是否遍历到最后一行
while(!result.isAtLastRow){
    // 指针移动到下一行数据
    result.goToNextRow()
    // 根据字段名获取字段index,从而获取字段值
    let id = result.getLong(result.getColumnIndex('id'))
    let name = result.getString(result.getColumnIndex('name'))
    tasks.push({id, name})
}
import relationalStore from '@ohos.data.relationalStore';
import TaskInfo from '../viewmodel/TaskInfo';

class TaskModel {

  private rdbStore: relationalStore.RdbStore
  private tableName: string = 'TASK'

  /**
   * 初始化任务表
   */
  initTaskDB(context){
    // 1.rdb配置
    const config = {
      name: 'MyApplication.db',
      securityLevel: relationalStore.SecurityLevel.S1
    }
    // 2.初始化SQL语句
    const sql = `CREATE TABLE IF NOT EXISTS TASK (
                  ID INTEGER PRIMARY KEY AUTOINCREMENT,
                  NAME TEXT NOT NULL,
                  FINISHED bit
                 )`
    // 3.获取rdb
    relationalStore.getRdbStore(context, config, (err, rdbStore) => {
      if(err){
        console.log('testTag', '获取rdbStore失败!')
        return
      }
      // 执行Sql
      rdbStore.executeSql(sql)
      console.log('testTag', '创建task表成功!')
      // 保存rdbStore
      this.rdbStore = rdbStore
    })
  }

  /**
   * 查询任务列表
   */
  async getTaskList(){
    // 1.构建查询条件
    let predicates = new relationalStore.RdbPredicates(this.tableName)
    // 2.查询
    let result = await this.rdbStore.query(predicates, ['ID', 'NAME', 'FINISHED'])
    // 3.解析查询结果
    // 3.1.定义一个数组,组装最终的查询结果
    let tasks: TaskInfo[] = []
    // 3.2.遍历封装
    while(!result.isAtLastRow){
      // 3.3.指针移动到下一行
      result.goToNextRow()
      // 3.4.获取数据
      let id = result.getLong(result.getColumnIndex('ID'))
      let name = result.getString(result.getColumnIndex('NAME'))
      let finished = result.getLong(result.getColumnIndex('FINISHED'))
      // 3.5.封装到数组
      tasks.push({id, name, finished: !!finished})
    }
    console.log('testTag', '查询到数据:', JSON.stringify(tasks))
    return tasks
  }

  /**
   * 添加一个新的任务
   * @param name 任务名称
   * @returns 任务id
   */
  addTask(name: string): Promise<number>{
    return this.rdbStore.insert(this.tableName, {name, finished: false})
  }

  /**
   * 根据id更新任务状态
   * @param id 任务id
   * @param finished 任务是否完成
   */
  updateTaskStatus(id: number, finished: boolean) {
    // 1.要更新的数据
    let data = {finished}
    // 2.更新的条件
    let predicates = new relationalStore.RdbPredicates(this.tableName)
    predicates.equalTo('ID', id)
    // 3.更新操作
    return this.rdbStore.update(data, predicates)
  }

  /**
   * 根据id删除任务
   * @param id 任务id
   */
  deleteTaskById(id: number){
    // 1.删除的条件
    let predicates = new relationalStore.RdbPredicates(this.tableName)
    predicates.equalTo('ID', id)
    // 2.删除操作
    return this.rdbStore.delete(predicates)
  }
}

let taskModel = new TaskModel();

export default taskModel as TaskModel;
二十九、ArkTs-通知-基础通知
应用可以通过通知接口发送通知消息,提醒用户关注应用中的变化。用户可以在通知栏查看和操作通知内容。
通知的使用步骤
- 导入notification模块
import notificationManager from '@ohos.notificationManager'
- 发布通知
// 2.1 构建通知请求
let request: notificationManager.NotificationRequest = {
    id: 10,
    content:{// 通知内容: ...}
}
// 2.2发布通知
notificationManager.publish(request)
.then(()=> console.log('发送通知成功'))
.catch(reason=>console.log('发送通知失败', JSON.stringify(reason))
- 取消通知
// 取消指定id的通知
notificationManager.cancel(10)
// 取消当前应用所有通知
notificationManager.cancelAll()
通知类型
| 类型枚举 | 说明 |
|---|---|
| NOTIFICATION_CONTENT_BASIC_TEXT | 普通文本型 |
| NOTIFICATION_CONTENT_LONG_TEXT | 长文本型 |
| NOTIFICATION_CONTENT_MULTILINE | 多行文本型 |
| NOTIFICATION_CONTENT_PICTURE | 图片型 |
// 普通文本型
let request: notificationManager.NotificationRequest = {
    id: 10,
    content:{
        contentType: notificationManager.ContentType.NOTIFICATION_CONTENT_BASIC_TEXT,
        normal: {
            title: '通知标题',
            text: '通知内容详情',
            additionalText: '通知附加内容'
        }
    }
}


// 长文本型
let request: notificationManager.NotificationRequest = {
    id: 10,
    content:{
        contentType: notificationManager.ContentType.NOTIFICATION_CONTENT_LONG_TEXT,
        longText: {
            title: '通知标题',
            text: '通知内容详情',
            additionalText: '通知附加内容',
            longText: '通知中的长文本,长、长、长',
            briefText: '通知概要和总结',
            expandedTitle: '通知展开时的标题'
        }
    }
}

// 多行文本型
let request: notificationManager.NotificationRequest = {
    id: 10,
    content:{
        contentType: notificationManager.ContentType.NOTIFICATION_CONTENT_MULTILINE,
        multiline: {
            title: '通知标题',
            text: '通知内容详情',
            additionalText: '通知附加内容',
            briefText: '通知概要和总结',
            longTitle: '通知展开时的标题',
            lines: [
                '第一行',
                '第二行',
                '第三行',
                '第四行',
            ]
        }
    }
}

// 图片型
let request: notificationManager.NotificationRequest = {
    id: 10,
    content:{
        contentType: notificationManager.ContentType.NOTIFICATION_CONTENT_PICTURE,
        picture: {
            title: '通知标题',
            text: '通知内容详情',
            additionalText: '通知附加内容',
            briefText: '通知概要和总结',
            expandTitle: '展开后标题',
            picture: this.pixel // 像素图
        }
    }
}
像素图的构建
async aboutToAppear() {
    // 获取资源管理器
    let rm = getContext(this).resourceManager;
    // 读取图片
    let file = await rm.getMediaContent($r('app.media.watchGT4')
    // 创建PixelMap
    image.createImageSource(file.buffer).createPixelMap()
    .then(value => this.pixel = value)
    .catch(reason => console.log('testTag','加载图片异常',JSON.stringify(reason))
}
let request: notificationManager.NotificationRequest = {
    id: 10,
    content:{// 通知内容: ...}
    // 投递的时间
    deliveryTime: new Date().getTime(),
    // 是否显示投递时间,默认值:false
    showDeliveryTime: true,
    // 分组,默认通知都是自己是一组
    groupName: 'wechat',
    // 通道类型,通知展示的方式
    slotType: notify.SlotType.SOCIAL_COMMUNICATION,
}
通道类型
| 类型枚举 | 说明 | 状态栏图标 | 提示音 | 横幅 |
|---|---|---|---|---|
| SOCIAL_COMMUNICATION | 社交类型 | √ | √ | √ |
| SERVICE_INFORMATION | 服务类型 | √ | √ | × |
| CONTENT_INFORMATION | 内容类型 | √ | × | × |
| OTHER_TYPES | 其他 | × | × | × |
三十、ArkTs-通知-进度条通知
进度条通知会展示一个动态的进度条,主要用于文件下载、长任务处理的进度显示。
使用进度条通知的步骤
- 判断当前系统是否支持进度条模板
this.isSupport = await notificationManager.isSupportTemplate('downloadTemplate')
if(!this.isSupport){
    return
}
- 定义通知请求
// 通知模板
let template = {
    name: 'downloadTemplate', // 模板名称,必须是downloadTemplate
    data: {
        progressValue: this.progressValue, // 进度条当前进度
        progressMaxValue: 100 // 进度条最大值
    }
}

// 通知请求
let reguest: notificationManager.NotificationRequest = {
    id: 999,
    template: template,
    content: {
        contentType: notify.ContentType.NOTIFICATION_CONTENT_BASIC_TEXT,
        normal:{
            title: this.filename + ': ' + this.state,
            text: '',
            additionalText: `${this.progressValue}%`,
        }
    }
}
- 发送通知
import notify from '@ohos.notificationManager'
import wantAgent, { WantAgent } from '@ohos.app.ability.wantAgent'
import promptAction from '@ohos.promptAction'

enum DownloadState {
  NOT_BEGIN = '未开始',
  DOWNLOADING = '下载中',
  PAUSE = '已暂停',
  FINISHED = '已完成',
}

@Component
export default struct DownloadCard {
  // 下载进度
  @State progressValue: number = 0
  progressMaxValue: number = 100
  // 任务状态
  @State state: DownloadState = DownloadState.NOT_BEGIN

  // 下载的文件名
  filename: string = '圣诞星.mp4'

  // 模拟下载的任务的id
  taskId: number = -1

  // 通知id
  notificationId: number = 999

  isSupport: boolean = false

  wantAgentInstance: WantAgent

  async aboutToAppear(){
    // 1.判断当前系统是否支持进度条模板
    this.isSupport = await notify.isSupportTemplate('downloadTemplate')
  }

  build() {
    Row({ space: 10 }) {
      Image($r('app.media.ic_files_video')).width(50)
      Column({ space: 5 }) {
        Row() {
          Text(this.filename)
          Text(`${this.progressValue}%`).fontColor('#c1c2c1')
        }
        .width('100%')
        .justifyContent(FlexAlign.SpaceBetween)

        // 进度条
        Progress({
          value: this.progressValue,
          total: this.progressMaxValue,
        })

        Row({ space: 5 }) {
          Text(`${(this.progressValue * 0.43).toFixed(2)}MB`)
            .fontSize(14).fontColor('#c1c2c1')
          Blank()
          if (this.state === DownloadState.NOT_BEGIN) {
            Button('开始').downloadButton()
              .onClick(() => this.download())

          } else if (this.state === DownloadState.DOWNLOADING) {
            Button('取消').downloadButton().backgroundColor('#d1d2d3')
              .onClick(() => this.cancel())

            Button('暂停').downloadButton()
              .onClick(() => this.pause())

          } else if (this.state === DownloadState.PAUSE) {
            Button('取消').downloadButton().backgroundColor('#d1d2d3')
              .onClick(() => this.cancel())

            Button('继续').downloadButton()
              .onClick(() => this.download())
          } else {
            Button('打开').downloadButton()
              .onClick(() => this.open())
          }
        }.width('100%')
      }
      .layoutWeight(1)
    }
    .width('100%')
    .borderRadius(20)
    .padding(15)
    .backgroundColor(Color.White)
  }


  cancel() {
    // 取消定时任务
    if(this.taskId > 0){
      clearInterval(this.taskId);
      this.taskId = -1
    }
    // 清理下载任务进度
    this.progressValue = 0
    // 标记任务状态:未开始
    this.state = DownloadState.NOT_BEGIN
    // 取消通知
    notify.cancel(this.notificationId)
  }

  download() {
    // 清理旧任务
    if(this.taskId > 0){
      clearInterval(this.taskId);
    }
    // 开启定时任务,模拟下载
    this.taskId = setInterval(() => {
      // 判断任务进度是否达到100
      if(this.progressValue >= 100){
        // 任务完成了,应该取消定时任务
        clearInterval(this.taskId)
        this.taskId = -1
        // 并且标记任务状态为已完成
        this.state = DownloadState.FINISHED
        // 发送通知
        this.publishDownloadNotification()
        return
      }
      // 模拟任务进度变更
      this.progressValue += 2
      // 发送通知
      this.publishDownloadNotification()
    }, 500)
    // 标记任务状态:下载中
    this.state = DownloadState.DOWNLOADING
  }

  pause() {
    // 取消定时任务
    if(this.taskId > 0){
      clearInterval(this.taskId);
      this.taskId = -1
    }
    // 标记任务状态:已暂停
    this.state = DownloadState.PAUSE
    // 发送通知
    this.publishDownloadNotification()
  }

  open() {
    promptAction.showToast({
      message: '功能未实现'
    })
  }

  /**
   * 发送下载通知
   */
  publishDownloadNotification(){
    // 1.判断当前系统是否支持进度条模板
    if(!this.isSupport){
      // 当前系统不支持进度条模板
      return
    }
    // 2.准备进度条模板的参数
    let template = {
      name: 'downloadTemplate',
      data: {
        progressValue: this.progressValue,
        progressMaxValue: this.progressMaxValue
      }
    }
    let request: notify.NotificationRequest = {
      id: this.notificationId,
      template: template,
      content: {
        contentType: notify.ContentType.NOTIFICATION_CONTENT_BASIC_TEXT,
        normal: {
          title: this.filename + ':  ' + this.state,
          text: '',
          additionalText: this.progressValue + '%'
        }
      }
    }
    // 3.发送通知
    notify.publish(request)
      .then(() => console.log('test', '通知发送成功'))
      .catch(reason => console.log('test', '通知发送失败!', JSON.stringify(reason)))
  }
}

@Extend(Button) function downloadButton() {
  .width(75).height(28).fontSize(14)
}
三十一、ArkTs-通知-通知行为意图
通知意图:我们可以给通知或者其中的按钮设置行为意图(Want),从而实现拉起应用组件或发布公共事件等能力
// 1.意图行为信息
let wantInfo = {
    wants:[
        {
            deviceId:'',
            bundleName: 'com.example.myapplication',
            abilityName: 'EntryAbility',
            action: '',
            entities: []
        }
    ],
    operationType: wantAgent.OperationType.START_ABILITY,
    requestCode: 0,
    wantAgentFlags: [wantAgent.WantAgentFlags.CONSTANT_FLAG]
}

// 2.创建wantAgent实例
this.wantAgentInstance = await wantAgent.getWantAgent(wantInfo)

// 3.通知请求
let request: notify.NotificationRequest = {
    id: 999,
    template: template,
    wantAgent: this.wantAgentInstance, // 设置通知意图
    content: {
    // ...
    }
}
import notify from '@ohos.notificationManager'
import wantAgent, { WantAgent } from '@ohos.app.ability.wantAgent'
import promptAction from '@ohos.promptAction'

enum DownloadState {
  NOT_BEGIN = '未开始',
  DOWNLOADING = '下载中',
  PAUSE = '已暂停',
  FINISHED = '已完成',
}

@Component
export default struct DownloadCard {
  // 下载进度
  @State progressValue: number = 0
  progressMaxValue: number = 100
  // 任务状态
  @State state: DownloadState = DownloadState.NOT_BEGIN

  // 下载的文件名
  filename: string = '圣诞星.mp4'

  // 模拟下载的任务的id
  taskId: number = -1

  // 通知id
  notificationId: number = 999

  isSupport: boolean = false

  wantAgentInstance: WantAgent

  async aboutToAppear(){
    // 1.判断当前系统是否支持进度条模板
    this.isSupport = await notify.isSupportTemplate('downloadTemplate')
    // 2.创建拉取当前应用的行为意图
    // 2.1.创建wantInfo信息
    let wantInfo: wantAgent.WantAgentInfo = {
      wants: [
        {
          bundleName: 'com.yugong',
          abilityName: 'EntryAbility',
        }
      ],
      requestCode: 0,
      operationType: wantAgent.OperationType.START_ABILITY,
      wantAgentFlags: [wantAgent.WantAgentFlags.CONSTANT_FLAG]
    }
    // 2.2.创建wantAgent实例
    this.wantAgentInstance = await wantAgent.getWantAgent(wantInfo)
  }

  build() {
    Row({ space: 10 }) {
      Image($r('app.media.ic_files_video')).width(50)
      Column({ space: 5 }) {
        Row() {
          Text(this.filename)
          Text(`${this.progressValue}%`).fontColor('#c1c2c1')
        }
        .width('100%')
        .justifyContent(FlexAlign.SpaceBetween)

        // 进度条
        Progress({
          value: this.progressValue,
          total: this.progressMaxValue,
        })

        Row({ space: 5 }) {
          Text(`${(this.progressValue * 0.43).toFixed(2)}MB`)
            .fontSize(14).fontColor('#c1c2c1')
          Blank()
          if (this.state === DownloadState.NOT_BEGIN) {
            Button('开始').downloadButton()
              .onClick(() => this.download())

          } else if (this.state === DownloadState.DOWNLOADING) {
            Button('取消').downloadButton().backgroundColor('#d1d2d3')
              .onClick(() => this.cancel())

            Button('暂停').downloadButton()
              .onClick(() => this.pause())

          } else if (this.state === DownloadState.PAUSE) {
            Button('取消').downloadButton().backgroundColor('#d1d2d3')
              .onClick(() => this.cancel())

            Button('继续').downloadButton()
              .onClick(() => this.download())
          } else {
            Button('打开').downloadButton()
              .onClick(() => this.open())
          }
        }.width('100%')
      }
      .layoutWeight(1)
    }
    .width('100%')
    .borderRadius(20)
    .padding(15)
    .backgroundColor(Color.White)
  }


  cancel() {
    // 取消定时任务
    if(this.taskId > 0){
      clearInterval(this.taskId);
      this.taskId = -1
    }
    // 清理下载任务进度
    this.progressValue = 0
    // 标记任务状态:未开始
    this.state = DownloadState.NOT_BEGIN
    // 取消通知
    notify.cancel(this.notificationId)
  }

  download() {
    // 清理旧任务
    if(this.taskId > 0){
      clearInterval(this.taskId);
    }
    // 开启定时任务,模拟下载
    this.taskId = setInterval(() => {
      // 判断任务进度是否达到100
      if(this.progressValue >= 100){
        // 任务完成了,应该取消定时任务
        clearInterval(this.taskId)
        this.taskId = -1
        // 并且标记任务状态为已完成
        this.state = DownloadState.FINISHED
        // 发送通知
        this.publishDownloadNotification()
        return
      }
      // 模拟任务进度变更
      this.progressValue += 2
      // 发送通知
      this.publishDownloadNotification()
    }, 500)
    // 标记任务状态:下载中
    this.state = DownloadState.DOWNLOADING
  }

  pause() {
    // 取消定时任务
    if(this.taskId > 0){
      clearInterval(this.taskId);
      this.taskId = -1
    }
    // 标记任务状态:已暂停
    this.state = DownloadState.PAUSE
    // 发送通知
    this.publishDownloadNotification()
  }

  open() {
    promptAction.showToast({
      message: '功能未实现'
    })
  }

  /**
   * 发送下载通知
   */
  publishDownloadNotification(){
    // 1.判断当前系统是否支持进度条模板
    if(!this.isSupport){
      // 当前系统不支持进度条模板
      return
    }
    // 2.准备进度条模板的参数
    let template = {
      name: 'downloadTemplate',
      data: {
        progressValue: this.progressValue,
        progressMaxValue: this.progressMaxValue
      }
    }
    let request: notify.NotificationRequest = {
      id: this.notificationId,
      template: template,
      wantAgent: this.wantAgentInstance,
      content: {
        contentType: notify.ContentType.NOTIFICATION_CONTENT_BASIC_TEXT,
        normal: {
          title: this.filename + ':  ' + this.state,
          text: '',
          additionalText: this.progressValue + '%'
        }
      }
    }
    // 3.发送通知
    notify.publish(request)
      .then(() => console.log('test', '通知发送成功'))
      .catch(reason => console.log('test', '通知发送失败!', JSON.stringify(reason)))
  }
}

@Extend(Button) function downloadButton() {
  .width(75).height(28).fontSize(14)
}
三十二、ArkTs-实战项目
可在B站上自行搜索,建议练习1-2个项目


 759
759


 被折叠的 条评论
为什么被折叠?
被折叠的 条评论
为什么被折叠?
 到【灌水乐园】发言


