


介绍
RabbitMQ是一个消息代理:它接受和转发消息。你可以将其视为邮局:当你把你想要寄出的邮件放在一个邮箱里时,你可以确定,邮递员先生或女士最终会把邮件交给你的收件人。在这个类比中,RabbitMQ是一个邮箱,邮局和邮递员
安装
Rabbit MQ 是建立在强大的Erlang OTP平台上,因此安装RabbitMQ之前要先安装Erlang
下载Erlang:http://www.erlang.org/downloads
下载RabbitMQ:https://www.rabbitmq.com/download.html
下载安装完成即可
使用web管理工具
运行命令:rabbitmq-plugins enable rabbitmq_management,即可开启web管理插件
默认的端口是15672,通过http://localhost:15672即可访问

默认的管理员账户密码都是:guest
使用
rabbitMQ的官方文档上共提供了6种使用方式:

下面将通过springboot(即 Spring AMQP)的方式来一一展示。
0.依赖以及配置
使用rabbitMQ只需要引入如下依赖即可:
        <dependency>
            <groupId>org.springframework.boot</groupId>
            <artifactId>spring-boot-starter-amqp</artifactId>
        </dependency>
账号配置:
默认端口是5672,虚拟主机为/,账户为guest,根据自己的情况填写
spring.rabbitmq.host=localhost
spring.rabbitmq.virtual-host=/test
spring.rabbitmq.port=5672
spring.rabbitmq.username=test
spring.rabbitmq.password=test
1.Hello world模式
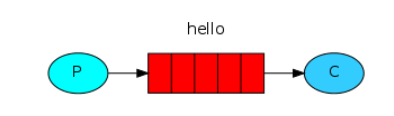
如图所示,一个生产者将详细发送到队列中,消费者从队列里获取消息。
1.1 定义一个队列(也可以在RabbitMQ服务端创建队列)
    @Bean
    public Queue myQueue() {
        return new Queue("test");
    }
1.2 定义一个生产者,将消息发送至队列
package cn.coolwind.rabbitmqdemo.controller;
import org.springframework.amqp.rabbit.core.RabbitTemplate;
import org.springframework.beans.factory.annotation.Autowired;
import org.springframework.web.bind.annotation.GetMapping;
import org.springframework.web.bind.annotation.RestController;
@RestController
public class SenderController {
@Autowired
private RabbitTemplate rabbitTemplate;
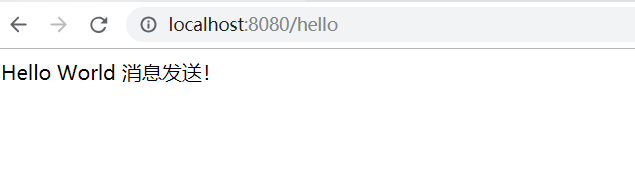
@GetMapping("/hello")
public Object hello() {
String msg = "Hello World 消息发送!";
rabbitTemplate.convertAndSend("test",msg);
return msg;
}
}
只需要使用 rabbitTemplate.convertAndSend("队列名",发送的内容) 即可。
1.3 定义一个消费者,接收队列里的消息
package cn.coolwind.rabbitmqdemo.consumer;
import org.springframework.amqp.rabbit.annotation.RabbitListener;
import org.springframework.stereotype.Component;
@Component
public class Consumer {
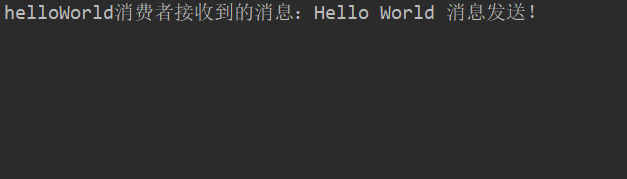
@RabbitListener(queues = "test")
public void helloWorldMsg(String msg) {
System.out.println("helloWorld消费者接收到的消息:"+msg);
}
}只需要在处理消息的方法上加 @RabbitListener(queues = "队列名")注解即可,方法里的参数即为接收到的消息。
1.4 运行
发送消息:
接收消息:
2.Work Queues模式

如图所示,一个生产者将消息发送到队列,可以由多个消费者来对队列里的消息进行消费,但每个消息只消费一次,即一条消息只有一个消费者处理。
2.1 定义一个生产者,向队列发送消息
    @GetMapping("/work")
    public Object work() {
        StringBuffer msg = new StringBuffer();
        for (int i = 0; i < 10; i++) {
            String content = "第" + i + "条Work Queues消息发送!";
            rabbitTemplate.convertAndSend("workQueue",content);
            msg.append(content);
        }
        return msg;
    }
与helloworld模式的发送一致,这里模拟发送10条消息。
2.2 定义消费者来接收消息
    @RabbitListener(queues = "workQueue")
    public void workMsg1(String msg) {
        System.out.println("Work消费者1:"+msg);
    }

    @RabbitListener(queues = "workQueue")
    public void workMsg2(String msg) {
        System.out.println("Work消费者2:"+msg);
    }
方式与helloworld模式相同,这里定义了2个消费者来获取消息
2.3运行
发送消息:

接收消息:

可以看出一条消息只会由一个消费者来消费,默认情况下,RabbitMQ将按顺序将每条消息发送给下一个消费者。平均而言,每个消费者将获得相同数量的消息。这种分发消息的方式称为循环法。
3.Publish/Subscribe模式
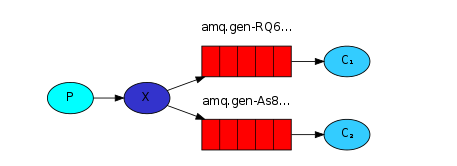
如图所示,生产者先将消息发送至一个交换机X,然后交换机X将消息发送到选定的队列里(队列1、队列2...),最后由消费者去消费对应队列里的消息。
3.1 首先定义一个交换机
使用new FanoutExchange("名字")创建一个交换机
    @Bean
    public FanoutExchange fanout() {
        return new FanoutExchange("publish");
    }
3.2 创建需要使用的队列
    @Bean
    public Queue subscribe1() {
        return new AnonymousQueue();
    }

    @Bean
    public Queue subscribe2() {
        return new AnonymousQueue();
    }
3.3 将队列与交换机绑定
    @Bean
    public Binding binding1(FanoutExchange fanout, Queue subscribe1) {
        return BindingBuilder.bind(subscribe1).to(fanout);
    }

    @Bean
    public Binding binding2(FanoutExchange fanout, Queue subscribe2) {
        return BindingBuilder.bind(subscribe2).to(fanout);
    }
3.4 生产者发送消息
同样是使用rabbitTemplate.convertAndSend()方法,里面的参数为:
(String exchange, String routingKey, Object object),分别是(交换机名字,路由,需要发送的消息)
    @Autowired
    private RabbitTemplate rabbitTemplate;

    @Autowired
    private FanoutExchange fanout;

    @GetMapping("/publish")
    public Object publish() {
        StringBuffer msg = new StringBuffer();
        for (int i = 0; i < 10; i++) {
            String content = "第" + i + "条publish消息发送!";
            rabbitTemplate.convertAndSend(fanout.getName(),"",content);
            msg.append(content).append("</br>");
        }
        return msg;
    }
3.5 消费者接受消息
同样是使用之前的方式
    @RabbitListener(queues = "#{subscribe1.name}")
    public void publish1(String msg) {
        log.info("发布订阅模式-消费者1:"+msg);
    }

    @RabbitListener(queues = "#{subscribe2.name}")
    public void publish2(String msg) {
        log.info("发布订阅模式-消费者2:"+msg);
    }
3.6 运行
可以看到,两个队列里的消费者都分别把消息接收了。(如果一个队列里有多个消费者的话,该队列就会和之前的work模式一样默认使用轮询的机制接收消息)

4.Routing模式

如图所示,生产者P将消息发送到交换机X,交换机X再根据对应的路由KEY(orange、black、green)来判断发送至哪一个队列中(Q1、Q2),最后由相应的消费者(C1,C2)来进行消费。
4.1 首先定义一个交换机
使用new DirectExchange("名字"); 创建一个交换机
    @Bean
    public DirectExchange direct() {
        return new DirectExchange("direct");
    }
4.2 定义队列
同3.2
    @Bean
    public Queue routingQueue1() {
        return new AnonymousQueue();
    }

    @Bean
    public Queue routingQueue2() {
        return new AnonymousQueue();
    }
4.3 绑定队列与交换机
    @Bean
    public Binding bindRouting1AndQueue1(DirectExchange directExchange, Queue routingQueue1) {
        //队列1与directExchange交换机绑定,并且接收routingKey为“routing1”的消息
        return BindingBuilder.bind(routingQueue1).to(directExchange).with("routing1");
    }

    @Bean
    public Binding bindRouting1AndQueue2(DirectExchange directExchange, Queue routingQueue2) {
        //队列2与directExchange交换机绑定,并且接收routingKey为“routing1”的消息
        return BindingBuilder.bind(routingQueue2).to(directExchange).with("routing1");
    }

    @Bean
    public Binding bindRouting2AndQueue2(DirectExchange directExchange, Queue routingQueue2) {
        //队列2与directExchange交换机绑定,并且接收routingKey为“routing2”的消息
        return BindingBuilder.bind(routingQueue2).to(directExchange).with("routing2");
    }
4.4 生产者发送消息
同样是使用rabbitTemplate.convertAndSend()方法,里面的参数为:
(String exchange, String routingKey, Object object),分别是(交换机名字,路由,需要发送的消息)
    @Autowired
    private RabbitTemplate rabbitTemplate;


    @Autowired
    private DirectExchange direct;

    @GetMapping("/routing")
    public Object routing() {
        StringBuffer msg = new StringBuffer();
        for (int i = 0; i < 10; i++) {
            String content = "第" + i + "条routing1消息发送!";
            String content2 = "第" + i + "条routing2消息发送!";
            rabbitTemplate.convertAndSend(direct.getName(),"routing1",content);
            rabbitTemplate.convertAndSend(direct.getName(),"routing2",content2);
            msg.append(content).append("</br>").append(content2).append("</br>");
        }
        return msg;
    }
4.5 消费者接受消息
与之前相同
    @RabbitListener(queues = "#{routingQueue1.name}")
    public void routing1(String msg) {
        log.info("queue1接收到的消息:"+msg);
    }

    @RabbitListener(queues = "#{routingQueue2.name}")
    public void routing2(String msg) {
        log.info("queue2接收到的消息:"+msg);
    }
4.6 运行结果

队列1只绑定了routing1,队列2绑定了routing1,routing2;
所以队列1只接受到了routing1的消息,而队列2两个消息都收到了
5 Topics 模式
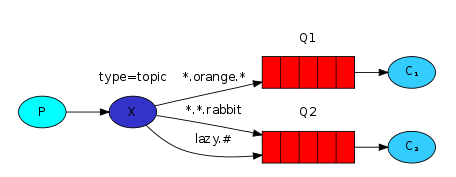
topics 模式是routing模式的升级版,也就是将routing模式中的key变成了通配符的形式(图中的:*.orange.* 、*.*.rabbit、lazy.#)。使用方式与routing模式大同小异。
以下只列出有差异的代码,步骤与之前的事例相同,可以从之前的代码类推
    @Bean
    public TopicExchange topic() {
        return new TopicExchange("topic");
    }


    @Bean
    public Binding bindTopic1AndQueue1(TopicExchange topicExchange, Queue topicQueue1) {
        //队列1与directExchange交换机绑定,并且接收topicKey为“*.*.topic1”的消息
        return BindingBuilder.bind(topicQueue1).to(topicExchange).with("*.*.topic1");
    }


//发送消息时使用:第二个参数与绑定时的“*.*.topic1”相对应
rabbitTemplate.convertAndSend(topic.getName(),"a.b.topic1",content);代码:https://github.com/fi00wind/rabbitmq-demo


 2992
2992


 被折叠的 条评论
为什么被折叠?
被折叠的 条评论
为什么被折叠?
 到【灌水乐园】发言


