


第一章 KubeSphere + seata 1.5.2 + Nacos 2.1.0 (集群模式)
文章目录
前言
Seata是一款开源的分布式事务解决方案组件,致力于提供高性能和简单易用的分布式事务服务。
Seata 将为用户提供了 AT、TCC、SAGA 和 XA 事务模式,为用户打造一站式的分布式解决方案(官方原话)。官方文档地址:https://seata.io/zh-cn/docs/overview/what-is-seata.html。本节内容我使用kubesphere 3.3.0 平台构建 seata 1.5.2 注册到nacos 2.1.0(集群模式)配置中心,数据库采用mysql8+。
一、创建Seata服务相关的数据库及相关表
提示:1.5.1不支持mysql8 从1.5.2开始支持mysql8
Seata服务数据存储的数据库和相关表脚本如下
seata参考地址:https://github.com/seata/seata/blob/develop/script/server/db/mysql.sql
nacos sql 地址:https://github.com/alibaba/nacos/blob/develop/distribution/conf/nacos-mysql.sql
-- -------------------------------- The script used when storeMode is 'db' --------------------------------
-- the table to store GlobalSession data
CREATE TABLE IF NOT EXISTS `global_table`
(
    `xid`                       VARCHAR(128) NOT NULL,
    `transaction_id`            BIGINT,
    `status`                    TINYINT      NOT NULL,
    `application_id`            VARCHAR(32),
    `transaction_service_group` VARCHAR(32),
    `transaction_name`          VARCHAR(128),
    `timeout`                   INT,
    `begin_time`                BIGINT,
    `application_data`          VARCHAR(2000),
    `gmt_create`                DATETIME,
    `gmt_modified`              DATETIME,
    PRIMARY KEY (`xid`),
    KEY `idx_status_gmt_modified` (`status` , `gmt_modified`),
    KEY `idx_transaction_id` (`transaction_id`)
) ENGINE = InnoDB
  DEFAULT CHARSET = utf8mb4;

-- the table to store BranchSession data
CREATE TABLE IF NOT EXISTS `branch_table`
(
    `branch_id`         BIGINT       NOT NULL,
    `xid`               VARCHAR(128) NOT NULL,
    `transaction_id`    BIGINT,
    `resource_group_id` VARCHAR(32),
    `resource_id`       VARCHAR(256),
    `branch_type`       VARCHAR(8),
    `status`            TINYINT,
    `client_id`         VARCHAR(64),
    `application_data`  VARCHAR(2000),
    `gmt_create`        DATETIME(6),
    `gmt_modified`      DATETIME(6),
    PRIMARY KEY (`branch_id`),
    KEY `idx_xid` (`xid`)
) ENGINE = InnoDB
  DEFAULT CHARSET = utf8mb4;

-- the table to store lock data
CREATE TABLE IF NOT EXISTS `lock_table`
(
    `row_key`        VARCHAR(128) NOT NULL,
    `xid`            VARCHAR(128),
    `transaction_id` BIGINT,
    `branch_id`      BIGINT       NOT NULL,
    `resource_id`    VARCHAR(256),
    `table_name`     VARCHAR(32),
    `pk`             VARCHAR(36),
    `status`         TINYINT      NOT NULL DEFAULT '0' COMMENT '0:locked ,1:rollbacking',
    `gmt_create`     DATETIME,
    `gmt_modified`   DATETIME,
    PRIMARY KEY (`row_key`),
    KEY `idx_status` (`status`),
    KEY `idx_branch_id` (`branch_id`),
    KEY `idx_xid_and_branch_id` (`xid` , `branch_id`)
) ENGINE = InnoDB
  DEFAULT CHARSET = utf8mb4;

CREATE TABLE IF NOT EXISTS `distributed_lock`
(
    `lock_key`       CHAR(20) NOT NULL,
    `lock_value`     VARCHAR(20) NOT NULL,
    `expire`         BIGINT,
    primary key (`lock_key`)
) ENGINE = InnoDB
  DEFAULT CHARSET = utf8mb4;

INSERT INTO `distributed_lock` (lock_key, lock_value, expire) VALUES ('AsyncCommitting', ' ', 0);
INSERT INTO `distributed_lock` (lock_key, lock_value, expire) VALUES ('RetryCommitting', ' ', 0);
INSERT INTO `distributed_lock` (lock_key, lock_value, expire) VALUES ('RetryRollbacking', ' ', 0);
INSERT INTO `distributed_lock` (lock_key, lock_value, expire) VALUES ('TxTimeoutCheck', ' ', 0);
二、配置文件准备
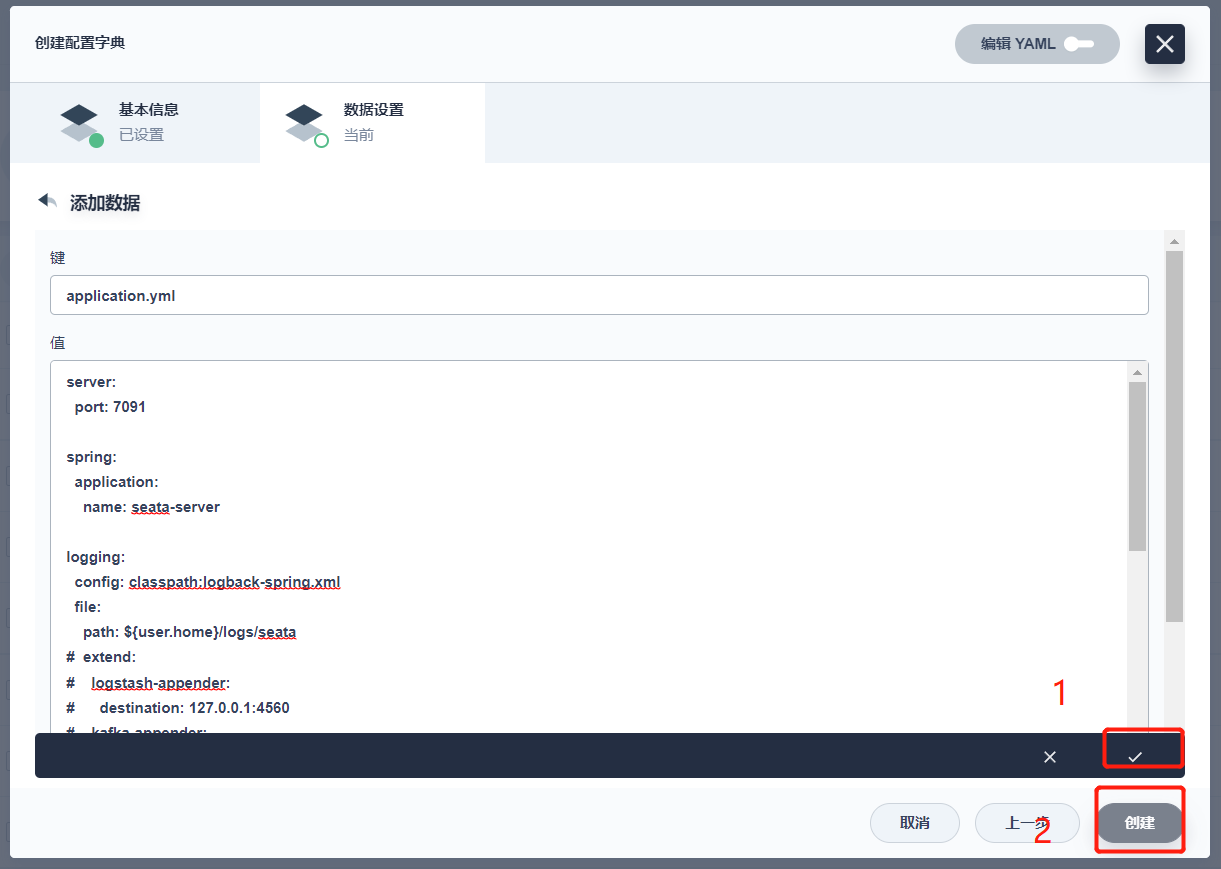
2.1、application.yml 配置文件
server:
  port: 7091

spring:
  application:
    name: seata-server
  cloud:
    nacos:
      discovery:
        # 服务注册地址
        server-addr: jzb-nacos.jianzhubao:8848
      config:
        server-addr: jzb-nacos.jianzhubao:8848

logging:
  config: classpath:logback-spring.xml
  file:
    path: ${user.home}/logs/seata
#  extend:
#    logstash-appender:
#      destination: 127.0.0.1:4560
#    kafka-appender:
#      bootstrap-servers: 127.0.0.1:9092
#      topic: logback_to_logstash

console:
  user:
    username: seata
    password: seata

seata:
  config:
    # support: nacos 、 consul 、 apollo 、 zk  、 etcd3
    type: nacos
    nacos:
      # nacos ip地址
      server-addr: jzb-nacos.jianzhubao:8848
      group: DEFAULT_GROUP
      namespace:
      username: "nacos"
      password: "nacos"
      ##if use MSE Nacos with auth, mutex with username/password attribute
      #access-key: ""
      #secret-key: ""
      # 读取nacos上的配置文件
      data-id: seata-server.properties
  registry:
    # support: nacos 、 eureka 、 redis 、 zk  、 consul 、 etcd3 、 sofa
    type: nacos
    nacos:
      application: seata-server
      # nacos ip地址
      server-addr: jzb-nacos.jianzhubao:8848
      group: DEFAULT_GROUP
      namespace:
      cluster: default
      username: "nacos"
      password: "nacos"
      ##if use MSE Nacos with auth, mutex with username/password attribute
      #access-key: ""
      #secret-key: ""
  security:
    secretKey: SeataSecretKey0c382ef121d778043159209298fd40bf3850a017
    tokenValidityInMilliseconds: 1800000
    ignore:
      urls: /,/**/*.css,/**/*.js,/**/*.html,/**/*.map,/**/*.svg,/**/*.png,/**/*.ico,/console-fe/public/**,/api/v1/auth/login
提示:nacos集群,seata高版本注册失败:提示:以下是本篇文章正文内容,下面案例可供参考,加上以下配置解决问题:
spring:
  cloud:
    nacos:
      discovery:
        # 服务注册地址
        server-addr: jzb-nacos.jianzhubao:8848
      config:
        server-addr: jzb-nacos.jianzhubao:8848
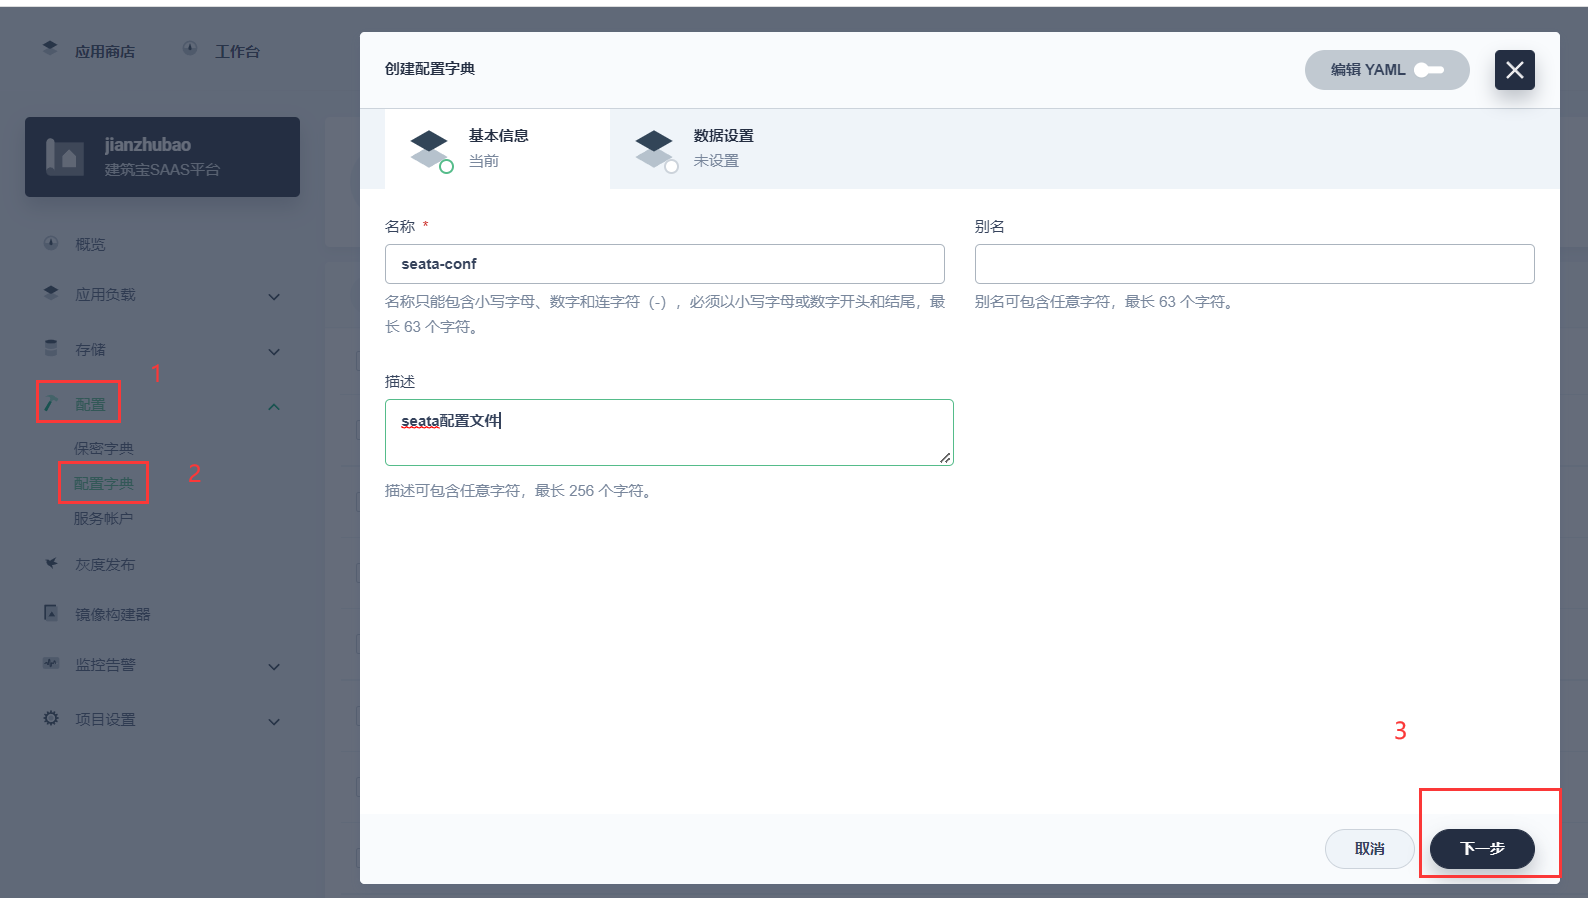
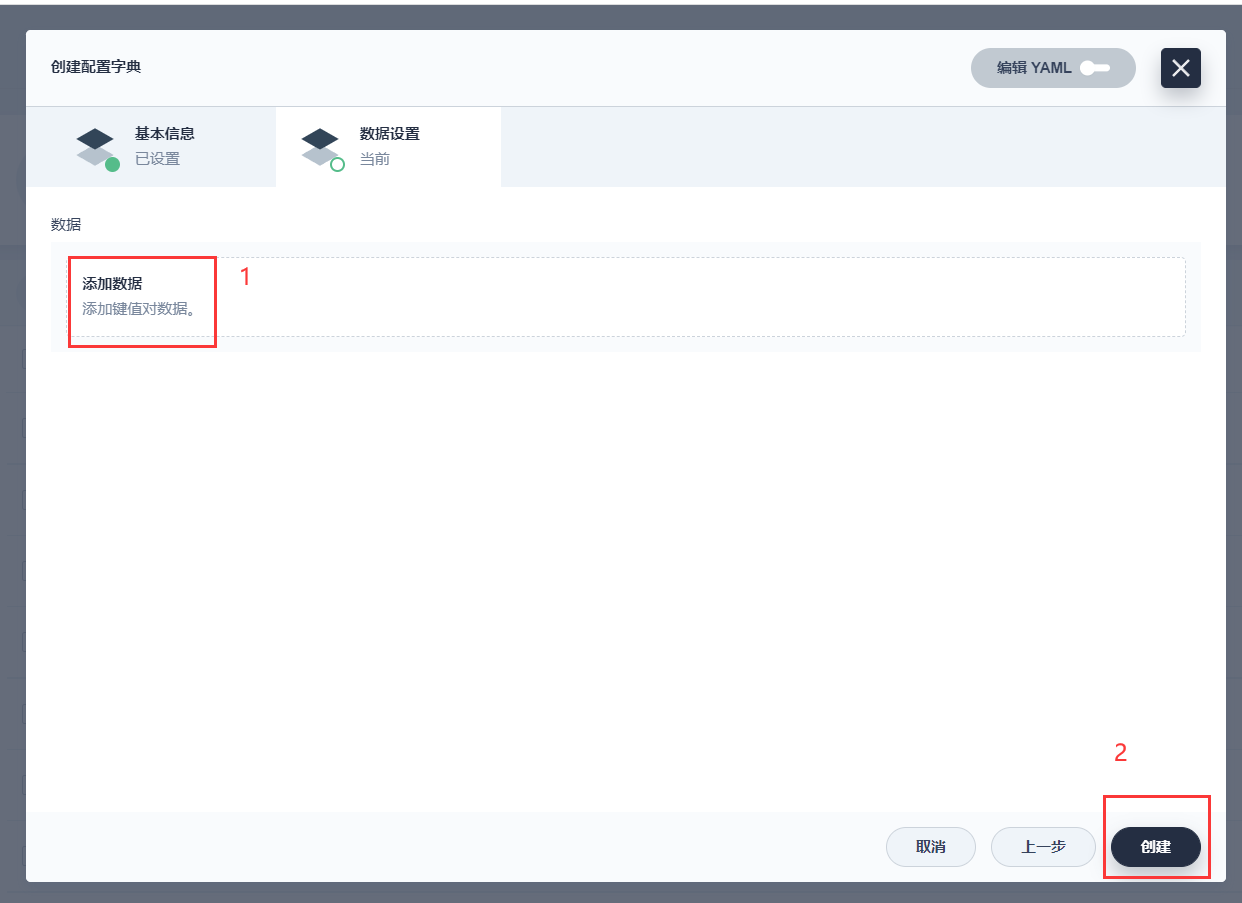
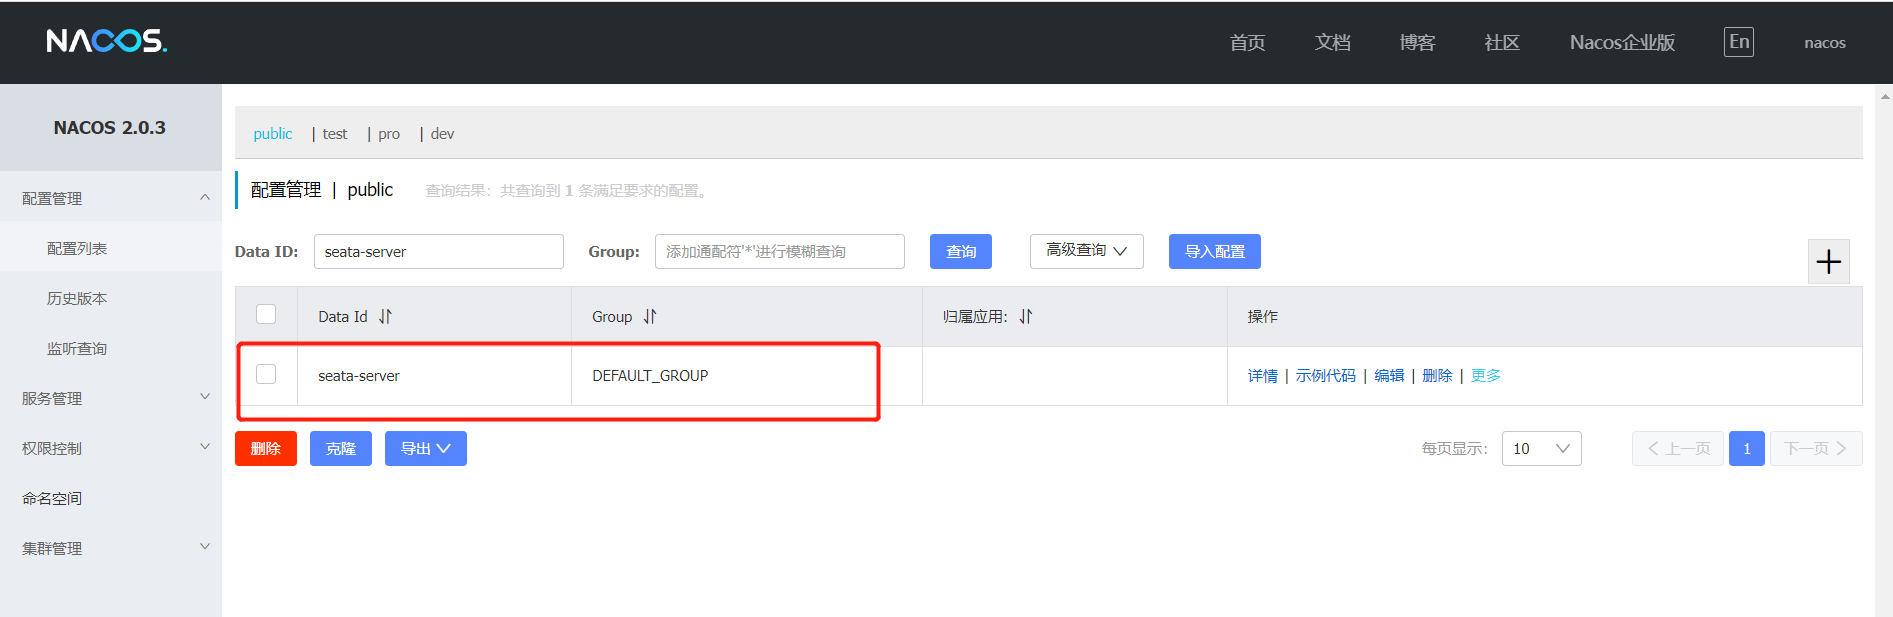
2.2、 在kubesphere上创建seata-conf 配置文件
2.3、在naocs配置中心配置seata-server.properties文件
2.3.1、 seata-server.properties文件
参考地址:https://github.com/seata/seata/blob/develop/script/config-center/config.txt
#For details about configuration items, see https://seata.io/zh-cn/docs/user/configurations.html
#Transport configuration, for client and server
transport.type=TCP
transport.server=NIO
transport.heartbeat=true
transport.enableTmClientBatchSendRequest=false
transport.enableRmClientBatchSendRequest=true
transport.enableTcServerBatchSendResponse=false
transport.rpcRmRequestTimeout=30000
transport.rpcTmRequestTimeout=30000
transport.rpcTcRequestTimeout=30000
transport.threadFactory.bossThreadPrefix=NettyBoss
transport.threadFactory.workerThreadPrefix=NettyServerNIOWorker
transport.threadFactory.serverExecutorThreadPrefix=NettyServerBizHandler
transport.threadFactory.shareBossWorker=false
transport.threadFactory.clientSelectorThreadPrefix=NettyClientSelector
transport.threadFactory.clientSelectorThreadSize=1
transport.threadFactory.clientWorkerThreadPrefix=NettyClientWorkerThread
transport.threadFactory.bossThreadSize=1
transport.threadFactory.workerThreadSize=default
transport.shutdown.wait=3
transport.serialization=seata
transport.compressor=none

#Transaction routing rules configuration, only for the client
##############事务分组名:default_tx_group 改为自己的分组名称, grouplist改成自己的IP地址或者域名或者默认127.0.0.1##################
service.vgroupMapping.default_tx_group=default
#If you use a registry, you can ignore it
service.default.grouplist=jzb-seata.jianzhubao:8091
service.enableDegrade=false
service.disableGlobalTransaction=false

#Transaction rule configuration, only for the client
client.rm.asyncCommitBufferLimit=10000
client.rm.lock.retryInterval=10
client.rm.lock.retryTimes=30
client.rm.lock.retryPolicyBranchRollbackOnConflict=true
client.rm.reportRetryCount=5
client.rm.tableMetaCheckEnable=true
client.rm.tableMetaCheckerInterval=60000
client.rm.sqlParserType=druid
client.rm.reportSuccessEnable=false
client.rm.sagaBranchRegisterEnable=false
client.rm.sagaJsonParser=fastjson
client.rm.tccActionInterceptorOrder=-2147482648
client.tm.commitRetryCount=5
client.tm.rollbackRetryCount=5
client.tm.defaultGlobalTransactionTimeout=60000
client.tm.degradeCheck=false
client.tm.degradeCheckAllowTimes=10
client.tm.degradeCheckPeriod=2000
client.tm.interceptorOrder=-2147482648
client.undo.dataValidation=true
client.undo.logSerialization=jackson
client.undo.onlyCareUpdateColumns=true
server.undo.logSaveDays=7
server.undo.logDeletePeriod=86400000
client.undo.logTable=undo_log
client.undo.compress.enable=true
client.undo.compress.type=zip
client.undo.compress.threshold=64k
#For TCC transaction mode
tcc.fence.logTableName=tcc_fence_log
tcc.fence.cleanPeriod=1h

#Log rule configuration, for client and server
log.exceptionRate=100

#Transaction storage configuration, only for the server. The file, DB, and redis configuration values are optional.
#####################mode改为db模式(根据自己的实际情况修改)#########################
store.mode=db
store.lock.mode=db
store.session.mode=db
#Used for password encryption
store.publicKey=

#If `store.mode,store.lock.mode,store.session.mode` are not equal to `file`, you can remove the configuration block.
store.file.dir=file_store/data
store.file.maxBranchSessionSize=16384
store.file.maxGlobalSessionSize=512
store.file.fileWriteBufferCacheSize=16384
store.file.flushDiskMode=async
store.file.sessionReloadReadSize=100

#These configurations are required if the `store mode` is `db`. If `store.mode,store.lock.mode,store.session.mode` are not equal to `db`, you can remove the configuration block.
#############################改为kubesphere中的mysql配置地址模式#########################
store.db.datasource=druid
store.db.dbType=mysql
#MySQL5.x 驱动com.mysql.jdbc.Driver,MySQL8.x驱动 com.mysql.cj.jdbc.Driver
store.db.driverClassName=com.mysql.cj.jdbc.Driver
store.db.url=jdbc:mysql://jzb-mysql-nacos.jianzhubao:3306/seata?useUnicode=true&rewriteBatchedStatements=true
store.db.user=root
store.db.password=123456
store.db.minConn=5
store.db.maxConn=30
store.db.globalTable=global_table
store.db.branchTable=branch_table
store.db.distributedLockTable=distributed_lock
store.db.queryLimit=100
store.db.lockTable=lock_table
store.db.maxWait=5000

#These configurations are required if the `store mode` is `redis`. If `store.mode,store.lock.mode,store.session.mode` are not equal to `redis`, you can remove the configuration block.
store.redis.mode=single
store.redis.single.host=127.0.0.1
store.redis.single.port=6379
store.redis.sentinel.masterName=
store.redis.sentinel.sentinelHosts=
store.redis.maxConn=10
store.redis.minConn=1
store.redis.maxTotal=100
store.redis.database=0
store.redis.password=
store.redis.queryLimit=100

#Transaction rule configuration, only for the server
server.recovery.committingRetryPeriod=1000
server.recovery.asynCommittingRetryPeriod=1000
server.recovery.rollbackingRetryPeriod=1000
server.recovery.timeoutRetryPeriod=1000
server.maxCommitRetryTimeout=-1
server.maxRollbackRetryTimeout=-1
server.rollbackRetryTimeoutUnlockEnable=false
server.distributedLockExpireTime=10000
server.xaerNotaRetryTimeout=60000
server.session.branchAsyncQueueSize=5000
server.session.enableBranchAsyncRemove=false
server.enableParallelRequestHandle=false

#Metrics configuration, only for the server
metrics.enabled=false
metrics.registryType=compact
metrics.exporterList=prometheus
metrics.exporterPrometheusPort=9898
2.3.2、 nacos配置
1、
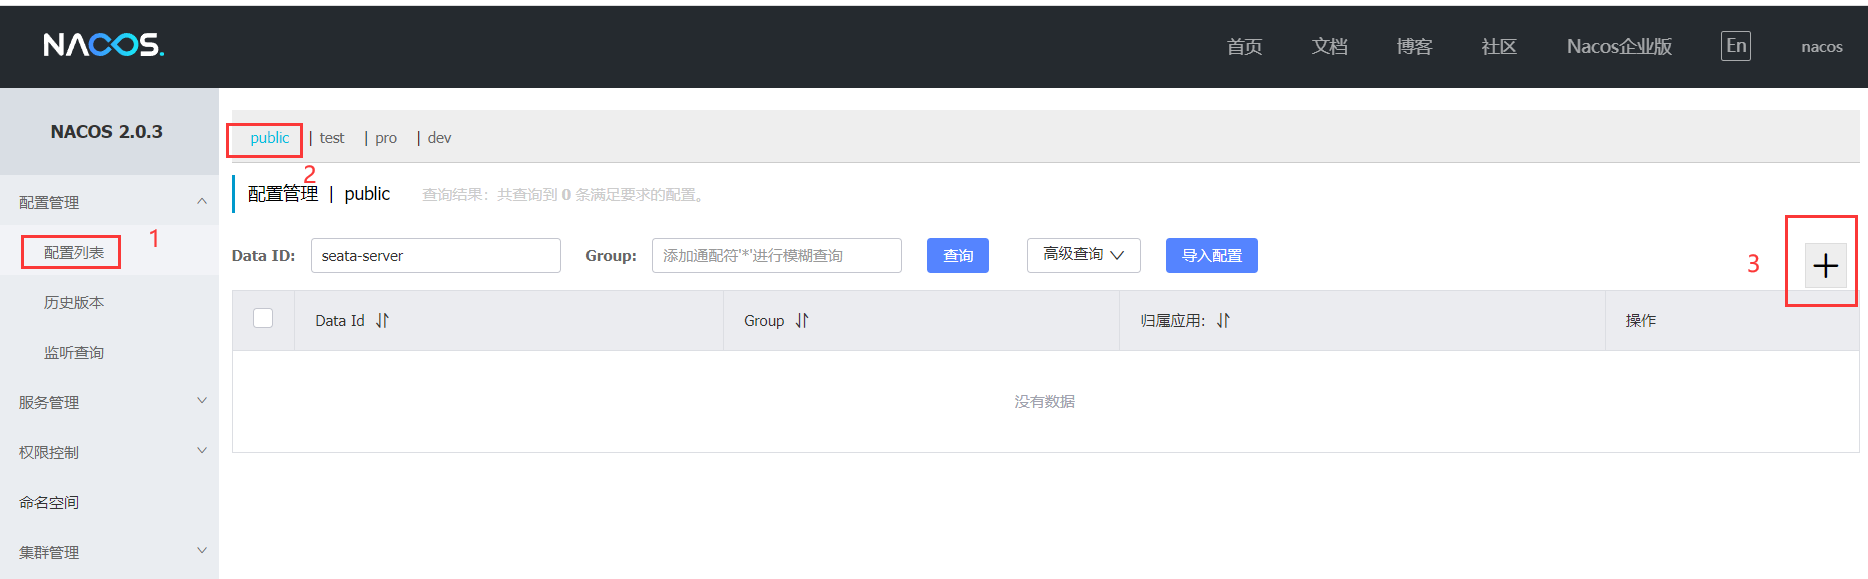
2、创建后保存即可
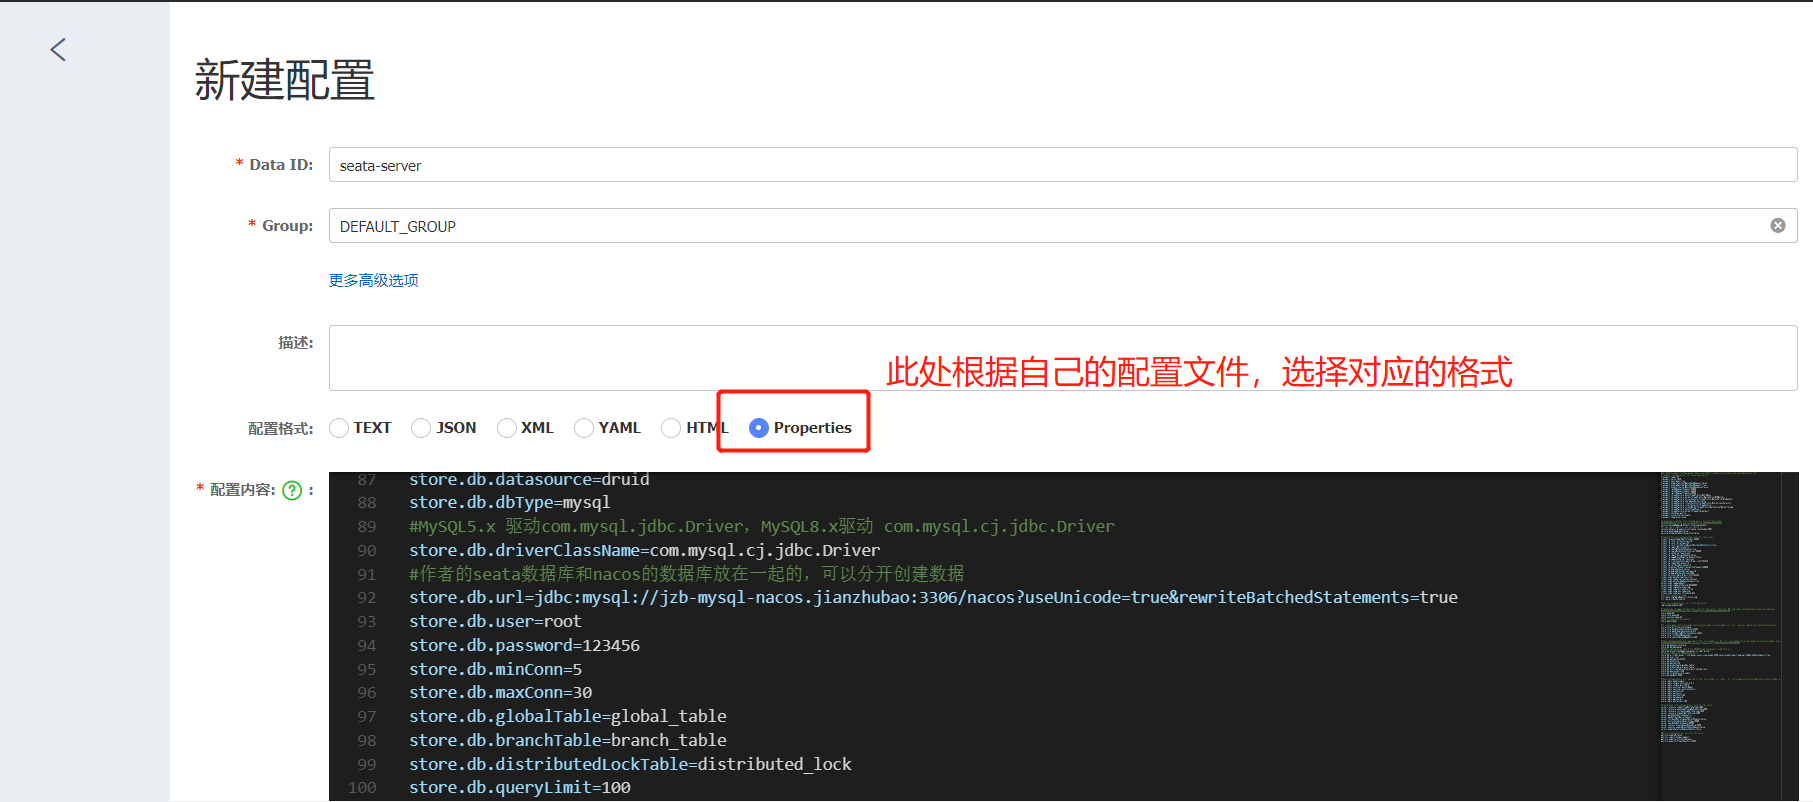
3、
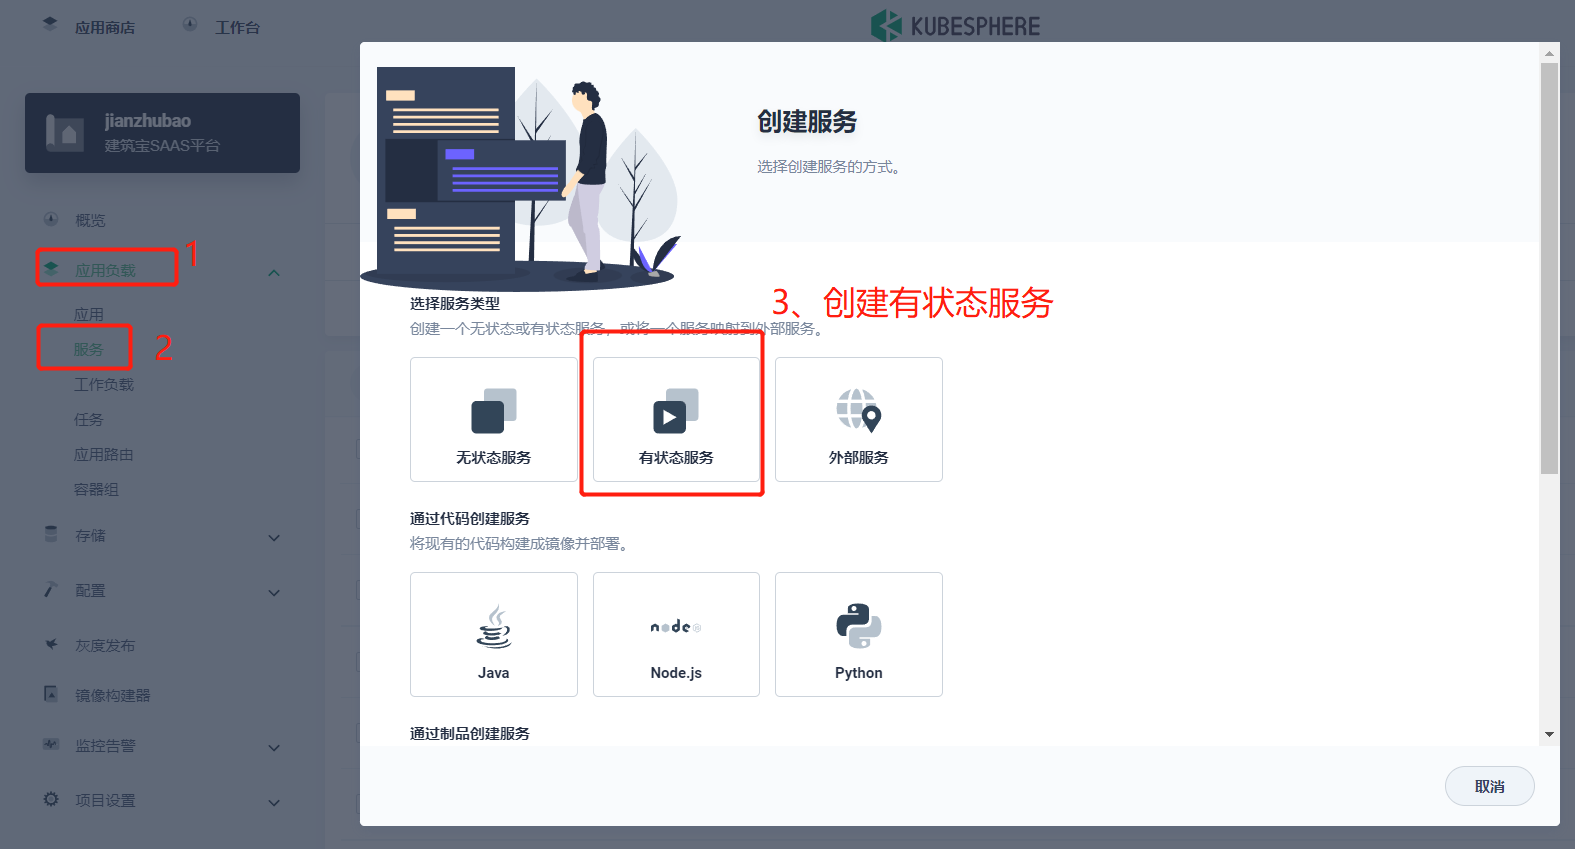
三、kubesphere 创建seata服务
3.1、创建服务
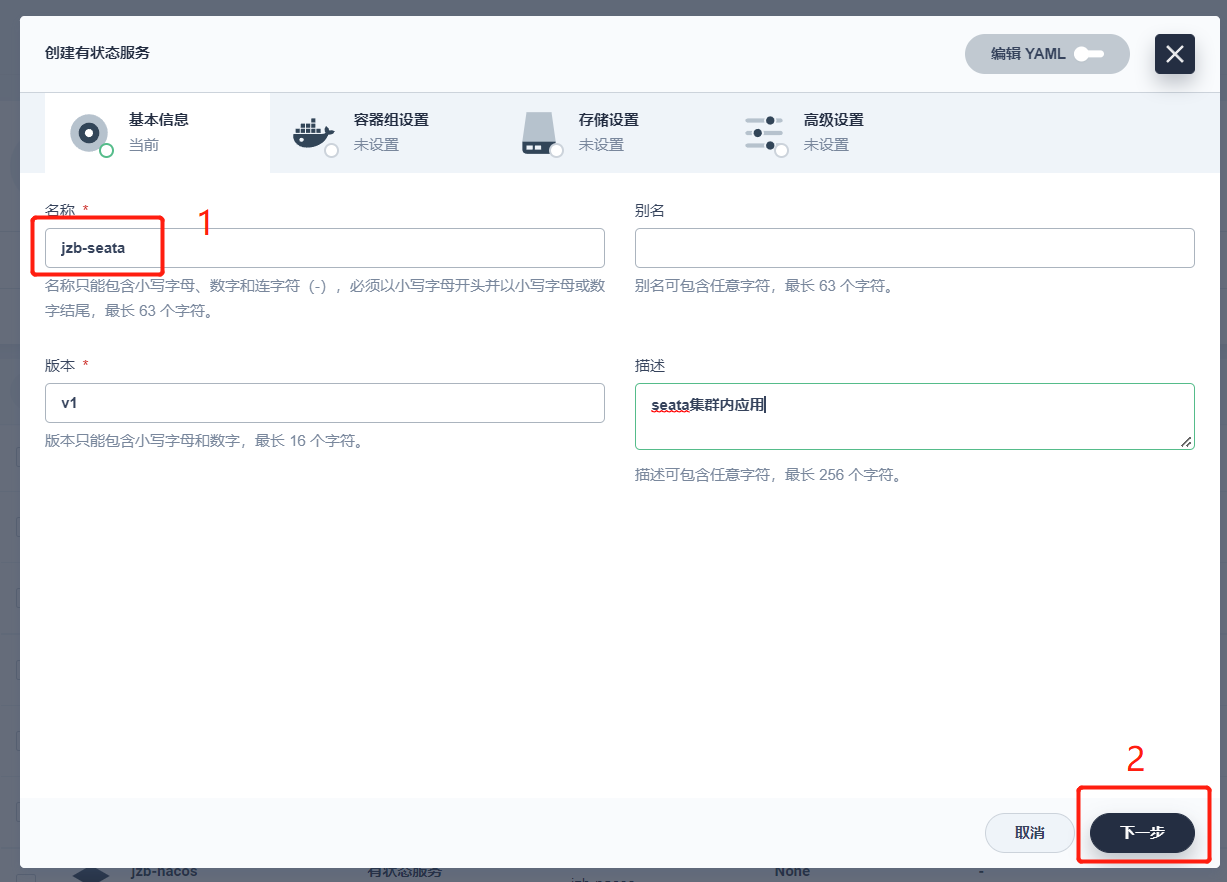
3.1.1 创建有状态服务器
3.1.2 基本信息
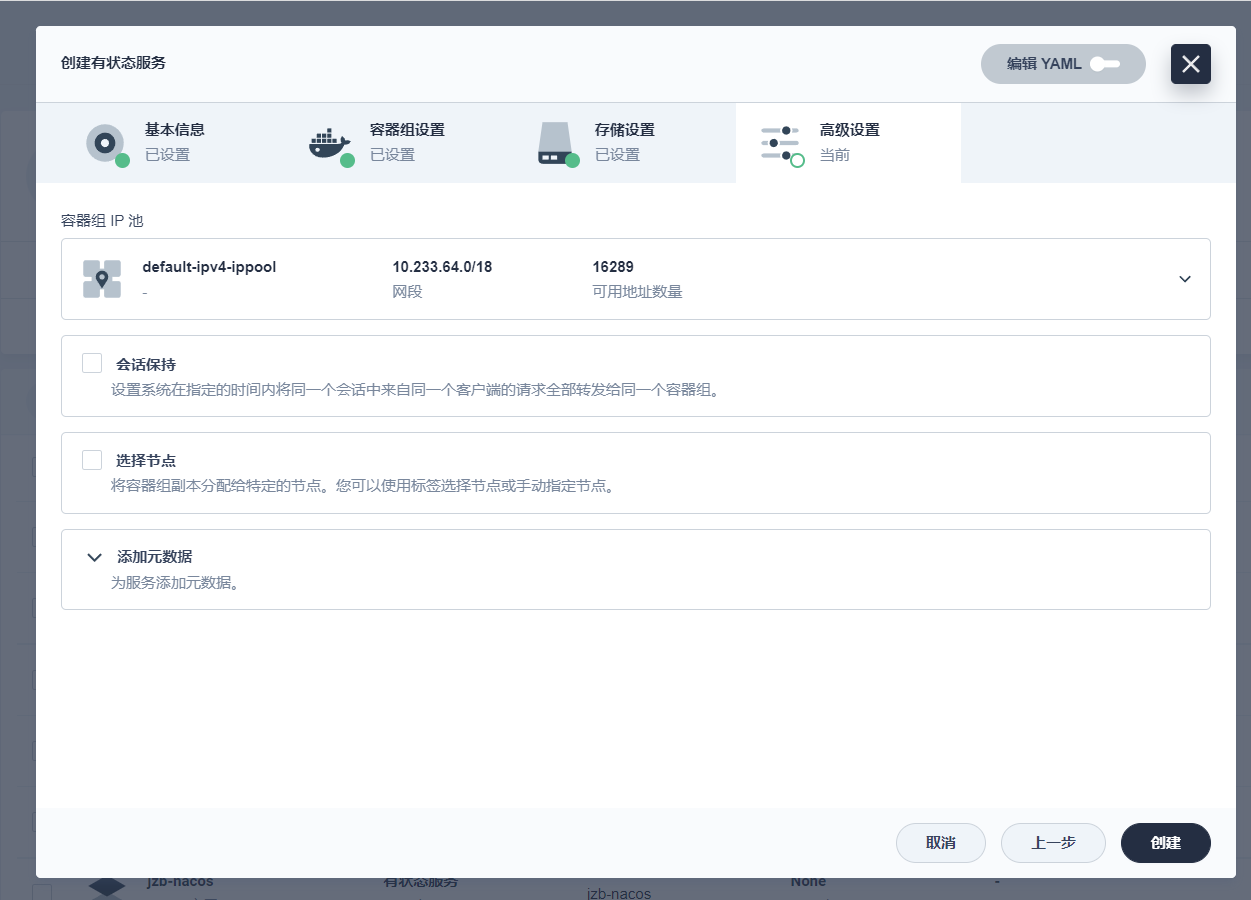
3.1.3 此处可以选择多个副本
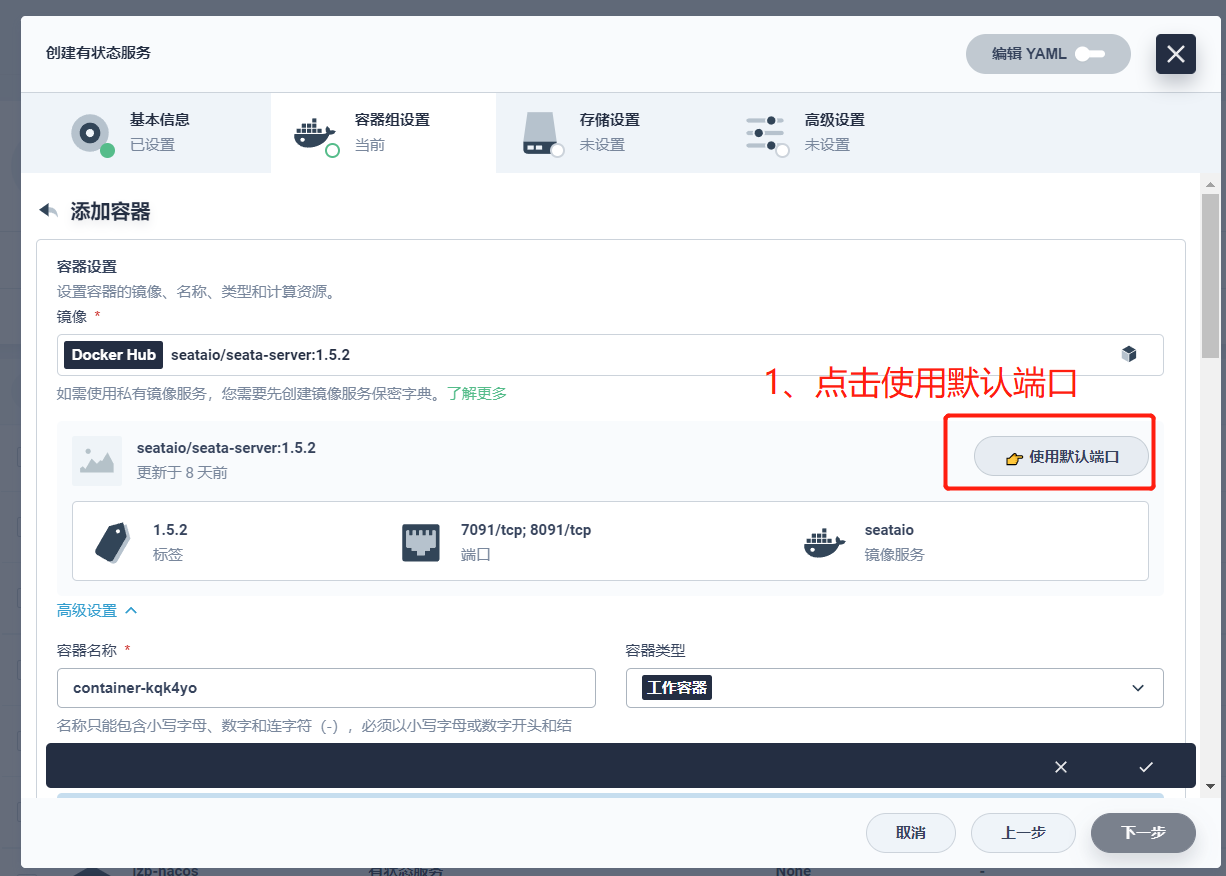
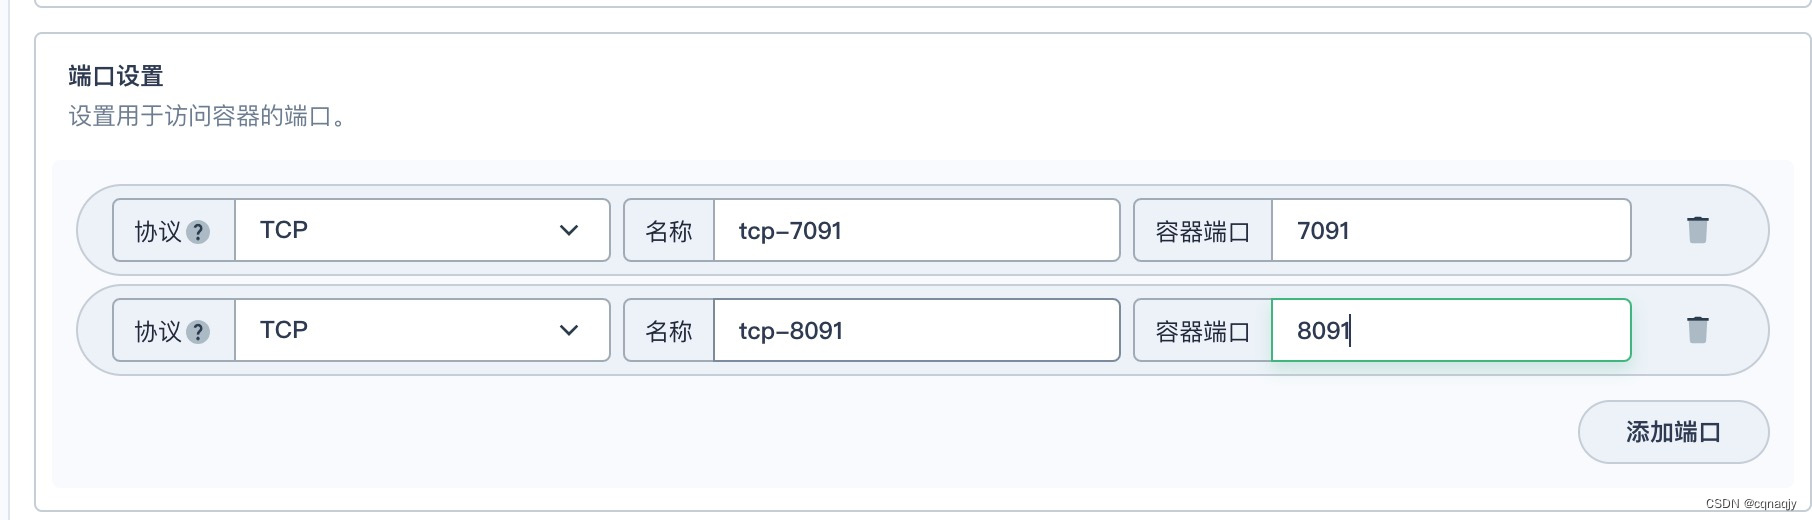
提示:seata版本采用的是1.5.2(seataio/seata-server:1.5.2)
点击下一步继续
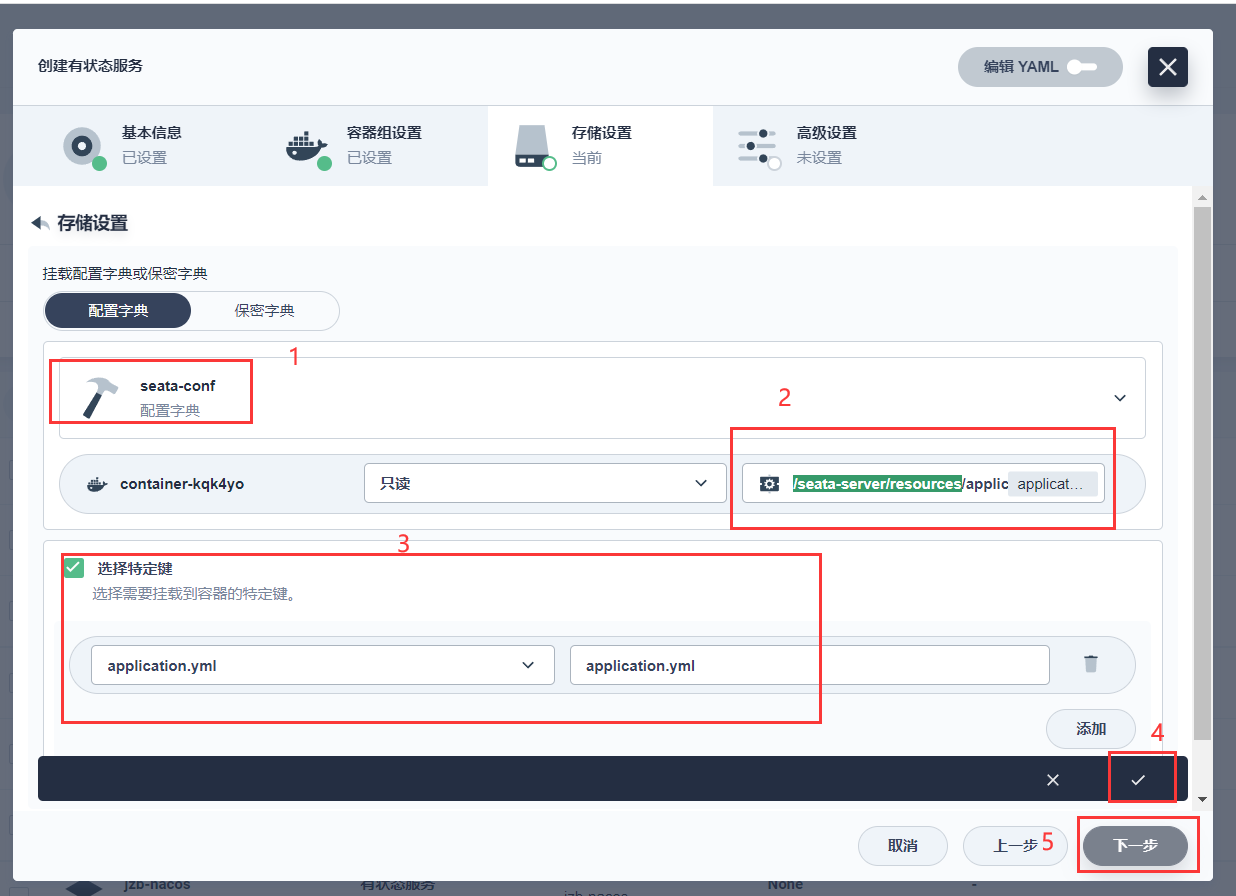
3.1.4 挂载我们提前准备好的配置文件
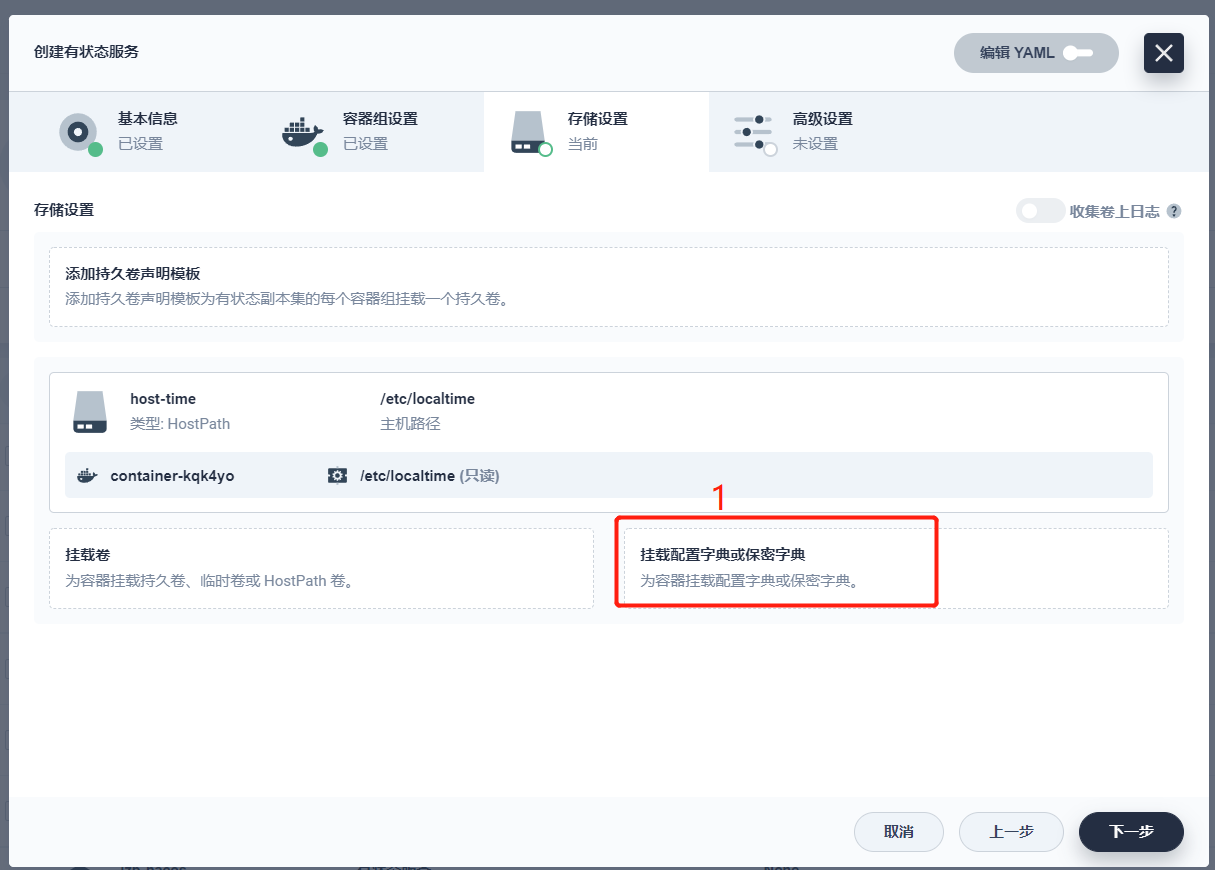
提示:挂载路径为 /seata-server/resources
3.1.5 创建

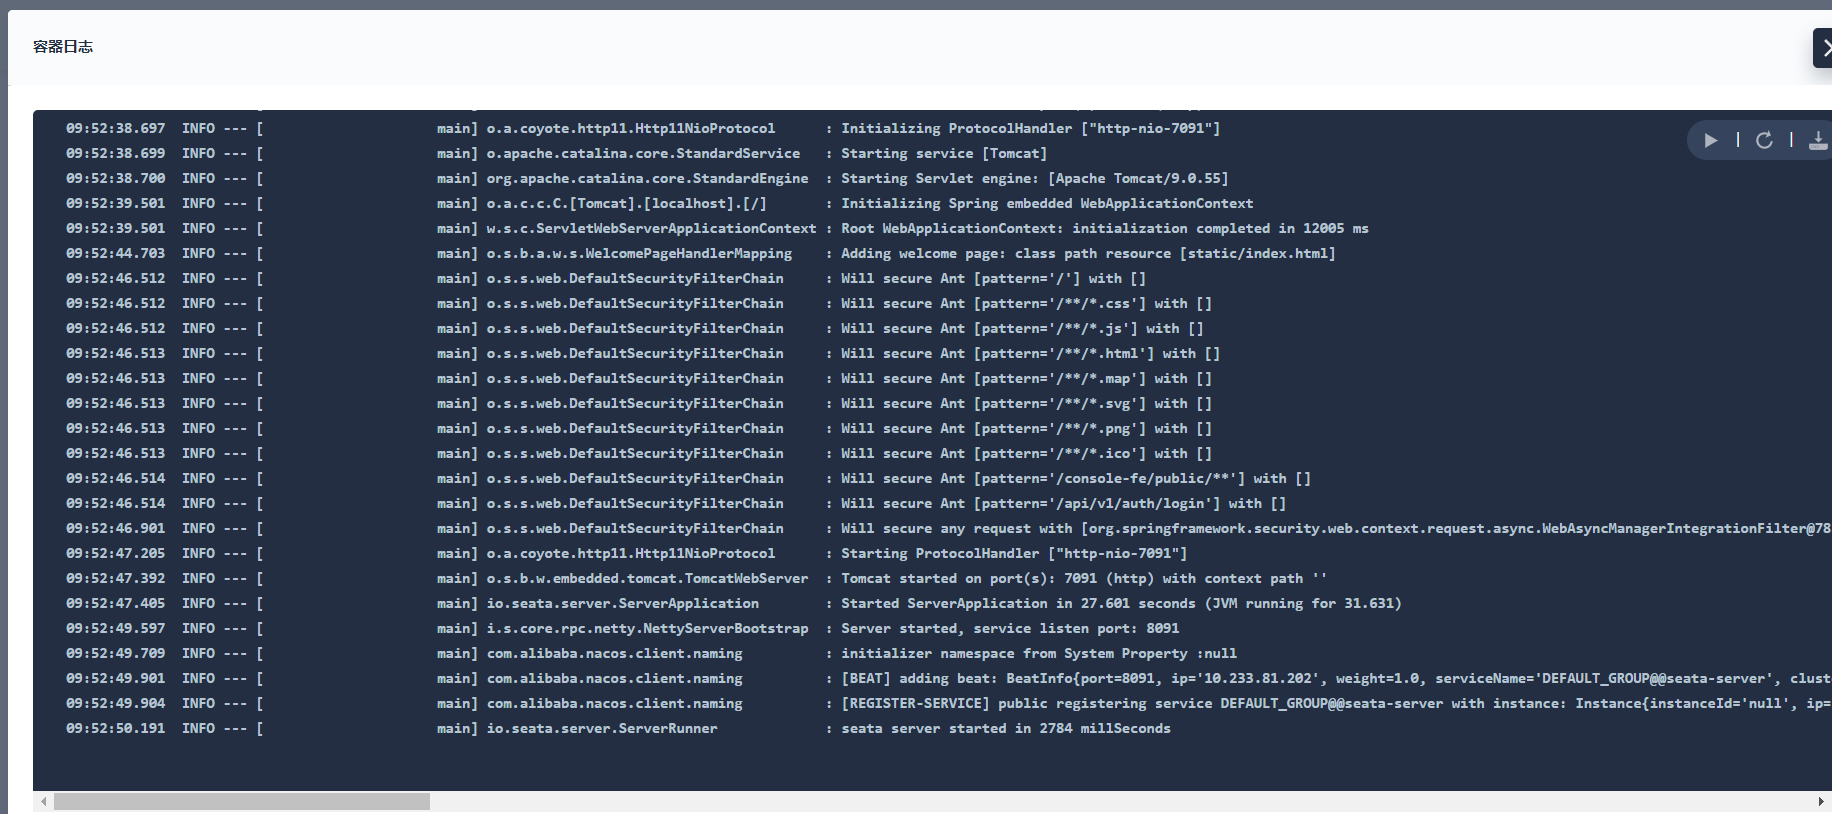
3.1.6 Seata启动成功
3.1.7 Seata注册成功
将nacos版本 从2.0.3升级到了2.1.0,spring-cloud-alibaba版本详情可参考:
https://github.com/alibaba/spring-cloud-alibaba/wiki/%E7%89%88%E6%9C%AC%E8%AF%B4%E6%98%8E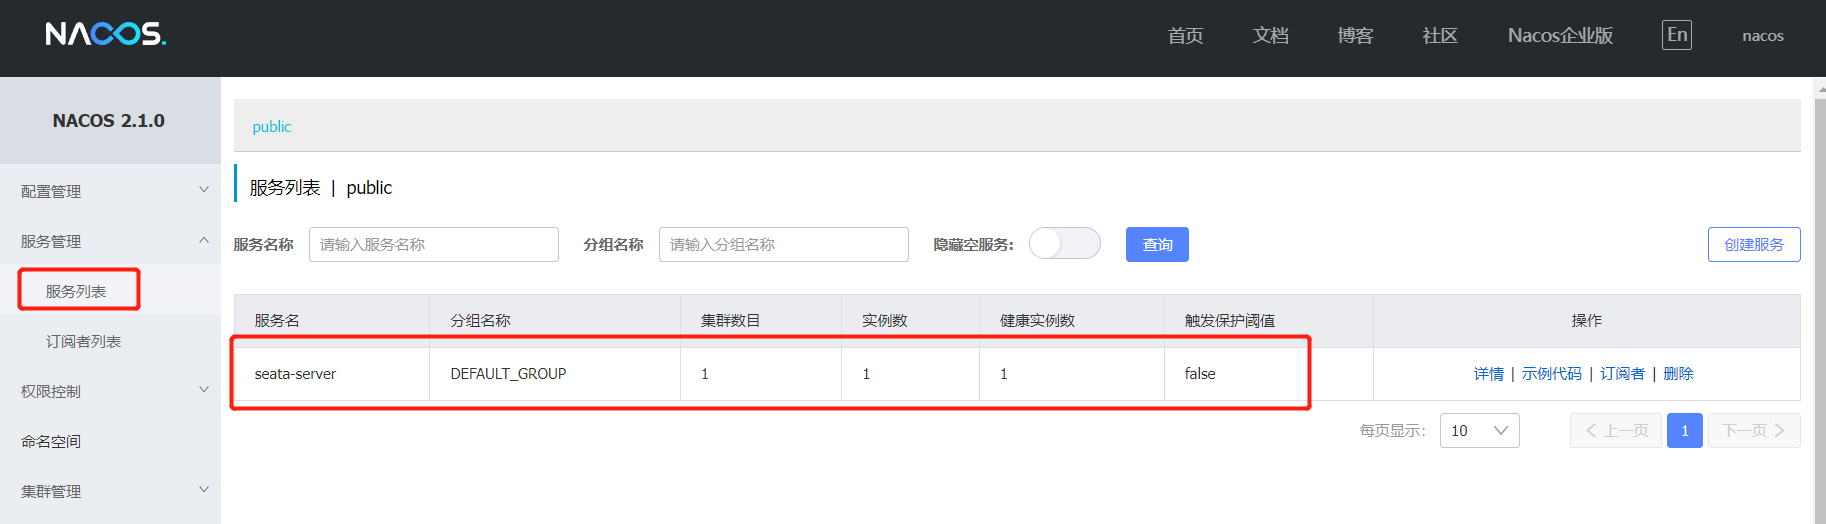
四 总结
至此,关于使用KubeSphere管理平台搭建一个高可用的分布式事务服务组件Seata到这里就结束了(本文nacos为集群模式)。作者制作不易,别忘了点赞、关注、加收藏哦,我们下期见。。。
五、其他文章传送门
第一章 KubeSphere 3.3.0 + Seata 1.5.2 + Nacos 2.1.0 (nacos集群模式)
第二章 KubeSphere3.3.0 + Nacos 2.1.0 (集群部署)
第三章 KubeSphere3.3.0 + Sentinel 1.8.4 + Nacos 2.1.0 集群部署
第四章 KubeSphere3.3.0 + Redis7.0.4 + Redis-Cluster 集群部署
第五章 KubeSphere3.3.0 + MySQL8.0.25 集群部署
第六章 KubeSphere3.3.0 安装部署 + KubeKey2.2.1(kk)创建集群
第七章 KubeSphere3.3.0 + MySQL8.0 单节点部署
第八章 KubeSphere3.3.0 + Redis7.0.4 单节点部署
第九章 KubeSphere3.3.0 + Nacos2.1.0 单节点部署
第十章 KubeSphere3.3.0 + FastDFS6.0.8 部署
第十一章 KubeSphere3.4.1 + MinIO:2024.3.15 部署


 1167
1167


 被折叠的 条评论
为什么被折叠?
被折叠的 条评论
为什么被折叠?
 到【灌水乐园】发言


