


防止mouseDown事件被子元素引用可以利用css pointer-events: none(禁用点击穿透);防止父级事件向下传递。
因为是简单的两个列表项的绑定,对拖拽性能要求不高。
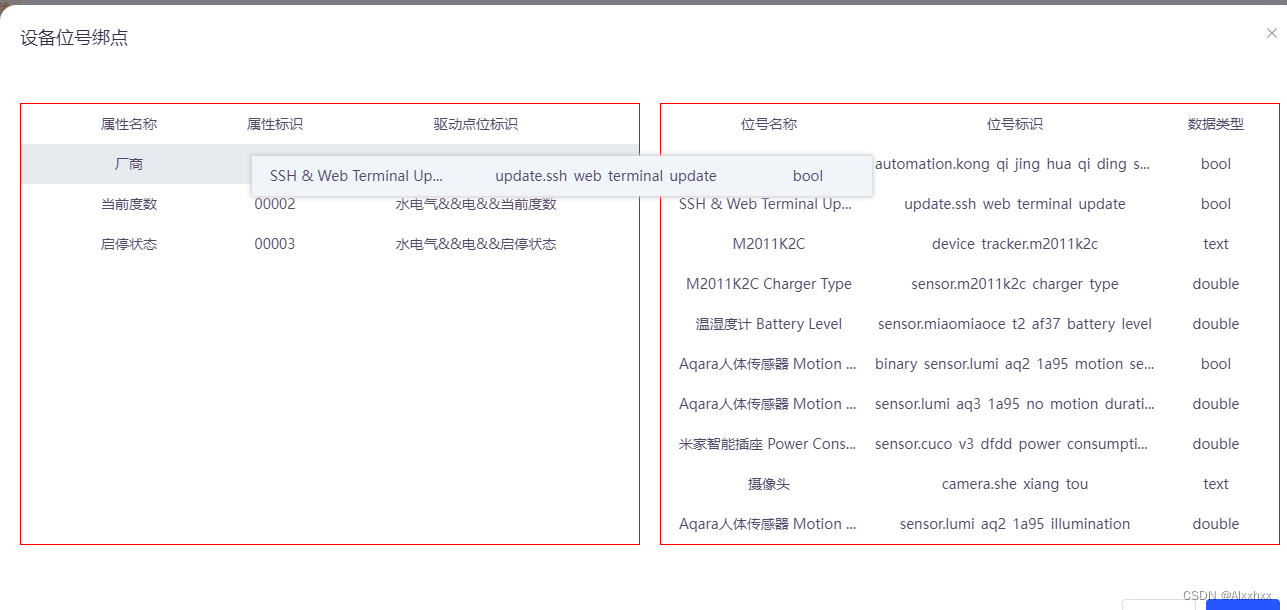
效果:
<template>
  <el-dialog title="设备位号绑点" :visible.async="isShow" width="1300px" @close="$emit('close',false)">
    <div class="drag-point">
      <ul class="left">
        <li><span :style="`min-width:${item.width};width:${item.width}`" v-for="(item,index) in deviceTableColumns"
                  :key="index">{{
            item.label
          }}</span></li>
        <li class="device-item" v-for="(row,idx) in deviceTabeleData" :key="idx">
            <span :style="`min-width:${item.width};width:${item.width}`" v-for="(item,index) in deviceTableColumns"
                  :key="index">
              {{ row[item.prop] ? row[item.prop] : '--' }}
            </span>
        </li>
      </ul>
      <ul class="right">
        <li><span :style="`min-width:${item.width};width:${item.width}`" v-for="(item,index) in pointTableColumns"
                  :key="index">{{
            item.label
          }}</span></li>
        <li @mousedown="handleMouseDown" v-for="(row,idx) in pointTabeleData" :key="idx">
            <span :style="`min-width:${item.width};width:${item.width}`" v-for="(item,index) in pointTableColumns"
                  :key="index"> {{
                row[item.prop] ? row[item.prop] : '--'
              }}
            </span>
        </li>
      </ul>
    </div>
    <div slot="footer">
      <el-button>取 消</el-button>
      <el-button type="primary">确 认</el-button>
    </div>
  </el-dialog>
</template>
<script>
import {removeNode} from "ol/dom";
import {
  devicePointInfo,
  driverIds,
  pointInstances,
  bindPointInstance,
  unboundPoint
} from '../api/iot/device'

export default {
  props: {
    open: {
      type: Boolean,
      default: false
    }
  },
  data() {
    return {
      pointTabeleData: [],
      pointTableColumns: [
        {label: '位号名称', prop: 'name', width: '180px'},
        {label: '位号标识', prop: 'uniqueCode', width: '280px'},
        {label: '数据类型', prop: 'type'},
      ],
      deviceTabeleData: [],
      deviceTableColumns: [{label: '属性名称', prop: 'name', width: '180px'}, {
        label: '属性标识', prop: 'identifier', width: '80px'
      }, {label: '驱动点位标识', prop: 'pointInstanceUnique'}],
      isShow: false,
      queryData: {
        pageSize: 10,
        pageNum: 1
      },
      pointForm: {
        driverInstanceId: "",
        name: "",
      },
      pointQueryData: {
        page: {
          pageSize: 10,
          pageNum: 1
        }
      }
    }
  },
  watch: {
    open(val) {
      this.isShow = val
    }
  },
  mounted() {
    this.getDevicePointInfo()
    this.getPontList()
  },
  methods: {
    getPontList() {
      //获取点位列表
      pointInstances({...this.pointForm, ...this.pointQueryData}).then(res => {
        this.pointTabeleData = res.rows
      })
    },
    //获取设备列表
    getDevicePointInfo() {
      devicePointInfo({id: this.$route.query.id, ...this.queryData}).then(res => {
        this.deviceTabeleData = res.rows
      })
    },
    clearStyle(dom) {
      //清除选中样式
      dom.childNodes.forEach(e => {
        e.style.cssText = ''
      })
    },
    mouseMove(copyDom, targetDom,parentDom) {
      let index = 0
      let {x: tx, y: ty} = targetDom.getBoundingClientRect()
      let {x, y} = parentDom.getBoundingClientRect()
      document.onmousemove = (move) => {
        copyDom.style.cssText += `top:${move.y - y - 10}px;left:${move.x - x - 100}px`
        if (move.x < tx + targetDom.clientWidth && move.x > tx) {//移入边界内生效
          targetDom.childNodes.forEach((e, idx) => { //遍历左侧列表子元素
            if (idx !== index && idx != 0) { //同一选项只执行一次
              let {x: cx, y: cy, height, width} = e.getBoundingClientRect() //获取元素属性
              if (move.y > cy && move.y < cy + height ) {
                index = idx
                e.style.cssText = "background:rgb(230,235,240);"
              } else {
                e.style.cssText = ""
              }
            }
          })
        } else {
          this.clearStyle(targetDom)
        }
      }
    },
    mouseUp(targetDom) {
      document.onmouseup = (up) => {
        document.onmousemove = null
        let copItems = document.getElementsByClassName('copy-item')
        this.clearStyle(targetDom)
        copItems.forEach(item => {
          removeNode(item)
        })
      }
    },
    handleMouseDown(e) {
      document.onselectstart = function () {
        return false;
      };
      let copyDom = e.currentTarget.cloneNode(true) //获取目标元素
      let parentDom = document.getElementsByClassName('drag-point')[0]
      let targetDom = document.getElementsByClassName('left')[0]
      let {x, y} = parentDom.getBoundingClientRect()
      copyDom.style.cssText = `box-shadow:0 0 5px 1px rgb(200,200,200);width:calc(50% - 10px);position: absolute;top:${e.y - y - 20}px;left:${e.x - x}px;z-index:99999`
      copyDom.setAttribute('class', 'copy-item')
      parentDom.append(copyDom)
      this.mouseMove(copyDom, targetDom,parentDom)
      this.mouseUp(targetDom)
    }
  }
}
</script>
<style lang="scss" scoped>
.drag-point {
  display: flex;
  position: relative;
  overflow: hidden;

  li {
    width: 100%;
    background-color: #fff;
    list-style: none;
    padding: 12px 10px;
    //background: rgb(200, 200, 200);
    display: flex;
    span {
      pointer-events: none;
      line-height: 16px;
      display: inline-block;
      justify-content: space-between;
      text-align: center;
      overflow: hidden;
      white-space: nowrap;
      text-overflow: ellipsis;
      margin: 0 8px;

      &:nth-last-child(1) {
        flex-grow: 1;
      }
    }

    &:hover {
      cursor: pointer;
      background-color: rgb(240, 245, 250);
    }
  }

  .left, .right {
    padding: 0;
    border: 1px solid red;
    width: 50%;
  }

  .left {
    margin-right: 10px;
  }

  .right {
    margin-left: 10px;
  }
}
</style>

</style>


 6842
6842


 被折叠的 条评论
为什么被折叠?
被折叠的 条评论
为什么被折叠?
 到【灌水乐园】发言


