


一、单文件上传
1.jar包

2.springmvc-servlet.xml配置
添加以下代码
<!-- 文件上传设置 -->
    <bean id="multipartResolver" class="org.springframework.web.multipart.commons.CommonsMultipartResolver">
        <property name="defaultEncoding" value="utf-8"></property>
        <property name="maxUploadSize" value="10485760000"></property>
        <property name="maxInMemorySize" value="4069"></property>
    </bean>
3.jsp页面编写
<html>
<head>
<meta http-equiv="Content-Type" content="text/html; charset=UTF-8">
<title>单文件上传</title>
</head>
<body>

    <div style="margin: 0 auto; margin-top: 100px;">
        <form action="oneUpload.html" method="post" enctype="multipart/form-data">
            <p>
                <span>文件</span>
                <input type="file" name="imageFile">
            </p>
            <p>
                <input type="submit" value="提交">
            </p>
        </form>
    </div>
</body>
</html>
4.controller文件编写
package com.Intimate.Controller;

import java.io.File;
import java.io.IOException;
import java.util.ArrayList;
import java.util.List;
import java.util.Map;

import javax.servlet.http.HttpServletRequest;
import javax.servlet.http.HttpServletResponse;
import javax.servlet.http.HttpSession;

import org.springframework.stereotype.Controller;
import org.springframework.web.bind.annotation.RequestMapping;
import org.springframework.web.bind.annotation.RequestParam;
import org.springframework.web.multipart.MultipartFile;
import org.springframework.web.multipart.MultipartHttpServletRequest;
import org.springframework.web.servlet.ModelAndView;

import com.upload.Common.ToolUtil;


@Controller
public class UploadController {

    @RequestMapping("/oneUpload")
    public String oneUpload(@RequestParam("imageFile") MultipartFile imageFile, HttpServletRequest request){

        String uploadUrl = "F:\\image\\";
        String originalFilaname = imageFile.getOriginalFilename();      //拿到图片的原始名称

        String newFilename = ToolUtil.makeFileNameByTime(originalFilaname);

        //判断文件路径是否存在,如果不存在则创建文件路径
        File dir = new File(uploadUrl);
        if(!dir.exists()){
            dir.mkdirs();
        }

        System.out.println("文件上传到:" + uploadUrl + newFilename);

        //判断上传文件是否存在,如果不存在则创建文件
        File targetFile = new File(uploadUrl + newFilename);
        if(!targetFile.exists()){
            try {
                targetFile.createNewFile();
            } catch (IOException e) {
                e.printStackTrace();
            }
        }

        //把上传的文件移动到targetFile中,即将内存中的数据写入磁盘中
        try {
            imageFile.transferTo(targetFile);
        } catch (IllegalStateException e) {
            e.printStackTrace();
        } catch (IOException e) {
            e.printStackTrace();
        }

        request.setAttribute("imageName", newFilename);
//      return "redirect:http://localhost:8080/springmvc_upload/upload/" + filaname;
        return "uploadResult";

    }

}
5.工具类编写
package com.upload.Common;

import java.text.SimpleDateFormat;

public class ToolUtil {

    public static String makeFileNameByTime(String filename){
        String fileExtName = filename.substring(filename.lastIndexOf(".")+1);
        //为防止文件覆盖的现象发生,要为上传文件产生一个唯一的文件名
        SimpleDateFormat sdf2 = new SimpleDateFormat("yyyy_MM_dd_HHmmss");
        String time = sdf2.format(new java.util.Date());
        return time + "."+fileExtName;
    }

    public static String makeFileNameRand(String filename){
        String fileExtName = filename.substring(filename.lastIndexOf(".")+1);

        return UUID.randomUUID() + "."+fileExtName;
    }
}
7.结果展示页面编写
<title>多文件上传结果</title>
</head>
<body>
    <div style="margin: 0 auto; margin-top: 100px;">

        <img alt="" src="/pic/${imageName}">
    </div>
</body>
</html>
/pic 是tomact的虚拟路径,对应着磁盘的一个物理途径,也就是上面图片上传的路径
设置步骤:
1.打开server面板

2.双击server,打开设置界面
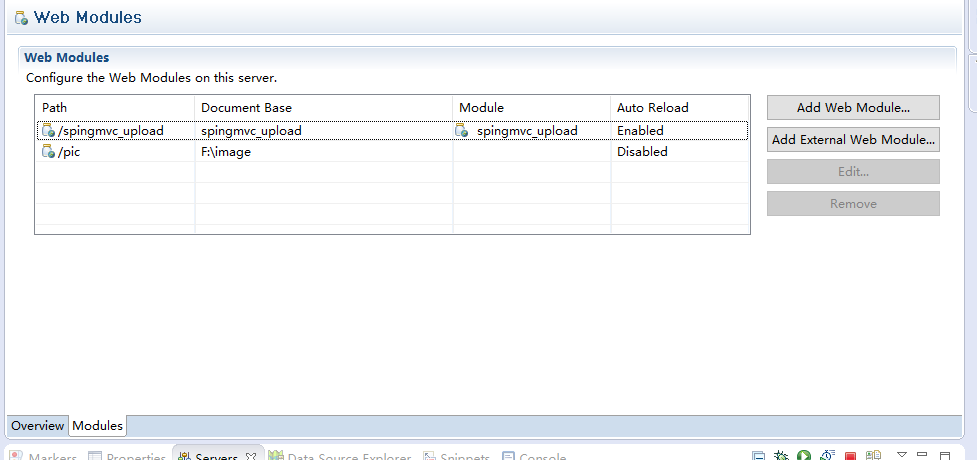
3.点击Add External Web Module按钮,选择路径
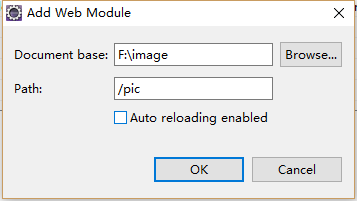
Document base 就是存放图片的物理路径;
Path 是虚拟路径的名称,记得 / 不能忘记;
点击ok,就完成了。
如果上面的方法没反应,还有一种直接改配置文件的方法:
打开tomact文件夹下的conf文件下的Server.xml文件
在<Host></Host>中最后加一句
<Context docBase="F:\\image" path="/pic" reloadable="false"/>保存即可
如果改配置文件也没用,那可能是用eclipse,有一个Server文件夹

那么就需要改Server中的server.xml
二、多文件上传
jar包和springmvc-servlet.xml的设置和单文件上传一致,只需要修改jsp页面和controller文件即可
1.jsp页面编写
<html>
<head>
<meta http-equiv="Content-Type" content="text/html; charset=UTF-8">
<title>多文件上传</title>
</head>
<body>

    <div style="margin: 0 auto; margin-top: 100px;">
        <form action="moreUpload.html" method="post" enctype="multipart/form-data">
            <p>
                <span>文件1:</span>
                <input type="file" name="imageFile1">
            </p>
            <p>
                <span>文件2:</span>
                <input type="file" name="imageFile2">
            </p>
            <p>
                <input type="submit" value="提交">
            </p>

        </form>
    </div>
</body>
</html>
2.contorller文件编写
package com.Intimate.Controller;

import java.io.File;
import java.io.IOException;
import java.util.ArrayList;
import java.util.List;
import java.util.Map;

import javax.servlet.http.HttpServletRequest;
import javax.servlet.http.HttpServletResponse;
import javax.servlet.http.HttpSession;

import org.springframework.stereotype.Controller;
import org.springframework.web.bind.annotation.RequestMapping;
import org.springframework.web.bind.annotation.RequestParam;
import org.springframework.web.multipart.MultipartFile;
import org.springframework.web.multipart.MultipartHttpServletRequest;
import org.springframework.web.servlet.ModelAndView;

import com.upload.Common.ToolUtil;


@Controller
public class UploadController {

    @RequestMapping("/moreUpload")
    public String moreUpload(HttpServletRequest request){

        MultipartHttpServletRequest multipartHttpServletRequest = (MultipartHttpServletRequest) request;
        Map<String, MultipartFile> files = multipartHttpServletRequest.getFileMap();

//      String uploadUrl = request.getSession().getServletContext().getRealPath("/") +"upload/";
        String uploadUrl = "F:\\image\\";
        //判断文件路径是否存在,如果不存在则创建文件路径
        File dir = new File(uploadUrl);
        if(!dir.exists()){
            dir.mkdirs();
        }

        List<String> fileList = new ArrayList<String>();

        for(MultipartFile file : files.values()){

            String originalFilaname = file.getOriginalFilename();      //拿到图片的原始名称
            String newFilename = ToolUtil.makeFileNameRand(originalFilaname);

            File targetFile = new File(uploadUrl + newFilename);
            if(!targetFile.exists()){
                try {
                    targetFile.createNewFile();
                } catch (IOException e) {
                    e.printStackTrace();
                }

                //把上传的文件移动到targetFile中
                try {
                    file.transferTo(targetFile);
                    fileList.add(newFilename);
                } catch (IllegalStateException e) {
                    e.printStackTrace();
                } catch (IOException e) {
                    e.printStackTrace();
                }
            }
        }

        request.setAttribute("files", fileList);

        return "uploadResult";
    }

}
3.结果展示页面编写
<html>
<head>
<meta http-equiv="Content-Type" content="text/html; charset=UTF-8">

<title>多文件上传结果</title>
</head>
<body>
    <div style="margin: 0 auto; margin-top: 100px;">
         <%
            List<String> fileList = (List)request.getAttribute("files");
            for(String url : fileList){
                %>
                <a href="/pic/<%=url%>">
                    <img alt="" src="/pic/<%=url%>">
                </a>
                <%
            }
        %>
    </div>
</body>
</html>
–End


 347
347

 被折叠的 条评论
为什么被折叠?
被折叠的 条评论
为什么被折叠?
 到【灌水乐园】发言


