1.搭建环境
Intellij IDEA 2016
JDK1.8
Tomcat9.0
struts2.5.5+hibernate5.2.6+spring4.3.4
mysql5.5.5
2.所需jar包
jar包不能随意多添加,不然会出现冲突,出现各种莫名其妙的问题,宁可少加,通过IDE报错再添加。
2.1 Struts:
2.2 Hibernate
copyHibernate lib\required下的jar包,Hibernate已经把所需jar放在该文件下了。
2.3 Spring
复制Spring内libs目录下包含所有的jar包(不需要复制结尾为sources和javadoc的jar包)
2.4 其他包
aspectjweaver.jar:spring aop用
commons-collections-3.1.jar,
commons-dbcp.jar,commons-pool.jar:dbcp连接池
log4j-core-2.7.jar,
mchange-commons-java-0.2.11.jar,
mysql-connector-java-5.0.3-bin.jar:mysql连接
struts-spring-plugin.jar:用于整合struts和spring
3.建表
create table user(id int primary key auto_increment,username varchar(20),passwordvarchar(20));
4.配置Struts框架
4.1 先在WEB-INF下面创建web.xml,配置struts监听。
<?xml version="1.0"encoding="UTF-8"?>
<web-app xmlns="http://xmlns.jcp.org/xml/ns/javaee"
xmlns:xsi="http://www.w3.org/2001/XMLSchema-instance"
xsi:schemaLocation="http://xmlns.jcp.org/xml/ns/javaeehttp://xmlns.jcp.org/xml/ns/javaee/web-app_3_1.xsd"
version="3.1">
<filter>
<filter-name>struts2</filter-name>
<filter-class>org.apache.struts2.dispatcher.filter.StrutsPrepareAndExecuteFilter</filter-class>
</filter>
<filter-mapping>
<filter-name>struts2</filter-name>
<url-pattern>/*</url-pattern>
</filter-mapping>
</web-app>
原来的jsp是通过servlet来做的,Struts其实就是个拦截器,把所有的请求(“/*”)都转发给了struts.
4.2 配置struts.xml
这个文件一般放在src目录下,工程发布时src会发布到WEB-INF/classes下。
Struts.xml用于转发各种请求到相应的处理类。
<?xml version="1.0" encoding="UTF-8" ?>
<!DOCTYPE struts PUBLIC
   "-//Apache Software Foundation//DTD Struts Configuration 2.1//EN"
   "http://struts.apache.org/dtds/struts-2.1.dtd">

<struts>
<!--   用于action后面跟方法名的动态调用,该功能在2.3版本默认关闭了-->
   <constant name="struts.enable.DynamicMethodInvocation" value="true" />
<!--   开发者模式打开,方便随时查看更改后的结果-->
   <constant name ="struts.devMode" value ="true" />
   <package name="registration" extends="struts-default">
      <action name="user" class="user">
         <result name="success">/registerSuccess.jsp</result>
         <result name="fail">/registerFail.jsp</result>
         <result name="list">/userlist.jsp</result>
      </action>
      <action name="userAdd" class="user" method="add">
         <result name="add">/add.jsp</result>
      </action>
   </package>
</struts>
4.3 创建Action类
创建用来处理各种请求的类
package com.bjsxt.action;

import com.bjsxt.model.User;
import com.bjsxt.service.UserManager;
import com.bjsxt.vo.UserRegisterInfo;
import com.opensymphony.xwork2.ActionSupport;
import com.opensymphony.xwork2.ModelDriven;
import org.springframework.context.annotation.Scope;
import org.springframework.stereotype.Component;
import javax.annotation.Resource;
import java.util.List;

@Component("user")//根据struts中的class来注入
@Scope("prototype")//每次创建一个action
public class UserAction extends ActionSupport implements ModelDriven {
    //UserRegisterInfo是用于封装登陆表中的username password password2,DTO
    private UserRegisterInfo info = new UserRegisterInfo();
    private UserManager um;
    //list.jsp显示时要用到users
    private List<User> users;

    public String add() throws Exception{
        User u = new User();
        u.setUsername(info.getUsername());
        u.setPassword(info.getPassword());
        if(um.exists(u)) {
            return "fail";
        }
        um.add(u);
        return  "add";
    }
    @Override
    public String execute()  {
            return "success";
    }
    public String list() {
        this.users = this.um.getUsers();
        return "list";
    }
    public UserRegisterInfo getInfo() {
        return info;
    }

    public void setInfo(UserRegisterInfo info) {
        this.info = info;
    }

    //@Override
    public Object getModel() {
        return info;
    }

    public List<User> getUsers() {
        return um.getUsers();
    }

    public void setUsers(List<User> users) {
        this.users = users;
    }
    public UserManager getUm() {
        return um;
    }

    @Resource(name="userManager")
    public void setUm(UserManager um) {
        this.um = um;
    }
}
5 搭建Hibernate
5.1 创建实体类
@Entity
public class User {
    private  int id;
    private  String username;
    private  String password;
@Id
@GeneratedValue
    public int getId() {
        return id;
    }

    public void setId(int id) {
        this.id = id;
    }

    public String getUsername() {
        return username;
    }

    public void setUsername(String username) {
        this.username = username;
    }

    public String getPassword() {
        return password;
    }

    public void setPassword(String password) {
        this.password = password;
    }
}
创建UserRegisterInfo
public class UserRegisterInfo {
    private  String username;
    private  String password;
    private  String password2;

    public String getUsername() {
        return username;
    }

    public void setUsername(String username) {
        this.username = username;
    }

    public String getPassword() {
        return password;
    }

    public void setPassword(String password) {
        this.password = password;
    }

    public String getPassword2() {
        return password2;
    }

    public void setPassword2(String password2) {
        this.password2 = password2;
    }
}
5.2 创建DAO
5.2.1 创建UserDao
public interface UserDao {
    public void save(User u);
    public boolean checkUserExistsWithName(String username);
    public List<User> getUsers();
}
5.2.2 创建UserDaoImpl
//在UserManagerImpl用到
@Component("userDao")
public class UserDaoImpl implements UserDao {
    //HibernateTemplate会由spring注入
    private HibernateTemplate hibernateTemplate;
    public void save(User u) {
        hibernateTemplate.save(u);
    }

    public boolean checkUserExistsWithName(String username) {
        List<User> users = (List<User>) hibernateTemplate.find("from User u where u.username = '" + username + "'");
        if(users != null && users.size() > 0) {
            return true;
        }
        return false;
          }

    public HibernateTemplate getHibernateTemplate() {
        return hibernateTemplate;
    }

    @Resource
    public void setHibernateTemplate(HibernateTemplate hibernateTemplate) {
        this.hibernateTemplate = hibernateTemplate;
    }

    public List<User> getUsers() {
        // TODO Auto-generated method stub
        return (List<User>)this.hibernateTemplate.find("from User");
    }
}
5.2.3 创建Service
UserManager
public interface UserManager {

    public abstract boolean exists(User u) throws Exception;

    public abstract void add(User u) throws Exception;

    public List<User> getUsers();

}
UserManagerImpl
//在UserManager用到
@Component("userManager")
public class UserManagerImpl implements UserManager {

    private UserDao userDao;

    public UserDao getUserDao() {
        return userDao;
    }

    @Resource(name="userDao")
    public void setUserDao(UserDao userDao) {
        this.userDao = userDao;
    }

    /* (non-Javadoc)
     * @see com.bjsxt.registration.service.impl.UserManager#exists(com.bjsxt.registration.model.User)
     */
    public boolean exists(User u) throws Exception {
        return userDao.checkUserExistsWithName(u.getUsername());

    }

    /* (non-Javadoc)
     * @see com.bjsxt.registration.service.impl.UserManager#add(com.bjsxt.registration.model.User)
     */
    public void add(User u) throws Exception {
        userDao.save(u);
    }

    public List<User> getUsers() {
        // TODO Auto-generated method stub
        return this.userDao.getUsers();
    }
}
6 搭建Spring
6.1 配置web.xml,增加listenser
<?xml version="1.0" encoding="UTF-8"?>
<web-app xmlns="http://xmlns.jcp.org/xml/ns/javaee"
         xmlns:xsi="http://www.w3.org/2001/XMLSchema-instance"
         xsi:schemaLocation="http://xmlns.jcp.org/xml/ns/javaee http://xmlns.jcp.org/xml/ns/javaee/web-app_3_1.xsd"
         version="3.1">
 <!--  工程启动时加载spring-->
    <listener>
        <listener-class>org.springframework.web.context.ContextLoaderListener</listener-class>
        <!-- default: /WEB-INF/applicationContext.xml -->
    </listener>
<!--指定beans.xml的位置,默认是放在WEB-INF下的applicationContext.xml-->
    <context-param>
        <param-name>contextConfigLocation</param-name>
        <!-- <param-value>/WEB-INF/applicationContext-*.xml,classpath*:applicationContext-*.xml</param-value>  -->
        <param-value>classpath:beans.xml</param-value>
    </context-param>

    <filter>
        <filter-name>struts2</filter-name>
        <filter-class>org.apache.struts2.dispatcher.filter.StrutsPrepareAndExecuteFilter</filter-class>
    </filter>

    <filter-mapping>
        <filter-name>struts2</filter-name>
        <url-pattern>/*</url-pattern>
    </filter-mapping>
6.2 配置applicationContext.xml(这里是beans.xml)
<?xml version="1.0" encoding="UTF-8"?>
<beans xmlns="http://www.springframework.org/schema/beans"
       xmlns:xsi="http://www.w3.org/2001/XMLSchema-instance"
       xmlns:context="http://www.springframework.org/schema/context"
       xmlns:aop="http://www.springframework.org/schema/aop"
       xmlns:tx="http://www.springframework.org/schema/tx"
       xsi:schemaLocation="http://www.springframework.org/schema/beans
           http://www.springframework.org/schema/beans/spring-beans-2.5.xsd
           http://www.springframework.org/schema/context
           http://www.springframework.org/schema/context/spring-context-2.5.xsd
           http://www.springframework.org/schema/aop
           http://www.springframework.org/schema/aop/spring-aop-2.5.xsd
           http://www.springframework.org/schema/tx
           http://www.springframework.org/schema/tx/spring-tx-2.5.xsd">
    <!--//使用注解-->
    <context:annotation-config/>
    <!--//自动扫描包下面的所有实体类 ,扫描含有@component标识的-->
    <context:component-scan base-package="com.bjsxt"/>
    <!--//jdbc.properties位置-->
    <bean
            class="org.springframework.beans.factory.config.PropertyPlaceholderConfigurer">
        <property name="locations">
            <value>classpath:jdbc.properties</value>
        </property>
    </bean>
    <!--   //设置datasource-->
    <bean id="dataSource" destroy-method="close"
          class="org.apache.commons.dbcp.BasicDataSource">
        <property name="driverClassName"
                  value="${jdbc.driverClassName}"/>
        <property name="url" value="${jdbc.url}"/>
        <property name="username" value="${jdbc.username}"/>
        <property name="password" value="${jdbc.password}"/>
    </bean>
    <!--//设置sessionfactory,包含datasource,model,hibernate-->
    <bean id="sessionFactory"
          class="org.springframework.orm.hibernate5.LocalSessionFactoryBean">
        <property name="dataSource" ref="dataSource"/>

        <property name="packagesToScan">
            <list>
                <value>com.bjsxt.model</value>

            </list>
        </property>
        <property name="hibernateProperties">
            <props>
                <prop key="hibernate.dialect">
                    org.hibernate.dialect.MySQLDialect
                </prop>
                <prop key="hibernate.show_sql">true</prop>
                <prop key="hibernate.hbm2ddl.auto">update</prop>
            </props>
        </property>
    </bean>
    <!--在UserDaoImpl用-->
    <bean id="hibernateTemplate" class="org.springframework.orm.hibernate5.HibernateTemplate">
        <property name="sessionFactory" ref="sessionFactory"/>
    </bean>
   <!-- 管理事务边界,要设置,不然默认是只读,不能插入数据-->
    <bean id="txManager"
          class="org.springframework.orm.hibernate5.HibernateTransactionManager">
        <property name="sessionFactory" ref="sessionFactory" />
    </bean>

    <aop:config>
        <aop:pointcut id="bussinessService"
                      expression="execution(public * com.bjsxt.service.*.*(..))" />
        <aop:advisor pointcut-ref="bussinessService"
                     advice-ref="txAdvice" />
    </aop:config>

    <tx:advice id="txAdvice" transaction-manager="txManager">
        <tx:attributes>
           <!-- 只读-->
            <tx:method name="exists" read-only="true" />
           <!-- 原来有就不创建-->
            <tx:method name="add*" propagation="REQUIRED"/>
        </tx:attributes>
    </tx:advice>
</beans>
6.3 连接数据库配置 jdbc.properties
jdbc.driverClassName=com.mysql.jdbc.Driver
jdbc.url=jdbc:mysql://localhost:3306/spring
jdbc.username=root
jdbc.password=root
7 jsp
7.1 register.jsp
<%@ page language="java" import="java.util.*" pageEncoding="utf-8"%>
<%
  String path = request.getContextPath();
  String basePath = request.getScheme()+"://"+request.getServerName()+":"+request.getServerPort()+path+"/";
%>

<!DOCTYPE HTML PUBLIC "-//W3C//DTD HTML 4.01 Transitional//EN">
<html>
<head>
  <base href="<%=basePath%>">
</head>

<body>
<form method="post" action="userAdd.action" >
  用户名:<input type="text" name="username"><br>
  密码:<input type="password" name="password"><br>
  确认密码:<input type="password" name="password2"><br>
  <input type="submit" value="提交"/>
</form><br>
</body>
</html>
7.2 userlist.jsp
<%@ page contentType="text/html;charset=UTF-8" language="java" %>
<%@taglib prefix="s" uri="/struts-tags" %>
<html>
  <head>
    <title>注册</title>
  </head>
  <body>
  <s:iterator value="users">
    <s:property value="username"/>
     </s:iterator>
  <s:debug/>
  </body>
</html>
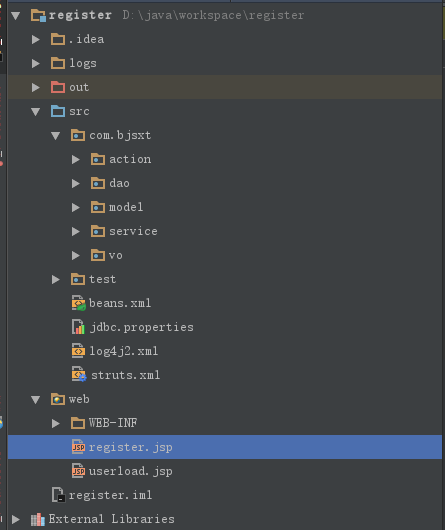
8、工程结构&&最终效果


 2077
2077

 被折叠的 条评论
为什么被折叠?


