


Building a WooCommerce payment extension is a straightforward process for the most part. The hardest problem that you’ll probably encounter is learning how to interact with the merchant’s API to submit a payment and parse the response back. In this article, we are going to build the real thing: a working WooCommerce payment extension. Then, we’ll even connect it to a real payment processor, which we are going to submit payments to and parse the response.
在大多数情况下,构建WooCommerce付款扩展程序是一个简单的过程。 您可能会遇到的最困难的问题是学习如何与商家的API交互以提交付款并解析响应。 在本文中,我们将构建一个真实的东西:一个有效的WooCommerce付款扩展。 然后,我们甚至将其连接到真实的付款处理器,我们将向该付款处理器提交付款并解析响应。

WooCommerce付款网关的不同风味 (The Different Flavors of WooCommerce Payment Gateways)
There are four different types of WooCommerce payment gateways which we can build to process payments on your store. Let’s begin by taking a look at the one we are going to be using in this article; the Direct method.
我们可以构建四种不同类型的WooCommerce付款网关来处理您商店上的付款。 让我们首先看一下我们将在本文中使用的那个。 直接方法。
Direct — this payment method allows the payment fields to be shown directly on the checkout page, and the payment happens as soon as the ‘Place Order’ button is pressed. This type of gateway requires you to install an SSL certificate on your site and might also require you to be PCI compliant. Being PCI compliant is something your Merchant evaluates for you. A good example of this type of gateway is the Authorize.net AIM, which we will use later on, when we build our WooCommerce payment extension.
直接-这种付款方式允许将付款字段直接显示在结帐页面上,并在按下“下订单”按钮后立即进行付款。 此类网关要求您在站点上安装SSL证书,并且还可能要求您符合PCI规范。 符合PCI标准是您的商家为您评估的内容。 这种网关的一个很好的例子是Authorize.net AIM,稍后我们将在构建WooCommerce付款扩展时使用它。
Form Based — in this method, the user must click a button on a form and then is redirected to the actual payment process website. Payment is then captured there; think PayPal Standard.
基于表单-使用此方法,用户必须单击表单上的按钮,然后将其重定向到实际的付款流程网站。 然后在这里捕获付款; 认为贝宝标准。
iFrame Based — through this method, the entire gateway payment system is loaded for you inside an iFrame on your store, kind of how PayPal Advanced works.
基于iFrame的—通过这种方法,整个网关支付系统都将加载到商店中的iFrame中,这类似于PayPal Advanced的工作方式。
Offline – last but not least, the offline method is where no online payments are made at all. Cheque or Bank Transfers are good examples of this type of payment.
离线-最后但并非最不重要的一点是,离线方法是根本不进行在线支付的地方。 支票或银行转帐就是这类付款的好例子。
为什么使用直接方法 (Why Use the Direct Method)
The direct method allows for a greater level of customization since the payment fields are handled by you and, most importantly, the customer never leaves your website. The customer will greatly enjoy this experience over the other three options.
直接方法允许进行更高级别的自定义,因为付款字段由您处理,最重要的是,客户从未离开过您的网站。 与其他三个选项相比,客户将非常享受这种体验。
本文使用的方法 (Methods Used in This Article)
Chances are there is more than one way of doing this and the results might be identical. Any suggestions on how you accomplish this task or further improvements are always welcome and received well. Just be polite and informative in your response.
这样做的可能性不只一种,而且结果可能是相同的。 始终欢迎并收到有关如何完成此任务或进一步改进的任何建议。 请在回应中保持礼貌和有益。
The following code has been tested in the latest versions available for WordPress (4.0) and WooCommerce (2.2.2) and using the dummy data provided for WooCommerce when you install the plugin.
以下代码已在适用于WordPress(4.0)和WooCommerce(2.2.2)的最新版本中进行了测试,并在安装插件时使用了为WooCommerce提供的伪数据。
获取Authorize.Net开发人员帐户 (Obtaining an Authorize.Net Developer Account)
If you don’t already have a developer/test account from Authorize.net, you’ll need one to fully complete and test this plugin. To obtain an Authorize.net developer/test or sandbox account (as they describe it), just go to their Developer Center and fill out the form.
如果您还没有Authorize.net的开发者/测试帐户,则需要一个帐户来完全完成并测试该插件。 要获得Authorize.net开发人员/测试或沙箱帐户(如他们所述),只需转到其开发人员中心并填写表格。
The developer sandbox is a fully functioning Authorize.Net payment gateway supporting the current API methods. The sandbox functions like our production environment. However, there are two key differences:
开发人员沙箱是功能齐全的Authorize.Net付款网关,支持当前的API方法。 沙箱的功能类似于我们的生产环境。 但是,有两个主要区别:
No actual card processing is performed. The sandbox only simulates connections to the card networks, but no actual card payments are processed.
没有执行实际的卡处理。 沙盒仅模拟与卡网络的连接,但不处理实际的卡付款。
Developers can trigger specific error conditions and transaction responses to aid in testing.
开发人员可以触发特定的错误条件和事务响应以帮助进行测试。
规划我们的WooCommerce付款扩展插件 (Planning Our WooCommerce Payment Extension Plugin)
In order to make this easier to read and follow, we are going to separate our plugin into two different files. One of the files will register our Payment Gateway and custom action link. The other will be a simple Class, which will contain the methods that are going to be responsible for creating the administration fields, handling the payment processing and field validation, and displaying an error message if you are not forcing SSL on the checkout page. Take a look below at our file structure:
为了使它更易于阅读和遵循,我们将把插件分成两个不同的文件。 其中一个文件将注册我们的Payment Gateway和自定义操作链接。 另一个将是一个简单的类,它将包含负责创建管理字段,处理付款处理和字段验证以及如果您未在结帐页面上强制使用SSL的情况下显示错误消息的方法。 下面看一下我们的文件结构:
woocommerce-authorizenet-aim-gateway (folder)

-- woocommerce-authorizenet-aim-gateway.php

-- woocommerce-authorizenet-aim.php
构建我们的插件 (Building Our Plugin)
Now that we have a clear understanding of how our plugin will be set-up and which files do what, we can begin by writing the bare-bones of our entire plugin; the basic code which we will expand on until the plugin is completed.
现在我们已经清楚地了解了如何设置插件以及哪些文件可以做什么,我们可以从编写整个插件的准系统开始。 在插件完成之前,我们将扩展的基本代码。
<?php
/*
Plugin Name: Authorize.net AIM - WooCommerce Gateway
Plugin URI: https://www.sitepoint.com/
Description: Extends WooCommerce by Adding the Authorize.net AIM Gateway.
Version: 1
Author: Yojance Rabelo, SitePoint
Author URI: https://www.sitepoint.com/
*/

// Include our Gateway Class and Register Payment Gateway with WooCommerce
add_action( 'plugins_loaded', 'spyr_authorizenet_aim_init', 0 );
function spyr_authorizenet_aim_init() {}


// Add custom action links
add_filter( 'plugin_action_links_' . plugin_basename( __FILE__ ), 'spyr_authorizenet_aim_action_links' );
function spyr_authorizenet_aim_action_links( $links ) {}
We can now see our plugin on the Plugins page but it doesn’t do anything yet. We are not ready to activate it just yet.
现在,我们可以在“插件”页面上看到我们的插件,但是它什么也没做。 我们尚未准备好激活它。

Let’s begin with the first file: include the PHP Class, register this new Payment Gateway with WooCommerce, and add your action links so that the customer can go to the settings page as soon as they activate the plugin.
让我们从第一个文件开始:包括PHP类,向WooCommerce注册此新的Payment Gateway,并添加操作链接,以便客户在激活插件后立即进入设置页面。
<?php
/*
Plugin Name: Authorize.net AIM - WooCommerce Gateway
Plugin URI: https://www.sitepoint.com/
Description: Extends WooCommerce by Adding the Authorize.net AIM Gateway.
Version: 1.0
Author: Yojance Rabelo, SitePoint
Author URI: https://www.sitepoint.com/
*/

// Include our Gateway Class and register Payment Gateway with WooCommerce
add_action( 'plugins_loaded', 'spyr_authorizenet_aim_init', 0 );
function spyr_authorizenet_aim_init() {
	// If the parent WC_Payment_Gateway class doesn't exist
	// it means WooCommerce is not installed on the site
	// so do nothing
	if ( ! class_exists( 'WC_Payment_Gateway' ) ) return;

	// If we made it this far, then include our Gateway Class
	include_once( 'woocommerce-authorizenet-aim.php' );

	// Now that we have successfully included our class,
	// Lets add it too WooCommerce
	add_filter( 'woocommerce_payment_gateways', 'spyr_add_authorizenet_aim_gateway' );
	function spyr_add_authorizenet_aim_gateway( $methods ) {
		$methods[] = 'SPYR_AuthorizeNet_AIM';
		return $methods;
	}
}

// Add custom action links
add_filter( 'plugin_action_links_' . plugin_basename( __FILE__ ), 'spyr_authorizenet_aim_action_links' );
function spyr_authorizenet_aim_action_links( $links ) {
	$plugin_links = array(
		'<a href="' . admin_url( 'admin.php?page=wc-settings&tab=checkout' ) . '">' . __( 'Settings', 'spyr-authorizenet-aim' ) . '</a>',
	);

	// Merge our new link with the default ones
	return array_merge( $plugin_links, $links );
}
Note that the action links, in this case the ‘Settings’ link, will only show when the plugin has been activated. This will lead the customer to the WooCommerce checkout administration page. Let’s continue on so that we are one step closer to activating the plugin, and viewing at least some default fields.
请注意,仅在激活插件后才会显示操作链接(在本例中为“设置”链接)。 这将把客户带到WooCommerce结帐管理页面。 让我们继续,以便我们离激活插件更近一步,并且至少查看一些默认字段。
设置我们的类构造器 (Setting Up Our Class Constructor)
Now that we are going to begin working on our actual Payment Class, we have to start by setting some default values for this Payment Gateway. Some of the settings we’ll define:
现在,我们将开始实际的付款类别,我们必须首先为此付款网关设置一些默认值。 我们将定义一些设置:
id — The global ID for this Payment method.
id —此付款方式的全局ID。
method_title — The Title shown on the top of the Payment Gateways Page next to all the other Payment Gateways.
method_title-标题显示在所有其他付款网关旁边的“付款网关”页面顶部。
method_description — The description for this Payment Gateway, shown on the actual Payment options page on the backend.
method_description —此付款网关的描述,显示在后端的实际“付款选项”页面上。
title — The title to be used for the vertical tabs that can be ordered from top to bottom.
title —用于垂直选项卡的标题,可以从上到下进行排序。
icon — If you want to show an image next to the gateway’s name on the front-end. URL to an image.
图标—如果要在前端网关名称旁边显示图像。 图片的网址。
has_fields — Bool. Can be set to ‘true’ if you want payment fields to show on the checkout if doing a direct integration, which we are doing in this case.
has_fields —布尔。 如果您希望在进行直接集成时在结帐时显示付款字段,可以将其设置为“ true”,在这种情况下,我们正在这样做。
supports — Supports the default credit card form. More on this later on. At this stage, you just need to know that it is super cool.
支持—支持默认的信用卡形式。 稍后将对此进行更多介绍。 在此阶段,您只需要知道它超级酷即可。
Expressing this on our constructor is next, along with some other useful functions that we need in order to make everything work in harmony. Comments will help you understand the purpose, and why it’s there.
接下来是在构造函数上表达这一点,以及我们需要的一些其他有用函数,以使所有组件和谐地工作。 注释将帮助您了解目的及其目的。
// Setup our Gateway's id, description and other values
function __construct() {

	// The global ID for this Payment method
	$this->id = "spyr_authorizenet_aim";

	// The Title shown on the top of the Payment Gateways Page next to all the other Payment Gateways
	$this->method_title = __( "Authorize.net AIM", 'spyr-authorizenet-aim' );

	// The description for this Payment Gateway, shown on the actual Payment options page on the backend
	$this->method_description = __( "Authorize.net AIM Payment Gateway Plug-in for WooCommerce", 'spyr-authorizenet-aim' );

	// The title to be used for the vertical tabs that can be ordered top to bottom
	$this->title = __( "Authorize.net AIM", 'spyr-authorizenet-aim' );

	// If you want to show an image next to the gateway's name on the frontend, enter a URL to an image.
	$this->icon = null;

	// Bool. Can be set to true if you want payment fields to show on the checkout
	// if doing a direct integration, which we are doing in this case
	$this->has_fields = true;

	// Supports the default credit card form
	$this->supports = array( 'default_credit_card_form' );

	// This basically defines your settings which are then loaded with init_settings()
	$this->init_form_fields();

	// After init_settings() is called, you can get the settings and load them into variables, e.g:
	// $this->title = $this->get_option( 'title' );
	$this->init_settings();

	// Turn these settings into variables we can use
	foreach ( $this->settings as $setting_key => $value ) {
		$this->$setting_key = $value;
	}

	// Lets check for SSL
	add_action( 'admin_notices', array( $this,	'do_ssl_check' ) );

	// Save settings
	if ( is_admin() ) {
		// Versions over 2.0
		// Save our administration options. Since we are not going to be doing anything special
		// we have not defined 'process_admin_options' in this class so the method in the parent
		// class will be used instead
		add_action( 'woocommerce_update_options_payment_gateways_' . $this->id, array( $this, 'process_admin_options' ) );
	}
} // End __construct()
激活您的插件 (Activate Your Plugin)
Go ahead and activate your plugin. Make sure that there are no errors thrown and click on the new ‘Settings’ link. This will take you to the Checkout administration options. You should now see your newly registered payment extension there.
继续并激活您的插件。 确保没有引发任何错误,然后单击新的“设置”链接。 这将带您进入Checkout管理选项。 现在,您应该在此处看到新注册的付款附加信息。

Scroll to the bottom of the page and you’ll be able to see it there, too.
滚动到页面底部,您也可以在那里看到它。
建立管理页面 (Building the Administration Page)
In order to build the administration page, we need to know what fields are required by WooCommerce itself, and what fields are required by the payment processor’s API. In our case, since we are using the Authorize.net AIM, we just need the Authorize.net API login and Transaction Key.
为了构建管理页面,我们需要知道WooCommerce本身需要哪些字段,以及付款处理器的API需要哪些字段。 在本例中,由于我们使用的是Authorize.net AIM,因此只需要Authorize.net API登录名和交易密钥即可。
Since we are using our testing account to build the plugin, it’s also a good idea to include an option to set the Gateway in test mode. Regardless of what you are doing, providing a way to easily turn the Gateway into test mode is very useful, and you should consider making it a requirement when you build your gateway. Most gateways will provide you with two different links to which you can send the transactions: one for testing purposes, and the other for a production environment.
由于我们使用测试帐户来构建插件,因此最好包含一个将网关设置为测试模式的选项。 无论您在做什么,提供一种轻松地将网关转换为测试模式的方法都是非常有用的,并且在构建网关时应考虑使其成为必需项。 大多数网关将为您提供两个不同的链接,您可以将交易发送到该链接:一个用于测试目的,另一个用于生产环境。
After some brainstorming, this is what I came up with for the fields that we are going to include in our administration page:
经过一番集思广益,这是我想出的要在管理页面中包括的字段:
enabled — Enable/Disable this payment gateway.
已启用-启用/禁用此支付网关。
title — Payment title that the customer will see during the checkout process.
title-客户在结帐过程中将看到的付款标题。
description — Payment description that the customer will see during the checkout process.
description-客户在结帐过程中看到的付款说明。
api_login — API Login provided by Authorize.net when you signed up for an account.
api_login —注册帐户时由Authorize.net提供的API登录。
trans_key — Transaction Key provided by Authorize.net when you signed up for an account.
trans_key —注册帐户时由Authorize.net提供的交易密钥。
environment — Place the payment gateway in test mode or production.
环境-将支付网关置于测试模式或生产环境。
Let’s turn these into code that WooCommerce understands, and will parse into options which will be rendered on the back-end. This is where init_form_fields() comes into play.
让我们将其转换为WooCommerce可以理解的代码,并将其解析为将在后端呈现的选项。 这就是init_form_fields()起作用的地方。
// Build the administration fields for this specific Gateway
public function init_form_fields() {
	$this->form_fields = array(
		'enabled' => array(
			'title'		=> __( 'Enable / Disable', 'spyr-authorizenet-aim' ),
			'label'		=> __( 'Enable this payment gateway', 'spyr-authorizenet-aim' ),
			'type'		=> 'checkbox',
			'default'	=> 'no',
		),
		'title' => array(
			'title'		=> __( 'Title', 'spyr-authorizenet-aim' ),
			'type'		=> 'text',
			'desc_tip'	=> __( 'Payment title the customer will see during the checkout process.', 'spyr-authorizenet-aim' ),
			'default'	=> __( 'Credit card', 'spyr-authorizenet-aim' ),
		),
		'description' => array(
			'title'		=> __( 'Description', 'spyr-authorizenet-aim' ),
			'type'		=> 'textarea',
			'desc_tip'	=> __( 'Payment description the customer will see during the checkout process.', 'spyr-authorizenet-aim' ),
			'default'	=> __( 'Pay securely using your credit card.', 'spyr-authorizenet-aim' ),
			'css'		=> 'max-width:350px;'
		),
		'api_login' => array(
			'title'		=> __( 'Authorize.net API Login', 'spyr-authorizenet-aim' ),
			'type'		=> 'text',
			'desc_tip'	=> __( 'This is the API Login provided by Authorize.net when you signed up for an account.', 'spyr-authorizenet-aim' ),
		),
		'trans_key' => array(
			'title'		=> __( 'Authorize.net Transaction Key', 'spyr-authorizenet-aim' ),
			'type'		=> 'password',
			'desc_tip'	=> __( 'This is the Transaction Key provided by Authorize.net when you signed up for an account.', 'spyr-authorizenet-aim' ),
		),
		'environment' => array(
			'title'		=> __( 'Authorize.net Test Mode', 'spyr-authorizenet-aim' ),
			'label'		=> __( 'Enable Test Mode', 'spyr-authorizenet-aim' ),
			'type'		=> 'checkbox',
			'description' => __( 'Place the payment gateway in test mode.', 'spyr-authorizenet-aim' ),
			'default'	=> 'no',
		)
	);
}
If you visit the Authorize.net AIM administration page now, your fields will display using the native WooCommerce template system for display administration options.
如果您现在访问Authorize.net AIM管理页面,则将使用本机WooCommerce模板系统显示字段以显示管理选项。
填写管理选项 (Fill Out The Administration Options)
Go ahead and fill out the administration option with your credentials. Don’t forget to set the gateway to Test mode so that we can work safely and test all of our code as we go. Press that ‘Save Changes’ button before proceeding.
继续并使用您的凭据填写管理选项。 不要忘记将网关设置为“测试”模式,以便我们可以安全地工作并在进行过程中测试所有代码。 在继续操作之前,请点击该“保存更改”按钮。
处理付款 (Processing Payments)
The payment processing is done via process_payment($order_id ). It is important to point out that it gets the current order passed to it so we can get the values we need. The credit card fields can be obtained from $_POST.
付款处理通过process_payment($order_id ) 。 重要的是要指出它已将当前订单传递给它,因此我们可以获得所需的值。 信用卡字段可以从$ _POST获得。
Many gateway plugins, including ours, use a similar interface for card payment fields in the checkout form so WooCommerce added a form for us to use when needed. This default form has automatic formatting for credit card numbers, expiration dates and it even displays automatically the type of card being used as soon as the customer enters the first few digits of their credit card number. To be able to use this form, make sure your site is running with at least version 2.1 of WooCommerce.
许多网关插件,包括我们的网关插件,都在结帐表单中为卡支付字段使用类似的界面,因此WooCommerce添加了一个表单供我们在需要时使用。 此默认格式具有自动格式化的信用卡号,到期日期,并且甚至在客户输入其信用卡号的前几位后就自动显示正在使用的卡的类型。 为了能够使用此表单,请确保您的网站运行的至少是WooCommerce 2.1版。
By default, the form will create the following form fields which can be obtained from $_POST:
默认情况下,该表单将创建以下表单字段,可以从$ _POST获得:
GATEWAYID-card-number
网关卡号
GATEWAYID-card-cvc
网关卡-cvc
GATEWAYID-card-expiry
网关卡到期
Here is an example of how the default form looks without any custom CSS.
这是没有任何自定义CSS的默认表单外观的示例。
Now that we know this, we can proceed to the next step and build the process_payment() function to handle the transaction.
现在我们知道了,我们可以继续下一步并构建process_payment()函数来处理交易。
// Submit payment and handle response
public function process_payment( $order_id ) {
	global $woocommerce;

	// Get this Order's information so that we know
	// who to charge and how much
	$customer_order = new WC_Order( $order_id );

	// Are we testing right now or is it a real transaction
	$environment = ( $this->environment == "yes" ) ? 'TRUE' : 'FALSE';

	// Decide which URL to post to
	$environment_url = ( "FALSE" == $environment )
					   ? 'https://secure.authorize.net/gateway/transact.dll'
					   : 'https://test.authorize.net/gateway/transact.dll';

	// This is where the fun stuff begins
	$payload = array(
		// Authorize.net Credentials and API Info
		"x_tran_key"           	=> $this->trans_key,
		"x_login"              	=> $this->api_login,
		"x_version"            	=> "3.1",

		// Order total
		"x_amount"             	=> $customer_order->order_total,

		// Credit Card Information
		"x_card_num"           	=> str_replace( array(' ', '-' ), '', $_POST['spyr_authorizenet_aim-card-number'] ),
		"x_card_code"          	=> ( isset( $_POST['spyr_authorizenet_aim-card-cvc'] ) ) ? $_POST['spyr_authorizenet_aim-card-cvc'] : '',
		"x_exp_date"           	=> str_replace( array( '/', ' '), '', $_POST['spyr_authorizenet_aim-card-expiry'] ),

		"x_type"               	=> 'AUTH_CAPTURE',
		"x_invoice_num"        	=> str_replace( "#", "", $customer_order->get_order_number() ),
		"x_test_request"       	=> $environment,
		"x_delim_char"         	=> '|',
		"x_encap_char"         	=> '',
		"x_delim_data"         	=> "TRUE",
		"x_relay_response"     	=> "FALSE",
		"x_method"             	=> "CC",

		// Billing Information
		"x_first_name"         	=> $customer_order->billing_first_name,
		"x_last_name"          	=> $customer_order->billing_last_name,
		"x_address"            	=> $customer_order->billing_address_1,
		"x_city"              	=> $customer_order->billing_city,
		"x_state"              	=> $customer_order->billing_state,
		"x_zip"                	=> $customer_order->billing_postcode,
		"x_country"            	=> $customer_order->billing_country,
		"x_phone"              	=> $customer_order->billing_phone,
		"x_email"              	=> $customer_order->billing_email,

		// Shipping Information
		"x_ship_to_first_name" 	=> $customer_order->shipping_first_name,
		"x_ship_to_last_name"  	=> $customer_order->shipping_last_name,
		"x_ship_to_company"    	=> $customer_order->shipping_company,
		"x_ship_to_address"    	=> $customer_order->shipping_address_1,
		"x_ship_to_city"       	=> $customer_order->shipping_city,
		"x_ship_to_country"    	=> $customer_order->shipping_country,
		"x_ship_to_state"      	=> $customer_order->shipping_state,
		"x_ship_to_zip"        	=> $customer_order->shipping_postcode,

		// Some Customer Information
		"x_cust_id"            	=> $customer_order->user_id,
		"x_customer_ip"        	=> $_SERVER['REMOTE_ADDR'],

	);

	// Send this payload to Authorize.net for processing
	$response = wp_remote_post( $environment_url, array(
		'method'    => 'POST',
		'body'      => http_build_query( $payload ),
		'timeout'   => 90,
		'sslverify' => false,
	) );

	if ( is_wp_error( $response ) )
		throw new Exception( __( 'We are currently experiencing problems trying to connect to this payment gateway. Sorry for the inconvenience.', 'spyr-authorizenet-aim' ) );

	if ( empty( $response['body'] ) )
		throw new Exception( __( 'Authorize.net\'s Response was empty.', 'spyr-authorizenet-aim' ) );

	// Retrieve the body's resopnse if no errors found
	$response_body = wp_remote_retrieve_body( $response );

	// Parse the response into something we can read
	foreach ( preg_split( "/\r?\n/", $response_body ) as $line ) {
		$resp = explode( "|", $line );
	}

	// Get the values we need
	$r['response_code']             = $resp[0];
	$r['response_sub_code']         = $resp[1];
	$r['response_reason_code']      = $resp[2];
	$r['response_reason_text']      = $resp[3];

	// Test the code to know if the transaction went through or not.
	// 1 or 4 means the transaction was a success
	if ( ( $r['response_code'] == 1 ) || ( $r['response_code'] == 4 ) ) {
		// Payment has been successful
		$customer_order->add_order_note( __( 'Authorize.net payment completed.', 'spyr-authorizenet-aim' ) );

		// Mark order as Paid
		$customer_order->payment_complete();

		// Empty the cart (Very important step)
		$woocommerce->cart->empty_cart();

		// Redirect to thank you page
		return array(
			'result'   => 'success',
			'redirect' => $this->get_return_url( $customer_order ),
		);
	} else {
		// Transaction was not succesful
		// Add notice to the cart
		wc_add_notice( $r['response_reason_text'], 'error' );
		// Add note to the order for your reference
		$customer_order->add_order_note( 'Error: '. $r['response_reason_text'] );
	}

}
Let’s break down the code even more so that it’s easier to understand.
让我们进一步分解代码,以便于理解。
Lines 5-15
5-15行
We assign $customer_order a new WC_Order holding all the information from the order for which we are about to process payment. Then we decide whether or not we are in test mode, and finally chose the right URL for the transaction.
我们$customer_order分配$customer_order一个新的WC_Order ,其中包含要处理的订单中的所有信息。 然后,我们确定是否处于测试模式,最后为交易选择正确的URL。
Lines 18-66
18-66行
These are arbitrary fields that we can send Authorize.net so that they can record this information. We build it into an array so that we can build a proper query using http_build_query() later on.
这些是我们可以发送给Authorize.net的任意字段,以便它们可以记录此信息。 我们将其构建到数组中,以便稍后可以使用http_build_query()构建适当的查询。
Lines 69-74
69-74行
Since we are using WordPress, we can utilize all the HTTP API to interact with other sites and, in this case, POST our payload for processing on Authorize.net. Follow this link for more on the HTTP API and wp_remote_post().
由于我们使用的是WordPress,因此我们可以利用所有HTTP API与其他站点进行交互,并且在这种情况下,可以将我们的有效载荷POST到Authorize.net上进行处理。 wp_remote_post()此链接以获取有关HTTP API和wp_remote_post() 。
Lines 76-80
76-80行
Two important checks happen here. First we make sure WordPress didn’t encounter any errors while POSTing our payload and secondly; we make sure that we got a response back. At any point, we throw an exception error letting the customer know if there is something wrong with the transaction. Take a look below at an example of one of these errors:
这里有两个重要的检查。 首先,我们确保WordPress在发布有效负载时没有遇到任何错误,其次; 我们确保我们得到了回应。 在任何时候,我们都会引发异常错误,让客户知道交易是否存在问题。 下面看一下其中一个错误的示例:

Lines 83-94
83-94行
If we’ve made it this far without any errors, then we can retrieve the response’s body and parse it into something we can read. The first four values in the response are the only ones we need. We add these four values to an array for easier testing and also to make it much simpler to read.
如果我们已经做到了这一点而没有任何错误,那么我们可以检索响应的主体并将其解析为可以读取的内容。 响应中的前四个值是我们唯一需要的值。 我们将这四个值添加到数组中,以便于测试,并且使其更易于阅读。
Lines 98-112
98-112行
Test the response_code value. Codes 1 or 4 mean that the transaction has been approved. In the event that the transaction is approved, we add a friendly order note for your reference, mark the order as paid, empty the cart’s contents, and finally redirect the customer to the ‘Thank You’ page. If you are curious about seeing how the order notes look after doing these four steps, take a look below:
测试response_code值。 代码1或4表示交易已获批准。 如果交易被批准,我们会添加一个友好的订单注释供您参考,将订单标记为已付款,清空购物车中的物品,最后将客户重定向到“谢谢”页面。 如果您对完成这四个步骤后的订购单外观感到好奇,请查看以下内容:
Lines 114-118
114-118行
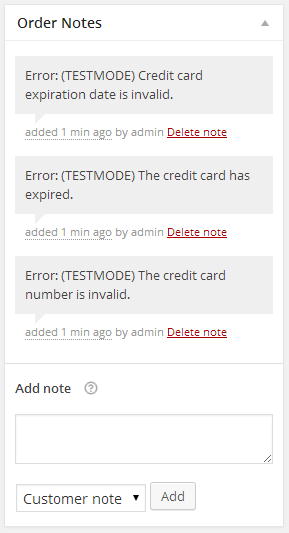
In case that the transaction is not successful, we display an error notice to the customer and update the order with the error received from Authorize.net. Here is an example of the order notes on the back-end after the customer has tried a couple of times to complete the transaction without success.
如果交易失败,我们会向客户显示错误通知,并使用从Authorize.net收到的错误来更新订单。 这是客户多次尝试完成交易但未成功后的后端订单注释示例。
That’s it for the payment processing.
付款处理就是这样。
验证提交的字段 (Validate Submitted Fields)
We are not doing any kind of field validation since we are relying on the default credit card form. Try to enter letters or symbols in any field and you’ll see it’s just not possible. In some cases, I can see how this would be extremely useful, for example; for validating expiration dates which would have to be in a specific format other than the standard we are mostly accustomed to seeing.
由于我们依赖默认的信用卡表格,因此我们不进行任何形式的字段验证。 尝试在任何字段中输入字母或符号,您将发现不可能。 例如,在某些情况下,我可以看到这将是多么有用。 用于验证到期日期,该日期必须采用我们最习惯看到的标准以外的特定格式。
For the sake of simplicity in this article, we are just going to return ‘true’ and bypass the field validation.
为了简单起见,我们将返回“ true”并绕过字段验证。
// Validate fields
public function validate_fields() {
	return true;
}
结帐页面是否使用SSL? (Do Checkout Pages Use SSL?)
Part of being able to provide a seamless checkout experience to the customer and allowing them to checkout on your own site requires the use of an SSL certificate. WooCommerce allows you to quickly enforce the use of SSL only on checkout pages by checking the ‘Force secure checkout’ under WooCommerce -> Settings -> Checkout.
能够为客户提供无缝的结帐体验并允许他们在自己的站点上结帐的部分能力要求使用SSL证书。 WooCommerce允许您通过选中WooCommerce->设置->结帐下的“强制安全结帐”,仅在结帐页面上快速强制使用SSL。
We are just going to check whether or not this has been checked. If it has not been checked, then we are going to display an error on the back-end, warning you that an SSL is required.
我们将要检查是否已检查。 如果尚未检查,则我们将在后端显示错误,警告您需要SSL。
// Check if we are forcing SSL on checkout pages
// Custom function not required by the Gateway
public function do_ssl_check() {
	if( $this->enabled == "yes" ) {
		if( get_option( 'woocommerce_force_ssl_checkout' ) == "no" ) {
			echo "<div class=\"error\"><p>". sprintf( __( "<strong>%s</strong> is enabled and WooCommerce is not forcing the SSL certificate on your checkout page. Please ensure that you have a valid SSL certificate and that you are <a href=\"%s\">forcing the checkout pages to be secured.</a>" ), $this->method_title, admin_url( 'admin.php?page=wc-settings&tab=checkout' ) ) ."</p></div>";
		}
	}
}
Assuming that we are not forcing a secure checkout, this message is displayed in the back-end.
假设我们没有强制进行安全检出,则此消息将显示在后端。

If you have made it this far, give yourself a pat on the back: you’ve just built a WooCommerce Payment Gateway by following this guide.
如果您已经做到了这一点,请给自己一个反面:您已经按照本指南构建了WooCommerce付款网关。
下一步是什么? (What’s Next?)
Challenge yourself. Try to create another payment gateway by following this article and applying the same techniques to your plugin. If I have to make a recommendation, I would recommend trying to build your own extension for Simplify Commerce. This is now bundled into WooCommerce so don’t be afraid to take a peek at that code.
挑战自己。 通过遵循本文并将相同的技术应用于您的插件,尝试创建另一个支付网关。 如果必须提出建议,我建议您尝试为自己的Simplify Commerce构建扩展。 现在,它已捆绑到WooCommerce中,因此不要害怕查看该代码。
Simplify Commerce has a great API, SDKs for your to use, and is very well documented. Also, signing up for a test account takes just minutes and you can be on your way to writing your next plugin in a heart beat.
Simplify Commerce具有出色的API,SDK供您使用,并且文档齐全。 此外,注册测试帐户仅需几分钟,您就可以编写一个心跳的下一个插件。
结论 (Conclusion)
As you can see, writing the WooCommerce payment extension was not as hard as you thought it would be. With a little practice, you can write a new one in a matter of hours, just remember to do a lot of testing before you release it to the public, or use it on any production environment. Develop with WP_DEBUG set to true so you can get extra feedback when needed.
如您所见,编写WooCommerce付款扩展并不像您想象的那样难。 稍加练习,您就可以在几个小时内编写一个新书,只是记得在将其发布给公众之前或在任何生产环境中使用它之前进行大量测试。 将WP_DEBUG设置为true进行开发,因此您可以在需要时获得额外的反馈。
插件代码 (The Plugin Code)
Below you’ll find the sample code used in this article it the complete form. Please comment below if you have any questions or comments.
在下面,您将找到本文使用的示例代码及其完整表格。 如果您有任何疑问或意见,请在下面发表评论。
WooCommerce Authorize.net目标 (WooCommerce Authorize.net AIM)
<?php
/* Authorize.net AIM Payment Gateway Class */
class SPYR_AuthorizeNet_AIM extends WC_Payment_Gateway {

	// Setup our Gateway's id, description and other values
	function __construct() {

		// The global ID for this Payment method
		$this->id = "spyr_authorizenet_aim";

		// The Title shown on the top of the Payment Gateways Page next to all the other Payment Gateways
		$this->method_title = __( "Authorize.net AIM", 'spyr-authorizenet-aim' );

		// The description for this Payment Gateway, shown on the actual Payment options page on the backend
		$this->method_description = __( "Authorize.net AIM Payment Gateway Plug-in for WooCommerce", 'spyr-authorizenet-aim' );

		// The title to be used for the vertical tabs that can be ordered top to bottom
		$this->title = __( "Authorize.net AIM", 'spyr-authorizenet-aim' );

		// If you want to show an image next to the gateway's name on the frontend, enter a URL to an image.
		$this->icon = null;

		// Bool. Can be set to true if you want payment fields to show on the checkout
		// if doing a direct integration, which we are doing in this case
		$this->has_fields = true;

		// Supports the default credit card form
		$this->supports = array( 'default_credit_card_form' );

		// This basically defines your settings which are then loaded with init_settings()
		$this->init_form_fields();

		// After init_settings() is called, you can get the settings and load them into variables, e.g:
		// $this->title = $this->get_option( 'title' );
		$this->init_settings();

		// Turn these settings into variables we can use
		foreach ( $this->settings as $setting_key => $value ) {
			$this->$setting_key = $value;
		}

		// Lets check for SSL
		add_action( 'admin_notices', array( $this,	'do_ssl_check' ) );

		// Save settings
		if ( is_admin() ) {
			// Versions over 2.0
			// Save our administration options. Since we are not going to be doing anything special
			// we have not defined 'process_admin_options' in this class so the method in the parent
			// class will be used instead
			add_action( 'woocommerce_update_options_payment_gateways_' . $this->id, array( $this, 'process_admin_options' ) );
		}
	} // End __construct()

	// Build the administration fields for this specific Gateway
	public function init_form_fields() {
		$this->form_fields = array(
			'enabled' => array(
				'title'		=> __( 'Enable / Disable', 'spyr-authorizenet-aim' ),
				'label'		=> __( 'Enable this payment gateway', 'spyr-authorizenet-aim' ),
				'type'		=> 'checkbox',
				'default'	=> 'no',
			),
			'title' => array(
				'title'		=> __( 'Title', 'spyr-authorizenet-aim' ),
				'type'		=> 'text',
				'desc_tip'	=> __( 'Payment title the customer will see during the checkout process.', 'spyr-authorizenet-aim' ),
				'default'	=> __( 'Credit card', 'spyr-authorizenet-aim' ),
			),
			'description' => array(
				'title'		=> __( 'Description', 'spyr-authorizenet-aim' ),
				'type'		=> 'textarea',
				'desc_tip'	=> __( 'Payment description the customer will see during the checkout process.', 'spyr-authorizenet-aim' ),
				'default'	=> __( 'Pay securely using your credit card.', 'spyr-authorizenet-aim' ),
				'css'		=> 'max-width:350px;'
			),
			'api_login' => array(
				'title'		=> __( 'Authorize.net API Login', 'spyr-authorizenet-aim' ),
				'type'		=> 'text',
				'desc_tip'	=> __( 'This is the API Login provided by Authorize.net when you signed up for an account.', 'spyr-authorizenet-aim' ),
			),
			'trans_key' => array(
				'title'		=> __( 'Authorize.net Transaction Key', 'spyr-authorizenet-aim' ),
				'type'		=> 'password',
				'desc_tip'	=> __( 'This is the Transaction Key provided by Authorize.net when you signed up for an account.', 'spyr-authorizenet-aim' ),
			),
			'environment' => array(
				'title'		=> __( 'Authorize.net Test Mode', 'spyr-authorizenet-aim' ),
				'label'		=> __( 'Enable Test Mode', 'spyr-authorizenet-aim' ),
				'type'		=> 'checkbox',
				'description' => __( 'Place the payment gateway in test mode.', 'spyr-authorizenet-aim' ),
				'default'	=> 'no',
			)
		);
	}

	// Submit payment and handle response
	public function process_payment( $order_id ) {
		global $woocommerce;

		// Get this Order's information so that we know
		// who to charge and how much
		$customer_order = new WC_Order( $order_id );

		// Are we testing right now or is it a real transaction
		$environment = ( $this->environment == "yes" ) ? 'TRUE' : 'FALSE';

		// Decide which URL to post to
		$environment_url = ( "FALSE" == $environment )
						   ? 'https://secure.authorize.net/gateway/transact.dll'
						   : 'https://test.authorize.net/gateway/transact.dll';

		// This is where the fun stuff begins
		$payload = array(
			// Authorize.net Credentials and API Info
			"x_tran_key"           	=> $this->trans_key,
			"x_login"              	=> $this->api_login,
			"x_version"            	=> "3.1",

			// Order total
			"x_amount"             	=> $customer_order->order_total,

			// Credit Card Information
			"x_card_num"           	=> str_replace( array(' ', '-' ), '', $_POST['spyr_authorizenet_aim-card-number'] ),
			"x_card_code"          	=> ( isset( $_POST['spyr_authorizenet_aim-card-cvc'] ) ) ? $_POST['spyr_authorizenet_aim-card-cvc'] : '',
			"x_exp_date"           	=> str_replace( array( '/', ' '), '', $_POST['spyr_authorizenet_aim-card-expiry'] ),

			"x_type"               	=> 'AUTH_CAPTURE',
			"x_invoice_num"        	=> str_replace( "#", "", $customer_order->get_order_number() ),
			"x_test_request"       	=> $environment,
			"x_delim_char"         	=> '|',
			"x_encap_char"         	=> '',
			"x_delim_data"         	=> "TRUE",
			"x_relay_response"     	=> "FALSE",
			"x_method"             	=> "CC",

			// Billing Information
			"x_first_name"         	=> $customer_order->billing_first_name,
			"x_last_name"          	=> $customer_order->billing_last_name,
			"x_address"            	=> $customer_order->billing_address_1,
			"x_city"              	=> $customer_order->billing_city,
			"x_state"              	=> $customer_order->billing_state,
			"x_zip"                	=> $customer_order->billing_postcode,
			"x_country"            	=> $customer_order->billing_country,
			"x_phone"              	=> $customer_order->billing_phone,
			"x_email"              	=> $customer_order->billing_email,

			// Shipping Information
			"x_ship_to_first_name" 	=> $customer_order->shipping_first_name,
			"x_ship_to_last_name"  	=> $customer_order->shipping_last_name,
			"x_ship_to_company"    	=> $customer_order->shipping_company,
			"x_ship_to_address"    	=> $customer_order->shipping_address_1,
			"x_ship_to_city"       	=> $customer_order->shipping_city,
			"x_ship_to_country"    	=> $customer_order->shipping_country,
			"x_ship_to_state"      	=> $customer_order->shipping_state,
			"x_ship_to_zip"        	=> $customer_order->shipping_postcode,

			// Some Customer Information
			"x_cust_id"            	=> $customer_order->user_id,
			"x_customer_ip"        	=> $_SERVER['REMOTE_ADDR'],

		);

		// Send this payload to Authorize.net for processing
		$response = wp_remote_post( $environment_url, array(
			'method'    => 'POST',
			'body'      => http_build_query( $payload ),
			'timeout'   => 90,
			'sslverify' => false,
		) );

		if ( is_wp_error( $response ) )
			throw new Exception( __( 'We are currently experiencing problems trying to connect to this payment gateway. Sorry for the inconvenience.', 'spyr-authorizenet-aim' ) );

		if ( empty( $response['body'] ) )
			throw new Exception( __( 'Authorize.net\'s Response was empty.', 'spyr-authorizenet-aim' ) );

		// Retrieve the body's resopnse if no errors found
		$response_body = wp_remote_retrieve_body( $response );

		// Parse the response into something we can read
		foreach ( preg_split( "/\r?\n/", $response_body ) as $line ) {
			$resp = explode( "|", $line );
		}

		// Get the values we need
		$r['response_code']             = $resp[0];
		$r['response_sub_code']         = $resp[1];
		$r['response_reason_code']      = $resp[2];
		$r['response_reason_text']      = $resp[3];

		// Test the code to know if the transaction went through or not.
		// 1 or 4 means the transaction was a success
		if ( ( $r['response_code'] == 1 ) || ( $r['response_code'] == 4 ) ) {
			// Payment has been successful
			$customer_order->add_order_note( __( 'Authorize.net payment completed.', 'spyr-authorizenet-aim' ) );

			// Mark order as Paid
			$customer_order->payment_complete();

			// Empty the cart (Very important step)
			$woocommerce->cart->empty_cart();

			// Redirect to thank you page
			return array(
				'result'   => 'success',
				'redirect' => $this->get_return_url( $customer_order ),
			);
		} else {
			// Transaction was not succesful
			// Add notice to the cart
			wc_add_notice( $r['response_reason_text'], 'error' );
			// Add note to the order for your reference
			$customer_order->add_order_note( 'Error: '. $r['response_reason_text'] );
		}

	}

	// Validate fields
	public function validate_fields() {
		return true;
	}

	// Check if we are forcing SSL on checkout pages
	// Custom function not required by the Gateway
	public function do_ssl_check() {
		if( $this->enabled == "yes" ) {
			if( get_option( 'woocommerce_force_ssl_checkout' ) == "no" ) {
				echo "<div class=\"error\"><p>". sprintf( __( "<strong>%s</strong> is enabled and WooCommerce is not forcing the SSL certificate on your checkout page. Please ensure that you have a valid SSL certificate and that you are <a href=\"%s\">forcing the checkout pages to be secured.</a>" ), $this->method_title, admin_url( 'admin.php?page=wc-settings&tab=checkout' ) ) ."</p></div>";
			}
		}
	}

} // End of SPYR_AuthorizeNet_AIM
WooCommerce Authorize.net AIM网关 (WooCommerce Authorize.net AIM Gateway)
<?php
/*
Plugin Name: Authorize.net AIM - WooCommerce Gateway
Plugin URI: https://www.sitepoint.com/
Description: Extends WooCommerce by Adding the Authorize.net AIM Gateway.
Version: 1.0
Author: Yojance Rabelo, SitePoint
Author URI: https://www.sitepoint.com/
*/

// Include our Gateway Class and register Payment Gateway with WooCommerce
add_action( 'plugins_loaded', 'spyr_authorizenet_aim_init', 0 );
function spyr_authorizenet_aim_init() {
	// If the parent WC_Payment_Gateway class doesn't exist
	// it means WooCommerce is not installed on the site
	// so do nothing
	if ( ! class_exists( 'WC_Payment_Gateway' ) ) return;

	// If we made it this far, then include our Gateway Class
	include_once( 'woocommerce-authorizenet-aim.php' );

	// Now that we have successfully included our class,
	// Lets add it too WooCommerce
	add_filter( 'woocommerce_payment_gateways', 'spyr_add_authorizenet_aim_gateway' );
	function spyr_add_authorizenet_aim_gateway( $methods ) {
		$methods[] = 'SPYR_AuthorizeNet_AIM';
		return $methods;
	}
}

// Add custom action links
add_filter( 'plugin_action_links_' . plugin_basename( __FILE__ ), 'spyr_authorizenet_aim_action_links' );
function spyr_authorizenet_aim_action_links( $links ) {
	$plugin_links = array(
		'<a href="' . admin_url( 'admin.php?page=wc-settings&tab=checkout' ) . '">' . __( 'Settings', 'spyr-authorizenet-aim' ) . '</a>',
	);

	// Merge our new link with the default ones
	return array_merge( $plugin_links, $links );
}
翻译自: https://www.sitepoint.com/building-a-woocommerce-payment-extension/


 1036
1036


 被折叠的 条评论
为什么被折叠?
被折叠的 条评论
为什么被折叠?
 到【灌水乐园】发言


