


以太坊dapp
In part 2 of this tutorial series on building DApps with Ethereum, we wrote the TNS token’s code. But we haven’t yet compiled it, deployed it, tested it or verified it. Let’s do all that in this part so that we’re ready for what comes next.
在本教程系列的第2部分中 ,我们使用Ethereum构建DApp,我们编写了TNS令牌的代码。 但是我们尚未对其进行编译,部署,测试或验证。 让我们完成本部分中的所有操作,以便为接下来的工作做好准备。
编译中 (Compiling)
At this point we have a file containing some Solidity code. But to make the Ethereum Virtual Machine understand it, we need to turn it into machine code. Additionally, in order to communicate with it from a web application, we need an ABI (application binary interface), which is a universally readable description of the functions that exist in a certain smart contract — be it a token or something more complex. We can create machine code for the EVM and the ABI all at once by using Truffle’s compiler.
至此,我们有了一个包含一些Solidity代码的文件。 但是要使以太坊虚拟机理解它,我们需要将其转换为机器代码。 另外,为了从Web应用程序与之通信,我们需要一个ABI(应用程序二进制接口),它是对某种智能合约中存在的功能的通用可读描述-是令牌还是更复杂的东西。 我们可以使用Truffle的编译器一次为EVM和ABI创建机器代码。
In the project folder, run:
在项目文件夹中,运行:
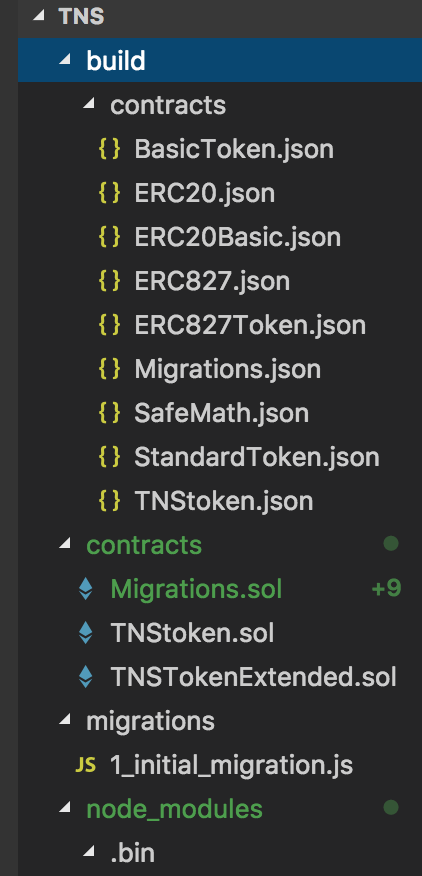
truffle compileThis command will look inside the contracts subfolder, compile them all and place their compiled version into the build subfolder. Note that if you used the alternative development flow from the last part, all the parent contracts from which our TNSToken contract is inheriting functionality will also be compiled one by one each in its own file.
该命令将查看contracts子文件夹内部,将其全部编译,然后将其编译版本放入build子文件夹。 请注意,如果您使用了最后一部分的替代开发流程,那么我们的TNSToken合同继承其功能的所有父合同也将在其自己的文件中一个一个地编译。
Feel free to inspect the contents of the generated JSON files. Our TNSToken should have over 10000 lines of JSON code.
随时检查生成的JSON文件的内容。 我们的TNSToken应该包含10000行以上的JSON代码。
部署到Ganache (Deploying to Ganache)
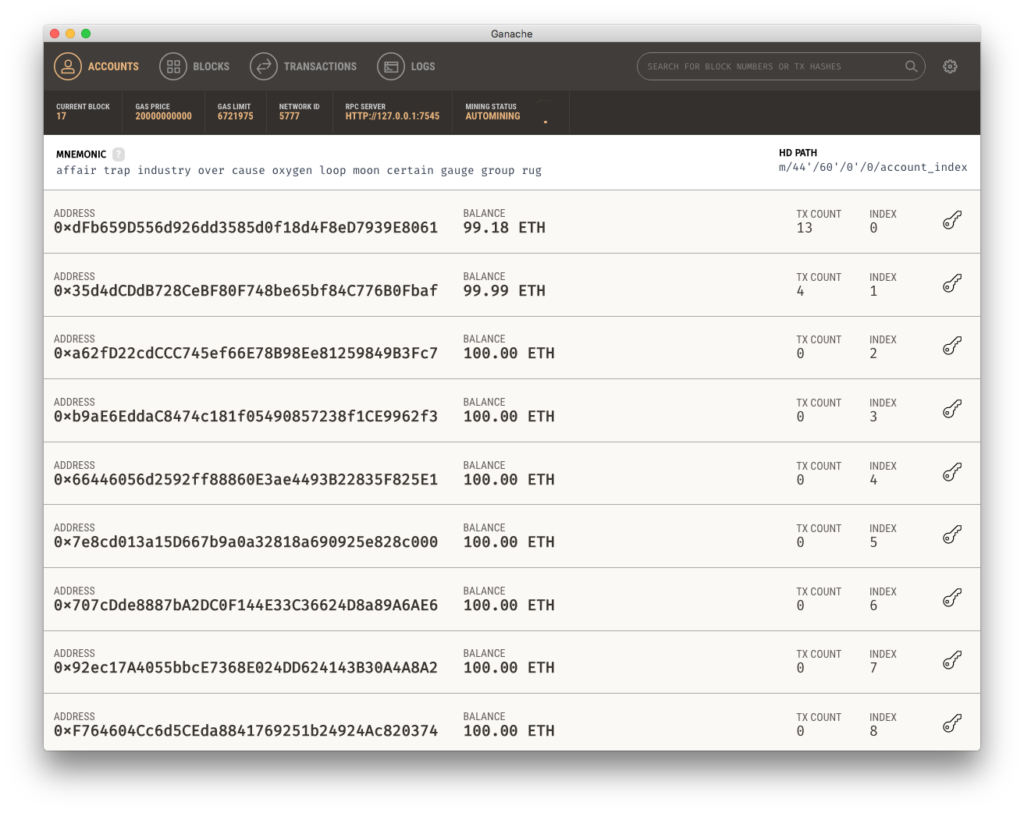
Now let’s see if we can deploy this to our simulated Ganache blockchain. If Ganache isn’t running already in a tab of your terminal or among your operating system’s applications, run it with:
现在让我们看看是否可以将其部署到模拟的Ganache区块链中。 如果Ganache尚未在终端的选项卡中或操作系统的应用程序中运行,请使用以下命令运行它:
ganache-cliOr run the app to get a screen like this one:
或运行该应用以获取如下所示的屏幕:
Then, back in the folder where we just compiled the contracts, we have to add a migration. Create the file migrations/2_deploy_tnstoken.js. If you’re not familiar with migrations in the Truffle ecosystem, see this guide.
然后,回到我们刚刚编制合同的文件夹中,我们必须添加一个迁移。 创建文件migrations/2_deploy_tnstoken.js 。 如果您不熟悉Truffle生态系统中的迁移,请参阅本指南 。
Let’s put the following into that file:
让我们将以下内容放入该文件:
var Migrations = artifacts.require("./Migrations.sol");
var TNSToken = artifacts.require("./TNSToken.sol");

module.exports = function(deployer, network, accounts) {
  deployer.deploy(TNSToken, {from: accounts[0]});
};
First the ability to do migrations at all is imported by requesting Migrations.sol. This is required in every migration. Next, deploying a token means we need to import its Solidity code, and we do this by pulling in TNSToken.sol, the code we wrote in the previous part. Finally, this is cookie cutter migrating with only the part between function(deployer, network, accounts) { and the last } changing.
首先,通过请求Migrations.sol来导入进行Migrations.sol 。 每次迁移都需要这样做。 接下来,部署令牌意味着我们需要导入其Solidity代码,并通过TNSToken.sol (我们在上一部分中编写的代码)来实现此目的。 最后,这是千篇一律的小工具,仅在function(deployer, network, accounts) {和最后一个}之间的部分进行迁移。
In this case, we tell the deployer to deploy the TNSToken and pass in the from argument in order to set the initial token holder. The address used here is a random one generated by Ganache, but by using the accounts array automatically passed to the deployer, we make sure we have access to the list of accounts present in the running node (be it a live Geth node or Ganache). In my particular example, the account[0] address was 0xdFb659D556d926dd3585d0f18d4F8eD7939E8061, also evident in the screenshot above.
在这种情况下,我们告诉部署者部署TNSToken并传入from参数,以设置初始令牌持有者。 此处使用的地址是由Ganache生成的随机地址,但是通过使用自动传递给部署程序的accounts数组,我们确保可以访问正在运行的节点(实时的Geth节点或Ganache)中存在的帐户列表。 。 在我的特定示例中, account[0]地址为0xdFb659D556d926dd3585d0f18d4F8eD7939E8061 ,这在上面的屏幕截图中也很明显。
Let’s also not forget to configure a development environment in truffle.js:
我们也不要忘记在truffle.js配置开发环境:
module.exports = {
  networks: {
    development: {
      host: "127.0.0.1",
      port: 7545,
      network_id: "*"
    }
  }
};
Note: take care of the port and IP; yours might be different!
注意:注意端口和IP; 您的可能会有所不同!
Finally, in the project folder, run truffle migrate. You should see something like this:
最后,在项目文件夹中,运行truffle migrate 。 您应该会看到以下内容:
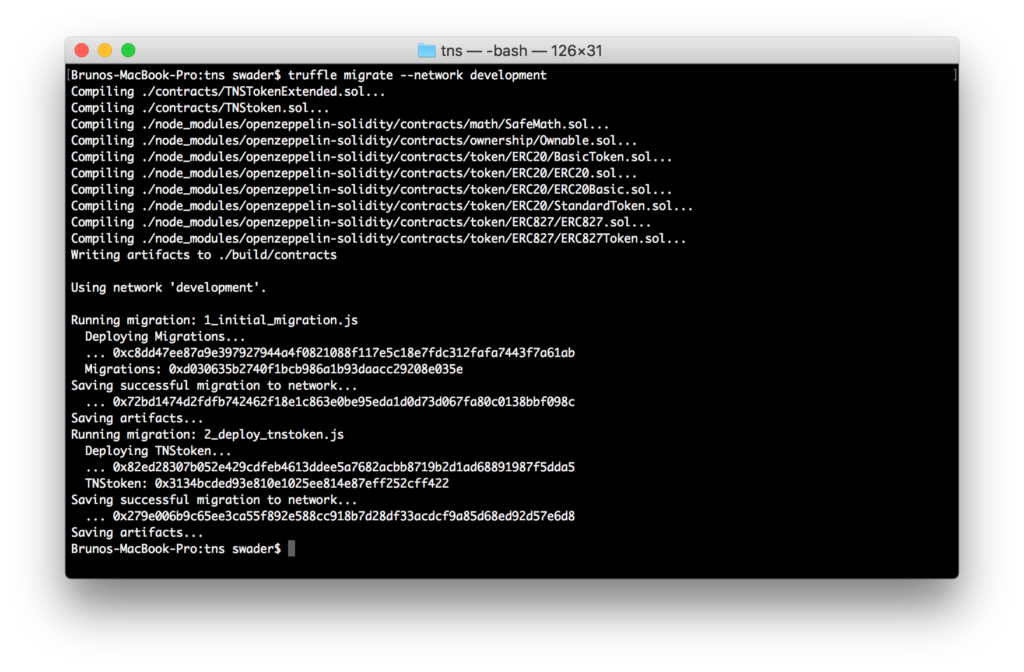
Notice the Ethereum address next to TNStoken: 0x3134bcded93e810e1025ee814e87eff252cff422. This is where our token was deployed. Now let’s see it in action.
注意复仇地址旁边TNStoken : 0x3134bcded93e810e1025ee814e87eff252cff422 。 这是我们的令牌的部署位置。 现在让我们来看一下它的作用。
测试令牌 (Testing the Token)
Automated tests are not necessary in this case. Token contracts are highly standardized and battle tested. If we had used some functionality that goes beyond the scope of a traditional token, then automated tests would have come in handy. As it is, though, testing it by sending it around to and from addresses is quite enough.
在这种情况下,不需要自动测试。 代币合同是高度标准化的,并且经过了战役测试。 如果我们使用的功能超出了传统令牌的范围,那么自动化测试将派上用场。 不过,通过在地址之间来回发送进行测试就足够了。
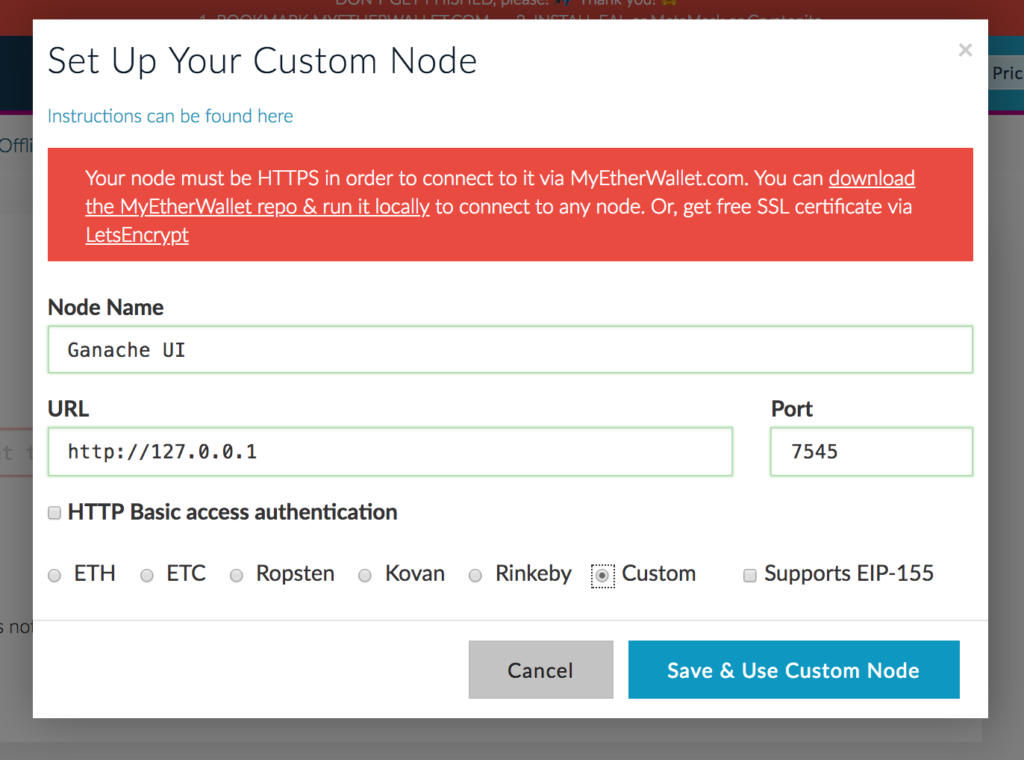
Open a wallet UI like MyEtherWallet and in the top right menu select a custom network. In the dialog, enter the information given to you by your private blockchain — either Ganache or an actual PoA blockchain, whichever you’re running based on part 1 of this tutorial series. In my example, that’s 127.0.0.1 for the address, and 7545 for the port.
打开类似MyEtherWallet的钱包用户界面,然后在右上角的菜单中选择一个自定义网络。 在对话框中,输入您的私人区块链(Ganache或实际的PoA区块链)提供给您的信息,无论您运行的是基于本教程系列的第1部分 。 在我的示例中,地址为127.0.0.1 ,端口为7545 。
Open the wallet which you set as the from value in the deployment script. If you’re using Ganache, you’ll see its private key printed on screen in the Ganache UI or the ganache output in the terminal.
打开您在部署脚本中设置为from值的钱包。 如果您使用的是Ganache,您将在Ganache UI或终端上的ganache输出中看到其私钥打印在屏幕上。

Finally, MEW needs to be told that this token exists. We do this by adding a custom token.
最后,需要告知MEW该令牌存在。 我们通过添加自定义标记来实现。
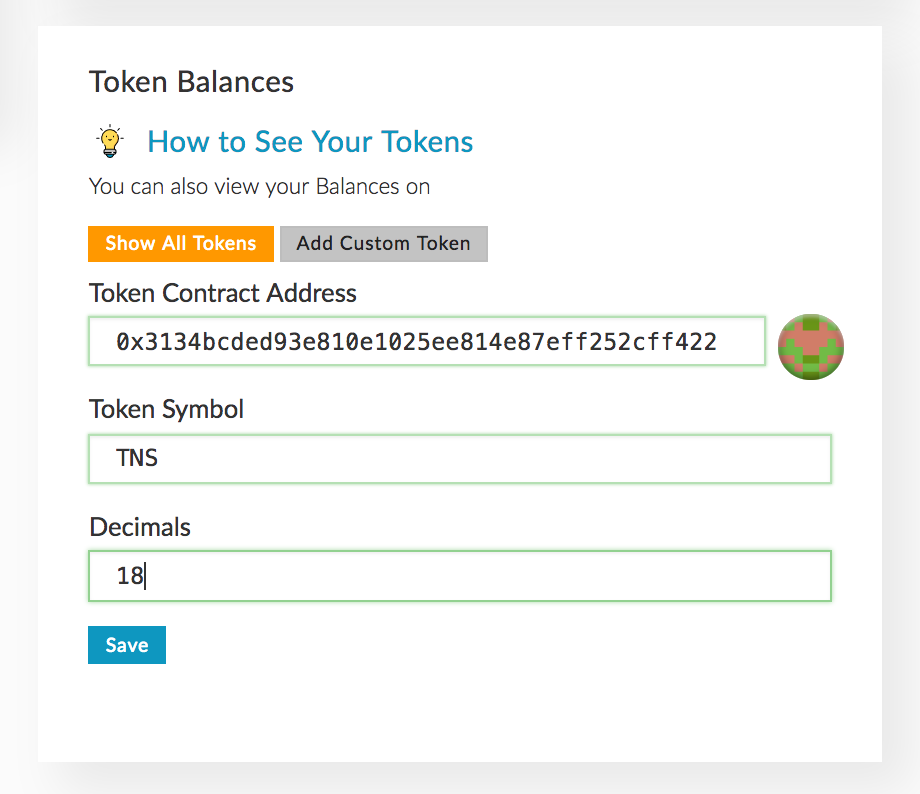
Immediately after having added the token, you’ll notice that the account now has a balance of 100 million of them, and that it’s able to send them in the currency dropdown selection menu. Let’s try sending some to another address.
添加令牌后,您会立即注意到该帐户现在有1亿美元的余额,并且能够在货币下拉选择菜单中发送它们。 让我们尝试发送一些到另一个地址。
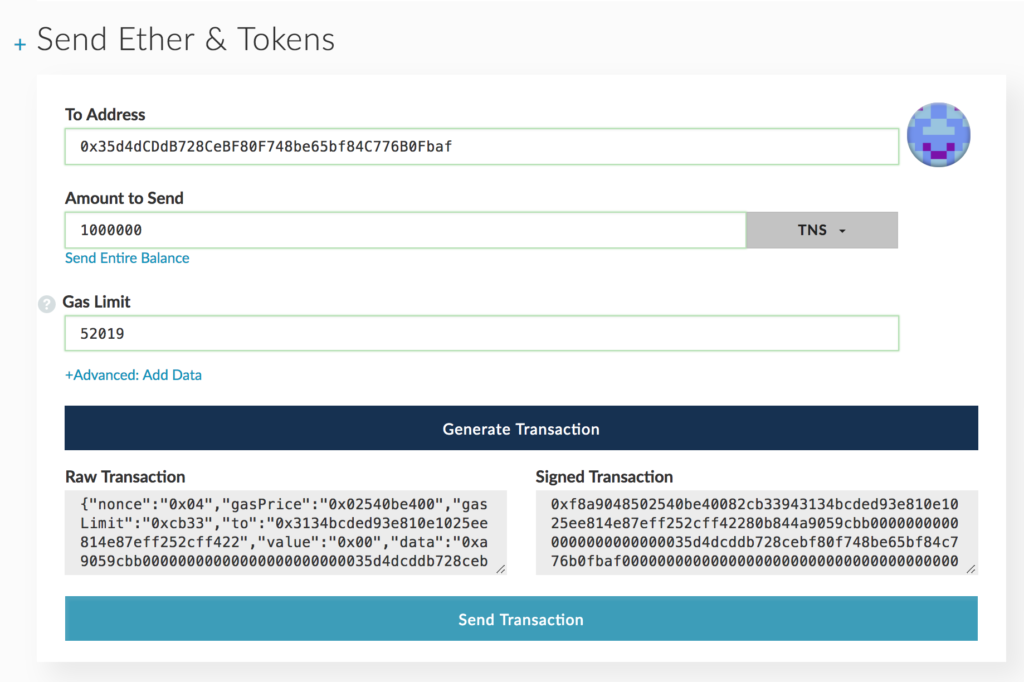
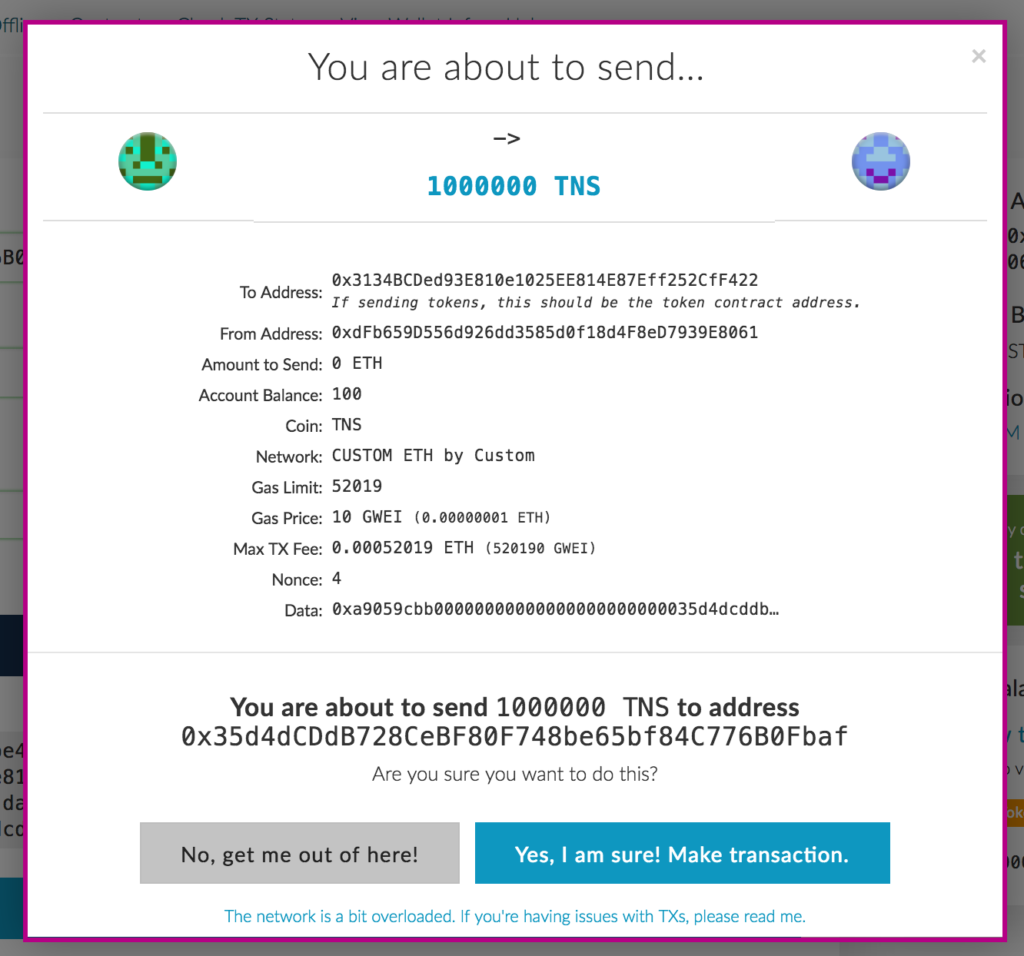
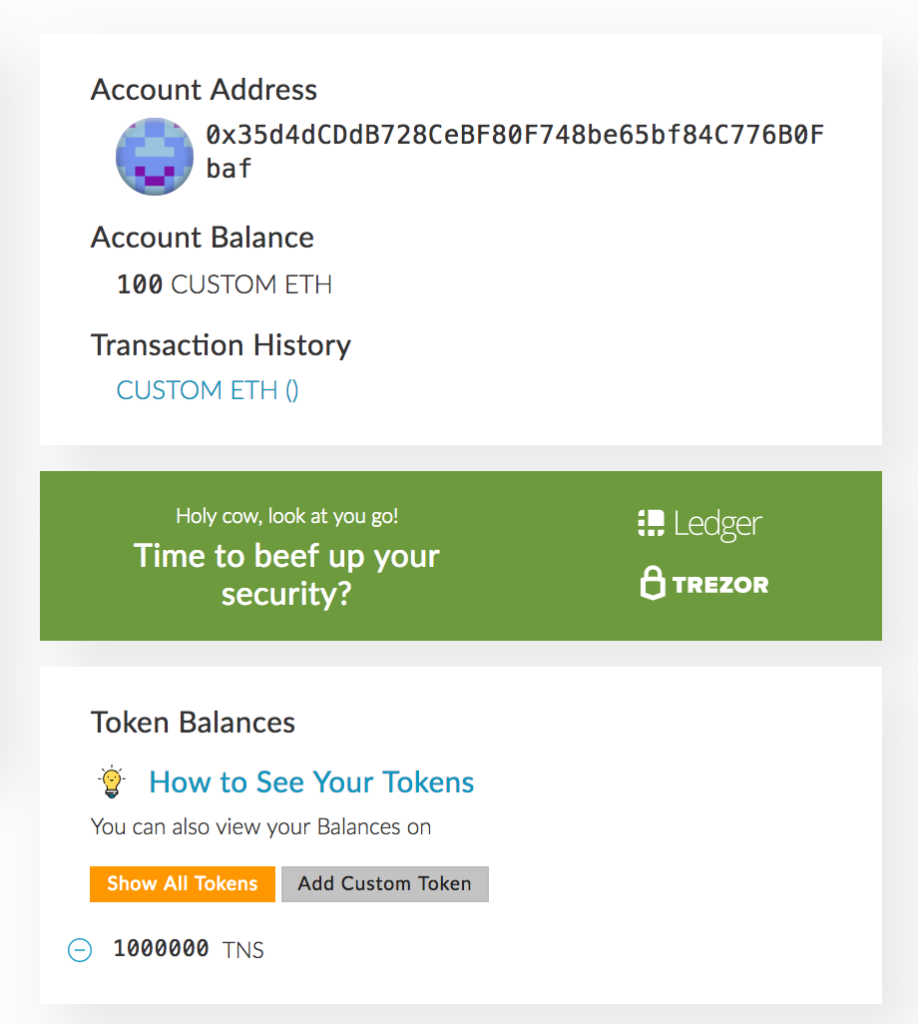
Go ahead and send those back now to get the original account back to 100 million again. We’ve just made sure our token’s basic functionality works as intended.
继续并立即将其退回,以使原始帐户再次回到1亿美元。 我们只是确保了令牌的基本功能按预期工作。
部署到实时网络 (Deploying to a Live Network)
This wouldn’t be a real token test without also deploying it on a live network. Let’s not use the mainnet, though, but a testnet like Rinkeby.
如果不将其部署在实时网络中,这将不是真正的令牌测试。 但是,我们不要使用主网,而要使用像Rinkeby这样的测试网。
In truffle.js, let’s add a new network — rinkeby — so that our file looks like this:
在truffle.js ,让我们添加一个新网络rinkeby ,以便我们的文件如下所示:
require('dotenv').config();
const WalletProvider = require("truffle-wallet-provider");
const Wallet = require('ethereumjs-wallet');
const Web3 = require("web3");
const w3 = new Web3();

const PRIVKEY = process.env["PRIVKEY"];
const INFURAKEY = process.env["INFURAKEY"];

module.exports = {
  networks: {
    development: {
      host: "127.0.0.1",
      port: 7545,
      network_id: "*"
    },
    rinkeby: {
      provider: function() {
        return new WalletProvider(
          Wallet.fromPrivateKey(
            Buffer.from(PRIVKEY, "hex")), "https://rinkeby.infura.io/"+INFURAKEY

        );
      },
      gas: 4600000,
      gasPrice: w3.utils.toWei("50", "gwei"),
      network_id: "3",
    },
  }
};
Yikes! What is all this now?
kes! 现在这是什么?
Let’s process it line by line.
让我们逐行处理它。
The first few lines import some node modules so we can use the functions below. If you get a missing module message for any of those, just running npm install web3-wallet-provider truffle-wallet-provider web3 dotenv --save should fix things.
前几行导入了一些节点模块,因此我们可以使用以下功能。 如果您发现其中任何一个缺少模块消息,只需运行npm install web3-wallet-provider truffle-wallet-provider web3 dotenv --save解决问题。
Next, we load the private key of the wallet from which we’re running the contract (so the wallet which will be getting the 100 million tokens; we can’t use the from value here) from a .env file in the root of the project folder. If it doesn’t exist, create it. That same file also has an Infura.io access key, which is a website that hosts Ethereum nodes and lets apps connect to them so developers don’t need to run full Ethereum nodes on their computers.
接下来,我们从根目录下的.env文件中加载运行合同的钱包的私钥(因此该钱包将获得1亿个代币;此处不能使用from值)。项目文件夹。 如果不存在,请创建它。 该文件还具有Infura.io访问密钥,该访问密钥是托管以太坊节点并允许应用程序连接到它们的网站,因此开发人员无需在其计算机上运行完整的以太坊节点。
The .env file is hidden by default and can be ignored in .gitignore so there’s no danger of your private key ever leaking — a very important precaution! This is what the file contains:
默认情况下, .env文件是隐藏的,可以在.gitignore忽略。因此,您的私钥永远不会泄漏,这是非常重要的预防措施! 这是文件包含的内容:
PRIVKEY="YOUR_PRIVATE_KEY";
INFURAKEY="YOUR_INFURA_ACCESS_KEY";
You can get your Infura key by registering here. The private key can easily be obtained if you just install Metamask, switch it to Rinkeby, and go to Export Private Key. Any method will work, though, so choose whatever you like. You can also use Ganache’s private key. A single private key unlocks the same wallet on all Ethereum networks — testnet, rinkeby, mainnet, you name it.
您可以在此处注册获取Infura密钥。 如果仅安装Metamask ,将其切换到Rinkeby,然后转到Export Private Key,则可以轻松获得私钥。 任何方法都可以,但是,请选择您喜欢的任何方法。 您还可以使用Ganache的私钥。 单个私钥可以在所有以太坊网络(测试网,rinkeby,主网,您命名)上解锁相同的钱包。
Back to our config file. We have a new network entry: rinkeby. This is the name of the Ethereum testnet we’ll be deploying to and the code inside the provider is basically cookie-cutter copy paste telling Truffle “grab my private key, hex-encode it, make it into an unlocked wallet, and then talk to Infura through it”.
回到我们的配置文件。 我们有一个新的network条目: rinkeby 。 这是我们将要部署到的以太坊测试网的名称,提供程序内部的代码基本上是用小甜饼复制粘贴告诉Truffle“抓住我的私钥,对其进行十六进制编码,使其放入解锁的钱包中,然后再进行通话通过Infura”。
Lastly, we define the gas limit we want to spend on executing this contract (4.6 million is enough, which can be changed if needed), how much the gas will cost (50 Gwei is actually quite expensive, but the Ether we’re playing with is simulated so it doesn’t matter) and the network ID is set to 4 because that’s how the Rinkeby testnet is labeled.
最后,我们定义了要在执行该合同上花费的瓦斯限制(460万就足够了,可以根据需要更改),瓦斯将花费多少(50 Gwei实际上非常昂贵 ,但是我们正在玩的以太坊和一起模拟,因此没有关系),并且网络ID设置为4,因为这就是Rinkeby测试网标记的方式 。
There’s one more thing we need to do. The migration file we wrote earlier is targeting a from address, but the address for Rinkeby is different. Does this mean we need to change the deployment script depending on the network? Of course not! Let’s change the 2_deploy_tnstoken.js file to look like this:
我们还需要做一件事。 我们前面写的迁移文件的目标是一个from地址,但该地址Rinkeby是不同的。 这是否意味着我们需要根据网络来更改部署脚本? 当然不是! 让我们将2_deploy_tnstoken.js文件更改为如下所示:
var Migrations = artifacts.require("./Migrations.sol");
var TNSToken = artifacts.require("./TNSToken.sol");

module.exports = function(deployer, network, accounts) {
  if (network == "development") {
    deployer.deploy(TNSToken, {from: accounts[0});
  } else {
    deployer.deploy(TNSToken);
  }
};
As you can see, deployment scripts are simple JavaScript and the second parameter given to the deployer is always the network’s name — which is what we can use to differentiate between them.
如您所见,部署脚本是简单JavaScript,分配给部署者的第二个参数始终是网络的名称,这是我们可以用来区分它们的名称。
If we try to run the migration now with truffle migrate --network rinkeby, it will fail if the address we used is new:
如果我们现在尝试使用truffle migrate --network rinkeby运行迁移,则如果我们使用的地址是新地址,它将失败:
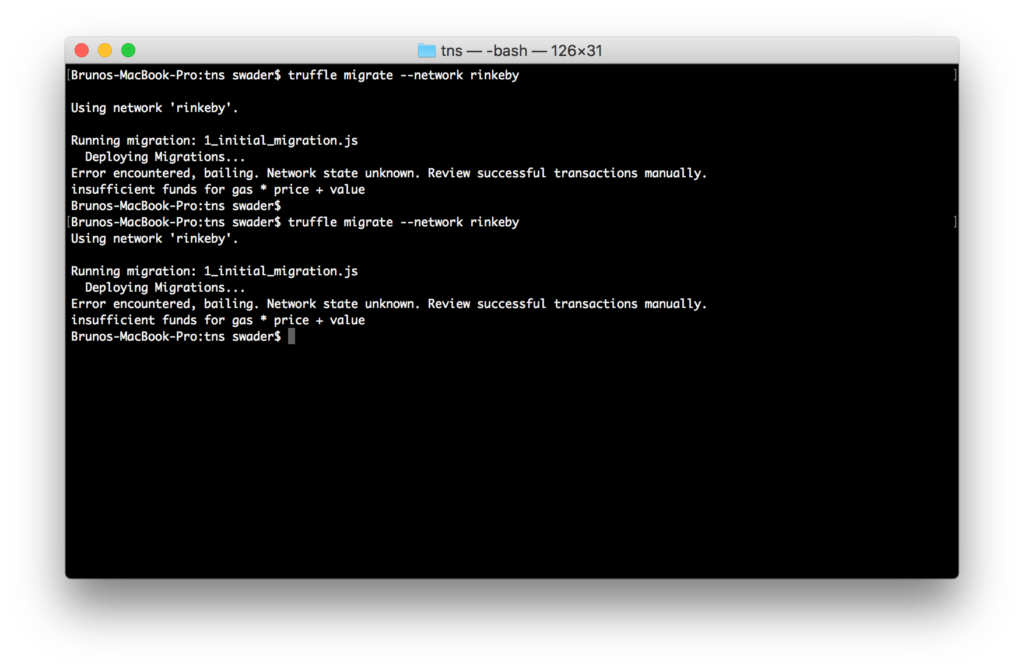
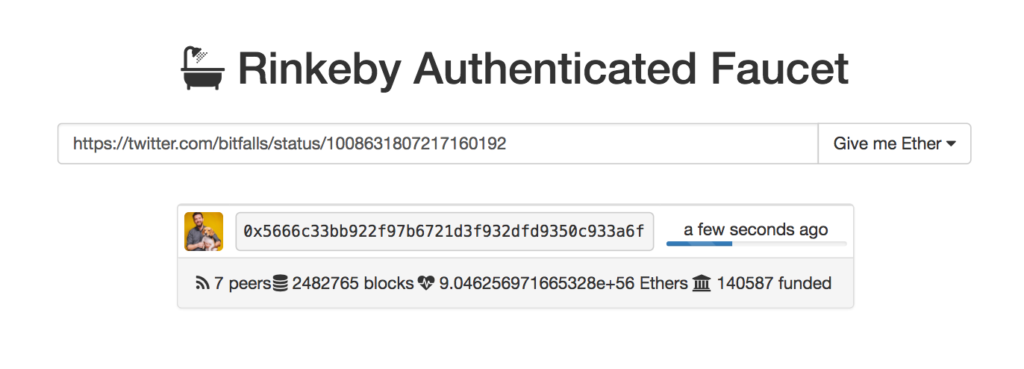
This is because the address has no Ether to spend on deploying the contract. That’s easy to solve, though. Just head over to the Rinkeby Faucet and ask for some. It’s free.
这是因为该地址没有以太坊可用于部署合同。 不过,这很容易解决。 只需前往Rinkeby水龙头并索取一些。 免费。
Now re-run the migration and the token contract will be deployed live on the Rinkeby network. It can be tested just like in the Ganache use case above. Everything should work exactly the same, only now you can also test it with your friends and colleagues. Progress!
现在,重新运行迁移,令牌合同将在Rinkeby网络上实时部署。 可以像上面的Ganache用例一样对其进行测试。 一切都应该完全相同,只是现在您还可以与朋友和同事进行测试。 进展!
奖励:验证和ENS (Bonus: Verification and ENS)
For extra trust points, it’s recommended that you verify the token on Etherscan and register an ENS domain for it.
为了获得额外的信任点,建议您在Etherscan上验证令牌并为其注册ENS域。
验证 (Verification)
Verification means submitting the source code of the token to Etherscan so it can compare it to what’s deployed on the network, thereby verifying it as backdoor-free. This is done on the Code tab of the token’s address. Since our token uses some third-party code and those can’t be easily pulled into the code window in the Verify screen, we need to flatten our contract. For that, we’ll use a tool called truffle-flattener:
验证意味着将令牌的源代码提交给Etherscan,以便可以将其与网络上部署的令牌进行比较,从而将其验证为无后门程序。 这是在令牌地址的“代码”选项卡上完成的。 由于我们的令牌使用了一些第三方代码,而这些代码无法轻易地插入到“ 验证”屏幕的代码窗口中,因此我们需要弄平合同。 为此,我们将使用一个名为truffle-flattener的工具:
npm install --global truffle-flattenerThis tool will copy all the dependencies and the token’s source code into a single file. We can run it like this:
该工具会将所有依赖项和令牌的源代码复制到一个文件中。 我们可以这样运行它:
truffle-flattener contracts/TNSToken.sol >> ./contracts/TNSTokenFlat.solA new file should be present in the contracts folder now, virtually identical to our source code but with dependency code pasted in (so SafeMath.sol, for example, will be pasted at the top of the file).
现在应该在contracts文件夹中出现一个新文件,该文件实际上与我们的源代码相同,但是粘贴了相关性代码(例如, SafeMath.sol将粘贴在文件顶部)。
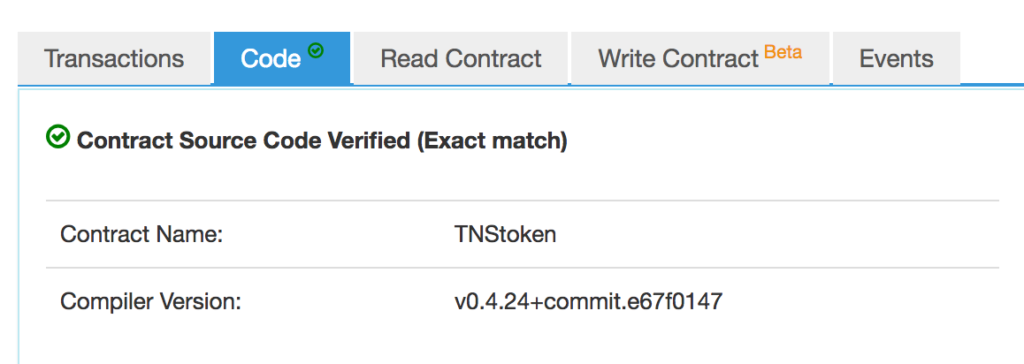
Paste the contents of that new file into the code window of the Verify screen, set the compiler to whatever version you get by running truffle version, and set Optimization to No. Click Verify and Publish, and once the process completes, your token’s address screen will have new tabs: Read Contract and Write Contract, and the Code tab will have a green checkmark, indicating that the code has been verified. This gives you additional trust points with the community.
将该新文件的内容粘贴到“ 验证”屏幕的代码窗口中,通过运行truffle version将编译器设置为所获得的任何truffle version ,并将“ 优化”设置为“ 否” 。 点击验证并发布 ,过程完成后,令牌的地址屏幕将具有新的标签: 读取合同和写入合同 ,并且代码标签将带有绿色的选中标记,表明代码已通过验证。 这为您提供了与社区的其他信任点。
ENS (ENS)
The ENS is the Ethereum Name System. It’s used to give Ethereum addresses human-readable names so you don’t have to remember the 0xmumbojumbo strings and can instead remember addresses like bitfalls.eth. You can then even register subdomains like token.bitfalls.eth. The process of registering an ENS domain is not simple and it takes time, so if you’d like to do that I recommend you read this guide and follow the instructions here.
ENS是以太坊名称系统。 它用于为以太坊地址提供人类可读的名称,因此您不必记住0xmumbojumbo字符串,而可以记住诸如bitfalls.eth地址。 然后,您甚至可以注册子域,例如token.bitfalls.eth 。 注册ENS域的过程并不简单,而且需要时间,因此,如果您愿意这样做,建议您阅读本指南并按照此处的说明进行操作。
结论 (Conclusion)
In this part we went through compiling and deploying a custom token. This token is compatible with all exchanges and can be used as a regular ERC20 token.
在这一部分中,我们经历了编译和部署自定义令牌的过程。 该令牌与所有交易所兼容,可以用作常规ERC20令牌。
翻译自: https://www.sitepoint.com/ethereum-dapps-compiling-deploying-testing-tns-tokens/
以太坊dapp


 2869
2869

 被折叠的 条评论
为什么被折叠?
被折叠的 条评论
为什么被折叠?
 到【灌水乐园】发言


