


wordpress本地开发
Like most WordPress developers, I used MAMP for local development environments. MAMP works well for some people, but it doesn’t really allow you to create reproducible development environments. Your environment is really at the will of both MAMP itself (i.e. your settings), as well as which operating system you’re developing on; and that’s really not a good thing.
像大多数WordPress开发人员一样,我在本地开发环境中使用了MAMP。 MAMP对某些人来说效果很好,但实际上并不允许您创建可复制的开发环境。 您的环境实际上取决于MAMP本身(即您的设置)以及您要开发的操作系统的意愿; 那真的不是一件好事。
After awhile, the MAMP workflow isn’t all that it’s cracked up to be, especially once you begin needing to share environments between team members. Suffice it to say, we left the MAMP workflow behind once we were introduced to the ubiquitous Vagrant. I won’t get into the details of that affair, because there’s already a great article written on that happening to somebody else. But how do you ease yourself into Vagrant, when you’re so used to your beloved MAMP workflow?
不久之后,MAMP工作流程就不那么简单了,尤其是当您开始需要在团队成员之间共享环境时。 可以说,一旦被介绍给无处不在的Vagrant ,我们就离开了MAMP工作流程。 我不会详细介绍该事件, 因为已经有一篇很棒的文章写给其他人了 。 但是,当您习惯了备受喜爱的MAMP工作流程时,如何使自己适应流浪汉呢?
Enter, Theme Juice (or tj), a command line utility for modern WordPress development. It takes the pain out of local development by taking advantage of Vagrant and an Apache fork of VVV called VVV-Apache as the virtual machine. It allows you to generate an unlimited number of local development projects, manage their dependencies, and even handles deploying them, all from the command line.
Enter, Theme Juice (或tj ),一个用于现代WordPress开发的命令行实用程序。 通过利用Vagrant和称为VVV-Apache的VVV的Apache分支作为虚拟机,可以减轻本地开发的痛苦。 它使您可以从命令行生成无限数量的本地开发项目,管理它们的依赖项,甚至处理部署它们。
要求 (Requirements)
This project requires Vagrant and VirtualBox to be able to create virtual machines for local development. Please download and install both of these before following along with this article.
该项目要求Vagrant和VirtualBox能够创建用于本地开发的虚拟机。 在跟随本文阅读之前,请下载并安装这两个工具。
tj is written entirely in Ruby and requires at least version 1.9.3., but I recommend one of the latest versions of Ruby MRI (2.2, 2.1, 2.0). If you’re curious if yours is supported, check out the Travis CI build, where I test against an array of different Ruby interpreters.
tj完全用Ruby编写,并且至少需要版本1.9.3。,但我建议使用Ruby MRI的最新版本(2.2、2.1、2.0)。 如果您对自己的支持是否感到好奇,请查看Travis CI构建,我将在其中测试一系列不同的Ruby解释器。
Lastly, it’s recommend that you set up SSH-keys for GitHub. Internally, tj uses git clone with SSH URLs, so things might break if you don’t have your keys set up properly.
最后,建议您为GitHub设置SSH密钥 。 在内部, tj使用带有SSH URL的git clone , 因此,如果您没有正确设置密钥 ,则事情可能会中断 。
If you’re using Windows, rest assured that you are supported! Just be sure to check out the documentation, because you might need to do a couple extra things to make sure it plays nicely with your operating system.
如果您使用的是Windows,请放心支持 ! 只需确保签出文档 ,因为您可能需要做一些额外的事情以确保它与您的操作系统完美配合。
安装 (Installation)
It’s as simple as running the command below inside of your terminal:
就像在终端内部运行以下命令一样简单:
gem install theme-juiceDepending on how your Ruby environment is set up, you may have to run that with sudo.
根据您的Ruby环境的设置方式,您可能必须使用sudo运行它。
介绍 (Introduction)
There has a been a great amount of work put into VVV by the community, but if there’s one thing that isn’t that great, it would be the process of creating a new project. After a few weeks of using VVV, I found myself doing the same steps over and over and over and over again:
社区在VVV中投入了大量工作,但是如果有一件事情不是那么好,那将是创建新项目的过程。 使用VVV几周后,我发现自己一遍又一遍地重复执行相同的步骤:
Create a new project folder in the
www/directory在
www/目录中创建一个新的项目文件夹Create a new conf file in
config/for the.devdomain (which could be using Nginx or Apache, depending on your VVV flavor)在
.dev域的config/创建一个新的conf文件(可以使用Nginx或Apache,具体取决于您的VVV风格)Create a new entry in
database/init-custom.sqlto set up a new database as well as a new user在
database/init-custom.sql创建一个新条目以设置新数据库以及新用户Create a new entry in a
Customfileto sync the local project folders to the VM folder (I don’t like having my actual project within the VM, because then removing the site actually requires you to remove your project folders)在
Customfile创建一个新条目,以将本地项目文件夹同步到VM文件夹(我不希望将我的实际项目放在VM中,因为然后删除站点实际上需要您删除项目文件夹)Create a new entry in a
Customfileto automate adding your new domain to your/etc/hosts(in our case, setting up a local DNS server with Landrush)创建一个新条目
Customfile自动加入您的新域名到你的/etc/hosts(在我们的情况下,建立一个本地DNS服务器抢注 )Create a new entry in a
Customfileto allow me to access my local project from another device (i.e. my phone and tablet), using xip.io在
Customfile创建一个新条目,以允许我使用xip.io从另一台设备(即手机和平板电脑)访问本地项目Set up a local
wp-cli.local.ymlfile to allow me to quickly execute WP-CLI commands on the project (without actually having to SSH into the VM, change to the project directory, and then execute the commands from there)设置本地
wp-cli.local.yml文件,以使我可以在项目上快速执行WP-CLI命令(实际上不必通过SSH进入VM,更改为项目目录,然后从那里执行命令)
I would literally do that multiple times a week. Talk about repetitive! The good news is that tj sits on top of VVV, automating all of that repetition; allowing you to quickly scaffold out (and manage) new development projects in just a few seconds.
我实际上每周会这样做多次。 谈论重复! 好消息是, tj位于VVV之上,可以自动执行所有重复操作。 使您能够在短短几秒钟内Swift完成(并管理)新的开发项目。
特征 (Features)
We’ll get into the nitty gritty details in a bit, but first let me quickly lay out all of the features tj offers:
我们将稍作详细介绍,但首先让我快速介绍一下tj提供的所有功能:
- New local development project generation (by executing the steps above) 生成新的本地开发项目(通过执行上述步骤)
- Management of existing projects, including project removal 现有项目管理,包括项目撤除
- Build tool and dependency management (more on this later) 构建工具和依赖项管理(稍后会对此进行详细介绍)
- Multi-stage single-command deployment, including database migration 多阶段单命令部署,包括数据库迁移
But, isn’t there already a few tools that do most of that work? At the time (i.e. mid last year), there was only VVV Site Wizard, which didn’t really satisfy all of the requirements put in place by the above steps; not to mention, we install WordPress inside of a subdirectory, which that script doesn’t support in the way we needed.
但是,难道不是已经有一些工具可以完成大部分工作吗? 当时(即去年年中),只有VVV Site Wizard不能真正满足上述步骤提出的所有要求。 更不用说,我们将WordPress安装在子目录内,该脚本不支持我们所需的方式。
One of the things about tj that differs itself from projects like VVV Site Wizard and Variable VVV is that tj sits on top of proven open source technologies, such as Capistrano for deployment, and Composer for management of plugins and the actual WordPress installation. There’s a huge eco-system around WPackigist, so we believe utilizing such great efforts is a no-brainer.
tj与VVV Site Wizard和Variable VVV等项目的不同之处之一是tj位于成熟的开源技术之上,例如Capistrano用于部署, Composer用于插件管理和实际的WordPress安装 。 WPackigist周围有一个巨大的生态系统,因此我们相信利用如此巨大的努力是不费吹灰之力的 。
What that means is that tj doesn’t provide you with options for selecting your WordPress version or which plugins you want to install, as all of that can (and should) be managed outside of tj via a starter theme. If you have an array of plugins that you prefer to use on every project, great! Just create a repository for your starter theme and voilà! You can use it within tj by either requesting it to be added to the CLI itself, or just passing it in via the prompts (discussed below).
这意味着tj不会为您提供选择WordPress版本或要安装的插件的选项,因为所有这些都可以(并且应该)通过入门主题在tj之外进行管理。 如果您希望在每个项目中使用一系列插件,那就太好了! 只需为您的入门主题和仓库创建一个存储库! 您可以在tj使用它,方法是请求将其添加到CLI本身 ,或者仅通过提示将其传递(如下所述)。
One thing worth noting: when I talk about a “starter theme”, I’m not referring to something like Underscores; rather, I’m talking about an entire WordPress-installation-starter, like WP-Skeleton, Bedrock or our starter theme. So, if you’re looking to use a custom starter theme, make sure it’s a full WordPress installation, and not simply a theme. In a future version, this might be changed to something like ‘kit’; it has remained this way so that we can ‘just ship it!’ i.e. to get this project out into the hands of the community as soon as we could.
有一点值得注意的是:当我谈到了“启动主题为”,我不是指像下划线 ; 相反,我在谈论的是整个WordPress安装启动程序,例如WP-Skeleton , Bedrock或我们的启动程序主题 。 因此,如果您要使用自定义的入门主题,请确保它是完整的WordPress安装,而不仅仅是主题。 在将来的版本中,可能会将其更改为类似于“ kit”的名称。 它一直保持这种方式,以便我们可以“只运送它!” 即尽快将这个项目交到社区手中。
创建您的第一个项目 (Creating Your First Project)
Now that we’ve discussed the steps that need automation, let’s see how we take advantage of what tj has to offer. To get started, we simply have to run the following command:
现在,我们已经讨论了需要自动化的步骤,让我们看看如何利用tj提供的功能。 首先,我们只需要运行以下命令:
tj createThere’s a ton of flags available to this command, but we won’t get into them today.
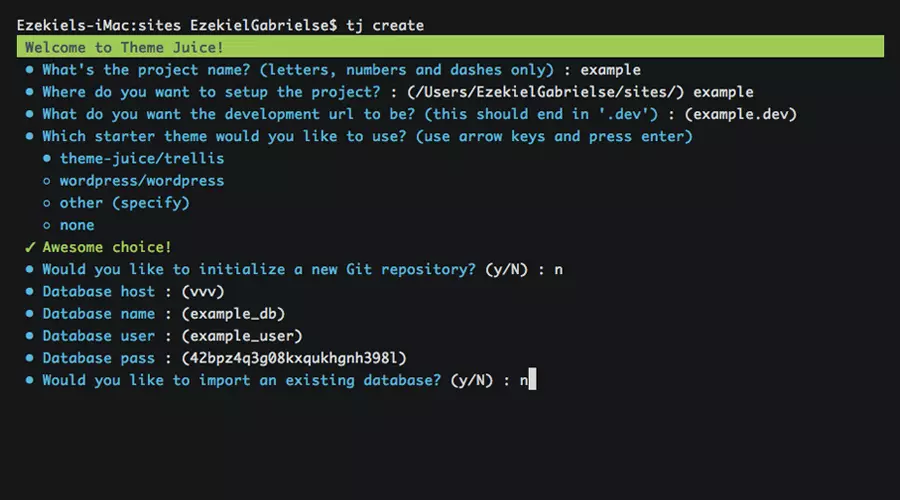
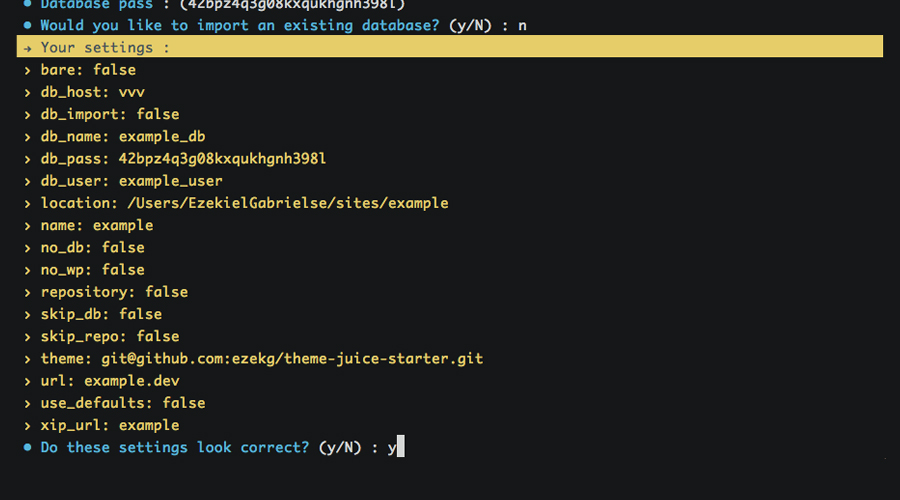
This will lead us through a series of prompts to set up our project, including name and path for the project (remember, the path can be anywhere on your system!), the starter theme you would like to use, the database information, etc. Using all of that information, tj will create the necessary files needed to get you up and running as quickly as possible. After the series of prompts, you’ll be asked to confirm:
这将引导我们通过一系列提示来设置项目,包括项目的名称和路径(请记住,路径可以在系统上的任何位置!),您要使用的入门主题,数据库信息等。 。使用所有这些信息, tj将创建必要的文件,以使您尽快启动并运行。 在一系列提示之后,将要求您确认:
On your first create, it’ll go ahead and install VVV into the ~/vagrant directory (unless another path is specified via global flags, or VVV is already installed) and then it’ll provision the VM, which might take a few minutes if you’ve never done it before.
在第一次create ,它将继续并将VVV安装到~/vagrant目录中(除非通过global flags指定了另一个路径,或者已经安装了VVV),然后将提供VM,这可能需要几分钟的时间。如果您以前从未做过。
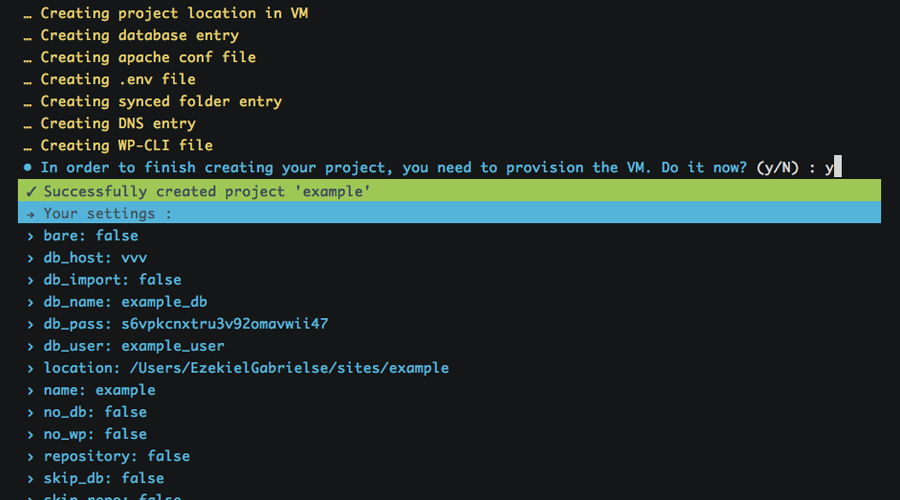
After that’s all finished up, tj will do its thing and in a few minutes (basically, the time it takes to provision the VM with the new changes), you’ll have a brand new development project to work with. Did I mention that you can automatically access this new project from any device on your network?
完成所有这些操作之后, tj将完成其工作,并在几分钟之内(基本上是为VM提供新更改所需的时间),您将有一个全新的开发项目可以使用。 我是否提到过您可以从网络上的任何设备自动访问此新项目 ?
建立一个现有的项目 (Setting up an Existing Project)
Working on an existing project? To make life easy, you can run the command below to set up existing projects into the VM:
正在处理现有项目? 为了使生活更轻松,您可以运行以下命令以将现有项目设置到VM中:
tj setupThe prompts will pretty much be identical to a create (internally, it’s actually the same command), with a few prompts omitted such as asking for a starter theme. Like create, this command also has a ton of flags available for it.
这些提示与create几乎完全相同(内部实际上是相同的命令),其中省略了一些提示,例如询问入门主题。 与create一样,此命令也有大量可用的标志 。
删除项目 (Removing a Project)
One thing that I wanted to make sure was possible with tj is having the freedom to delete a project from the VM, without actually deleting all of my files. Why? Because I don’t need 20 projects running inside of my VM, when I’m only actively working on 2-3 of them. This allows you to create, remove, and recreate projects with ease.
我想确保使用tj可以实现的一件事是,可以从VM中删除项目,而无需实际删除我的所有文件。 为什么? 因为我不需要在VM内运行20个项目,所以当我只在其中的2-3个工作时就可以正常运行。 这使您可以轻松地创建,删除和重新创建项目。
Now that I’ve mentioned how tj handles removals, to remove a project from the VM, simply run the command below and follow the prompts:
现在,我已经提到了tj如何处理删除,要从VM中删除项目,只需运行以下命令并按照提示进行操作:
tj deleteBy default, your database is not dropped when removing a project (to allow easier restoration later on), but just in case you want to drop it, you can use the --drop-db flag. Check out the documentation to see the full list of flags.
默认情况下,删除项目时不会删除数据库(以便以后进行更轻松的还原),但是如果您要删除它,则可以使用--drop-db标志。 查看文档以查看标志的完整列表。
使用Juicefile (Utilizing a Juicefile)
The Juicefile is a YAML configuration file that can be used to store commonly-used build scripts and deployment configuration. Each command list can be mapped to an individual project’s build tool, allowing a streamlined set of commands to be used across multiple projects that utilize different tools. To better understand this, check out our starter theme’s Juicefile; it contains command mappings for all of our build tools and dependency managers:
Juicefile是一个YAML配置文件,可用于存储常用的构建脚本和部署配置。 每个命令列表都可以映射到单个项目的构建工具,从而可以在使用不同工具的多个项目中使用简化的命令集。 为了更好地理解这一点,请查看我们的入门主题的Juicefile ; 它包含我们所有构建工具和依赖项管理器的命令映射:
commands:
  install:                         # Run application install scripts
    - composer install
    - bundle install
    - npm install
    - bower install
    - grunt build
  watch:                           # Manage build tools
    - grunt %args%
  assets:                          # Manage front-end dependencies
    - bower %args%
  vendor:                          # Manage back-end dependencies
    - composer %args%
  wp:                              # Manage WP installation
    - wp ssh --host=vagrant %args%
  backup:                          # Create a backup of the local database
    - mkdir -p backup
    - wp ssh --host=vagrant db export backup/$(date +'%Y-%m-%d-%H-%M-%S').local.sql
As you can tell by looking at the configuration above, we’re able to do some minor scripting with arguments. This isn’t huge, but does allow you to better utilize your aliases. For example, by running tj install we’re able to quickly run our entire build process in the correct order; or another example, we can run tj vendor update to update all our our Composer dependencies.
如您所见,通过上面的配置可以看出,我们可以对参数进行一些小的脚本编写。 这虽然不大,但是可以让您更好地利用别名。 例如,通过运行tj install我们可以按正确的顺序快速运行我们的整个构建过程。 或另一个示例,我们可以运行tj vendor update来更新我们所有的Composer依赖项。
This feature obviously isn’t for everybody, especially when you don’t use many dependency managers or build tools. That being said, it works well for us, especially since our build stack is full of pre-compiled languages like Haml, Sass and CoffeeScript.
显然,此功能并不适合所有人,尤其是当您不使用许多依赖项管理器或构建工具时。 话虽如此,它对我们来说效果很好,特别是因为我们的构建堆栈中充满了诸如Haml,Sass和CoffeeScript之类的预编译语言。
Interested in learning more about how to set up and utilize a Juicefile? Check out the documentation for all of the available options.
有兴趣了解更多有关如何设置和使用Juicefile吗? 查看文档以获取所有可用选项。
部署项目 (Deploying a Project)
There’s not a lot of things that I dislike more than FTP deployments. By utilizing the popular tool Capistrano, plus an awesome rsync extension, tj is able to create one-command deployments for all of your projects that are both quick and reliable, without the need for having all of your build tools installed on your remote servers. Setting up a deployment stage is as simple as this:
除了FTP部署外,我没有太多不喜欢的东西。 通过使用流行的工具Capistrano以及出色的rsync扩展 , tj能够为您的所有项目创建一个快速而可靠的单命令部署,而无需在远程服务器上安装所有构建工具。 设置部署阶段非常简单:
stages:
  production:                      # Stage name
    server: 192.168.50.4           # Server IP or domain
    path: /var/www/production      # Path to the web root
    user: deploy                   # User to deploy as
    url: example.com               # URL for stage
    uploads: app/uploads           # Path to uploads directory from project root
    tmp: tmp                       # Path to temp directory
    shared:                        # Files to share between deployments
      - .env.production
    ignore:                        # Files to ignore on deployments
      - robots.txt
    roles:                         # Stage roles (for Capistrano)
      - :web
      - :app
      - :db
Once you set up your deployment configuration within your project’s Juicefile (check out our configuration for inspiration), you simply need to run:
在项目的Juicefile设置部署配置后( 请查看我们的配置以获取灵感 ),您只需要运行:
tj deploy <stage>Aaaaannd you’re off! tj can also handle database migration with a single command via tj remote <stage> db:pull and tj remote <stage> db:push.
你要走了! tj还可以通过tj remote <stage> db:pull和tj remote <stage> db:push通过单个命令处理数据库迁移。
In pretty much the same way, you can migrate the uploads/ folder and .env file between stages. Want to get started with your first deploy? Head over here and follow the quick setup guide to easily get up and running.
以几乎相同的方式,您可以在阶段之间迁移uploads/文件夹和.env文件。 想开始您的第一次部署吗? 转至此处,并按照快速设置指南轻松启动和运行。
结论 (Conclusion)
I hope you’ve enjoyed this article. We’ve looked into how tj can help you leave your dated MAMP workflow behind, while also allowing you to take advantage of its many features. Interested in learning more? Let us know! If the demand is there, I’d love to do a screencast for creating a new project, or setting up and deploying your first project.
希望您喜欢这篇文章。 我们研究了tj如何帮助您将过时的MAMP工作流程抛在后面,同时还使您可以利用其许多功能。 有兴趣了解更多吗? 让我们知道! 如果有需求,我很乐意进行截屏视频,以创建一个新项目,或者设置和部署您的第一个项目。
If you have any questions regarding what we discussed today, let me know in the comments below or hit me up on Twitter and I’ll help you out wherever I can.
如果您对我们今天讨论的内容有任何疑问,请在下面的评论中让我知道,或在Twitter上与我联系,我将尽一切可能为您提供帮助。
翻译自: https://www.sitepoint.com/introducing-theme-juice-for-local-wordpress-development/
wordpress本地开发


 1118
1118

 被折叠的 条评论
为什么被折叠?
被折叠的 条评论
为什么被折叠?
 到【灌水乐园】发言


