


wordpress api
Writing to local files is one of the functionalities many plugins and themes need for various purposes. Security is the most important issue plugins and themes have to take care of while writing to local file systems. WordPress runs across various hosting services and configurations, therefore it becomes difficult for developers to create plugins and themes which access local file systems to work across all different kinds of environments without compromising security.
写入本地文件是许多插件和主题出于各种目的所需的功能之一。 安全是最重要的问题,插件和主题在写入本地文件系统时必须注意。 WordPress跨各种托管服务和配置运行,因此,开发人员很难创建插件和主题来访问本地文件系统,以在不影响安全性的情况下跨所有不同类型的环境工作。
In this tutorial, we’ll learn how to use the WordPress Filesystem API to access local file systems which takes care of proper file permissions. In the process, we’ll create a plugin which displays a form with a textarea in an admin page that saves the content of the textarea to a file.
在本教程中,我们将学习如何使用WordPress Filesystem API来访问本地文件系统,该文件应注意适当的文件权限。 在此过程中,我们将创建一个插件,该插件在管理页面中显示带有textarea的表单,该表单将textarea的内容保存到文件中。
为什么要使用WordPress Filesystem API? (Why Use the WordPress Filesystem API?)
You might be wondering why we don’t just use PHP’s file system functions to read and write local files instead of learning and using a whole new set of APIs?
您可能想知道为什么我们不仅仅使用PHP的文件系统函数来读写本地文件,而不是学习和使用一套全新的API?
The issue of using PHP file system APIs is that it doesn’t take care of file permissions automatically. Suppose you’re using a shared hosting service to host your WordPress site and your hosting web server is running as the “admin” operating system account. Whenever you create files using PHP, they’re owned as the “admin” user. Therefore, any other website hosted in the same shared hosting can also access your website files as they’re also running as the “admin” user, posing a security issue to your site. To protect us from this issue, you need to change the file owner and permissions manually using PHP.
使用PHP文件系统API的问题是它不会自动处理文件权限。 假设您正在使用共享的托管服务来托管WordPress网站,并且您的托管Web服务器以“管理员”操作系统帐户的身份运行。 每当您使用PHP创建文件时,它们都被称为“管理员”用户。 因此,在同一共享托管中托管的任何其他网站也可以访问您的网站文件,因为它们也以“管理员”用户身份运行,这给您的网站带来了安全问题。 为了保护我们免受此问题的影响,您需要使用PHP手动更改文件所有者和权限。
But when you login using SSH or FTP/SFTP to create files then they are owned by the operating system user account that you are logged in as. If the FTP server is running as the “admin” user and you’re logged in as the “narayanprusty” user, then newly created files will have an owner as “narayanprusty”, not “admin”.
但是,当您使用SSH或FTP / SFTP登录以创建文件时,它们将由您以其身份登录的操作系统用户帐户拥有。 如果FTP服务器以“ admin”用户身份运行,并且您以“ narayanprusty”用户身份登录,则新创建的文件的所有者将为“ narayanprusty”,而不是“ admin”。
WordPress introduced the Filesystem API which can automatically takes care of file permissions. The Filesystem API was released in WordPress 2.6. WordPress actually released it to support its plugin, theme and core update system, but later on plugins and themes starting using it for their own purposes.
WordPress引入了Filesystem API ,它可以自动处理文件权限。 Filesystem API在WordPress 2.6中发布。 WordPress实际上已发布了它以支持其插件,主题和核心更新系统,但后来针对插件和主题开始将其用于自己的目的。
文件系统API如何工作? (How Does the Filesystem API work?)
The Filesystem API can write to file systems using system calls (i.e. direct, ftp, ftp socket or ssh2). It chooses one of the methods based on whichever method creates files with proper file permissions and which PHP extension is available. The Filesystem API first checks the direct method, then ftp and finally ssh2.
Filesystem API可以使用系统调用(例如,直接,ftp,ftp套接字或ssh2)写入文件系统。 它会根据创建具有适当文件权限的文件以及可用PHP扩展名的方法中的一种来选择一种方法。 Filesystem API首先检查direct方法,然后是ftp ,最后是ssh2 。
While using FTP or SSH, you’ll need to get the credentials from your user. The Filesystem API provides function makes it easier to display a form to take credentials and store them.
使用FTP或SSH时,您需要从用户那里获取凭据。 Filesystem API提供的功能使显示表单来获取凭据和存储凭据变得更加容易。
创建我们的插件文件和目录 (Creating Our Plugin Files and Directory)
Now let’s create our plugin which displays a textarea in a page, where submitting the form saves the contents of the textarea to a local file.
现在,让我们创建一个在页面中显示文本区域的插件,在此处提交表单会将文本区域的内容保存到本地文件中。
Here’s the directory structure of our plugin:
这是我们插件的目录结构:
--filesystem
	--filesystem.php
	--filesystem-demo
		--demo.txt
Create these files and directories in the wp-content/plugins directory of your WordPress installation.
在WordPress安装的wp-content/plugins目录中创建这些文件和目录。
To make the plugin installable, put this code in the filesystem.php file:
要使该插件可安装,请将以下代码放在filesystem.php文件中:
<?php

/*
Plugin Name: Filesystem API
Plugin URI: http://www.sitepoint.com
Description: A sample plugin to demonstrate Filesystem API
Version: 1.0
Author: Narayan Prusty
*/
Now visit your admin panel and install the plugin.
现在访问您的管理面板并安装插件。
创建管理页面 (Creating an Admin Page)
Next we need a page in our admin where our example will reside. Here’s the code to create this page and display the textarea. Just place this code in the filesystem.php file:
接下来,我们需要在管理员页面中放置我们的示例。 这是创建此页面并显示文本区域的代码。 只需将此代码放在filesystem.php文件中:
function menu_item()
{
  add_submenu_page("options-general.php", "Demo", "Demo", "manage_options", "demo", "demo_page");
}

add_action("admin_menu", "menu_item");

function demo_page()
{
  ?>
      <div class="wrap">
         <h1>Demo</h1>
         <form method="post">
          <?php
            $output = "";

            if(isset($_POST["file-data"]))
            {
              $output = write_file_demo($_POST["file-data"]);
            }
            else
            {
              $output = read_file_demo();
            }

            if(!is_wp_error($output))
            {
            	?>
            		<textarea name="file-data"><?php echo $output; ?></textarea>
		          	<?php wp_nonce_field("filesystem-nonce"); ?>
		          	<br>
		          	<input type="submit">
            	<?php
            }
            else
            {
              echo $output->get_error_message();
            }
          ?>
         </form>
      </div>
   <?php
}
Here’s how the code works:
代码的工作方式如下:
First we added a page to the “Settings” menu.
demo_pageis the callback for displaying the page content.首先,我们在“设置”菜单中添加了一个页面。
demo_page是用于显示页面内容的回调。Inside the page we’re displaying a HTML form with a textarea and nonce field. There’s also a submit button to submit the form. The textarea name is
file-data. The nonce is added to prevent a CSRF attack.在页面内部,我们正在显示带有textarea和nonce字段HTML表单。 还有一个提交按钮来提交表格。 文本区域名称为
file-data。 添加了nonce以防止CSRF攻击 。When the page is open, then we’re retrieving the stored file data using the
read_file_demofunction. When the form is submitted, we’re storing the content of the textarea into a file using thewrite_file_demofunction.打开页面后,我们将使用
read_file_demo函数检索存储的文件数据。 提交表单后,我们使用write_file_demo函数将文本区域的内容存储到文件中。If
read_file_demoorwrite_file_demoreturns an instance of theWP_Errorobject, then we’ll display an error message instead.如果
read_file_demo或write_file_demo返回WP_Error对象的实例,那么我们将显示一条错误消息。
Note, the above code will break your WordPress site, as we haven’t yet created the read_file_demo and write_file_demo functions. Let’s create them now!
请注意,由于我们尚未创建read_file_demo和write_file_demo函数,因此上述代码将破坏您的WordPress网站。 让我们现在创建它们!
写入文件 (Writing to a File)
Here’s the implementation of our write_file_demo function:
这是我们write_file_demo函数的实现:
function connect_fs($url, $method, $context, $fields = null)
{
  global $wp_filesystem;
  if(false === ($credentials = request_filesystem_credentials($url, $method, false, $context, $fields)))
  {
    return false;
  }

  //check if credentials are correct or not.
  if(!WP_Filesystem($credentials))
  {
    request_filesystem_credentials($url, $method, true, $context);
    return false;
  }

  return true;
}

function write_file_demo($text)
{
  global $wp_filesystem;

  $url = wp_nonce_url("options-general.php?page=demo", "filesystem-nonce");
  $form_fields = array("file-data");

  if(connect_fs($url, "", WP_PLUGIN_DIR . "/filesystem/filesystem-demo", $form_fields))
  {
    $dir = $wp_filesystem->find_folder(WP_PLUGIN_DIR . "/filesystem/filesystem-demo");
    $file = trailingslashit($dir) . "demo.txt";
    $wp_filesystem->put_contents($file, $text, FS_CHMOD_FILE);

    return $text;
  }
  else
  {
    return new WP_Error("filesystem_error", "Cannot initialize filesystem");
  }
}
Here’s how the code works:
代码的工作方式如下:
First we referenced the global
$wp_filesystemobject inside the function. This object is an instance of theWP_Filesystemclass. It’s responsible for exposing various methods for reading, creating, writing and deleting files.首先,我们在函数内部引用了全局
$wp_filesystem对象。 该对象是WP_Filesystem类的实例。 它负责公开用于读取,创建,写入和删除文件的各种方法。- Next, we’re creating a nonce URL of our form page and an array with the field names of our form. 接下来,我们将创建表单页面的现时URL和具有表单字段名称的数组。
Finally, we connect to the filesystem using the
connect_fsfunction.最后,我们使用
connect_fs函数连接到文件系统。connect_fsuses the request_filesystem_credentials function provided by WordPress to find an appropriate method to connect to the file system (direct, FTP or SSH). In case of FTP or SSH it will echo a form to ask for the credentials from the user. In the case of direct method, it simply returns true.connect_fs使用WordPress提供的request_filesystem_credentials函数来找到合适的方法来连接文件系统(直接,FTP或SSH)。 如果是FTP或SSH,它将回显一个表单以要求用户提供凭据。 在直接方法的情况下,它仅返回true。When the textarea form is submitted and the
request_filesystem_credentialschooses FTP or SSH method then we display the credentials form and hides thefile-datafield in the credentials form.当提交textarea表单并且
request_filesystem_credentials选择FTP或SSH方法时,我们将显示凭据表单,并在凭据表单中隐藏file-data字段。request_filesystem_credentialsfunction’s first parameter takes an URL where to redirect once it has got the correct credentials. The redirect is of type POST request. Therequest_filesystem_credentialslast parameter is an array of the field names to post to the redirect URL.request_filesystem_credentials函数的第一个参数采用一个URL,一旦获得正确的凭据,该URL就会重定向到该URL。 重定向的类型为POST请求。request_filesystem_credentials最后一个参数是要发布到重定向URL的字段名称的数组。- Once the credentials form is submitted, then it redirects back to the original form submit URL with proper field names and the values that were entered by the user. 提交凭据表单后,它将使用适当的字段名和用户输入的值重定向回原始表单提交URL。
Again, the whole process starts and we execute the
write_file_demo. This timerequest_filesystem_credentialshas the credentials therefore it will simply return true.同样,整个过程开始,我们执行
write_file_demo。 这次request_filesystem_credentials具有凭据,因此它将仅返回true。Then we use
$wp_filesystem->find_folderto reference to the folder. Then we build the complete path of thedemo.txtfile.然后,我们使用
$wp_filesystem->find_folder来引用该文件夹。 然后,我们构建demo.txt文件的完整路径。We used
$wp_filesystem->put_contentsto write data to the file.我们使用
$wp_filesystem->put_contents将数据写入文件。
Note: If you try to use the $wp_filesystem object’s methods without requesting and verifying credentials then they will not work.
注意:如果您尝试使用$wp_filesystem对象的方法而不请求和验证凭据,则它们将不起作用。
读取文件 (Reading a File)
Here is the implementation of the read_file_demo function.
这是read_file_demo函数的实现。
function read_file_demo()
{
  global $wp_filesystem;

  $url = wp_nonce_url("options-general.php?page=demo", "filesystem-nonce");

  if(connect_fs($url, "", WP_PLUGIN_DIR . "/filesystem/filesystem-demo"))
  {
    $dir = $wp_filesystem->find_folder(WP_PLUGIN_DIR . "/filesystem/filesystem-demo");
    $file = trailingslashit($dir) . "demo.txt";

    if($wp_filesystem->exists($file))
    {
      $text = $wp_filesystem->get_contents($file);
      if(!$text)
      {
        return "";
      }
      else
      {
        return $text;
      }
    }
    else
    {
      return new WP_Error("filesystem_error", "File doesn't exist");
    }
  }
  else
  {
    return new WP_Error("filesystem_error", "Cannot initialize filesystem");
  }
}
Here is how the code works:
代码的工作方式如下:
While reading the
demo.txtfile, we first connect to the file system using therequest_filesystem_credentialsfunction.在读取
demo.txt文件时,我们首先使用request_filesystem_credentials函数连接到文件系统。- This time we aren’t passing any form fields in the last parameter because the form is not submitted. We’re just passing the redirect URL so that it’s redirected once the credentials are retrieved. 这次我们没有在最后一个参数中传递任何表单字段,因为没有提交表单。 我们只是传递重定向URL,以便在检索到凭据后将其重定向。
We’re then checking if the file exists using the
$wp_filesystem->existsfunction. It file doesn’t exist we display an error. Otherwise we’re reading the file using the$wp_filesystem->get_contentsfunction and returning the content.然后,使用
$wp_filesystem->exists函数检查文件是否$wp_filesystem->exists。 该文件不存在,我们显示错误。 否则,我们将使用$wp_filesystem->get_contents函数读取文件并返回内容。
Assuming WordPress has chosen FTP as the suitable method for creating files, here are the screenshots of the whole process:
假设WordPress选择了FTP作为创建文件的合适方法,以下是整个过程的屏幕截图:
First when we open the demo page we will see this form:
首先,当我们打开演示页面时,我们将看到以下表格:
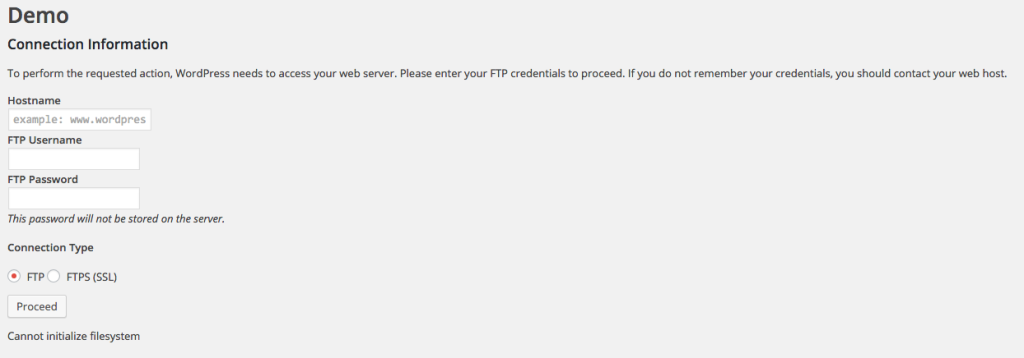
Here, we need to enter FTP or FTPS credentials and submit it. Once we submit it, we’ll see this form:
在这里,我们需要输入FTP或FTPS凭据并提交。 提交后,我们将看到以下表格:
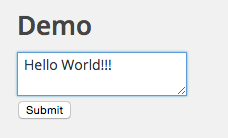
An empty textarea was displayed. Enter the text “Hello World!!!” submit the form. You will again see the credentials form.
显示了一个空的文本区域。 输入文本“ Hello World !!!” 提交表格。 您将再次看到凭据表单。

You have to fill it again because WordPress doesn’t store the FTP password by default (you can do this in wp-config.php, more on that later). So every time your plugin needs to work with a file system, it must ask credentials. Now submitting it will redirect back to the redirect URL with field names and values submitted earlier. Here is how the textarea appears:
您必须再次填写密码,因为WordPress默认情况下不会存储FTP密码(您可以在wp-config.php中进行此操作,稍后再介绍)。 因此,每当您的插件需要使用文件系统时,它都必须询问凭据。 现在提交它会重定向回带有先前提交的字段名称和值的重定向URL。 以下是文本区域的显示方式:

Here, we read the contents of the file and display it.
在这里,我们读取文件的内容并显示它。
$wp_filesystem对象的其他方法 (Other Methods of the $wp_filesystem Object)
The $wp_filesystem object provides many other methods to perform various other operations on files and directories. We just saw writing and reading n file. You can find the whole list of what you can do at the WP_Filesystem_Base () documentation page.
$wp_filesystem对象提供了许多其他方法来对文件和目录执行各种其他操作。 我们刚刚看到读写n文件。 您可以在WP_Filesystem_Base()文档页面上找到可以执行的操作的完整列表。
Let’s check out some of the important ones:
让我们检查一些重要的:
$wp_filesystem->delete:
deleteis used to delete a file or directory. You need to pass a string representing the path.$ wp_filesystem-> delete :
delete用于删除文件或目录。 您需要传递代表路径的字符串。$wp_filesystem->mkdir:
mkdiris used to create a directory. It takes a string representing the parent directory.$ wp_filesystem-> mkdir :
mkdir用于创建目录。 它采用代表父目录的字符串。$wp_filesystem->move:
moveis used to move file It takes two parameters i.e., the first one is the path of the file and second one is the directory where to move it to.$ wp_filesystem-> move :
move用于移动文件它带有两个参数,即第一个是文件的路径,第二个是将文件移动到的目录。$wp_filesystem->size:
sizereturns the size of a file in bytes. You need to pass path of a file.$ wp_filesystem-> size :
size返回文件的大小(以字节为单位)。 您需要传递文件的路径。$wp_filesystem->chmod:
chmodis used to change permissions of a file. It takes three arguments i.e., path of the file, the permission octal number and boolean representing recursion.$ wp_filesystem-> chmod :
chmod用于更改文件的权限。 它采用三个参数,即文件的路径,权限八进制数和表示递归的布尔值。
You can find which method of connection is used by WordPress to access filesystem using $wp_filesystem->method public property.
您可以使用$wp_filesystem->method公共属性找到WordPress使用哪种连接方法来访问文件系统。
永久存储凭证 (Storing Credentials Permanently)
We saw that WordPress doesn’t store the FTP or SSH credentials permanently. It’s not user friendly to ask for details again and again. There is a way to store the credentials permanently using the wp-config.php file.
我们看到WordPress不会永久存储FTP或SSH凭据。 一次又一次地询问详细信息不是用户友好的。 有一种方法可以使用wp-config.php文件永久存储凭据。
Use these options to store the FTP and SSH credentials:
使用以下选项存储FTP和SSH凭据:
FTP_HOST: The host name of the server.
FTP_HOST :服务器的主机名。
FTP_USER: The username to use while connecting.
FTP_USER :连接时使用的用户名。
FTP_PASS: The password to use while connecting
FTP_PASS :连接时使用的密码
FTP_PUBKEY: The path of the public key which will be used while using SSH2 connection.
FTP_PUBKEY :使用SSH2连接时将使用的公用密钥的路径。
FTP_PRIKEY: The path of the private key which will be used while using SSH2 connection.
FTP_PRIKEY :使用SSH2连接时将使用的私钥的路径。
结论 (Conclusion)
In this article we saw the process of designing an admin page that accesses our file system using the WordPress Filesystem API. In case you’re trying to access a file system in a background process (such as using a cron job), then its not possible to display the credentials form if required, in that case you’ll need to make sure you notify your user to place the credential constants in the wp-config.php file. You can go ahead and experiment further with this API and share your experiences with us below.
在本文中,我们看到了设计管理页面的过程,该页面使用WordPress Filesystem API访问我们的文件系统。 如果您尝试在后台进程中访问文件系统(例如使用cron作业),则无法显示凭据表单(如果需要),在这种情况下,您需要确保通知用户将凭据常量放置在wp-config.php文件中。 您可以继续尝试使用此API并在下面与我们分享您的经验。
翻译自: https://www.sitepoint.com/introduction-to-the-wordpress-filesystem-api/
wordpress api


 529
529

 被折叠的 条评论
为什么被折叠?
被折叠的 条评论
为什么被折叠?
 到【灌水乐园】发言


