


wordpress api
With the release of version 4.3, WordPress introduced Site Icons, which allows users to define an icon that represents their website. As often occurs, this new concept has an associated API.
随着版本4.3的发布,WordPress引入了站点图标,该站点图标允许用户定义代表其网站的图标。 通常,这个新概念都有一个关联的API。
This article will delve into Site Icons, beginning by defining what they are. Then, we will play with this brand new API, which is essentially composed of four functions and two filters. This doesn’t sound like much, but you’ll see that it is definitely enough!
本文将首先定义“网站图标”,然后深入研究它们。 然后,我们将使用这个全新的API,该API本质上由四个功能和两个过滤器组成。 听起来似乎不多,但是您一定会发现它已经足够了!
什么是网站图标? (What Is a Site Icon?)
Good news: if you’ve worked with the web for a while, then you probably already know what a Site Icon is. In fact, it is just the name WordPress has given to an icon we all know well: the favicon.
好消息:如果您使用网络已有一段时间,那么您可能已经知道什么是网站图标。 实际上,这只是WordPress赋予我们大家都知道的图标的名称:favicon。
A favicon is the image displayed on the browser’s tab when your website is opened. In addition, when you save a shortcut to a webpage on the home screen of your smartphone, your mobile OS uses your favicon so that the same generic icon is not displayed for every website.
网站图标是打开您的网站时显示在浏览器选项卡上的图像。 另外,当您在智能手机的主屏幕上保存到网页的快捷方式时,您的移动操作系统会使用收藏夹图标,因此不会为每个网站显示相同的通用图标。
Once set up, the Site Icon will also be displayed on your administration panel, which was, until now didn’t have a favicon.
设置完成后,“站点”图标也将显示在您的管理面板上,该图标直到现在还没有图标。
By defining a Site Icon, you therefore define your website’s favicon. The good news is that, as a user or a theme developer, you don’t have to do anything to activate the feature. In fact, the display of the Site Icon is activated by default in WordPress 4.3: the call for the right function is done when the wp_head action occurs and every theme must call this action.
通过定义站点图标,您就可以定义网站的图标。 好消息是,作为用户或主题开发人员,您无需执行任何操作即可激活该功能。 实际上,默认情况下,WordPress 4.3中已激活“网站图标”的显示:当发生wp_head操作且每个主题都必须调用此操作时, wp_head需要调用正确的功能。
This means one thing: if you want to try what we do in this article, you can do it without changing your current theme. The only thing you must do before following this tutorial is update your WordPress installation to version 4.3 (see our article about updating your WordPress installation if you haven’t already done so.
这意味着一件事:如果您想尝试本文中的操作,则可以在不更改当前主题的情况下进行操作。 在遵循本教程之前,您唯一要做的就是将WordPress安装更新到版本4.3(如果尚未这样做,请参阅有关更新WordPress安装的文章。
如何定义站点图标 (How To Define a Site Icon)
Defining a new Site Icon can be achieved by using the Theme Customizer. You have two ways to access this customizer:
可以使用主题定制器来定义新的网站图标。 您可以通过两种方式访问此定制器:
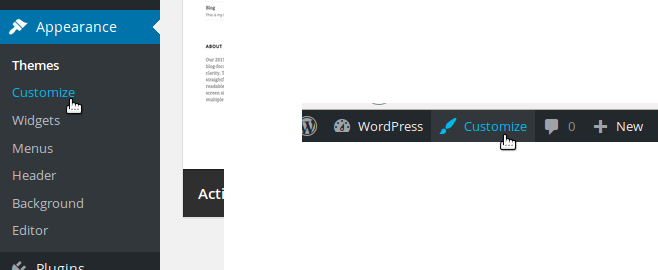
- By using the administration menu, the customizer is located in the ‘Appearance’ menu, with the second entry named ‘Customize’ 通过使用管理菜单,定制器位于“外观”菜单中,第二个条目名为“定制”
- By hitting the ‘Customize’ button in the administration bar, which appears at the top of every page of your website once you are logged in (this button is new to WordPress 4.3) 登录后,点击管理栏中的“自定义”按钮,该按钮显示在网站每个页面的顶部(此按钮是WordPress 4.3的新功能)
The Theme Customizer consists of a preview of your website, with a sidebar on the left allowing you to customize some details. For the purposes of this tutorial, we’re interested in the ‘Site Identity’ menu option.
主题定制器包括网站的预览,左侧带有侧边栏,可让您自定义一些详细信息。 就本教程而言,我们对“站点标识”菜单选项感兴趣。
If you have already used the Theme Customizer, you might have noticed a change: the ‘Site Title & Tagline’ menu option has been replaced by ‘Site Identity’. This new name reflects the changes made to this menu option: you can now set not only your site’s title and tagline, but also its Site Icon.
如果您已经使用了主题定制器,则可能已经注意到了一个变化:“站点标题和标语”菜单选项已由“站点标识”代替。 这个新名称反映了对该菜单选项所做的更改:您现在不仅可以设置站点的标题和标语,还可以设置其站点图标。
If it’s the first time you have played with Site Icons, WordPress will show you the text ‘No file selected’ and you will be able to select an image to use as your Site Icon by hitting the ‘Select File’ button right below.
如果这是您第一次使用“网站图标”,WordPress将为您显示“未选择文件”文本,您可以通过单击下面的“选择文件”按钮来选择要用作网站图标的图像。
A media window will then be opened. You already know this window, as it is the same as you see everywhere you can select a media file. You can select an already uploaded image, or you can upload a new one. To ensure you have a good image quality in every context, you should upload an image which is, according to WordPress, “at least 512 pixels wide and tall”.
然后将打开一个媒体窗口。 您已经知道此窗口,因为它与选择媒体文件的处处可见。 您可以选择一个已经上传的图像,也可以上传一个新的图像。 为了确保在每种情况下都具有良好的图像质量,您应该上传一张图像,根据WordPress,该图像“至少高512像素”。
Once you’ve selected your image, you can choose to crop it and only select the square to really use as your Site Icon. Note that cropping this image won’t alter the original file, so you can crop it without worrying about the display of your original file, if you chose an existing image file.
选择图像后,您可以选择裁剪图像,仅选择要真正用作站点图标的正方形。 请注意,裁剪此图像不会更改原始文件,因此,如果选择了现有的图像文件,则可以裁剪它而不必担心原始文件的显示。
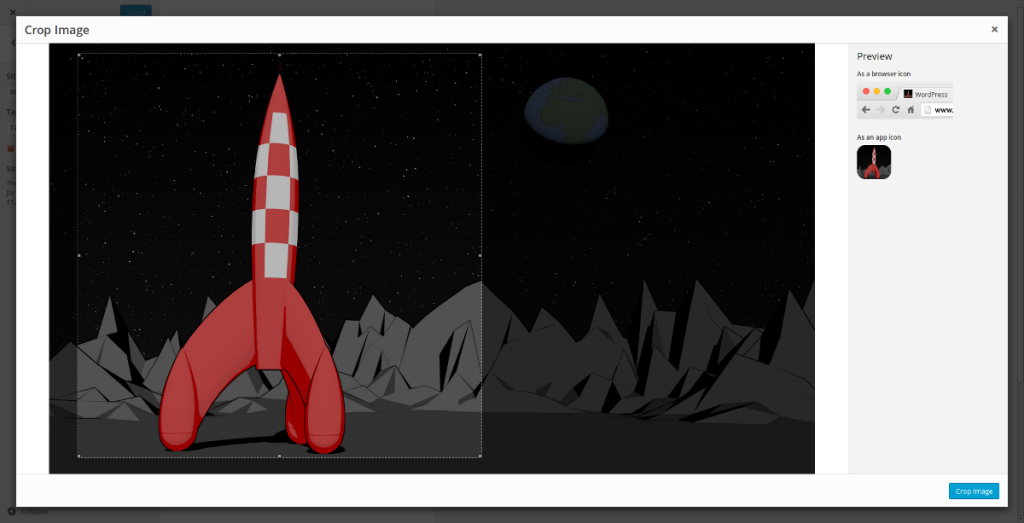
Next, once you’ve selected the square that you want to use, hit the ‘Crop Image’ button in the bottom right corner of the window and wait for the magic to happen!
接下来,一旦选择了要使用的正方形,请点击窗口右下角的“裁剪图像”按钮,然后等待魔术发生!
WordPress will automatically resize your image to the dimensions that needs (for example, WordPress will create a 512 pixels wide square, even if your image is smaller than 512 pixels).
WordPress会自动将图像调整为所需的尺寸(例如,即使您的图像小于512像素,WordPress也会创建一个512像素宽的正方形)。
To save the change you just made, hit the ‘Save & Publish’ button at the top of the Theme Customizer. Now you should see your brand new favicon on every page of your website.
要保存您刚刚进行的更改,请点击主题定制器顶部的“保存并发布”按钮。 现在,您应该在网站的每个页面上看到全新的网站图标。
You can remove and change the Site Icon at any stage, by using the Theme Customizer.
您可以在任何阶段使用主题自定义程序删除和更改网站图标。
检索当前站点图标 (Retrieving the Current Site Icon)
Retrieving your current site icon is all automatic. As a theme or plugin developer, you don’t have to worry about the Site Icon for its basic usage: once the image is selected, WordPress will automatically display it as a favicon.
检索当前站点图标是完全自动的。 作为主题或插件开发人员,您不必担心“网站图标”的基本用法:选择图像后,WordPress会自动将其显示为网站图标。
However, if you need to retrieve the current Site Icon for any reason in your theme or your plugin, it’s possible. For example, if you’re developing a theme, you can show your own favicon manager in an administration panel if the user hasn’t defined a Site Icon (you can also redirect them to the Theme Customizer).
但是,如果出于某种原因需要在主题或插件中检索当前的站点图标,则可以。 例如,如果您正在开发主题,则可以在管理面板中显示您自己的收藏夹管理器(如果用户尚未定义网站图标)(也可以将其重定向到主题定制器)。
WordPress网站图标功能API (WordPress Site Icon Functions API)
At the moment, WordPress provides four functions in the Site Icon public API. We will review each of them.
目前,WordPress在Site Icon公共API中提供了四个功能。 我们将对其进行复审。
知道是否设置了站点图标 (Knowing If a Site Icon Is Set)
The first function we’ll see is has_site_icon(). As its name suggests, this function allows you to see whether a Site Icon is set. That way you can indicate to your users to set a Site Icon.
我们将看到的第一个函数是has_site_icon() 。 顾名思义,此功能使您可以查看是否设置了站点图标。 这样,您可以指示用户设置站点图标。
This function returns a boolean: true if a Site Icon is set, false otherwise.
此函数返回一个布尔值:如果设置了站点图标,则返回true ,否则返回false 。
if (has_site_icon()) {
    // User set a Site Icon, do something awesome!
}
else {
    // User didn't set a Site Icon, do something else. But still awesome.
}
检索站点图标URL (Retrieving the Site Icon URLs)
WordPress provides two functions that enable us to retrieve the current Site Icon URLs: get_site_icon_url() and site_icon_url(). As we said above, WordPress generates several files in different sizes for a Site Icon. That’s why there is no error in the title of this part: there are several URLs we can retrieve.
WordPress提供了两个使我们能够检索当前站点图标URL的功能: get_site_icon_url()和site_icon_url() 。 如上所述,WordPress会为站点图标生成多个大小不同的文件。 这就是该部分标题没有错误的原因:我们可以检索几个URL。
We will begin with get_site_icon_url(). It can be used without a parameter: it will then return the current Site Icon, in its 512 pixels size.
我们将从get_site_icon_url()开始。 它可以不带参数使用:它将返回当前的站点图标,其大小为512像素。
if (has_site_icon())
    echo '<img src="' . get_site_icon_url() . '" alt="Site Icon" />';
But, we can also pass to this function three parameters. All of them are optional.
但是,我们也可以将三个参数传递给该函数。 它们都是可选的。
The first parameter is the ID of the blog on which you want the Site Icon; this is useful when Multisite is enabled. By default, this parameter is set to null and the current site is retrieved. In most cases, that’s the behavior we want, so you can continue to pass null as the first parameter.
第一个参数是您要在其上放置“网站”图标的博客的ID; 启用多站点时,此功能很有用。 默认情况下,此参数设置为null并检索当前站点。 在大多数情况下,这就是我们想要的行为,因此您可以继续将null作为第一个参数传递。
The second parameter is more interesting, as it defines the wanted size for the Site Icon. You can indicate any size you want, but remember that WordPress won’t generate a new image for you: it will instead return the lower size, which is greater than the value you indicated if you indicated a value lower than 512. If you indicated a value greater or equal than 512, it will always return the 512 pixel version of the image.
第二个参数更有趣,因为它定义了站点图标的所需大小。 您可以指定所需的任何大小,但是请记住WordPress不会为您生成新图像:它会返回较小的大小,如果您指定的值小于512,则该大小将大于您指定的值。大于或等于512的值,它将始终返回图像的512像素版本。
For example, the following won’t display a 200 pixels wide image, but will instead display a 270 pixel wide version (with the default generated sizes).
例如,以下内容将不会显示200像素宽的图像,而将显示270像素宽的版本(具有默认的生成尺寸)。
if (has_site_icon())
echo '<img src="' . get_site_icon_url(null, 200) . '" alt="Site Icon" />';
Finally, the third parameter is the URL of the image you want to see if no Site Icon is found. It’s a good way to define a fallback URL without having to test by ourselves if the returned URL is empty or not.
最后,第三个参数是要查找的图像的URL(如果未找到“站点图标”)。 这是定义后备URL的好方法,而无需我们自己测试返回的URL是否为空。
The second function we can cite when we talk about retrieving a Site Icon is site_icon_url(). It echoes the URL of the current Site Icon, retrieved with get_site_icon_url(). It can be used in the same way.
当我们谈论检索站点图标时,我们可以引用的第二个函数是site_icon_url() 。 它回显通过get_site_icon_url()检索的当前站点图标的URL。 可以以相同的方式使用。
回显元标记 (Echoing the Meta Tags)
The last function we’ll look at is the one used by WordPress during the wp_head action: it directly echoes all the meta tags needed to indicate to the browser (or the OS on a smartphone) the available sizes for the favicon. This function is wp_site_icon() and it does not accept any parameter.
我们要看的最后一个功能是WordPress在wp_head动作期间使用的wp_head :它直接回显所有必要的meta标记,以向浏览器(或智能手机上的操作系统)指示该图标的可用大小。 此函数是wp_site_icon() ,并且不接受任何参数。
// We should be in the head tag
wp_site_icon();
定义自己的站点图标大小 (Defining Your Own Site Icon Sizes)
By default, WordPress generates several sizes when you crop your Site Icon. It uses four different sizes for generating the meta tags:
默认情况下,当您裁剪站点图标时,WordPress会生成几种大小。 它使用四种不同的大小来生成meta标记:
- A 32 pixels wide image for the classic favicon (in a browser) 经典Favicon的32像素宽图像(在浏览器中)
- A 180 pixels wide image for using as app icon in iOS 180像素宽的图像,可在iOS中用作应用程序图标
- A 192 pixels wide image for using as Android or Chrome app icon 192像素宽的图像,可用作Android或Chrome应用程序图标
- A 270 pixels wide image for using as a tile in Windows. 270像素宽的图像,用作Windows中的图块。
The four corresponding meta tags are all generated in the wp_site_icon() function, but what if you want to add your own sizes?
四个相应的meta标记都在wp_site_icon()函数中生成,但是如果要添加自己的大小怎么办?
It is possible to add your own sizes, thanks to two new filters, available with WordPress 4.3 and dedicated to the Site Icon API.
借助两个新过滤器,可以添加自己的尺寸,这两个过滤器可用于WordPress 4.3,并且专用于Site Icon API。
The first filter is named site_icon_image_sizes and can be used to indicate the sizes you need for the Site Icon in your theme or plugin. The callback function must except for one parameter: an array containing the current sizes, which will be generated. It must return an array containing the sizes to generate (you can override the existing array, but you should just add your own).
第一个过滤器名为site_icon_image_sizes ,可用于指示主题或插件中“站点图标”所需的大小。 回调函数必须除一个参数之外:一个将包含当前大小的数组。 它必须返回一个包含要生成的大小的数组(您可以覆盖现有数组,但应该添加自己的数组)。
function add_my_site_icon_sizes($sizes) {
    $sizes[] = 64;

    return $sizes;
}
add_filter('site_icon_image_sizes', 'add_my_site_icon_sizes');
Without using them, adding new sizes is useless. That’s why we find a second filter: site_icon_meta_tags, called when WordPress generates the meta tags corresponding to the Site Icon (in wp_site_icon()).
如果不使用它们,则添加新尺寸是没有用的。 这就是为什么我们找到第二个过滤器的原因: site_icon_meta_tags ,当WordPress生成与站点图标相对应的meta标签时(在wp_site_icon() )。
For this filter, your callback function must except for an array containing all the current meta tags and must return the new tags to display. Once again, if you can override the existing array, you shouldn’t do this (unless you really think that the tags generated by default are useless).
对于此过滤器,您的回调函数必须除包含所有当前meta标记的数组之外,并且必须返回要显示的新标记。 再一次,如果您可以覆盖现有数组,则不应这样做(除非您真的认为默认情况下生成的标签是无用的)。
function add_my_site_icon_meta_tags($tags) {
    $tags[] = sprintf('<link rel="icon" href="%s" sizes="64x64" />', esc_url(get_site_icon_url(null, 64)));

    return $tags;
}
add_filter('site_icon_meta_tags', 'add_my_site_icon_meta_tags');
结论 (In Conclusion)
With four functions and two filters, the WordPress Site Icon API is not as extensive as some other APIs, but you can see that a range of options is covered, from generating your own icon sizes, through to displaying them.
WordPress Site Icon API具有四个功能和两个过滤器,不像其他一些API那样广泛,但是您可以看到其中涵盖了从生成自己的图标大小到显示它们的一系列选项。
That being said, you shouldn’t use this API to display any images other than the favicon; this is not the purpose for which it has been built, and as wp_site_icon() is called by default, some side effects could be observed.
话虽如此,您不应使用此API显示除收藏图标之外的任何图像; 这不是构建它的目的,并且由于默认调用wp_site_icon() ,因此可能会观察到一些副作用。
You can retrieve the filters used in this article in a little plugin available right here. Note that this example is freely inspired from the one provided by the WordPress team to introduce us to this new API.
您可以在此处的一个小插件中检索本文中使用的过滤器。 请注意,此示例是从WordPress团队提供的示例中自由启发而来的, 向我们介绍了此新API。
翻译自: https://www.sitepoint.com/all-you-need-to-know-about-the-new-wordpress-site-icon-api/
wordpress api


 424
424

 被折叠的 条评论
为什么被折叠?
被折叠的 条评论
为什么被折叠?
 到【灌水乐园】发言


