


wordpress api
Most WordPress themes have a Theme settings page to customize its features, behaviour and styles. Providing a theme settings page with your theme makes it easy for your users to customize your theme instead of directly editing the PHP or CSS files. This makes updating your theme easier, as users will not lose the changes they’ve made.
大多数WordPress主题都有一个“主题设置”页面,以自定义其功能,行为和样式。 提供带有主题的主题设置页面可以使用户轻松自定义主题,而不必直接编辑PHP或CSS文件。 这使更新主题变得更加容易,因为用户不会丢失所做的更改。
In this tutorial we’ll learn the ‘WordPress’ recommended way of creating a theme settings page, that is, using the WordPress Settings API. The WordPress Settings API was added in WordPress 2.7 and since then it has become one of the most popular WordPress APIs. This tutorial will also be useful if you’re planning to add a settings page to your WordPress plugin. Let’s get started.
在本教程中,我们将学习创建主题设置页面的“ WordPress”推荐方法,即使用WordPress Settings API。 WordPress设置API是在WordPress 2.7中添加的,此后它已成为最受欢迎的WordPress API之一。 如果您打算将设置页面添加到WordPress插件中,那么本教程也将非常有用。 让我们开始吧。
我们应该在主题设置页面中包含什么? (What Shall We Include in a Theme Settings Page?)
Options in your theme settings page depend on what features and customization your theme supports. That said, there are some common things which are included in every theme settings page. Some of the common options are: social URLs, static or responsive layout and header logo to name a few. In this tutorial I’ll show you how to include these four options in our theme settings page.
主题设置页面中的选项取决于主题支持的功能和自定义。 也就是说,每个主题设置页面中都包含一些常见的东西。 一些常见的选项包括:社交URL,静态或响应式布局以及标头徽标等。 在本教程中,我将向您展示如何在主题设置页面中包括这四个选项。
创建主题设置页面菜单项 (Creating a Theme Settings Page Menu Item)
First we have to create a menu item on the admin panel that will access our theme settings page.
首先,我们必须在管理面板上创建一个菜单项,该菜单项将访问我们的主题设置页面。
We can create a menu item using the WordPress Menu API. Here’s the code to create a menu item.
我们可以使用WordPress菜单API创建菜单项。 这是创建菜单项的代码。
function theme_settings_page(){}
function add_theme_menu_item()
{
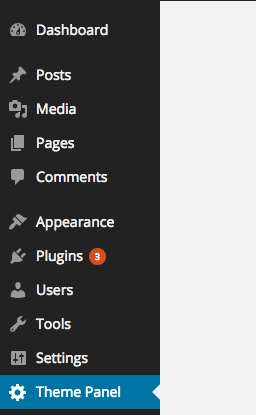
add_menu_page("Theme Panel", "Theme Panel", "manage_options", "theme-panel", "theme_settings_page", null, 99);
}
add_action("admin_menu", "add_theme_menu_item");Here, theme-panel is the unique ID representing our menu item. theme_settings_page is the callback for displaying the content of the page created by the Menu API. We’ll be coding this function next.
在这里, theme-panel是代表我们菜单项的唯一ID。 theme_settings_page是用于显示由Menu API创建的页面内容的回调。 接下来,我们将对该函数进行编码。
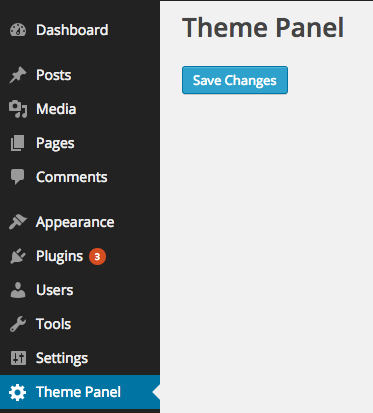
Here’s how it looks.
这是它的外观。
设置API概述 (Overview of the Settings API)
The Settings API is used to populate the page created by the menu item API. A settings page is divided into sections and fields.
设置API用于填充菜单项API创建的页面。 设置页面分为部分和字段。
For the sake of this tutorial, we’ll just be creating a single section and will put all the fields inside that section.
为了本教程的缘故,我们将只创建一个部分,并将所有字段放入该部分中。
Here is the code for the theme_settings_page function to create a section and add the submit button.
这是theme_settings_page函数的代码,用于创建部分并添加提交按钮。
function theme_settings_page()
{
    ?>
	    <div class="wrap">
	    <h1>Theme Panel</h1>
	    <form method="post" action="options.php">
	        <?php
	            settings_fields("section");
	            do_settings_sections("theme-options");
	            submit_button();
	        ?>
	    </form>
		</div>
	<?php
}
Here we’re registering a section using settings_field with an ID section. theme-options is a group ID to all of the fields belonging to a section. Finally, the submit_button() function echoes the submit button for our theme settings page.
在这里,我们使用settings_field和ID为section来注册一个section 。 theme-options是属于节的所有字段的组ID。 最后, submit_button()函数在主题设置页面上回显提交按钮。
Here’s how that should look.
这就是它的外观。
添加社交资料网址 (Adding Social Profile URLs)
Now, let’s add fields in our settings page to store our Facebook and Twitter profile URLs. Almost every WordPress theme has social profile options, therefore it’s a handy, practical example.
现在,让我们在设置页面中添加字段以存储我们的Facebook和Twitter个人资料URL。 几乎每个WordPress主题都有社交配置文件选项,因此这是一个方便实用的示例。
Here’s the code to add input text fields using the Settings API.
这是使用Settings API添加输入文本字段的代码。
function display_twitter_element()
{
?>
<input type="text" name="twitter_url" id="twitter_url" value="<?php echo get_option('twitter_url'); ?>" />
<?php
}
function display_facebook_element()
{
?>
<input type="text" name="facebook_url" id="facebook_url" value="<?php echo get_option('facebook_url'); ?>" />
<?php
}
function display_theme_panel_fields()
{
add_settings_section("section", "All Settings", null, "theme-options");
add_settings_field("twitter_url", "Twitter Profile Url", "display_twitter_element", "theme-options", "section");
add_settings_field("facebook_url", "Facebook Profile Url", "display_facebook_element", "theme-options", "section");
register_setting("section", "twitter_url");
register_setting("section", "facebook_url");
}
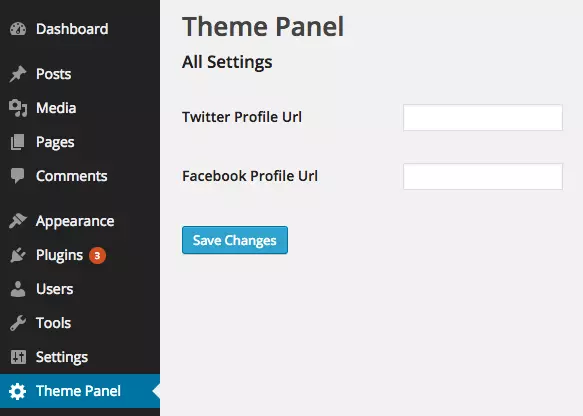
add_action("admin_init", "display_theme_panel_fields");After the admin panel is initialized, we’re registering the sections and fields display callbacks. Here we’re using three important functions:
初始化管理面板后,我们将注册各节和显示回调的字段。 在这里,我们使用三个重要功能:
add_settings_sectionis used to display the section heading and description.add_settings_section用于显示节标题和描述。add_settings_fieldis used to display the HTML code of the fields.add_settings_field用于显示字段HTML代码。register_settingis called to automate saving the values of the fields.调用
register_setting以自动保存字段的值。
Here’s what our settings page should now look like.
这是我们的设置页面现在应显示的样子。
We’ve now seen how to add input text fields using our settings page. Let’s see how to add a checkbox by providing an option to choose between static or responsive layouts.
现在,我们已经了解了如何使用设置页面添加输入文本字段。 让我们看看如何通过提供在静态或响应式布局之间进行选择的选项来添加复选框。
添加选项以在布局之间进行选择 (Adding Option to Choose Between Layouts)
Let’s see how to expand out the display_theme_panel_fields function to display a checkbox to choose between layouts.
让我们看看如何扩展display_theme_panel_fields函数以显示一个复选框,以在布局之间进行选择。
Here’s the code to achieve this.
这是实现此目的的代码。
function display_twitter_element()
{
?>
<input type="text" name="twitter_url" id="twitter_url" value="<?php echo get_option('twitter_url'); ?>" />
<?php
}
function display_facebook_element()
{
?>
<input type="text" name="facebook_url" id="facebook_url" value="<?php echo get_option('facebook_url'); ?>" />
<?php
}
function display_layout_element()
{
?>
<input type="checkbox" name="theme_layout" value="1" <?php checked(1, get_option('theme_layout'), true); ?> />
<?php
}
function display_theme_panel_fields()
{
add_settings_section("section", "All Settings", null, "theme-options");
add_settings_field("twitter_url", "Twitter Profile Url", "display_twitter_element", "theme-options", "section");
add_settings_field("facebook_url", "Facebook Profile Url", "display_facebook_element", "theme-options", "section");
add_settings_field("theme_layout", "Do you want the layout to be responsive?", "display_layout_element", "theme-options", "section");
register_setting("section", "twitter_url");
register_setting("section", "facebook_url");
register_setting("section", "theme_layout");
}
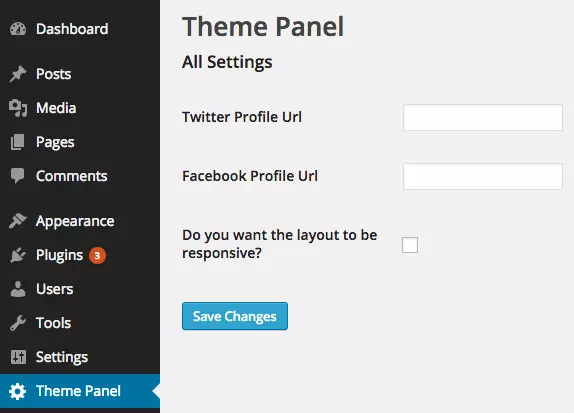
add_action("admin_init", "display_theme_panel_fields");We added a new settings field using add_settings_field and registered it using register_settings as usual. One thing to note, if we want to tell whether a user has checked the checkbox or not, we’re using the checked() function.
我们使用add_settings_field添加了一个新的设置字段,并照常使用register_settings注册了它。 需要注意的一件事是,如果我们想告诉用户是否已选中了复选框,则使用了checked()函数。
The checked() function compares a value with an another value, if they’re equal then it echoes a checked attribute, otherwise nothing.
checked()函数将一个值与另一个值进行比较,如果它们相等,则将回显一个checked属性,否则不做任何处理。
Here’s how our settings page looks now.
现在是我们的设置页面的外观。
上载徽标 (Uploading a Logo)
The register_setting function takes a third argument which is a callback, this callback is fired before it saves the settings into the database. We can utilise this callback to handle uploads.
register_setting函数采用第三个参数,它是一个回调,在将设置保存到数据库之前会触发该回调。 我们可以利用此回调来处理上传。
Here is code to upload a logo in our settings page.
这是在我们的设置页面中上传徽标的代码。
function logo_display()
{
	?>
        <input type="file" name="logo" />
        <?php echo get_option('logo'); ?>
   <?php
}

function handle_logo_upload()
{
	if(!empty($_FILES["demo-file"]["tmp_name"]))
	{
		$urls = wp_handle_upload($_FILES["logo"], array('test_form' => FALSE));
	    $temp = $urls["url"];
	    return $temp;
	}

	return $option;
}

function display_theme_panel_fields()
{
	add_settings_section("section", "All Settings", null, "theme-options");

    add_settings_field("logo", "Logo", "logo_display", "theme-options", "section");

    register_setting("section", "logo", "handle_logo_upload");
}

add_action("admin_init", "display_theme_panel_fields");
Here, we’re using wp_handle_upload to store the image file and retrieve its URL and store it as a option.
在这里,我们使用wp_handle_upload来存储图像文件并检索其URL并将其存储为一个选项。
Here’s how our settings page looks now, it’s shaping up nicely!
这是我们的设置页面现在的外观,它的外观很好!
检索设置 (Retrieving Settings)
A theme needs to retrieve the setting values on the front end. The Settings API internally stores the values using the Options API. Therefore, you can retrieve the values using get_option() function.
主题需要在前端检索设置值。 Settings API使用Options API在内部存储值。 因此,您可以使用get_option()函数检索值。
It’s quite simple, here’s the code.
这很简单,这是代码。
<?php

$layout = get_option('theme_layout');
$facebook_url = get_option('facebook_url');
$twitter_url = get_option('twitter_url');
结论 (Conclusion)
In this article we saw how we can easily create a theme settings page using the Settings API. We created a text, file and checkbox input fields to take input in various data formats. Go ahead and try to expand the page and add more form controls yourself.
在本文中,我们了解了如何使用Settings API轻松创建主题设置页面。 我们创建了文本,文件和复选框输入字段,以采用各种数据格式进行输入。 继续尝试扩展页面并自己添加更多表单控件。
翻译自: https://www.sitepoint.com/create-a-wordpress-theme-settings-page-with-the-settings-api/
wordpress api


 3964
3964

 被折叠的 条评论
为什么被折叠?
被折叠的 条评论
为什么被折叠?
 到【灌水乐园】发言


