


wordpress评论插件
Fresh content on any site is a good thing. A nice touch is to display your most discussed posts to your website visitors. In the case of WordPress, a widget is the ideal place for this. Users who wouldn’t otherwise know where to go after reading the current post, might check out and hopefully participate in your blog’s most commented posts. Your most commented on posts are commonly also the ones which bring most page views and are the most interesting.
任何网站上的新鲜内容都是一件好事。 一个不错的办法是向您的网站访问者显示讨论最多的帖子。 在WordPress的情况下,小部件是理想的选择。 在阅读了当前帖子之后不知道要去哪里的用户,可以签出并希望参与您博客中评论最多的帖子。 您最常在帖子中留言最多的也是那些带来最多页面浏览量且最有趣的帖子。
In this tutorial we will create a basic plugin to display most commented on posts in a widget. Although there are lots of plugins available for this purpose, many of them tend to be overwhelming and also don’t support caching. In this article, the plugin we’ll build will be lightweight and will cache the top 10 commented posts for 24 hours.
在本教程中,我们将创建一个基本插件,以显示窗口小部件中帖子最多的评论。 尽管有许多可用于此目的的插件,但其中许多插件往往不堪重负,也不支持缓存。 在本文中,我们将构建的插件将是轻量级的,并将在24小时内缓存评论最多的10个帖子。
插件目录和文件 (Plugin Directory and Files)
To start with the plugin development, create a directory called most-commented-widget and create the following files in it:
要开始插件开发,请创建一个名为most-commented-widget的目录,并在其中创建以下文件:
--most-commented-widget
  -most-commented-widget.php
  -style.css
In the most-commented-widget.php file, add the following text to make the plugin installable.
在最受评论的widget.php文件中,添加以下文本以使插件可安装。
<?php

/*
Plugin Name: Most Commented Posts Widget
Plugin URI: https://www.sitepoint.com
Description: Displays most commented posts in an widget
Author: Narayan Prusty
*/
get_posts()函数 (The get_posts() Function)
We will use the get_posts() function instead of the WP_Query object to retrieve the most commented on posts, because using WP_Query directly alters the main loop (i.e., global $wp_query variable) which would cause site issues.
我们将使用get_posts()函数而不是WP_Query对象来检索评论最多的帖子,因为使用WP_Query直接更改主循环(即全局$wp_query变量),这将导致站点问题。
The get_posts() function is used to retrieve an array of WP_Post objects based on a set of parameters. get_posts() internally uses WP_Query object’s query function to construct a MySQL query and execute it. WP_Query object’s query doesn’t alter the main loop.
get_posts()函数用于根据一组参数检索WP_Post对象的数组。 get_posts()内部使用WP_Query对象的query函数构造一个MySQL查询并执行它。 WP_Query对象的query不会更改主循环。
瞬态API (The Transients API)
The Transients API is used to store key value pairs of data, just like the Options API, but with an expiration time. The Transients API stores the data only in cache if persistence caching is configured. Therefore the Transients API is great for caching data.
Transients API用于存储键值数据对,就像Options API一样,但是具有到期时间。 如果配置了持久性缓存,则Transients API仅将数据存储在缓存中。 因此,Transients API非常适合缓存数据。
We will use the Transients API to cache our most commented posts for 24 hours.
我们将使用Transients API将我们评论最多的帖子缓存24小时。
创建小部件 (Creating a Widget)
OK, let’s create our widget. A widget is a class which extends the WP_Widget class. Here’s the code:
好的,让我们创建小部件。 小部件是扩展WP_Widget类的类。 这是代码:
class Most_Commented_Post_Widget extends WP_Widget
{
    public function __construct()
    {
        parent::__construct("Most_Commented_Post_Widget", "Display Most Commented Posts", array("description" => __("This plugin displays three most commented posts in an widget")));
    }

    public function form($instance)
    {
        if($instance)
        {
            $title = esc_attr($instance['title']);
        }
        else
        {
            $title = '';
        }
        ?>

        <p>
            <label for="<?php echo $this->get_field_id('title'); ?>"><?php echo "Title"; ?></label>
            <input class="widefat" id="<?php echo $this->get_field_id('title'); ?>" name="<?php echo $this->get_field_name('title'); ?>" type="text" value="<?php echo $title; ?>" />
        </p>

        <?php
    }

    public function update($new_instance, $old_instance)
    {
        $instance = $old_instance;
        $instance['title'] = strip_tags($new_instance['title']);
        return $instance;
    }

    public function widget($args, $instance)
    {
        extract($args);

        $title = apply_filters('widget_title', $instance['title']);

        echo $before_widget;

        if($title)
        {
            echo $before_title . $title . $after_title ;
        }

        echo $after_widget;
    }
}

function register_most_commented_widget()
{
  register_widget("Most_Commented_Post_Widget");
}

add_action("widgets_init", "register_most_commented_widget");
Here’s how the code works:
代码的工作方式如下:
We are registering the widget class using the
register_widgetfunction which is called inside thewidgets_initaction.我们正在使用
register_widget函数注册小部件类,该函数在widgets_init操作内部widgets_init。The
widgetfunction of ourMost_Commented_Post_Widgetclass is responsible for echoing the front end output.Most_Commented_Post_Widget类的widget函数负责回显前端输出。- At present, we’re just displaying the title on the front end. 目前,我们只是在前端显示标题。
检索和显示评论最多的帖子 (Retrieving and Displaying the Most Commented On Posts)
Here is the implementation of the widget function of the Most_Commented_Post_Widget class which displays the top 10 most commented on posts:
这是Most_Commented_Post_Widget类的widget功能的实现,该功能显示对帖子评论最多的10个:
public function widget($args, $instance)
{
    extract($args);

    $title = apply_filters('widget_title', $instance['title']);

    echo $before_widget;

    if($title)
    {
        echo $before_title . $title . $after_title ;
    }

    $posts = null;

    $posts = get_posts(array(
    	'orderby'	=> 'comment_count',
    	'order'     => 'DESC',
    	'posts_per_page' => 10
	));

	?><ul class="most-commented-post-widget"><?php

        foreach ($posts as $key => $value)
        {
        	$title = $value->post_title;
        	$comment_count = $value->comment_count;
        	$url = get_permalink($value->ID);

        	?>
        	<li>
        		<a href="<?php echo $url; ?>"><?php echo $title; ?></a>
        		<br>
        		<small><?php echo $comment_count; ?> comments</small>
        	</li>
        	<?php

        }

    ?></ul><?php
    echo $after_widget;
}
Here is how the code works:
代码的工作方式如下:
We’re calling the
get_postsfunction withorderby,orderandposts_per_pagearray keys. We are retrieving the top 10 most commented on posts in descending order.我们使用
orderby,order和posts_per_page数组键调用get_posts函数。 我们正在按降序检索对帖子评论最多的前10名。And then we’re using a
foreachconstruct to loop through the array of theWP_Postobjects.然后,我们使用一个
foreach构造foreachWP_Post对象的数组。- We’re then displaying the title and the number of comments. 然后,我们显示标题和评论数。
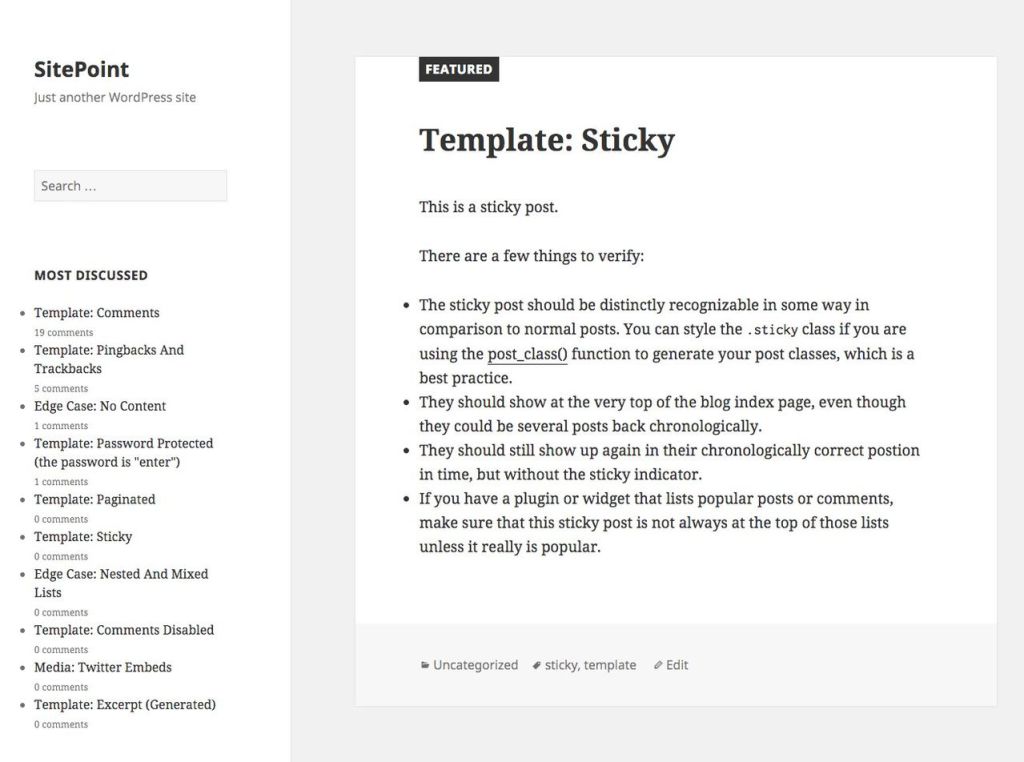
This is how our widget looks at present:
这是我们的小部件当前的外观:
But we haven’t started caching the result, yet. Let’s see how to cache the get_posts() result.
但是我们还没有开始缓存结果。 让我们看看如何缓存get_posts()结果。
缓存评论最多的帖子列表 (Caching the Most Commented On Posts List)
Let’s see how we can implement the Transients API in our widget. Here’s the code of the widget function with the Transients API implementation:
让我们看看如何在小部件中实现Transients API。 这是带有Transients API实现的widget函数的代码:
public function widget($args, $instance)
{
    extract($args);

    $title = apply_filters('widget_title', $instance['title']);

    echo $before_widget;

    if($title)
    {
        echo $before_title . $title . $after_title ;
    }

    $posts = null;

    if(get_transient("most_commented_posts") == false)
    {
    	$posts = get_posts(array(
	    	'orderby'	=> 'comment_count',
	    	'order'     => 'DESC',
	    	'posts_per_page' => 10
		));

    	set_transient("most_commented_posts", json_encode($posts), 86400);
    }
    else
    {
    	$posts = get_transient("most_commented_posts");
    	$posts = json_decode($posts);
    }

	?><ul class="most-commented-post-widget"><?php

        foreach ($posts as $key => $value)
        {
        	$title = $value->post_title;
        	$comment_count = $value->comment_count;
        	$url = get_permalink($value->ID);

        	?>
        	<li>
        		<a href="<?php echo $url; ?>"><?php echo $title; ?></a>
        		<br>
        		<small><?php echo $comment_count; ?> comments</small>
        	</li>
        	<?php

        }

    ?></ul><?php
    echo $after_widget;
}
Here, we’re storing the resultant array as a transient with a expiration timer for 24 hours. If the transient returns false, then we’re running the query again and storing the result as a transient for next 24 hours. Now the plugin will play much nicer with MySQL.
在这里,我们将使用过期计时器将结果数组存储为瞬态,持续24小时。 如果瞬态返回false,那么我们将再次运行查询并将结果存储为瞬态,持续24小时。 现在,该插件将在MySQL中发挥更好的作用。
样式小部件 (Styling the Widget)
Let’s style our widget to look more professional. Put this code in the plugin file to enqueue the style.css file.
让我们对小部件进行样式设置使其看起来更专业。 将此代码放在插件文件中以加入style.css文件。
function most_commented_widget_style()
{
    wp_register_style("most-commented-post-widget-style", plugin_dir_url(__FILE__) . "style.css");
    wp_enqueue_style("most-commented-post-widget-style");
}

add_action("wp_enqueue_scripts", "most_commented_widget_style");
Place this code in the style.css file to style the lists and add some margin.
将此代码放在style.css文件中以设置列表样式并添加一些边距。
.most-commented-post-widget
{
list-style: none;
}
.most-commented-post-widget li
{
margin-bottom: 20px;
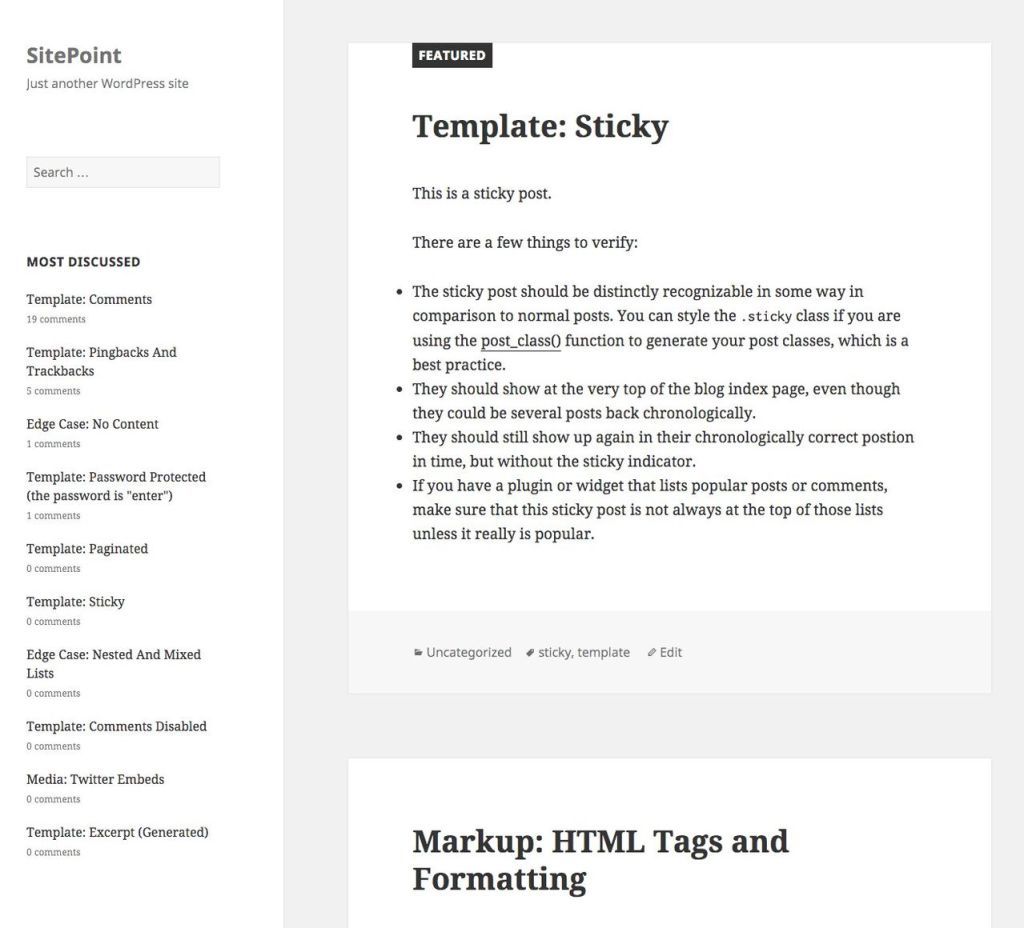
}This is what our widget should now look like:
这是我们的小部件现在应如下所示:
结论 (Conclusion)
In this article I’ve shown you how to easily build your own Most Commented On Posts plugin for WordPress. You can now go ahead and expand on this to display images and add more information. Please share your experience with your own plugins below.
在本文中,我向您展示了如何轻松地为WordPress构建自己的“ 评论最多的帖子”插件。 现在,您可以继续进行扩展,以显示图像并添加更多信息。 请在下面与您自己的插件分享您的经验。
翻译自: https://www.sitepoint.com/creating-a-most-commented-on-posts-plugin-for-wordpress/
wordpress评论插件


 564
564

 被折叠的 条评论
为什么被折叠?
被折叠的 条评论
为什么被折叠?
 到【灌水乐园】发言


