


 本文探讨了如何使用Opauth库在CodeIgniter框架中实现标准化的第三方身份验证流程,包括集成步骤、登录链接创建及响应处理。
Open Authentication has evolved as a standard for third-party authentication in recent years and allows us to securely authenticate our application’s users through a standard interface. Twitter and Facebook has been the standouts among dozens of authentication service providers. And of course we can find many open source libraries for accessing authentication providers, but a large problem with these libraries is that different developers have different styles and ways of implementing the same system. It’s difficult to use these libraries in a standard way or to replace one library with another.
近年来,开放式身份验证已发展成为第三方身份验证的标准,使我们能够通过标准界面安全地验证应用程序的用户。 Twitter和Facebook已经成为数十个身份验证服务提供商中的佼佼者。 当然,我们可以找到许多用于访问身份验证提供程序的开源库,但是这些库的一个大问题是,不同的开发人员使用不同的样式和方式来实现同一系统。 以标准方式使用这些库或用一个库替换另一个库是很困难的。
Opauth is an open source library created to standardize the authentication process among various service providers. In this article we’ll explore how we can effectively use Opauth to standardize our authentication strategies. I’ll be using CodeIgniter here, but even if you’re not familiar with CodeIgniter, I suggest you continue reading since it will be similar for other frameworks as well. Once you understand the necessary details for integration, adapting to any framework is super simple.
Opauth是一个开放源代码库,用于在各种服务提供商之间标准化身份验证过程。 在本文中,我们将探讨如何有效地使用Opauth来标准化我们的身份验证策略。 我将在这里使用CodeIgniter,但是即使您不熟悉CodeIgniter,我也建议您继续阅读,因为其他框架也是如此。 一旦您了解了集成的必要细节,适应任何框架都是非常简单的。
Opauth的重要性 (Importance of Opauth)
Opauth acts as an interface between your application and the open authentication provider libraries. It can be considered as a standard adapter for these authentication libraries. Once you setup Opauth, any service can be requested using a standard set of methods instead of learning various different APIs. It also allows us to receive responses for successful or failed executions in a standard format. Opauth is highly portable, giving us the ability to change open auth service libraries as well as our PHP framework of choice with minor modifications.
Opauth充当应用程序和开放式身份验证提供程序库之间的接口。 可以将其视为这些身份验证库的标准适配器。 设置Opauth后,可以使用一组标准方法来请求任何服务,而无需学习各种不同的API。 它还允许我们以标准格式接收成功执行或失败执行的响应。 Opauth具有高度的可移植性,使我们能够更改开放式身份验证服务库以及我们选择PHP框架,并进行少量修改。
Opauth执行过程 (Opauth Execution Process)
First, let’s look at the following illustration which shows the process of handling application requests by Opauth:
首先,让我们看一下下图,该图显示了Opauth处理应用程序请求的过程:
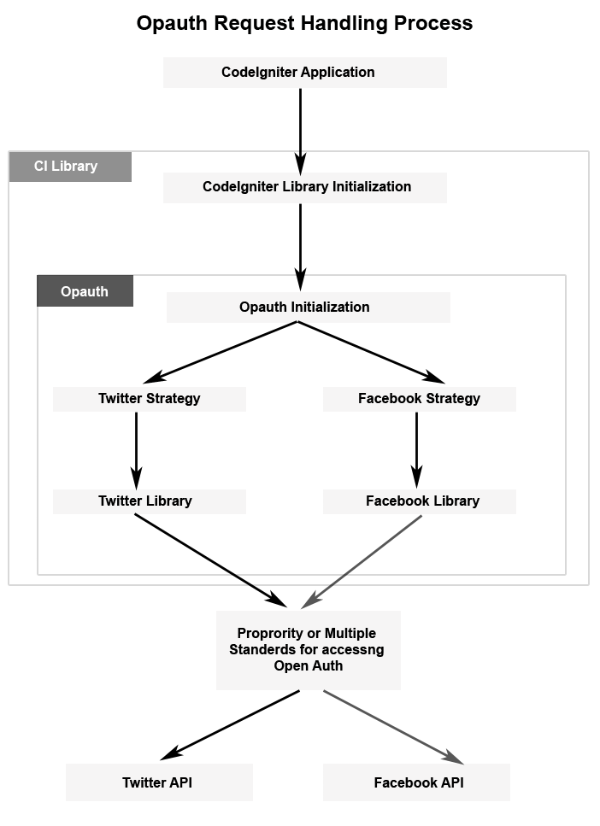
Initially the application requests open authentication details from the CodeIgniter library. The library initializes the Opauth process by creating an Opauth class object. Opauth requests the standard strategy depending on the provided URL. A strategy is a set of instructions that talk to the auth providers and handle their responses. The strategy employs a specific library to initiate the actual authentication request. Finally we have access to the respective API of the service provider.
最初,应用程序从CodeIgniter库请求打开身份验证详细信息。 该库通过创建Opauth类对象来初始化Opauth进程。 Opauth根据提供的URL请求标准策略。 策略是一组与auth提供程序进行对话并处理其响应的指令。 该策略采用特定的库来启动实际的身份验证请求。 最后,我们可以访问服务提供商的相应API。
As you can see in the image, I have separated the Opauth section. Opauth contains the initialization, service provider libraries, and the respective strategy interfaces. The actual authentication request starts after the process is completed by Opauth of standardizing the request.
如您在图像中看到的,我将Opauth部分分开。 Opauth包含初始化,服务提供程序库以及相应的策略接口。 实际的身份验证请求在标准化请求的过程完成后开始。
There are around 18 libraries currently listed on the Opauth site, which comes with a built-in strategy class for Opauth. In cases where a service provider doesn’t have a strategy class, we can create our own class using the strategy contribution guide.
Opauth站点上当前列出了大约18个库,它们带有Opauth的内置策略类。 如果服务提供商没有策略类,则可以使用策略贡献指南创建自己的类。
将Opauth与CodeIgniter集成 (Integrating Opauth with CodeIgniter)
Opauth integration libraries are available for use with many of the more popular frameworks, but also a plain “vanilla” version of the library to be used in those which don’t use a framework. Ideally you should have an idea of how to integrate the plain PHP version into a framework so you can work with those which are not supported at the moment. CodeIgniter is one of my favorites, so I’ll explain how you can integrate the plain Opauth version into CodeIgniter from scratch.
Opauth集成库可用于许多较流行的框架,但也可用于不使用框架的库的普通“原始”版本的库。 理想情况下,您应该了解如何将纯PHP版本集成到框架中,以便可以使用当前不支持的版本。 CodeIgniter是我的最爱之一,因此,我将说明如何从头开始将普通的Opauth版本集成到CodeIgniter中。
First, we have to download the plain version of the Opauth library from GitHub and copy the downloaded directory to your application/libraries directory (since we’re using Codeigniter, it needs to be integrated as a plugin or library). I’ve named the directory Opauth_lib, and you can remove both the example and test directories inside if necessary.
首先,我们必须从GitHub下载Opauth库的普通版本,并将下载的目录复制到您的application/libraries目录(由于我们使用的是Codeigniter,因此需要将其集成为插件或库)。 我已将目录命名为Opauth_lib ,并且可以根据需要在其中删除example目录和test目录。
I’d like to show you how to integrate Opauth into CodeIgniter using a custom Codeigniter library, so create the library file as Opauth_lib.php and require the Opauth.php file located inside the lib directory.
我想向您展示如何使用自定义Codeigniter库将Opauth集成到CodeIgniter中,因此将库文件创建为Opauth_lib.php并要求将Opauth.php文件放在lib目录中。
<?php
$opauth_lib_dir = dirname(__FILE__) . '/Opauth_lib/lib/Opauth/';
require $opauth_lib_dir . 'Opauth.php';
Now create the class for the library.
现在为库创建类。
<?php
class OpauthLib
{
    protected $configurations;
    protected $opauth_obj;

    public function __construct($configurations) {
        $this->configurations = $configurations;
    }
}
Configuration is necessary for making Opauth work, so I’ve passed the configuration data into the constructor of the library class. I like to use a config file inside the application/config directory to include the necessary information for Opauth as shown here:
为了使Opauth能够正常工作,必须进行配置,因此我已将配置数据传递到库类的构造函数中。 我喜欢在application/config目录中使用一个配置文件来包含Opauth的必要信息,如下所示:
<?php
$config['opauth'] = array(
    'path' => '/auth/login/',
    'callback_url' => 'http://example.com/auth/authenticate/',
    'callback_transport' => 'post',
    'security_salt' => 'rakhithanimesh123',

    'Strategy' => array(
        'Twitter' => array(
            'key' => 'twitter app key',
            'secret' => 'twitter app secret'
        ),
        'LinkedIn' => array(
            'api_key' => 'linkedin app key',
            'secret_key' => 'linkedin app secret'
        )
    ),
);
Let’s discuss the meaning of each of the parameters in the above code.
让我们讨论以上代码中每个参数的含义。
path – defines where you access your login links. Since I have installed Codeigniter as the root directory, the path will be
/auth/login/, which is the controller and function name respectively.路径 –定义您访问登录链接的位置。 由于我已经将Codeigniter安装为根目录,因此路径将为
/auth/login/,分别是控制器名称和函数名称。callback_url – defines the URL where you handle the response after successful authentication or a failure. I’ve used same controller but with a different function. Here we have to define the complete URL instead of a relative URL.
callback_url –定义成功验证或失败后处理响应的URL。 我使用了相同的控制器,但功能不同。 在这里,我们必须定义完整的URL,而不是相对URL。
callback_transport – defines how you handle the response. It defaults to “session”. Since CodeIgniter doesn’t use native sessions, I’ve specified “post” for the callback transport. You can use “session”, “get”, or “post” for this parameter.
callback_transport –定义如何处理响应。 默认为“会话”。 由于CodeIgniter不使用本机会话,因此我为回调传输指定了“ post”。 您可以为该参数使用“会话”,“获取”或“发布”。
security_salt – defines a random security key for signing the oauth response.
security_salt –定义用于签署oauth响应的随机安全密钥。
Strategy – defines an array of service provider information for your application. We need to provide the necessary parameters with their values for each of strategy. Here I have used Twitter and LinkedIn as the strategies and their application keys as parameters.
策略 –为您的应用程序定义一系列服务提供商信息。 我们需要为每种策略提供必要的参数及其值。 在这里,我将Twitter和LinkedIn用作策略,并将其应用程序密钥用作参数。
Once the strategies are defined in the config, we have to get the respective libraries with their strategy class and copy them to the OpauthLib/lib/Opauth/Strategy directory. Service providers are called vendors in Opauth, and the following screen shows the contents inside a specific strategy.
在配置中定义了策略后,我们必须获取各自的库及其策略类,并将它们复制到OpauthLib/lib/Opauth/Strategy目录。 服务提供商在Opauth中称为供应商,以下屏幕显示了特定策略内的内容。

实施开放身份验证登录 (Implementing an Open Authentication Login)
Now that we’ve integrated with CodeIgniter, the next step is to create the login links for each of the strategies we defined in the config file. I’ve used the path /auth/login and so we need to create a controller with a login() method.
现在我们已经与CodeIgniter集成在一起,下一步就是为我们在配置文件中定义的每个策略创建登录链接。 我已经使用了/auth/login路径,因此我们需要使用login()方法创建一个控制器。
<?php
class Auth extends CI_Controller
{
    protected $open_auth_config;

    public function __construct() {
        parent::__construct();
        $this->open_auth_config = $this->config->item('opauth');
        $this->load->library('opauth_lib', $this->open_auth_config);
    }

    public function login($stratergy = "") {
        if ($stratergy != "") {
            $this->opauth_lib->initialize();
        }
        else {
            foreach ($this->open_auth_config['Strategy'] as $strategy => $strategy_detail) {
                echo "<p><a href='".$this->config->item('base_url')."auth/login/".strtolower($strategy)."'>".$strategy."</a></p>";
            }
        }
    }
}
The constructor receives the Opauth configuration information and loads the library we created in the previous section. The login() method creates the login links to redirect the user to the respective site for authentication. Opauth login URLs are configured by adding the strategy into the path parameter. For example, the Twitter login URL will be /auth/login/twitter and LinkedIn URL will be /auth/login/linkedin.
构造函数接收Opauth配置信息并加载我们在上一节中创建的库。 login()方法创建登录链接,以将用户重定向到相应的站点进行身份验证。 通过将策略添加到path参数来配置Opauth登录URL。 例如,Twitter登录URL将是/auth/login/twitter而LinkedIn URL将是/auth/login/linkedin 。
The strategy is passed as an optional parameter to our login() method. Therefore, when the strategy is empty, we generate login links for all the strategies using the Opauth config. When the user clicks on a login link, the strategy will not be empty and we call the initialize method of our Opauth library to redirect the user for authentication. The Following is the implementation for the initialize method inside the library class Opauth_lib.
该策略作为可选参数传递给我们的login()方法。 因此,当策略为空时,我们将使用Opauth配置为所有策略生成登录链接。 当用户单击登录链接时,该策略将不会为空,并且我们调用Opauth库的initialize方法来重定向用户以进行身份验证。 以下是库类Opauth_lib的initialize方法的实现。
<?php
public function initialize() {
    $this->opauth_obj = new Opauth($this->configurations);
    $this->opauth_obj->run();
}
All it needs to do is initialize the Opauth class in the core Opauth library with the configurations and call the run() method. It will automatically identify the requested strategy through the URL and redirect the user for authentication.
它需要做的就是使用配置初始化核心Opauth库中的Opauth类,然后调用run()方法。 它将通过URL自动识别请求的策略,并重定向用户以进行身份验证。
处理开放式身份验证响应 (Handling the Open Auth Response)
Let’s assume that the user clicked the Twitter login link. Once she authorizes the application by logging into Twitter, redirection will be take the user back to the location we specified as the callback URL in the config. In this case, the response will be handled through Auth‘s authenticate() method. Here’s its implementation:
假设用户单击了Twitter登录链接。 一旦她通过登录Twitter授权了该应用程序,重定向将把用户带回到我们在配置中指定为回调URL的位置。 在这种情况下,将通过Auth的authenticate()方法处理响应。 这是它的实现:
<?php
public function authenticate() {
    $response = null;
    $response = unserialize(base64_decode($_POST['opauth']));
    echo "<pre>";print_r($response);exit;
}
Since I specified the post method in the config, the response can be accessed using $_POST['opauth']. Now the user has logged into our system using open authentication and the response will contain user details, user tokens, and other necessary information in a standard format. You can save the desired information in a session or database to keep the login active for the user across many requests.
由于我在配置中指定了post方法,因此可以使用$_POST['opauth']访问响应。 现在,用户已使用开放式身份验证登录到我们的系统,并且响应将包含用户详细信息,用户令牌以及其他必要格式的标准信息。 您可以将所需的信息保存在会话或数据库中,以使用户在许多请求中都保持登录状态。
To implement a logout method, simply clear out the respective information used to keep the user signed in and redirect back to the login links.
要实现注销方法,只需清除用于保持用户登录状态的相应信息,然后重定向回登录链接。
收盘时 (In Closing)
In this article we discussed how to integrate Opauth with CodeIgniter. The following is a general list of guidelines for integrating Opauth with any given PHP framework:
在本文中,我们讨论了如何将Opauth与CodeIgniter集成。 以下是将Opauth与任何给定PHP框架集成的准则的一般列表:
- Download the plain version of Opauth and create a library or plugin depending on your framework. 下载普通版本的Opauth并根据您的框架创建一个库或插件。
- Create a new config file or copy the config details to existing config file of the framework. 创建一个新的配置文件或将配置详细信息复制到框架的现有配置文件中。
- Add any number of strategies with the required parameters. 添加具有所需参数的任意数量的策略。
- Get the service provider libraries for each of the defined strategies and copy to the libraries’ directories inside Opauth. 获取每种已定义策略的服务提供商库,然后将其复制到Opauth中的库目录。
- Create two functions for handling login links and responses for available strategies. 创建两个函数来处理登录链接和可用策略的响应。
Initialize the Opauth class and call its
run()method to get things working.初始化Opauth类,并调用其
run()方法以使工作正常。
You can grab a copy of the source code used for this article from GitHub.
您可以从GitHub上获取本文使用的源代码的副本 。
Let me know what you think about using Opauth to standardize your authentication mechanism. Try to create Opauth plugins for other PHP frameworks and support the open source community.
让我知道您对使用Opauth标准化身份验证机制的想法。 尝试为其他PHP框架创建Opauth插件,并支持开源社区。
Image via Fotolia
图片来自Fotolia
翻译自: https://www.sitepoint.com/integrating-open-authentication-using-opauth/


 143
143

 被折叠的 条评论
为什么被折叠?
被折叠的 条评论
为什么被折叠?
 到【灌水乐园】发言


