


In my last article Designing with Microsoft Expression Blend, we learned the basics of designing a Microsoft Silverlight application using Expression Blend. We took the prototype built in SketchFlow in my first article (Rapid Prototyping with SketchFlow) and we created a Silverlight 3 application that integrates with the browser history. We then went on to look at Blend’s support for sample data. Finally we looked at the styling of interface elements and the use of templates in XAML.
在上一篇文章“ 使用Microsoft Expression Blend设计”中 ,我们学习了使用Expression Blend设计Microsoft Silverlight应用程序的基础知识。 我们在第一篇文章( 使用SketchFlow进行快速原型制作)中采用了SketchFlow内置的原型,并创建了一个与浏览器历史记录集成的Silverlight 3应用程序。 然后,我们继续研究Blend对示例数据的支持。 最后,我们研究了XAML中界面元素的样式和模板的使用。
In my final article, we’ll be taking our sample portfolio application even further. We’ll learn about storyboards and how to create animations. We’ll then return to behaviors and learn how to use them to set up interactivity in our application without writing any code. After this article I’ll be handing over to Tatham Oddie, who will take you through the features of Expression Blend’s sister product: Expression Web.
在我的最后一篇文章中,我们将进一步研究示例投资组合应用程序。 我们将学习故事板以及如何创建动画。 然后,我们将返回到行为,并学习如何在应用程序中使用它们来设置交互性而无需编写任何代码。 本文结束后,我将交给Tatham Oddie,他将带您了解Expression Blend的姊妹产品Expression Web的功能 。
Once you’re done reading, be sure to check out our Article Quiz to test yourself.
阅读完毕后,请务必查看我们的文章测验以测试自己。
Before we jump in, we should recap what has happened in Microsoft-land since the last article. Microsoft recently held its annual MIX conference in Las Vegas, where there were a lot of announcements around Expression and Silverlight.
在开始之前,我们应该回顾一下自上一篇文章以来在Microsoft领域发生的事情。 微软最近在拉斯维加斯举行了其年度MIX会议,其中有许多关于Expression和Silverlight的公告。
Firstly, Silverlight 4 was released. Silverlight 4 introduces a bunch of new features—too many to list here, but some of my favorites are:
首先,发布了Silverlight 4。 Silverlight 4引入了许多新功能-在这里列出太多,但是我最喜欢的一些功能是:
Out-of-browser and multi-touch support introduce some interesting opportunities for dedicated experience, such as kiosks and tablet-based applications
浏览器外和多点触控支持为专用体验(例如信息亭和基于平板电脑的应用程序)带来了一些有趣的机会
Webcam and microphone support will allow for lots of new applications such as augmented reality
网络摄像头和麦克风支持将允许许多新应用程序,例如增强现实
Mouse wheel, right-click, and drag and drop support are especially good news for business application designers like me
鼠标滚轮,右键单击和拖放支持对于像我这样的业务应用程序设计师来说尤其是个好消息。
“Toast” notifications using the native operating system
使用本机操作系统的“ Toast”通知
Google Chrome support is now official
Google Chrome支持现已正式发布
With Silverlight 4 comes a release candidate of Expression Blend 4. Blend 4 has some interesting new features as well, including:
Silverlight 4附带了Expression Blend 4的候选发布。Blend 4还具有一些有趣的新功能,包括:
Silverlight 4 and Windows Presentation Foundation (WPF) 4 support
Silverlight 4和Windows Presentation Foundation(WPF)4支持
Some long-awaited basic shapes like polygon, arrow, and arc
一些期待已久的基本形状,例如多边形,箭头和弧形
Better management of sketch styles in SketchFlow
在SketchFlow中更好地管理草图样式
More control over SketchFlow Animations
更好地控制SketchFlow动画
A number of new behaviors, including ones for managing touch UIs
许多新行为,包括用于管理触摸UI的行为
A data store for storing global variables and other states that affect a SketchFlow prototype
数据存储区,用于存储影响SketchFlow原型的全局变量和其他状态
For this article I’ve switched to using Expression Blend 4.
在本文中,我已切换为使用Expression Blend 4。
Finally, the other big announcement from MIX10 was that Silverlight will be the main platform for designing user experiences for Windows Phone. This effectively means that anyone who is currently a WPF or Silverlight designer is now also a Windows Phone designer.
最后,MIX10的另一个重要公告是Silverlight将成为设计Windows Phone用户体验的主要平台。 这实际上意味着当前是WPF或Silverlight设计师的任何人现在也都是Windows Phone设计师。
Meanwhile, our immediate concern is to complete our portfolio application. First stop: real data.
同时,我们最关心的是完成我们的投资组合申请。 第一站:真实数据。
In the last article, we used Blend’s Sample Data feature to generate some placeholder data for us to represent the list of projects for our portfolio. That’s how we created our list of Latin text and pictures of chairs. Now it’s time to add some real project data.
在上一篇文章中,我们使用Blend的Sample Data功能为我们生成了一些占位符数据,以代表我们投资组合的项目列表。 这就是我们创建拉丁文字和椅子图片列表的方式。 现在是时候添加一些实际的项目数据了。
There are a number of ways we can source the project information. We could:
我们可以通过多种方式来获取项目信息。 我们可以:
fetch the information from a web service, probably as XML
从Web服务中获取信息,可能是XML
retrieve an XML file and parse it using .NET’s SQL-based “Linq” feature
检索XML文件并使用.NET基于SQL的“ Linq”功能进行解析
grab the information from the underlying HTML page (this option has some appeal, because it allows us to have an HTML fallback version of the page for browsers without Silverlight, and also allows search engines to index our Silverlight application’s key content)
从基础HTML页面获取信息(此选项颇具吸引力,因为它允许我们为没有Silverlight的浏览器提供该页面HTML后备版本,并且还允许搜索引擎为我们的Silverlight应用程序的关键内容建立索引)
just embed the data in our project (can include the text and images, or just the text, with the images referred to by URLs)
只需将数据嵌入到我们的项目中即可(可以包含文本和图像,也可以仅包含文本,其中包含URL引用的图像)
While the third option is probably recommended, since this article focuses on design rather than development, we’re going to use the simpler fourth option.
虽然可能建议使用第三个选项,但由于本文重点是设计而非开发,因此我们将使用更简单的第四个选项。
The first step is to build an XML file that will contain our sample project data for the portfolio.
第一步是构建一个XML文件,其中将包含项目组合的样本项目数据。
For each project we need:
对于每个项目,我们需要:
a title
标题
a brief description
简短说明
two images
两张图片
Tatham is going to take you through Expression Web in detail in the next two articles, but for now, Expression Web makes a perfectly good XML editor for me to use to enter my project information, as shown in Figure 1, “An XML file viewed in Expression Web”.
Tatham将在接下来的两篇文章中详细介绍Expression Web,但是到目前为止,Expression Web为我提供了一个非常好的XML编辑器,供我用来输入项目信息, 如图1所示: “查看了XML文件”。在Expression Web中” 。

Now that I have my real data, I can open up our prototype in Expression Blend and replace the previous sample data.
现在我有了真实的数据,可以在Expression Blend中打开我们的原型并替换以前的示例数据。
The Data panel in Blend allows us to add various data sources, including importing one from XML. The panel is shown in Figure 2, “Use the Data panel to import an XML data source”.
Blend中的“ 数据”面板允许我们添加各种数据源,包括从XML导入数据源。 该面板如图2所示: “使用Data面板导入XML数据源” 。

Note that Blend still calls this kind of data “sample data,” but it works fine for the modest amount of information we need for our application. If we had more data we might want to be smarter about retrieving it after the main application has loaded, for example.
请注意,Blend仍将这类数据称为“样本数据”,但对于我们为应用程序所需的少量信息,它可以正常工作。 例如,如果我们有更多数据,我们可能希望在主应用程序加载后更聪明地进行检索。
Choose Enable sample data when application is running to use your sample data at run-time, as illustrated in Figure 3, “Importing sample data”.
选择“ 在应用程序运行时启用示例数据”以在运行时使用示例数据, 如图3“导入示例数据”所示 。

Once the new sample data is loaded, the next step is to change the data bindings of the master and detail panels of our portfolio.
一旦加载了新的样本数据,下一步就是更改我们产品组合的主面板和详细面板的数据绑定。
If we expand the schema for our imported data in the Data panel, we can see that Blend has assumed that each data element is a string. That’s fine for all elements except one, the Image element, which actually contains the filename of an image—so we need to change that.
如果在“ 数据”面板中为导入的数据扩展架构,我们可以看到Blend假定每个数据元素都是一个字符串。 这对所有元素都很好,除了Image元素(实际上包含图像的文件名)之外,因此我们需要更改它。
Blend provides a drop-down list in the Data panel, shown in Figure 4, “Data types are set in the Data panel”, that lets us adjust the data type to Image and point to the directory containing the images. Blend will then import the images into the project.
Blend在“ 数据”面板中提供了一个下拉列表, 如图4所示,“在数据面板中设置了数据类型” ,它使我们可以将数据类型调整为“ 图像”并指向包含图像的目录。 Blend将把图像导入到项目中。

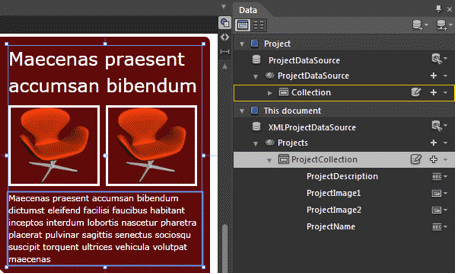
As we saw in the previous article, you can bind elements like ListBoxes to sample (or live) data by dragging the data definition from the Data panel. This is shown in Figure 5, “Drag data from the Data panel to bind it to the target element”.
正如我们在上一篇文章中所看到的,可以通过从“ 数据”面板中拖动数据定义,将ListBox es之类的元素绑定到采样(或实时)数据。 如图5所示,“从“数据”面板中拖动数据以将其绑定到目标元素” 。

Dragging a new data source onto a list does have the side effect of resetting the templates used by the list. In the last article, we defined templates for individual ListItems and their containers, so we now need to re-assign the ListBox’s templates back to those values.
将新的数据源拖到列表上确实会产生重置列表使用的模板的副作用。 在上一篇文章中,我们为各个ListItem及其容器定义了模板,因此现在我们需要将ListBox的模板重新分配回这些值。

By using the same tag names in the new XML data source as I used in the original sample data (for example, <ProjectName>), the templates previously applied to the ListBox’s ListItems still work with the new data source (since the Template looks for the ProjectName property in its current data context).
通过在新XML数据源中使用与原始示例数据中相同的标记名(例如<ProjectName> ),以前应用于ListBox的ListItem的模板仍可与新数据源一起使用(因为模板在其当前数据上下文中查找ProjectName属性。
With the new project list bound to the master list, we can move onto the details panel.
将新项目列表绑定到主列表后,我们可以转到详细信息面板。
Binding the new project data to the details panel is even easier. In the last article we created a StackPanel to contain all the items in our detail view. If we select the StackPanel and look at the Data panel, we can see that the StackPanel has its DataContext set to the sample collection we made. We need to change this DataContext to point to our new XML data source.
将新项目数据绑定到详细信息面板更加容易。 在上一篇文章中,我们创建了一个StackPanel来包含我们的详细信息视图中的所有项目。 如果选择StackPanel并查看“ 数据”面板,则可以看到StackPanel的DataContext设置为我们制作的样本集合。 我们需要更改此DataContext使其指向我们的新XML数据源。
Figure 7. The Data panel shows us the DataContext of the currently selected element
图7. Data面板向我们展示了当前选定元素的DataContext
We just need to change the DataContext for the details StackPanel to point to our new data source. Blend lets us simply drag the new data context off the Data panel and drop it on the StackPanel. We just need to remember to switch the Data panel to details mode first, so we bind to the current selection from the collection, not the whole list.
我们只需要更改DataContext以使详细信息StackPanel指向我们的新数据源。 Blend使我们可以简单地将新的数据上下文从“ 数据”面板上拖放到StackPanel 。 我们只需要记住首先将“ 数据”面板切换到详细信息模式,因此我们绑定到集合中的当前选择,而不是整个列表。
As your page fills up its often easier to work with the object in the Objects and Timeline panel, rather than the object on the artboard, as shown in Figure 8, “Working with the Objects and Timeline panel”.
页面填满后,通常可以更轻松地使用“对象和时间轴”面板中的对象 ,而不是美工板上的对象, 如图8“使用对象和时间轴面板”所示 。

At this point, for my portfolio I want to adjust the background of the detail panel so that the logo behind is partially covered when the description text is long enough to overlap it. I’ll simply select the StackPanel that contains the detail panel, set its background to match the background of the interface, and then adjust the alpha channel so that the logo shows through just a little.
此时,对于我的投资组合,我想调整详细信息面板的背景,以便在描述文本足够长以使其重叠时,可以部分覆盖后面的徽标。 我仅选择包含详细信息面板的StackPanel ,将其背景设置为与界面背景相匹配,然后调整Alpha通道,以使徽标仅显示一点。

Now we have a portfolio that is functionally complete, with some static visual styling.
现在,我们有了功能齐全的组合,并带有一些静态的视觉样式。

The next step is to add animation and transitions to make the application flow better and to help visitors understand the mechanics of the application.
下一步是添加动画和过渡效果,以使应用程序更好地流动,并帮助访问者了解应用程序的机制。
翻译自: https://www.sitepoint.com/expression-blend-behaviors-2/


 178
178

 被折叠的 条评论
为什么被折叠?
被折叠的 条评论
为什么被折叠?
 到【灌水乐园】发言


