director示例
I don’t know about you, but I’m not a big fan of the tools that Flash provides for creating vector graphics. It’s not that the tools are no good — they’re fine; but I’m simply more comfortable using Illustrator.
我不了解您,但我不是Flash提供的用于创建矢量图形的工具的忠实拥护者。 不是说工具不好,而是很好。 但是使用Illustrator会让我更自在。
So you can imagine my excitement when I was shown how to export my Illustrator graphics as SWFs that I could import and use in Flash! Then I learned that you can take Flash and import it into Director, and was accordingly ecstatic!
因此,当向我展示如何将Illustrator图形导出为可以在Flash中导入和使用的SWF文件时,您可以想象我的兴奋! 然后,我了解到您可以使用Flash并将其导入Director中,因此欣喜若狂!
So, today, I’m going to share the joy! Here, I’ll illustrate how to create slick vector graphics that we’ll draw in Illustrator, build in Flash, and then import and use in Director. Let’s get started!
所以,今天,我要分享快乐! 在这里,我将说明如何创建光滑的矢量图形,这些矢量图形将在Illustrator中绘制,在Flash中构建,然后在Director中导入和使用。 让我们开始吧!
鼠标移到 (Mouseover)
In the image below, I’ve created a rectangle in Illustrator, copied it and reversed the colours for a mouseover effect.
在下图中,我在Illustrator中创建了一个矩形,将其复制并反转了颜色以产生鼠标悬停效果。

Now, one thing we have to do before we export our button is ‘create outlines’ on our text. We can do this in Flash with the ‘Break Apart’ function, but I always do it in Illustrator.
现在,导出按钮之前,我们要做的一件事就是在文本上“创建轮廓”。 我们可以在Flash中使用“分隔符”功能来做到这一点,但是我总是在Illustrator中做到这一点。
To do this, select the text on both buttons: click on one of the text fields, hold down the ‘Shift’ key, then click the second text field. When you’ve got your selections done, your graphic should look like this:
为此,请选择两个按钮上的文本:单击一个文本字段,按住“ Shift”键,然后单击第二个文本字段。 完成选择后,您的图形应如下所示:

Excellent! Now click on the Type menu, where, a little less than half way down, you should see ‘Create Outlines’. Select this option, then zoom in on your graphics a bit (leaving them selected). They should look something like this:
优秀的! 现在,单击“类型”菜单,在该菜单中,位于略少于一半的位置,您会看到“创建轮廓”。 选择此选项,然后稍微放大图形(将其选中)。 他们应该看起来像这样:
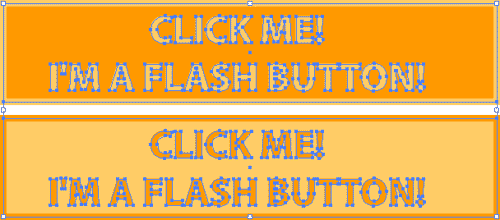
We’ve just converted your text from a text element into a graphic element. The benefit of this lies in the eventual Flash output. If the end user of your Flash file doesn’t have the specific font you used on their system, it won’t matter: the file will display the way you want it to, as the text is now a graphic, not a font.
我们刚刚将您的文本从文本元素转换为图形元素。 这样做的好处在于最终的Flash输出。 如果您的Flash文件的最终用户没有您在系统上使用的特定字体,那就没关系:该文件将以您想要的方式显示,因为文本现在是图形,而不是字体。
Now we have to export our button so that we can bring it into Flash and start using it. To do this we click the File menu in Illustrator then look for ‘Export’. Once you’ve clicked that, you should see something (system, OS and settings provided) like the window below.
现在,我们必须导出按钮,以便可以将其带入Flash并开始使用它。 为此,我们单击Illustrator中的“文件”菜单,然后查找“导出”。 单击后,您应该会看到类似下面的窗口(提供的系统,操作系统和设置)。
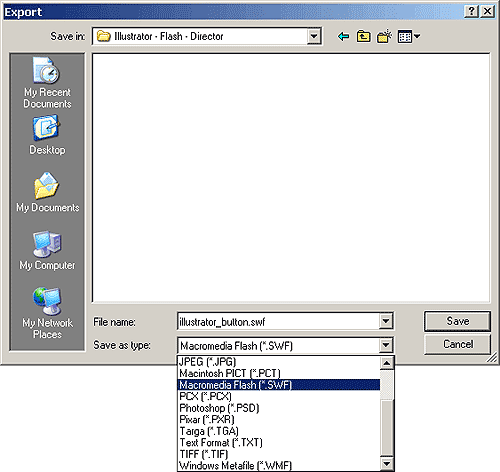
Here, Illustrator asks what format we’d like to export our vector graphic as. As you can see, there are a lot of different formats to choose from. Highlighted in dark blue is the one we want: Macromedia Flash (*.SWF). The good people at Adobe have graciously given us the ability to export right out of Illustrator and into a Flash file.
在这里,Illustrator询问我们要将矢量图形导出为哪种格式。 如您所见,有很多不同的格式可供选择。 深蓝色突出显示的是我们想要的:Macromedia Flash(* .SWF)。 Adobe的优秀人才慷慨地给予了我们从Illustrator导出到Flash文件的功能。
So let’s do that! Choose the area of your hard drive you want to save the file to, name it, click Macromedia Flash (*.SWF) from the drop down, and finally hit ‘Save’. You’ll end up with this:
因此,让我们开始吧! 选择要将文件保存到的硬盘驱动器区域,为其命名,从下拉列表中单击Macromedia Flash(* .SWF),最后单击“保存”。 您将得到以下结果:
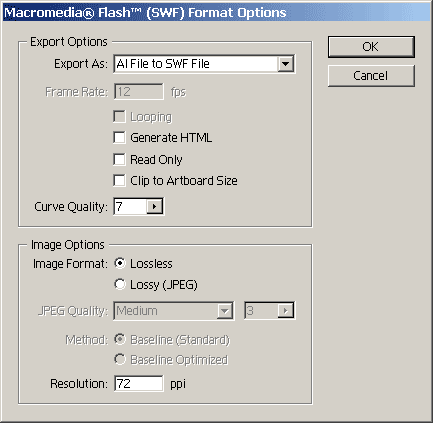
This is our SWF Format Option box. This is where we tell Illustrator how we want our Flash file to be built. Let’s start at the top.
这是我们的SWF格式选项框。 在这里,我们告诉Illustrator我们希望如何构建Flash文件。 让我们从顶部开始。
The ‘Export As’ drop down consists of three options (AI being the Adobe Illustrator extension):
“导出为”下拉列表由三个选项组成(AI是Adobe Illustrator扩展):
AI File to SWF File
AI文件到SWF文件
This option will simply export the file and do nothing fancy with it. You’ll get a single layer file that contains all the different elements of your graphic.
此选项将仅导出文件,而不会对其进行任何处理。 您将获得一个包含图形中所有不同元素的单层文件。
AI Layers to SWF Frames
AI层到SWF帧
This option will create a Flash file that separates your Illustrator layers (if you’ve got any) into a series of frames. Each frame will hold each individual layer’s graphic. 10 layers will get you 10 frames.
此选项将创建一个Flash文件,该文件将Illustrator图层(如果有的话)分成一系列框架。 每个框架将保留每个单独图层的图形。 10层将为您提供10帧。
AI Layers to SWF Files
AI图层到SWF文件
The option will also separate your layers, but instead of creating a series of frames, it generates a series of separate Flash files. So if you’ve got 10 layers and you select this option, you’ll end up with 10 Flash files.
该选项还将分隔您的图层,但它不会创建一系列框架,而是会生成一系列单独的Flash文件。 因此,如果您有10层并且选择了此选项,最终将得到10个Flash文件。
Here’s what the drop down looks like:
下拉列表如下所示:

Next: Frame Rate: Flash defaults for 12 Frames per Second (FPS), thus, so does Illustrator (as you can see above). This option would be useful if you chose AI Layers to SWF Frames. Why? Because, by exporting your layers as Flash frames, you are (in essence) creating a Flash animation. This option will allow you to specify the frame rate of that animation.
下一页:帧速率: Flash默认为每秒12帧(FPS),因此Illustrator也是如此(如您在上面看到的)。 如果选择“ AI图层到SWF帧”,此选项将很有用。 为什么? 因为,通过将图层导出为Flash帧,(实质上)是在创建Flash动画。 此选项将允许您指定该动画的帧频。
Next: Looping: Again, this choice is handy if you convert layers to frames.
下一步:循环:同样,如果将图层转换为帧,此选择很方便。
Next: Generate HTML: This option would be appropriate if you wanted to produce an HTML file that contained all the EMBED and other necessary tags to export your Flash movie into a Webpage (the same thing as Publishing within Flash). As we’re exporting our graphics to Flash so that we can work with them in that environment, we don’t need to use this option.
下一步:生成HTML:如果您想生成一个包含所有EMBED和其他必要标记HTML文件,以将您的Flash电影导出到网页中(与在Flash中发布相同),那么此选项将是合适的。 当我们将图形导出到Flash以便可以在该环境中使用它们时,我们不需要使用此选项。
Next: Read Only: Again, this is not an option we need to use. If you chose this option, you’d be unable to import the SWF into Flash to use for our button. Basically, it locks your SWF.
下一步:只读:同样,这不是我们需要使用的选项。 如果选择此选项,则将无法将SWF导入Flash以用于我们的按钮。 基本上,它会锁定您的SWF。
Next: Clip to Artboard Size: We’d choose this option if we’d overlapped the artboard a bit, for example, if we wanted our movie to be 550px X 400px, and we had an oval that overlapped those dimensions slightly. Instead of messing about shaping the oval to our artboard, we would choose this option to have Illustrator cut it off at that point.
下一页:剪辑到画板尺寸:如果我们将画板稍微重叠一点,例如,如果我们希望电影尺寸为550px X 400px,并且我们有一个椭圆形稍微重叠了这些尺寸,则我们将选择此选项。 我们可以选择使用此选项以使Illustrator在此时将其切除,而不是去弄乱椭圆形到画板上。
Next: Curve Quality: This option is just like optimizing: the higher the quality, the higher the file size. I don’t think I’ve ever changed this value before, but if you’re smarter than I am, you’ll experiment and see what you can come up with.
下一页:曲线质量:此选项就像优化:质量越高,文件大小越大。 我认为我以前从未更改过此值,但是如果您比我聪明,可以尝试一下,然后看看可以做什么。
Next: Image Options: This one option we don’t want to mess with. Why? This function creates optimized JPEGs of your vector graphics, undermining the reason why we used vector graphics in the first place.
下一页:图像选项:我们不想惹的这个选项。 为什么? 此功能可为您的矢量图形创建优化的JPEG,从而避免了我们首先使用矢量图形的原因。
Okay! That’s it. From here on in, it’s normal Flash authoring!
好的! 而已。 从这里开始,这是正常的Flash创作!
Now that we’ve got our graphics exported as a Flash movie, save the Illustrator file and close up.
现在,我们已将图形导出为Flash影片,保存Illustrator文件并关闭。
在Flash中工作 (Working in Flash)
We now need to open up Flash, to put our graphics together into a button. We start this by doing a normal Flash, File>Import of our Illustrator-created SWF file. Once you’ve done that, your graphic will show up on the stage and, if you select it and zoom, it should look something like this:
现在,我们需要打开Flash,将我们的图形放到一个按钮中。 首先,通过执行普通的Flash,即Illustrator创建的SWF文件的File> Import导入。 完成此操作后,您的图形将显示在舞台上,如果您选择它并进行缩放,它应该看起来像这样:
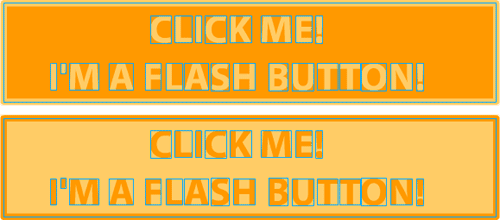
I’ve zoomed in on this to show you the text. It looks just like Flash text after the ‘Break Apart’ function has been applied, doesn’t it?
我将其放大以显示文本。 应用了“分隔符”功能后,它看起来像Flash文本,不是吗?
So now we have our exported button graphics sitting on the main stage. It’s time to start to build our button!
因此,现在我们将导出的按钮图形放在主舞台上。 现在该开始构建按钮了!
Select the top button graphic (top graphic only) and copy it by selecting Edit > Copy. Then click Insert > New Symbol. This will bring up the New Symbol Properties box. You will see a name box (that will be set to the default ‘Symbol 1’) that you can leave or rename. It’s best to give this button a name other than Symbol 1 – preferably something that you’ll remember. I used flashButton.
选择顶部按钮图形(仅顶部图形),然后通过选择“编辑”>“复制”进行复制。 然后单击插入>新符号。 这将弹出“新符号属性”框。 您将看到一个名称框(将被设置为默认的“符号1”),您可以保留或重命名该框。 最好给此按钮一个不同于Symbol 1的名称,最好是您会记住的名称。 我用了flashButton。
Now, look below the name field: you’ll find the area where you tell Flash what sort of symbol you want to create. In our case, we want to create a button symbol. By default, Flash will have it set on Movie, but you want to select Button. Once you’ve done that, click OK!
现在,在名称字段下面查看:您将找到告诉Flash您要创建哪种符号的区域。 在我们的例子中,我们想创建一个按钮符号。 默认情况下,Flash会将其设置在“电影”上,但是您要选择“按钮”。 完成后,单击“确定”!
No you’ll find yourself in edit mode for your new button. Choose Edit > Paste to drop the top button graphic you copied onto the canvas. Once you’ve pasted it in, it should look something like this:
不,您会发现自己处于新按钮的编辑模式。 选择“编辑”>“粘贴”,将复制到画布上的顶部按钮图形拖放到画布上。 粘贴后,它应该如下所示:
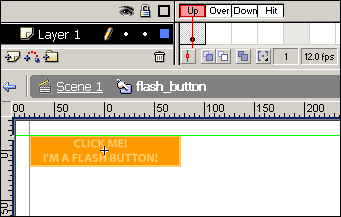
I put the guides in there to ensure that I’ll be able to line up the second button graphic once I bring it in. You can set up guides for yourself by clicking View > Rulers. Once the rulers are visible, you can drag and drop your guides onto the stage in the same way you would in Illustrator or Photoshop.
我在其中放置了辅助线,以确保将其带入后便可以对齐第二个按钮图形。您可以通过单击视图>标尺来自己设置辅助线。 一旦标尺可见,就可以像在Illustrator或Photoshop中一样,将辅助线拖放到舞台上。
创建鼠标悬停效果 (Creating the Mouseover Effect)
Our next step(s) will involve creating the actual mouseover steps. We need to get our keyframes built and insert the appropriate graphics. This is where we’ll use our second button graphic. First, let’s select the entire graphic we have right no, and hit the F6 key 3 times. This will create the remaining 3 keyframes needed for the button, and place the graphic into those keyframes.
我们的下一步将涉及创建实际的鼠标悬停步骤。 我们需要构建关键帧并插入适当的图形。 这是我们将使用第二个按钮图形的地方。 首先,让我们选择没有的整个图形,然后按F6键3次。 这将创建按钮所需的其余3个关键帧,并将图形放置在这些关键帧中。
Once you’ve done that, you should have something like the screenshot below:
完成此操作后,应具有以下屏幕截图:
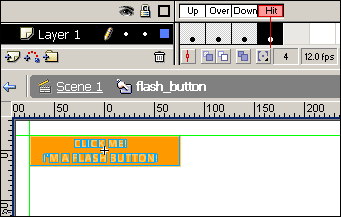
We’re going to keep this button pretty simple — we’ve come to the point where we need our second button graphic. First we have to prepare the keyframe in which it will reside. Look for the second keyframe (labeled ‘Over’) and click on it, to select the frame that we want to put our second button graphic in. As you’ll see, we’ve already got our first (top) button graphic in the keyframe. Don’t worry — that’s easy to remedy. The graphic should be selected. If it is not, select it and hit ‘Delete’ on your keyboard. Done!
我们将使这个按钮保持非常简单-我们需要第二个按钮图形。 首先,我们必须准备将其驻留在其中的关键帧。 查找第二个关键帧(标记为“ Over”),然后单击它,以选择要放入第二个按钮图形的框架。如您所见,我们已经在第一个(顶部)按钮图形中关键帧。 不用担心-这很容易补救。 该图形应被选择。 如果不是,请选择它并按键盘上的“ Delete”。 做完了!
You should now have a keyframe that looks like this:
现在,您应该具有一个如下所示的关键帧:
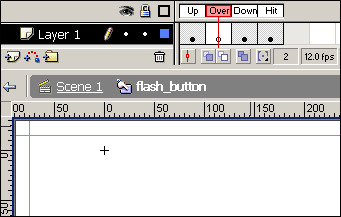
Your stage is blank and the second keyframe is white, which signifies that it’s empty. This is good – it’s exactly what we want. Now, above the stage you’ll see the word “Scene 1”, with flash_button displayed to the right of it. That’s a crumb trail of our location: flash_button is bold and appears at the end, to represent the fact that we’re in that button’s editing area. This feature allows easy navigation through your Flash movie. Click the words “Scene 1”, and you’re back at the initial (main) stage of our movie, where the original button graphics are located.
您的舞台为空白,第二个关键帧为白色,表示它为空。 很好–这正是我们想要的。 现在,在舞台上方,您会看到单词“场景1”,并在其右侧显示flash_button。 这是我们所在位置的痕迹:flash_button粗体显示在最后,表示我们处于该按钮的编辑区域。 此功能使您可以轻松浏览Flash电影。 单击“场景1”,您回到电影的初始(主要)阶段,原始按钮图形位于该阶段。
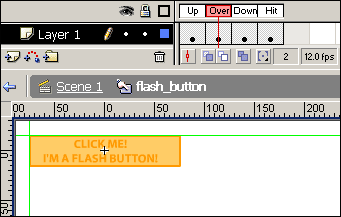
Next, we need to select and copy the second (bottom) button graphic. Once that is done, we’re going to have to open the Library to find our button: hitting the F11 key will do just that. Once you’ve opened your library, you’ll see your button appear. Double click on your button (in the library window) to open up its editing area again. Viola! We’re right back to the above screenshot.
接下来,我们需要选择并复制第二个(底部)按钮图形。 完成此操作后,我们将必须打开“库”以找到我们的按钮:按下F11键即可做到这一点。 打开媒体库后,您会看到按钮出现。 双击您的按钮(在库窗口中)以再次打开其编辑区域。 中提琴! 我们回到了上面的屏幕截图。
As for the first button graphic, we now need to place our second (bottom) button graphic on the stage. Select that graphic and, using your guides, place it in the proper location. It should look like this:
至于第一个按钮图形,我们现在需要在舞台上放置第二个(底部)按钮图形。 选择该图形,然后使用向导将其放置在正确的位置。 它看起来应该像这样:
回顾中 (In Review)
Our button is now complete, and ready for use! For those that are unsure of what they’ve just created, you’ve built a button symbol that will have a mouseover effect. Here’s the keyframe run down:
现在我们的按钮已经完成,可以使用了! 对于不确定自己刚刚创建的内容的用户,您已经构建了一个按钮符号,它将具有鼠标悬停效果。 以下是关键帧的运行情况:
Up: This is the normal (unchanged) state of the button
向上:这是按钮的正常(不变)状态
Over: This is what the button will change into once the mouse is hovered over it
过:这是什么按钮将变为一旦鼠标悬停它
Down: The graphic to be displayed when the button is clicked
下:单击按钮时要显示的图形
Hit: This is a very important keyframe, which tells Flash were the ‘hot-spot’ of our button is. We can make the hot spot bigger or small — or even a different shape than the button itself. We need not worry about this state for this particular example. When we first set up our keyframes, we put the first (top) button graphic in that area, hence our Hit Zone is the same size and shape as our button.
命中:这是一个非常重要的关键帧,它告诉Flash是我们按钮的“热点”。 我们可以使热点变大或变小,甚至可以使其形状与按钮本身不同。 对于此特定示例,我们不必担心这种状态。 首次设置关键帧时,我们将第一个(顶部)按钮图形放置在该区域中,因此,“命中区域”的大小和形状与按钮相同。
Okay… so now we need to head back to our initial (main) stage. Remember how to do that? That’s right! Click the Scene 1 link.
好吧...所以现在我们需要回到初始(主要)阶段。 还记得怎么做吗? 那就对了! 单击“场景1”链接。
We still have our original graphics here and we now no longer need them. So highlight and delete them both from the stage.
我们仍然在这里保留原始图形,现在不再需要它们。 因此,从舞台上高亮显示并删除它们。
Do you still have the Library open? If not, hit F11 to open it up. Now drag and drop your button onto the stage. Once you’ve done that, you can use the Align tool (Window > Align) to center the button, and Window > Properties to resize the window. I resized my window to be just slightly bigger than my button (I’ll explain why I did this in a moment). This is what I ended up with:
您还打开图书馆吗? 如果不是,请按F11键将其打开。 现在将您的按钮拖放到舞台上。 完成此操作后,可以使用“对齐”工具(“窗口”>“对齐”)将按钮居中,并使用“窗口”>“属性”来调整窗口的大小。 我将窗口的大小调整为略大于按钮的大小(稍后将解释为什么这样做)。 我最终得到的是:

Cool! Now we need to export our Flash button. We can do that by clicking on File > Export Movie. Find a place where you want to save the movie, and hit ‘save’. This will bring up an options window. At this point, we don’t want to change the details here, so just hit OK.
凉! 现在我们需要导出Flash按钮。 我们可以通过单击文件>导出影片来做到这一点。 找到您要保存电影的地方,然后单击“保存”。 这将打开一个选项窗口。 此时,我们不想在此处更改详细信息,因此只需单击“确定”即可。
Once the export has run its course (which should be very quick) you can save your Flash movie and shut down Flash. Then, find your exported Flash movie (SWF) and double click it. If everything went right, you should see a button that displays a mouseover effect. When you click it, though, it will do nothing, as it’s not yet linked to any action.
导出过程完成后(应该很快),您可以保存Flash电影并关闭Flash。 然后,找到您导出的Flash电影(SWF)并双击它。 如果一切正常,您应该看到一个显示鼠标悬停效果的按钮。 但是,当您单击它时,它不会执行任何操作,因为它尚未链接到任何动作。
That is how you us Illustrator to create graphics for your Flash movies, though this was, of course, a very simple example. You very well could have made this button with the tools that the Flash drawing environment supplies, but if you’re familiar with Illustrator, this process will have been much easier.
这就是我们用Illustrator为Flash电影创建图形的方式,尽管这当然是一个非常简单的示例。 您可以使用Flash绘图环境提供的工具来完成此按钮的操作,但是如果您熟悉Illustrator,则此过程会容易得多。
Now it’s time to take this a step further! Let’s bring that button of ours into Director!
现在是时候将这一步骤更进一步了! 让我们把这个按钮带入Director!
导入导演 (Importing into Director)
You can import Flash into Director in the same way that you’d import any other element you’d like to use. First, start a Director movie that has the same dimensions as your Flash button: 200px X 50px.
您可以将Flash导入Director中,就像导入其他要使用的元素一样。 首先,启动一个具有与Flash按钮相同尺寸的Director影片:200px X 50px。
Once you’ve done this, import the Flash button and place it on our stage. You’ll end up with this:
完成此操作后,导入Flash按钮并将其放置在我们的舞台上。 您将得到以下结果:
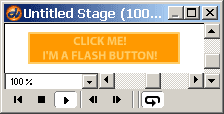
One thing I forgot to mention above was that I made my movie background black to illustrate Director’s awesome Ink feature. This is why I gave some extra space around the Flash button with a white background. We can get rid of that every easy with Director.
我上面忘记提及的一件事是,我将电影背景设为黑色以说明Director出色的Ink功能。 这就是为什么我在带有白色背景的Flash按钮周围留出了一些额外的空间的原因。 通过Director,我们可以轻松摆脱一切。
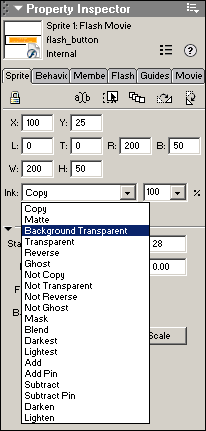
In the screenshot above, the flash button is not selected. Select it by clicking it. Then open the Cast Member Properties box. Once in there, change the Ink option to ‘Background Transparent’. You’ll end up with what I’ve got in the screenshot below.
在上面的屏幕截图中,未选择闪光灯按钮。 通过单击将其选中。 然后打开“演员属性”框。 到达那里后,将“墨水”选项更改为“背景透明”。 您将得到下面的屏幕快照中的内容。
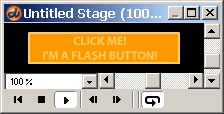
Once you set the Ink to Background Transparent, your button will look like this:
将墨水设置为“背景透明”后,您的按钮将如下所示:
That’s all there it to it! If you publish the movie now, you’ll end up with a nice Shockwave movie that contains your Flash movie! The best thing is, you don’t have to write any Lingo, or have any other images to make the button output the mouseover!
这就是全部! 如果您现在发布电影,最终将得到一部包含Flash电影的漂亮Shockwave电影! 最好的事情是,您不必编写任何Lingo,也不需要任何其他图像即可使按钮输出到鼠标悬停!
I’ve also made a Shockwave movie where I used Photoshop PSDs to make a mouseover button in Director. I did this as I wanted to illustrate the difference is file sizes. Another very important benefit to using vector graphics is the scalability… but that is a whole other tutorial!
我还制作了一部Shockwave电影,在其中我使用了Photoshop PSD在Director中制作了一个鼠标悬停按钮。 我这样做是因为我想说明差异是文件大小。 使用矢量图形的另一个非常重要的好处是可伸缩性……但这是另一个完整的教程!
Download this file to see all these buttons in action!
下载此文件以查看所有这些正在使用的按钮!
director示例


 5387
5387

 被折叠的 条评论
为什么被折叠?


