


grav cms
We previously looked at some essential Grav plugins with which to round off the installation of a personal blog. In this post, we’ll take a look at some additional, advanced plugins, rounding it all off with an installation of Varnish for supercaching, taking performance to a whole new level.
我们之前曾看过一些基本的Grav插件,可用来完成个人博客的安装。 在本文中,我们将介绍一些其他高级插件,并通过安装Varnish进行超级缓存来解决所有这些问题,从而将性能提升到一个全新的水平。
相关页面 (Related Pages)
Once a blog has enough posts, user retention becomes more difficult – as users find it hard to locate related or interesting posts to read, they leave your site. The related pages plugin helps with that.
一旦博客中有足够的帖子,用户保留就变得更加困难–由于用户很难找到相关或有趣的帖子来阅读,因此他们离开了您的网站。 相关的页面插件可以帮助您。
Out of the box, it includes some sensible defaults for calculating relation scores between posts, and can include title scanning, content parsing, matching by taxonomies, and much more. Once the scanning has been configured, rendering the pages is a matter of including the generated list of related items in an existing template, like so:
开箱即用,它包括一些合理的默认值,用于计算帖子之间的关系得分,并且可以包括标题扫描,内容解析,分类法匹配等。 配置了扫描后,渲染页面就可以在现有模板中包括生成的相关项目列表,如下所示:
{% if config.plugins.relatedpages.enabled and related_pages|length > 0 %}
    <h4>Related Posts</h4>
    {% include 'partials/relatedpages.html.twig' %}
{% endif %}
Note that the styling, while decent in its default form, is ultimately up to you. That’s where the next plugin comes in handy.
请注意,样式虽然采用默认形式,但最终由您决定。 那是下一个插件派上用场的地方。
自定义JS和CSS,而无需扩展主题 (Custom JS and CSS without extending the theme)
Sometimes, all you need to do is include a small JS or CSS modification in your pages. A full theme extension would, in that case, be overkill. That’s where the assets plugin comes in.
有时,您需要做的就是在页面中包含小的JS或CSS修改。 在这种情况下,完整的主题扩展将是多余的。 这就是资产插件的来源。
Once installed, you have the ability to add JS / CSS frontmatter to your pages:
安装完成后,您就可以向页面添加JS / CSS主题了:
{assets:js order:10}
custom-script.js
/blog/some-blog/post/script.js
//cdnjs.cloudflare.com/ajax/libs/1140/2.0/1140.min.js
http://somesite.com/js/cookies.min.js
{/assets}

{assets:inline_css}
h1 {color: red !important;}
{/assets}
Notice the inline_ prefix when dealing with inline CSS / JS
在处理内联CSS / JS时请注意inline_前缀
This then lets you easily tweak the look and feel of certain pages when needed – like adding some fancy demo logic into the mix, custom styling in case the page is of a different type than what you usually post, and more.
然后,这使您可以在需要时轻松调整某些页面的外观和感觉,例如在组合中添加一些精美的演示逻辑,自定义样式(以防页面与通常发布的页面类型不同)以及更多内容。
搜索 (Search)
Having many posts is pointless if there’s no way for people to search them and find the one they’re looking for. Given that Grav is a flat-file system with no database, searching takes more than just firing off a MySQL LIKE %% query.
如果没有人可以搜索并找到所需的帖子,那么拥有很多帖子毫无意义。 鉴于Grav是没有数据库的平面文件系统,因此搜索不仅仅是触发MySQL LIKE %%查询。
The simplesearch plugin (named that way purely because it uses a very simple method of searching – string matching) adds this feature. It comes with its own search field partial, and a search results page, but these can of course be fully customized.
simplesearch插件 (之所以这样命名,纯粹是因为它使用了一种非常简单的搜索方法-字符串匹配)来添加此功能。 它带有自己的部分搜索字段和一个搜索结果页面,但是这些当然可以完全自定义。
For example, after copying the user/plugins/simplesearch/templates/simplesearch_results.html.twig file into user/themes/cacti-swader/templates/ and modifying it, here’s how the implementation looks on my own blog:
例如,将user/plugins/simplesearch/templates/simplesearch_results.html.twig文件复制到user/themes/cacti-swader/templates/并对其进行修改后,该实现在我自己的博客上的外观如下:

注意事项 (Caveats)
筛选器 (Filters)
To make sure it works across all pages, the filters value in the configuration file must be EMPTY, not non-existent. If you remove it completely, it will fall back to the default of the plugin’s original configuration file, which limits the results to those that have a category of blog. Here’s my configuration in user/config/plugins/simplesearch.yaml:
为了确保它可以在所有页面上使用,配置文件中的filters值必须为EMPTY,而不是不存在。 如果将其完全删除,它将恢复为插件原始配置文件的默认值,从而将结果限制为具有blog category的结果。 这是我在user/config/plugins/simplesearch.yaml :
enabled: true
built_in_css: true
display_button: false
min_query_length: 3
route: /search
filters: ""
template: simplesearch_results
order:
  by: date
  dir: desc
性能 (Performance)
While effective, this plugin will lose performance as your collection of posts grows, because it iterates through every page you have and compares its content to the given search query. The length of the posts and their number directly correlates to the search performance. It is recommended to implement a more powerful search engine once the number of posts reaches critical mass (e.g. over 1000).
虽然有效,但该插件会随着您帖子集的增长而失去性能,因为它会遍历您拥有的每个页面并将其内容与给定的搜索查询进行比较。 帖子的长度及其数量与搜索效果直接相关。 建议一旦帖子数量达到临界数量(例如,超过1000个),就实施更强大的搜索引擎。
多国语言和SimpleSearch (Multi-language and SimpleSearch)
If you’re using the language switcher by utilizing a multi-language theme, you might want to modify the langswitcher.html.twig partial to ignore the search query string when switching languages because of this. Use the instructions in the linked issue to fix the problem. And while we’re on the topic of language, to modify the string “Search results” and other values on the search results page, you can either modify the user/plugins/simplesearch/language.yaml file, or change the strings used in the search results template to use those defined in the theme’s language file.
如果您使用的语言切换器利用一个多语言的主题,你可能要修改langswitcher.html.twig部分开关,因为语言时忽略搜索字符串此 。 使用链接的问题中的说明解决问题。 而且,当我们处于语言主题时,要修改字符串“ Search results”和搜索结果页面上的其他值,您可以修改user/plugins/simplesearch/language.yaml文件,或更改在搜索结果模板以使用主题语言文件中定义的模板。
注释 (Comments)
To add a comments section, we can use the JsComments plugin. It’s an abstraction of several popular comment systems, allowing for their site-wide installation in an instant, by just modifying the config file and adding the appropriate license key or identification code.
要添加评论部分,我们可以使用JsComments插件 。 它是几种流行评论系统的抽象,只需修改配置文件并添加适当的许可证密钥或标识代码,即可立即在整个站点范围内进行安装。
Unfortunately, Disqus is still the most viable option today, so let’s go with that.
不幸的是,Disqus仍然是当今最可行的选择,因此让我们继续吧。
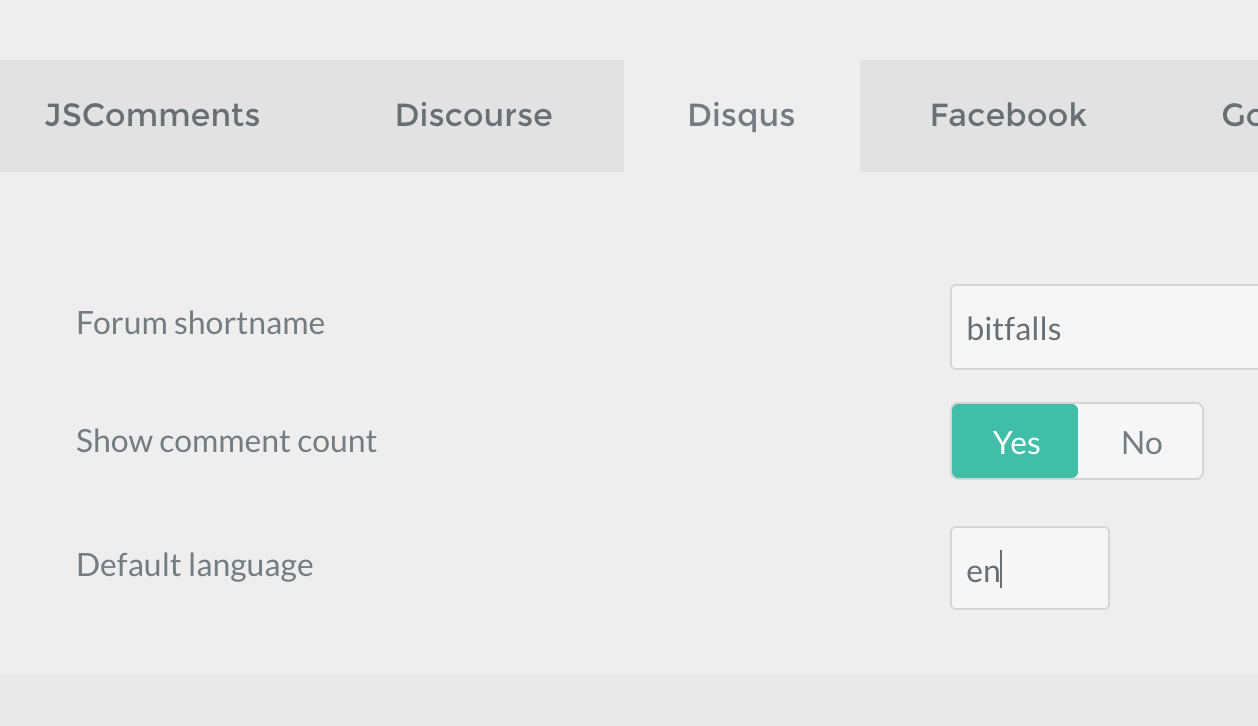
The Admin Panel UI intuitively offers all the options we need to set, most notably the “Enabled” and “Active” option in the main tab, and the Disqus shortname in the Disqus tab:
Admin Panel UI直观地提供了我们需要设置的所有选项,最值得注意的是主选项卡中的“ Enabled”和“ Active”选项,以及Disquss选项卡中的Disqus短名称:
Once done, the JS snippet needs to be injected into the template or page in which we want the comments rendered. This snippet is identical for all providers, and automatically switches out the comment system code when and if you decide on a different provider:
完成后,需要将JS代码片段注入我们要在其中呈现注释的模板或页面。 此代码段对于所有提供程序都是相同的,并且当您决定使用其他提供程序时会自动切换出注释系统代码:
{% if config.plugins.jscomments.enabled %}
{{ jscomments() }}
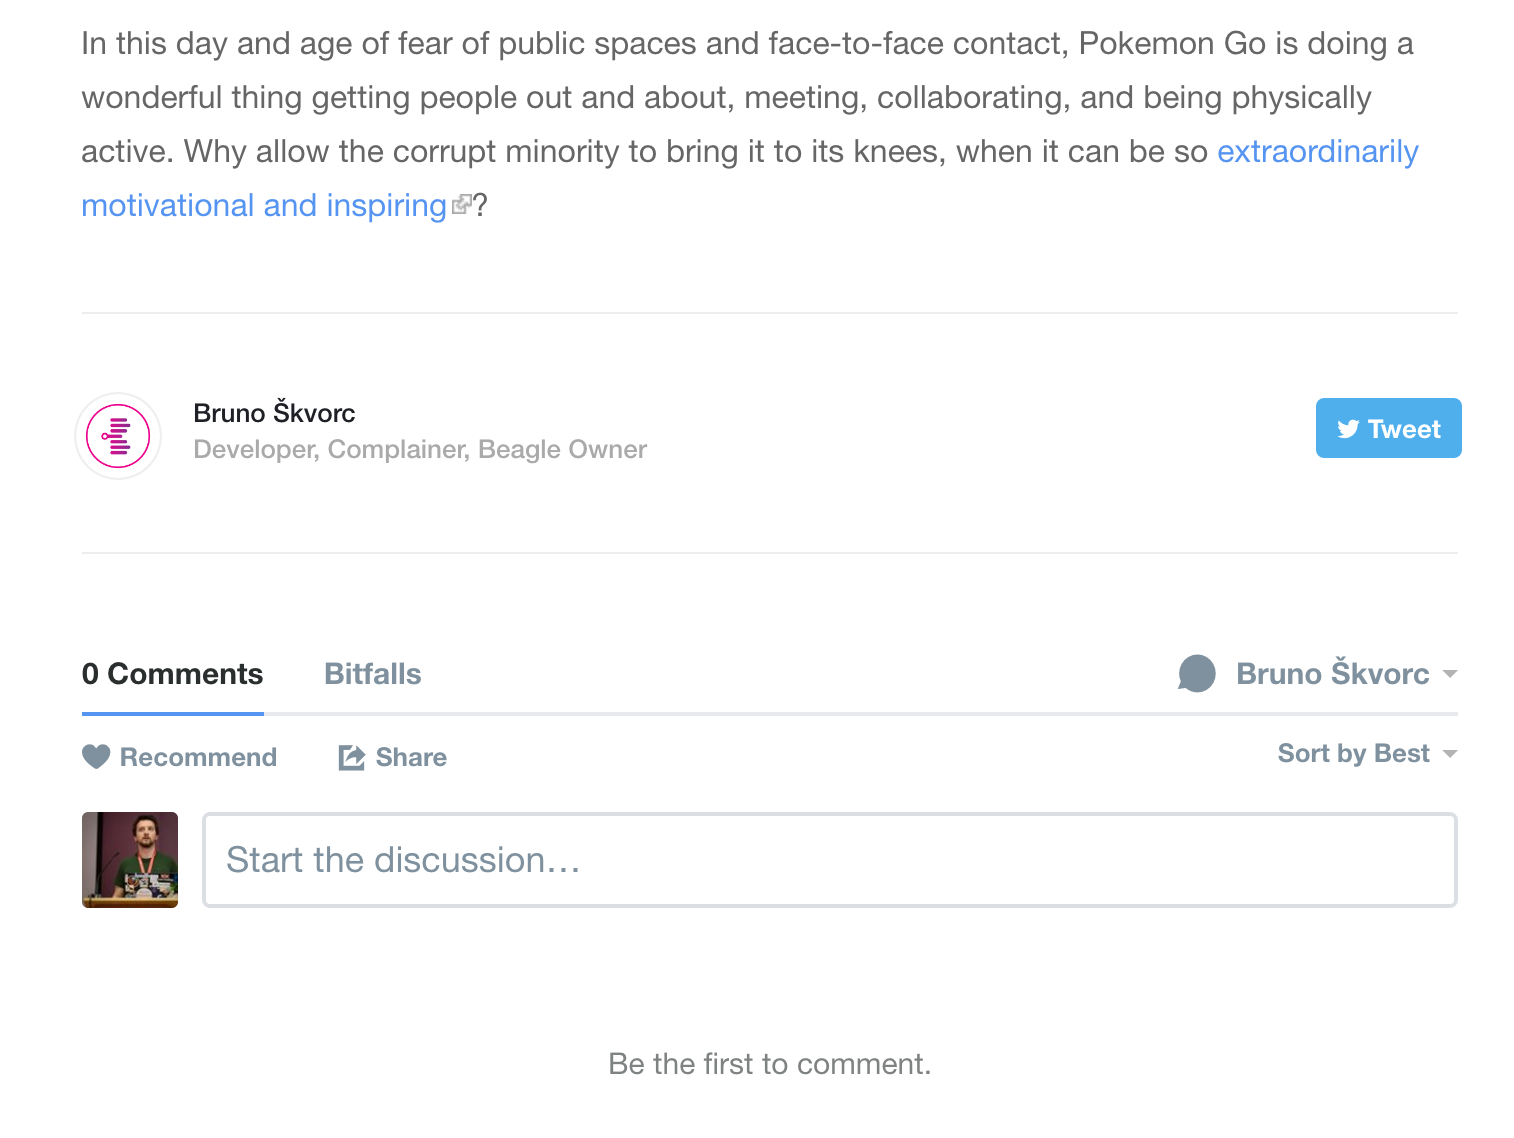
{% endif %}Here’s how the implementation looks on my blog:
这是实现在我的博客上的样子:
与官方评论的差异 (Difference from Official Comments)
There is also an official comments plugin which provides native commenting functionality and saves the comments in local files, but it’s missing some crucial features (see list in README file) and it’s flat-file based, not JS-based, which means they don’t play nice with full page caching.
还有一个官方的注释插件 ,该插件提供本机注释功能并将注释保存在本地文件中,但是缺少一些关键功能(请参阅README文件中的列表),并且它是基于平面文件的,而不是基于JS的,这意味着它们没有整页缓存效果不错。
When pages with JS comments are cached, they’re loaded asynchronously after the page is shown, regardless of the level of caching, which makes sure they’re always up to date even if you cache your content very aggressively.
缓存带有JS注释的页面时,无论页面的缓存级别如何,都将在显示页面后异步加载它们,从而确保即使您非常积极地缓存内容,它们也始终是最新的。
图像优化和CDN (Image Optimization and CDNs)
Any good blog post is rich with text-breaking images to increase readability. But images tend to get pretty heavy sometimes, and bandwidth is precious – especially during traffic spikes. There are two options: CDN, and image optimization.
任何一篇不错的博客文章都带有断行符图像,以增加可读性。 但是有时图像会变得很沉重,带宽非常宝贵-尤其是在流量高峰期间。 有两个选项:CDN和图像优化。
CDN (CDN)
Grav’s CDN plugin works great with pullzone CDNs like MaxCDN.
Grav的CDN插件可与MaxCDN等Pullzone CDN一起使用。
A pullzone CDN is a special type of setup many CDNs offer where, when a file is requested from your site, it is first copied to the CDN, then to all its remote locations for serving around the world, and then served back to the user.
Pullzone CDN是许多CDN提供的一种特殊类型的设置,当从您的站点请求文件时,首先将其复制到CDN,然后再复制到其所有远程位置以在世界范围内提供服务,然后再提供给用户。
Pullzones usually aren’t free, and need additional setting up, plus some CNAME records at your domain’s registrar, but all the effort is worth it when the speed gains and bandwidth savings are considered.
Pullzone通常不是免费的 ,并且需要进行额外的设置 ,并在您的域的注册商处添加一些CNAME记录,但是考虑到速度的提高和带宽的节省,所有的努力都是值得的。
Once fully configured on the CDN’s side, implementing a pullzone in Grav is extremely simple. The plugin provides the typical yaml configuration file (fully editable in the Admin UI):
一旦在CDN端完全配置,在Grav中实现Pullzone非常简单。 该插件提供了典型的yaml配置文件(可在管理界面中完全编辑):
enabled: true
inline_css_replace: true
pullzone: yourdomain.cdn.com
tags: 'a|link|img|script'
extensions: 'jpe?g|png|gif|ttf|otf|svg|woff|xml|js|css'
The above means: Replace all links to resources with the yourdomain.cdn.com domain, including url() calls in CSS, and do the same for all the listed extensions in all a, link, img, and script tags. This effectively makes the CDN auto-serve all static assets.
上述方法:更换用的所有资源链接yourdomain.cdn.com域,包括url()在CSS电话,全部上市做同样的extensions在所有的a , link , img和script标签。 这有效地使CDN自动提供所有静态资产。
For assets you don’t want CDNed, there’s a nocdn mode, too.
对于不需要 CDNed的资产,也有一个nocdn模式 。
图像优化 (Image Optimization)
Whereas a CDN will serve assets with great efficiency and over great distances, you might also be interested in merely optimizing your images and reducing their filesize. The rather specific optimus plugin ties into the Optimus image optimization service.
CDN可以高效地服务于远距离的资产,而您可能还对仅优化图像并减小文件大小感兴趣。 相当具体的optimus插件与Optimus图像优化服务相关。
Optimus is an arguably much more affordable service, clocking in at $19 per year for personal projects, but it lacks the geo-diversity of a CDN and only handles images. That said, this too can lead to some astonishing bandwidth savings.
Optimus可以说是一种更为实惠的服务,个人项目的年收入为19美元,但它缺乏CDN的地域多样性,只能处理图像。 话虽如此,这也可以带来惊人的带宽节省。
Once installed, Optimus is automatically activated and sends all images for processing to the service. There are two things to keep in mind:
安装完成后,Optimus会自动激活,并将所有图像发送至服务。 有两件事要牢记:
- the initial load of images will be slow, because it’ll take time for Optimus to process them and send them back 图像的初始加载速度会很慢,因为Optimus需要花费一些时间来处理它们并将其发送回去
the images will get saved and cached locally – they get returned back to your server, so it’s still you serving them.
这些图像将被保存并在本地缓存-它们将返回到您的服务器,因此仍由您提供。
The ideal approach would be using Optimus to optimize images, and then forwarding those to a CDN pullzone, thus reducing bandwidth for static assets to near 0%, but at a cost of about an extra $100 per year when looked at in total.
理想的方法是使用Optimus优化图像,然后将其转发到CDN Pullzone,从而将静态资产的带宽减少到接近0%,但每年总计花费大约100美元。
There is another way to super-cache your site, though, and that one’s free.
不过,还有另一种方法可以超级缓存您的网站,而该网站是免费的。
用清漆缓存 (Caching with Varnish)
As a final, super-optimization step, we’ll take advantage of Varnish, the reverse proxy server which caches full pages for arbitrary amounts of time and serves them very, very quickly. It protects your server from traffic spikes, and saves server resources for other processes and sites.
作为最后的超级优化步骤,我们将利用Varnish ( 反向代理服务器)的优势,该服务器将整个页面缓存任意时间,并非常非常快地为其提供服务。 它可以保护您的服务器免受流量高峰的影响,并节省其他进程和站点的服务器资源。
After installing it with something like sudo apt-get install varnish, we can modify some settings files. The default value for DAEMON_OPTS in /etc/default/varnish is actually fine as it is by default:
使用sudo apt-get install varnish类的东西安装它之后,我们可以修改一些设置文件。 实际上, /etc/default/varnish DAEMON_OPTS的默认值是可以的,因为默认情况下是这样的:
DAEMON_OPTS="-a :6081
             -T localhost:6082
             -f /etc/varnish/default.vcl
             -S /etc/varnish/secret
             -s malloc,256m"
Note: find out about these values in our original Varnish post
注意:在我们的原始Varnish帖子中了解这些值
The other file to pay attention to is /etc/varnish/default.vcl, and its backend value.
另一个要注意的文件是/etc/varnish/default.vcl及其backend值。
backend default {
    .host = "127.0.0.1";
    .port = "8080";
}
The port should be changed to the port of the regular server, and the host should be renamed to the hostname of the server as defined in the server configuration. For my example during local development, it ends up looking like this:
该端口应更改为常规服务器的端口,并且主机应重命名为服务器配置中定义的服务器的主机名。 对于我在本地开发期间的示例,最终看起来像这样:
backend default {
    .host = "test.app";
    .port = "80";
}
For this to work, the /etc/hosts file of the server you’re running your development sites on needs to have the 127.0.0.1 test.app entry, and you need to have the server configuration of this particular site named test.app, like so:
为此,运行开发站点的服务器的/etc/hosts文件需要具有127.0.0.1 test.app条目, 并且需要具有名为test.app特定站点的服务器配置。 ,就像这样:
server {

    listen 80;
    listen 443 ssl;

    server_name test.app;

    ...
Now, the combination of these files makes sure that when visiting the page http://test.app:6081, Varnish actually fetches the content from http://test.app:80, saves it, and forwards it to the browser.
现在,这些文件的组合可确保在访问页面http://test.app:6081 ,Varnish实际上从http://test.app:80获取内容,将其保存并转发到浏览器。
The same applies to live servers, but obviously those will differ in domain names.
实时服务器也是如此,但是显然,它们的域名会有所不同。
Deploying for production entails the following:
部署生产需要以下内容:
- change port for Nginx / Apache to something esoteric (9123) 将Nginx / Apache的端口更改为深奥的东西(9123)
change backend port in
/etc/varnish/default.vclto that port将
/etc/varnish/default.vcl后端端口更改为该端口- change Varnish front end port to 80 将清漆前端端口更改为80
Once done, you successfully got a Varnish-powered supercached site going, and you’re ready for those Hacker News / Reddit traffic spikes!
完成后,您就可以成功使用由Varnish提供支持的超级缓存站点,并且可以为那些Hacker News / Reddit流量激增做好准备!
结论 (Conclusion)
As you can see, there’s a lot that can be done with Grav (and around it), and we haven’t even looked at fully custom plugins or themes yet – something we’ll do in the near future.
如您所见,Grav(及其周围)可以做很多事情,我们甚至还没有研究完全自定义的插件或主题-我们将在不久的将来做这些事情。
With the setup presented in this post, and the plugins from the previous list, your blog is 100% production ready.
有了本文中介绍的设置以及上一列表中的插件,您的博客即可100%投入生产。
Have you given Grav a try yet? How do you feel about our suggestions in this post? Would you approach anything differently? Let us know!
您尝试过Grav吗? 您对此帖子的建议有何看法? 您会采取不同的方法吗? 让我们知道!
翻译自: https://www.sitepoint.com/6-more-must-do-grav-tweaks-ready-for-hacker-news-traffic/
grav cms


 1068
1068

 被折叠的 条评论
为什么被折叠?
被折叠的 条评论
为什么被折叠?
 到【灌水乐园】发言


