


adobe animate
This article was sponsored by Adobe. Thank you for supporting the sponsors that make SitePoint possible!
本文由Adobe赞助。 感谢您支持使SitePoint成为可能的赞助商!
This tutorial guides you through building an interactive infographic in Adobe Edge Animate CC 2014 (see Figure 1). Along the way, you’ll learn how to bring your design to life with interactive widgets containing animated states. If you’re interested in infographic design, you might like to read this tutorial’s companion piece!
本教程将指导您在Adobe Edge Animate CC 2014中构建交互式信息图(请参见图1)。 在此过程中,您将学习如何通过包含动画状态的交互式小部件使设计栩栩如生。 如果您对信息图表设计感兴趣,则可能需要阅读本教程的配套文章 !
See the Pen Adobe Edge – Of Time and Trees Demo by SitePoint (@SitePoint) on CodePen.
请参阅CodePen上的SitePoint ( @SitePoint )的Pen Adobe Edge –时间和树木演示 。
Adobe工具: (Adobe tools:)
This tutorial covers a simple workflow using:
本教程使用以下内容介绍了一个简单的工作流程:
• Adobe Illustrator CC 2014 • Adobe Edge Animate CC 2014
•Adobe Illustrator CC 2014•Adobe Edge Animate CC 2014
内容: (Contents:)
This tutorial walks through creating an infographic composition, from start to finish:
本教程从头到尾逐步介绍了如何创建信息图结构:
- Step 1: Create the background graphic in Illustrator CC 2014 步骤1:在Illustrator CC 2014中创建背景图形
- Step 2: Build the static composition in Edge Animate CC 2014 步骤2:在Edge Animate CC 2014中构建静态合成
- Step 3: Build the TimelineTrigger widget 步骤3:构建TimelineTrigger小部件
- Step 4: Build the DetailPanel widget 步骤4:构建DetailPanel小部件
- Step 5: Add a data source 步骤5:添加数据源
- Step 6: Bind the triggers to the detail panel 步骤6:将触发器绑定到详细信息面板
步骤1:在Illustrator CC 2014中创建背景图形 (Step 1: Create the background graphic in Illustrator CC 2014)
The tutorial assumes that you’ve already done the important work of collecting data, text, and a story or message for your infographic. When you’re ready to move from concept to design, Adobe Photoshop CC 2014 or Adobe Illustrator CC 2014 is a good place to start.
本教程假定您已经完成了为图表收集数据,文本以及故事或消息的重要工作。 当您准备从概念过渡到设计时,Adobe Photoshop CC 2014或Adobe Illustrator CC 2014是一个不错的起点。
In this case, you’ll produce the background graphic in Illustrator. Later, you’ll convert the vector graphics to SVG (Scalable Vector Graphics) format by copying and pasting them in Edge Animate CC 2014. As the name would suggest, SVG files are scalable, and will work well with the responsive layout you’ll build in Edge Animate.
在这种情况下,您将在Illustrator中生成背景图形。 稍后,您可以通过在Edge Animate CC 2014中复制和粘贴矢量图形,将其转换为SVG(可缩放矢量图形)格式。顾名思义,SVG文件是可伸缩的,并且将与响应式布局一起很好地工作内置Edge Animate。
Follow these steps to create the background graphic:
请按照以下步骤创建背景图形:
1.设置项目。 (1. Setup the project.)
a. Download and install Adobe Illustrator CC 2014 and Adobe Edge Animate CC 2014 from the Creative Cloud.
一个。 从Creative Cloud下载并安装Adobe Illustrator CC 2014和Adobe Edge Animate CC 2014。
b. Download the supplied files from the article, and unzip them to your Desktop.
b。 从文章中下载提供的文件 ,并将其解压缩到您的桌面。
c. Open the infographic_project folder. You’ll use this folder as your project folder as you work (see Figure 2). Take a look at the infographic-design.ai file in the assets folder. This file contains the mockup for the design, and the vector graphics you’ll use for your background in Edge Animate.
C。 打开infographic_project文件夹。 您将在工作时将此文件夹用作项目文件夹(请参见图2)。 查看资产文件夹中的infographic-design.ai文件。 该文件包含设计的模型,以及将在Edge Animate中用于背景的矢量图形。
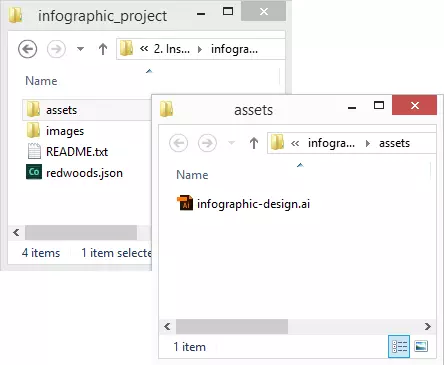
Figure 2: The infographic_project folder and supplied files
图2:infographic_project文件夹和提供的文件
2.在Illustrator中创建作品。 (2. Create your artwork in Illustrator.)
a. Open the infographic-design.ai file located in the assets folder of the supplied files. Double-click on the file to launch Adobe Illustrator CC 2014.
一个。 打开位于提供的文件的Assets文件夹中的infographic-design.ai 文件 。 双击该文件以启动Adobe Illustrator CC 2014。
b. Take a moment to explore the design. You can see that the design is fully realized, and works as a standalone graphic to some extent. Although the text and timeline triggers appear in the mockup, you’ll omit those layers when you create the SVG file (see Figure 3). You’ll add the text and triggers in Edge Animate.
b。 花一点时间探索设计。 您可以看到该设计已完全实现,并且在某种程度上可以用作独立图形。 尽管文本和时间线触发器显示在模型中,但是在创建SVG文件时,您将省略这些层(请参见图3)。 您将在Edge Animate中添加文本和触发器。

Figure 3: The organization of the design in the Illustrator file
图3:Illustrator文件中的设计组织
c. Hide or lock the text, triggers, and play button layers, and select all the remaining graphics on the tree and background layers (see Figure 4). These graphics will become your background after you create your composition in the next step.
C。 隐藏或锁定文本,触发器和播放按钮层,然后选择树和背景层上的所有其余图形(参见图4)。 在下一步中创建合成后,这些图形将成为您的背景。

Figure 4: The vector artwork selected in Illustrator
图4:在Illustrator中选择的矢量图稿
步骤2:在Edge Animate中建立静态合成 (Step 2: Build the static composition in Edge Animate)
At this point, you’re ready move to Edge Animate CC 2014 to start work on your interactive composition. Leave Illustrator open, you’ll return to copy your background graphics in the following steps.
至此,您已经准备好迁移到Edge Animate CC 2014来开始进行交互式合成。 将Illustrator保持打开状态,您将按照以下步骤返回以复制背景图形。
Follow these steps to layout the composition:
请按照以下步骤布局组成:
1.设置响应式合成。 (1. Setup the responsive composition.)
a. Open the current version of Adobe Edge Animate CC 2014. You’ll use the new Responsive Scaling features to create a design that scales its size to the size of the screen viewing it.
一个。 打开当前版本的Adobe Edge Animate CC2014。您将使用新的“响应缩放”功能来创建一个设计,该设计将其尺寸缩放为查看它的屏幕尺寸。
b. Choose File > New, to create a new file. Save the file into the project folder with the name infographic.html. Notice that Edge Animate adds supporting files to the project folder as well.
b。 选择“文件”>“新建”以创建一个新文件。 将文件保存到名称为infographic.html的项目文件夹中。 请注意,Edge Animate也将支持文件添加到项目文件夹。
c. Update the Stage properties in the Properties panel to the following (see Figure 5):
C。 将“属性”面板中的舞台属性更新为以下内容(请参见图5):
• W: 850
•宽:850
• H: 800
•高:800
• Min W: 380
•最低W:380
• Max W: 1200
•最大W:1200
• Center Stage: Checked, Horizontal
•中央舞台:格子,水平
• Responsive Scaling, Checked, Both
•响应缩放,已选中
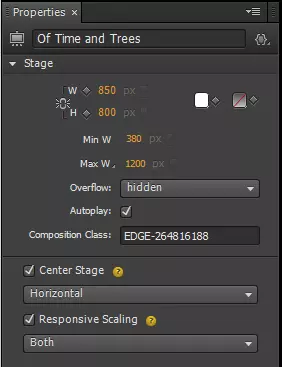
Figure 5: The Stage properties for the infographic
图5:信息图的舞台属性
2.从Illustrator复制并粘贴背景图形。 (2. Copy and paste the background graphics from Illustrator. )
a. Return to Illustrator and make sure you have all the graphics on the tree and background layers selected. Copy the graphics to the clipboard.
一个。 返回Illustrator,并确保已选择树和背景层上的所有图形。 将图形复制到剪贴板。
b. Return to Edge Animate, and paste the graphics onto the Stage. Notice that a dialog box appears asking you for the name of the resulting SVG file (see Figure 6). Enter the name Background.svg, and press OK.
b。 返回到Edge Animate,然后将图形粘贴到舞台上。 注意,将出现一个对话框,询问您所生成的SVG文件的名称(请参见图6)。 输入名称Background.svg,然后按OK。

Figure 6: Pasting Illustrator graphics in Edge Animate creates an SVG
图6:在Edge Animate中粘贴Illustrator图形将创建SVG
c. Position the SVG graphic on the Stage so that it sits center screen.
C。 将SVG图形放置在舞台上,使其位于屏幕中央。
d. Take a look in the project folder and notice that the SVG graphic was saved to the images folder. You can open the SVG graphic in Illustrator if you need to make any edits.
d。 查看项目文件夹,注意SVG图形已保存到images文件夹。 如果需要进行任何编辑,则可以在Illustrator中打开SVG图形。
3.添加文本作为HTML元素。 (3. Add text as HTML elements.)
- a. Add text above the background graphic using the Text tool in Edge Animate. (You can copy the text from the completed project files if you like.) In my mockup, I’m simply using Arial (or sans) font, but you can add web fonts or your own font choices here.
- 一个。 使用Edge Animate中的“文本”工具在背景图形上方添加文本。 (您可以根据需要从完成的项目文件中复制文本。)在我的模型中,我只是使用Arial(或sans)字体,但是您可以在此处添加Web字体或自己的字体选择。
- The font sizes are as follows:
- 字体大小如下:
- Title: 48 Pt. 标题:48点
- Caption: 21 Pt. 标题:21点。
- Timeline: 12 Pt. 时间轴:12点。
- b. Select all the text, right click and choose Convert to Symbol. In the Create Symbol dialog box, name the symbol GridText, and press OK. Grouping the text inside a symbol cleans up the Stage (see Figure 7).
- b。 选择所有文本,右键单击并选择“转换为符号”。 在“创建符号”对话框中,将符号命名为GridText,然后按“确定”。 将符号内的文本分组可以清理舞台(请参见图7)。
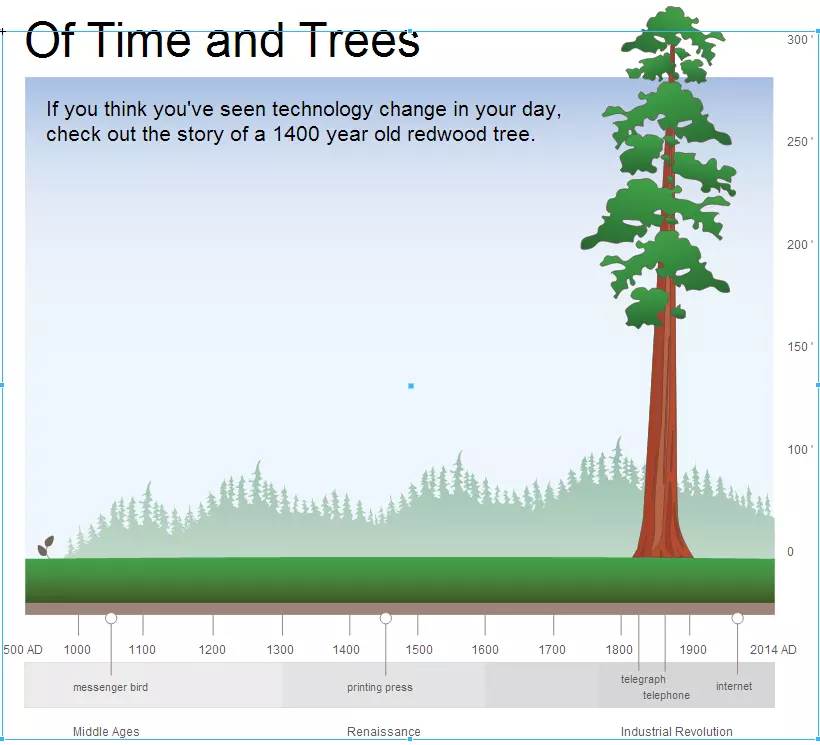
Figure 7: The static graphics and HTML text in Edge Animate CC
图7:Edge Animate CC中的静态图形和HTML文本
4.保存文件。 (4. Save the file.)
步骤3:构建TimelineTrigger小部件 (Step 3: Build the TimelineTrigger widget)
You’ll notice there are numbered timeline triggers in the mockup design. Rather than build 8 different graphics, you’ll build a single TimelineTrigger widget in Edge Animate (see Figure 8). What I’m calling a widget is simply an Edge Animate symbol that can be configured using a little code. The fun part is that the widget has its own timeline with animated states.
您会注意到,样机设计中有编号的时间轴触发器。 您无需构建8个不同的图形,而是可以在Edge Animate中构建单个TimelineTrigger小部件(请参见图8)。 我所说的小部件只是可以使用少量代码进行配置的Edge Animate符号。 有趣的是,小部件具有自己的带有动画状态的时间轴。

Figure 8: Instances of the TimelineTrigger widget along the timeline
图8:沿着时间线的TimelineTrigger小部件的实例
Follow these steps to build the TimelineTrigger widget:
请按照以下步骤来构建TimelineTrigger小部件:
1.创建小部件图形和符号。 (1. Create the widget graphics and symbol.)
a. Select the Ellipse Tool and draw a circle about 30 pixels in diameter. Select the Text Tool and add a text element above the circle. Make sure the name of the text element layer is “Text”.
一个。 选择“椭圆工具”并绘制一个直径约30像素的圆。 选择文本工具,然后在圆上方添加一个文本元素。 确保文本元素层的名称为“文本”。
b. Select both the circle and the text, right-click, and choose Convert to Symbol. In the Create Symbol dialog box, name the symbol TimelineTrigger, uncheck the Autoplay timeline option, and press OK.
b。 选择圆和文本,单击鼠标右键,然后选择“转换为符号”。 在“创建符号”对话框中,将符号命名为“ TimelineTrigger”,取消选中“自动播放时间线”选项,然后按“确定”。
c. Notice that the circle and text element now appear as a single grouped object. Double-click on the instance to enter its timeline.
C。 注意,circle和text元素现在显示为单个分组的对象。 双击实例以输入其时间轴。
d. At this point, you’ve left the main Stage timeline, and are now working in the TimelineTrigger symbol timeline. You can navigate back to the Stage using the Stage link on the top left of the Stage area.
d。 至此,您已经离开了舞台的主要时间轴,现在正在使用TimelineTrigger符号时间轴。 您可以使用“舞台”区域左上方的“舞台”链接导航回舞台。
2.添加标签以将时间线分成多个部分。 (2. Add labels to split the timeline into sections.)
a. In the next steps, you’ll work with the timeline tools to add animated states to the widget. Take a look at Figure 9 to get familiar with the tool names and locations on the Timeline panel.
一个。 在接下来的步骤中,您将使用时间轴工具将动画状态添加到小部件。 看一下图9,以熟悉“时间轴”面板上的工具名称和位置。

Figure 9: The Timeline panel tools
图9:“时间轴”面板工具
b. Drag the timeline marker to the 0 mark, and click on the Insert Label button to add a label. Type the text “default” into the label.
b。 将时间线标记拖动到0标记,然后单击“插入标签”按钮以添加标签。 在标签中输入文本“ default”。
c. Add a label named “rollover” at the 1 second mark, and add another label named “rollout” at the 2 second mark. You’ll navigate to the labels to play specific states of the animation.
C。 在1秒标记处添加一个名为“ rollover”的标签,并在2秒标记处添加另一个名为“ rollout”的标签。 您将导航到标签以播放动画的特定状态。
3.添加过渡状态动画。 (3. Add the rollover state animation.)
a. Drag the timeline marker to the 1 second mark, and click the Toggle Pin button to select it. Notice that a blue pin icon appears on the timeline marker.
一个。 将时间线标记拖到1秒标记,然后单击“切换图钉”按钮将其选中。 请注意,时间轴标记上会出现一个蓝色的图钉图标。
b. Drag the timeline marker to the 1.5 second mark, and select the ellipse graphic and change its width and height amounts to 150% in the Properties panel. Select the text and change its font size to a larger number. Position the scaled graphics so they appear centered inside the symbol, Notice that colored animation spans appear on the timeline between the pinned points.
b。 将时间线标记拖到1.5秒标记,然后选择椭圆图形,然后在“属性”面板中将其宽度和高度更改为150%。 选择文本并将其字体大小更改为更大的数字。 放置缩放的图形,使它们出现在符号的中心,请注意,彩色动画跨度出现在时间轴上的固定点之间。
c. Select the animation spans, and click on the Easing button. Choose the Ease Out Elastic option.
C。 选择动画跨度,然后单击“缓动”按钮。 选择“缓出弹性”选项。
4.添加展开状态动画。 (4. Add the rollout state animation.)
a. Deselect the Toggle Pin Tool and move the timeline marker to the 2 second mark.
一个。 取消选择“切换图钉工具”,然后将时间线标记移到2秒标记。
b. Select the Toggle Pin Tool again, and drag the timeline marker to the 2.5 second mark. Change the ellipse’s width and height scale back to 100%, and change the text’s font size back to the original size in the Properties panel. Position the graphics as needed.
b。 再次选择“切换图钉工具”,然后将时间轴标记拖动到2.5秒标记。 将椭圆的宽度和高度比例更改回100%,然后在“属性”面板中将文本的字体大小更改回原始大小。 根据需要放置图形。
c. Deselect the Toggle Pin Tool.
C。 取消选择“切换图钉工具”。
d. Select the new animation spans, and click on the Easing button. Choose the Ease Out Elastic option.
d。 选择新的动画跨度,然后单击“缓动”按钮。 选择“缓出弹性”选项。
5.沿时间轴添加停止动作触发器。 (5. Add stop action triggers along the timeline.)
a. Drag the timeline marker to the 1.5 second mark, and click on the Insert Trigger button. Notice that a Trigger icon appears on the timeline, and the Actions panel opens.
一个。 将时间线标记拖到1.5秒标记,然后单击“插入触发器”按钮。 注意,触发器图标出现在时间轴上,并且“动作”面板打开。
b. Click on the Playback button under the Pick an action section, and then click the Stop button (see Figure 10).
b。 单击“选择动作”部分下的“播放”按钮,然后单击“停止”按钮(请参见图10)。

Figure 10: The enhanced Actions panel workflow while adding a stop action
图10:增强的“动作”面板工作流程,同时添加了停止动作
c. Select the TimelineTrigger target under the Pick a target section, and then press the Enter key to commit the code.
C。 在“选择目标”部分下选择“ TimelineTrigger”目标,然后按Enter键提交代码。
d. Close the panel.
d。 关闭面板。
e. Add another stop action at the 2.5 second mark.
e。 在2.5秒标记处添加另一个停止动作。
6.添加一个“ hitarea”元素。 (6. Add a “hitarea” element. )
a. Select the Ellipse tool, and draw a circle above the other graphics.
一个。 选择“椭圆”工具,然后在其他图形上方绘制一个圆圈。
b. Select the circle and set its opacity to 0 in the Properties panel.
b。 选择圆,然后在“属性”面板中将其不透明度设置为0。
c. Name the circle layer “Hitarea” in the Properties panel. Your timeline should look like Figure 11 at this point.
C。 在“属性”面板中将圆形图层命名为“ Hitarea”。 此时,您的时间轴应如图11所示。
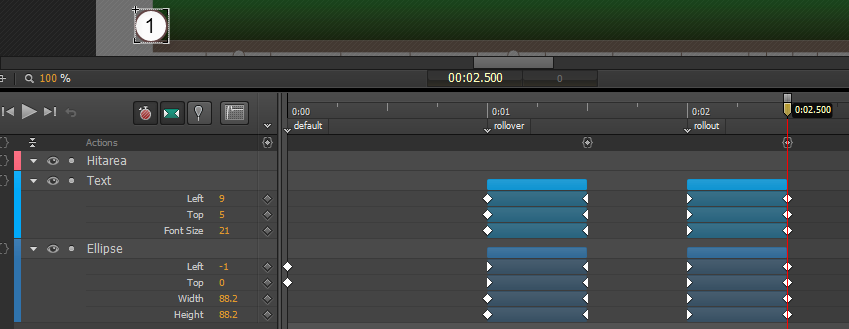
Figure 11: The completed timeline of the TimelineTrigger widget
图11:TimelineTrigger小部件的完整时间线
将代码添加到符号以控制状态。 (Add code to the symbol to control the states.)
a. Click on the Open Actions button next to the TimelineTrigger element in the Elements panel, and choose the creationComplete event. (Note that this step assumes that you’re still editing inside the TimelineTrigger timeline. You can also access the TimelineTrigger actions by choosing Window > Code to launch the Code panel.) b. You can use the Actions panel editor to guide you through adding actions, or you can type code directly into the text editor. From here on out, you’ll be pasting code snippets into the Actions panel. c. Copy and paste the following code into the Actions panel:
一个。 单击“元素”面板中“ TimelineTrigger”元素旁边的“打开操作”按钮,然后选择creationComplete事件。 (请注意,此步骤假设您仍在TimelineTrigger时间线内进行编辑。您还可以通过选择“窗口”>“代码”以启动“代码”面板来访问TimelineTrigger操作。)b。 您可以使用“动作”面板编辑器来指导您添加动作,也可以直接在文本编辑器中键入代码。 从现在开始,您将代码片段粘贴到“动作”面板中。 C。 将以下代码复制并粘贴到“动作”面板中:
function handleEvent( event ){

	if(!sym.getVariable("selected") )
	{
		switch( event ){
			case "mouseover":
				sym.play("rollover");
				break;
			case "mouseout":
				sym.play("rollout");
				break;
			case "click":
				// Callback to controller

				break;
		}
	}
}
// Relay trigger events to handleEvent
sym.$("Hitarea").on("mouseover mouseout click", function(e)
{
	handleEvent(e.type);
});
// Set variable defaults
sym.setVariable("id", null);
8.创建窗口小部件实例并将其放置在时间轴上。 (8. Create widget instances and position them on the timeline. )
a. Click on the Stage link on the top left of the Stage area to return to the Stage timeline.
一个。 单击“舞台”区域左上方的“舞台”链接以返回到舞台时间线。
b. Position the existing TimelineTrigger instance on the left edge of the timeline graphic.
b。 将现有的TimelineTrigger实例放置在时间线图形的左边缘。
c. Copy and paste the instance to create a total of eight instances. Rename the instances in the Timeline or Elements panel, so that they following the naming convention “Trigger[n]”, where [n] is a number between 0 and 7.
C。 复制并粘贴实例,以创建总共八个实例。 在“时间轴”或“元素”面板中重命名实例,以使它们遵循命名约定“ Trigger [n]”,其中[n]是介于0到7之间的数字。
d. Position the instances along the timeline as seen in Figure 8.
d。 沿着时间轴放置实例,如图8所示。
9.在舞台上添加代码以初始化小部件。 (9. Add code on the Stage to initialize the widgets.)
a. While editing the Stage timeline, click on the Open Actions button next to the Stage element in the Elements panel. Choose the compositionReady event.
一个。 编辑舞台时间轴时,在“元素”面板中单击“舞台”元素旁边的“打开动作”按钮。 选择compositionReady事件。
b. Copy and paste the following code in the Actions panel:
b。 将以下代码复制并粘贴到“动作”面板中:
/******************************************************
 * Initialize timeline triggers by setting their
 * numbers and ids.
 */
var len = 8;
for(var i=0; i<len ; i++)
{
	// Set trigger state
	sym.getSymbol("Trigger"+i).$("Text").html(i+1);
	sym.getSymbol("Trigger"+i).setVariable("id", i);
}
10.保存文件。 (10. Save the file.)
Essentially the pattern you just learned is an easy way to create buttons, and elements with states, in Edge Animate. You’ll return to work on the timeline triggers in Step 6.
本质上,您刚刚学到的模式是在Edge Animate中创建按钮和具有状态的元素的简便方法。 您将在第6步中重新使用时间轴触发器。
步骤4:构建DetailPanel小部件 (Step 4: Build the DetailPanel widget)
Next, you’ll create a second widget that displays detail text (see Figure 12). This time, you’ll use two symbols. One will layout three text fields, while the other animates the layout on and off the screen.
接下来,您将创建另一个显示详细信息文本的小部件(参见图12)。 这次,您将使用两个符号。 一个将对三个文本字段进行布局,而另一个将对屏幕上和屏幕外的布局进行动画处理。
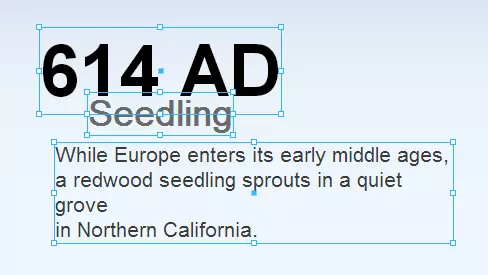
Figure 12: The layout of the DetailPanel widget
图12:DetailPanel小部件的布局
Follow these steps to build the widget:
请按照以下步骤构建窗口小部件:
1.创建文本布局和符号。 (1. Create the text layout and symbols.)
- a. Use the Text Tool to draw three text elements on the screen. Position them to look like Figure 12, using the following font sizes:
- 一个。 使用文本工具在屏幕上绘制三个文本元素。 使用以下字体大小将它们定位为如图12所示:
- Title: 72 Pt. 标题:72分。
- Caption: 36 Pt. 标题:36点
- Details: 21 Pt. 详细信息:21点。
c. Position the symbol instance in the left center of the Stage.
C。 将元件实例放置在舞台的左中心。
d. Right-click on the instance, and convert it to a symbol named DetailPanelAnimation. Double-click on the resulting instance to enter the DetailPanelAnimation timeline. This step nests the text layout symbol in a wrapper symbol, so the text layout symbol can be animated more easily as a single element.
d。 右键单击该实例,然后将其转换为名为DetailPanelAnimation的符号。 双击生成的实例以进入DetailPanelAnimation时间轴。 此步骤将文本布局符号嵌套在包装器符号中,因此可以更轻松地将文本布局符号作为单个元素进行动画处理。
2.添加标签以在时间轴中创建部分。 (2. Add labels to create sections in the timeline.)
- a. Add the following labels to the DetailPanelAnimation timeline:
- 一个。 将以下标签添加到DetailPanelAnimation时间轴:
- 0.00: default 0.00:默认
- 0.01: show 0.01:显示
- 0.02: hide 0.02:隐藏
3.设置默认状态。 (3. Setup the default state.)
a. Select the graphics at the 0 mark, and drag them off the bottom of the Stage.
一个。 选择0标记处的图形,然后将其拖离舞台底部。
4.添加显示状态动画。 (4. Add the show state animation.)
b. Set the easing to Ease Out Back.
b。 将缓动设置为“缓出”。
5.添加隐藏状态动画。 (5. Add the hide state animation.)
- a. Setup an animation between the 2 second and 2.75 second marks. The panel should animate from the target position, to the final position a few inches above. In the end, the DetailPanelAnimation timeline should look like Figure 13.
- 一个。 在2秒和2.75秒之间设置动画。 面板应从目标位置进行动画,直到最后几英寸的最终位置。 最后,DetailPanelAnimation时间线应如图13所示。
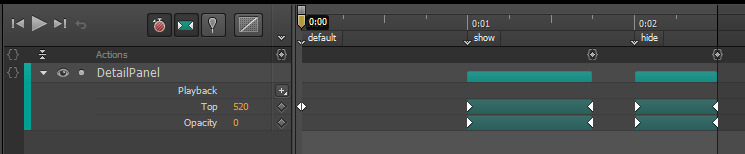
Figure 13: The completed DetailPanelAnimation timeline
图13:完整的DetailPanelAnimation时间线
b. Set the easing to Ease In Back.
b。 将缓动设置为“缓入”。
在显示的末尾添加停止动作,并隐藏动画跨度以在每个动画状态后暂停文本。 (Add stop actions to the end of the show and hide animation spans to pause the text after each animated state.)
保存文件。 (Save the file.)
In the next steps, you’ll import a data source, and bind all the widgets together.
在接下来的步骤中,您将导入一个数据源,并将所有小部件绑定在一起。
步骤5:添加数据源 (Step 5: Add a data source)
So far you’ve built the view that will display your infographic data, but you still need a data source. In this step you’ll import a supplied JSON file that contains a list of facts related to the eight points along the timeline design. You can view and edit the JSON file in a text editor like Adobe Dreamweaver CC 2014 or Adobe Edge Code CC Preview.
到目前为止,您已经构建了将显示信息图数据的视图,但是仍然需要数据源。 在此步骤中,您将导入提供的JSON文件,其中包含与时间轴设计中的八个点相关的事实的列表。 您可以在文本编辑器(如Adobe Dreamweaver CC 2014或Adobe Edge Code CC Preview)中查看和编辑JSON文件。
Follow these steps to import the details list:
请按照以下步骤导入详细信息列表:
1.单击“元素”面板中“舞台”元素旁边的“打开动作”按钮,返回舞台的compositionReady事件。 (1. Return to the Stage’s compositionReady event by clicking on the Open Actions button next to the Stage element in the Elements panel.)
2.将以下代码复制并粘贴到初始化代码下方: (2. Copy and paste the following code below the initialization code:)
/******************************************************
 * Sample data model to be visualized in the infographic
 * design. Each entry includes the year and a text snippet.
 */
var dataModel;

$.getJSON( "redwoods.json", function( json ){
	dataModel = json;
});
3.“动作”面板应如下所示(见图14)。 (3. The Actions panel should look something like this (see Figure 14).)
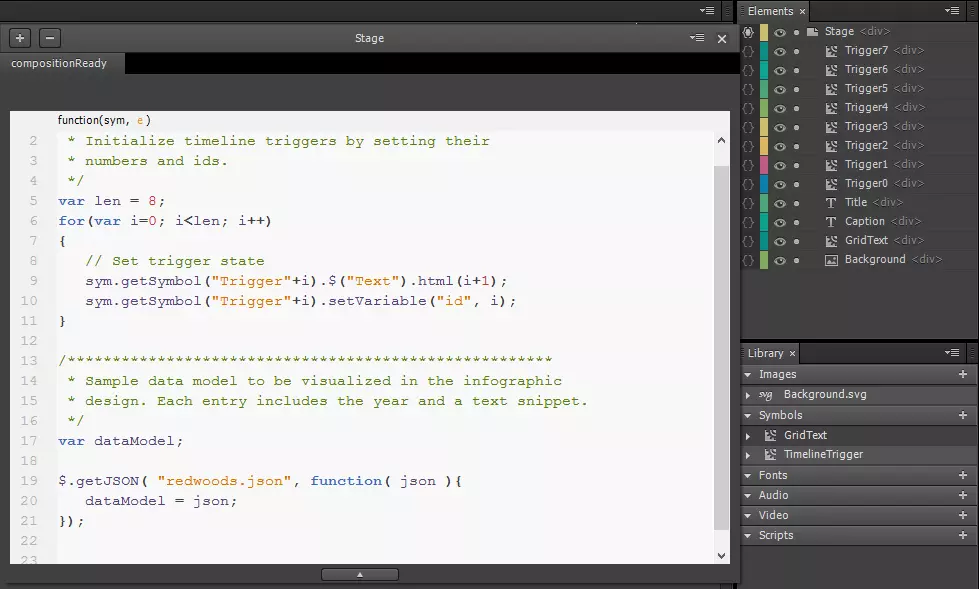
Figure 14: The code on the Stage’s compositionReady event
图14:舞台上的compositionReady事件的代码
保存文件。 (Save the file.)
The code uses the built-in jQuery getJSON command to load the redwoods.json file. In the next step you’ll route the data to the view.
该代码使用内置的jQuery getJSON命令加载redwoods.json文件。 在下一步中,您将数据路由到视图。
步骤6:将触发器绑定到详细信息面板 (Step 6: Bind the triggers to the detail panel)
You’ll finish the project by adding a little more code to the Stage timeline and the TimelineTrigger symbol timeline. The goal is to have each trigger instance callback to the Stage timeline. The Stage timeline essentially acts as a controller binding the data model, to the HTML view.
您将通过向舞台时间线和TimelineTrigger符号时间线添加更多代码来完成项目。 目标是使每个触发器实例回调到舞台时间轴。 阶段时间轴实质上是将数据模型绑定到HTML视图的控制器。
Follow these steps to bind the widgets to the data source:
请按照以下步骤将小部件绑定到数据源:
1.使用回调函数更新阶段代码。 (1. Update the Stage code with a callback function.)
a. Return to the Stage’s compositionReady code in the Actions panel.
一个。 返回到“动作”面板中舞台的compositionReady代码。
b. Add the following code below the rest:
b。 在其余代码下面添加以下代码:
/****************************************************
 * Handle clicks from timeline triggers.
 * Process events here to handle the triggers
 * as a group.
 */
var index = -1;

function handleClickEvent( id ){

	// Handle timeline trigger clicks
	showDetail(id);
}
// Expose to globally accessible scope
sym.setVariable("handleClickEvent", handleClickEvent);
2.更新TimelineTrigger代码。 (2. Update the TimelineTrigger code.)
a. Return to the TimelineTrigger’s creationComplete code in the Actions panel. You can either enter the TimelineTrigger’s timeline and use the Elements panel, or use the Code panel to get there.
一个。 返回到“动作”面板中的TimelineTrigger的creationComplete代码。 您可以输入TimelineTrigger的时间轴并使用“元素”面板,也可以使用“代码”面板到达那里。
b. Copy and paste the following code inside the switch statement, in the “click” event handler, in the handleEvent function:
b。 将以下代码复制并粘贴到switch语句内的handleEvent函数的click事件处理程序中:
// Callback to controller function
var id = sym.getVariable("id");
var callback = sym.getComposition().
		getStage().
getVariable("handleClickEvent");
callback( id );
3.在舞台代码中添加支持功能。 (3. Add supporting functions to the Stage code.)
b. Copy and paste the following code below the rest:
b。 将以下代码复制并粘贴到其余代码下面:
/*****************************************************
 * Controller for data and view state
 */
var timeoutDelay = 500;

function setState( id, state ){

	var symbol = sym.getSymbol(id);
	if( symbol ){
	    symbol.setVariable("selected", state);
	    symbol.play(state ? "rollover" : "rollout");
	}
}

function showDetail( id ){

	// Reset last timeline selection
	setState("Trigger"+index, false);

	// Save new selection
	index = id;

	// Select next timeline trigger
	setState("Trigger"+index, true);

	// Show details
	var data = dataModel[index];
	var anim = sym.getSymbol("DetailPanelAnimation");
	var details = anim.getSymbol("DetailPanel");
	if( details )
	{
		 // Transition out
		 if( anim.getPosition() > 0 ){
			anim.play("hide");
		 }

	// Transition in with new data...
setTimeout(function()
	{
		details.$("Year").html(data.year+" AD");
		details.$("Caption").html(data.title);
		details.$("Details").html(data.text);
		anim.play("show");
	},
	timeoutDelay);
	}
}
4.保存文件。 (4. Save the file.)
Choose File > Preview in Browser to preview your work. If you run into problems compare your work to the completed files for reference.
选择“文件”>“在浏览器中预览”以预览您的工作。 如果遇到问题,请将您的工作与完成的文件进行比较以供参考。
从这往哪儿走 (Where to go from here)
Try to take the concepts you learned in the tutorial, and build more interactivity and rich media into the infographic. For example, you’ll notice that the “extra credit” completed file has a play button and a timer that can play a slideshow. Deconstruct the file, and see if you can setup your own work as a slideshow. Have fun with it.
尝试采用您在教程中学到的概念,并在信息图中构建更多的交互性和富媒体。 例如,您会注意到完成的“额外信用”文件具有一个播放按钮和一个可以播放幻灯片的计时器。 解构该文件,然后查看是否可以将自己的作品设置为幻灯片显示。 玩得开心。
翻译自: https://www.sitepoint.com/creating-infographic-adobe-edge-animate-cc-2014/
adobe animate


 363
363

 被折叠的 条评论
为什么被折叠?
被折叠的 条评论
为什么被折叠?
 到【灌水乐园】发言


