


sendgrid
If you’ve used blogging services such as Tumblr or the now-defunct Posterous, you may be aware that many of them let you bypass their web interface and create posts via email by sending a message to a specific email address.
如果您曾经使用过诸如Tumblr或现已停用的Posterous之类的博客服务,则您可能会意识到,其中许多服务使您可以绕开其Web界面,并通过向特定的电子邮件地址发送消息来通过电子邮件创建帖子。
In this article, I’m going to look at how you might implement an email-to-post feature, using SendGrid. SendGrid is a service for sending email – usually in bulk, but they also offer a less well-publicized feature for handling incoming email. SendGrid can be configured to handle all incoming messages for a given domain by pinging a URI of your choosing, and by implementing a simple webhook, you can act on the incoming mail accordingly.
在本文中,我将研究如何使用SendGrid实现电子邮件到帖子功能。 SendGrid是一种用于发送电子邮件的服务,通常是批量发送,但是它们还提供了一个不太广为人知的处理传入电子邮件的功能。 通过对您选择的URI进行ping操作,可以将SendGrid配置为处理给定域的所有传入消息,并通过实现简单的Webhook,可以对传入的邮件进行相应的处理。
入门 (Getting Started)
I’ve based the example code for this article on this Slim Framework skeleton application.
我已经基于Slim Framework骨架应用程序构建了本文的示例代码。
To make the app easier to debug, we can implement file-based logging by adding the following to the require section of its composer.json file:
为了使应用程序易于调试,我们可以通过在composer.json文件的require部分添加以下内容来实现基于文件的日志记录:
"slim/extras": "dev-develop",Update the instantiation of the framework in include/services.php to configure the logger as follows:
更新include/services.php框架的实例以配置记录器,如下所示:
$app = new Slim(array(
    'view' => new Twig(),
    'templates.path' => $c['config']['path.templates'],
    'log.writer' => new \Slim\Extras\Log\DateTimeFileWriter(array(
        'path' => dirname($c['config']['path.logs']),
        'name_format' => 'Y-m-d',
        'message_format' => '%label% - %date% - %message%'
    ))
));
Then, copy the example configuration file to config/config.php and set your own configuration values (such as your database connection details). Additionally, add the following lines to specify the directories that will hold log files and uploaded images:
然后,将示例配置文件复制到config/config.php并设置您自己的配置值(例如数据库连接详细信息)。 此外,添加以下行以指定用于保存日志文件和上载图像的目录:
'path.logs'    => $basedir . 'logs/',
'path.uploads' => $basedir . 'public/uploads/'
Create the directories and ensure they are both writeable by the web server.
创建目录并确保它们都可被Web服务器写入。
Our application will provide registered users with an email alias. By matching the part before the @ in the recipient email address, we can determine the user who’s posting. In the real world, you’ll probably want to make the alias something much more difficult to guess, and perhaps restrict access to emails sent from a specific address (though of course this is fairly simple to spoof!).
我们的应用程序将为注册用户提供电子邮件别名。 通过匹配收件人电子邮件地址中@之前的部分,我们可以确定正在发布的用户。 在现实世界中,您可能希望使别名变得更难以猜测,并且可能限制对从特定地址发送的电子邮件的访问(尽管这很容易欺骗!)。
The database schema defines two tables to hold the users and posts respectively:
数据库模式定义了两个表来分别保存用户和帖子:
CREATE TABLE users (
    id INTEGER NOT NULL AUTO_INCREMENT,
    name VARCHAR(128) NOT NULL ,
    alias VARCHAR(45) NOT NULL ,

    PRIMARY KEY (id) ,
   INDEX alias (alias ASC)
);

CREATE  TABLE posts (
    id INTEGER NOT NULL AUTO_INCREMENT,
    title VARCHAR(255) NOT NULL,
    body TEXT NOT NULL,
    image varchar(255),
    user_id INTEGER NOT NULL,

    PRIMARY KEY (id)
);
You’ll also need an account with SendGrid (the free plan should be more than sufficient for this example application). Once you’ve signed up, navigate to the Developers page using the top navigation and click Parsing Incoming Emails on the right-hand side. Enter suitable values for your hostname and callback.
您还将需要一个具有SendGrid的帐户(对于此示例应用程序,免费计划应绰绰有余 )。 注册后,使用顶部导航导航至“开发人员”页面,然后单击右侧的“解析传入的电子邮件”。 输入适当的值作为您的主机名和回调。
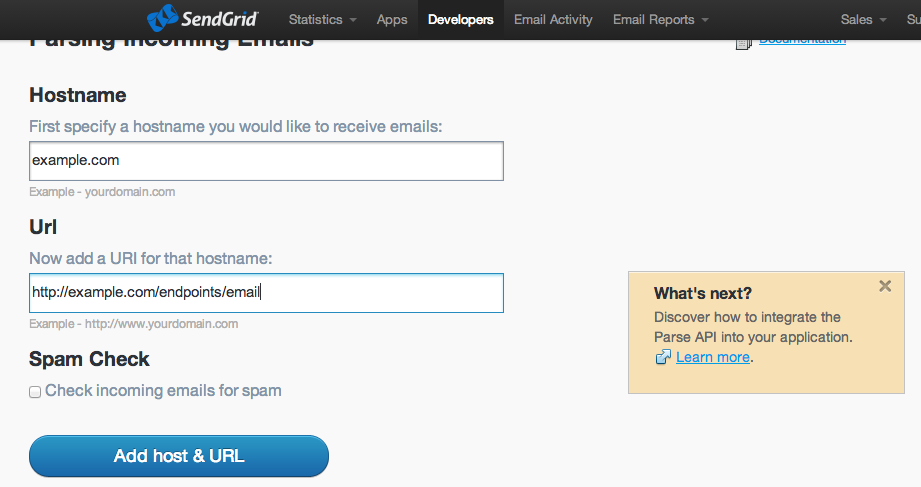
When an email is received for a given domain, SendGrid will send a POST request to your URL which includes information such as the sender, recipient and body, as well as any file attachments.
当收到给定域的电子邮件时,SendGrid将向您的URL发送POST请求,其中包括诸如发件人,收件人和正文以及所有文件附件之类的信息。
And finally, you’ll need to add an MX record for the domain you’re using. The way in which you do this depends on your hosting provider and can vary enormously, so consult the relevant documentation. The record needs to point to mx.sendgrid.net.
最后,您需要为所使用的域添加MX记录。 执行此操作的方式取决于您的托管服务提供商,并且可能相差很大,因此请查阅相关文档。 该记录需要指向mx.sendgrid.net 。
建立回调 (Building the Callback)
The application should respond to POST requests at the URL you specified, for example:
应用程序应使用您指定的URL响应POST请求,例如:
$app->post('/endpoints/email', function () use ($app, $c) {If SendGrid tries to “ping” your endpoint and gets a 4xx or 5xx response, it will queue and retry the request, and keep doing so for a period of 3 days. As such, it’s important that a successful ping returns a 200 status.
如果SendGrid尝试“ ping”您的端点并获得4xx或5xx响应,它将排队并重试该请求,并持续3天。 因此,成功执行ping操作必须返回200状态,这一点很重要。
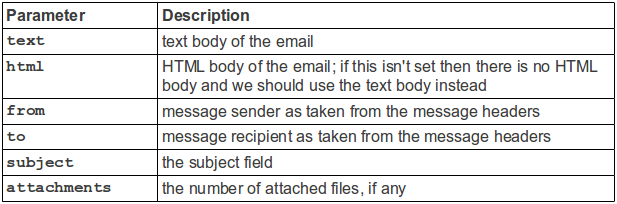
When SendGrid hits the endpoint, it does so with various pieces of information from the email it received. These are documented in the online API reference, but the ones we’re particularly interested in are:
当SendGrid到达端点时,它会使用收到的电子邮件中的各种信息来执行此操作。 这些都记录在在线API参考中 ,但是我们特别感兴趣的是:
In an ideal world we could just read the recipient’s email address directly from the “to” field, but the field could match any of the following non-exhaustive list of examples depending on how was sent:
在理想的情况下,我们可以直接从“收件人”字段中读取收件人的电子邮件地址,但是该字段可以匹配以下示例的任何非详尽列表,具体取决于发送方式:
test-user@example.comtest-user@example.com"Test User" <test-user@example.com>"Test User" <test-user@example.com>"Test User" <test-user@example.com>, another-recipient@example.com"Test User" <test-user@example.com>, another-recipient@example.com"Test User" <test-user@example.com>; "Another Recipient" <another-recipient@example.com>"Test User" <test-user@example.com>; "Another Recipient" <another-recipient@example.com>
We need a regular expression to parse what could be multiple recipients:
我们需要一个正则表达式来解析可能是多个接收者:
$to = $req->post('to');
preg_match_all('/\b[A-Z0-9._%+-]+@(?:[A-Z0-9-]+\.)+[A-Z]+\b/i', $to, $result, PREG_PATTERN_ORDER);

foreach ($result[0] as $toAddress) {
    // handle the from address
}
For each recipient, we then extract the alias portion of the address and try and find a user that matches:
然后,对于每个收件人,我们提取地址的别名部分,然后尝试找到匹配的用户:
$alias = substr($toAddress, 0, strpos($toAddress, '@'));
$user = $c['db']->users->where('alias = ?', $alias)->fetch();

if ($user) {
    // great, we've got a valid user
}
For each recipient, creating a post might look like something like this:
对于每个收件人,创建帖子可能看起来像这样:
$c['db']->posts()->insert(array(
    'title'   =>  $req->post('subject'),
    'body'    =>  ($req->post('html')) ? $req->post('html') : $req->post('text'),
    'user_id' =>  $user['id'],
));
Now we have basic email-to-post functionality! Sure, it’s not very secure, but that’s outside of the scope of this article.
现在,我们有了基本的电子邮件发布功能! 当然,它不是很安全,但这超出了本文的范围。
Let’s expand the application a bit and allow users to add an image to a post by sending it as a mail attachment. The POST request from SendGrid includes a parameter called attachments which contains the number of attached files. Attached files are POSTed along with the request and can be handled in the same way you would handle file uploads from a web form.
让我们稍微扩展一下应用程序,并允许用户通过将其作为邮件附件发送来将图像添加到帖子中。 来自SendGrid的POST请求包含一个名为attachments的参数,该参数包含attachments的数量。 附加文件随请求一起发布,并且可以按照与处理从Web表单上载文件相同的方式进行处理。
if ($user) {
    $numAttachments = $req->post('attachments');
    $uploadedFiles = array();

    if ($numAttachments) {
        foreach ($_FILES as $key => $file) {
            $log->info('Saving file to ' . $c['config']['uploads.dir'] . $file['name']);
            move_uploaded_file($file['tmp_name'], $c['config']['uploads.dir'] . $file['name']);
            $uploadedFiles[] = $file['name'];
    }
}
To keep things simple, let’s just save the filename of the first attached file to the database:
为简单起见,我们只将第一个附加文件的文件名保存到数据库中:
$c['db']->posts()->insert(array(
    'title'   => $req->post('subject'),
    'body'    => ($req->post('html')) ? $req->post('html') : $req->post('text'),
    'user_id' => $user['id'],
    'image'   => (count($uploaded_files)) ? $uploadedFiles[0] : ''
));
摘要 (Summary)
In this article we’ve looked at a simple use for incoming email parsing – a basic “email to post” type function for a blogging-style application, allowing users to create posts by sending an email to a special address.
在本文中,我们研究了传入电子邮件解析的一种简单用法-博客样式应用程序的基本“发电子邮件”类型功能,允许用户通过将电子邮件发送到特殊地址来创建帖子。
By registering a simple callback, there are all sorts of fun and interesting things you can do to respond to incoming emails. For instance, how about:
通过注册一个简单的回调,您可以做各种有趣的事情来响应传入的电子邮件。 例如,如何:
- sending alerts when an email has been received 在收到电子邮件时发送警报
- transferring attachments to Dropbox, Copy.com, SkyDrive, S3, etc. 将附件传输到Dropbox,Copy.com,SkyDrive,S3等
- allowing people to reply by email to notifications from bulletin boards, messaging systems, etc. 允许人们通过电子邮件回复公告板,消息系统等的通知。
- handling unsubscribe requests 处理退订请求
If you think of other interesting uses, do let me know in the comments. Oh, and downloadable code for this article is available on GitHub for you to clone and explore.
如果您想到其他有趣的用途,请在评论中告诉我。 哦,GitHub上提供了本文的可下载代码,供您克隆和浏览。
翻译自: https://www.sitepoint.com/handle-incoming-email-with-sendgrid/
sendgrid


 437
437

 被折叠的 条评论
为什么被折叠?
被折叠的 条评论
为什么被折叠?
 到【灌水乐园】发言


