


flex布局 flex
A web widget, or badge, is a small, embeddable element that you can add to your site that will display your content from another web service. But enabling web widgets to work properly can be a hassle. One of the easiest ways to build a widget is to build a Flex application that compiles a Flash object.
Web窗口小部件或徽章是可嵌入的小型元素,您可以将其添加到站点中,以显示来自另一个Web服务的内容。 但是,使Web小部件能够正常工作可能很麻烦。 生成窗口小部件的最简单方法之一是生成可编译Flash对象的Flex应用程序。
In this article, I’ll show you how to create a small Flex widget that we’ll call FlickrTag. The widget can be embedded on any web page and will show a set of Flickr photos matching a specified search term, centered on a particular location; for example, you could use the widget to show dog pictures near Fremont, California. You can use the code as a basis for your own widgets, as well – the principles are the same whether you use Flickr or some other service.
在本文中,我将向您展示如何创建一个小的Flex小部件,我们将其称为FlickrTag。 该小部件可以嵌入到任何网页上,并以特定位置为中心显示一组与指定搜索词匹配的Flickr照片; 例如,您可以使用小部件在加利福尼亚州弗里蒙特附近显示狗的图片。 您也可以将代码用作自己的小部件的基础-无论使用Flickr还是其他服务,其原理都是相同的。
There’s a lot to do, so let’s dig right in. The first step is to install Flex Builder 3, which is a development environment for Flex. You can download the Flex SDK, which is free, and build this code from the command line. But trust me, it’s easier to just use Flex Builder 3, and there is a 60-day free trial of it from Adobe. You’ll also need a Flickr API key so that your widget can retrieve images.
有很多事情要做,所以让我们深入研究。第一步是安装Flex Builder 3 ,这是Flex的开发环境。 您可以免费下载Flex SDK ,然后从命令行构建此代码。 但是请相信我,使用Flex Builder 3会更容易,并且Adobe可以提供60天的免费试用。 您还需要Flickr API密钥,以便小部件可以检索图像。
显示一些照片 (Showing Some Photos)
With Flex Builder installed, let’s create a new Flex Builder project and have a look at the first version of our FlickrTag widget. This first version will retrieve a list of photos from Flickr using a REST request and arrange them as a wide strip of images. In the versions that follow, we’ll have some pop-up functionality that shows more information about the photos.
安装了Flex Builder后,让我们创建一个新的Flex Builder项目并查看FlickrTag小部件的第一个版本。 第一个版本将使用REST请求从Flickr检索照片列表,并将它们排列为宽幅图像。 在随后的版本中,我们将提供一些弹出功能,以显示有关照片的更多信息。
Here is all the MXML code we need. You can view a complete listing in flickrmap1.mxml:
这是我们需要的所有MXML代码。 您可以在flickrmap1.mxml中查看完整的清单 :
<?xml version="1.0" encoding="utf-8"?>

<mx:Application xmlns:mx="http://www.adobe.com/2006/mxml"

    layout="absolute" creationComplete="onStartup()"

    width="660" height="100"

    horizontalScrollPolicy="off" verticalScrollPolicy="off">

<mx:Script>

<![CDATA[

// ... We'll fill this in soon

]]>

</mx:Script>

<mx:HTTPService id="flickrSearch" resultFormat="e4x"

    result="onFlickrResult(event)" />

<mx:HBox id="hbPictures" cornerRadius="15" width="660" height="100"

    borderColor="#00FF00" borderThickness="3" borderStyle="solid"

    backgroundColor="#CCFFCC" paddingBottom="10" paddingTop="10"

    paddingLeft="10" paddingRight="10" horizontalGap="5"

    horizontalScrollPolicy="off" verticalScrollPolicy="off">

</mx:HBox>

</mx:Application>
At the top of the file we have the <mx:Application> tag that wraps the whole Flex application. This tag stipulates that when the application is loaded we should call the onStartup method. This method can be found within the <mx:Script> tags, where we also import some required classes and set some variables to store image data and a constant to store the Flickr API key:
在文件的顶部,我们有<mx:Application>标记,用于包装整个Flex应用程序。 此标记规定,在加载应用程序时,我们应调用onStartup方法。 该方法可以在<mx:Script>标记中找到,在该标记中,我们还导入了一些必需的类,并设置了一些变量来存储图像数据和一个常量来存储Flickr API密钥:
<mx:Script>

<![CDATA[

import mx.core.UIComponent;

import mx.controls.Image;

import mx.rpc.events.ResultEvent;

private const FLICKR_KEY:String = 'Your Flickr API Key';

private var images:Array = [];

private var imageItems:Array = [];

private function onStartup() : void {

  flickrSearch.url = createFlickrURL();

  flickrSearch.send();

  for( var imgItem:int = 0; imgItem < ( hbPictures.width - 30 ) / 80; imgItem++ ) {

    var newImage:Image = new Image();

    newImage.data = null;

    newImage.width = 75;

    newImage.height = 75;

    imageItems.push( newImage );

    hbPictures.addChild( newImage );

  }

}
This onStartup method uses the createFlickrUrl method to set the URL for the Flickr search query:
此onStartup方法使用createFlickrUrl方法设置Flickr搜索查询的URL:
private function createFlickrURL( ) : String {

  var query:String = 'http://api.flickr.com/services/rest/?api_key='+

      FLICKR_KEY;

  query += '&method=flickr.photos.search&extras=geo';

  query += '&text='+parameters.text;

  query += '&lat='+parameters.lat;

  query += '&lon='+parameters.lon;

  query += '&radius=30';

  query += '&per_page=100&page=1&sort=date-posted-desc';

  return query;

}
The createFlickrUrl function uses some parameters that are specified in the widget creation code. We’ll see how to specify those in a second.
createFlickrUrl函数使用在小部件创建代码中指定的一些参数。 我们将稍后介绍如何指定这些内容。
To finish up with this code we look at the onFlickrResult method, which is called when Flickr sends back an XML response:
为了完成这段代码,我们看一下onFlickrResult方法,当Flickr发回XML响应时调用该方法:
private function onFlickrResult( event:ResultEvent ) : void {

  for each( var photo:XML in event.result..photo ) {

    var smallPhotoUrl:String = 'http://static.flickr.com/'+photo.@server+

        '/'+photo.@id+'_'+photo.@secret+'_s.jpg';

    var bigPhotoUrl:String = 'http://static.flickr.com/'+photo.@server+

        '/'+photo.@id+'_'+photo.@secret+'.jpg';

    images.push( {

      source:smallPhotoUrl,

      bigSource:bigPhotoUrl,

      title:photo.@title,

        latitude:photo.@latitude,

        longitude:photo.@longitude

      } );

  }

  setPictures();

}
The onFlickrResult method looks for all of the photo tags and stores the picture location, the title, and the latitude and longitude in an object within the images array.
onFlickrResult方法查找所有照片标签,并将图片位置,标题以及纬度和经度存储在images数组中的对象中。
Once the onFlickResult method has chewed through all of the photos, the setPictures method compiles a random sampling of the Flickr images returned from the feed and puts them in a box, hbPictures:
一旦onFlickResult方法检查完所有照片之后, setPictures方法就会对从提要中返回的Flickr图像进行随机采样,然后将它们放入框hbPictures :
private function setPictures() : void {

  for each( var ii:Image in imageItems ) {

    var imgIndex:int = int( Math.random() * images.length );

    ii.data = images[ imgIndex ];

    ii.source = images[ imgIndex ].source;

  }

}

]]>

</mx:Script>
So, where do the search term, the latitude, and the longitude come from? Well, they come from the source URL we specify to include the Flash file. Our HTML template uses JavaScript to embed the element, so we’ll need to tweak the JavaScript in the index.template.html file managed by Flex Builder 3, found in the html-template folder within your project folder. You can edit the index.html.template file by double-clicking the file or right clicking on the file in the Project panel and selecting Open.
那么,搜索字词,纬度和经度从何而来? 好吧,它们来自我们指定要包含Flash文件的源URL。 我们HTML模板使用JavaScript嵌入元素,因此我们需要在Flex Builder 3管理的index.template.html文件中调整JavaScript,该文件位于项目文件夹中的html-template文件夹中。 您可以通过双击文件或在“项目”面板中右键单击该文件并选择“打开”来编辑index.html.template文件。
You can see the updated code for the template below:... } else if (hasRequestedVersion) { AC_FL_RunContent( "src", "${swf}?text=dog&lat=37.57228&lon=-122.0747", "width", "${width}", "height", "${height}", "align", "middle", "id", "${application}", "quality", "high", "bgcolor", "${bgcolor}", "name", "${application}", "allowScriptAccess","sameDomain", "type", "application/x-shockwave-flash", "pluginspage", "http://www.adobe.com/go/getflashplayer" ); } ...
您可以在下面看到模板的更新代码: ... } else if (hasRequestedVersion) { AC_FL_RunContent( "src", "${swf}?text=dog&lat=37.57228&lon=-122.0747", "width", "${width}", "height", "${height}", "align", "middle", "id", "${application}", "quality", "high", "bgcolor", "${bgcolor}", "name", "${application}", "allowScriptAccess","sameDomain", "type", "application/x-shockwave-flash", "pluginspage", "http://www.adobe.com/go/getflashplayer" ); } ... ... } else if (hasRequestedVersion) { AC_FL_RunContent( "src", "${swf}?text=dog&lat=37.57228&lon=-122.0747", "width", "${width}", "height", "${height}", "align", "middle", "id", "${application}", "quality", "high", "bgcolor", "${bgcolor}", "name", "${application}", "allowScriptAccess","sameDomain", "type", "application/x-shockwave-flash", "pluginspage", "http://www.adobe.com/go/getflashplayer" ); } ...
We’ve altered the value of the src parameter. In this case, I’m specifying that the text we should look for is dog, and that the latitude and longitude indicates the location of Fremont. When we launch this from Flex Builder 3, we should see a strip of images, as depicted below.
我们已经更改了src参数的值。 在这种情况下,我指定我们要查找的文本是dog,并且经度和纬度指示弗里蒙特的位置。 当我们从Flex Builder 3启动它时,我们应该看到一条图像,如下图所示。
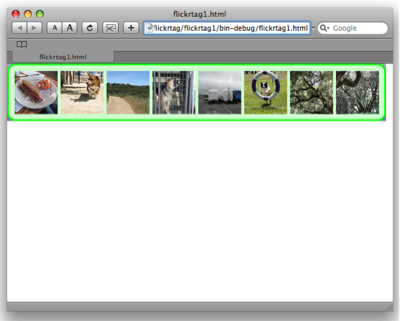
The biggest problem with this widget is the size of the download. Have a look for the FlickrTag.swf file that is sitting in the project output folder; this is a folder inside your project folder called bin-debug by default. Even with this limited functionality, the widget clocks in at around 400KB, which is more of a whoa-didget than a widget.
这个小部件的最大问题是下载的大小。 看一下位于项目输出文件夹中的FlickrTag.swf文件; 这是项目文件夹中的默认情况下称为bin-debug的文件夹。 即使功能有限,该小部件的时钟约为400KB,这比小部件更令人讨厌 。
To trim it down to size, we’ll use a new feature of Flash 9 called a runtime shared library (RSL). This means that we’ll split our code, which is small, from the Flex Framework code, which is fairly fat. The first time our visitor visits, they will download both our code and the Flex Framework code; after that, they’ll just download our code and use the Framework version, which is cached in the player. Thankfully, moving to RSLs is super easy. The first step is to go into the project’s Properties panel under the Project menu, and select Flex Build Path. You’ll see this dialog, shown below.
为了缩小尺寸,我们将使用Flash 9的一项新功能,称为运行时共享库(RSL)。 这意味着我们将从很小的Flex框架代码中分离出很小的代码。 访客第一次访问时,他们将下载我们的代码和Flex Framework代码; 之后,他们将只下载我们的代码,并使用存储在播放器中的Framework版本。 幸运的是,迁移到RSL非常容易。 第一步是进入“项目”菜单下项目的“属性”面板,然后选择“ Flex Build Path”。 您将看到此对话框,如下所示。

From here we select the Flex Build Path tab, and within that select the Library path tab. Once we’re there we expand the framework.swc file, which is the big Flex Framework library. Click on the Link Type item and then click on the Edit button. That brings up the Library Path Item Options dialog, shown below.
在这里,我们选择“ Flex构建路径”选项卡,然后在其中选择“库路径”选项卡。 到达该目录后,我们将扩展framework.swc文件,这是很大的Flex Framework库。 单击链接类型项,然后单击编辑按钮。 这将打开“库路径项目选项”对话框,如下所示。
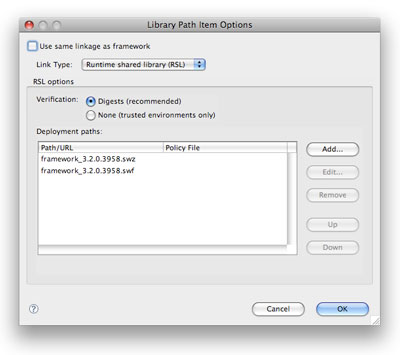
This is the dialog where we make the change from merging the framework.swc code into our Flash application, or linking it as an RSL. We want to uncheck the Use same linkage as framework checkbox, then select Runtime Shared Library, as shown above.
在此对话框中,我们可以进行更改,从将framework.swc代码合并到Flash应用程序中,或者将其链接为RSL。 我们要取消选中“使用与框架相同的链接”复选框,然后选择“运行时共享库”,如上所示。
With that done we can launch the widget, and have another look at the size of the widget’s SWF file and see that it’s been significantly reduced. And it really should stay around that size as we add more functionality to it.
完成此操作后,我们可以启动小部件,并再次查看小部件的SWF文件的大小,并发现它已大大减小。 随着我们为其添加更多功能,它确实应该保持在该大小左右。
Flex, combined with the use of RSLs, is the way to build Flash widgets quickly.
Flex与RSL的结合使用,是快速构建Flash窗口小部件的方法。
添加映射 (Adding Mapping)
The next step is to add a map into the widget so that it displays where the photo was taken when the user selects it. To do this I’m going to use the UMap component from Advanced Flash Components, which is free for non-commercial use. The advantage of the UMap component is that, unlike the Google and Yahoo map components, its license allows you to use the component on any domain.
下一步是将地图添加到小部件中,以便在用户选择时显示照片的拍摄地点。 为此,我将使用Advanced Flash Components中的UMap组件 ,该组件免费用于非商业用途。 UMap组件的优势在于,与Google和Yahoo地图组件不同,其许可允许您在任何域上使用该组件。
Download and unzip the UMap component. Then, to add the component, copy the .swc files from the Flex Components folder in the downloaded archive into the libs folder in our FlickrTag project folder.
下载并解压缩UMap组件。 然后,要添加组件,请将.swc文件从下载的存档中的Flex Components文件夹复制到FlickrTag项目文件夹中的libs文件夹中。
The complete code for the FlickrTag application with the map installed can be seen in flickrtag2.mxml.
可以在flickrtag2.mxml中看到安装了地图的FlickrTag应用程序的完整代码。
First we increase the height of the widget by adjusting the mx:Application tag:
首先,我们通过调整mx:Application标签来增加小部件的高度:
<mx:Application xmlns:mx="http://www.adobe.com/2006/mxml"

    layout="absolute" creationComplete="onStartup()" width="660"

    height="400" horizontalScrollPolicy="off"

    verticalScrollPolicy="off">
Inside the <mx:Script> tag we need to import some map classes and add a new variable: import com.afcomponents.umap.overlays.Marker; import com.afcomponents.umap.types.LatLng; import com.afcomponents.umap.gui.*; import com.afcomponents.umap.events.MapEvent; import com.afcomponents.umap.core.UMap; private var map:UMap = null;
在<mx:Script>标记内,我们需要导入一些地图类并添加一个新变量: import com.afcomponents.umap.overlays.Marker; import com.afcomponents.umap.types.LatLng; import com.afcomponents.umap.gui.*; import com.afcomponents.umap.events.MapEvent; import com.afcomponents.umap.core.UMap; private var map:UMap = null; import com.afcomponents.umap.overlays.Marker; import com.afcomponents.umap.types.LatLng; import com.afcomponents.umap.gui.*; import com.afcomponents.umap.events.MapEvent; import com.afcomponents.umap.core.UMap; private var map:UMap = null;
We need to adjust the onStartup function to add a mouse click event listener to the images:
我们需要调整onStartup函数,以向图像添加鼠标单击事件侦听器:
private function onStartup() : void {

  flickrSearch.url = createFlickrURL();

  flickrSearch.send();

  for( var imgItem:int = 0; imgItem < ( hbPictures.width - 30 ) / 80; imgItem++ ) {

    var newImage:Image = new Image();

    newImage.data = null;

    newImage.width = 75;

    newImage.height = 75;

    newImage.addEventListener(MouseEvent.CLICK,onImageClick);

    imageItems.push( newImage );

    hbPictures.addChild( newImage );

  }

}
We also need to add a bunch of new mapping functions:
我们还需要添加一堆新的映射功能:
private function createMap() : void {

  map = new UMap();

  var uic:UIComponent = new UIComponent();

  uic.setStyle( 'top', 0 );

  uic.setStyle( 'left', 0 );

  uic.width = mapArea.width;

  uic.height = mapArea.height;

  mapArea.addChild( uic );

  map.setSize( mapArea.width, mapArea.height );

  map.addEventListener(MapEvent.READY, onMapReady);

  uic.addChild( map );

}

private function onMapReady( event:MapEvent ) : void {

  map.setZoom( 12 );

  centerMap();

}

private function centerMap() : void {

  var lat:Number = Number( imgSelected.data.latitude );

  var lng:Number = Number( imgSelected.data.longitude );

  map.setCenter( new LatLng( lat, lng ) );

  var m:Marker = new Marker( { position:new LatLng( lat, lng ) } );

  map.addOverlay( m );

}

private function onImageClick( event:Event ) : void {

  var clkImg:Image = event.currentTarget as Image;

  imgSelected.data = clkImg.data;

  imgSelected.source = clkImg.data.bigSource;

  imgTitle.text = clkImg.data.title;

  if ( mapArea.getChildren().length == 0 ) {

    createMap();

  } else {

    centerMap();

  }

}
Finally, we add some new interface elements:
最后,我们添加一些新的界面元素:
<mx:HBox id="hbDetail" top="110" cornerRadius="15" width="660"

    height="290" borderColor="#00FF00" borderThickness="3"

    borderStyle="solid" backgroundColor="#CCFFCC" paddingBottom="10"

    paddingTop="10" paddingLeft="10" paddingRight="10"

    horizontalGap="5" horizontalScrollPolicy="off"

    verticalScrollPolicy="off">

  <mx:Image id="imgSelected" width="270" height="270"

      horizontalAlign="center" verticalAlign="middle" />

  <mx:VBox width="100%" height="100%"

      horizontalScrollPolicy="off" verticalScrollPolicy="off">

    <mx:Label id="imgTitle" fontWeight="bold" fontSize="14" />

    <mx:Canvas id="mapArea" height="230" width="360"

        horizontalScrollPolicy="off" verticalScrollPolicy="off"

        clipContent="true" />

  </mx:VBox>

</mx:HBox>
The user interface is now divided into two boxes. In the top box is the set of images, and in the bottom box is the map and an enlarged version of the selected image. The map, once initialized, is centered on the latitude and longitude coordinates of the selected image and a marker confirms the location. You can see the result below.
现在,用户界面分为两个框。 在顶部的框中是图像集,在底部的框中是地图和所选图像的放大版本。 初始化后,地图将以所选图像的纬度和经度坐标为中心,并且标记会确认位置。 您可以在下面看到结果。
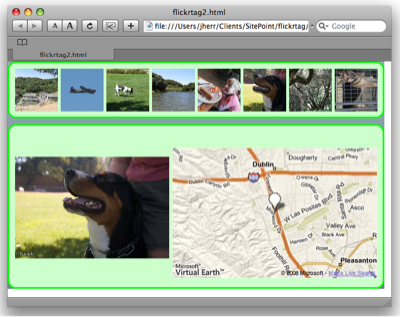
This looks really pretty, but it’s far too big to be included in a web page. Ideally, only the top portion of the widget would be visible. Then, when the user clicks on it the drop-down should appear over the text in the web page. That way the control can take up just a small amount of space until it’s used.
这看起来确实很漂亮,但是太大了,无法包含在网页中。 理想情况下,只有小部件的顶部是可见的。 然后,当用户单击它时,下拉菜单应显示在网页上的文本上方。 这样,在使用控件之前,它仅可占用少量空间。
构建弹出版本 (Building the Pop-up Version)
Some small changes are required to implement the drop-down menu transition phase. We’ll do this by creating two states for the Flex application. The first is the bar state where just the horizontal list of images is shown. The second is the detail state where both the image list and the image detail windows are shown.
为了实现下拉菜单过渡阶段,需要进行一些小的更改。 我们将通过为Flex应用程序创建两个状态来做到这一点。 第一个是条形状态,其中仅显示图像的水平列表。 第二个是详细状态,其中同时显示了图像列表和图像详细信息窗口。
The two states are defined in <mx:State> tags, and the transition between the two states is defined in <mx:Transition> tags. An initial state is defined in the <mx:Application> tag. In this case I’m going to fade-in the detail window, but you can use any effect you like to bring the application to life.
这两个状态在<mx:State>标记中定义,并且这两个状态之间的过渡在<mx:Transition>标记中定义。 初始状态在<mx:Application>标记中定义。 在这种情况下,我将淡入细节窗口,但是您可以使用任何喜欢的效果使应用程序栩栩如生。
You can see the completed code in flickrtag3.mxml.
您可以在flickrtag3.mxml中看到完整的代码 。
Here’s the addition we’ll make to the mx:Application element:
这是我们将对mx:Application元素添加的内容:
<mx:Application xmlns:mx="http://www.adobe.com/2006/mxml"

    layout="absolute" creationComplete="onStartup()" width="660"

    height="400" backgroundAlpha="0" horizontalScrollPolicy="off"

    verticalScrollPolicy="off" currentState="bar">
And here’s how we change the onImageClick function within the <mx:Script> element:
这是我们更改<mx:Script>元素内的onImageClick函数的方式:
private function onImageClick( event:Event ) : void {

  var clkImg:Image = event.currentTarget as Image;

  imgSelected.data = clkImg.data;

  imgSelected.source = clkImg.data.bigSource;

  imgTitle.text = clkImg.data.title;

  if ( mapArea.getChildren().length == 0 ) {

    createMap();

  } else {

    centerMap();

  }

  currentState = 'detail';

}
Our states and transitions are defined as follows:
我们的状态和过渡定义如下:
<mx:states>

  <mx:State name="bar">

    <mx:SetProperty target="{hbDetail}" name="visible" value="false" />

  </mx:State>

  <mx:State name="detail">

    <mx:SetProperty target="{hbDetail}" name="visible" value="true" />

  </mx:State>

</mx:states>

<mx:transitions>

  <mx:Transition fromState="bar" toState="detail">

  <mx:Sequence>

    <mx:SetPropertyAction target="{hbDetail}" name="visible" />

    <mx:Fade target="{hbDetail}" alphaFrom="0" alphaTo="1"

        duration="200" />

  </mx:Sequence>

  </mx:Transition>

  <mx:Transition fromState="detail" toState="bar">

  <mx:Sequence>

    <mx:Fade target="{hbDetail}" alphaFrom="1" alphaTo="0"

        duration="200" />

    <mx:SetPropertyAction target="{hbDetail}" name="visible" />

  </mx:Sequence>

  </mx:Transition>

</mx:transitions>
To avoid a big gray rectangle we should adjust the index.template.html file to set the wmode parameter of the widget to transparent so that the widget background is transparent:
为了避免出现一个大的灰色矩形,我们应该调整index.template.html文件以将小部件的wmode参数设置为transparent以便小部件背景是透明的:
AC_FL_RunContent(

  "src", "${swf}?text=dog&lat=37.57228&lon=-122.0747",

  "width", "${width}",

  "height", "${height}",

  "align", "middle",

  "id", "${application}",

  "quality", "high",

  "bgcolor", "${bgcolor}",

  "wmode", "transparent",

  "name", "${application}",

  "allowScriptAccess","sameDomain",

  "type", "application/x-shockwave-flash",

  "pluginspage", "http://www.adobe.com/go/getflashplayer"

);
Other than the states and transitions, the code for the rest of the application remains exactly the same.
除了状态和转换以外,其余应用程序的代码完全相同。
Now the tricky part starts: how can we place the control precisely on the HTML page in such a way as to let the rest of the content flow around the Flex application? The secret is to absolutely position a div element in the HTML with the width and height of the bar.
现在,棘手的部分开始了:如何将控件精确地放置在HTML页面上,以使其余内容在Flex应用程序中流动? 秘诀是使用条的宽度和高度在HTML中绝对定位div元素。
To demonstrate the technique we can make a few changes to the index.html.template file. Just after the opening <body> tag, add the following content: <p>Add a paragraph of text here...</p> <div id="widget"><div>
为了演示该技术,我们可以对index.html.template文件进行一些更改。 在打开<body>标记之后,添加以下内容: <p>Add a paragraph of text here...</p> <div id="widget"><div>
Then just before the closing <body> tag, add the following content:
然后在结束<body>标记之前,添加以下内容:
</div></div>

<p>Add a paragraph of text here...</p>

<p>Add a paragraph of text here...</p>

<p>Add a paragraph of text here...</p>
That will surround our widget with content. Notice the widget is now inside a div element, which is nested within a parent div element with the ID of inner.
这将使我们的小部件包含内容。 请注意,小部件现在位于div元素内,该元素嵌套在ID为inner的父div元素inner 。
We then need to add some CSS:
然后,我们需要添加一些CSS:
#widget {

  height:100px;

  width:660px;

  position:relative;

}

#widget div {

  position:absolute;

  top:0;

  left:0;

}
We restrict the height of the outer div to 100px so it can contain the widget in bar mode, but not obscure the page content. Absolutely positioning the div that contains the widget will allow it to pop out over the page content when an image is clicked.
我们将外部div的高度限制为100px,以便它可以在条形模式下包含小部件,但不会模糊页面内容。 绝对定位包含窗口小部件的div将允许其在单击图像时在页面内容上弹出。
Launch this from Flex Builder 3 and you’ll see a similar screen to that shown below.
从Flex Builder 3启动它,您将看到与以下所示类似的屏幕。

This shows the widget in its bar mode. From here, I can click on one of the images and the detail portion of the application fades in over the rest of the HTML page. You can see here:
这显示小部件处于其条形模式。 从这里,我可以单击其中一幅图像,然后该应用程序的详细信息部分将淡入HTML页面的其余部分。 您可以在这里看到:

The nice thing about this approach is that you can have a Flash application on your page that takes up minimal space until the user wants to click on it. From there you can expand the application to take up a bunch of space and really show its value.
这种方法的好处是,您可以在页面上拥有一个Flash应用程序,该应用程序将占用最小的空间,直到用户希望单击它为止。 从那里,您可以扩展应用程序以占用大量空间并真正展示其价值。
从这往哪儿走 (Where to Go from Here)
This article is really just a starting point. You can take what you learned here – about accessing web services, mapping, and creating an expanding Flash application – and use it in your own work. But beyond that, you should start to see the potential of using Flex as a way of building Flash widgets quicker, as well as offering better maintainability than you’d have using Flash alone.
本文实际上只是一个起点。 您可以在这里学习到有关访问Web服务,映射和创建扩展的Flash应用程序的知识,并将其用于自己的工作中。 但是除此之外,您应该开始看到使用Flex来更快地构建Flash窗口小部件以及提供比单独使用Flash更好的可维护性的潜力。
flex布局 flex


 947
947


 被折叠的 条评论
为什么被折叠?
被折叠的 条评论
为什么被折叠?
 到【灌水乐园】发言


