


wordpress本地开发
Object Orientated code is everywhere and WordPress is no exception.
面向对象的代码无处不在,WordPress也不例外。
The Core of WordPress is built on series of objects/classes used to control everything from manipulation of the database to the look and feel of your site.
WordPress的核心建立在一系列对象/类上,这些对象/类用于控制从数据库操作到网站外观的所有内容。
Throughout this tutorial, we will look into Object Orientated design and how you can use these in practical applications when developing for WordPress including:
在整个教程中,我们将研究面向对象的设计以及在为WordPress开发时如何在实际应用中使用这些对象,包括:
- Understanding exactly what object orientated design is. 准确了解什么是面向对象的设计。
- Discussing why we should use object orientated design. 讨论为什么我们应该使用面向对象的设计。
- Examining a real world example to showcase how it can work. 检查一个真实的示例,以展示其工作方式。
Note 1: Also note that this tutorial outlines primarily WordPress centric concepts, so if you are entirely new to object orientated design you should probably get a quick overview of OO via the PHP reference guide.
注意1:还请注意,本教程主要概述了以WordPress为中心的概念,因此,如果您是面向对象设计的新手,则可能应该通过PHP参考指南快速了解OO。
Note 2: If you’re keen on downloading everything right away feel free to download the source from my GitHub repository and follow along with the tutorial.
注意2:如果您希望立即下载所有内容,请随时从我的GitHub存储库下载源代码,并按照教程进行操作。
Let’s jump right into it!
让我们跳进去吧!
到底什么是面向对象设计? (What Is Object Orientated Design Anyway?)
Object Orientation Design (OO Design) is a different methodology for solving issues, separate from the traditional procedural approach.
面向对象设计(OO Design)是解决问题的另一种方法,与传统的过程方法不同。
With Object Orientated Design you create a structure (class) that will group together all of your related functions (methods) and information (properties) to solve an issue.
使用面向对象的设计,您可以创建一个结构(类),将所有相关功能(方法)和信息(属性)组合在一起,以解决问题。
This is different from procedural development in which you create functions and variables to solve issues, however, these elements can be separated across multiple files, re-declared and often loosely related.
这不同于在过程开发中创建函数和变量来解决问题的方法,但是,这些元素可以在多个文件中分开,重新声明并且通常是松散相关的。
In a nutshell, object orientated design is about bringing together related functionality into a single place so that it can be maintained, expanded and used from a single location.
简而言之,面向对象的设计是将相关功能集成到一个地方,以便可以在单个位置进行维护,扩展和使用。
为什么面向对象是一个好主意? (Why Object Orientation Is a Good Idea?)
Since procedural code has worked well you might be wondering what’s the point in developing in an object orientated approach?
由于过程代码运行良好,您可能想知道以面向对象的方法进行开发有什么意义?
While there is nothing ‘wrong’ with procedural design, there are several benefits to developing in a more object orientated style.
尽管程序设计没有“错误”,但以面向对象的风格进行开发有许多好处。
组织 (Organisation)
You code is generally better organized when using an object orientated approach. Creating classes means that the functionality for solving your issue is all within a file (unlike procedural development where you may have functions and variables spread everywhere).
使用面向对象的方法时,通常可以更好地组织代码。 创建类意味着解决问题的功能全部在文件内(与过程开发不同,在过程开发中,函数和变量可能分布在各处)。
Having all of your code in one place helps you keep things organised and assists other developers who may come along and need to understand how your system works.
将所有代码放在一个地方可以帮助您使事情井井有条,并帮助其他可能需要并了解您的系统工作原理的开发人员。
There’s nothing worse than picking up a project and having to hunt around to find the functions and variables that are used to create various elements of the site (which are invariably spread across multiple files for reasons unknown).
没有什么比选择一个项目并四处寻找用于创建站点的各种元素的函数和变量(由于未知的原因而总是分布在多个文件中)更糟糕的了。
可扩展性 (Scalability)
When solving issues with an object orientated approach you create classes.
用面向对象的方法解决问题时,可以创建类。
These classes can be expanded or scaled by extending them using inheritance. Inheritance will let you create a class based off another class which gives access to all of its properties and methods to the new class.
通过使用inheritance扩展这些类,可以对其进行扩展或缩放。 继承将使您可以基于另一个类创建一个类,该类使新类可以访问其所有属性和方法。
You can expand a class to perform additional functionality, or even override its methods and properties to cater to the situation.
您可以扩展一个类以执行其他功能,甚至可以重写其方法和属性来迎合这种情况。
With procedural code you would either need to refactor part of your code or create new code entirely to handle additional situations.
使用过程代码,您将需要重构部分代码,或者完全创建新代码来处理其他情况。
模块化 (Modularity)
The purpose of object orientated design is to encapsulate all of the functionality to solve a situation into a class.
面向对象设计的目的是将解决问题的所有功能encapsulate到一个类中。
Since all of the code to solve an issue is inside a class and that class generally within its own PHP file, you can take an entire file and use it in another location, thus it is modular in nature.
由于解决问题的所有代码都在一个类内部,并且该类通常在其自己PHP文件中,因此您可以获取整个文件并在另一个位置使用它,因此它本质上是模块化的。
The benefit of this is that if you write classes well enough, you should be able to reuse them later on and only have to perform slight customizations.
这样做的好处是,如果您编写的类足够好,则以后应该可以重用它们,而只需执行少量自定义即可。
While you can copy and paste procedural code, it’s generally not as well organized and you may have to go through several files to ensure you have the functionality needed.
尽管您可以复制和粘贴过程代码,但通常组织起来并不那么好,您可能必须浏览多个文件以确保具有所需的功能。
示例场景–创建简单的事件展示 (Example Scenario – Creating a Simple Event Showcase)
In this scenario, our client wants a location on their website where they can create and manage events. These events will be used to promote upcoming trivia nights, bingo competitions and other fun activities.
在这种情况下,我们的客户希望在其网站上拥有一个可以创建和管理事件的位置。 这些活动将用于促进即将到来的琐事之夜,宾果游戏比赛和其他有趣的活动。
The first steps are to break down the desired functionality so we can plan our solution (planning well here will help our object orientated approach going forward). In our scenario, we can see the following set of tasks:
第一步是分解所需的功能,以便我们可以规划解决方案(在此处进行良好的规划将有助于我们面向对象的方法不断发展)。 在我们的场景中,我们可以看到以下任务集:
- Create a custom content type to manage these ‘events’. 创建自定义内容类型来管理这些“事件”。
- Add additional meta boxes to handle additional information processing. 添加其他元框以处理其他信息处理。
- Save additional meta information. 保存其他元信息。
- Display meta information for our ‘events’. 显示我们的“事件”的元信息。
We can create either a plugin or we can edit the child theme to provide this functionality.
我们可以创建一个插件 ,也可以编辑子主题以提供此功能。
For this scenario, we will create our functionality inside of a file which we can then include in the child theme. I’ve chosen this method because we will want to edit our theme templates so we can output our additional event information.
对于这种情况,我们将在文件内部创建功能,然后将其包含在子主题中。 之所以选择此方法,是因为我们要编辑主题模板,以便输出其他事件信息。
设置目录并创建文件 (Getting Your Directory Set up and Creating Your Files)
Because we want everything to be easily managed and modular, let’s start by setting up the folder structure inside the child theme.
因为我们希望所有内容都易于管理和模块化,所以我们首先在子主题内设置文件夹结构。
An easy way to organize everything is by creating an includes directory inside your child theme. This directory will contain other code or functionality your theme will include/implement (you can call this whatever you want, the purpose is to have a single directory inside the theme).
组织一切的一种简单方法是在子主题内创建一个includes目录。 该目录将包含主题将包含/实现的其他代码或功能(您可以随意调用此名称,目的是在主题内具有一个目录)。
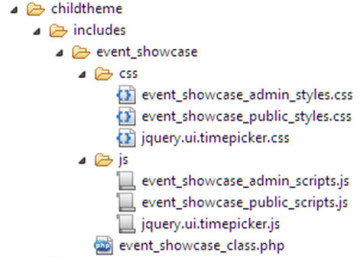
Inside this directory we should make another folder, this time called event_showcase. It is inside this folder we will be placing all of our applicable files for this scenario. We will also need a js and a css folder.
在此目录中,我们应该创建另一个文件夹,这次称为event_showcase 。 在此文件夹中,我们将放置此方案的所有适用文件。 我们还将需要一个js和一个css文件夹。
Organizing your functionality into folders will mean that going forward you can more easily see what modules / features your theme implements. For example, you might want to implement another set of functionality for your theme you could just add a new folder and logically everything is neatly organized.
将您的功能组织到文件夹中,将意味着您可以更轻松地查看主题实现的模块/功能。 例如,您可能想为您的主题实现另一组功能,您可以仅添加一个新文件夹,并且逻辑上一切都井井有条。
Let’s create the files for our example and move them into their correct directories
让我们为示例创建文件,然后将其移至正确的目录中
event_showcase_class.phpevent_showcase_class.phpevent_showcase_admin_styles.cssevent_showcase_admin_styles.cssevent_showcase_admin_scripts.jsevent_showcase_admin_scripts.jsevent_showcase_public_styles.cssevent_showcase_public_styles.cssevent_showcase_public_scripts.jsevent_showcase_public_scripts.js
You should have something similar to below:
您应该具有类似以下内容:
Later on you will need to download and place the jQuery time picker script and style inside this directory. Don’t worry about this for now.
稍后,您将需要下载jQuery时间选择器脚本和样式并将其放置在此目录中。 现在不用担心。
在WordPress中加载文件 (Loading Your Files Inside WordPress)
With our files set up we now need to include them inside of our child theme.
设置好文件后,我们现在需要将其包含在子主题中。
Open up your child theme’s functions.php and place the following code at either the top or bottom
打开您的子主题的functions.php并将以下代码放在顶部或底部
//Theme functions for child theme

//load our event showcase class
$event_showcase = get_stylesheet_directory() . '/includes/event_showcase/event_showcase_class.php';
include($event_showcase);
This will load the main class file which will outline our functionality. Inside of this class we will handle script and style enqueuing along with other elements.
这将加载主类文件,该文件将概述我们的功能。 在该类的内部,我们将处理脚本和样式排队以及其他元素。
创建课程大纲 (Creating Your Class Outline)
Our class file called event_showcase_class.php will contain the majority of the functionality used for our events system; as such it’s a good idea to map out a basic outline of what methods and properties we will need to make this work.
我们的类文件event_showcase_class.php将包含用于事件系统的大多数功能; 因此,最好是勾勒出完成这项工作所需的方法和属性的基本轮廓。
Copy the following code into your class file.
将以下代码复制到您的类文件中。
/*
 * Event Showcase
 * Creates an 'event' content type to showcase upcoming functions and information
 * Uses hooks and filters inside your theme to output relevant information
 */

 class event_showcase{

	//variables
	private $directory = '';
	private $singular_name = 'event';
	private $plural_name = 'events';
	private $content_type_name = 'event_showcase';

	//magic function, called on creation
	public function __construct(){}
	//sets the directory (path) so that we can use this for our enqueuing
	public function set_directory_value(){}
	//check if we need to flush rewrite rules
	public function check_flush_rewrite_rules(){}
	//enqueue public scripts and styles
	public function enqueue_public_scripts_and_styles(){}
	//enqueue admin scripts and styles
	public function enqueue_admin_scripts_and_styles(){}
	//adding our new content type
	public function add_content_type(){}
	//adding meta box to save additional meta data for the content type
	public function add_meta_boxes_for_content_type(){}
	//displays the visual output of the meta box in admin (where we will save our meta data)
	public function display_function_for_content_type_meta_box($post){}
	//when saving the custom content type, save additional meta data
	public function save_custom_content_type($post_id){}
	//display additional meta information for the content type
	//@hooked using 'display_additional_meta_data' in theme
	function display_additional_meta_data(){}
 }

 //create new object
 $event_showcase = new event_showcase;
Let’s run through the methods and properties so we can understand the process flow:
让我们遍历方法和属性,以便我们了解流程:
- Variables – We declare a few variables to make the class more modular (so we can copy this file and change a few properties and the class will handle the other changes). 变量–我们声明了一些变量以使类更具模块化(因此,我们可以复制此文件并更改一些属性,而该类将处理其他更改)。
__construct()– All of our hooks, filters and initializing code will go in here.__construct()–我们所有的钩子,过滤器和初始化代码都将放在这里。set_directory_value()– Defines ourdirectoryproperty which will let us easily enqueue files that we place in our CSS or JS directories.set_directory_value()–定义directory属性,使我们可以轻松地将放入CSS或JS目录中的文件set_directory_value()。check_flush_rewrite_rules()– Handles the flushing of the pretty permalinks when we add our content type (which makes the new items work).check_flush_rewrite_rules()–当添加内容类型时,处理漂亮的永久链接的刷新(这使新项目起作用)。enqueue_public_scripts_and_styles()– Loads our public facing scripts and styles.enqueue_public_scripts_and_styles()–加载面向公众的脚本和样式。enqueue_admin_scripts_and_styles()– Loads the admin scripts and styles.enqueue_admin_scripts_and_styles()–加载管理脚本和样式。add_content_type()– Defines the new content type we are creating.add_content_type()–定义我们正在创建的新内容类型。add_meta_boxes_for_content_type()– Adds the meta boxes for our new content type.add_meta_boxes_for_content_type()–为我们的新内容类型添加元框。display_function_for_content_type_meta_box– Builds the back-end admin interface for the content type so we can save extra information.display_function_for_content_type_meta_box–为内容类型构建后端管理界面,以便我们可以保存其他信息。save_custom_content_type($post_id)– Handles saving of the custom content type (and our meta information).save_custom_content_type($post_id)–处理自定义内容类型(和我们的元信息)的保存。display_additional_meta_data()– Displays the saved meta information on the front end.display_additional_meta_data()–在前端显示保存的元信息。
Let’s go through now and update these elements and outline the code
让我们现在通过更新这些元素并概述代码
类属性 (The Class Properties)
We declare some properties at the top of our class that will be referenced via our methods. The purpose of these is that they make it easier to re-purpose this class and change its functionality in the future.
我们在类的顶部声明一些属性,这些属性将通过我们的方法进行引用。 它们的目的是使它们在将来重用此类并更改其功能时更加容易。
//variables
private $directory = '';
private $singular_name = 'event';
private $plural_name = 'events';
private $content_type_name = 'event_showcase';
__构造() (__construct())
Our __construct function is a magic function. These functions are special PHP5+ functions that classes can access to perform specific actions.
我们的__construct函数是一个魔术函数。 这些函数是类可以访问以执行特定操作的特殊PHP5 +函数。
All of them start with the double underscore before their name and can be optionally included in any class definition. Understanding all of the magic functions is best left for another discussion (here is another article on magic functions and constants).
它们全都以其名称前的双下划线开头,并且可以选择包含在任何类定义中。 了解所有魔术函数最好留给其他讨论(这是另一篇有关魔术函数和常量的文章)。
The __construct function is called as soon as a class is initialized so it is the first function that will be triggered. It is here we are adding all of our hooks, filters and startup logic. Update the basic outline with the following code.
初始化类后,将立即调用__construct函数,因此它将是第一个被触发的函数。 在这里,我们要添加所有的挂钩,过滤器和启动逻辑。 使用以下代码更新基本轮廓。
//magic function, called on creation
public function __construct(){

	$this->set_directory_value(); //set the directory url on creation
	add_action('init', array($this,'add_content_type')); //add content type
	add_action('init', array($this,'check_flush_rewrite_rules')); //flush re-write rules for permalinks (because of content type)
	add_action('add_meta_boxes', array($this,'add_meta_boxes_for_content_type')); //add meta boxes
	add_action('wp_enqueue_scripts', array($this,'enqueue_public_scripts_and_styles')); //enqueue public facing elements
	add_action('admin_enqueue_scripts', array($this, 'enqueue_admin_scripts_and_styles')); //enqueues admin elements
	add_action('save_post_' . $this->content_type_name, array($this,'save_custom_content_type')); //handles saving of content type meta info
	add_action('display_content_type_meta', array($this,'display_additional_meta_data')); //displays the saved content type meta info
}
You might be thinking that the add_action looks a little different than what you may have seen before and you’re correct.
您可能会认为add_action看起来与以前看到的有所不同,并且您是正确的。
When using add_action and add_filter calls inside a class you must supply the second argument in an array. The first value of the array is the $this variable (meaning the class itself) and the second is the name of the function that will be used (wrapped in quotes).
在类中使用add_action和add_filter调用时,必须在数组中提供第二个参数。 数组的第一个值是$this变量(表示类本身),第二个是将要使用的函数的名称(用引号引起来)。
For more information view the class footnote for the add_action function on the WordPress Codex.
有关更多信息,请查看WordPress Codex上add_action函数的类脚注。
set_directory_value() (set_directory_value())
Since we will be enqueuing CSS and JS, it makes sense to store the file directory URL into a variable that we can access. Our directory structure is /includes/event_showcase however it can customized to suit your structure.
由于我们将使用CSS和JS排队,因此将文件目录URL存储到我们可以访问的变量中是有意义的。 我们的目录结构为/includes/event_showcase但是可以根据您的结构进行自定义。
//sets the directory (path) so that we can use this for our enqueuing
public function set_directory_value(){
	$this->directory = get_stylesheet_directory_uri() . '/includes/event_showcase';
}
check_flush_rewrite_rules() (check_flush_rewrite_rules())
Since we are adding a custom content type we need to handle Pretty Permalinks; these permalinks are rewrites that make your page URL look less ugly (instead of having http://mywebsite.com.au/?p=123 you can have http://mywebsite.com.au/my-event).
由于我们要添加自定义内容类型,因此我们需要处理Pretty Permalinks ; 这些永久链接是重写的代码,使您的页面URL看起来不太难看(而不是拥有http://mywebsite.com.au/?p=123您可以拥有http://mywebsite.com.au/my-event )。
Rewriting ensures that your content types are converted into the pretty format, however, this rewriting is expensive and if done excessively can slow your site down. Because rewriting can affect your site it is generally only changed on theme/plugin activation or deactivation.
重写可确保将您的内容类型转换为漂亮的格式,但是,这种重写是昂贵的,而且如果重写过多,则会使您的网站变慢。 由于重写会影响您的网站,因此通常仅在主题/插件激活或停用时进行更改。
Since you may not want to manually update your permalinks, this function asks WordPress to do it automatically and only once (after your new content type has been added).
由于您可能不想手动更新永久链接,因此此功能要求WordPress自动且仅一次(在添加了新的内容类型之后)执行一次。
This function will check to see if the website needs to be flushed via a theme option. If a flush is required it will update the permalinks and then set the value of the option to false (so it triggers only once, not every time we load a page).
此功能将检查是否需要通过主题选项刷新网站。 如果需要刷新,它将更新永久链接,然后将选项的值设置为false(因此仅触发一次,而不是每次加载页面时触发)。
//check if we need to flush rewrite rules
public function check_flush_rewrite_rules(){
	$has_been_flushed = get_option($this->content_type_name . '_flush_rewrite_rules');
	//if we haven't flushed re-write rules, flush them (should be triggered only once)
	if($has_been_flushed != true){
		flush_rewrite_rules(true);
		update_option($this->content_type_name . '_flush_rewrite_rules', true);
	}
}
enqueue_public_scripts_and_styles() (enqueue_public_scripts_and_styles())
This function handles the enqueuing of the scripts and styles for the website on the front-end.
此功能处理前端网站的脚本和样式的入队。
We use the name of the content type in the enqueue calls so that there shouldn’t be any naming conflicts with other plugins (as it will translate into something unique i.e `event_showcase_public_scripts`).
我们在入队调用中使用内容类型的名称,以便与其他插件之间不存在任何命名冲突(因为它将转化为唯一的东西,即“ event_showcase_public_scripts”)。
We call both wp_enqueue_style and wp_enqueue_script to load our resources.
我们调用wp_enqueue_style和wp_enqueue_script来加载资源。
We also use the $directory and $content_type_name properties when loading our resources.
加载资源时,我们还使用$directory和$content_type_name属性。
//enqueue public scripts and styles
public function enqueue_public_scripts_and_styles(){
	//public styles
	wp_enqueue_style(
		$this->content_type_name . '_public_styles',
		$this->directory . '/css/' . $this->content_type_name . '_public_styles.css'
	);
	//public scripts
	wp_enqueue_script(
		$this->content_type_name . '_public_scripts',
		$this->directory . '/js/' . $this->content_type_name . '_public_scripts.js',
		array('jquery')
	);
}
enqueue_admin_scripts_and_styles() (enqueue_admin_scripts_and_styles())
This function handles the enqueuing of the scripts and styles for the website on the admin back-end.
此功能在admin后端处理网站的脚本和样式的入队。
We check to see if we are on an edit screen or new screen for our content type and proceed only if we are (no need to load resources when we’re not on the right page).
我们检查内容类型是在编辑屏幕上还是在新屏幕上,并且仅在存在时(如果不在正确的页面上就不需要加载资源)才继续。
We call both wp_enqueue_style and wp_enqueue_script to load our resources, essentially the same as our public facing function.
我们调用wp_enqueue_style和wp_enqueue_script来加载我们的资源,基本上与面向公众的功能相同。
For this example, I am using both the jQuery UI Datepicker (part of the jQuery UI library) and the jQuery UI Time Picker (built to have a similar style as the date picker).
对于此示例,我同时使用了jQuery UI Datepicker (jQuery UI库的一部分)和jQuery UI Time Picker (构建为具有与日期选择器相似的样式)。
Go and download the Time Picker library from the above link and include the relevant CSS and JS file inside your directory.
从上面的链接下载Time Picker库,并将相关CSS和JS文件包含在目录中。
//enqueue admin scripts and styles
public function enqueue_admin_scripts_and_styles(){

	global $pagenow, $post_type;

	//process only on post edit page for custom content type
	if(($post_type == $this->content_type_name) && ($pagenow == 'post-new.php' || $pagenow == 'post.php')){

		//admin styles
		wp_enqueue_style(
			$this->content_type_name . '_public_styles',
			$this->directory . '/css/' . $this->content_type_name . '_admin_styles.css'
		);
		//jquery ui styles for datepicker
		wp_enqueue_style(
			$this->content_type_name . '_jquery_ui_style',
			'//code.jquery.com/ui/1.11.4/themes/smoothness/jquery-ui.css'
		);
		//timepicker styles
		wp_enqueue_style(
			'jquery_ui_timepicker_styles',
			$this->directory . '/css/jquery.ui.timepicker.css'
		);
		//timepicker script
		wp_enqueue_script(
			'jquery_ui_timepicker_script',
			$this->directory . '/js/jquery.ui.timepicker.js'
		);
		//admin scripts (depends on datepicker and timepicker)
		wp_enqueue_script(
			$this->content_type_name . '_public_scripts',
			$this->directory . '/js/' . $this->content_type_name . '_admin_scripts.js',
			array('jquery','jquery-ui-datepicker','jquery_ui_timepicker_script')
		);
	}
}
add_content_type() (add_content_type())
We declare our custom content type in this function.
我们在此函数中声明我们的自定义内容类型。
The function uses the $singular_name, $plural_name and $content_type_nameproperties to make the registration of this new post type easy.
该函数使用$singular_name , $plural_name和$content_type_name属性使此新帖子类型的注册变得容易。
Structuring the registration function like this means that you can easily change and register a post type by supping only a few pieces of information.
这样构造注册功能意味着您只需提供几条信息就可以轻松更改和注册帖子类型。
For a more detailed outline on registering custom content types please view the WordPress codex for the register_post_type function
有关注册自定义内容类型的更详细概述,请查看WordPress Codex中的register_post_type函数
//adding our new content type
public function add_content_type(){
$labels = array(
'name' => ucwords($this->singular_name),
'singular_name' => ucwords($this->singular_name),
'menu_name' => ucwords($this->plural_name),
'name_admin_bar' => ucwords($this->singular_name),
'add_new' => ucwords($this->singular_name),
'add_new_item' => 'Add New ' . ucwords($this->singular_name),
'new_item' => 'New ' . ucwords($this->singular_name),
'edit_item' => 'Edit ' . ucwords($this->singular_name),
'view_item' => 'View ' . ucwords($this->plural_name),
'all_items' => 'All ' . ucwords($this->plural_name),
'search_items' => 'Search ' . ucwords($this->plural_name),
'parent_item_colon' => 'Parent ' . ucwords($this->plural_name) . ':',
'not_found' => 'No ' . ucwords($this->plural_name) . ' found.',
'not_found_in_trash' => 'No ' . ucwords($this->plural_name) . ' found in Trash.',
);
$args = array(
'labels' => $labels,
'public' => true,
'publicly_queryable'=> true,
'show_ui' => true,
'show_in_nav' => true,
'query_var' => true,
'hierarchical' => false,
'supports' => array('title','editor','thumbnail'),
'has_archive' => true,
'menu_position' => 20,
'show_in_admin_bar' => true,
'menu_icon' => 'dashicons-format-status'
);
//register your content type
register_post_type($this->content_type_name, $args);
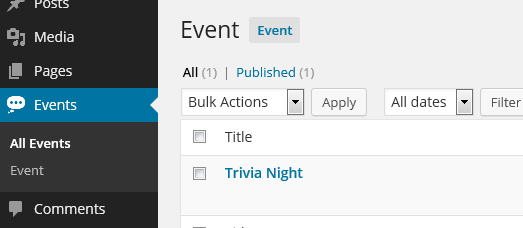
}Once you’ve added this step you should see a new item has been added to the back-end WordPress menu.
添加此步骤后,您应该会看到一个新项目已添加到后端WordPress菜单中。
add_meta_boxes_for_content_type() (add_meta_boxes_for_content_type())
We add the meta boxes we need for our content type here. We call the add_meta_box function and provide it with out functionality. The short story is that we use this to create a new admin box to hold our new form elements we want to save.
我们在这里添加内容类型所需的元框。 我们调用add_meta_box函数并为其提供功能。 简短的故事是,我们使用它来创建一个新的管理框,以保存我们要保存的新表单元素。
//adding meta box to save additional meta data for the content type
public function add_meta_boxes_for_content_type(){

	//add a meta box
	add_meta_box(
		$this->singular_name . '_meta_box', //id
		ucwords($this->singular_name) . ' Information', //box name
		array($this,'display_function_for_content_type_meta_box'), //display function
		$this->content_type_name, //content type
		'normal', //context
		'default' //priority
	);

}
display_function_for_content_type_meta_box($ post) (display_function_for_content_type_meta_box($post))
We use this function to output the back-end options for the new meta information for our content type.
我们使用该功能为内容类型的新元信息输出后端选项。
For our example, we are collecting dates, times and other information about the event that we will show to the end user.
对于我们的示例,我们正在收集有关事件的日期,时间和其他信息,这些事件将显示给最终用户。
We start by collecting all of the additional post meta into variables and displaying the output of the HTML form. Some of these fields will trigger the date picker interface and others will trigger the time picker (determined by the class used on the element).
我们首先将所有其他post meta收集到变量中并显示HTML表单的输出。 其中一些字段将触发日期选择器界面,而其他字段将触发时间选择器(由元素上使用的类确定)。
In addition, we set a nonce field so that we can verify on save if the request came from this page.
此外,我们设置了一个随机数字段,以便我们可以在请求保存时验证是否来自此页面。
//displays the back-end admin output for the event information
public function display_function_for_content_type_meta_box($post){
//collect meta information
$event_subtitle = get_post_meta($post->ID,'event_subtitle', true);
$event_start_date = get_post_meta($post->ID,'event_start_date', true);
$event_end_date = get_post_meta($post->ID,'event_end_date', true);
$event_start_time = get_post_meta($post->ID,'event_start_time', true);
$event_end_time = get_post_meta($post->ID,'event_end_time', true);
$event_location = get_post_meta($post->ID,'event_location', true);
$event_price = get_post_meta($post->ID,'event_price', true);
//set nonce
wp_nonce_field($this->content_type_name . '_nonce', $this->content_type_name . '_nonce_field');
?>
<p>Enter additional information about your event below</p>
<div class="field-container">
<label for="event_subtitle">Subtitle</label>
<input type="text" name="event_subtitle" id="event_subtitle" value="<?php echo $event_subtitle; ?/>"/>
</div>
<div class="field-container">
<label for="event_location">Event Location</label>
<textarea name="event_location" id="event_location">< ?php echo $event_location; ?></textarea>
</div>
<div class="field-container">
<label for="event_start_date">Start Date</label>
<input type="text" name="event_start_date" id="event_start_date" class="admin-datepicker" value="<?php echo $event_start_date; ?/>" required/>
</div>
<div class="field-container">
<label for="event_end_date">End Date</label>
<input type="text" name="event_end_date" id="event_end_date" class="admin-datepicker" value="<?php echo $event_end_date; ?/>" required/>
</div>
<div class="field-container">
<label for="event_start_time">Start Time</label>
<input type="text" name="event_start_time" id="event_start_time" class="admin-timepicker" value="<?php echo $event_start_time; ?/>" required/>
</div>
<div class="field-container">
<label for="event_end_time">End Time</label>
<input type="text" name="event_end_time" id="event_end_time" class="admin-timepicker" value="<?php echo $event_end_time; ?/>" required/>
</div>
<div class="field-container">
<label for="event_price">Price</label>
<input type="text" name="event_price" id="event_price" value="<?php echo $event_price; ?/>"/>
</div>
< ?php
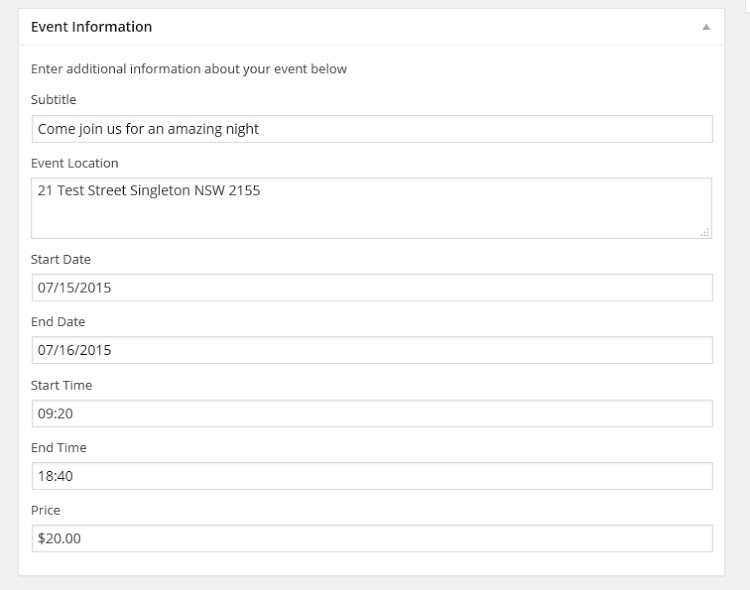
}When you’re all done with this step you should see the new empty meta box has been transformed and now can hold all of our new info.
完成此步骤后,您应该会看到新的空meta框已转换,现在可以容纳我们的所有新信息。
save_custom_content_type($ post_id) (save_custom_content_type($post_id))
Here is where we save our additional meta data for our custom content type.
在这里,我们将其他元数据保存为自定义内容类型。
We first check for the nonce that we added in our meta box and verify its authenticity. After this we check that we are not doing an autosave and that the user can actually edit this page. If all of those checks are passed we move forward.
我们首先检查在元框中添加的随机数,并验证其真实性。 此后,我们检查我们没有进行自动保存,并且用户可以实际编辑此页面。 如果所有这些检查都通过了,我们将继续前进。
We collect all of our values into variables and sanitize them using the sanitize_text_field function. After this we call the update_post_meta function to save our data.
我们将所有值收集到变量中,并使用sanitize_text_field函数对其进行sanitize_text_field 。 此后,我们调用update_post_meta函数保存数据。
//when saving the custom content type, save additional meta data
public function save_custom_content_type($post_id){

	//check for nonce
	if(!isset($_POST[$this->content_type_name . '_nonce_field'])){
		return $post_id;
	}
	//verify nonce
	if(!wp_verify_nonce($_POST[$this->content_type_name . '_nonce_field'] , $this->content_type_name . '_nonce')){
		return $post_id;
	}
	//check for autosaves
	if(defined('DOING_AUTOSAVE') && DOING_AUTOSAVE){
		return $post_id;
	}
	//check if the user can edit
	if(!current_user_can('edit_posts')){
		return $post_id;
	}

	//collect sanitized information
	$event_subtitle =sanitize_text_field($_POST['event_subtitle']);
	$event_start_date =sanitize_text_field($_POST['event_start_date']);
	$event_end_date = sanitize_text_field($_POST['event_end_date']);
	$event_start_time =sanitize_text_field($_POST['event_start_time']);
	$event_end_time = sanitize_text_field($_POST['event_end_time']);
	$event_location = sanitize_text_field(wpautop($_POST['event_location']));
	$event_price = sanitize_text_field($_POST['event_price']);

	//save post meta
	update_post_meta($post_id,'event_subtitle',$event_subtitle);
	update_post_meta($post_id,'event_start_date',$event_start_date);
	update_post_meta($post_id,'event_end_date',$event_end_date);
	update_post_meta($post_id,'event_start_time',$event_start_time);
	update_post_meta($post_id,'event_end_time',$event_end_time);
	update_post_meta($post_id,'event_location',$event_location);
	update_post_meta($post_id,'event_price', $event_price);

}
display_additional_meta_data() (display_additional_meta_data())
This function displays the saved meta information for a single post of our new content type (single event).
此功能显示我们新内容类型(单个事件)的单个帖子的已保存元信息。
We defined a new action called display_content_type_meta inside of our __construct function, here is what it looked like:
我们在__construct函数中定义了一个名为display_content_type_meta的新动作,如下所示:
add_action('display_content_type_meta', array($this,'display_additional_meta_data')); //displays the saved content type meta infoThis action’s second value was called display_additional_meta_data and corresponds to this function. This means that any time someone calls do_action('display_content_type_meta'); it will call this function and display the new post meta information.
此操作的第二个值称为display_additional_meta_data ,与该函数相对应。 这意味着任何时候有人调用do_action('display_content_type_meta'); 它将调用此函数并显示新的帖子元信息。
You can call do_action('display_content_type_meta');from anywhere inside your theme (so long as you are on a single post of this content type) and it will display the meta information.
您可以调用do_action('display_content_type_meta'); 从主题内部的任何位置开始(只要您位于此内容类型的单个帖子上),它将显示元信息。
I am using a parent theme of twenty thirteen so I am hooking into the content.php of the child theme for my display.
我使用的父主题为21,因此我将其插入子主题的content.php中进行显示。
This function will get the global $post and $post_type and check that the current item being viewed is of our new content type.
此函数将获取全局$post和$post_type并检查当前正在查看的项目是否属于我们的新内容类型。
After this the function collects the meta information and displays it (making a few quick checks along the way).
此后,该功能将收集元信息并显示它(沿途进行一些快速检查)。
//display additional meta information for the content type
//@hooked using 'display_additional_meta_data' in theme
function display_additional_meta_data(){
global $post, $post_type;
//if we are on our custom post type
if($post_type == $this->content_type_name){
//collect information
$event_subtitle = get_post_meta($post->ID,'event_subtitle', true);
$event_start_date = get_post_meta($post->ID,'event_start_date', true);
$event_end_date = get_post_meta($post->ID,'event_end_date', true);
$event_start_time = get_post_meta($post->ID,'event_start_time', true);
$event_end_time = get_post_meta($post->ID,'event_end_time', true);
$event_location = get_post_meta($post->ID,'event_location', true);
$event_price = get_post_meta($post->ID,'event_price', true);
$html = '';
if(!empty($event_subtitle)){
$html .= '' . $event_subtitle . '
';
}
$html .= '
';
echo $html;
}
}附加文件,CSS和JS (Additional Files, CSS and JS)
Now that the bulk of the functionality has been completed let’s swap into our CSS and JS files to quickly add some styles and interactivity.
现在,大部分功能已经完成,让我们交换到CSS和JS文件中,以快速添加一些样式和交互性。
event_showcase_admin_styles.css (event_showcase_admin_styles.css)
/*
 * Admin Styles
 * Styling the back-end of our content type
 */

.field-container{
	margin-bottom: 10px;
}
.field-container label{
	display: block;
	margin-bottom: 5px;
	width: 100%;
}
.field-container input,
.field-container textarea,
.field-container select{
	width: 100%;
}
event_showcase_public_styles.css (event_showcase_public_styles.css)
/*
 * Public Styles
 * Front end stytes to format our additional content meta
 */

.additional-meta{
	margin-bottom: 15px;
}
.additional-meta .meta{
	margin-bottom: 5px;
}
.additional-meta .meta span{
	margin-left: 10px;
}
event_showcase_admin_scripts.js (event_showcase_admin_scripts.js)
/*
 * Admin Scripts
 * activates jQuery date picker and time picker on the backend
 */

jQuery(document).ready(function($){

	//activate datepicker
	$('.admin-datepicker').datepicker();

	//activate timepicker
	$('.admin-timepicker').timepicker();
});
完整的实用功能! (Completed Functionality in Action!)
When everything is all pieced together you should be able to create a new ‘event’ with additional meta data. When you view your event you should see something to my sample below
当所有内容拼凑在一起时,您应该能够使用其他元数据创建一个新的“事件”。 当您查看活动时,您应该在下面的示例中看到一些内容

You can see the additional subtitle, dates, times and ticket data.
您可以查看其他字幕,日期,时间和票证数据。
Extending a basic post type like this and adding extra elements helps to create a much more interactive and easy website to manage. No longer will the user have to add all of that information via the content area which can be messy, hard to use and inconsistent. They now have a simple easy to manage the interface.
扩展这样的基本帖子类型并添加其他元素有助于创建更具交互性和更易于管理的网站。 用户不再需要通过内容区域添加所有这些信息,这些信息可能是混乱的,难以使用的以及不一致的。 他们现在有一个易于管理的简单界面。
从这里到哪里? (Where to from Here?)
Now that you have seen a practical example of Object Orientated design and how easy it can be to enhance your development, you can can apply these skills and build better themes and plugins.
既然您已经看到了面向对象设计的实际示例,并且可以轻松轻松地进行开发,那么您可以应用这些技能并构建更好的主题和插件。
You might want to download the source of this example from my GitHub page and then alter it suit an upcoming project or extend it to provide additional functionality.
您可能想要从我的GitHub页面下载此示例的源代码,然后根据即将进行的项目对其进行更改,或对其进行扩展以提供其他功能。
Hopefully this article will help you plan your development and see how an object orientated methodology can save you both time and effort.
希望本文能帮助您计划开发并了解面向对象的方法如何节省您的时间和精力。
翻译自: https://www.sitepoint.com/object-orientated-development-with-wordpress/
wordpress本地开发


 152
152

 被折叠的 条评论
为什么被折叠?
被折叠的 条评论
为什么被折叠?
 到【灌水乐园】发言


