


亚马逊新手工作日报
Buying online is closely associated with Amazon for a long time we can remember. In addition their recent foray into movie streaming, tablets etc has made them among the leaders in their space. To support the kind of volume in terms of transactions and data they serve through various channels, the backbone of servers has to be world class. They have many data centers and servers to handle the traffic they receive. What they built and worked in-house created a new line of business for Amazon to offer: Amazon web services.
我们记得很长一段时间,在线购买与亚马逊紧密相关。 此外,他们最近涉足电影流媒体,平板电脑等领域,使其跻身该领域的领导者之列。 为了支持通过各种渠道提供的交易和数据方面的交易量,服务器的骨干必须是世界一流的。 他们有许多数据中心和服务器来处理收到的流量。 他们内部建立和工作的内容为Amazon提供了一条新的业务范围:Amazon Web服务。
什么是Amazon Web Services? (What is Amazon Web Services?)
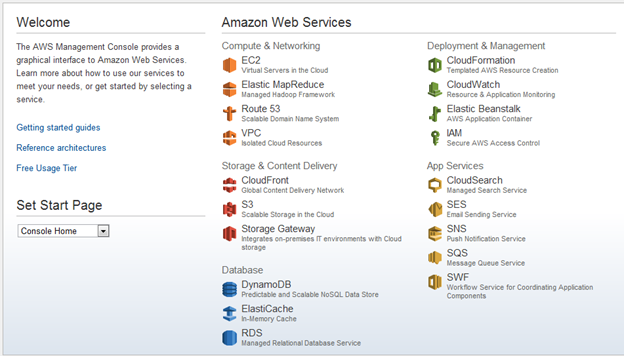
AWS is collection of many services, offered by Amazon, giving developers access to high-end technology resources, without worrying about its maintenance. Initially started with Cloud storage service, S3 which lets you store your data on their servers, back in 2006. After its immense success they added many other services and technologies under AWS umbrella.
AWS是Amazon提供的许多服务的集合,使开发人员可以访问高端技术资源,而不必担心其维护。 S3最初始于云存储服务,它使您可以在2006年将数据存储在其服务器上。在获得巨大成功之后,他们在AWS的支持下添加了许多其他服务和技术。
亚马逊弹性云计算 (Amazon Elastic Cloud Computing)
Amazon Elastic Cloud Computing or Amazon EC2 is a web service that offers all the tools required for running applications in the cloud. With its minimalistic web service interface you can set up your instances in matter of minutes, while having complete control over them, unlike the traditional web hosts. The power of EC2 lies with the elasticity part, of course. You don’t need to confine yourself to any thresholds. You can scale-up or scale-down your resources on the fly, as per your requirements. Another best part is that the instances can be launched across the globe, to serve your users better. One thing to note here is that all storage in the instances is transient in nature, i.e. it gets erased when an instance is stopped or terminated. You need to use EBS for persistent storage.
Amazon Elastic Cloud Computing或Amazon EC2是一项Web服务,提供在云中运行应用程序所需的所有工具。 与传统的Web主机不同,借助其简约的Web服务界面,您可以在几分钟内设置实例,同时完全控制它们。 当然,EC2的力量在于弹性部分。 您无需将自己限制在任何阈值内。 您可以根据需要即时扩展或缩减资源。 另一个最好的部分是实例可以在全球范围内启动,以更好地为您的用户服务。 这里要注意的一件事是,实例中的所有存储本质上都是瞬时的,即,当实例停止或终止时,它将被擦除。 您需要使用EBS进行持久存储。
执行个体 (Instances)
An instance is simply a virtual machine which acts as your own private server. In plain terms, an Instance in AWS world is the same as web server in traditional world; the only difference is that it is managed directly by Amazon. Instances are classified into 13 types, based on their computational power, as with real world specs, in terms of memory, processing speed, core type and storage, at various price points.
实例只是充当您自己的私有服务器的虚拟机。 简而言之,AWS世界中的实例与传统世界中的Web服务器相同; 唯一的区别是它由亚马逊直接管理。 根据实例的计算能力(与真实世界的规格一样),实例在内存,处理速度,核心类型和存储方面(根据价格)分为13种类型。
While the term instance refers to the hardware specs, it’s utterly worthless without the required software. This is where AMI (Amazon Machine Installer) comes in picture. While instances deal with the hardware side of the game, AMI handles the software part. AMI is a pre-configured operating system and virtual application software bundled together which acts as your web server.
虽然实例一词指的是硬件规格,但是如果没有必需的软件,它就一文不值。 这是AMI(Amazon机器安装程序)的图片所在。 实例处理游戏的硬件方面,而AMI处理软件部分。 AMI是捆绑在一起的预配置操作系统和虚拟应用程序软件,可充当您的Web服务器。
设置实例 (Setting up an Instance)
Sign up for Amazon Web Services, you might have to provide your credit card details. But don’t worry, if you are a first timer there, then you should opt for free usage tier!
注册Amazon Web Services ,您可能必须提供您的信用卡详细信息。 但是不用担心,如果您是那里的初学者,那么您应该选择免费使用套餐 !
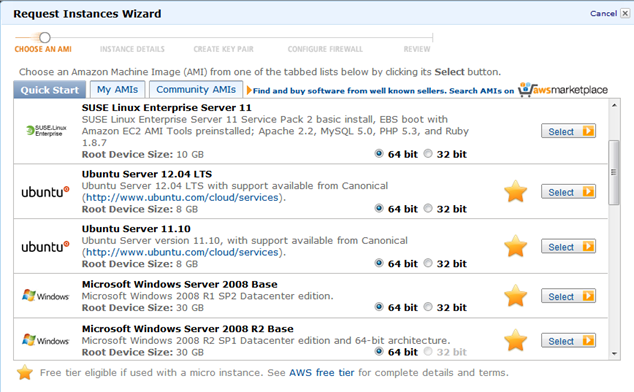
步骤1:选择一个根设备 (Step 1: Select a Root Device)
Once you’ve setup your AWS account, to get started, just point your browser to the Amazon Console page. From the Dashboard, click the Launch Instance button to open the Instance Wizard. This wizard builds your own server or there are a plenty of Community offerings to choose from. In this case I’ve chosen an Ubuntu installation as it’s easier to install and maintain packages.
设置您的AWS账户后,要开始使用,只需将浏览器指向Amazon Console页面即可。 从控制面板中,单击启动实例按钮以打开实例向导。 该向导将构建您自己的服务器,或者有很多社区产品可供选择。 在这种情况下,我选择了Ubuntu安装,因为它更易于安装和维护软件包。
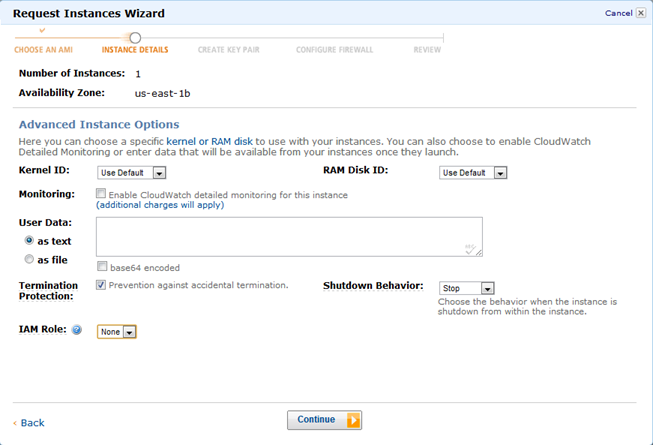
步骤2:配置您的实例 (Step 2: Configure your Instance)
After choosing the root device, configure the instance details like number and type of instances, Availability Zone, Shutdown behavior, etc. You have an option to for Spot Instances also. For the purpose of this tutorial, I’m setting up on a micro-instance.
选择根设备后,配置实例详细信息,例如实例的数量和类型,可用区,关闭行为等。您还可以选择竞价型实例。 出于本教程的目的,我将设置一个微实例。
步骤3:设定金钥对 (Step 3: Setup a key pair)
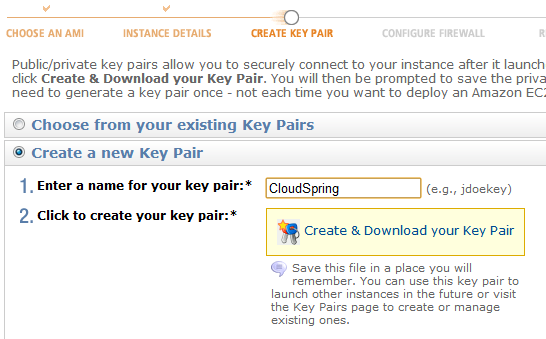
For enhanced security, setup a private-public key pair and SSH into your EC2 instance. Download your private key and protect it properly, to prevent any unauthorized access. If you’re working in a team environment, set the key for everyone and share.
为了增强安全性,请在您的EC2实例中设置私钥-公钥对和SSH。 下载您的私钥并对其进行适当保护,以防止任何未经授权的访问。 如果您在团队环境中工作,请为所有人设置密钥并共享。
步骤4:配置防火墙规则 (Step 4: Configure Firewall rules)
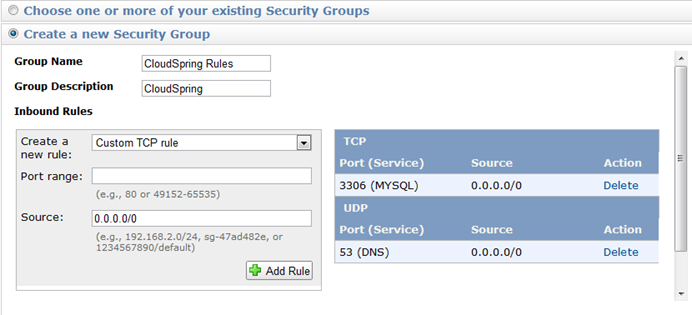
You can decide what comes in and what goes out of your application easily with EC2’s Security Groups and take complete control over your traffic.. Basically this works on a simple allow-deny mechanism. You can set up custom Firewall rules for each of your instances or use a pre-defined Security group. Though setting up this is not mandatory, especially during development, in the light of recent attacks on several popular apps, it’s absolutely vital to have a tighter security policy when your app goes live and ideally you should consult with Security experts before setting this up.
您可以使用EC2的安全组轻松确定应用程序中有哪些内容以及哪些内容不存在,并可以完全控制您的流量。基本上,这是基于简单的允许拒绝机制。 您可以为每个实例设置自定义防火墙规则,也可以使用预定义的安全组。 尽管不是强制性的设置(尤其是在开发过程中),鉴于最近对几个流行应用程序的攻击,但在应用程序上线时制定更严格的安全策略绝对至关重要,理想情况下,在进行此设置之前,应咨询安全专家。
Step 5: Call Starbucks
步骤5:致电星巴克
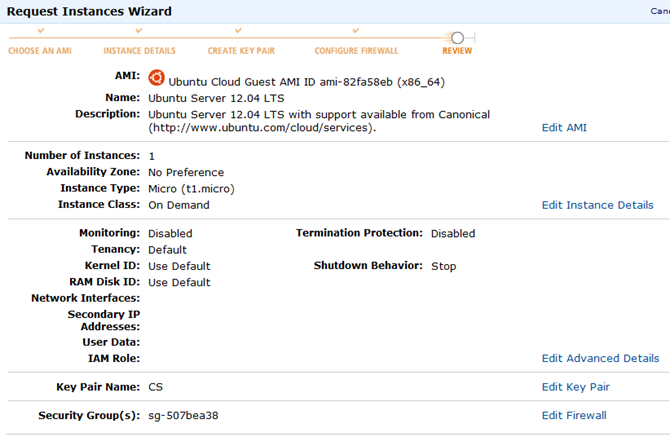
This is the most important step of all, and the best way to good mental health. Okay, I made that up. Anyways, just click the ‘Launch instance’ and help yourself to a hot cup of espresso, while Amazon brings up the instance for you.
这是最重要的一步,也是实现良好心理健康的最佳方法。 好吧,我做了。 无论如何,只要单击“启动实例”并帮自己喝杯浓咖啡,而Amazon就会为您提供实例。
连接到您的实例 (Connecting to your Instance)

Now, your instance is up and ready. Let’s look at the dashboard for a little detour. It follows the traditional, left side navigation pattern and on the left corner you will find the Region setting. Just click the Instances, left navigation link to grab information about your instances.
现在,您的实例已启动并准备就绪。 让我们看一下仪表板的弯路。 它遵循传统的左侧导航模式,在左上角可以找到“区域”设置。 只需单击实例,左侧导航链接即可获取有关实例的信息。
Our instances have a lifecycle like computers. You can start them, stop them, reboot them and even terminate at your will. The little green dot on the instance panel indicates that your instance is running. During development phase be sure to stop your instances, to avoid unnecessary billing.
我们的实例具有像计算机一样的生命周期。 您可以启动它们,停止它们,重新启动它们,甚至可以随意终止。 实例面板上的小绿点表示您的实例正在运行。 在开发阶段,请确保停止实例,以避免不必要的费用。
Let’s see how we can connect to your instance. One, you could use a SSH Client from your workspace or else you could use Amazon’s web interface. We’ll see both the approaches.
让我们看看如何连接到您的实例。 一种,您可以在工作区中使用SSH客户端,也可以使用Amazon的Web界面。 我们将看到两种方法。
i)SSH客户端 (i) SSH Client)
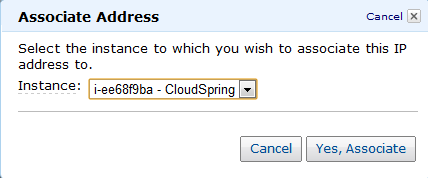
Every server or a website has a unique name and an address- host name and IP address. Similarly your EC2 instance needs an IP address on the web. Amazon allows you to do so with the help of Elastic IP’s. Just click the Elastic IP link on the left hand side to create a new Elastic IP and click the Associate button to attach your instance to this IP. Elastic IP’s are static in nature and doesn’t change unless you manually release them. Copy the public DNS name from the Instances Summary page. We’ll need that later.
每个服务器或网站都有唯一的名称以及地址,主机名和IP地址。 同样,您的EC2实例需要Web上的IP地址。 Amazon允许您在Elastic IP的帮助下做到这一点。 只需单击左侧的Elastic IP链接即可创建新的Elastic IP,然后单击Associate按钮将您的实例附加到该IP。 弹性IP本质上是静态的,除非您手动释放它们,否则它们不会改变。 从“实例摘要”页面复制公共DNS名称。 我们稍后需要。
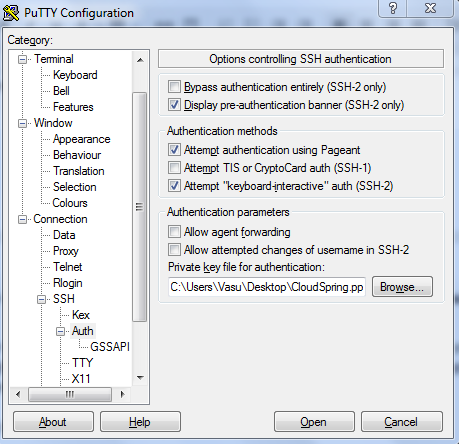
You can either use Terminal from your Mac or Putty from your Windows machine. If you’re using Putty, you might have to download Puttygen to convert your .pem private key file to .ppk format, first. Then open Putty -> Connection -> SSH -> Auth and browse for the .ppk file that you just created.
您可以在Mac上使用Terminal,也可以在Windows机器上使用Putty。 如果您使用的是Putty,则可能必须先下载Puttygen才能将.pem私钥文件转换为.ppk格式。 然后打开Putty-> Connection-> SSH-> Auth并浏览您刚刚创建的.ppk文件。
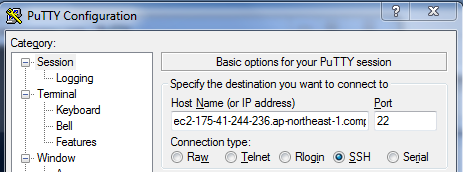
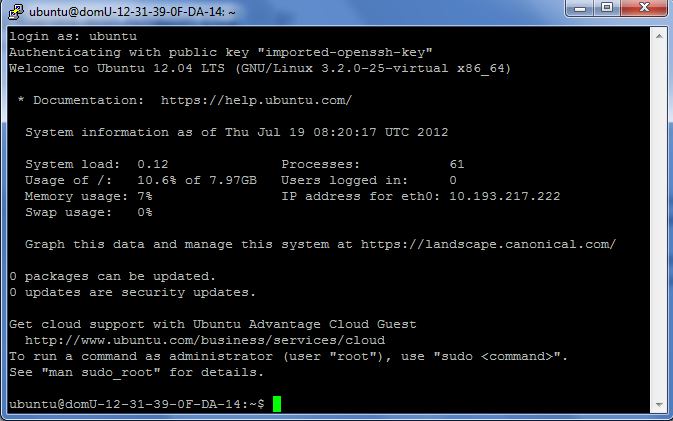
Now go back to the Session tab and paste the public DNS, into the host name field. Connect to setup your connection. During the first time, you’ll get a dialog saying that host key not cached into the registry. Since this is a key we created, go ahead and add it to your registry. Enter ‘ubuntu’ as your username, and Voilà ! That’s how your server looks like:
现在返回“会话”选项卡,并将公共DNS粘贴到主机名字段中。 连接以设置您的连接。 第一次,您会看到一个对话框,提示主机密钥未缓存到注册表中。 由于这是我们创建的密钥,因此继续并将其添加到您的注册表中。 输入“ ubuntu”作为用户名,然后输入Voilà! 这就是您的服务器的外观:
It’s even simpler on a Mac or Linux based system. Just open your terminal and copy the .pem file you downloaded to the ssh directory and login to your remote machine with the following commands.
在基于Mac或Linux的系统上,它甚至更简单。 只需打开终端,然后将下载的.pem文件复制到ssh目录,然后使用以下命令登录到远程计算机即可。
sudo cp /source_dir/CloudSpring.pem ~/.ssh/CloudSpring.pemsudo ssh -i ~/.ssh/CloudSpring.pem your_amazon_public_dns
ii)Web界面 (ii) Web interface)
If you don’t have access to a Terminal, you can ssh your instance directly from your browser. But you’ll need to have Java enabled for this to work and it can slow down your system a bit.
如果您无权访问终端,则可以直接从浏览器中SSH实例。 但是,您需要启用Java才能使其正常工作,并且这可能会减慢系统速度。

使用EC2托管 (Hosting with EC2)
Our machine is ready but let’s setup a quick and dirty ruby installation to show up a webpage!
我们的机器已经准备好了,但是让我们设置一个快速而肮脏的Ruby安装程序来显示一个网页!
Ruby安装 (Ruby Installation)
Run to check if ruby exists on this machine:
运行以检查此机器上是否存在Ruby:
ruby –vThe most popular rails stack would be Apache + MySQL + Phusion mod_rails.
最受欢迎的rails堆栈是Apache + MySQL + Phusion mod_rails。
First let’s install apache and ruby,
首先让我们安装apache和ruby,
sudo apt-get updatesudo apt-get install ruby1.9.1sudo apt-get install apache2sudo apt-get install mysql-client libmysqlclient-dev
Now we need ruby gems to handle the rest of the packages.
现在,我们需要Ruby宝石来处理其余的包装。
sudo apt-get install rubygemsOnce that is done, you can go ahead with your regular setup as usual.
完成后,您可以照常进行常规设置。
gem install railsThis will take a while before it completes. Lets set up our first rails project,
这需要一段时间才能完成。 让我们建立第一个Rails项目,
rails new helloworld –d mysqlsudo /etc/init.d/apache2 restart
Now, point your browser to the publicdns_address/helloworld, and you should get the Rails welcome page.
现在,将浏览器指向publicdns_address / helloworld,您将获得Rails的欢迎页面。
那是一个包裹 (And that’s a wrap)
Now all that is left is to setup your VirtualHosts to map your DNS. This guide should help you throughout the process. But you promised an easy method? Oh! Yeah, I almost forgot. Bitnami offers the complete stack, of any for free. Just sign up for their service, give your AWS credentials, and set up the stack.
现在剩下的就是设置您的VirtualHosts以映射您的DNS。 本指南应在整个过程中为您提供帮助。 但是您答应了一种简单的方法? 哦! 是的,我差点忘了。 Bitnami免费提供完整的堆栈。 只需注册他们的服务,提供您的AWS凭证,然后设置堆栈。
Amazon AWS is an awesome service that has a lot of tricks under its sleeve. Obviously there is a great deal to cover, and we’ll try to rectify this in the future articles. What would you like us to cover here in the future? Feel free to join us in the discussion and let us know about your thoughts. Thanks for reading, and stay tuned.
Amazon AWS是一项很棒的服务,它有很多技巧。 显然,有很多内容需要介绍,我们将在以后的文章中尝试纠正这一问题。 您希望我们将来在这里介绍什么? 欢迎加入我们的讨论,并让我们知道您的想法。 感谢您的阅读,敬请期待。
翻译自: https://www.sitepoint.com/a-newbies-guide-to-amazon-web-services/
亚马逊新手工作日报


 4426
4426


 被折叠的 条评论
为什么被折叠?
被折叠的 条评论
为什么被折叠?
 到【灌水乐园】发言


