


azure 70-533
We all know that WordPress is an amazingly rich, extendable and simple platform. That’s probably one of the reasons it powers so much of the web today. But in some cases this richness can be the downfall of your site. If you load too many plugins, for example, or alternatively – select that one theme that is too complex for your application, you might end up seeing heavy database queries and prolonged execution.
我们都知道WordPress是一个非常丰富,可扩展且简单的平台。 这可能是它为当今众多网络提供支持的原因之一。 但是在某些情况下,这种丰富程度可能会导致您的网站崩溃。 例如,如果您加载了太多插件,或者选择了一个主题,而该主题对于您的应用程序来说太复杂了,那么您可能最终会看到繁重的数据库查询并延长了执行时间。
This means you need an easy, safe and reliable way to profile your WordPress app that will help you identify the bottlenecks slowing it down.
这意味着您需要一种简单,安全和可靠的方式来配置WordPress应用程序,这将帮助您确定降低速度的瓶颈。

This article demonstrates a simple way to do just this. It describes how to debug a WordPress application deployed on Microsoft Azure’s web app service, using Z-Ray for Azure – a new technology that was announced a few months ago and is now in preview mode. While Z-Ray as a standlone tool for Azure developers is a new offering, Z-Ray in itself is not. Zend introduced it over a year ago as part of Zend Server. There are plenty of resources available on the web for understanding what Z-Ray is, but just so we’re all on the same page – here is a very short description.
本文演示了一种简单的方法来执行此操作。 它描述了如何使用Z-Ray for Azure调试在Microsoft Azure的Web应用程序服务上部署的WordPress应用程序 ,这是几个月前宣布的新技术,目前处于预览模式。 尽管Z-Ray作为Azure开发人员的独立工具是一项新产品,但Z-Ray本身不是。 Zend于一年多前作为Zend Server的一部分推出了它。 Web上有很多资源可以理解Z-Ray是什么,但是正是如此,我们都在同一页面上–这是一个非常简短的描述。
Z-Ray is a debugging tool for PHP developers that provides information on what’s going on under the hood of your PHP apps, in your browser, and without having to change a thing in your code. Using Z-Ray Live!, developers can also profile non-browser based requests coming into the server as well, such as mobile and API requests. In addition to generic PHP information, Z-Ray also provides detailed information for specific apps and frameworks, such as WordPress, Magento, Drupal, Symfony, Laravel and Zend Framework. For more information on these features, this article provides a great overview.
Z-Ray是面向PHP开发人员的调试工具,它可以提供有关PHP应用程序内部,浏览器中正在发生的事情的信息,而无需更改代码中的任何内容。 使用Z-Ray Live !,开发人员还可以对非基于浏览器的请求(例如移动和API请求)进行分析。 除了通用PHP信息外,Z-Ray还提供有关特定应用程序和框架的详细信息,例如WordPress,Magento,Drupal,Symfony,Laravel和Zend Framework。 有关这些功能的更多信息, 本文提供了很好的概述。
Note: Before we begin, please note that to follow the steps below, you’ll need an active Microsoft Azure account (Free Trial).
注意 :在我们开始之前,请注意,要执行以下步骤,您需要一个有效的Microsoft Azure帐户( 免费试用版 )。
步骤1:建立WordPress网路应用程式 (Step 1 : Creating a WordPress Web App)
Our first step is to create a new WordPress web app on Azure.
我们的第一步是在Azure上创建一个新的WordPress Web应用程序。
Azure offers a number of easy ways to get up and running with WordPress. In this case, we will be deploying a WordPress package called Scalable WordPress, that already contains a basic WordPress setup, including database configurations.
Azure提供了许多简单的方法来启动和运行WordPress。 在这种情况下,我们将部署一个名为可扩展WordPress的WordPress软件包,该软件包已经包含基本的WordPress设置,包括数据库配置。
After logging into the Azure Portal, click the New button in the top-left corner.
登录到Azure门户后,单击左上角的“ 新建”按钮。
In the Create blade, select Web + Mobile and then Scalable WordPress.
在“创建”刀片中,选择“ Web +移动” ,然后选择“ 可扩展WordPress” 。

In the Scalable WordPress blade that slides open, you will now need to configure the WordPress web app you are about to deploy on Azure. Start by selecting a name for the web app’s resource group. In Azure, a resource group contains resources related to a specific application. For example, the application itself, a database and a storage account. You can either use the suggested name for the web app’s resource group or enter a new one.
现在,在可滑动打开的可伸缩WordPress刀片服务器中,您将需要配置要在Azure上部署的WordPress Web应用程序。 首先为Web应用程序的资源组选择一个名称。 在Azure中,资源组包含与特定应用程序相关的资源。 例如,应用程序本身,数据库和存储帐户。 您可以使用Web应用程序资源组的建议名称,也可以输入一个新名称。
Next, select the web app settings section, and in the Web App blade that slides open, configure the following:
接下来,选择“ Web应用程序设置”部分,然后在滑动打开的Web App刀片中配置以下内容:
- URL – enter the URL of your website URL –输入您的网站的URL
- App Service Plan – enter a new name for a service plan. A service plan is basically a set of features that you can share on all your Azure web apps. 应用服务计划–输入服务计划的新名称。 服务计划基本上是可以在所有Azure Web应用程序上共享的一组功能。
- Pricing Tier – select the pricing tier that suits your requirements 定价层–选择适合您需求的定价层
- Location – select a location for hosting your web 位置–选择用于托管网络的位置

Click OK.
单击确定 。
Select the database settings section, and select whether to use an existing MySQL database or create a new one (in which case you will need to define a new name, select a pricing tier and location, and accept the legal terms).
选择数据库设置部分,然后选择使用现有MySQL数据库还是创建一个新MySQL数据库(在这种情况下,您将需要定义一个新名称,选择一个定价层和位置并接受法律条款)。

Next, select the storage settings section, and and select whether to use an existing storage account or create a new one (in which case you will need to define a new storage account name).
接下来,选择“存储设置”部分,然后选择是使用现有的存储帐户还是创建一个新的存储帐户 (在这种情况下,您将需要定义一个新的存储帐户名称)。
- The last section in the blade displays the subscription that will be used. If you would like to use a different subscription, select this section. 刀片服务器的最后一部分显示将使用的订阅。 如果您想使用其他订阅,请选择此部分。
That’s it. You’ve finished configuring the new web app settings and don’t worry – if you forgot one of the configuration steps, or if you got it wrong the first time, Azure will make sure you know about it.
而已。 您已经完成了新的Web应用程序设置的配置,请不要担心–如果您忘记了其中一个配置步骤,或者如果第一次遇到错误,Azure将确保您了解它。
Click Create to deploy your new WordPress web app. Now we are taken to the Startboard where we can see that our web app is being created. This may take a minute or two, and once our WordPress app is ready, its blade will open automatically.
单击创建以部署新的WordPress Web应用程序。 现在,我们进入了Startboard,可以看到正在创建我们的Web应用程序。 这可能需要一两分钟,并且一旦我们的WordPress应用准备就绪,它的刀片将自动打开。

Click the Browse button at the top of the blade to open your WordPress app. The famous WordPress “five-step” configuration wizard is displayed.
单击刀片顶部的“ 浏览”按钮以打开WordPress应用。 显示著名的WordPress“五步”配置向导。

Complete the installation steps, and launch WordPress (be sure to make note of the password you define to enter your admin panel).
完成安装步骤,然后启动WordPress(请确保记下您定义的密码以进入管理面板)。

步骤2:启用Z射线 (Step 2 : Enabling Z-Ray)
Great! We’ve successfully deployed a WordPress web app on Azure. Now, how do we get Z-Ray working?
大! 我们已经在Azure上成功部署了WordPress Web应用程序。 现在,我们如何使Z-Ray工作?
In the web app blade, open the Tools menu. To do this, click the Tools icon at the top of the blade.
在网络应用刀片中,打开“工具”菜单。 为此,请单击刀片顶部的“ 工具”图标。

Under the Develop section of the Tools blade, you’ll see a variety of development tools and features available. Select Zend Z-Ray, and then Enable Z-Ray for Azure.
在“工具”刀片的“开发”部分下,您将看到各种可用的开发工具和功能。 选择Zend Z-Ray ,然后为Azure启用Z-Ray 。
Next, you get a list of the available pricing tiers, including a monthly estimate of the costs. Decide which tier best suits you, and click Select.
接下来,您将获得可用定价层的列表,包括每月的成本估算。 确定最适合您的层,然后单击“ 选择” 。
Note: Z-Ray on Microsoft Azure is currently in preview, so prices may change in the future without notice.
注意 :Microsoft Azure上的Z-Ray当前处于预览状态,因此将来价格可能更改,恕不另行通知。
Have a read through the legal terms that are then displayed. If you accept them, click Purchase.
通读随后显示的法律条款。 如果您接受它们,请单击购买 。
After a short while you’ll get a notification informing you that Z-Ray was successfully enabled. This means that Z-Ray is now enabled for your WordPress web app.
片刻之后,您会收到一条通知,通知您Z-Ray已成功启用。 这意味着您的WordPress网络应用现已启用Z-Ray。

Well done! To start working with Z-Ray, simply refresh your web app in the browser. Z-Ray is displayed at the bottom of the page.
做得好! 要开始使用Z-Ray,只需在浏览器中刷新Web应用程序即可。 Z-Ray显示在页面底部。

步骤3:使用Z-Ray开发WordPress (Step 3 : Developing WordPress with Z-Ray)
Congratulations! You’ve successfully deployed your WordPress web app and enabled Z-Ray. What’s next?
恭喜你! 您已经成功部署了WordPress网络应用并启用了Z-Ray。 下一步是什么?
To start using Z-Ray, simply select the various panels on Z-Ray and begin drilling down into your code.
要开始使用Z-Ray,只需选择Z-Ray上的各个面板,然后开始深入研究代码。
Out of the box, Z-Ray tracks and displays detailed info on: the functions triggered by your app, executed SQL queries (including the query’s bound value, the result of the query, how long the query took and the amount of rows in the code affected by the query), errors and warnings, thrown exceptions, and more (for a nice detailed overview of Z-Ray’s main features, read this article).
开箱即用,Z-Ray跟踪并显示有关以下内容的详细信息:应用程序触发的功能,已执行SQL查询(包括查询的绑定值,查询结果,查询所花的时间以及行中的行数)。受查询影响的代码),错误和警告,引发的异常等(有关Z-Ray主要功能的详细介绍,请阅读本文 )。
For WordPress developers, Z-Ray displays additional information on WordPress elements and code constructs. This information can be accessed by opening the WordPress panel on the right hand side of Z-Ray.
对于WordPress开发人员,Z-Ray显示有关WordPress元素和代码构造的其他信息。 可以通过打开Z-Ray右侧的WordPress面板来访问此信息。
Let’s take a closer look.
让我们仔细看看。
仪表板 (Dashboard)
The Dashboard panel gives you a great overview of your WordPress application – with a chart showing the load time for plugins, themes and core, and additional general details about the app’s configuration, including the version, number of plugins, number of DB queries, and more.
“信息中心”面板为您提供了有关WordPress应用程序的出色概述-图表显示了插件,主题和核心的加载时间,以及有关应用程序配置的其他常规信息,包括版本,插件数量,数据库查询数量以及更多。

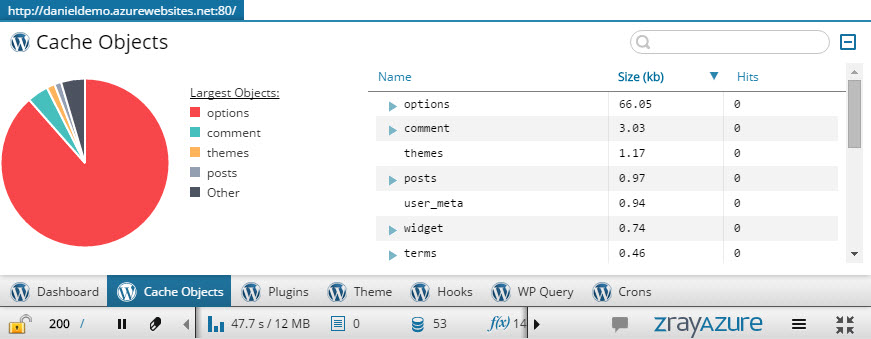
缓存对象 (Cache Objects)
The Cache Objects panel gives you a precise picture on cached objects for the page. This includes a chart depicting the largest cached objects and their size, and a full detailed breakdown of the objects with size and number of hits.
“缓存对象”面板为您提供页面的缓存对象的精确图片。 其中包括一个图表,该图表描述了最大的缓存对象及其大小,以及对象的完整详细分类以及命中的大小和数目。
外挂程式 (Plugins)
The Plugins panel is extremely useful because it can give you a great view on loaded plugins and the resources they are consuming. The panel shows you a chart depicting the relative load times for plugins, together with a table showing the name, version, state, load time and path for each plugin.
“插件”面板非常有用,因为它可以使您很好地了解已加载的插件及其消耗的资源。 该面板显示了一个图表,描述了插件的相对加载时间,以及一个表格,显示了每个插件的名称,版本,状态,加载时间和路径。

主题 (Theme)
Z-Ray also helps you profile the theme your app is using. In the Theme panel, you can see info on the CSS used, execution time, and the file used.
Z-Ray还可以帮助您分析应用程序正在使用的主题。 在“主题”面板中,您可以查看有关所用CSS,执行时间和所用文件的信息。

钩子 (Hooks)
The Hooks panel enables you to see all the WordPress hooks triggered during execution, including Core hooks (to see Core hooks, simply select the Core check-box in the filters area on the left). You can view the name of the hook, its type (action/filter), who called the hook, the time it took to execute, the hook priority, and the name of the file.
通过“挂钩”面板,您可以查看执行期间触发的所有WordPress挂钩,包括Core挂钩(要查看Core挂钩,只需选中左侧过滤器区域中的Core复选框)。 您可以查看钩子的名称,钩子的类型(操作/过滤器),调用钩子的人,执行时间,钩子优先级以及文件名。

WP查询 (WP Query)
The WP Query panel displays information on the current main WordPress query.
WP Query面板显示有关当前主要WordPress查询的信息。

Crons (Crons)
Last but not least, in the Crons panel you’ll get insight into the WordPress cron system. View the hooked functions, their schedule, any defined arguments for the cron event, and the time of the next execution.
最后但并非最不重要的一点是,在Crons面板中,您将深入了解WordPress cron系统。 查看挂钩函数,它们的时间表,为cron事件定义的所有参数以及下一次执行的时间。

步骤4:调试移动设备和API请求 (Step 4: Debugging Mobile and API Requests)
Z-Ray also supports debugging non-browser based requests with Z-Ray Live! – a tool that provides real-time monitoring of all requests made to the server, including those made by APIs, web services, and mobile requests.
Z-Ray还支持使用Z-Ray Live调试基于非浏览器的请求! –一种工具,可提供对服务器的所有请求(包括API,Web服务和移动请求所发出的请求)的实时监视。
Note: Z-Ray Live! is only supported on the Standard edition of Z-Ray for Azure.
注意 :Z-Ray Live! Z-Ray for Azure的标准版仅受支持。
To use Z-Ray Live! you will need to open the Z-Ray for Azure Management Dashboard which is a user interface for managing and configuring Z-Ray. To do this, click the Z-Ray Management Dashboard link in the Zend Z-Ray for Azure blade.
要使用Z-Ray Live! 您将需要打开Z-Ray for Azure管理仪表板,这是用于管理和配置Z-Ray的用户界面。 为此,请在Zend Z-Ray for Azure刀片服务器中单击Z-Ray管理仪表板链接。

Once the Z-Ray Management Dashboard is displayed, simply select the Z-Ray Live! page. Tracking for requests is commenced as soon as the page loads, so simply wait for the requests to come pouring in! For a quick test, reload your WordPress app in the browser.
显示Z-Ray管理仪表盘后,只需选择Z-Ray Live! 页。 页面加载后立即开始跟踪请求,因此只需等待请求涌入即可! 为了进行快速测试,请在浏览器中重新加载WordPress应用。

步骤5:在生产中使用Z射线 (Step 5: Using Z-Ray in Production)
Before we part ways, this final step will explain how to safely use Z-Ray in production as well.
在我们分开之前,最后一步将解释如何在生产中安全使用Z-Ray。
The Z-Ray Secured Mode allows you to enable Z-Ray for specific IPs or URLs, and for a specific time duration, by passing an access token to the URL as a GET parameter. Only URLs using this token will then be able to use Z-Ray.
Z-Ray安全模式允许您通过将访问令牌作为GET参数传递给URL,从而为特定IP或URL以及特定持续时间启用Z-Ray。 只有使用此令牌的URL才能使用Z-Ray。
So, how do you create a new access token?
那么,如何创建新的访问令牌?
Open the Access Modes | Mode page in the Z-Ray Management Dashboard.
打开访问模式| Z-Ray管理仪表板中的“ 模式”页面。
Select the Secured mode, and click Save. When prompted, verify your selection. Z-Ray is now in Secured mode, and if you refresh your WordPress application, Z-Ray will not be displayed.
选择安全模式,然后单击保存 。 出现提示时,请确认您的选择。 Z-Ray现在处于安全模式,如果您刷新WordPress应用程序,则不会显示Z-Ray。
Next, open the Access Mode | Tokens page, and click Create Token. The Create Access Token dialog is displayed.
接下来,打开访问模式| 令牌页面,然后点击创建令牌 。 显示“创建访问令牌”对话框。

Configure the new access token:
配置新的访问令牌:
- Name – Enter a description for the new token for reference purposes only. 名称–输入新令牌的描述,仅供参考。
- IP Restriction – Enter a comma-separated list of IPs representing the machines you wish to enable Z-Ray on, either as a masked range or in CIDR. Example: 127.0.0.1 will limit access to just the local machine, 10.0.0.0/8 will open up access to any address that starts with 10. IP限制–输入IP的逗号分隔列表,代表要启用Z-Ray的计算机(以屏蔽范围或在CIDR中)。 例如:127.0.0.1将限制对本地计算机的访问,10.0.0.0/8将开放对以10开头的任何地址的访问。
URL Restriction (Optional) – Enter the URL of a page you wish to enable access to Z-Ray for. Note: This token setting option is not mandatory. However, leaving this field empty will allow access to Z-Ray for all pages on the server.
URL限制(可选)–输入您希望为其启用Z-Ray访问权限的页面的URL。 注意 :此令牌设置选项不是必需的。 但是,将此字段保留为空将允许访问服务器上所有页面的Z-Ray。
- Time Restriction – Set a time limit for the access token, after which access to Z-Ray will no longer be enabled. 时间限制–设置访问令牌的时间限制,此后将不再启用对Z-Ray的访问。
Click Create Token. A token is created you will be informed on how to access Z-Ray.
点击创建令牌 。 将创建一个令牌,您将被告知如何访问Z-Ray。

To use the token, all you have to do is add it as a GET parameter to the page URL.
要使用令牌,您要做的就是将其作为GET参数添加到页面URL。
摘要 (Summary)
The combination of Z-Ray and Azure means WordPress developers, and indeed PHP developers as a whole, get to benefit from both Microsoft Azure’s web app service, and Z-Ray’s introspection capabilities. Being able to easily get deep insight into all the various elements constructing the page will help developers cut development time and ultimately produce better code.
Z-Ray和Azure的结合意味着WordPress开发人员,乃至整个PHP开发人员都将从Microsoft Azure的Web应用程序服务和Z-Ray的自省功能中受益。 能够轻松深入地了解构成页面的所有各种元素,将有助于开发人员减少开发时间并最终产生更好的代码。
Hope you enjoyed the read!
希望您喜欢阅读!
Zend and Microsoft are always looking for feedback, so if you have any ideas for improving Z-Ray for Azure, feel free to reach out to zrayazure-feedback@zend.com!
Zend和Microsoft一直在寻求反馈,因此,如果您有任何改进Z-Ray for Azure的想法,请随时联系zrayazure-feedback@zend.com !
翻译自: https://www.sitepoint.com/debugging-wordpress-on-azure-with-z-ray/
azure 70-533


 118
118

 被折叠的 条评论
为什么被折叠?
被折叠的 条评论
为什么被折叠?
 到【灌水乐园】发言


