


vr虚拟现实社交
The methods available for web developers to build virtual reality experiences for the web is growing at a rapid and exciting pace! I previously covered how to build VR on the web last year and it has already advanced quite a bit since then. There are quite a few options for building virtual reality experiences for the web that have emerged in 2016 — in the past two weeks, we’ve explored A-Frame, an open source extensible VR web framework and building VR within VR using Primrose. Last month, Google themselves announced another exciting option that is set to bring even more VR to the web — embeddable VR Views.
Web开发人员用于构建Web虚拟现实体验的可用方法正在Swift而令人兴奋地增长! 去年,我曾介绍过去年如何在网络上构建VR,自那时以来,它已经发展了很多。 在2016年出现了很多用于构建网络虚拟现实体验的选项-在过去的两周中,我们探索了A-Frame(一种开源可扩展VR网络框架)并使用Primrose在VR中构建VR 。 上个月,谷歌自己宣布了另一个激动人心的选择,该选择旨在将更多VR引入网络-嵌入式VR视图。
什么是VR视图? (What Are VR Views?)
“VR Views” provide the ability for developers to embed 360 degree virtual reality images and video into websites on desktop and mobile. VR Views can also be embedded into native apps on Android and iOS. In this article, we will explore how simple it is to embed a 360 panoramic image into an existing website.
“ VR视图”使开发人员能够将360度虚拟现实图像和视频嵌入到台式机和移动设备的网站中。 VR Views也可以嵌入Android和iOS的本机应用程序中。 在本文中,我们将探讨将360度全景图像嵌入到现有网站中有多么简单。
设备兼容性 (Device Compatibility)
Google’s VR View works on the latest versions of the following browsers on both desktop and mobile:
Google的VR View可在台式机和移动设备上使用以下浏览器的最新版本:
- Chrome on Android, iOS, Windows, Mac OS X and Linux. 在Android,iOS,Windows,Mac OS X和Linux上使用Chrome。
- Safari on iOS and Mac OS X. iOS和Mac OS X上的Safari。
- Firefox on Windows, Mac OS X and Linux. Windows,Mac OS X和Linux上的Firefox。
- IE 11 and Edge on Windows. Windows上的IE 11和Edge。
With desktop versions, your “virtual reality” experience is mostly a panorama experience where you drag the view around with your mouse. They call this version of the experience a “magic window” — it is similar to desktop Quicktime VR panorama experiences that some may have seen a few years back. However, the VR Views from Google today are done using JavaScript rather than a third-party plugin, and can be enhanced through a true VR view using Google Cardboard.
对于台式机版本,您的“虚拟现实”体验主要是全景体验,您可以用鼠标拖动视图。 他们称这种体验为“魔术窗口”,类似于几年前可能看到的桌面Quicktime VR全景体验。 但是,如今来自Google的VR视图是使用JavaScript而非第三方插件完成的,并且可以使用Google Cardboard通过真实的VR视图进行增强。
拍摄全景照片 (Taking a Panoramic Photo)
Google have a “Cardboard Camera” app that can take 360 degree panoramic photos on Android. For those on iOS, there is an app called Optonaut which can also take 360 photos. I’m not quite sure how easy Optonaut photos are to export and use elsewhere, so if you do have an iOS device and give this a go — I’d love to hear how it went!
Google有一个“ Cardboard Camera”应用程序,可以在Android上拍摄360度全景照片。 对于iOS上的用户,有一个名为Optonaut的应用程序,它也可以拍摄360张照片。 我不太确定Optonaut照片要在其他地方导出和使用有多容易,因此,如果您确实有iOS设备并且可以尝试一下-我很想听听它的进展!
With the Google Cardboard camera, you can take a 360 photo by standing in one place and moving in a circle, following the instructions on screen. The most effective scenes will be ones taken outdoors, with a wide open space and not too much detail at the bottom or top of your image. If you are taking a photo of a smaller room, you may need to adjust the image before it will look right (we’ll look at how to do so below).
使用Google Cardboard相机,您可以按照屏幕上的说明站在一个地方并绕圈移动,以拍摄360度照片。 最有效的场景是在室外拍摄的场景,这些场景应具有广阔的开放空间,并且图像底部或顶部的细节不要太多。 如果您正在拍摄较小房间的照片,则可能需要先调整图像,然后图像才能看起来正确(我们将在下面介绍如何操作)。
When you have taken a photo with the camera, you should find the 360 photo on your phone over at /sdcard/DCIM/CardboardCamera. Copy that to the computer you will be doing your development on.
使用相机拍照后,应该可以在/sdcard/DCIM/CardboardCamera上的手机上找到360度的照片。 将其复制到将要进行开发的计算机上。
准备影像 (Preparing An Image)
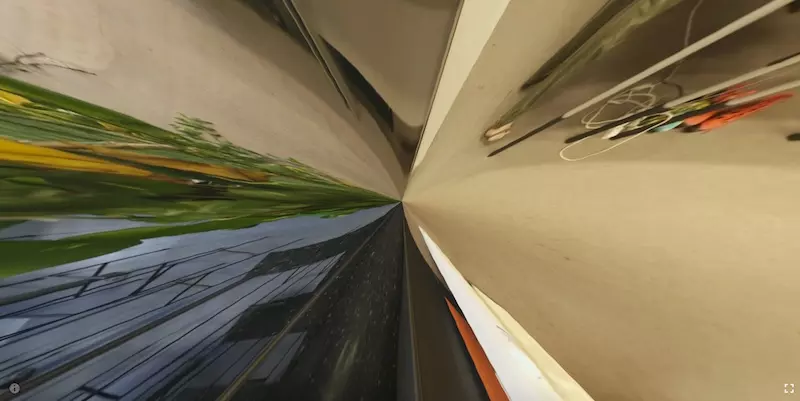
If you do not have a large amount of sky and ground in your scene, your image is likely to display a bit strangely in those areas. Sometimes, especially for indoor shots, this is unavoidable. We used a photo of the SitePoint office (thanks Angela!), which has a perfect example of what the bottom of an image that has a lot of unavoidable detail at the bottom will look like:
如果场景中没有大量的天空和地面,则图像在这些区域中可能会显得有些奇怪。 有时,尤其是对于室内拍摄,这是不可避免的。 我们使用了SitePoint办公室的照片(感谢Angela!) ,该照片很好地说明了在底部有很多不可避免的细节的图像底部的样子:
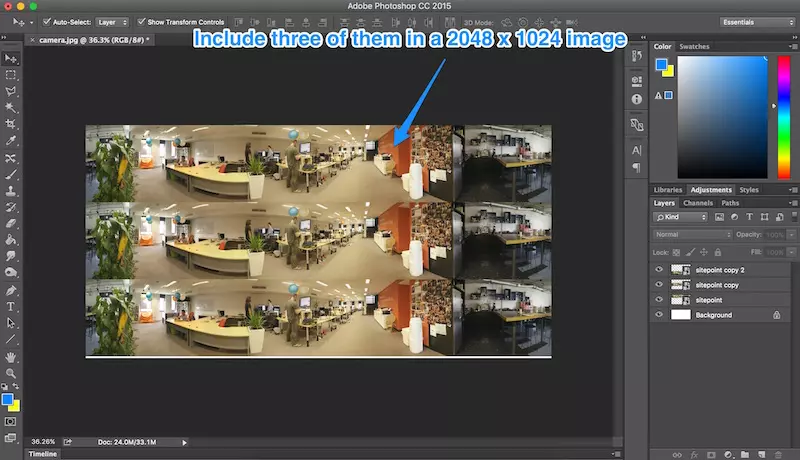
To avoid having too much detail at the top and bottom of your image, you can add space above and below the image that’ll keep things looking neater. There are plenty of techniques you can try to give a nice top and bottom area that doesn’t scrunch up too much, my favorite so far is to add a blurred reversed image on both the top and bottom.
为了避免在图像的顶部和底部有太多细节,您可以在图像上方和下方添加空间,以使外观看起来更加整洁。 有很多技术可以尝试使顶部和底部的区域不会过度压缩,到目前为止,我最喜欢的是在顶部和底部都添加模糊的反转图像。
To try this method, create a 2048 x 1024 image in photoshop and paste three of your panorama image inside it:
若要尝试此方法,请在photoshop中创建一个2048 x 1024的图像,并将其中的三个全景图像粘贴到其中:
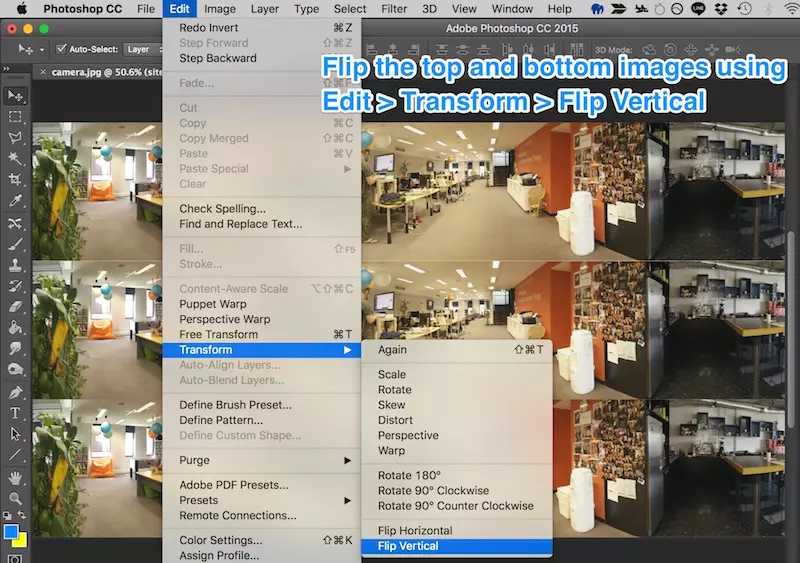
Stretch all three so that it fills the canvas and then flip the top and bottom images using Edit > Transform > Flip Vertical:
拉伸所有三个,使其充满画布,然后使用“ 编辑”>“变换”>“垂直翻转”翻转顶部和底部的图像:
That should look like so:
看起来应该像这样:

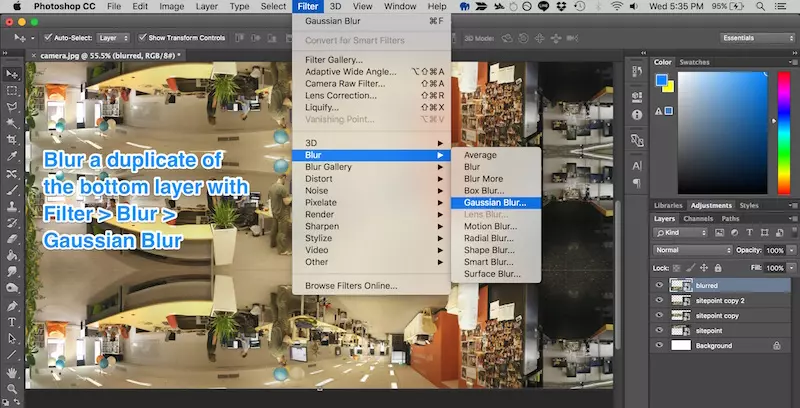
Duplicate the top and bottom images, then blur the duplicate using Filter > Blur > Gaussian Blur:
复制顶部和底部的图像,然后使用“ 滤镜”>“模糊”>“高斯模糊”对副本进行模糊处理 :
Try out different values for the radius value, as some scenes will look better with more blur and vice versa:
尝试使用不同的半径值,因为某些场景在出现更多模糊时会看起来更好,反之亦然:

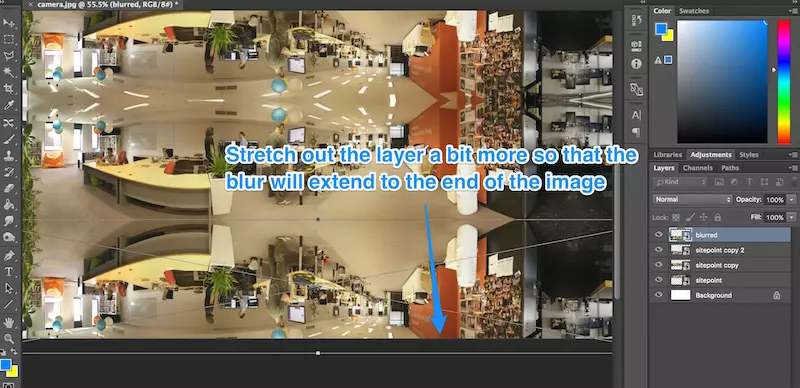
Stretch out each of the blurred layers so that they extend beyond the image (as the edges will fade out and we don’t want them to fade out on the edges of our canvas):
拉伸每个模糊的图层,以使它们延伸到图像之外(因为边缘会淡出,并且我们不希望它们在画布的边缘上淡出):
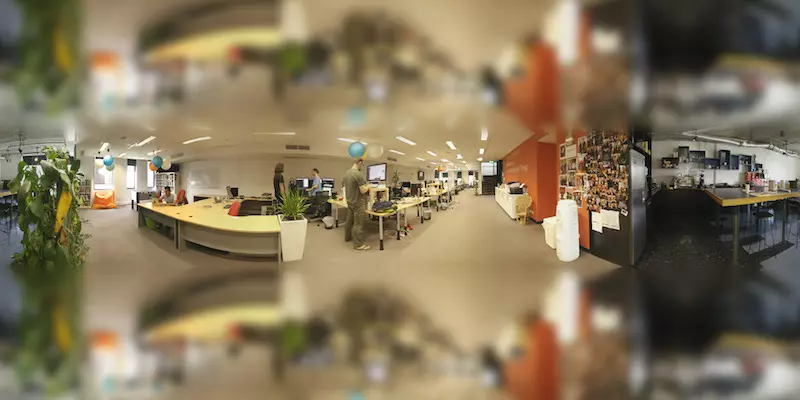
Our final result for the images should look like so:
这些图像的最终结果应如下所示:
If you have photoshop skills, you may come up with other ways of making the bottom and top of the image less conspicuously strange. Some scenes will be easier and less obvious than others!
如果您具有Photoshop技能,则可以想出其他方法来减少图像底部和顶部的明显异象。 有些场景会比其他场景更容易且不那么明显!
嵌入我们的形象 (Embedding Our Image)
There are two options for embedding our image in a VR View. We can either embed Google’s hosted VR View or host our own version. At the moment, hosting our own version on the same server is more reliable. Things do not work quite right on iOS Safari when the VR View and image are hosted on different servers. The server with the image also needs to be able to allow cross-origin resource sharing (CORS) if using Google’s hosted VR View.
有两个选项可将我们的图像嵌入到VR视图中。 我们可以嵌入Google托管的VR View或托管我们自己的版本。 目前,将我们自己的版本托管在同一服务器上更加可靠。 当VR视图和图像托管在不同的服务器上时,在iOS Safari上无法正常运行。 如果使用Google托管的VR View,则带有映像的服务器还需要能够允许跨域资源共享(CORS)。
使用Google的托管VR视图 (Using Google’s Hosted VR View)
For a quick test of what the VR View is like, you can include the following in your web page:
要快速测试VR View的外观,可以在网页中添加以下内容:
<iframe width="100%"
	height="300px"
	allowfullscreen
	frameborder="0"
	src="//storage.googleapis.com/vrview/index.html?image=//storage.googleapis.com/vrview/examples/coral.jpg&
	is_stereo=true">
</iframe>
That sample code from Google looks like this in action:
来自Google的示例代码实际上是这样的:
By default, you will see a lovely 360 panoramic view of fish in a coral reef! If you change the image= parameter in the iframe’s URL, you can set the panorama to your own image. This should work as long as the server you are using to host the image works with CORS.
默认情况下,您将在珊瑚礁中欣赏到鱼的360度全景! 如果您在iframe的网址中更改image=参数,则可以将全景图设置为您自己的图像。 只要用于托管映像的服务器与CORS一起使用,此方法就应该起作用。
You’ll see an is_stereo=true attribute in there — this is when the image is set up with a duplicate of the panorama in the one image. To keep things simple, we haven’t gone down that route in our custom image example! For more info on this, see Google’s documentation on VR View.
您将在其中看到一个is_stereo=true属性-这是在将图像设置为在一个图像中复制全景图的情况。 为简单起见,在我们的自定义图像示例中,我们没有走这条路! 有关此的更多信息, 请参阅有关VR View的Google文档 。
托管VR视图自己 (Hosting The VR View Yourself)
Google’s hosted VR View is incredibly convenient and about as simple as embedding a YouTube video — perfect for quick embedding of panoramic content. However, if you want to use this for a large audience on many platforms, you will want to host the VR View yourself. Otherwise, the images will have an incorrect orientation bug on iOS Safari. Hopefully, that will be solved soon enough and self-hosting will no longer be needed!
Google托管的VR View非常方便,并且与嵌入YouTube视频一样简单,非常适合快速嵌入全景内容。 但是,如果要在许多平台上将其用于大量观众,则需要自己托管VR View。 否则,图像将在iOS Safari上出现错误的方向错误。 希望这将尽快解决,并且不再需要自我托管!
Self-hosting isn’t too difficult to set up. Download the code from Google’s VR View GitHub and host it somewhere with public access. If you keep it within a folder called “vrview” on your server, then you will be able to access it at //yourdomain.com/vrview/?image=examples/coral.jpg&is_stereo=true. If you have hosting set up directly for this (or have a domain name pointing directly at it), then you can avoid the /vrview bit.
设置自我托管并不难。 从Google的VR View GitHub下载代码,并将其托管在具有公共访问权限的位置。 如果将其保存在服务器上名为“ vrview”的文件夹中,则可以通过//yourdomain.com/vrview/?image=examples/coral.jpg&is_stereo=true访问它。 如果直接为此设置了主机(或直接指向域名),则可以避免使用/vrview位。
To add other images, include them within your server wherever you’d prefer (e.g. images/yourimage.jpg) and then change the URL above to look for this new image (e.g. //yourdomain.com/vrview/?image=images/yourimage.jpg).
要添加其他图像,请将它们包含在服务器中的images/yourimage.jpg (例如images/yourimage.jpg ),然后更改上面的URL以查找此新图像(例如//yourdomain.com/vrview/?image=images/yourimage.jpg )。
If you are just looking to quickly test this with your own images and don’t have hosting ready yourself, one great option is to use GitHub Pages.
如果您只是想使用自己的图像快速进行测试,而又没有自己准备好托管,那么一个不错的选择是使用GitHub Pages。
在GitHub Pages上托管VR视图 (Hosting The VR View On GitHub Pages)
You can avoid downloading and hosting the VR View yourself by instead forking Google’s repository and then hosting it on your GitHub account using GitHub Pages.
通过分叉Google的存储库,然后使用GitHub Pages将其托管在您的GitHub帐户上,可以避免自己下载和托管VR View。
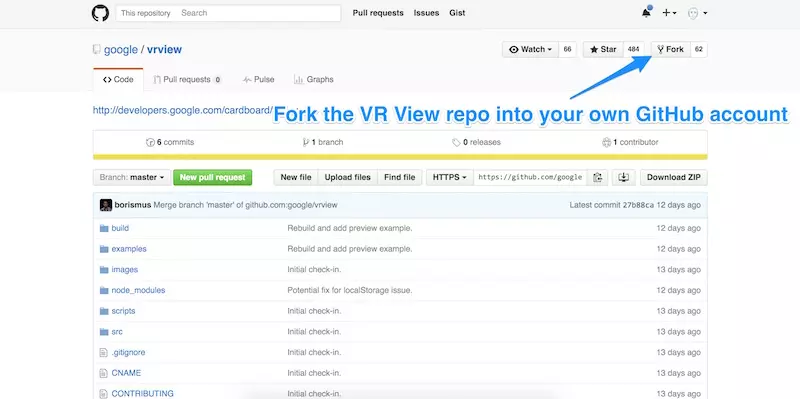
To begin, go to Google’s VR View GitHub repo and click “Fork”:
首先,转到Google的VR View GitHub存储库 ,然后单击“ Fork”:
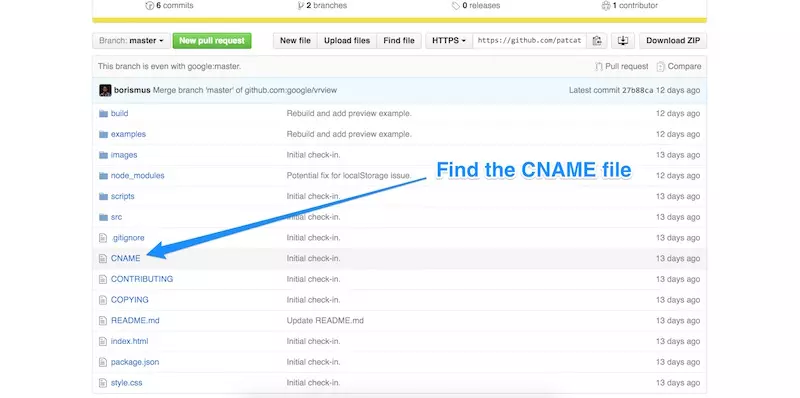
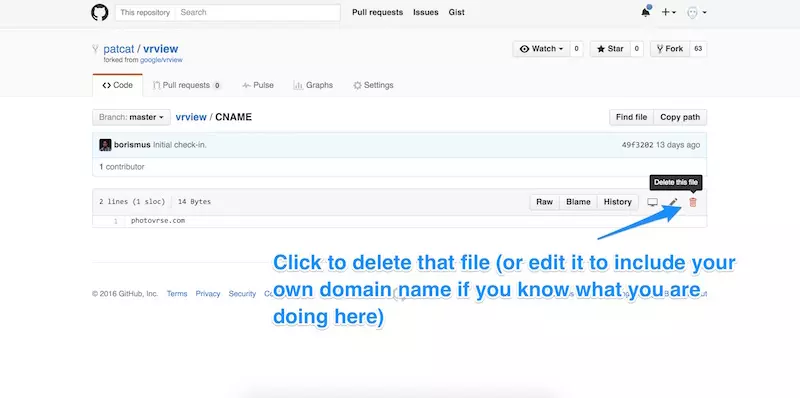
Then, inside your fork of the repo, find the CNAME file and click it:
然后,在仓库的分支中,找到CNAME文件并单击它:
This file will assign a domain name to your GitHub Page. If you have a domain name ready to use and would like to set it up to work with this, read over GitHub’s guide to using a custom domain with GitHub Pages. Otherwise, click the trashcan icon on the right hand side to remove this file from your forked version of the repo. This will instead allow you to use a typical http://you.github.io/ address.
该文件将为您的GitHub页面分配一个域名。 如果您准备使用一个域名,并且想对其进行设置,请阅读GitHub指南,以将自定义域与GitHub Pages一起使用 。 否则,请单击右侧的垃圾桶图标,以从分叉的版本库中删除此文件。 相反,它将允许您使用典型的http://you.github.io/地址。
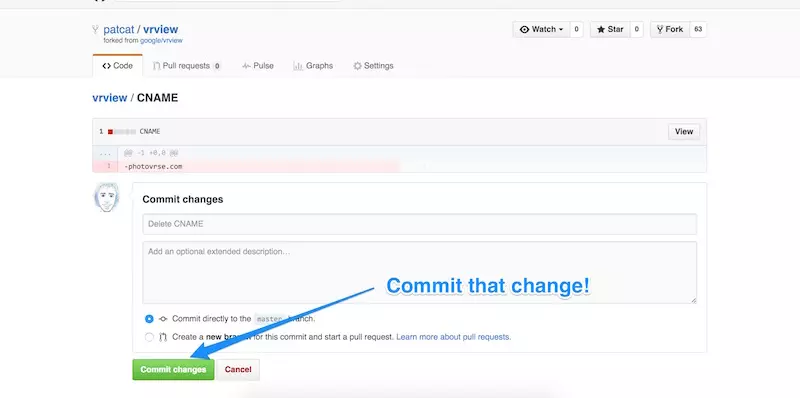
Commit that change:
提交更改:
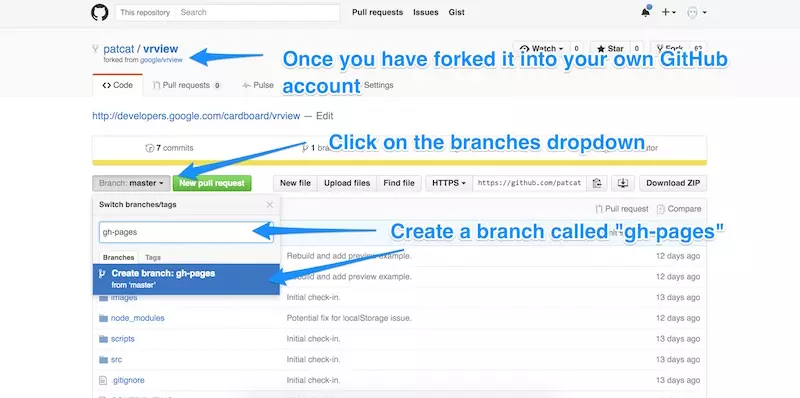
Finally, create a new branch in your forked version of the VR View and call it “gh-pages”. Everything in this branch will be what is accessible on your GitHub Page for this repo:
最后,在您的VR视图的分支版本中创建一个新分支,并将其称为“ gh-pages” 。 该分支中的所有内容都将在您的GitHub页面上为此仓库提供:
If you now visit http://you.github.io/vrview/?image=examples/coral.jpg, you should have your own working version of the VR View!
如果现在访问http://you.github.io/vrview/?image=examples/coral.jpg ,那么您应该拥有自己的VR View工作版本!
From here, you can add your own images wherever you’d prefer, just as you could do with self-hosting above. In this case, you’d need to add that image to your gh-pages branch directly, or add it to master and then bring it into the gh-pages branch from there. If you are new to GitHub, you can avoid much of the confusion of the command line and just drag your image into the browser window while the folder for your image is open.
在这里,您可以随心所欲地添加自己的图像,就像上面的自托管一样。 在这种情况下,您需要将该图像直接添加到gh-pages分支,或将其添加到master ,然后从那里将其带入gh-pages分支。 如果您是GitHub的新用户,则可以避免命令行的很多混乱,只需在打开图像文件夹的同时将图像拖到浏览器窗口中即可。
Once you have updated the image, change the URL to target that image (e.g. http://you.github.io/vrview/?image=yourimage.jpg) and you should see it in a glorious 360 panorama!
更新图像后,更改URL以该图像为目标(例如,http: http://you.github.io/vrview/?image=yourimage.jpg image= http://you.github.io/vrview/?image=yourimage.jpg ),您应该会在辉煌的360度全景图中看到它!
在行动! (In Action!)
Here’s a 360 sneak peek of what’s like to work in the SitePoint office — finally, all of the SitePoint staff can re-visit the office virtually in their spare time! You can see it in full screen by clicking the full-screen icon in the bottom right. If you are on a smartphone, there will be a VR icon next to it too. Click that if you have a Google Cardboard headset and enjoy!
这是360度偷窥SitePoint办公室的工作情况-最后,所有SitePoint工作人员都可以在业余时间重新访问办公室! 通过单击右下角的全屏图标,您可以全屏查看它。 如果您使用的是智能手机,它旁边也会有一个VR图标。 如果您拥有Google Cardboard耳机,请点击并享受!
You can see the VR View on its own over on my VR View GitHub Page!
您可以在我的VR View GitHub Page上单独查看VR View !
结论 (Conclusion)
Google’s VR View adds yet another simple option for creating 360 VR content for the web and is incredibly easy to put together!
Google的VR View添加了另一个简单的选项,可为网络创建360 VR内容,并且非常容易组合!
If you put together a 360 view of your own, I’d love to see what you create! Let me know in the comments below, or get in touch with me on Twitter at @thatpatrickguy.
如果您将自己的360度视图放在一起,我很乐意看到您创建的内容! 在下面的评论中让我知道,或者在Twitter上通过@thatpatrickguy与我联系 。
翻译自: https://www.sitepoint.com/embedding-virtual-reality-across-the-web-with-vr-views/
vr虚拟现实社交


 295
295

 被折叠的 条评论
为什么被折叠?
被折叠的 条评论
为什么被折叠?
 到【灌水乐园】发言


