


yii crud
Yii is a high performance framework that’s fast, secure, and well-suited for Web 2.0 applications. It favors convention over configuration, which means that if you follow its guidelines you’ll end up writing much less code than you would otherwise (and less code implies fewer bugs). Furthermore, it offers many convenient features out of the box, such as scaffolding, data access objects, theming, access control, caching, and more. In this article I’ll cover the basics using Yii to create a CRUD system.
Yii是一个快速,安全并且非常适合Web 2.0应用程序的高性能框架。 它偏爱约定而不是配置,这意味着如果您遵循其准则,则最终编写的代码将比其他情况少得多(更少的代码意味着更少的错误)。 此外,它开箱即用提供了许多方便的功能,例如脚手架,数据访问对象,主题,访问控制,缓存等等。 在本文中,我将介绍使用Yii创建CRUD系统的基础知识。
入门 (Getting Started)
I assume you already have Apache, PHP (5.1 or greater), and MySQL installed on your system, so the first step is downloading the framework files. Head over to the official Yii website and download the latest stable version, which at the time of this writing is 1.1.13.
我假设您已经在系统上安装了Apache,PHP(5.1或更高版本)和MySQL,因此第一步是下载框架文件。 前往Yii官方网站并下载最新的稳定版本,在撰写本文时为1.1.13。
Extract the ZIP file to get the folder yii-1.1.13.e9e4a0 (the version identifier may be different depending on the version you download) and rename it yii, then move the folder to your web-accessible root directory. For me, this is C:\wamp\www so the location to the framework files will be C:\wamp\www\yii. I’ll refer to this as <YiiRoot> throughout the article so you’ll be able to follow along easily even if your own setup is different.
解压缩ZIP文件以获得文件夹yii-1.1.13.e9e4a0 (版本标识符可能会有所不同,具体取决于您下载的版本),并将其重命名为yii ,然后将该文件夹移至可从Web访问的根目录。 对我来说,这是C:\wamp\www所以框架文件的位置将是C:\wamp\www\yii 。 在整篇文章中,我将其称为<YiiRoot> ,因此即使您自己的设置不同,您也可以轻松进行后续操作。
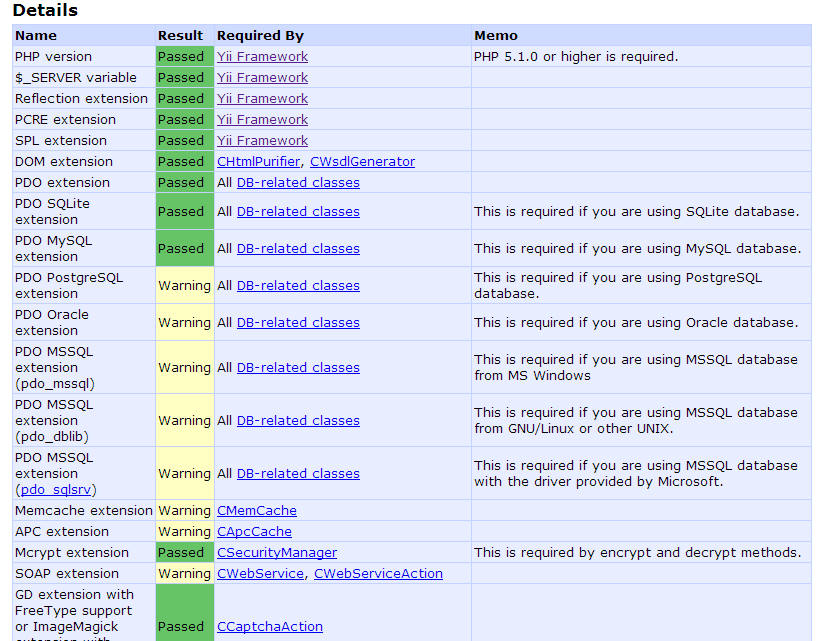
Next, we should check which features of Yii will be supported by our system. Access http://localhost/yii/requirements/ in your browser to see the requirement details of the framework. Since we’ll be working with a MySQL database, you should have the MYSQL PDO extension enabled.
接下来,我们应该检查系统将支持Yii的哪些功能。 在浏览器中访问http:// localhost / yii / requirements /以查看框架的要求详细信息。 由于我们将使用MySQL数据库,因此您应该启用MYSQL PDO扩展。
We wanted to quickly check the requirements of Yii, which is why we put the files in the accessible directory, but it’s recommended to keep Yii files outside of the web root. After the check, feel free to move it elsewhere.
我们想快速检查Yii的要求,这就是为什么我们将文件放在可访问的目录中,但建议将Yii文件保留在Web根目录之外。 检查后,随时将其移至其他位置。
向前进 (Moving Forward)
Every web app has a directory structure, and Yii apps also need to maintain a hierarchical structure inside the web root. To create a skeleton app with a a suitable directory structure we can use Yii’s command line tool yiic. Navigate to the web root and type the following:
每个Web应用程序都有目录结构,Yii应用程序还需要在Web根目录内部维护层次结构。 要创建具有合适目录结构的框架应用程序,我们可以使用Yii的命令行工具yiic 。 导航到Web根目录,然后键入以下内容:
<YiiRoot>frameworkyiic webapp yiitest
This will create the skeleton app called yiitest with the minimum required files. Inside you’ll find index.php which serves as an entry script; it accepts user requests and decides which controller should handle the request.
这将使用所需的最少文件来创建名为yiitest的骨架应用程序。 在内部,您可以找到index.php作为输入脚本; 它接受用户请求并决定哪个控制器应处理该请求。
Yii is based on MVC and OOP principles so you should be well versed with these topics. If you’re not familiar with MVC, read the SitePoint series The MVC Pattern and PHP which offers a good introduction.
Yii基于MVC和OOP原则,因此您应该精通这些主题。 如果您不熟悉MVC,请阅读SitePoint系列MVC模式和PHP ,其中提供了很好的介绍。
Yii URLs look like http://localhost/yiitest/index.php?r=controllerID/actionID. For example, in a blogging system the URL could be http://localhost/yiitest/index.php?r=post/create. post is the controller ID and create is the action ID. The entry script decides which controller and method to invoke based on the IDs.
Yii URL看起来像http://localhost/yiitest/index.php?r = controllerID / actionID 。 例如,在博客系统中,URL可以为http://localhost/yiitest/index.php?r = post / create 。 post是控制器ID, create是操作ID。 入口脚本根据ID决定调用哪个控制器和方法。
The controller whose ID is post must be named PostController (the ID strips the suffix “Controller” from the class name and converts the first letter to lowercase). The action ID is the ID of a method present inside the controller in a similar way; inside PostController there would be a method named actionCreate().
ID为post的控制器必须命名为PostController (ID将从类名中PostController后缀“ Controller”,并将首字母转换为小写)。 动作ID是控制器内部以类似方式存在的方法的ID。 在PostController内部,将有一个名为actionCreate()的方法。
There may be several views associated with a controller, so we keep the view files inside protected/views/controllerID folders. We can create a view file for our controller called create.php it in the above described directory, and then present this view to the users simply by writing the following code for actionCreate():
可能有几个与控制器关联的视图,因此我们将视图文件保存在protected/views/ controllerID文件夹中。 我们可以在上述目录中为控制器创建一个名为create.php的视图文件,然后只需为actionCreate()编写以下代码即可向用户显示该视图:
public function actionCreate()
{
    $this->render('create');
}
It’s also possible to pass additional data to the view when necessary. This is done as follows:
必要时还可以将其他数据传递到视图。 这样做如下:
$this->render('create', array('data' => $data_item));Inside the view file we can access the data through the $data variable.
在视图文件中,我们可以通过$data变量访问$data 。
The view also has access to $this which points to the controller instance that rendered it.
该视图还可以访问$this ,它指向呈现该视图的控制器实例。
Furthermore, if you’d like user friendly URLs you can uncomment the following in protected/config/main.php:
此外,如果您希望使用用户友好的URL,可以在protected/config/main.php取消注释以下内容:
'urlManager'=>array(
    'urlFormat'=>'path',
    'rules'=>array(
        '<controller:w+>/<id:d+>'=>'<controller>/view',
        '<controller:w+>/<action:w+>/<id:d+>'=>'<controller>/<action>',
        '<controller:w+>/<action:w+>'=>'<controller>/<action>',
    )
The URLs will then look like http://localhost/yiitest/controllerID/actionID.
然后,URL看起来像http:// localhost / yiitest / controllerID / actionID 。
开发CRUD应用 (Developing a CRUD App)
Now that you know the important Yii conventions, it’s time to get started with CRUD. In this section we will develop a simple system where a user can perform CRUD operations (create, retrieve, update, and delete) on a blog post.
既然您知道了重要的Yii约定,就该开始使用CRUD了。 在本节中,我们将开发一个简单的系统,用户可以在其中对博客帖子执行CRUD操作(创建,检索,更新和删除)。
第1步 (Step 1)
Create the MySQL database yiitest and inside that create a table named posts. The table will have just 3 columns for our purposes here: id, title, and content.
创建MySQL数据库yiitest并在其中创建一个名为posts的表。 该表在此处仅具有3列供我们使用: id , title和content 。
CREATE TABLE posts (
    id INTEGER NOT NULL PRIMARY KEY AUTO_INCREMENT,
    title VARCHAR(100),
    content TEXT
)
Open up your application’s config file (protected/config/main.php) and uncomment the following:
打开应用程序的配置文件( protected/config/main.php )并取消注释以下内容:
'db'=>array(
'connectionString' => 'mysql:host=localhost;dbname=testdrive,
'emulatePrepare' => true,
'username' => 'root',
'password' => '',
'charset' => 'utf8',
)
Replace testdrive with the name of our database, i.e. yiitest. And obviously you should provide the necessary credentials for Yii to connect as well.
将testdrive替换为我们数据库的名称,即yiitest 。 显然,您也应该提供必要的凭据以供Yii连接。
第2步 (Step 2)
In Yii every database table should have a corresponding model class of type CActiveRecord. The benefit is that we don’t have to deal with database tables directly. Instead we can work with model objects that correspond to different rows of a table. For instance, the Post class is the model for the posts table. An object of this class represents a row from the table posts and has attributes that represent the column values.
在Yii中,每个数据库表应具有一个对应的CActiveRecord类型的模型类。 好处是我们不必直接处理数据库表。 相反,我们可以使用与表的不同行相对应的模型对象。 例如, Post类是posts表的模型。 此类的对象代表表格posts的一行,并具有代表列值的属性。
To generate the model quickly, we’ll make use of Yii’s web-based tool gii. This tool can be used to generate models, controllers, and forms for CRUD operations. To use gii in your project, find the following in your application’s config file and uncomment it and add a password.
为了快速生成模型,我们将使用Yii的基于Web的工具gii。 该工具可用于生成CRUD操作的模型,控制器和表单。 要在项目中使用gii,请在应用程序的配置文件中找到以下内容,然后取消注释并添加密码。
'gii'=>array(
'class'=>'system.gii.GiiModule',
'password'=>your password to access gii,
'ipFilters'=>array('127.0.0.1','::1'),
)
Then access gii with the following URL: http://localhost/yiitest/index.php?r=gii. If you’re using user friendly URLs, the URL is: http://localhost/yiitest/gii.
然后使用以下URL访问gii: http://localhost/yiitest/index.php?r = gii 。 如果您使用的是用户友好的URL,则该URL为: http:// localhost / yiitest / gii 。
Click on Model Generator. gii will ask you for name of the table; enter “posts” for the table name and for model use the name “Post”. Then click Generate to create the model.
单击模型生成器。 gii将询问您桌子的名称; 输入“ posts”作为表名,模型输入“ Post”。 然后单击生成以创建模型。
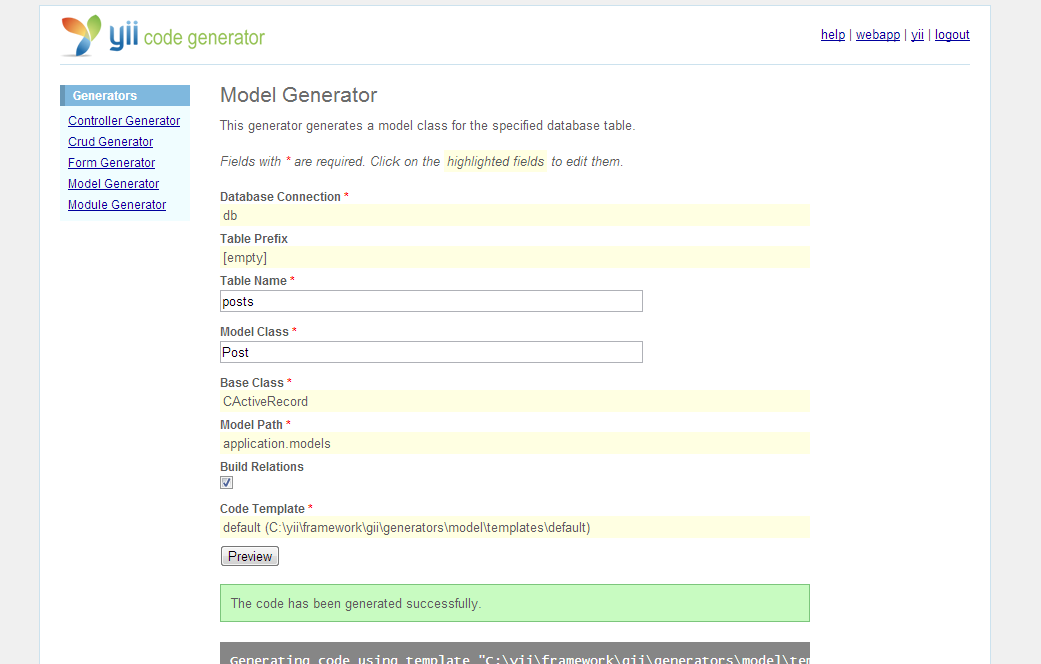
Check protected/models and you will find the file Post.php there.
检查protected/models ,您将在Post.php找到文件Post.php 。
第三步 (Step 3)
Now click on CRUD Generator. Enter the model name as “Post”. The controller ID will be auto populated as “post”. This means a new controller will be generated under the name of PostController.php.
现在单击CRUD Generator。 输入型号名称为“ Post”。 控制器ID将自动填充为“ post”。 这意味着将以PostController.php的名称生成一个新的控制器。
Click on Generate. The process will generate the controller and also several view files with the forms necessary for the CRUD operations.
单击生成。 该过程将生成控制器以及带有CRUD操作所需格式的几个视图文件。

Now you have a brand new CRUD app! Click on the “try it now” link to test it out. To manage the posts you will need to be logged in as admin/admin.
现在您有了一个全新的CRUD应用程序! 单击“立即尝试”链接进行测试。 要管理帖子,您将需要以admin / admin身份登录。
To create a new post you will need to access http://localhost/yiitest/post/create and for updating a specific post just point your browser to http://localhost/yiitest/post/update/postID. Similarly you can list all the posts and delete some or all of them.
要创建新帖子,您将需要访问http:// localhost / yiitest / post / create,并且要更新特定帖子,只需将浏览器指向http:// localhost / yiitest / post / update / postID即可 。 同样,您可以列出所有帖子并删除其中的一些或全部。
结论 (Conclusion)
Yii is very powerful when it comes to developing Web 2.0 projects. In fact, we just saw how easy it is to create a fully functional CRUD system in only a few minutes! Clearly Yii can save you a lot of hard work because you don’t have to start from scratch. Yii gives us the foundation and we can extend it as we see fit.
Yii在开发Web 2.0项目方面非常强大。 实际上,我们只看到在几分钟之内创建一个功能齐全的CRUD系统是多么容易! 显然,Yii可以省去很多麻烦,因为您不必从头开始。 Yii为我们提供了基础,我们可以根据需要扩展它。
翻译自: https://www.sitepoint.com/build-a-crud-app-with-yii-in-minutes/
yii crud


 3778
3778


 被折叠的 条评论
为什么被折叠?
被折叠的 条评论
为什么被折叠?
 到【灌水乐园】发言


