


后台重新加载页面
This article is part of a series on building a sample application — a multi-image gallery blog — for performance benchmarking and optimizations. (View the repo here.)
本文是构建用于性能基准测试和优化的示例应用程序(一个多图像画廊博客)系列文章的一部分。 (在此处查看回购 。)
In a previous article, we’ve added on-demand image resizing. Images are resized on the first request and cached for later use. By doing this, we’ve added some overhead to the first load; the system has to render thumbnails on the fly and is “blocking” the first user’s page render until image rendering is done.
在上一篇文章中,我们添加了按需调整图像大小的功能 。 图像会在第一个请求时调整大小,并缓存以备后用。 这样,我们为第一次加载增加了一些开销。 系统必须即时渲染缩略图,并且要“阻止”第一个用户的页面渲染,直到完成图像渲染为止。
The optimized approach would be to render thumbnails after a gallery is created. You may be thinking, “Okay, but we’ll then block the user who is creating the gallery?” Not only would it be a bad user experience, but it also isn’t a scalable solution. The user would get confused about long loading times or, even worse, encounter timeouts and/or errors if images are too heavy to be processed. The best solution is to move these heavy tasks into the background.
优化的方法是在创建画廊后渲染缩略图。 您可能会想,“好吧,但是我们将阻止创建画廊的用户?” 这不仅会带来糟糕的用户体验,而且不是可扩展的解决方案。 如果图像太重而无法处理,则用户将对较长的加载时间感到困惑,甚至更糟的是会遇到超时和/或错误。 最好的解决方案是将这些繁重的任务移到后台。
后台工作 (Background Jobs)
Background jobs are the best way of doing any heavy processing. We can immediately notify our user that we’ve received their request and scheduled it for processing. The same way as YouTube does with uploaded videos: they aren’t accessible after the upload. The user needs to wait until the video is processed completely to preview or share it.
后台作业是执行大量处理的最佳方法。 我们可以立即通知用户我们已收到他们的请求并安排了处理时间。 与YouTube处理上传的视频的方式相同:上传后无法访问它们。 用户需要等到视频完全处理后才能预览或共享。
Processing or generating files, sending emails or any other non-critical tasks should be done in the background.
处理或生成文件,发送电子邮件或任何其他非关键任务应在后台完成。
后台处理如何工作? (How Does Background Processing Work?)
There are two key components in the background processing approach: job queue and worker(s). The application creates jobs that should be handled while workers are waiting and taking from the queue one job at a time.
后台处理方法中有两个关键组件:作业队列和工作者。 该应用程序创建的作业应在工人等待并每次从队列中取出一个作业时进行处理。
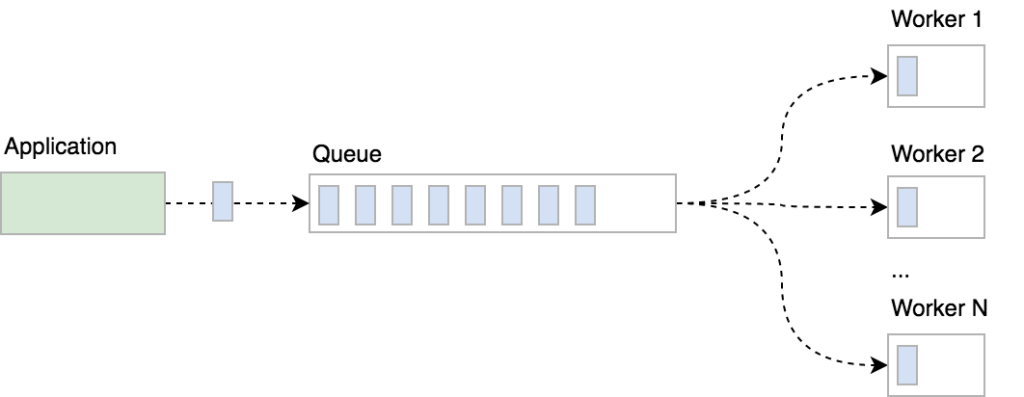
You can create multiple worker instances (processes) to speed up processing, chop a big job up into smaller chunks and process them simultaneously. It’s up to you how you want to organize and manage background processing, but note that parallel processing isn’t a trivial task: you should take care of potential race conditions and handle failed tasks gracefully.
您可以创建多个工作程序实例(进程)以加快处理速度,将大任务切成较小的块,然后同时进行处理。 由您决定如何组织和管理后台处理,但是请注意,并行处理并不是一项微不足道的任务:您应注意潜在的竞争条件并妥善处理失败的任务。
我们的技术栈 (Our tech stack)
We’re using the Beanstalkd job queue to store jobs, the Symfony Console component to implement workers as console commands and Supervisor to take care of worker processes.
我们正在使用Beanstalkd作业队列来存储作业,使用Symfony控制台组件将工作程序实现为控制台命令,并使用Supervisor来处理工作程序进程。
If you’re using Homestead Improved, Beanstalkd and Supervisor are already installed so you can skip the installation instructions below.
如果您使用的是Homestead Improvement ,则已经安装了Beanstalkd和Supervisor,因此您可以跳过下面的安装说明。
安装Beanstalkd (Installing Beanstalkd)
Beanstalkd is
豆茎是
a fast work queue with a generic interface originally designed for reducing the latency of page views in high-volume web applications by running time-consuming tasks asynchronously.
具有通用接口的快速工作队列,该接口最初旨在通过异步运行耗时的任务来减少大容量Web应用程序中页面视图的延迟。
There are many client libraries available that you can use. In our project, we’re using Pheanstalk.
您可以使用许多客户端库 。 在我们的项目中,我们正在使用Pheanstalk 。
To install Beanstalkd on your Ubuntu or Debian server, simply run sudo apt-get install beanstalkd. Take a look at the official download page to learn how to install Beanstalkd on other OSes.
要在您的Ubuntu或Debian服务器上安装Beanstalkd,只需运行sudo apt-get install beanstalkd 。 查看官方下载页面,以了解如何在其他OS上安装Beanstalkd。
Once installed, Beanstalkd is started as a daemon, waiting for clients to connect and create (or process) jobs:
安装后,Beanstalkd作为守护程序启动,等待客户端连接和创建(或处理)作业:
/etc/init.d/beanstalkd
Usage: /etc/init.d/beanstalkd {start|stop|force-stop|restart|force-reload|status}
Install Pheanstalk as a dependency by running composer require pda/pheanstalk.
通过运行composer require pda/pheanstalk将Pheanstalk安装为依赖composer require pda/pheanstalk 。
The queue will be used for both creating and fetching jobs, so we’ll centralize queue creation in a factory service JobQueueFactory:
该队列将用于创建和获取作业,因此我们将在工厂服务JobQueueFactory集中创建队列:
<?php

namespace App\Service;

use Pheanstalk\Pheanstalk;

class JobQueueFactory
{
    private $host = 'localhost';
    private $port = '11300';

    const QUEUE_IMAGE_RESIZE = 'resize';

    public function createQueue(): Pheanstalk
    {
        return new Pheanstalk($this->host, $this->port);
    }
}
Now we can inject the factory service wherever we need to interact with Beanstalkd queues. We are defining the queue name as a constant and referring to it when putting the job into the queue or watching the queue in workers.
现在,我们可以在需要与Beanstalkd队列进行交互的任何地方注入工厂服务。 我们将队列名称定义为一个常量,并在将作业放入队列或在工作者中观察队列时引用它。
安装主管 (Installing Supervisor)
According to the official page, Supervisor is a
根据官方页面 ,主管是
client/server system that allows its users to monitor and control a number of processes on UNIX-like operating systems.
客户/服务器系统,允许其用户监视和控制类似UNIX的操作系统上的许多进程。
We’ll be using it to start, restart, scale and monitor worker processes.
我们将使用它来启动,重新启动,扩展和监视工作进程。
Install Supervisor on your Ubuntu/Debian server by runningsudo apt-get install supervisor. Once installed, Supervisor will be running in the background as a daemon. Use supervisorctl to control supervisor processes:
通过运行sudo apt-get install supervisor在您的Ubuntu / Debian服务器上sudo apt-get install supervisor 。 安装完成后,Supervisor将作为后台程序在后台运行。 使用supervisorctl控制主管流程:
$ sudo supervisorctl help

default commands (type help <topic>):
=====================================
add    exit      open  reload  restart   start   tail
avail  fg        pid   remove  shutdown  status  update
clear  maintail  quit  reread  signal    stop    version
To control processes with Supervisor, we first have to write a configuration file and describe how we want our processes to be controlled. Configurations are stored in /etc/supervisor/conf.d/. A simple Supervisor configuration for resize workers would look like this:
要使用Supervisor控制流程,我们首先必须编写一个配置文件并描述我们希望如何控制流程。 配置存储在/etc/supervisor/conf.d/ 。 用于调整大小的工作人员的简单Supervisor配置如下所示:
[program:resize-worker]
process_name=%(program_name)s_%(process_num)02d
command=php PATH-TO-YOUR-APP/bin/console app:resize-image-worker
autostart=true
autorestart=true
numprocs=5
stderr_logfile = PATH-TO-YOUR-APP/var/log/resize-worker-stderr.log
stdout_logfile = PATH-TO-YOUR-APP/var/log/resize-worker-stdout.log
We’re telling Supervisor how to name spawned processes, the path to the command that should be run, to automatically start and restart the processes, how many processes we want to have and where to log output. Learn more about Supervisor configurations here.
我们正在告诉Supervisor如何命名产生的进程,应该运行的命令的路径,自动启动和重新启动进程,我们要拥有多少个进程以及在哪里记录输出。 在此处了解有关Supervisor配置的更多信息。
在后台调整图像大小 (Resizing images in the background)
Once we have our infrastructure set up (i.e., Beanstalkd and Supervisor installed), we can modify our app to resize images in the background after the gallery is created. To do so, we need to:
设置好基础架构后(即,安装了Beanstalkd和Supervisor),可以在创建图库后修改应用以在后台调整图像大小。 为此,我们需要:
update image serving logic in the
ImageController更新
ImageController图像投放逻辑- implement resize workers as console commands 将调整大小的工人实现为控制台命令
- create Supervisor configuration for our workers 为我们的员工创建主管配置
- update fixtures and resize images in the fixture class. 更新灯具并调整灯具类中的图像大小。
更新图像服务逻辑 (Updating Image Serving Logic)
So far we’ve been resizing images on the first request: if the image file for a requested size doesn’t exist, it’s created on the fly.
到目前为止,我们一直在第一个请求上调整图像大小:如果不存在所请求大小的图像文件,则会即时创建它。
We’ll now modify ImageController to return image responses for requested size only if the resized image file exists (i.e., only if the image has already been resized).
现在,我们将修改ImageController,以仅在调整大小后的图像文件存在时(即,仅当图像已经调整大小时)返回请求大小的图像响应。
If not, the app will return a generic placeholder image response saying that the image is being resized at the moment. Note that the placeholder image response has different cache control headers, since we don’t want to cache placeholder images; we want to have the image rendered as soon as the resize process is finished.
如果不是,则该应用将返回通用的占位符图像响应,说明当前正在调整图像大小。 请注意,由于我们不想缓存占位符图像,因此占位符图像响应具有不同的缓存控制标头。 我们希望在调整大小过程完成后立即渲染图像。
We’ll create a simple event called GalleryCreatedEvent with Gallery ID as a payload. This event will be dispatched within the UploadController after Gallery is successfully created:
我们将创建一个名为GalleryCreatedEvent的简单事件,并将Gallery ID作为有效负载。 成功创建Gallery后,将在UploadController调度此事件:
...

$this->em->persist($gallery);
$this->em->flush();

$this->eventDispatcher->dispatch(
    GalleryCreatedEvent::class,
    new GalleryCreatedEvent($gallery->getId())
);

$this->flashBag->add('success', 'Gallery created! Images are now being processed.');
...
Additionally, we’ll update the flash message with “Images are now being processed.” so the user knows we still have some work to do with their images before they’re ready.
此外,我们将用“正在处理图像”更新Flash消息。 因此用户知道在准备好图像之前,我们还有很多工作要做。
We’ll create GalleryEventSubscriber event subscriber that will react to the GalleryCreatedEvent and request a resize job for every Image in the newly created Gallery:
我们将创建GalleryEventSubscriber事件订阅者,该事件订阅者将对GalleryCreatedEvent做出React,并为新创建的Gallery中的每个图像请求调整大小的作业:
public function onGalleryCreated(GalleryCreatedEvent $event)
{
    $queue = $this->jobQueueFactory
        ->createQueue()
        ->useTube(JobQueueFactory::QUEUE_IMAGE_RESIZE);

    $gallery = $this->entityManager
        ->getRepository(Gallery::class)
        ->find($event->getGalleryId());

    if (empty($gallery)) {
        return;
    }

    /** @var Image $image */
    foreach ($gallery->getImages() as $image) {
        $queue->put($image->getId());
    }
}
Now, when a user successfully creates a gallery, the app will render the gallery page, but some of the images won’t be displayed as their thumbnails while still not ready:
现在,当用户成功创建图库时,该应用程序将呈现图库页面,但是在尚未准备就绪时,某些图像将不会显示为缩略图:
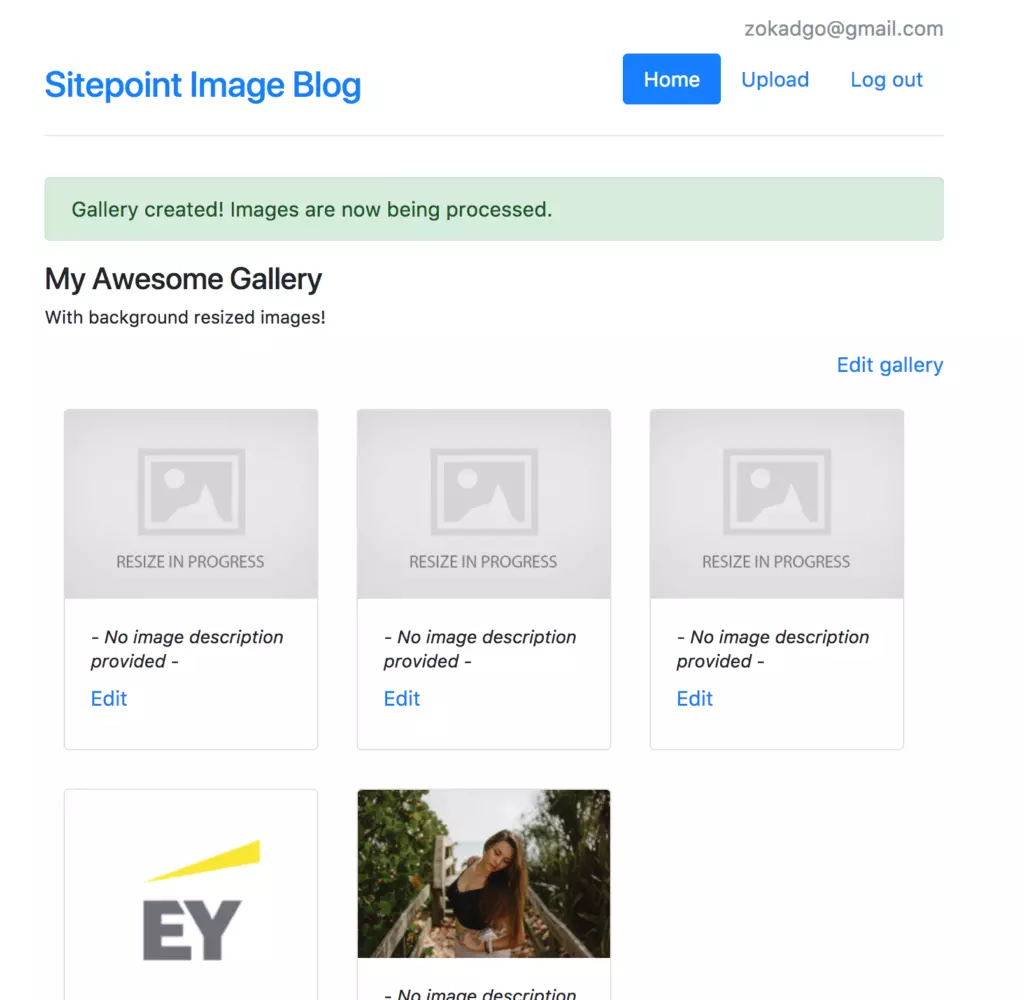
Once workers are finished with resizing, the next refresh should render the full Gallery page.
工作人员完成大小调整后,下一次刷新应呈现完整的Gallery页面。
将调整大小的工作人员实现为控制台命令 (Implement resize workers as console commands)
The worker is a simple process doing the same job for every job he gets from the queue. Worker execution is blocked at the $queue->reserve() call until either job is reserved for that worker, or a timeout happens.
工人是一个简单的过程,对于他从队列中获得的每个工作都执行相同的工作。 在$queue->reserve()调用中阻止工作程序执行,直到为该工作程序保留了作业或发生了超时。
Only one worker can take and process a Job. The job usually contains payload — e.g., string or serialized array/object. In our case, it’ll be UUID of a Gallery that’s created.
只有一名工人可以接受和处理工作。 作业通常包含有效负载,例如字符串或序列化的数组/对象。 在我们的例子中,它将是创建的图库的UUID。
A simple worker looks like this:
一个简单的工人看起来像这样:
// Construct a Pheanstalk queue and define which queue to watch.
$queue = $this->getContainer()
    ->get(JobQueueFactory::class)
    ->createQueue()
    ->watch(JobQueueFactory::QUEUE_IMAGE_RESIZE);

// Block execution of this code until job is added to the queue
// Optional argument is timeout in seconds
$job = $queue->reserve(60 * 5);

// On timeout
if (false === $job) {
    $this->output->writeln('Timed out');

    return;
}

try {
    // Do the actual work here, but make sure you're catching exceptions
    // and bury job so it doesn't get back to the queue
    $this->resizeImage($job->getData());

    // Deleting a job from the queue will mark it as processed
    $queue->delete($job);
} catch (\Exception $e) {
    $queue->bury($job);
    throw $e;
}
You may have noticed that workers will exit after a defined timeout or when a job is processed. We could wrap worker logic in an infinite loop and have it repeat its job indefinitely, but that could cause some issues such as database connection timeouts after a long time of inactivity and make deploys harder. To prevent that, our worker lifecycle will be finished after it completes a single task. Supervisor will then restart a worker as a new process.
您可能已经注意到,工作人员将在定义的超时时间或处理作业后退出。 我们可以将工作程序逻辑包装成一个无限循环,并使其无限期地重复其工作,但这可能会导致一些问题,例如长时间不活动后数据库连接超时,并使部署更加困难。 为避免这种情况,我们的工作者生命周期将在完成一项任务后完成。 然后主管将重新启动工作进程作为新进程。
Take a look at ResizeImageWorkerCommand to get a clear picture how the Worker command is structured. The worker implemented in this way can also be started manually as a Symfony console command: ./bin/console app:resize-image-worker.
看一下ResizeImageWorkerCommand可以清楚地看到Worker命令的结构。 以这种方式实现的工作程序也可以作为Symfony控制台命令手动启动: ./bin/console app:resize-image-worker 。
创建主管配置 (Create Supervisor configuration)
We want our workers to start automatically, so we’ll set an autostart=true directive in the config. Since the worker has to be restarted after a timeout or a successful processing task, we’ll also set an autorestart=true directive.
我们希望我们的工作人员自动启动,因此我们将在配置中设置一个autostart=true指令。 由于必须在超时或成功完成处理任务后重新启动工作程序,因此我们还将设置一个autorestart=true指令。
The best part about background processing is the ease of parallel processing. We can set a numprocs=5 directive and Supervisor will spawn five instances of our workers. They will wait for jobs and process them independently, allowing us to scale our system easily. As your system grows, you’ll probably need to increase the number of processes. Since we’ll have multiple processes running, we need to define the structure of a process name, so we’re setting a process_name=%(program_name)s_%(process_num)02d directive.
关于后台处理的最好的部分是并行处理的简便性。 我们可以设置numprocs=5指令,Supervisor将生成我们的worker的五个实例。 他们将等待作业并独立处理它们,从而使我们能够轻松扩展系统。 随着系统的发展,您可能需要增加进程数。 由于将运行多个进程,因此需要定义进程名称的结构,因此我们要设置process_name=%(program_name)s_%(process_num)02d指令。
Last but not least, we want to store workers’ outputs so we can analyze and debug them if something goes wrong. We’ll define stderr_logfile and stdout_logfile paths.
最后但并非最不重要的一点是,我们希望存储工人的输出,以便在出现问题时可以对其进行分析和调试。 我们将定义stderr_logfile和stdout_logfile路径。
The complete Supervisor configuration for our resize workers looks like this:
我们的调整大小工作人员的完整Supervisor配置如下所示:
[program:resize-worker]
process_name=%(program_name)s_%(process_num)02d
command=php PATH-TO-YOUR-APP/bin/console app:resize-image-worker
autostart=true
autorestart=true
numprocs=5
stderr_logfile = PATH-TO-YOUR-APP/var/log/resize-worker-stderr.log
stdout_logfile = PATH-TO-YOUR-APP/var/log/resize-worker-stdout.log
After creating (or updating) the configuration file located in /etc/supervisor/conf.d/ directory, you have to tell Supervisor to re-read and update its configuration by executing the following commands:
在创建(或更新)位于/etc/supervisor/conf.d/目录中的配置文件后,您必须通过执行以下命令告诉Supervisor重新读取并更新其配置:
supervisorctl reread
supervisorctl update
If you’re using Homestead Improved (and you should be!) you can use scripts/setup-supervisor.sh to generate the Supervisor configuration for this project: sudo ./scripts/setup-supervisor.sh.
如果您正在使用Homestead Enhanced (应该这样做),则可以使用scripts / setup-supervisor.sh生成此项目的Supervisor配置: sudo ./scripts/setup-supervisor.sh 。
更新装置 (Update Fixtures)
Image thumbnails won’t be rendered on the first request anymore, so we need to request rendering for every Image explicitly when we’re loading our fixtures in the LoadGalleriesData fixture class:
图片缩略图不会在第一个请求上再次渲染,因此,当我们在LoadGalleriesData夹具类中加载夹具时,我们需要显式请求为每个Image渲染:
$imageResizer = $this->container->get(ImageResizer::class);
$fileManager = $this->container->get(FileManager::class);

...

$gallery->addImage($image);
$manager->persist($image);

$fullPath = $fileManager->getFilePath($image->getFilename());
if (false === empty($fullPath)) {
    foreach ($imageResizer->getSupportedWidths() as $width) {
        $imageResizer->getResizedPath($fullPath, $width, true);
    }
}
Now you should feel how fixtures loading is slowed down, and that’s why we’ve moved it into the background instead of forcing our users to wait until it’s done!
现在您应该感觉到灯具的加载速度如何降低了,这就是为什么我们将其移至后台而不是强迫用户等待完成的原因!
技巧和窍门 (Tips and Tricks)
Workers are running in the background so that even after you deploy a new version of your app, you’ll have outdated workers running until they aren’t restarted for the first time.
工作程序在后台运行,因此,即使您部署了新版本的应用程序,您也会运行过时的工作程序,直到他们第一次没有重新启动。
In our case, we’d have to wait for all our workers to finish their tasks or timeout (5 minutes) until we’re sure all our workers are updated. Be aware of this when creating deploy procedures!
在我们的情况下,我们必须等待所有工作人员完成任务或超时(5分钟),直到我们确定所有工作人员都已更新。 创建部署过程时请注意这一点!
翻译自: https://www.sitepoint.com/using-background-processing-to-speed-up-page-load-times/
后台重新加载页面


 776
776

 被折叠的 条评论
为什么被折叠?
被折叠的 条评论
为什么被折叠?
 到【灌水乐园】发言


