


owin 怎么部署在云中
目录 ( Table of Contents)
This post was first published on the Auth0 blog and republished here in full with their permission.
这篇文章最初在Auth0博客上发布,并在其允许下在此处全部重新发布。
TL;DR: There is a popular mantra amongst developers that goes like this write, test and deploy. In this tutorial, I’ll show you how to deploy your PHP apps to different cloud server platforms such as Google Cloud, Microsoft Azure, Heroku, IBM Bluemix, and others.
TL; DR:在开发人员中有一个流行的口头禅,就是这样的编写,测试和部署 。 在本教程中,我将向您展示如何将PHP应用程序部署到不同的云服务器平台,例如Google Cloud , Microsoft Azure , Heroku , IBM Bluemix等。
云服务器简介 (Introduction to Cloud Servers)
Cloud servers are basically virtual servers that run within a cloud computing environment. There are various benefits to hosting and deploying your applications in the cloud. They are:
云服务器基本上是在云计算环境中运行的虚拟服务器。 在云中托管和部署应用程序有很多好处。 他们是:
- Economically efficient. 经济高效。
- You have the freedom to modify the server software to your needs. 您可以根据自己的需要修改服务器软件。
- Cloud servers scale very well. 云服务器可很好地扩展。
- Stability and security. 稳定性和安全性。
In fact, many companies have moved their infrastructure to the cloud in order to reduce cost and complexity. It’s a great option for small, mid-sized, and enterprise scale businesses. If you write a lot of tutorials and do POCs (Proof-of-concepts) like me, it’s also a great choice for you!
实际上,许多公司已将其基础架构移至云中以降低成本和复杂性。 对于中小型企业规模的企业来说,这是一个不错的选择。 如果您像我一样写很多教程并进行POC(概念验证),那对您来说也是个不错的选择!
A generic PHP application involves the common LAMP (Linux, Apache, Mysql and PHP) stack.
通用PHP应用程序涉及通用的LAMP(Linux,Apache,Mysql和PHP)堆栈。
Linux: The operating system that runs the other software packages.
Linux:运行其他软件包的操作系统。
Apache: The web server that runs the PHP code. A popular alternative software is Nginx.
Apache:运行PHP代码的Web服务器。 Nginx是一种流行的替代软件。
MySQL: The database. A popular alternative software is PostgreSQL.
MySQL:数据库。 流行的替代软件是PostgreSQL。
PHP: The server-side language for building the application.
PHP:用于构建应用程序的服务器端语言。
For a crash course on LAMP / MAMP / WAMP, see this premium resource.
有关LAMP / MAMP / WAMP的速成课程,请参阅此高级资源 。
Now let’s cover how to deploy PHP applications to several cloud server platforms.
现在让我们介绍如何将PHP应用程序部署到多个云服务器平台。
Heroku (Heroku)
Heroku is a cloud platform that helps you deploy and host your applications the modern way. It does all the heavy-lifting for you. Let’s quickly take a look at how to deploy and maintain a PHP application on heroku.
Heroku是一个云平台,可帮助您以现代方式部署和托管应用程序。 它为您完成了所有繁重的工作。 让我们快速看一下如何在heroku上部署和维护PHP应用程序。
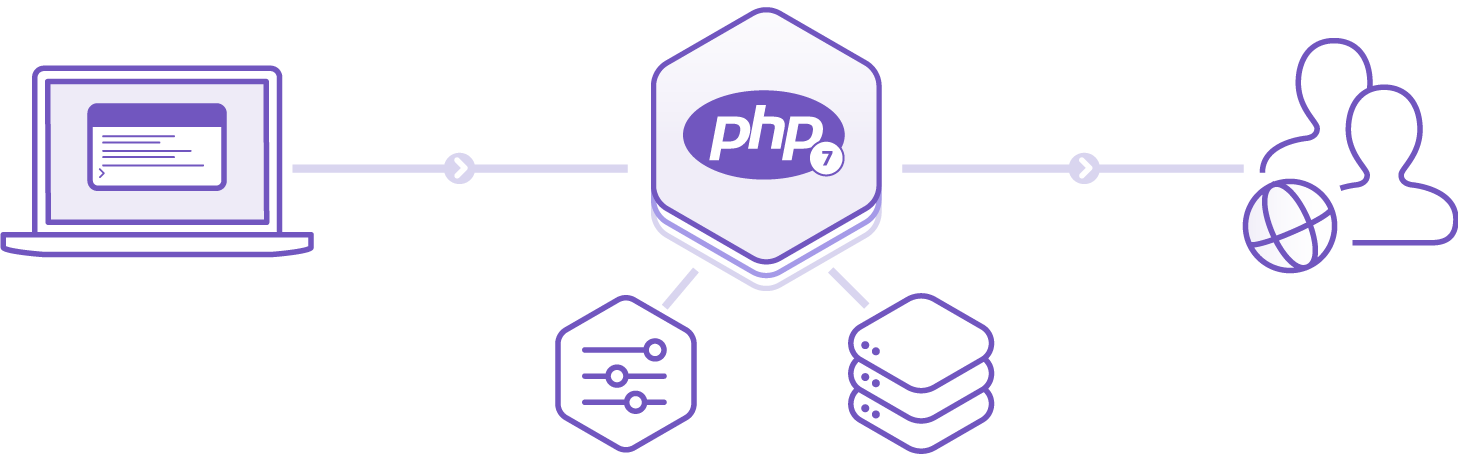
PHP Heroku Architecture
PHP Heroku架构
If you don’t have an account, go ahead and create one on heroku.com. Then go ahead and install the heroku cli. Once you have that installed, clone this simple starwars PHP application.
如果您没有帐户,请继续在heroku.com上创建一个帐户 。 然后继续安装heroku cli 。 安装完成后,请克隆此简单的starwars PHP应用程序 。
Heroku runs your PHP app in a dyno, a smart container which provides a modern stack with your choice of web server (Apache or Nginx) and runtime (PHP or HHVM).
Heroku在dyno(一个智能容器)中运行您PHP应用程序,该容器提供了一个现代堆栈,可以选择Web服务器(Apache或Nginx)和运行时(PHP或HHVM)。
Make sure you follow these steps below:
确保遵循以下步骤:
Create a
.envfile from.env.example.从
.env.example创建一个.env文件。You need to have an account with Auth0.
您需要拥有Auth0帐户。
Go to your Auth0 Dashboard and click the “create a new client” button.
转到您的Auth0信息中心 ,然后点击“创建新客户端”按钮。
- Name your new app and select “Regular Web Applications”. 为您的新应用命名,然后选择“常规Web应用”。
In the Settings for your new Auth0 client app, add
http://localhost:8000to the Allowed Callback URLs.在新的Auth0客户端应用程序的“设置”中,将
http://localhost:8000到允许的回调URL。Copy out your client id, client secret, domain and callback url. Ensure you assign them to the right variables in your
.envfile.复制您的客户端ID , 客户端密钥 , 域和回调URL 。 确保将它们分配给
.env文件中的正确变量。
We have a composer.json file which contains the list of packages that the application needs. Go ahead and run composer install on your local machine to install these packages. Not familiar with Composer? This video might help.
我们有一个composer.json文件,其中包含应用程序所需的软件包列表。 继续并在本地计算机上运行composer install来安装这些软件包。 不熟悉Composer? 该视频可能会有所帮助。
Go ahead and run the app. The app should be running like so:
继续运行该应用程序。 该应用程序应该像这样运行:

Landing page
登陆页面
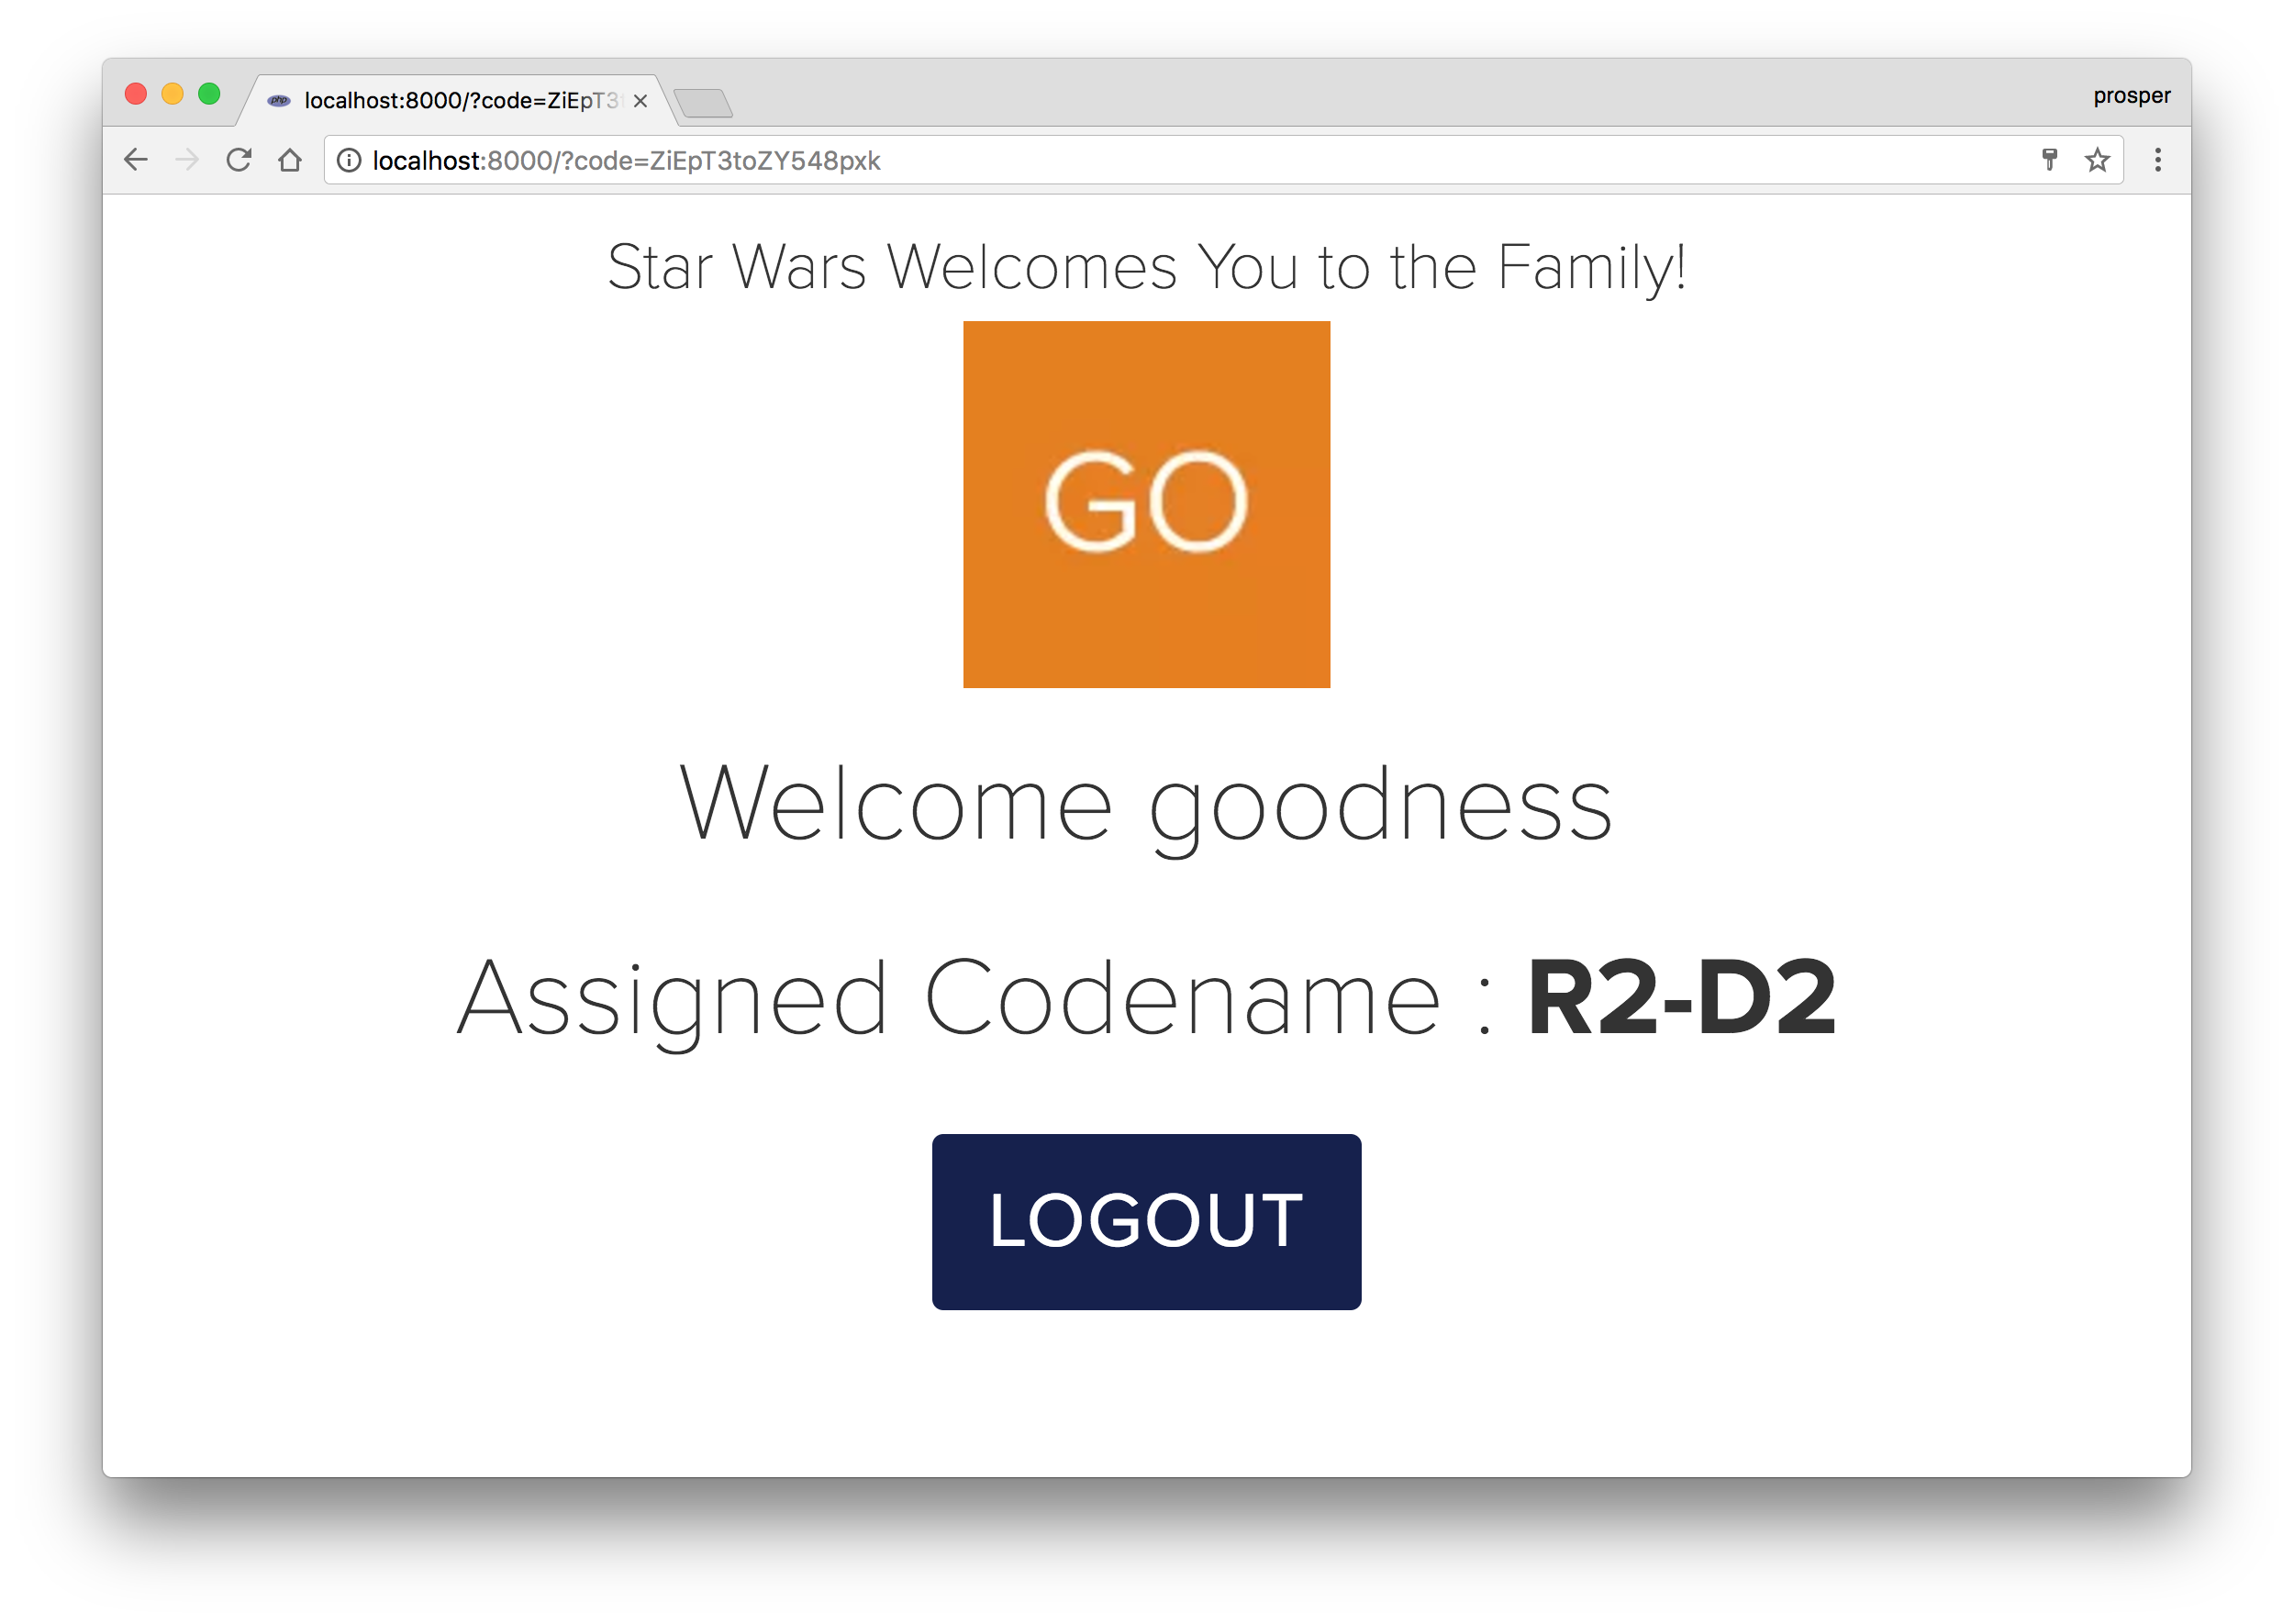
Logged In User
登录用户
Awesome! Our app works locally. Time to deploy! The first thing we’ll do is to add a Procfile to the root directory of our app.
太棒了! 我们的应用程序在本地运行。 该部署了! 我们要做的第一件事是将Procfile添加到应用程序的根目录。
Create a new file called Procfile without any file extension and add this:
创建一个没有任何文件扩展名的名为Procfile的新文件,并添加以下内容:
web: vendor/bin/heroku-php-apache2A Procfile is a text file in the root directory of your application that defines process types and explicitly declares what command should be executed to start your app on heroku.
Procfile是应用程序根目录中的文本文件,它定义进程类型并显式声明应执行哪些命令以在heroku上启动应用程序。
If you are interested in using Nginx as the web server, then the content of your Procfile would be:
如果您对使用Nginx作为Web服务器感兴趣,那么Procfile的内容将是:
web: vendor/bin/heroku-php-nginxNow that you have added the Procfile, go ahead and upload the project to GitHub or Bitbucket. Mine is starwazapp.
现在您已经添加了Procfile,继续并将项目上传到GitHub或Bitbucket 。 我的是starwazapp 。
Head over to dashboard.heroku.com/apps and create a new app like so:
转至dashboard.heroku.com/apps并创建一个新的应用程序,如下所示:
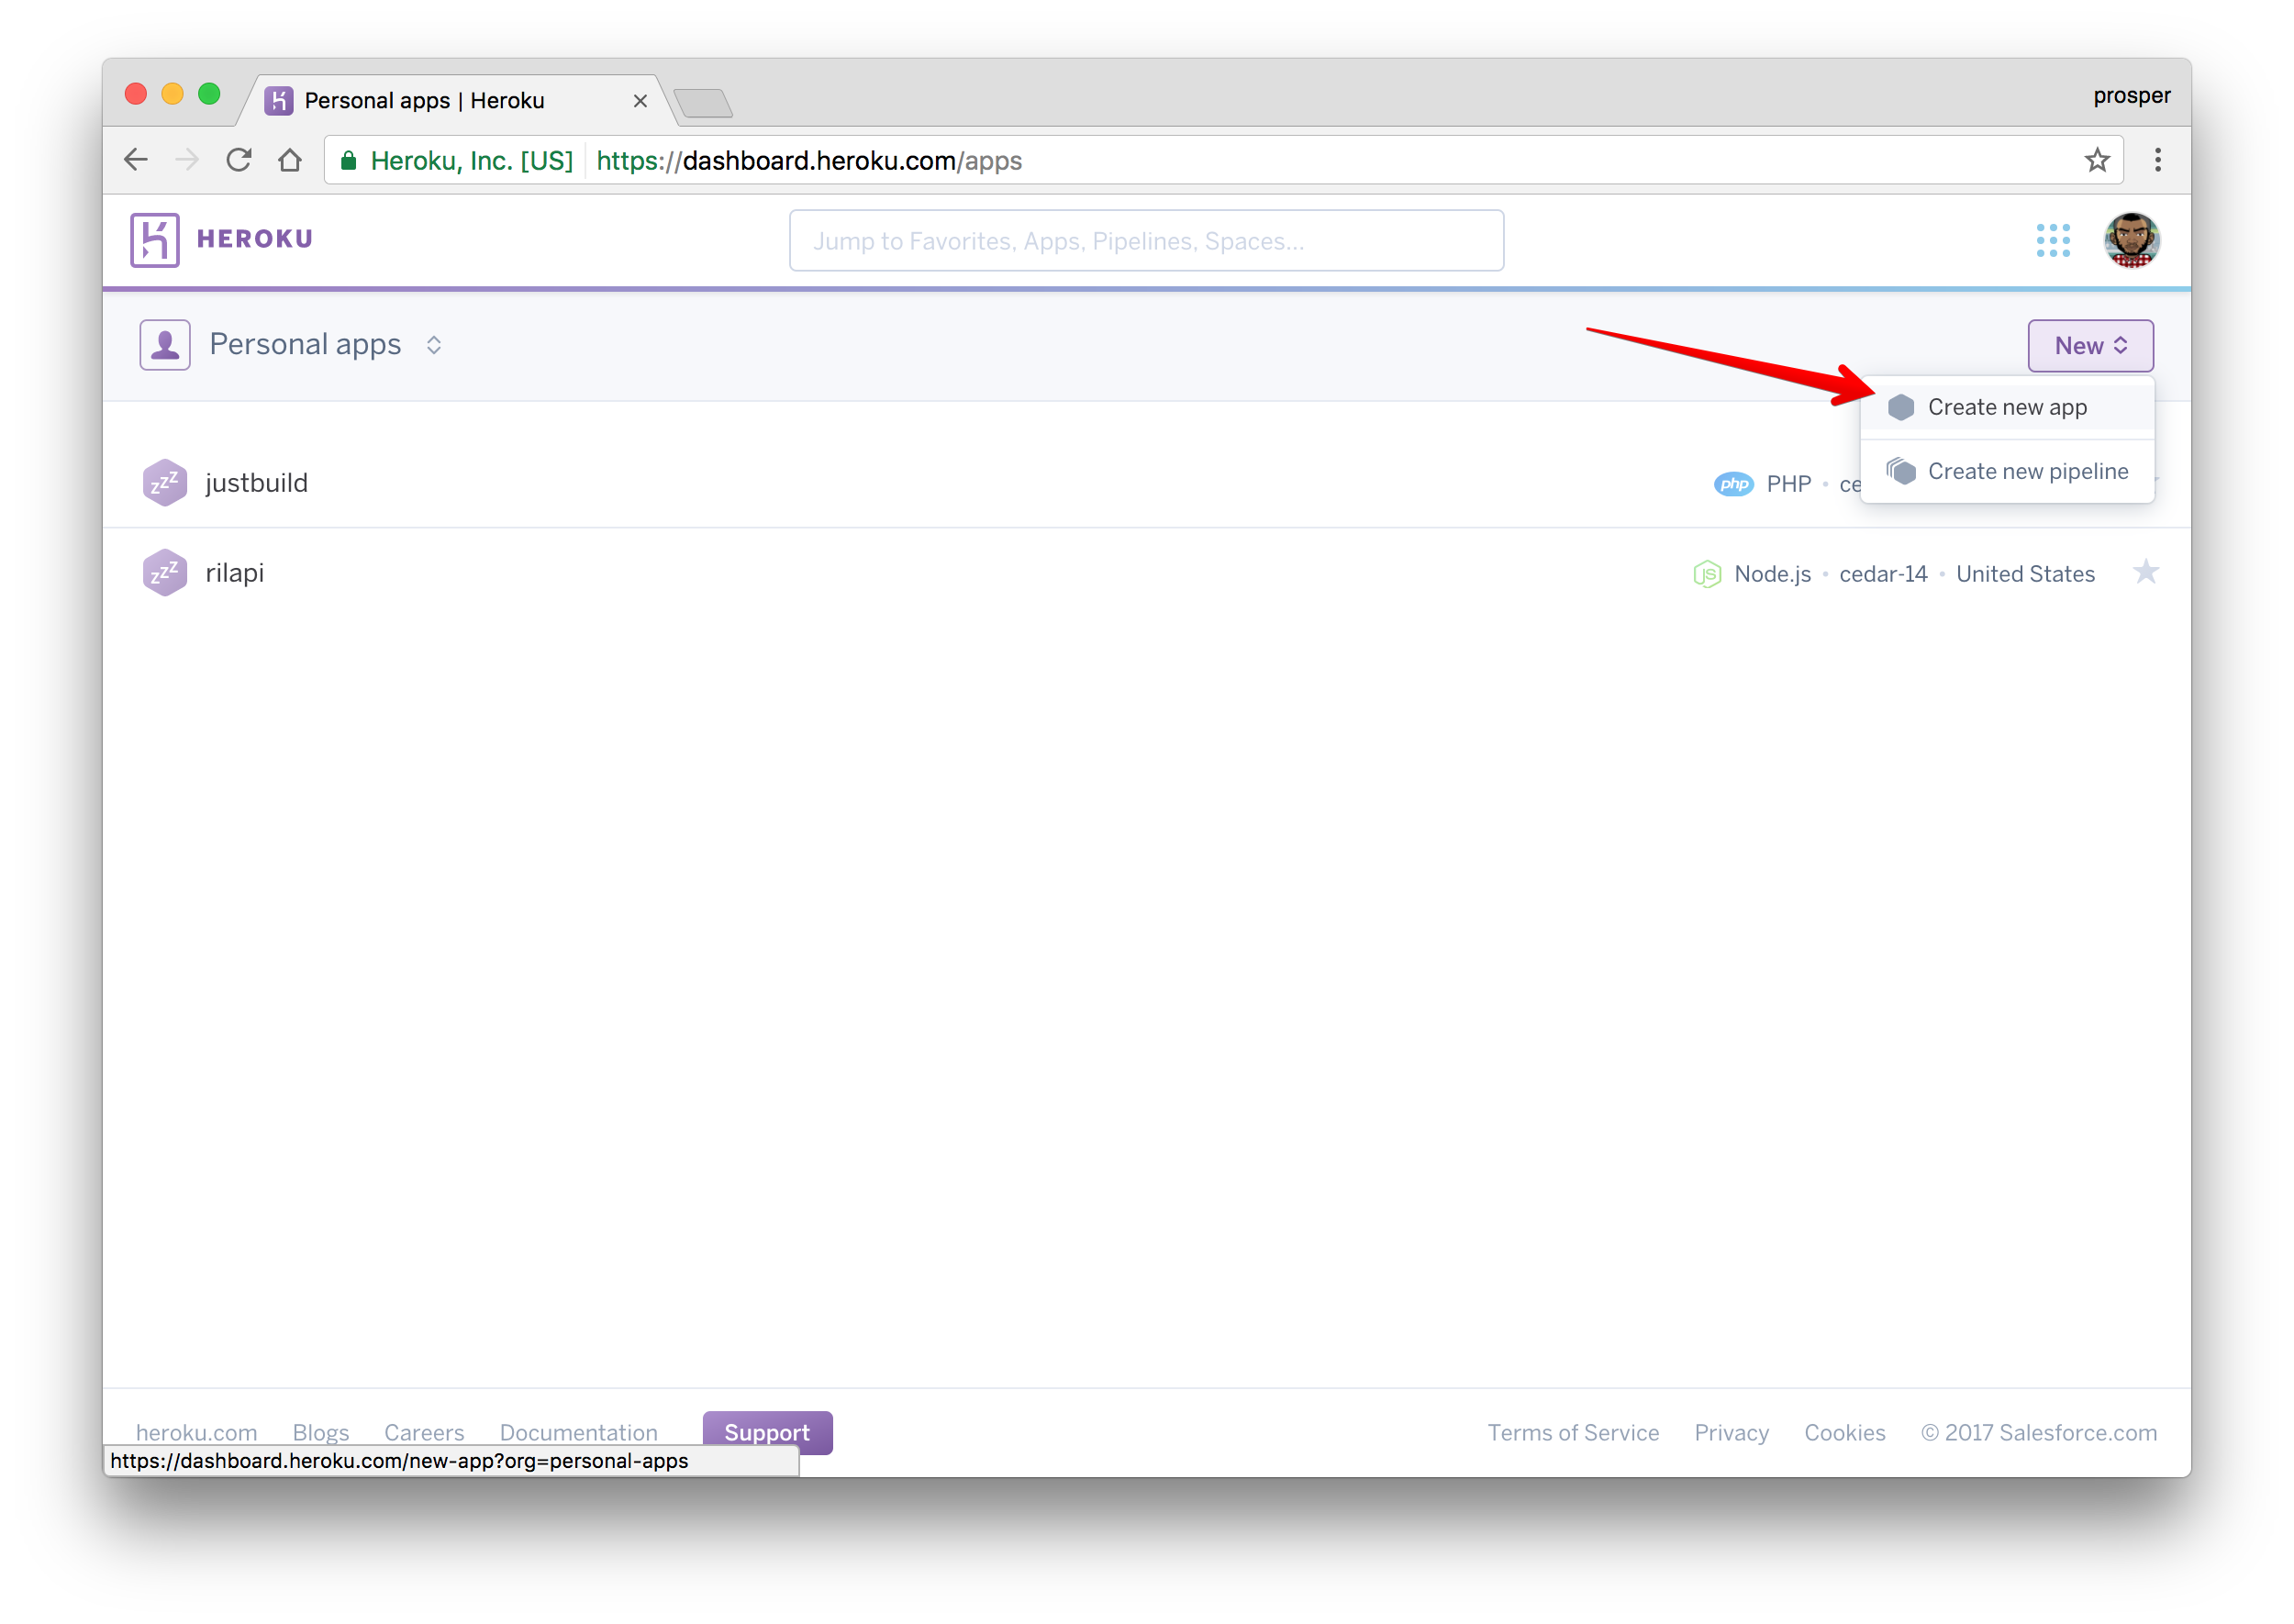
Create a new app from the dashboard
从仪表板创建新应用
Give it a name like so:
给它起一个这样的名字:
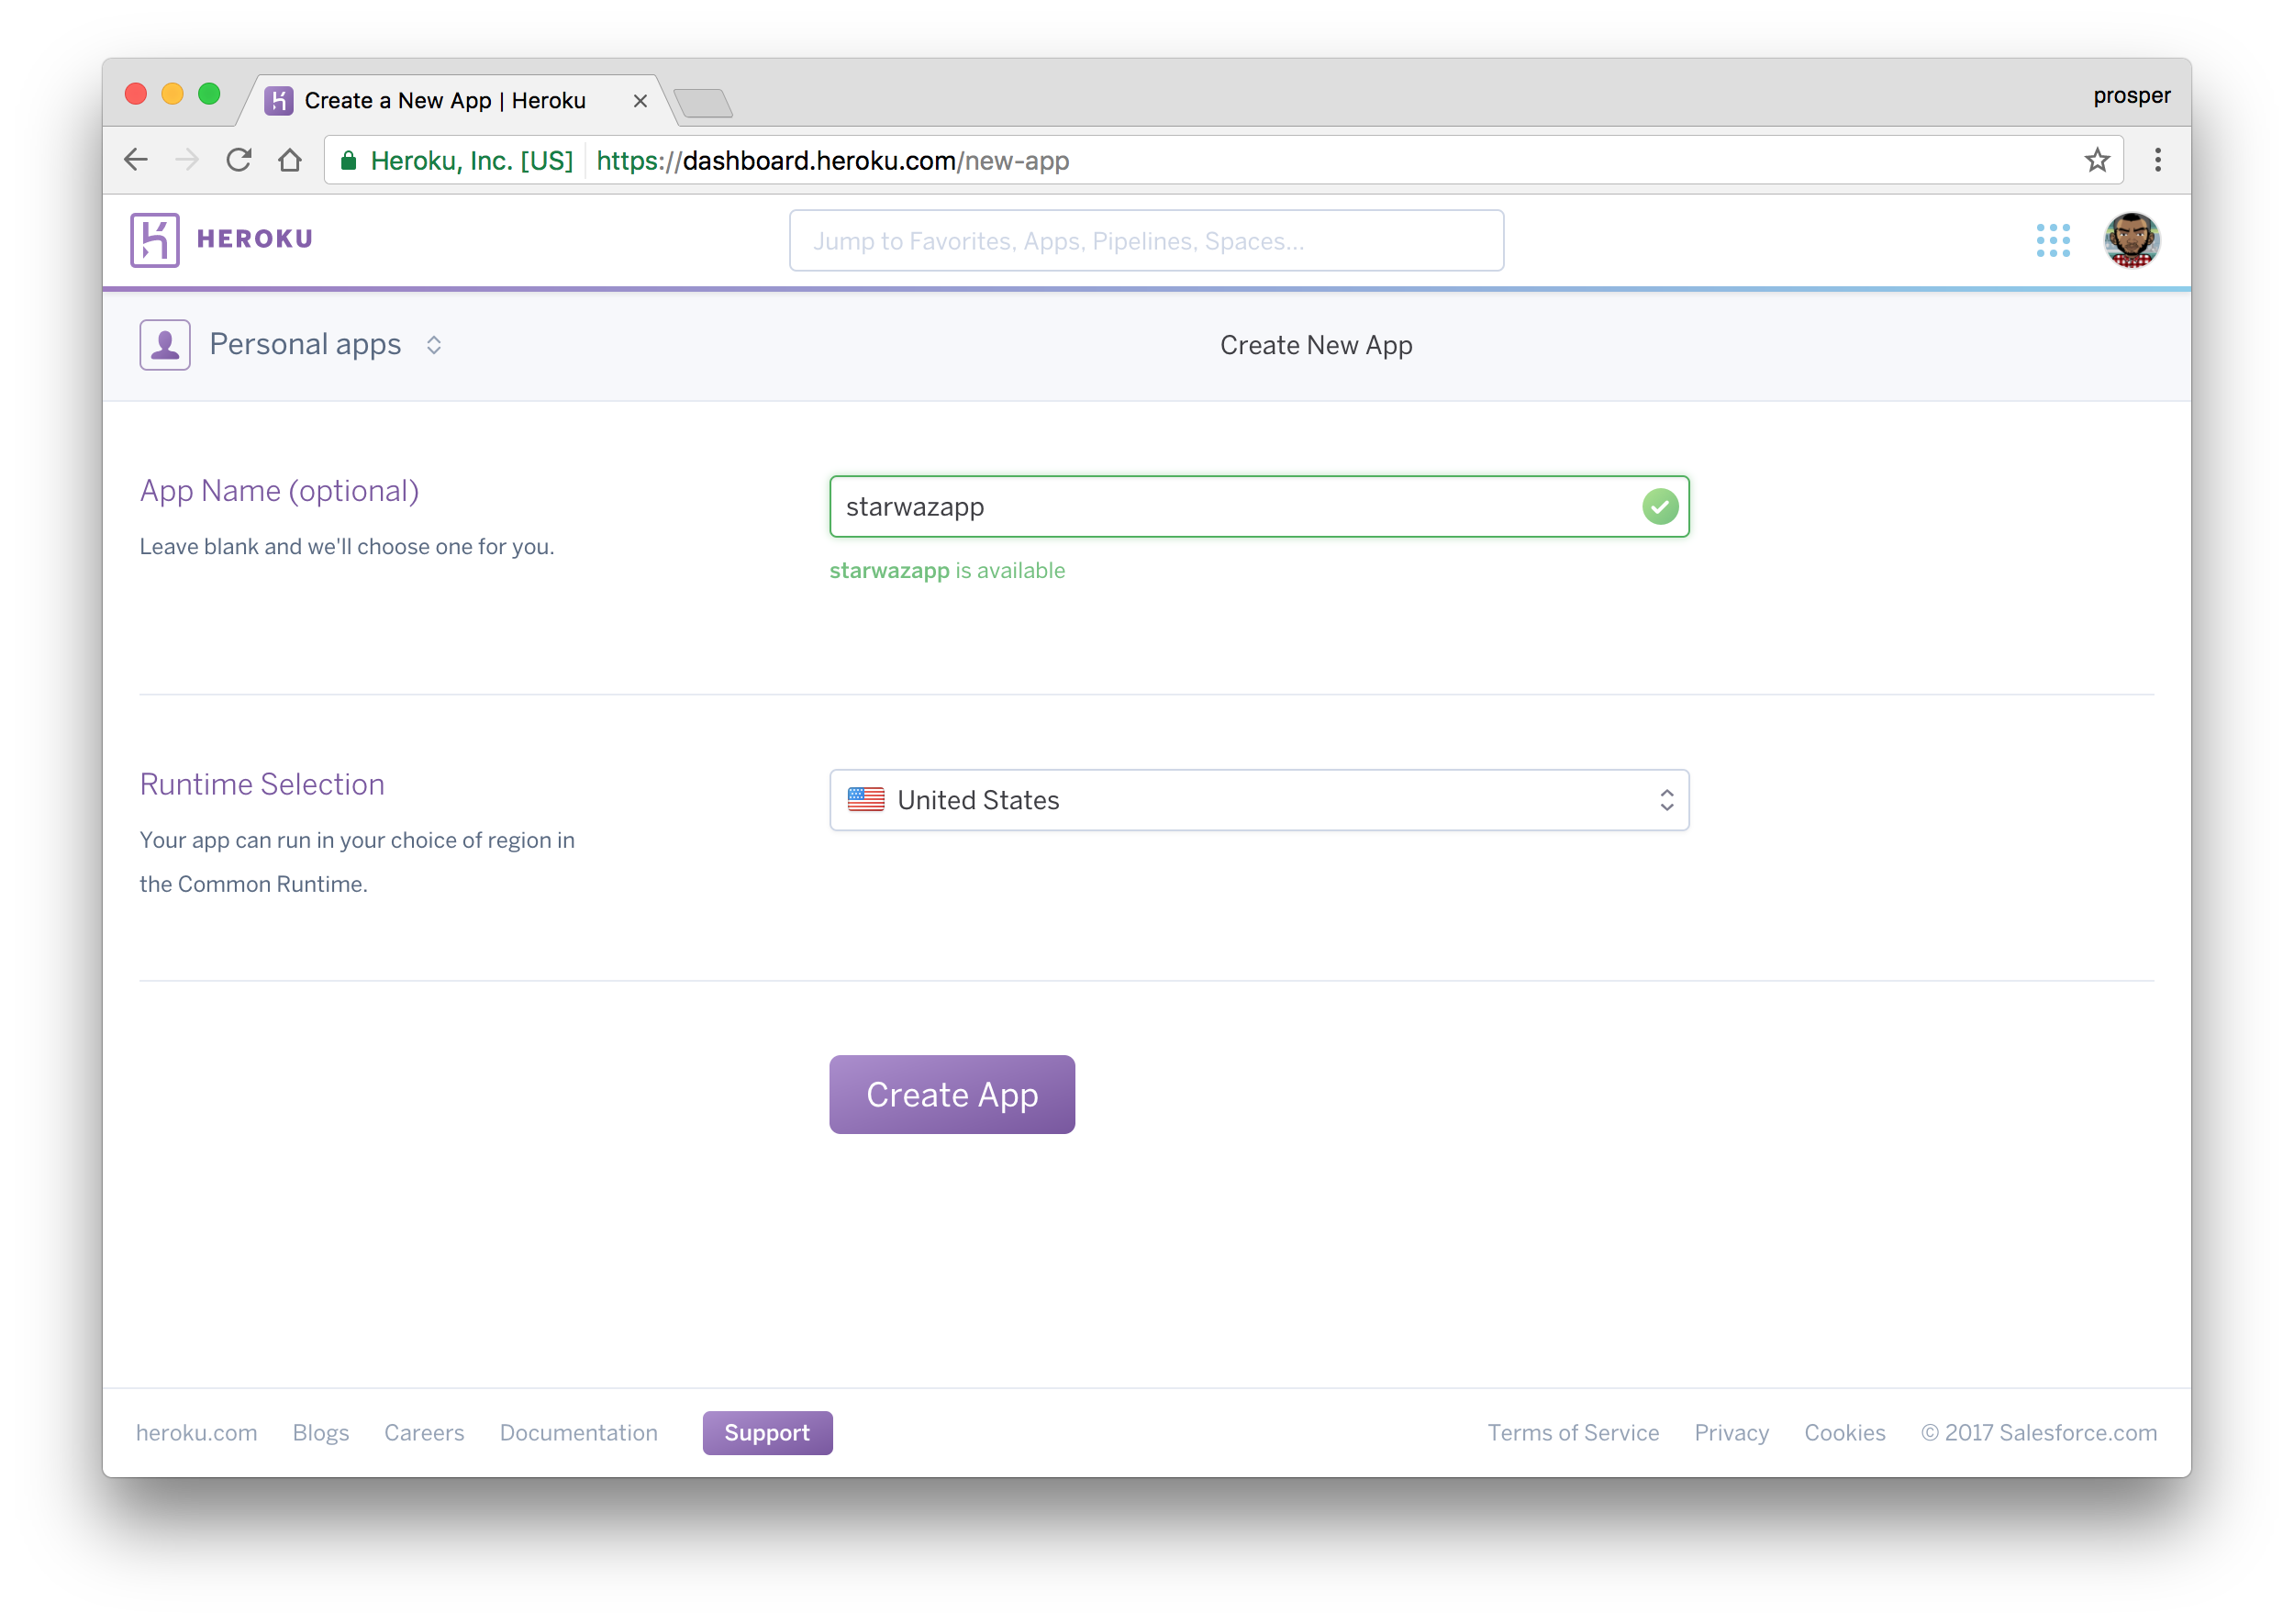
Give app a name
为应用命名
Choose a deployment method. In our case, we’ll use GitHub like so:
选择一种部署方法。 在我们的例子中,我们将像这样使用GitHub:
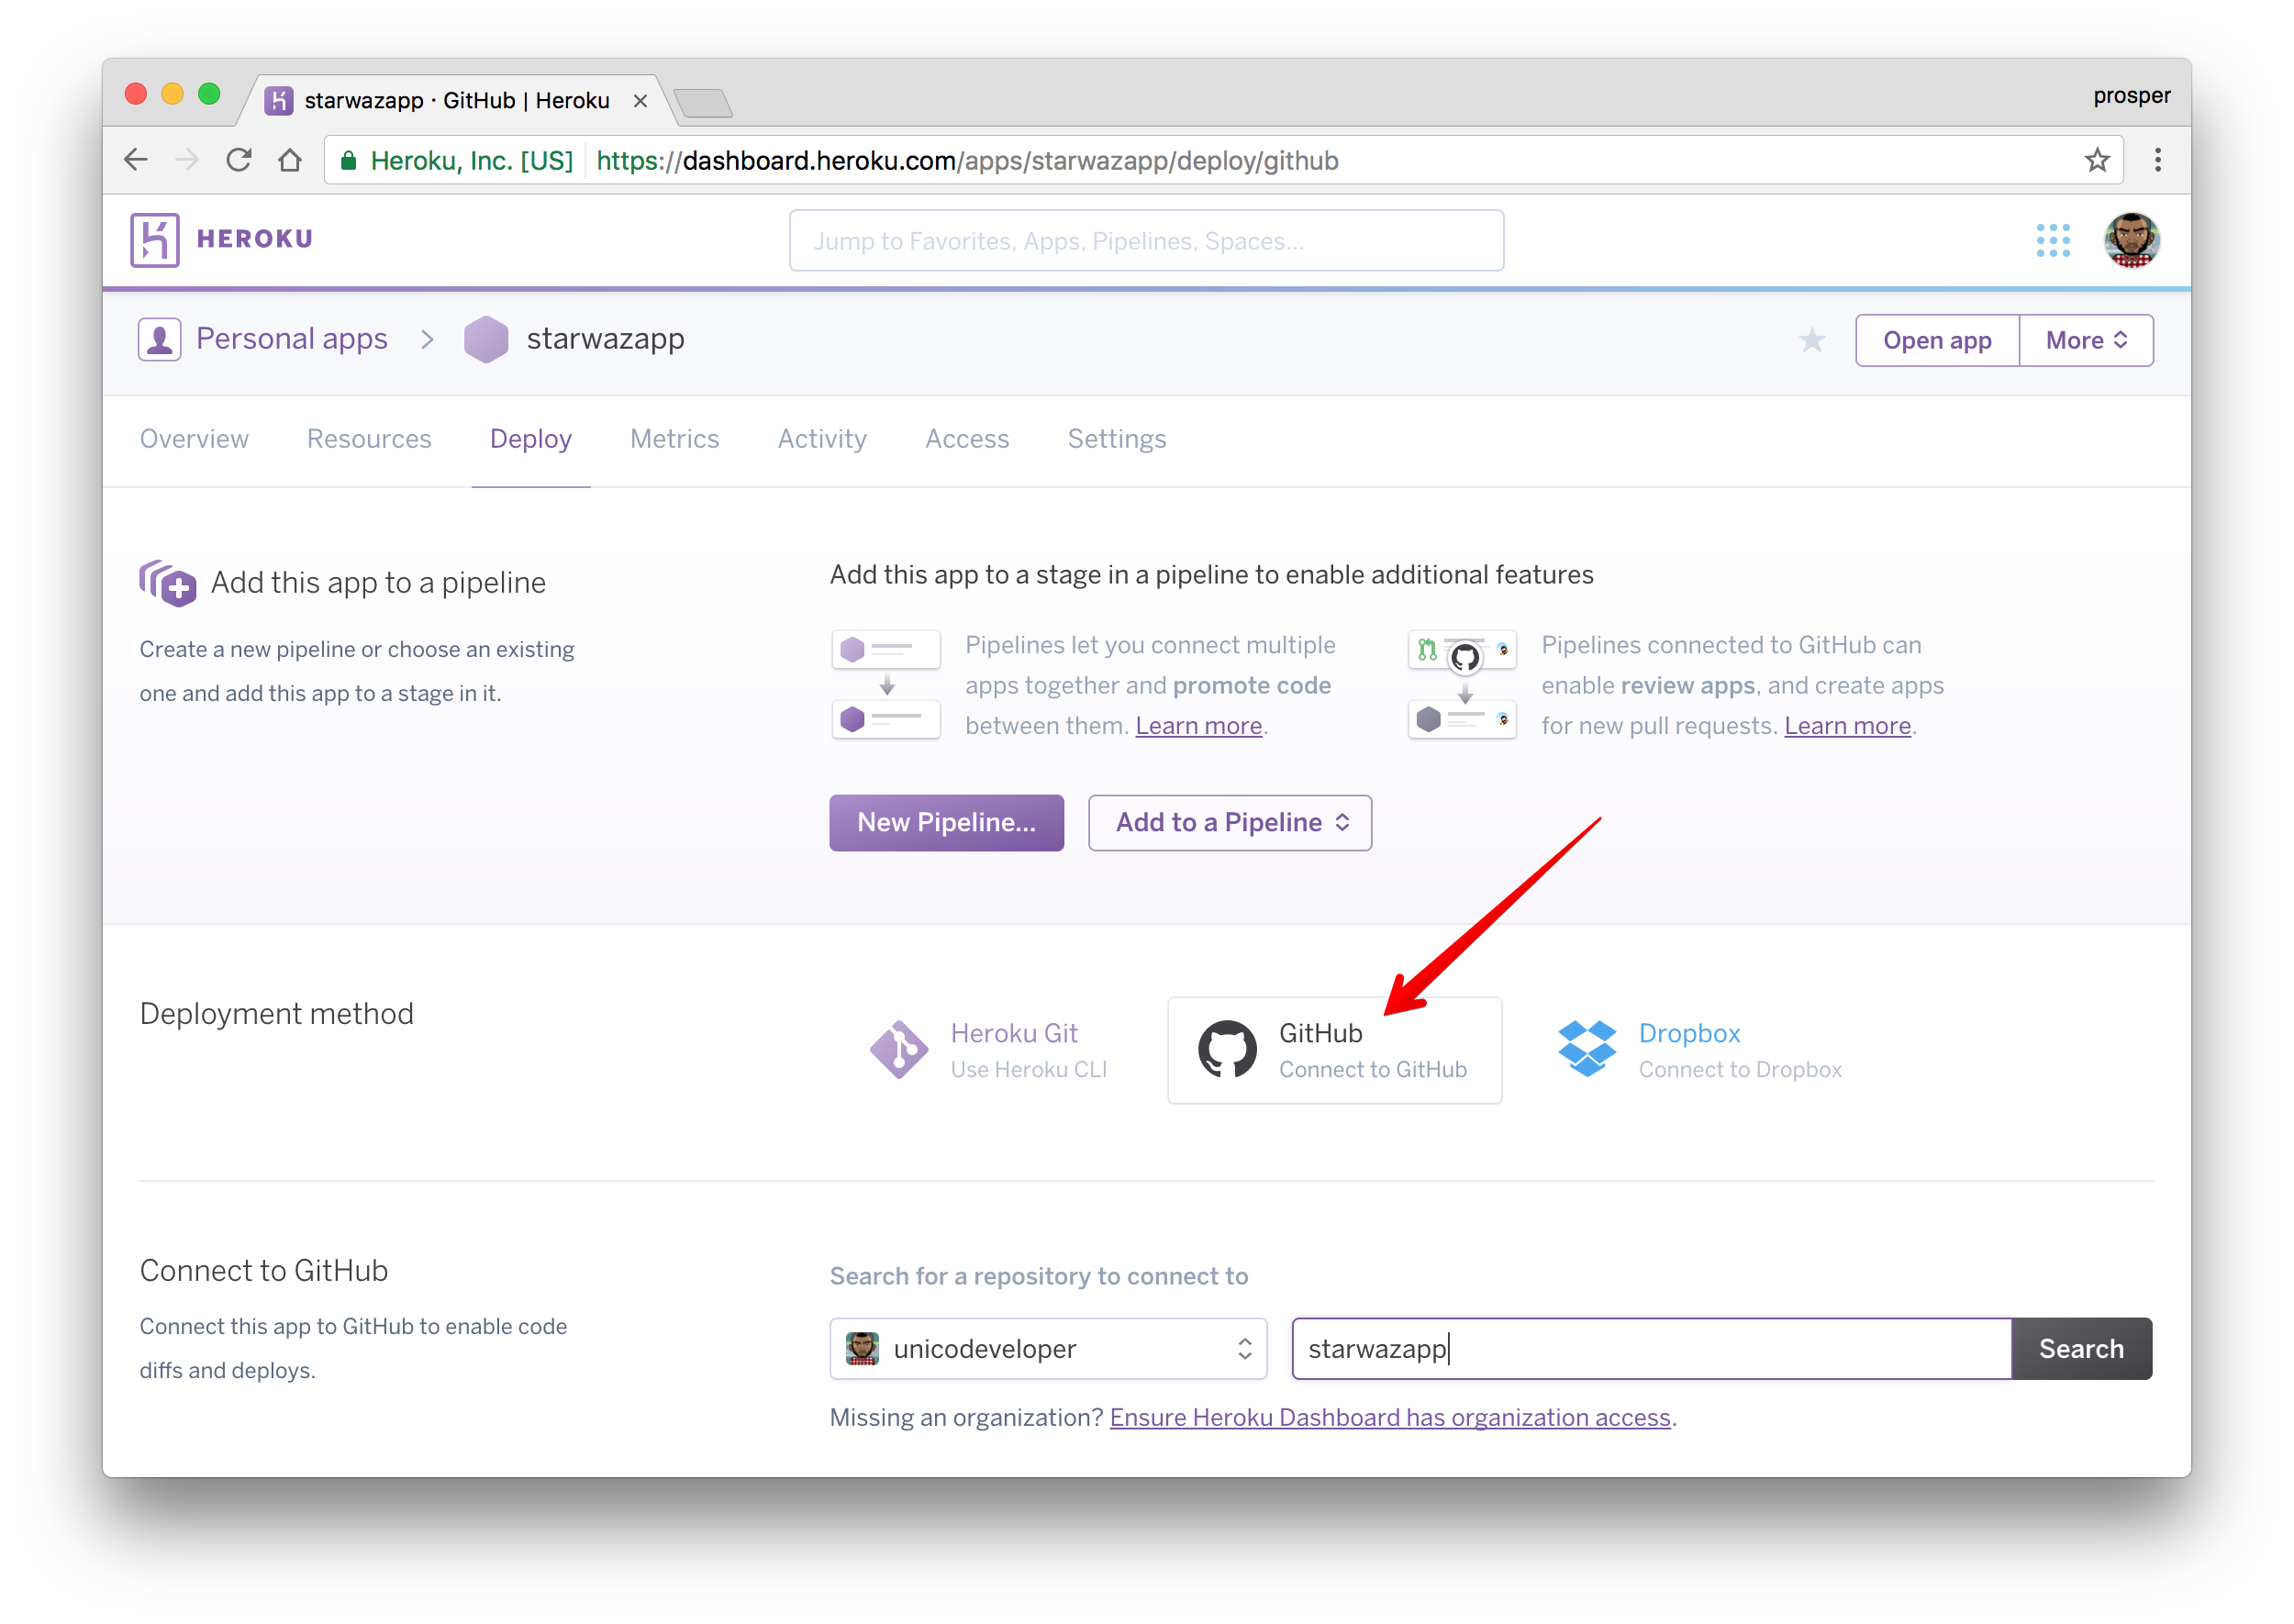
Connect to GitHub
连接到GitHub
The reason for choosing GitHub is to make the development and maintenance process very smooth. Developers can work on new features using the git workflow.
选择GitHub的原因是使开发和维护过程非常顺利。 开发人员可以使用git工作流程来开发新功能。
Now, type the name of the repo in the circled area and click Search. Heroku will search for your repo under your GitHub account and display it like so
现在,在带圆圈的区域中输入存储库的名称,然后单击搜索 。 Heroku将在您的GitHub帐户下搜索您的存储库,并将其显示为
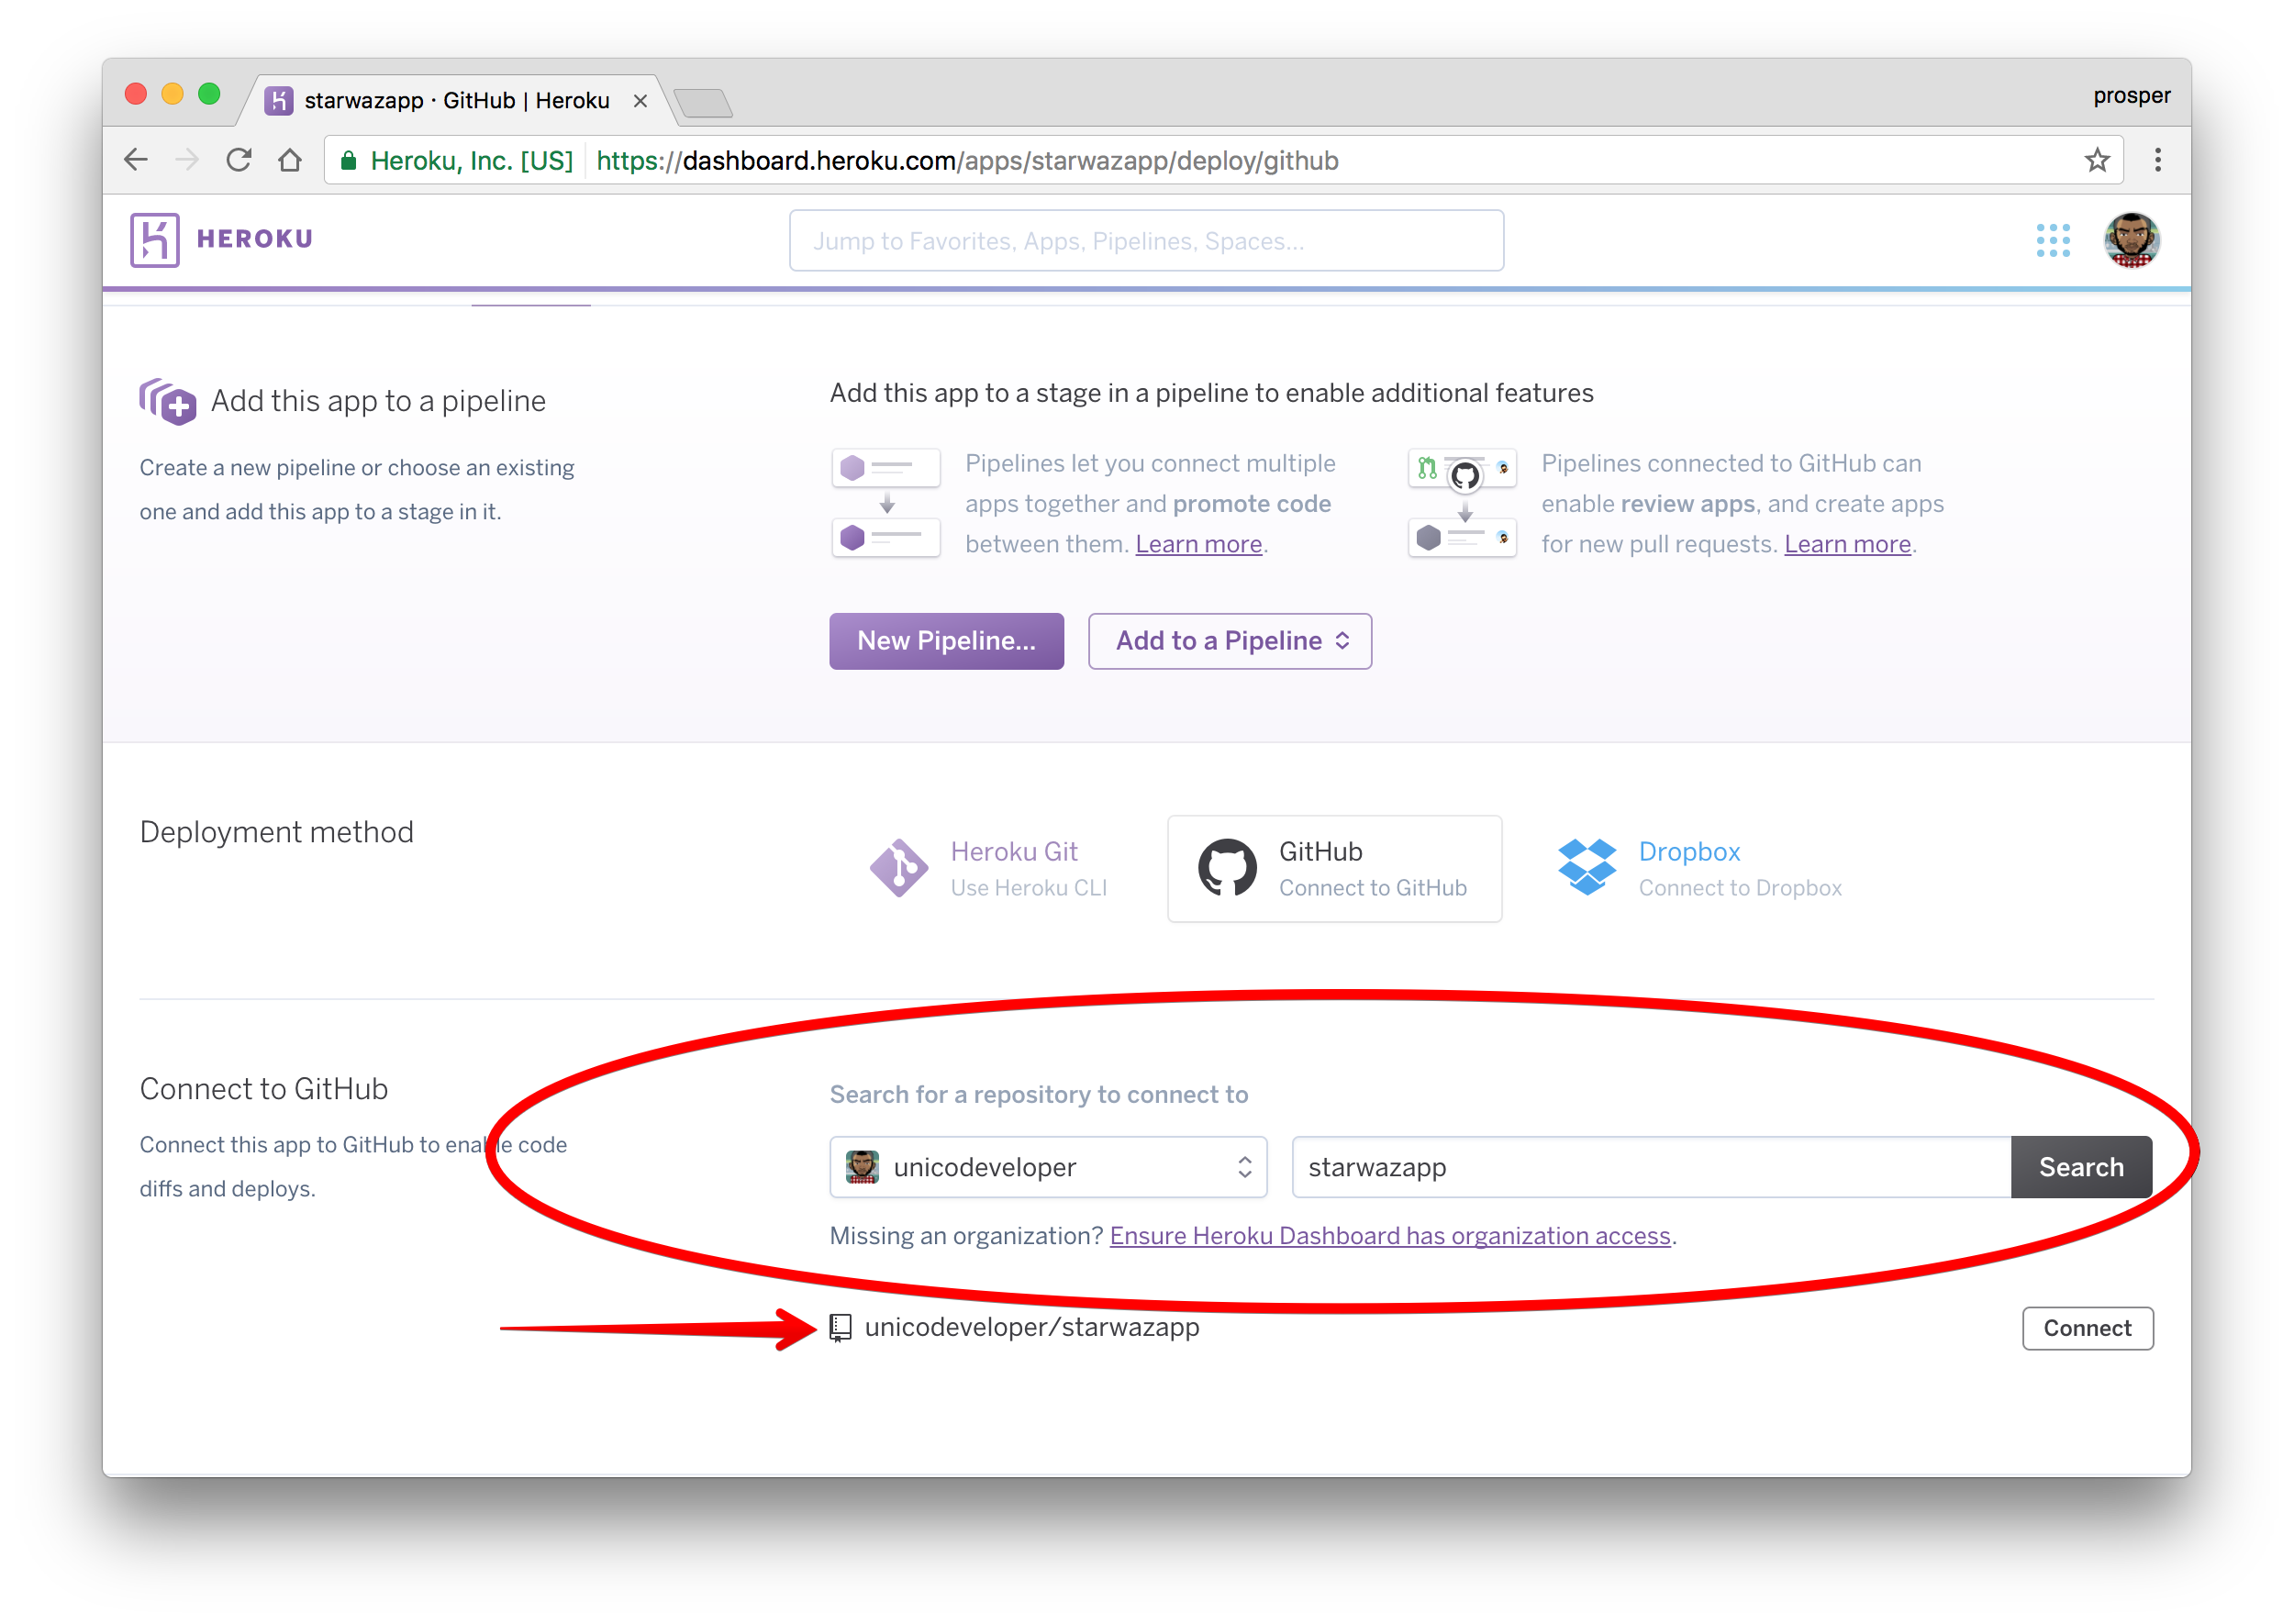
Search for repo
搜索回购
Click on connect like so
点击像这样的connect
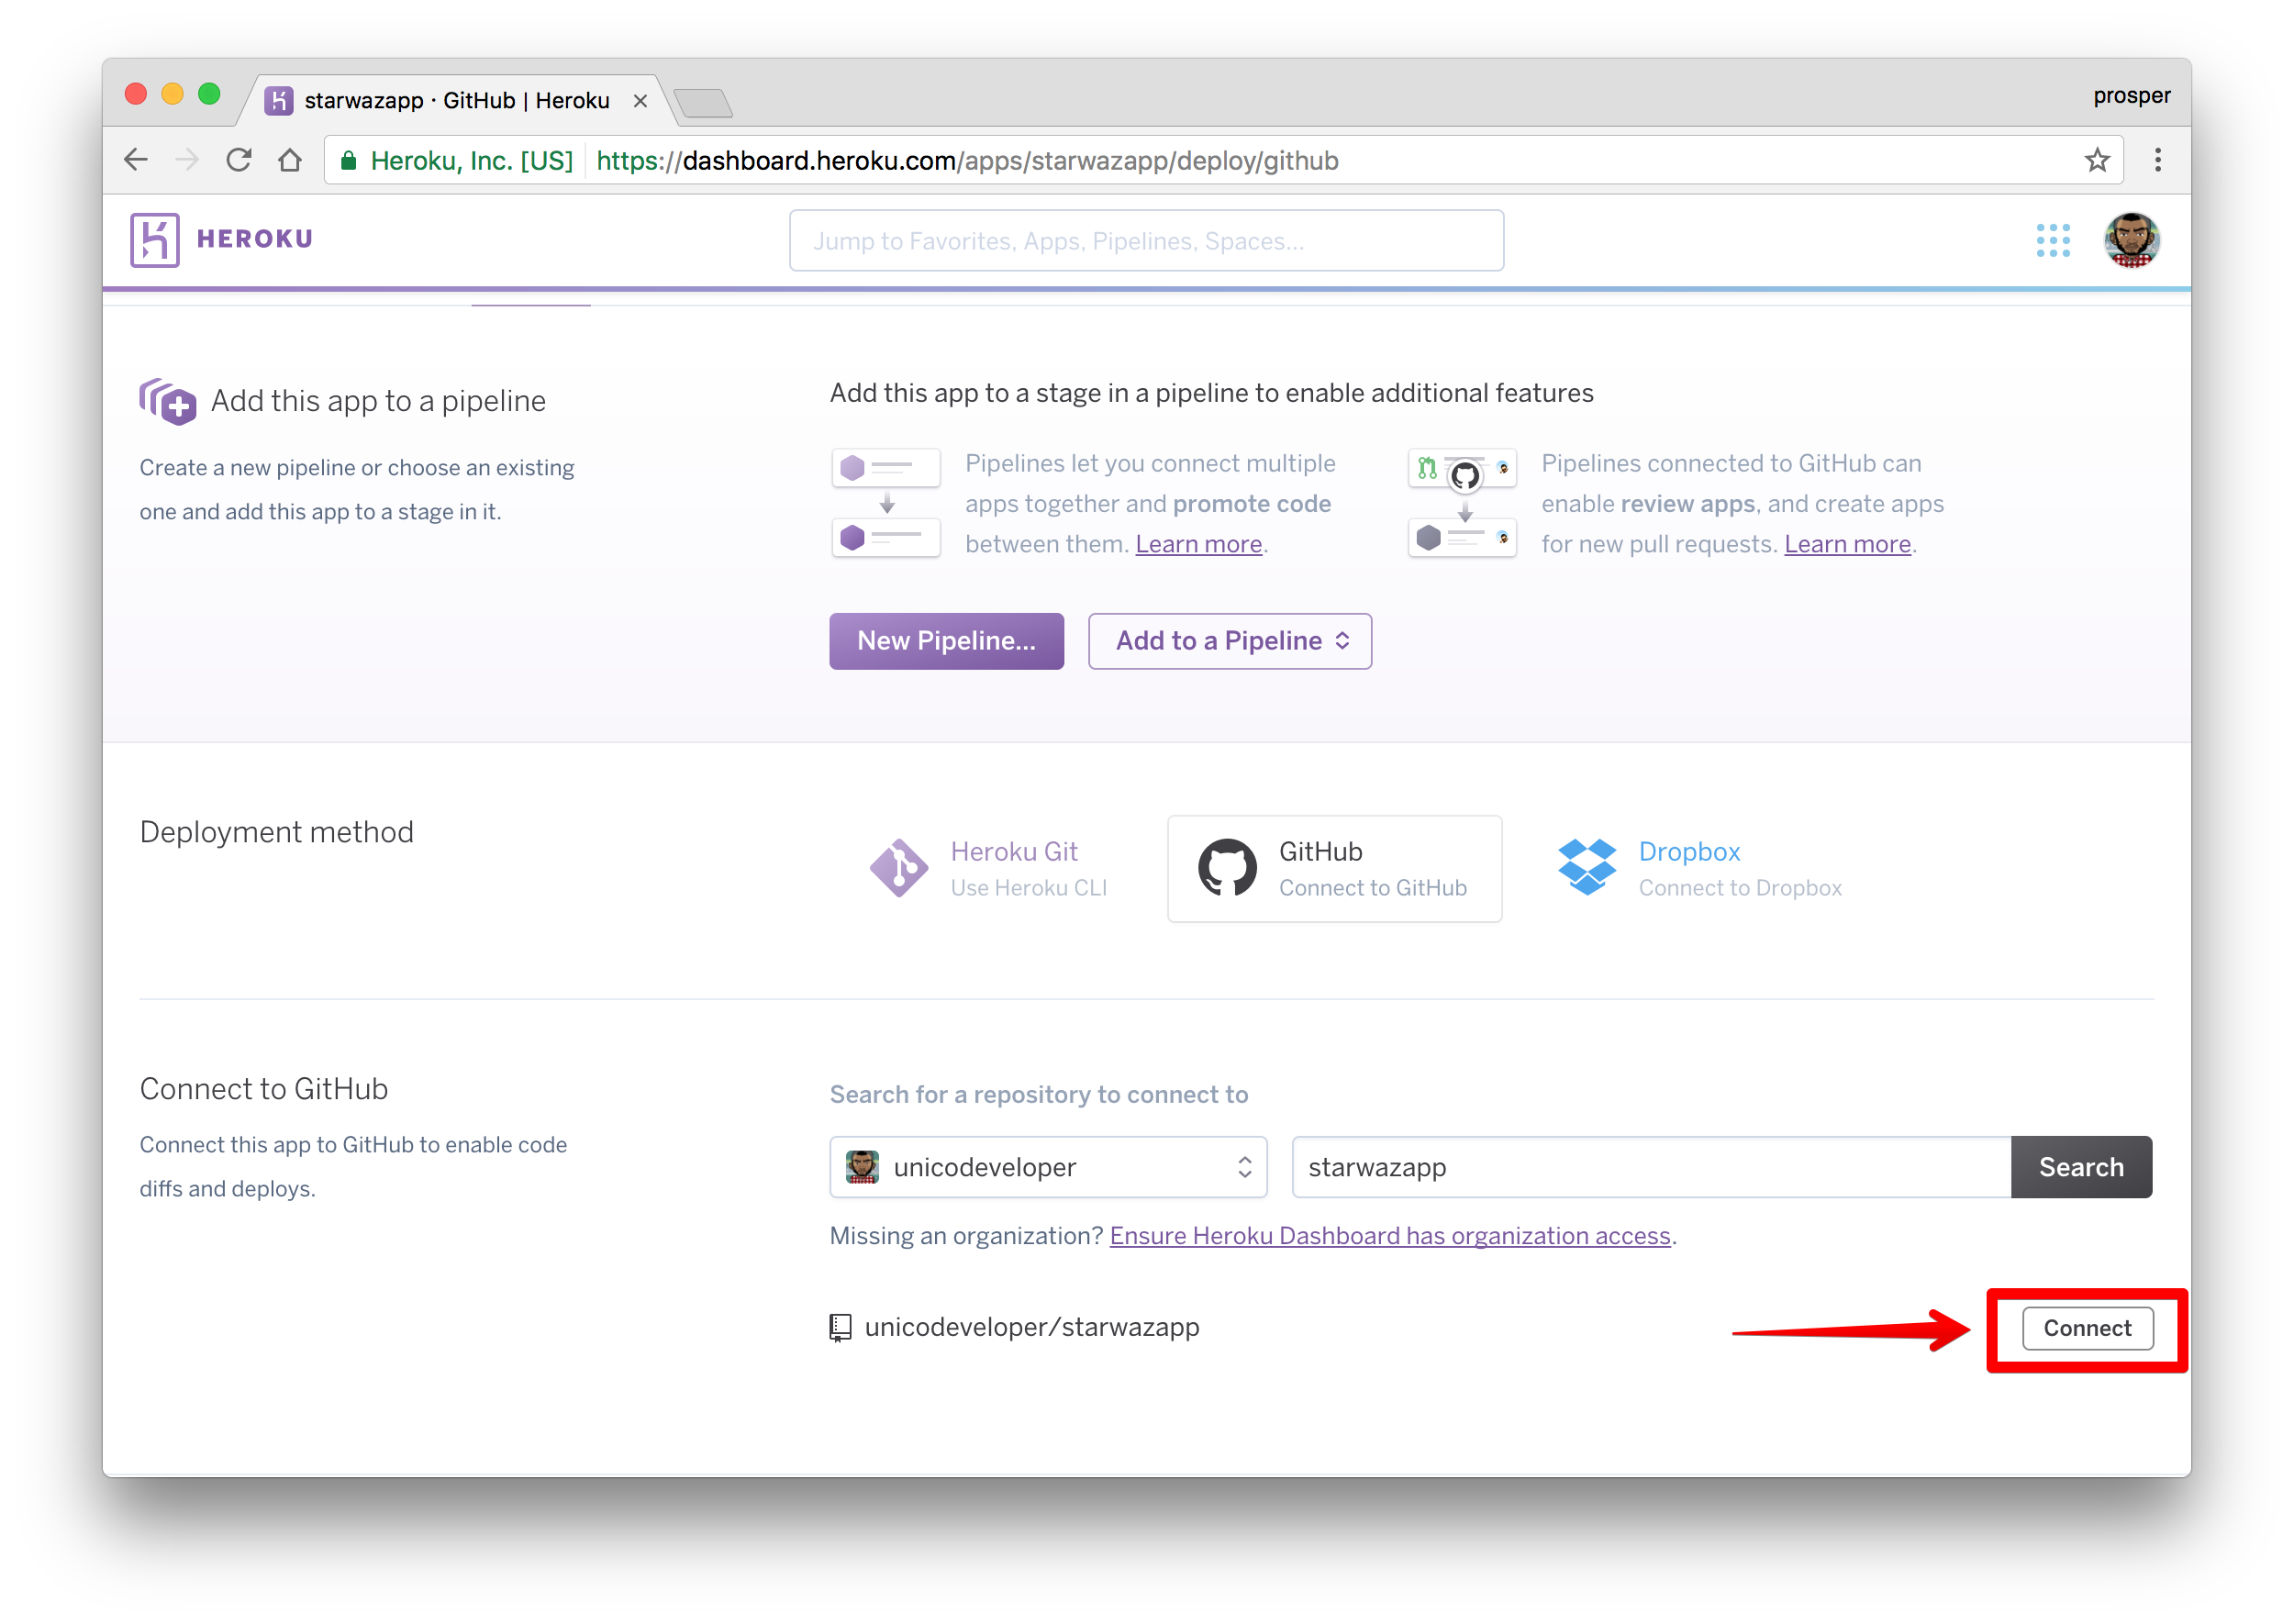
Click on the connect button
点击连接按钮
Heroku will connect the repo like so
Heroku将像这样连接回购
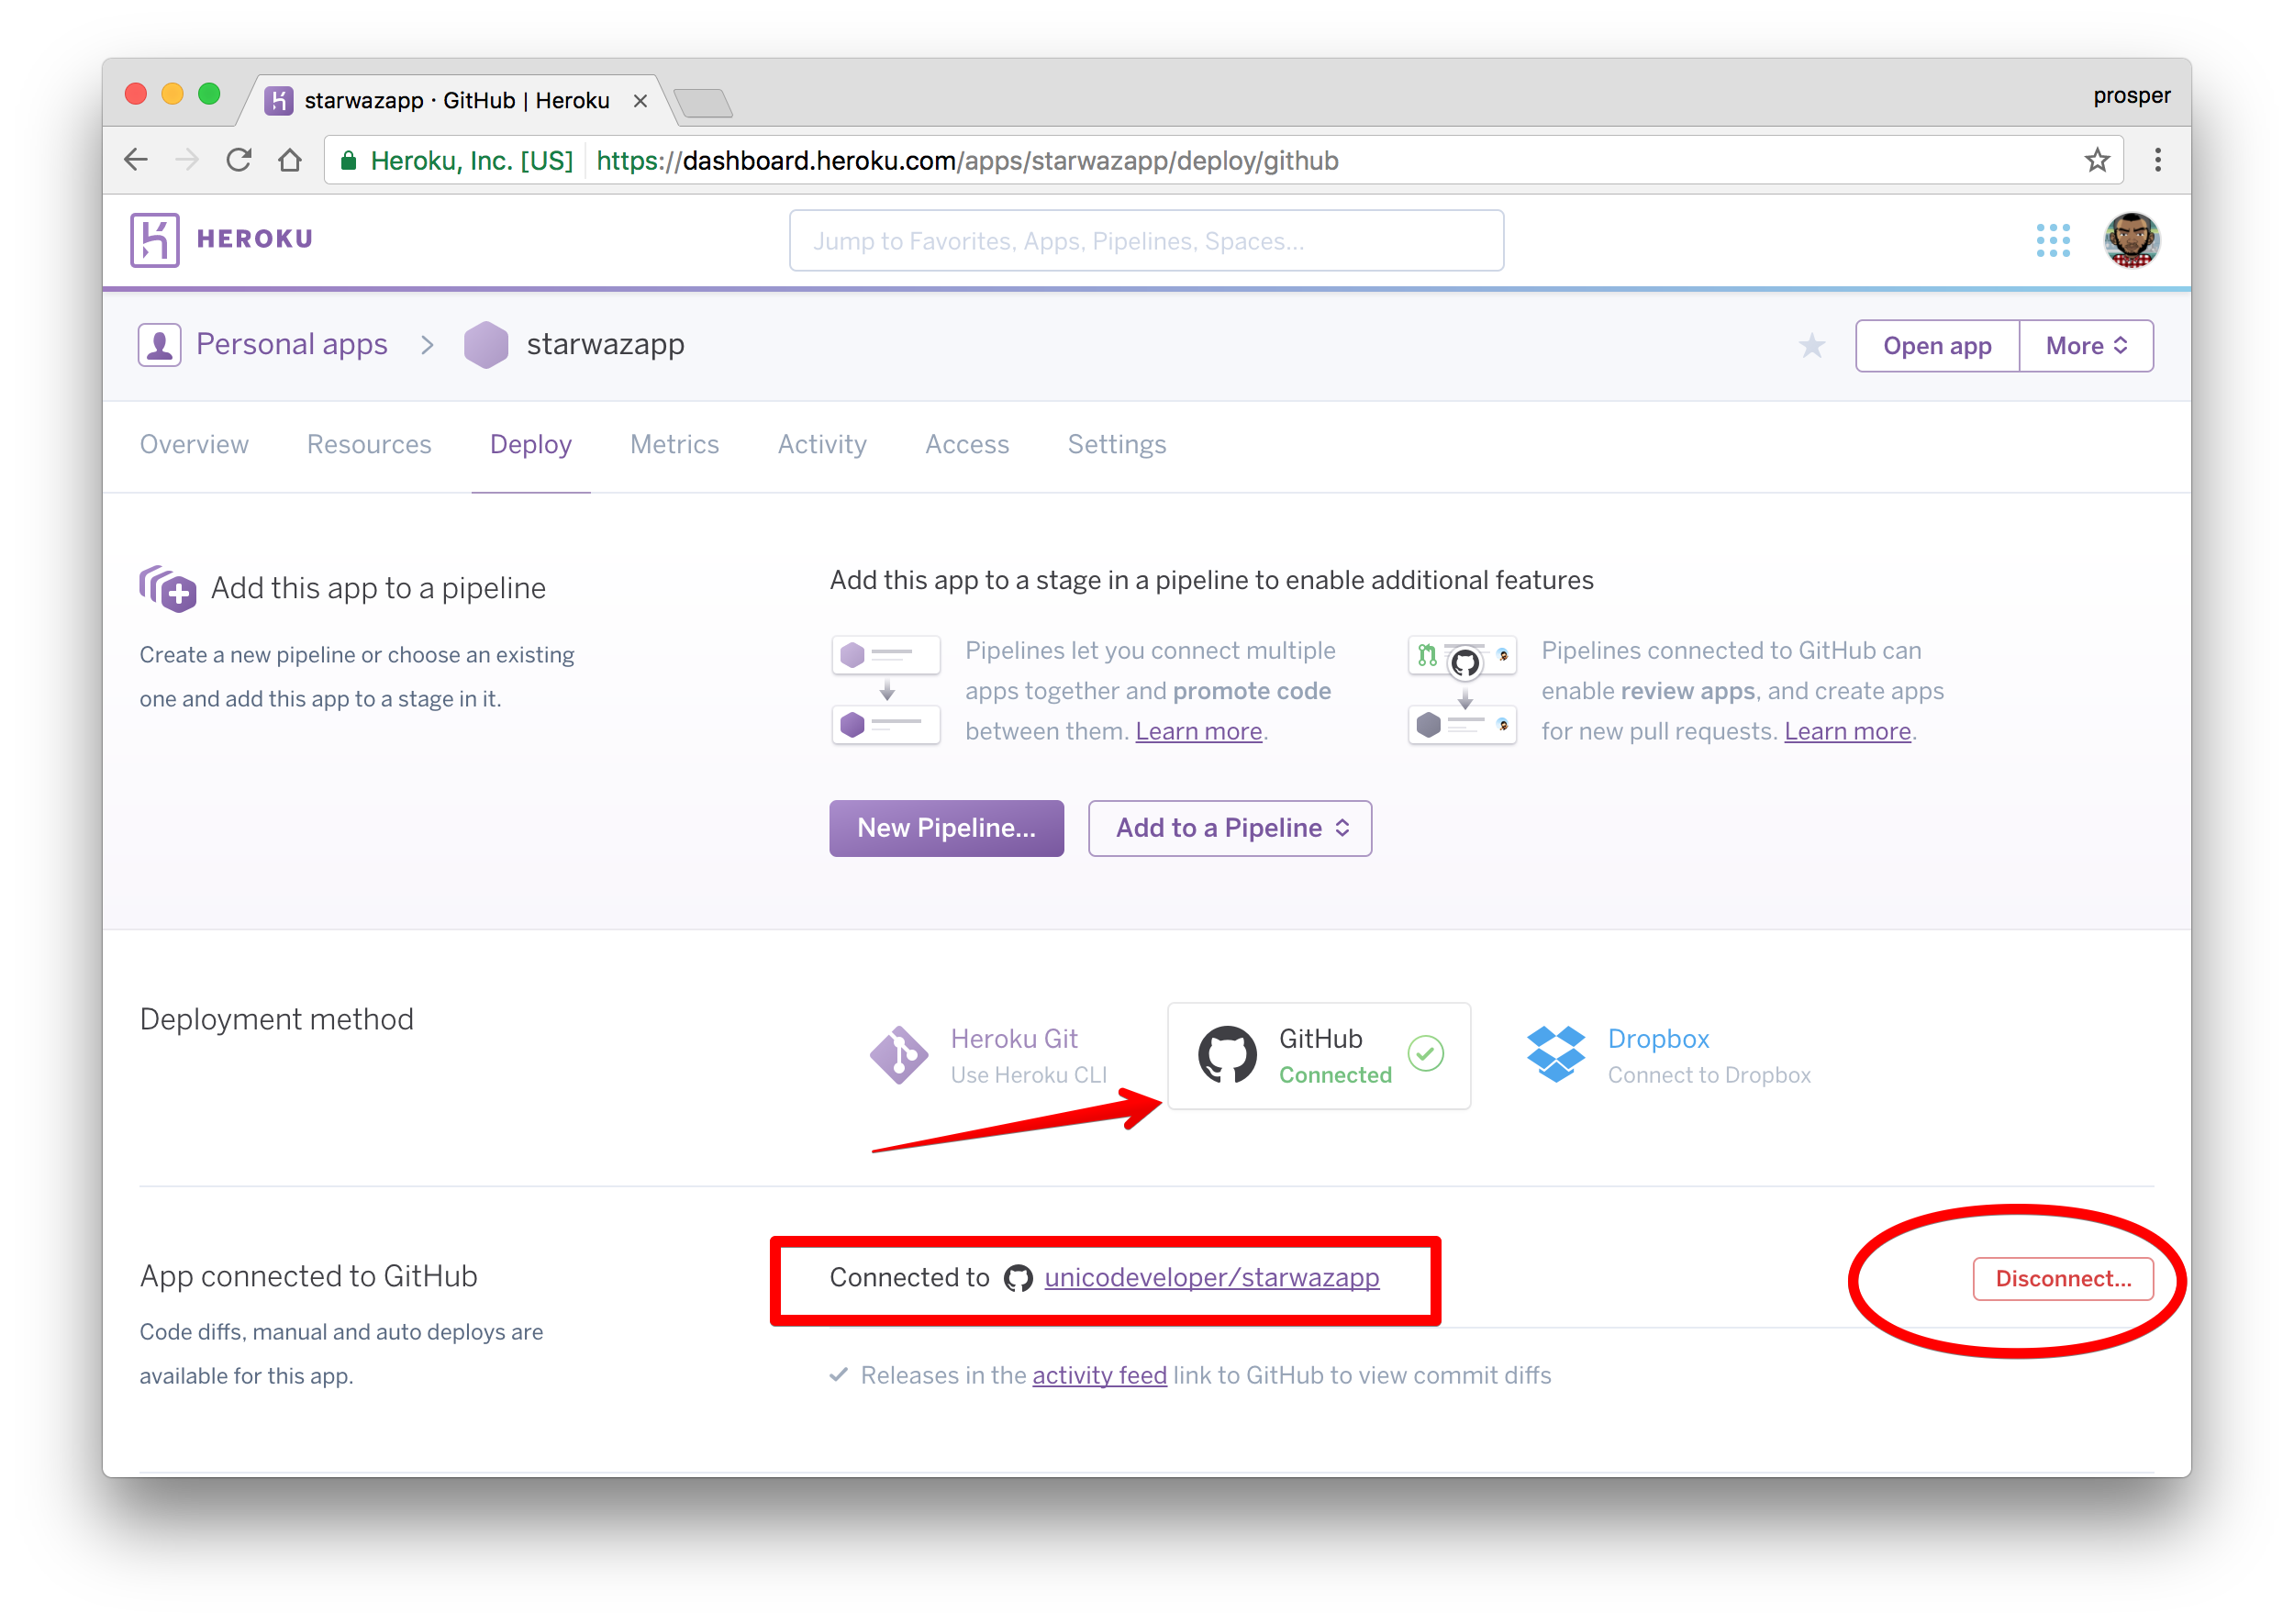
Connected Project
关联项目
Scroll down a bit. This is the interesting part. Heroku allows you to enable automatic deploys with the push of a button. It also gives you an option to wait for your continuous integration process to pass before deploying to production. In a real world app, you’ll have a test suite for your codebase. A developers’ code runs against the test suite. If it passes, the code will be pushed to production.
向下滚动一点。 这是有趣的部分。 Heroku允许您通过按一下按钮来启用自动部署。 它还为您提供了一个选项,可以等待您的连续集成过程通过,然后再部署到生产中。 在现实世界中的应用程序中,您将为代码库提供一个测试套件。 开发人员的代码针对测试套件运行。 如果通过,则代码将被推送到生产环境。
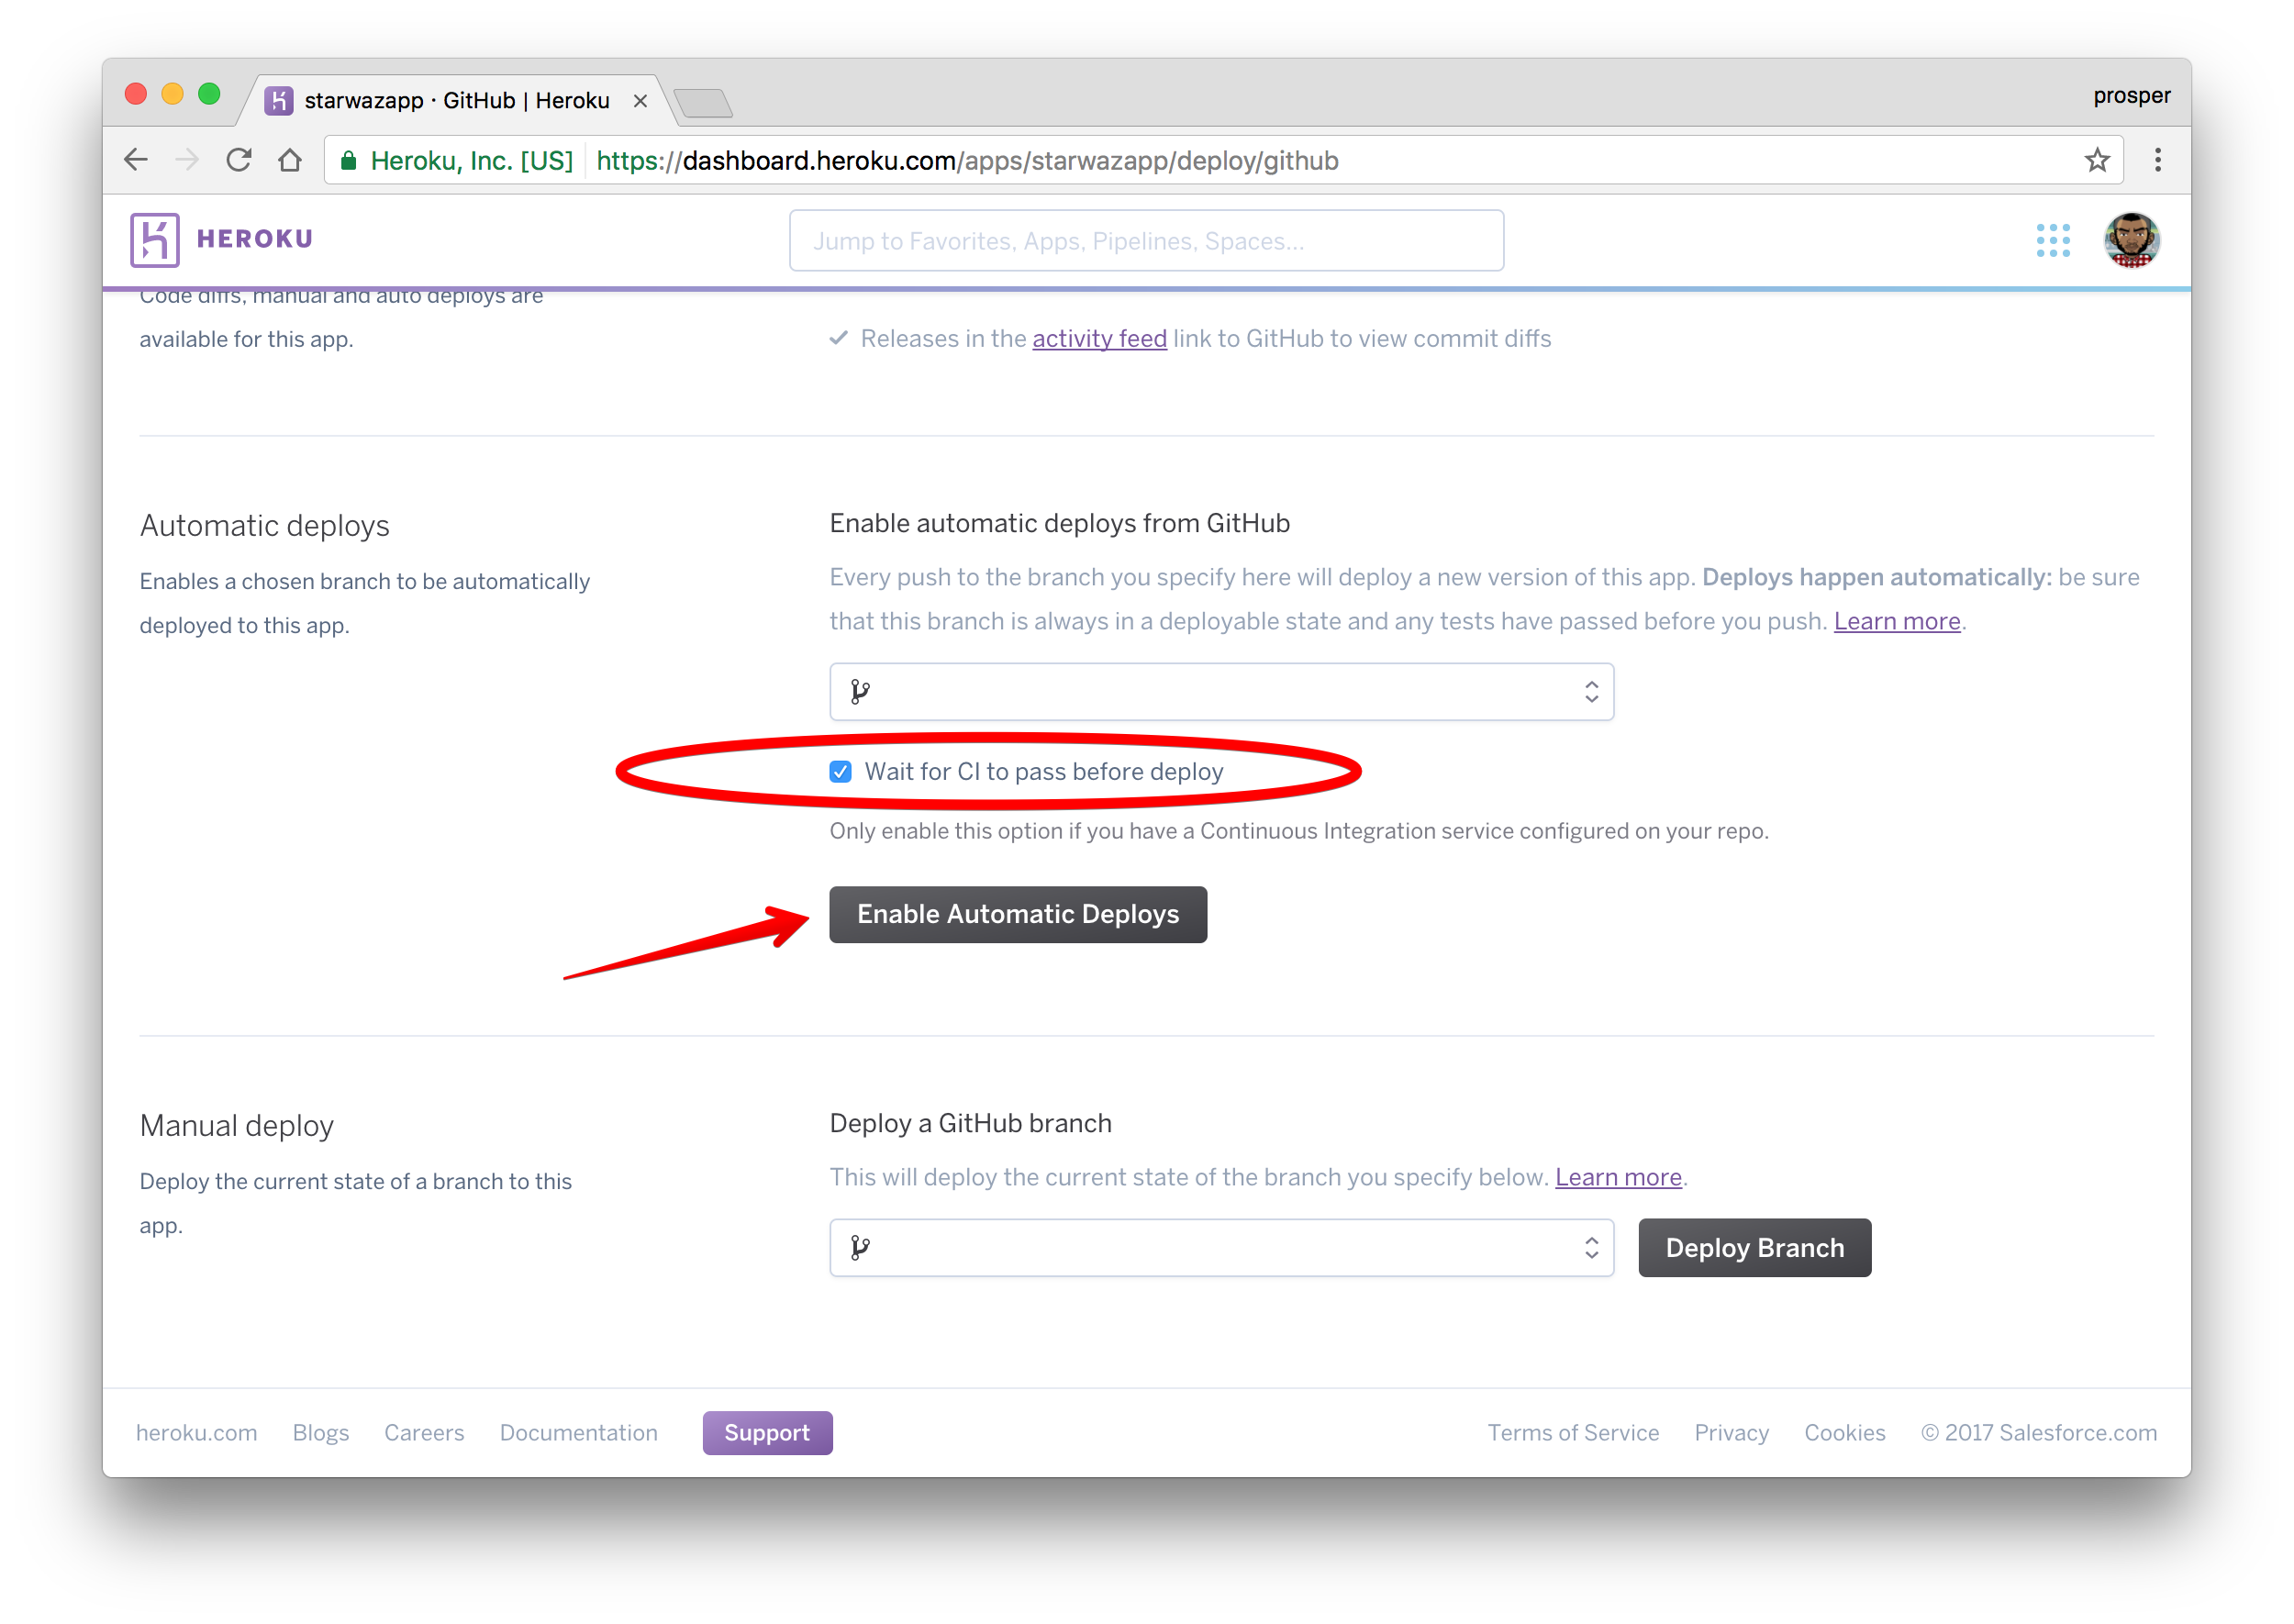
Click to enable automatic deploys. We don’t have any CI service, so we don’t need to enable that option. Now, let’s deploy the master branch.
单击以启用自动部署。 我们没有任何CI服务,因此我们不需要启用该选项。 现在,让我们部署master分支。
Note: You can have other branches and specify which branch you want for production. In our case, the master branch is the production branch.
注意:您可以具有其他分支,并指定要用于生产的分支。 在我们的例子中,主分支是生产分支。
Click on the Deploy branch. Heroku will scan through your composer.lock file, install the necessary packages, and deploy!
单击Deploy分支 。 Heroku将扫描您的composer.lock文件,安装必要的软件包,然后进行部署!
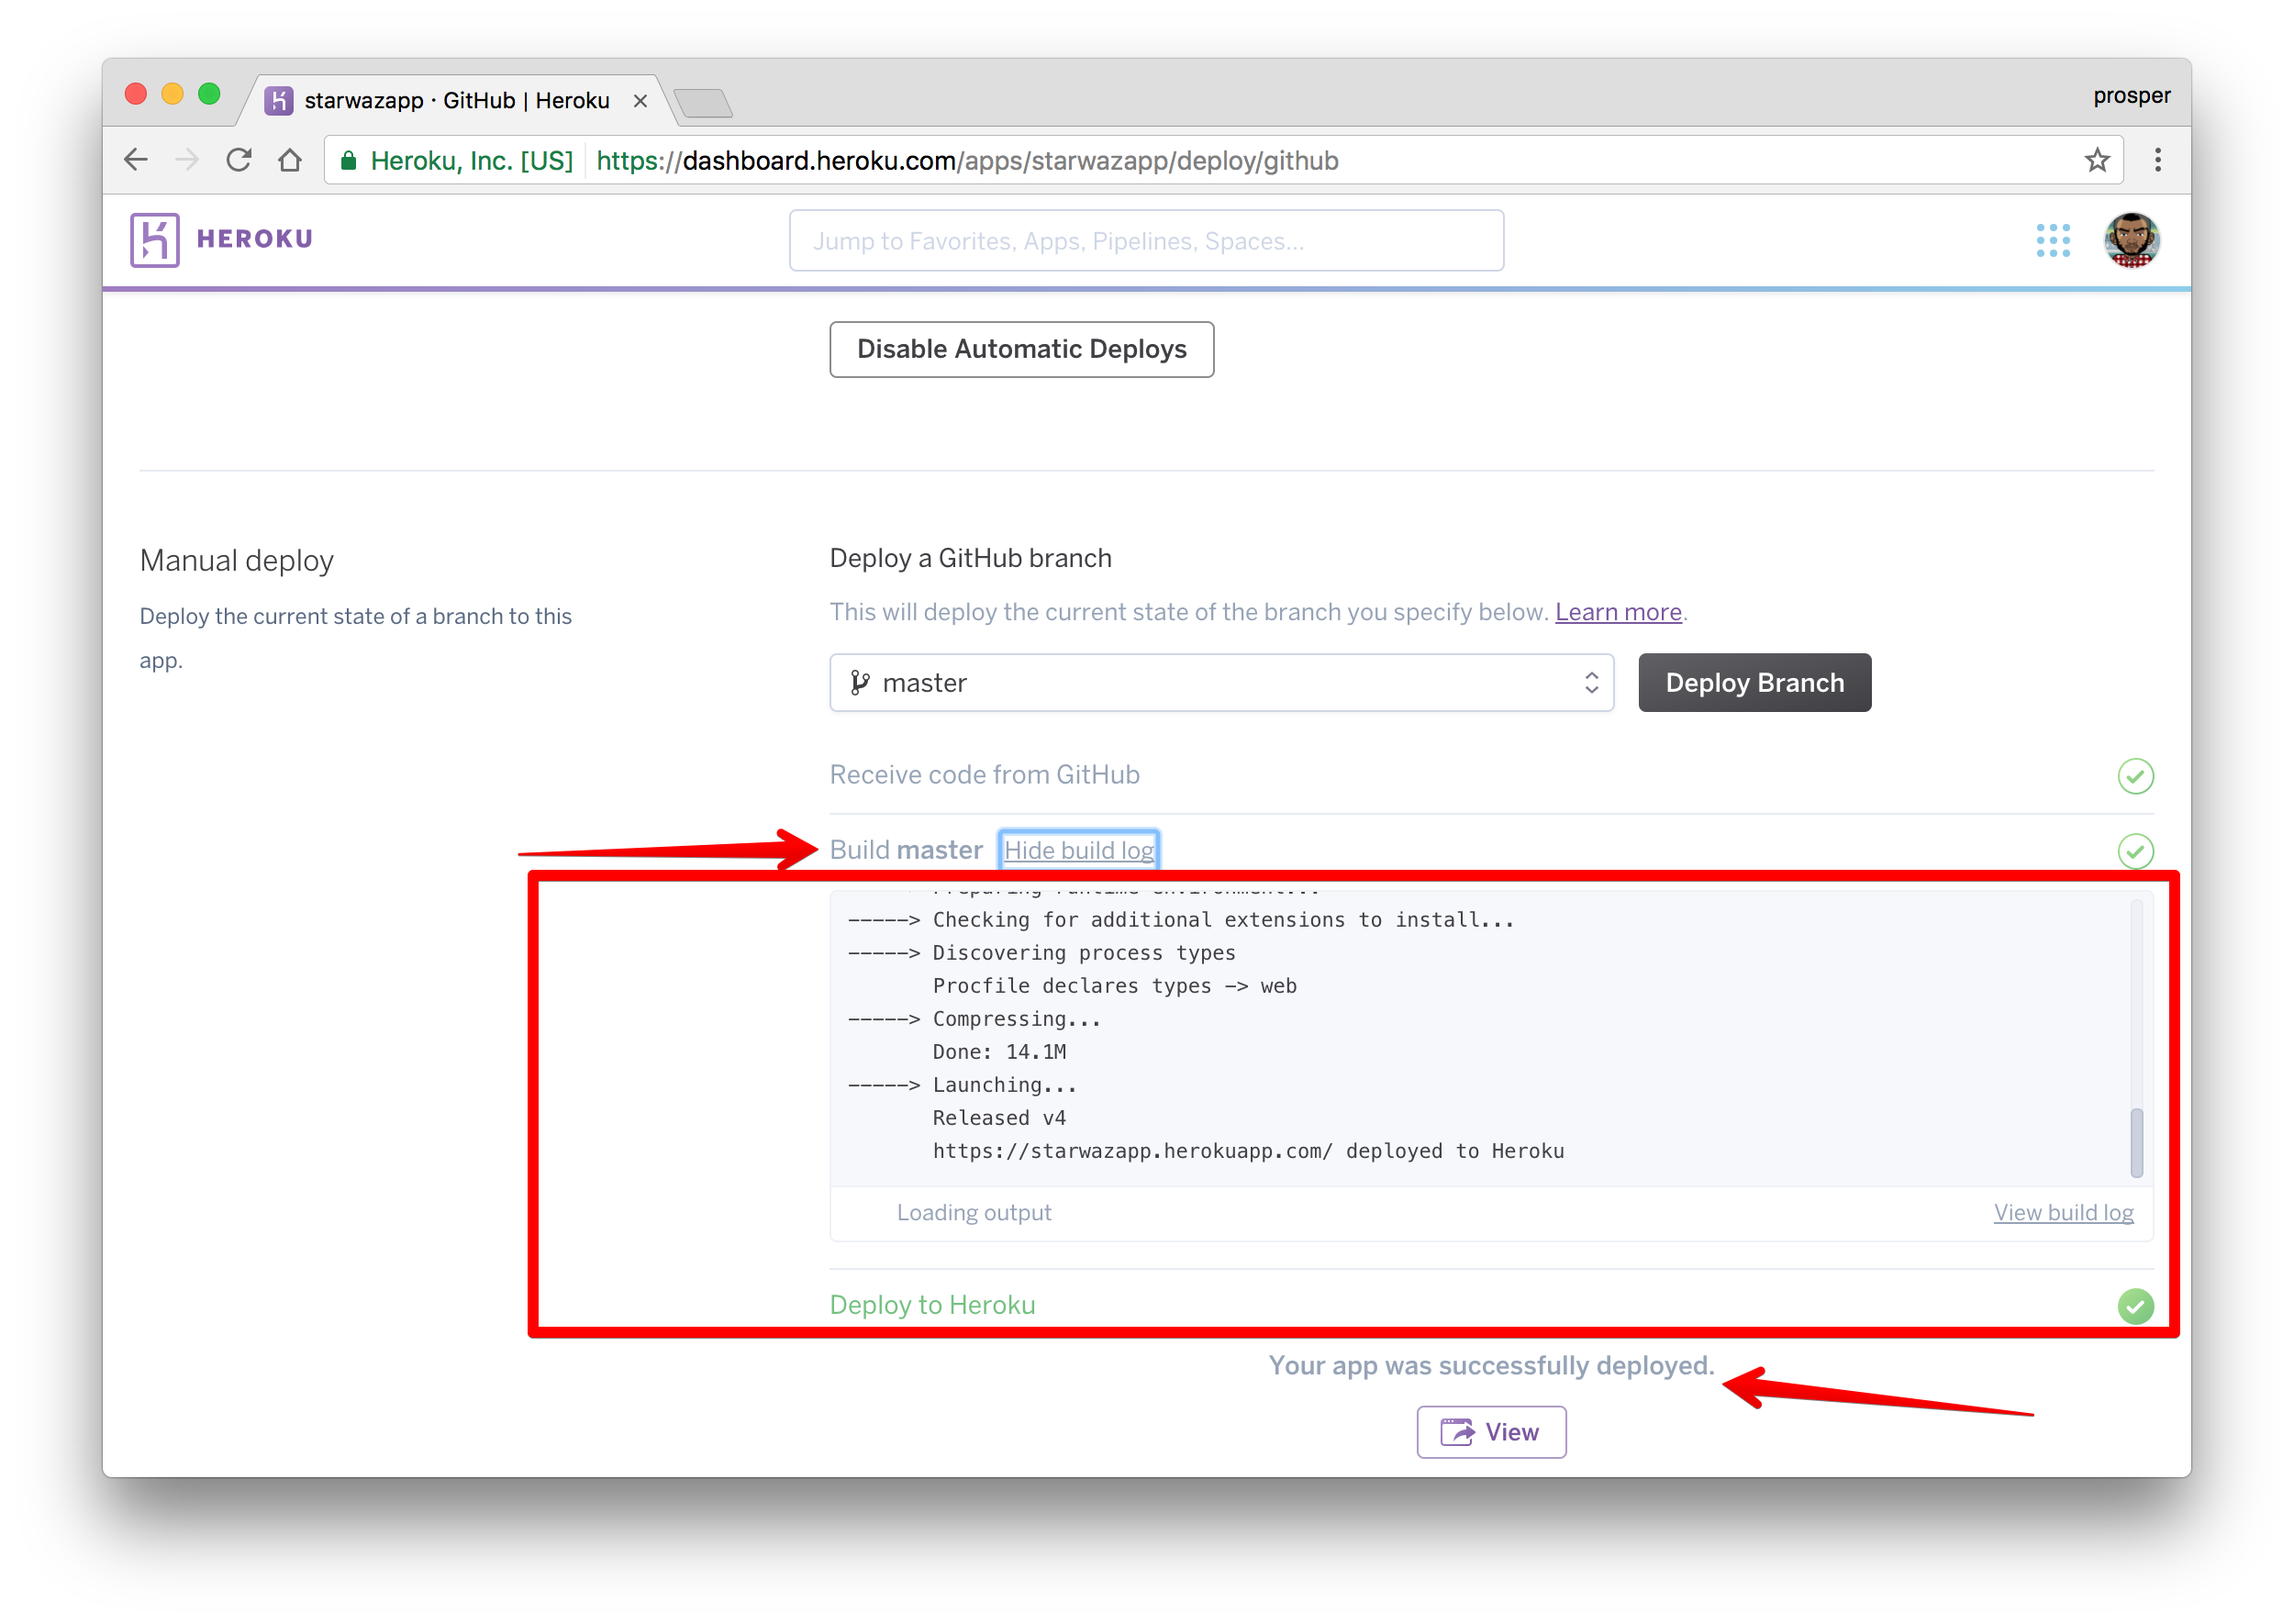
Deploy finally
最终部署
Click the View button to check out your app.
单击查看按钮以签出您的应用程序。
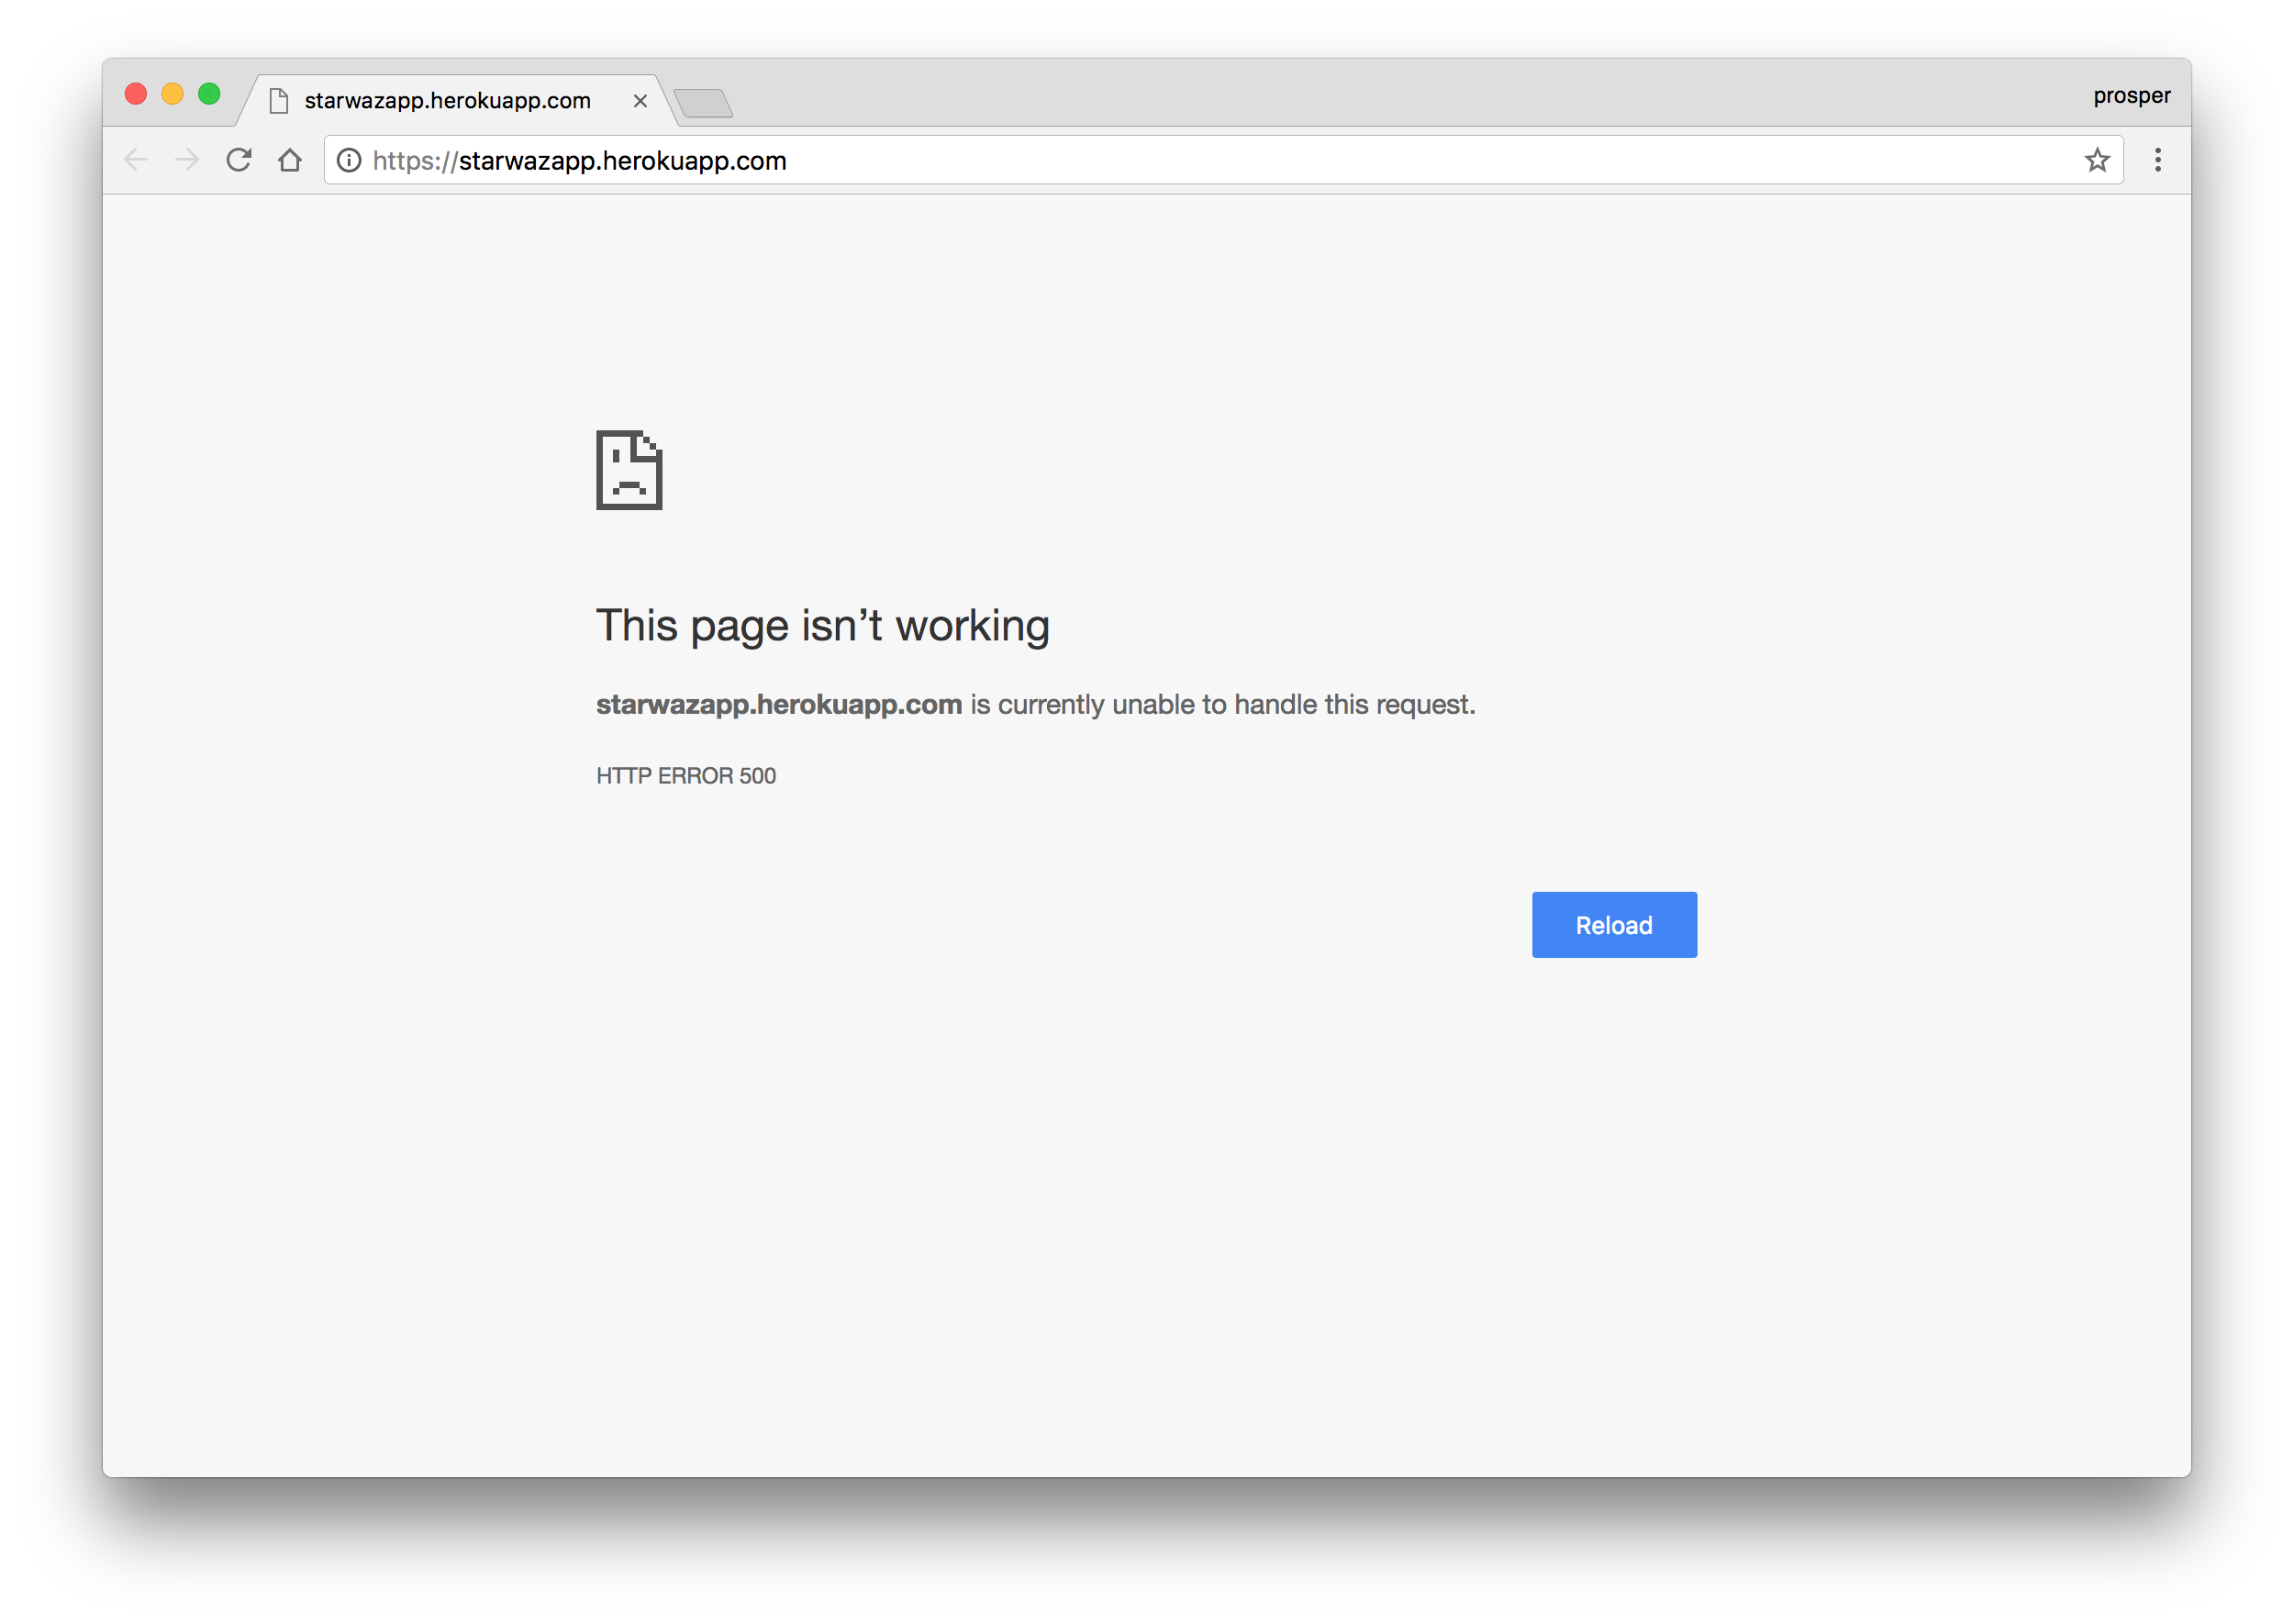
Error 500
错误500
Ooops! We are experiencing a 500 error. Aha, we haven’t set any environment variables yet. Locally, we had a .env file. On Heroku, there is no .env file, but there is a way to set environment variables. Go to Settings in your dashboard and add them as config variables like so:
哎呀! 我们遇到500错误。 啊哈,我们还没有设置任何环境变量。 在本地,我们有一个.env文件。 在Heroku上,没有.env文件,但是有一种设置环境变量的方法。 转到仪表板中的“设置” ,然后将它们添加为配置变量,如下所示:
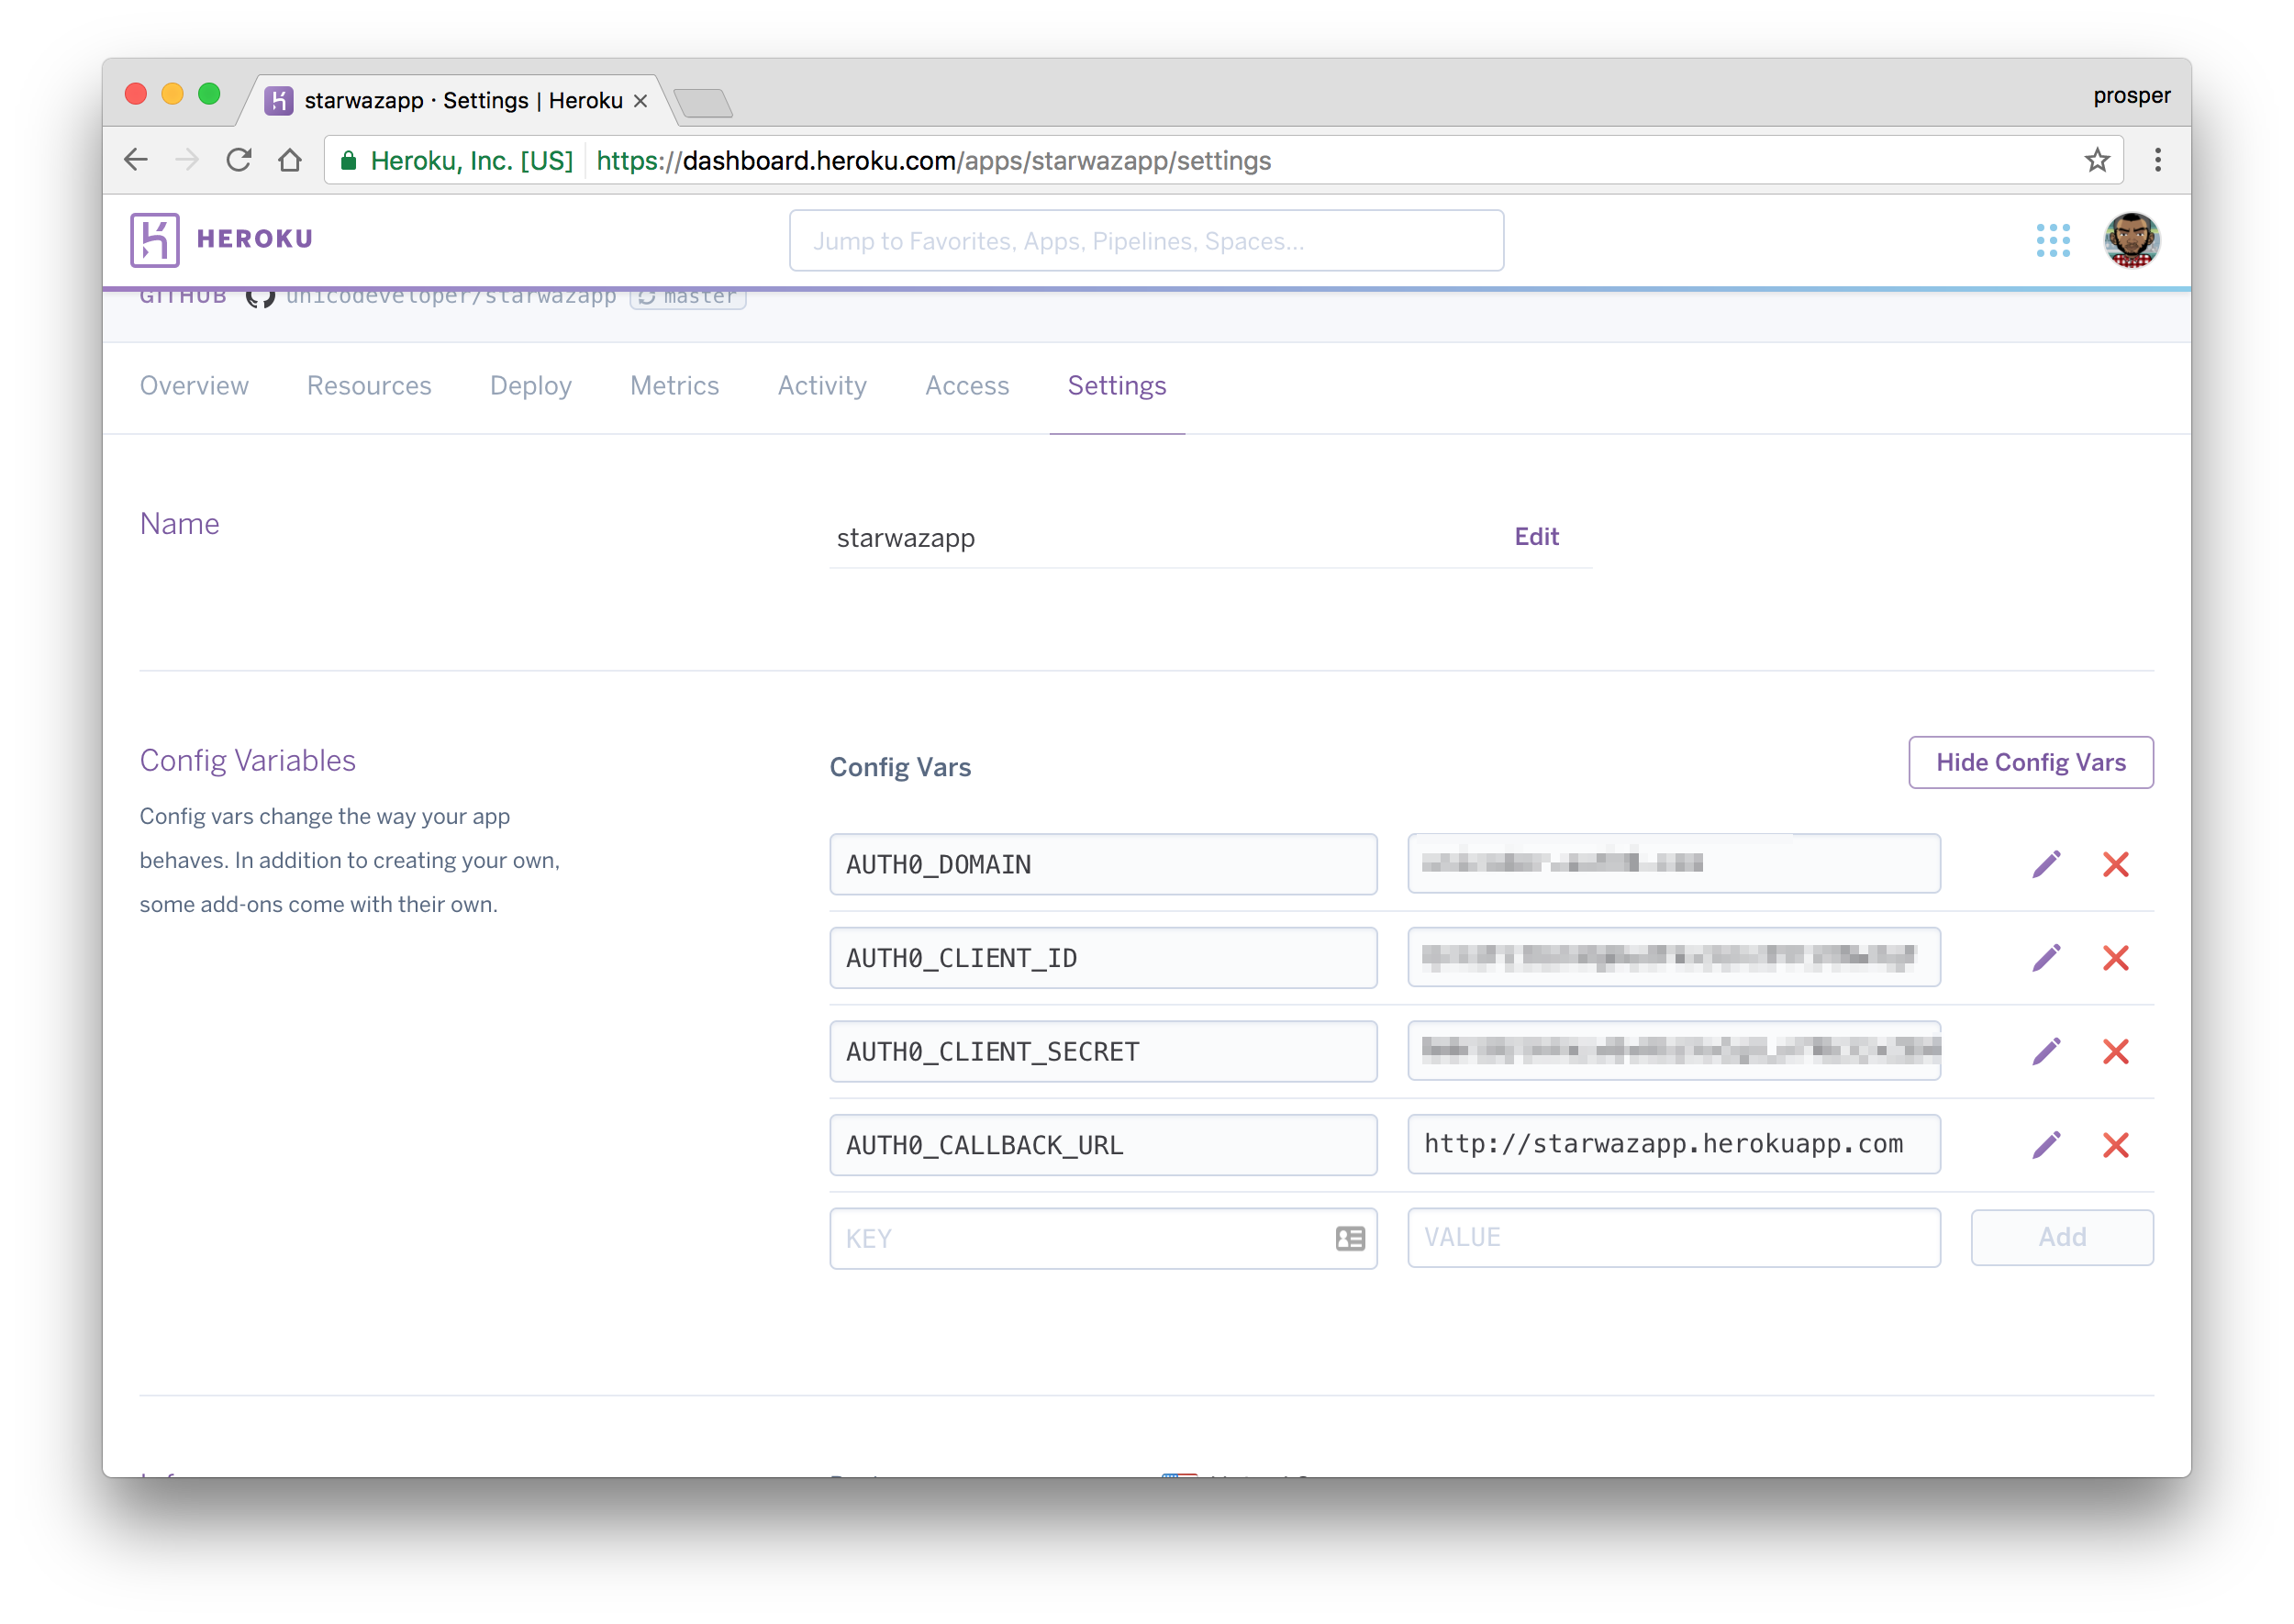
Oh, one more thing! The new callback url in my case is http://starwazapp.herokuapp.com. Make sure you add your new callback url to the Allowed Callback URLs in your Auth0 dashboard.
哦,还有一件事! 在我的情况下,新的回调URL是http://starwazapp.herokuapp.com 。 确保将新的回调URL添加到Auth0仪表板中的“ 允许的回调URL”中。
Your app should be live & working now!
您的应用现在应该可以运行了!
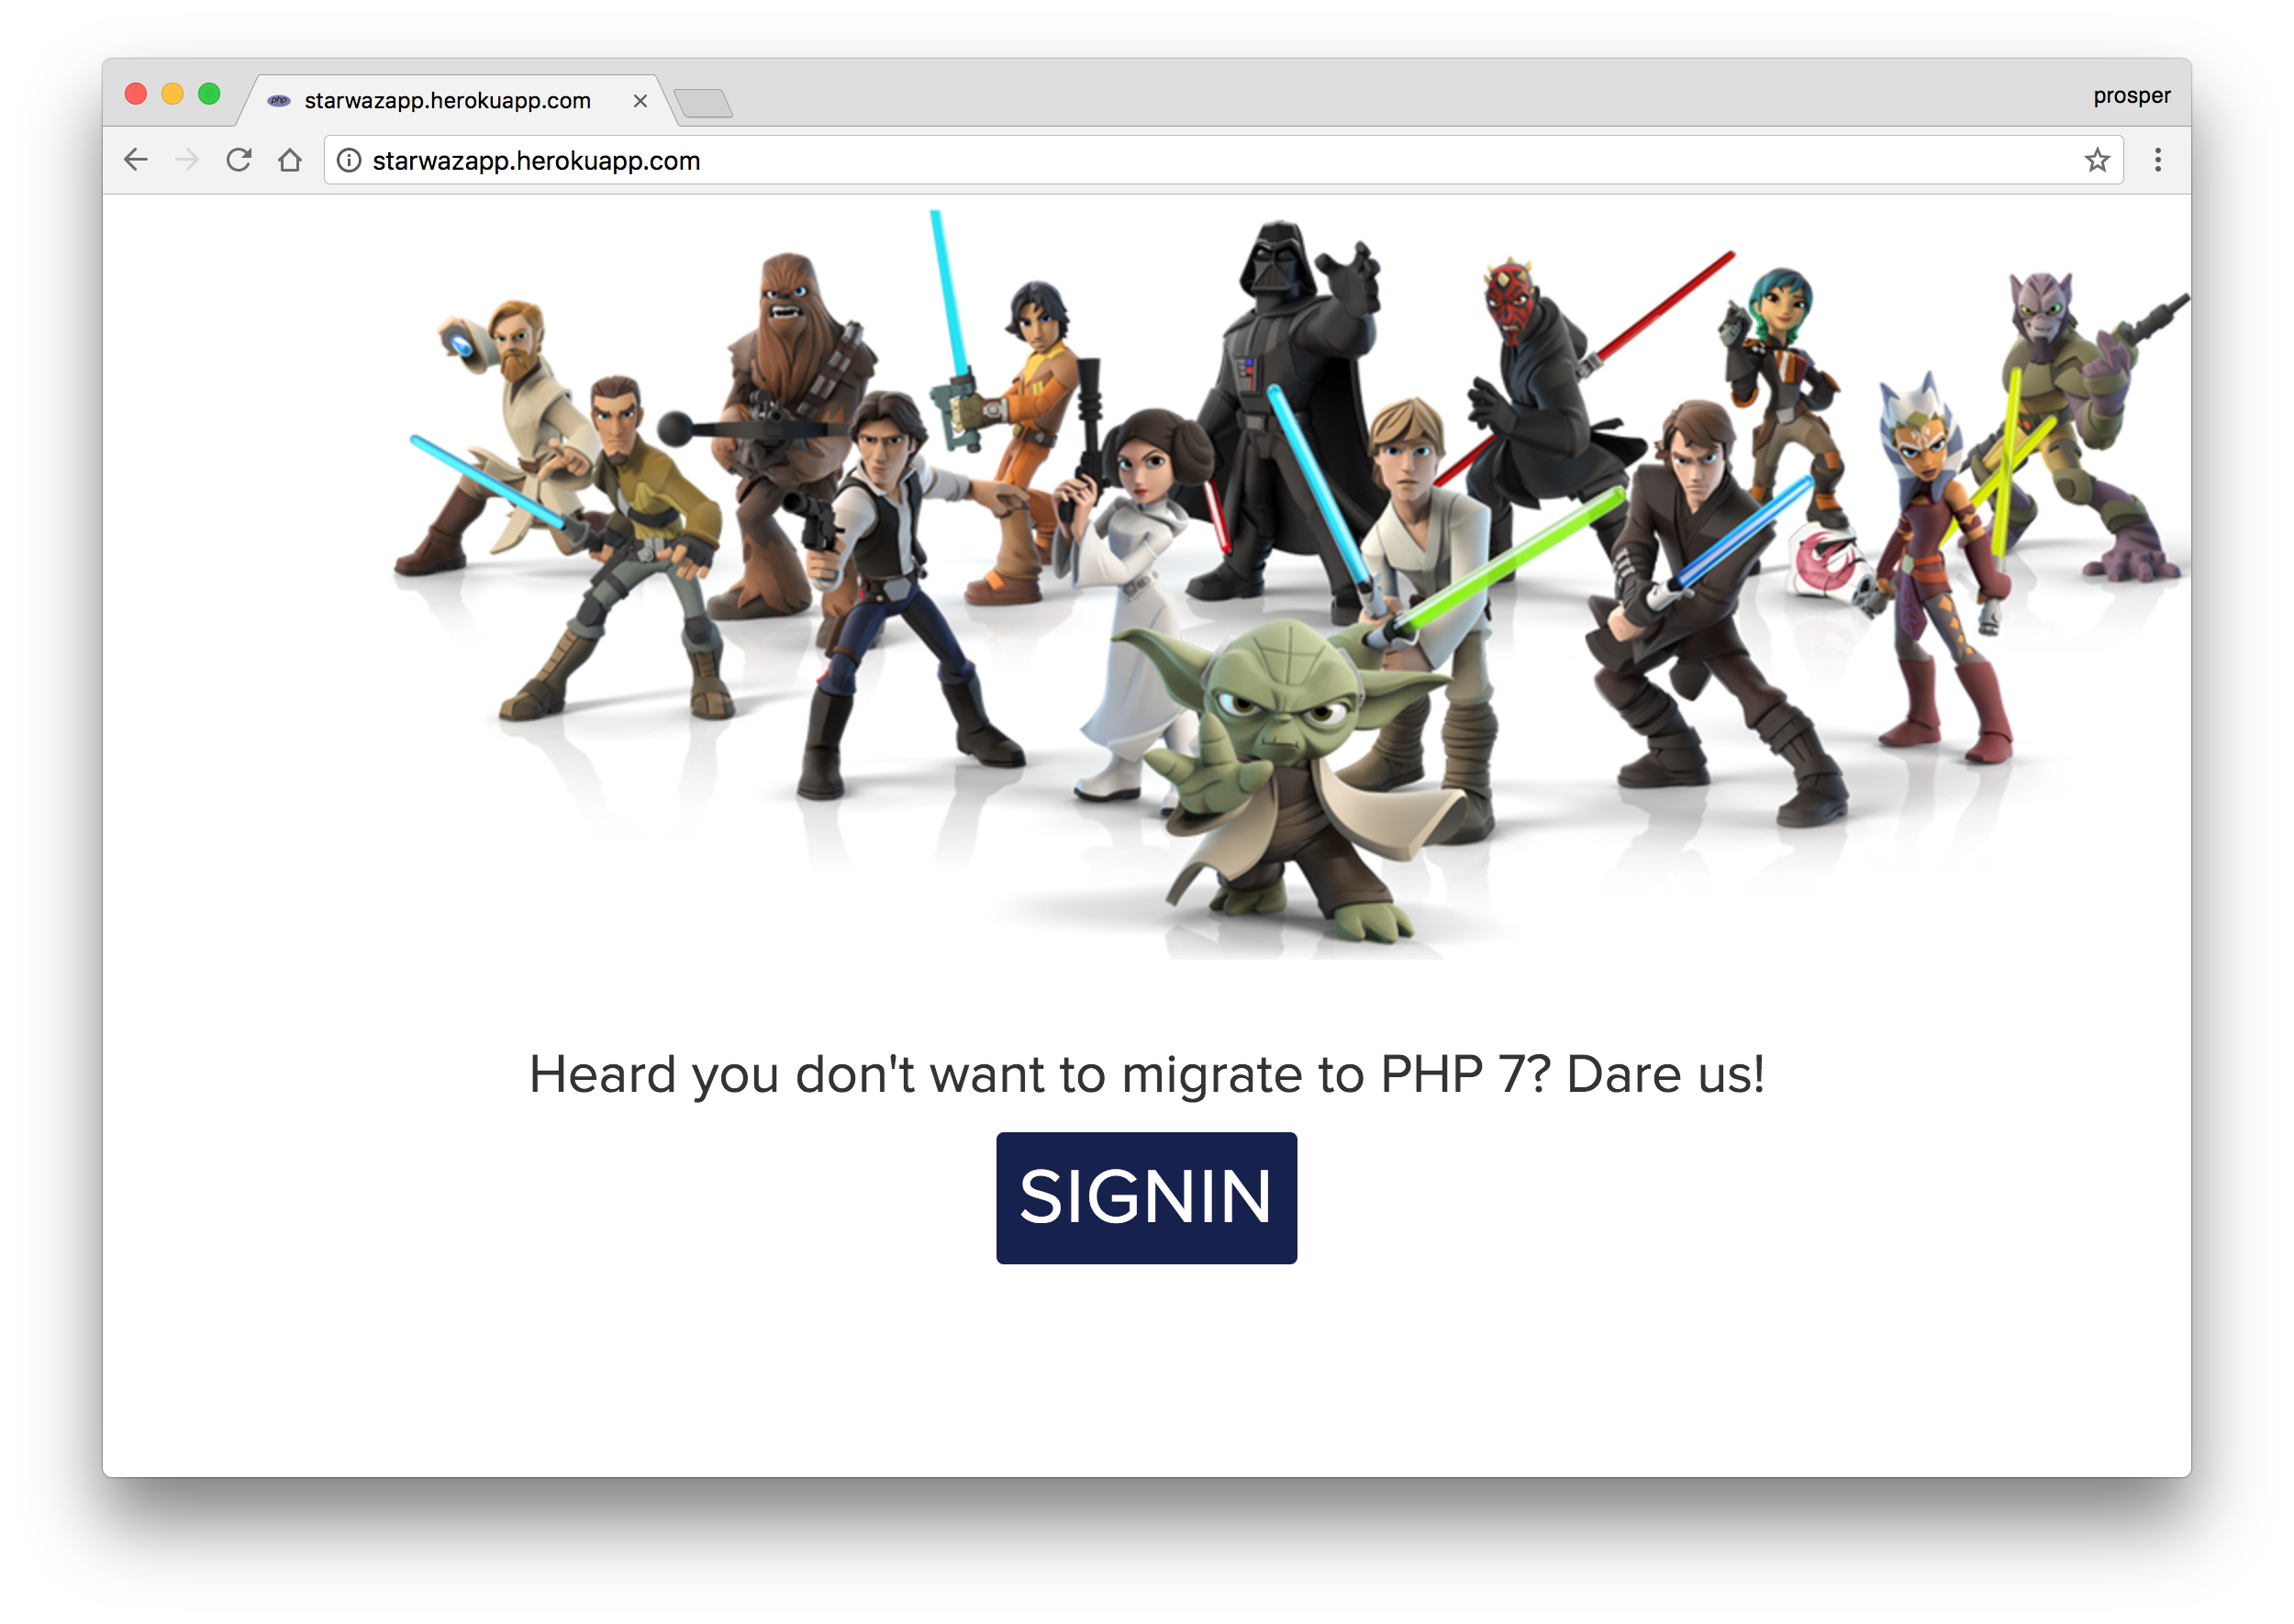
Live App
实时应用
做出一点零钱 (Make a small change)
Let’s make a small change to our app and see how effortlessly it deploys it to production.
让我们对应用程序进行一些小的更改,看看它如何轻松地将其部署到生产环境中。
Open index.php and change the content of the <p> tag from Heard you don't want to migrate to PHP 7? Dare us! to Star Wars - The Awakening!. Commit and push to your master branch. Now, go to the Activity tab of your Heroku Dashboard and notice the build. Reload your app and you’ll see the difference.
打开index.php并从Heard you don't want to migrate to PHP 7? Dare us!更改<p>标记的内容, Heard you don't want to migrate to PHP 7? Dare us! Heard you don't want to migrate to PHP 7? Dare us! Star Wars - The Awakening! 。 提交并推送到您的主分支。 现在,转到Heroku仪表板的“ 活动”选项卡,并注意构建。 重新加载您的应用程序,您会发现区别。
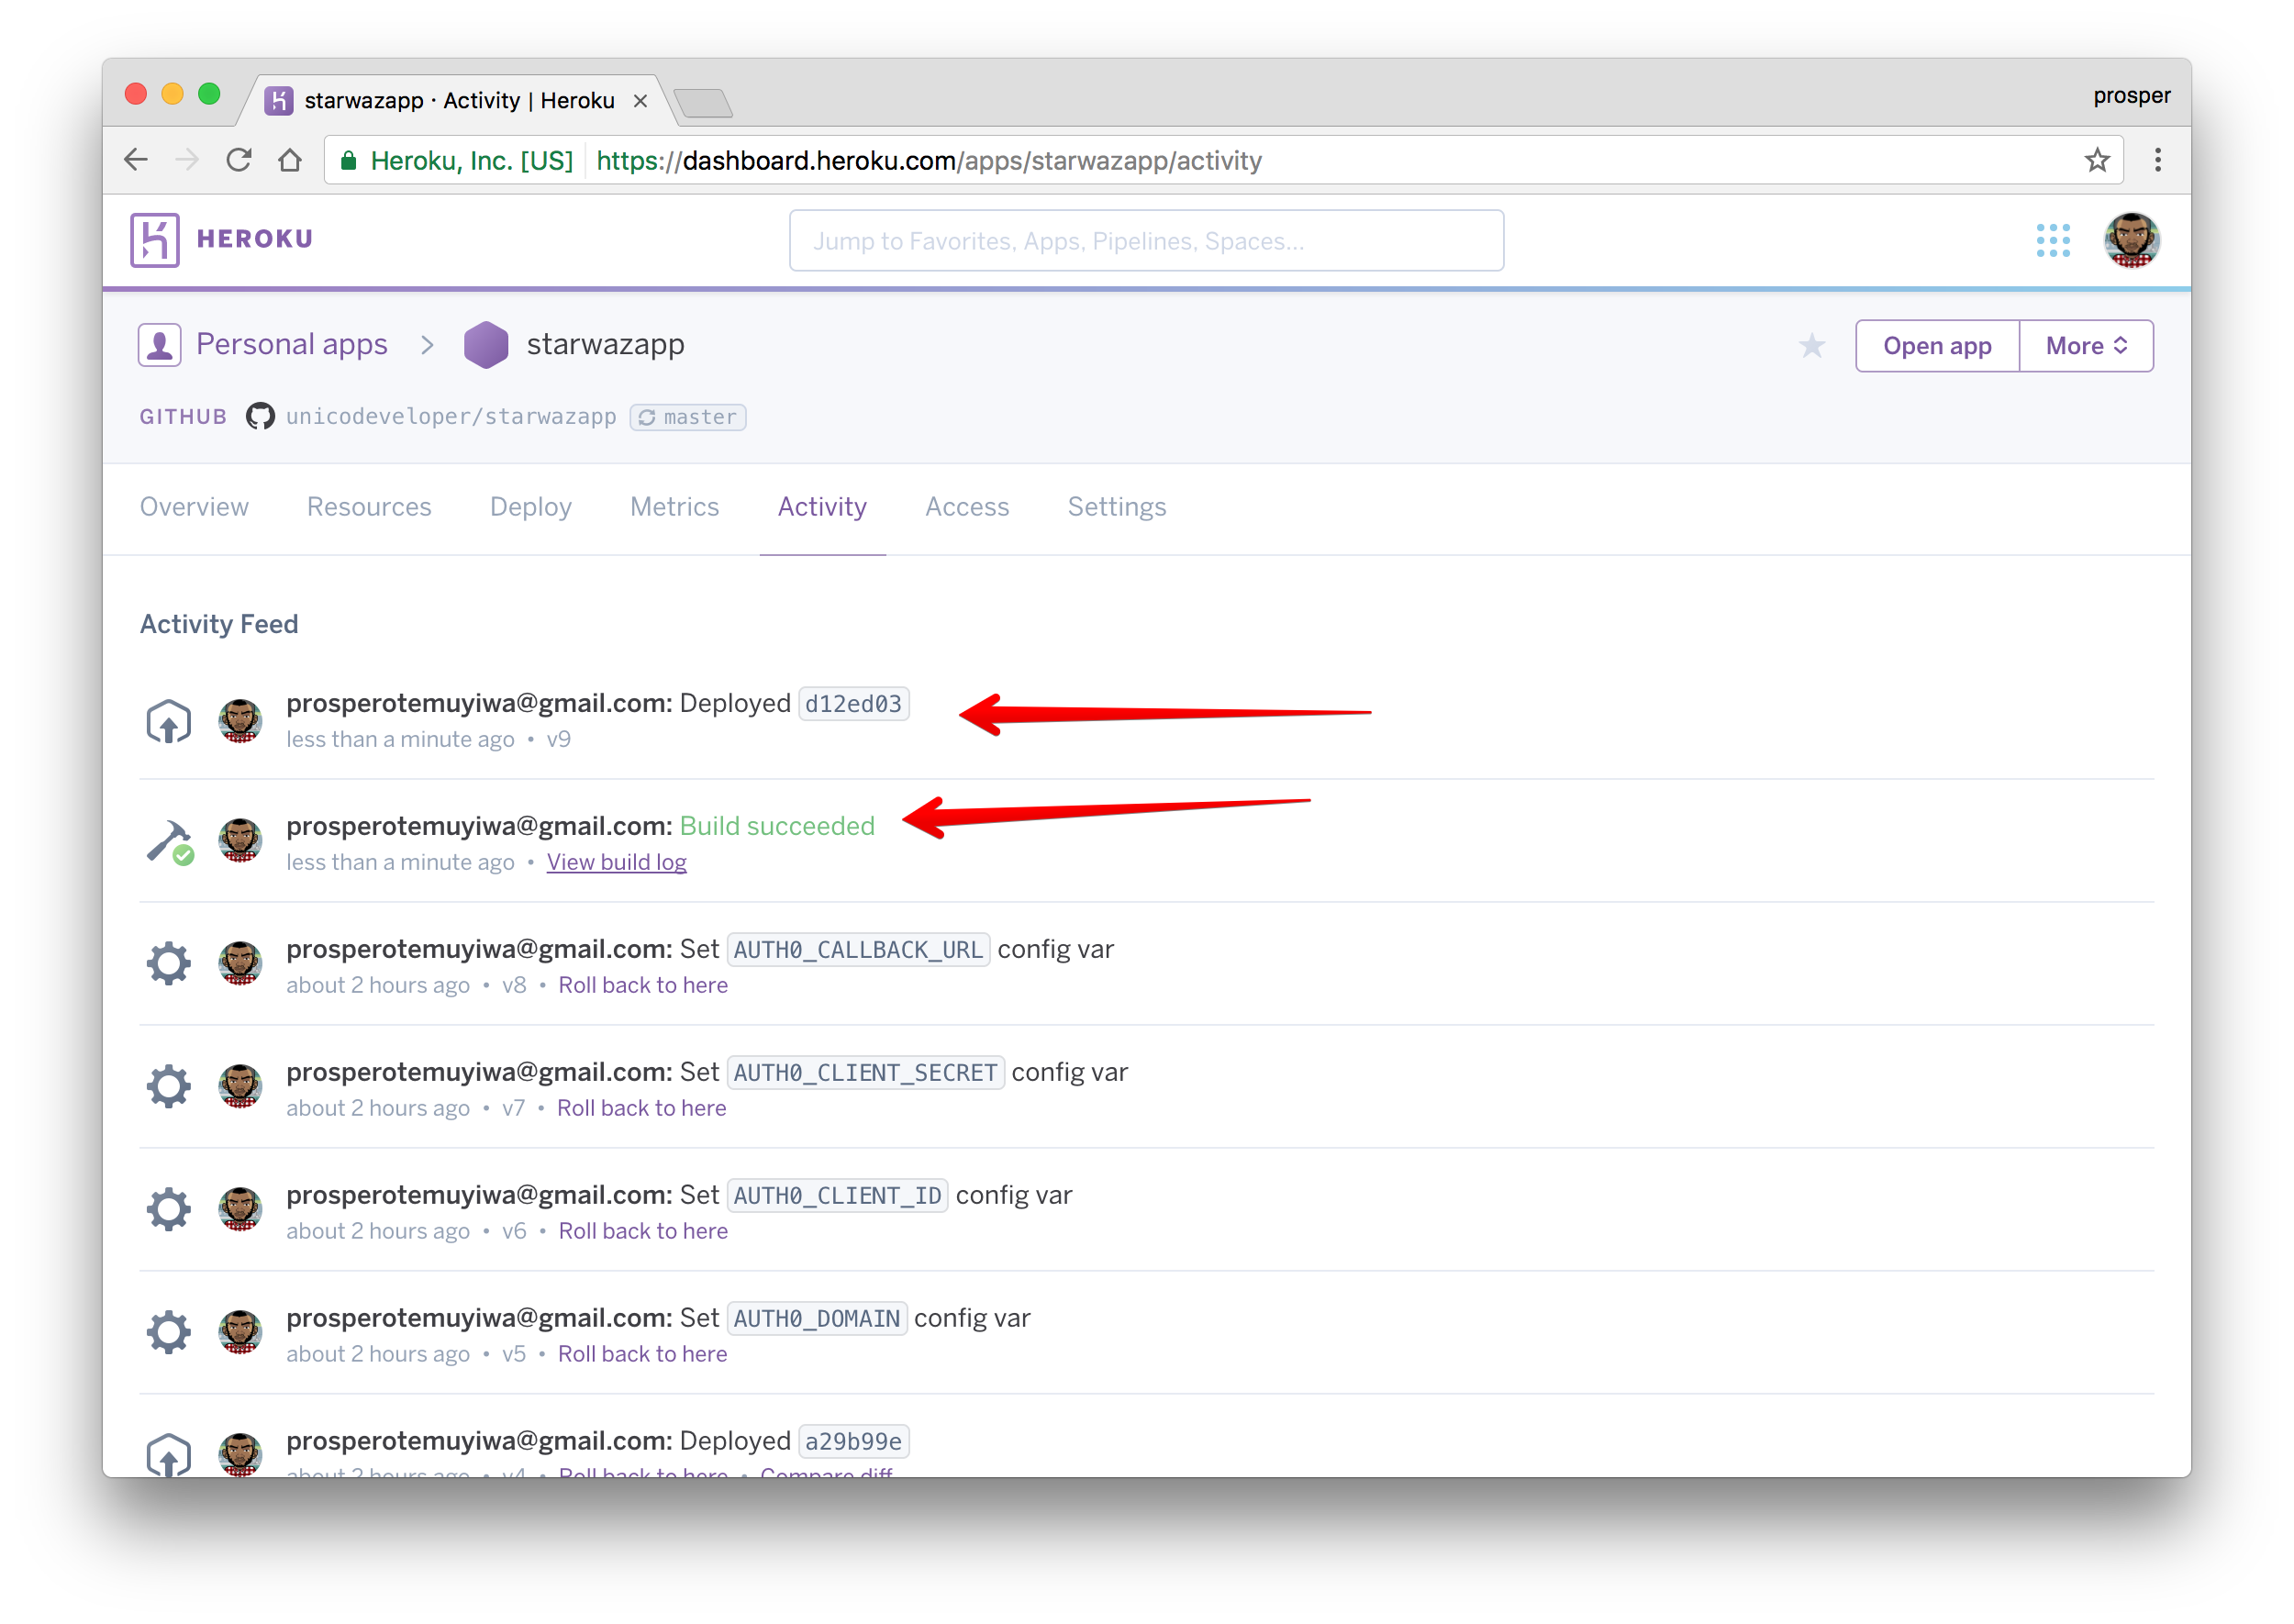
Build Succeeded
建立成功

New version
新版本
数据库,缓存和Cron作业 (Database, Caching & Cron Jobs)
Let’s quickly talk about how to handle the database, caching, and cron jobs. On Heroku, you can use ClearDB and Postgres with PHP. Add ClearDB to your app like so:
让我们快速讨论一下如何处理数据库,缓存和cron作业。 在Heroku上,可以将ClearDB和Postgres与PHP结合使用。 将ClearDB添加到您的应用中,如下所示:
heroku addons:create cleardb:igniteThis command provisions a new ClearDB database and returns the URL that the app will use to access it. All you need to do is add it to your app as an environment variable and parse it in your app’s config like so:
此命令提供一个新的ClearDB数据库,并返回应用程序将用来访问它的URL。 您需要做的就是将其作为环境变量添加到您的应用程序中,然后像下面这样在应用程序的配置中对其进行解析:
ClearDB is a powerful, fault tolerant database-as-a-service in the cloud for your MySQL powered applications.
对于您MySQL驱动的应用程序,ClearDB是云中功能强大的容错数据库即服务。
<?php
$url = parse_url(getenv("CLEARDB_DATABASE_URL"));

$server = $url["host"];
$username = $url["user"];
$password = $url["pass"];
$db = substr($url["path"], 1);

$conn = new mysqli($server, $username, $password, $db);
?>
using mysqli
使用mysqli
You can tweak that to suit the PDO style. Add Postgres to your app like so:
您可以对其进行调整以适合PDO样式。 像这样将Postgres添加到您的应用中:
heroku addons:create heroku-postgresql:hobby-devHead over to the addons, and you’ll see other kinds of databases that you can use with your PHP app.
转到插件 ,您将看到可以与PHP应用程序一起使用的其他类型的数据库。
Heroku provides an array of addons for caching, from memcache, to fastly , to ironcache, and others. You can check out how to use memcache with PHP on Heroku here.
Heroku提供了一系列用于缓存的插件,从memcache到fastly到ironcache等等。 您可以在此处查看如何在PHP的Heroku上使用memcache 。
Finally, you can use the Heroku Scheduler for running jobs on your app at scheduled time intervals.
最后,您可以使用Heroku Scheduler在计划的时间间隔上在应用程序上运行作业。
谷歌云 (Google Cloud)
The Google Cloud platform is a giant and trusted cloud platform that a lot of companies all over the world have adopted in deploying and hosting their apps. Your apps will be running on the same infrastructure that powers all of Google’s products. What other form of confidence do you need to assure you that your application will scale well enough to serve your thousands and millions of users easily?
Google Cloud平台是一个巨大且值得信赖的云平台,世界各地的许多公司都在部署和托管其应用程序时采用了该平台。 您的应用将在支持所有Google产品的相同基础架构上运行。 您还需要其他什么信心形式来确保您的应用程序可以很好地扩展以轻松地为成千上万的用户提供服务?
Google Cloud offers different options for hosting PHP apps. The platform offers App Engine (Fully managed), Compute Engine (Scalable VMs) and Container Engine (Kubernetes Clusters).
Google Cloud提供了不同的托管PHP应用程序的选项。 该平台提供App Engine(完全托管) , Compute Engine(可伸缩VM)和Container Engine(Kubernetes群集) 。
In our case, we’ll use App Engine. It abstracts the infrastructure away. Let’s jump into deploying our famous Star Wars app to Google App Engine.
在本例中,我们将使用App Engine。 它将基础架构抽象化。 让我们开始将著名的《星球大战》应用程序部署到Google App Engine。
When using Google App Engine, you can choose the Standard or Flexible environment. The latter, like the name implies, allows you to install any PHP extension that works on Debian Linux, has a configurable Nginx web server, writable filesystem, latest PHP versions and allows you to run deployment scripts using composer.json.
使用Google App Engine时,您可以选择标准或灵活环境。 顾名思义,后者允许您安装可在Debian Linux上运行的任何PHP扩展,具有可配置的Nginx Web服务器,可写的文件系统,最新PHP版本,并允许您使用composer.json运行部署脚本。
We’ll use the flexible environment. Go ahead and create a new project. Click on Create, give the project a name, select the region you’d like to serve your app in, and enable billing.
我们将使用灵活的环境。 继续创建一个新项目 。 点击创建 ,为项目命名,选择您要在其中投放应用的区域,然后启用结算。
Note: You won’t be charged without your permission.
注意:未经您的许可不会向您收费。
Now, download the Google SDK and install the Google Cloud tools.
现在,下载Google SDK并安装Google Cloud工具。
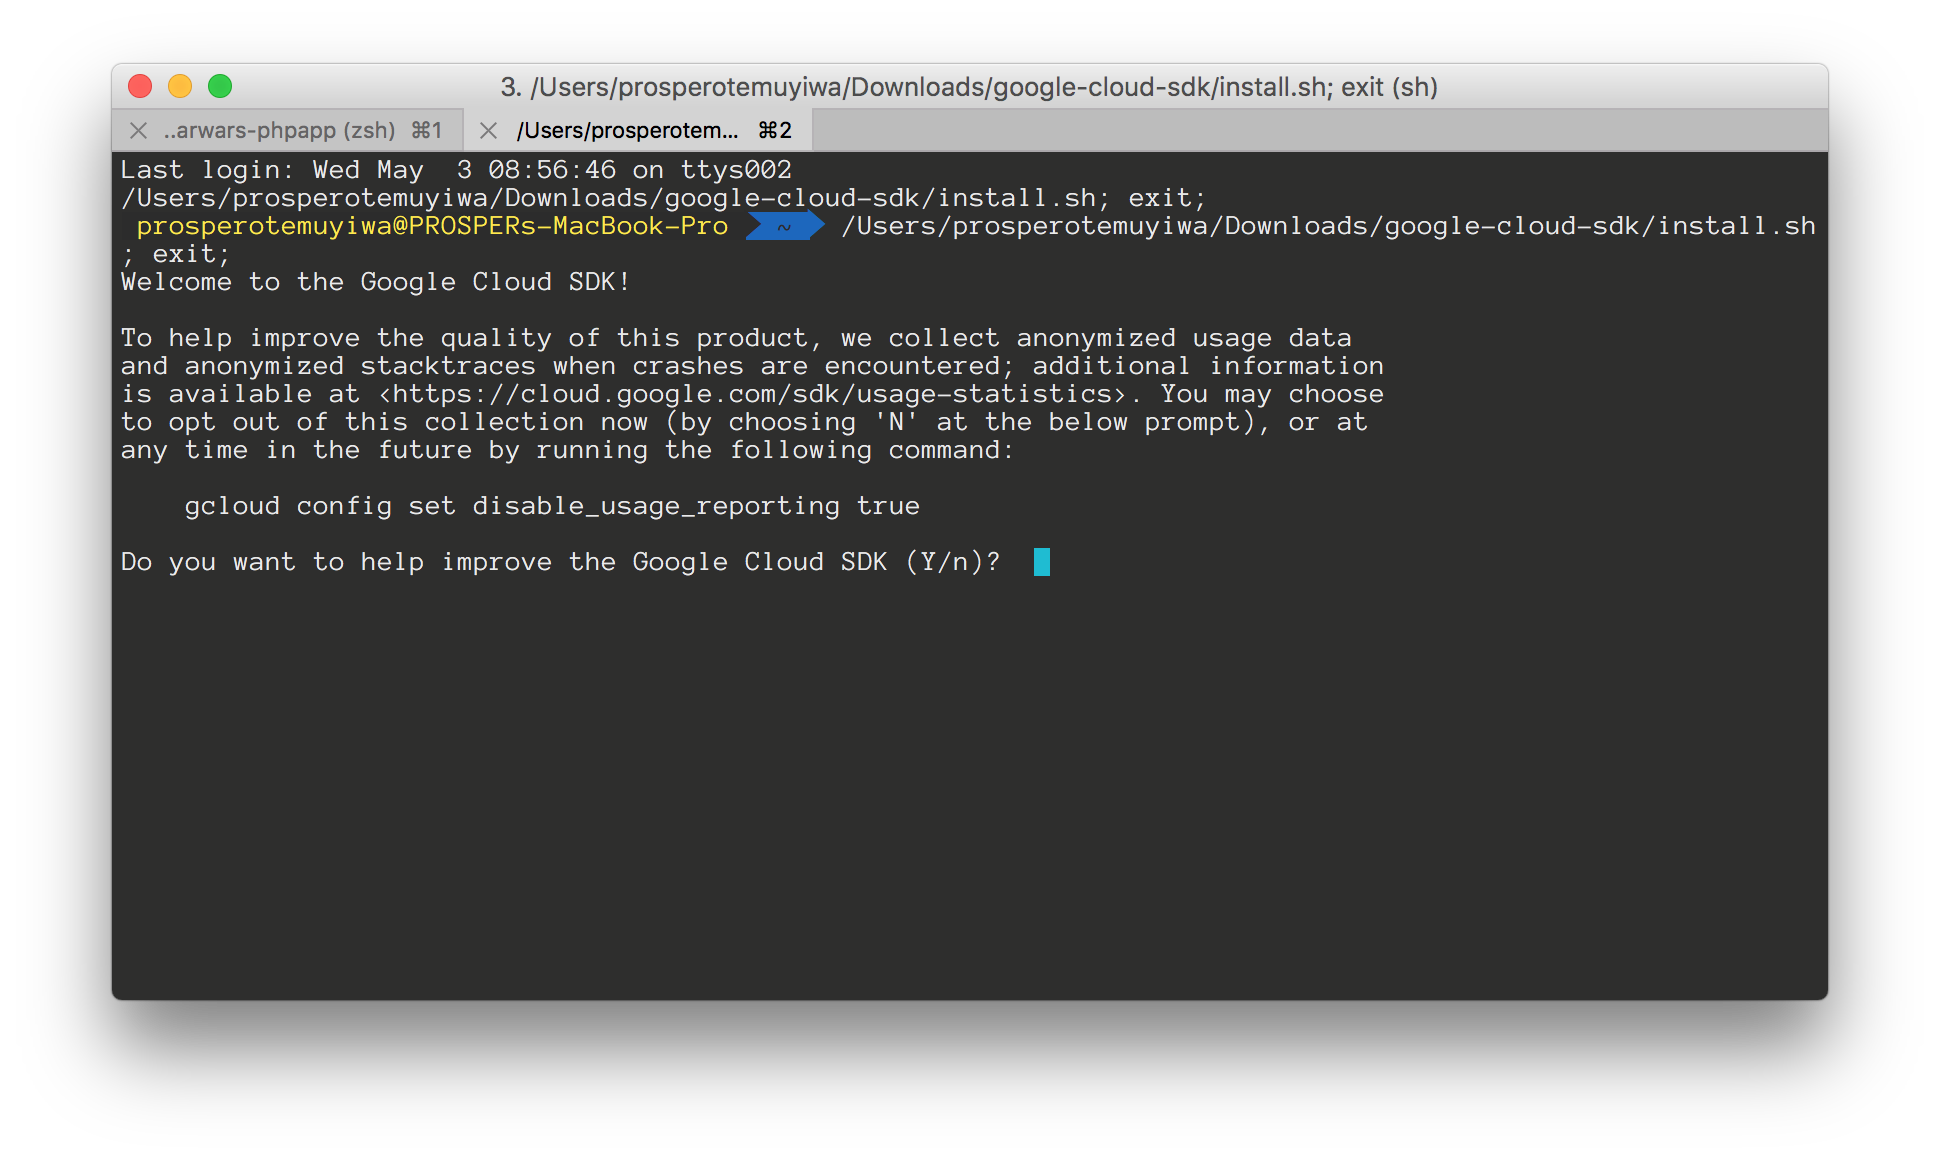
Installing Google SDK
安装Google SDK
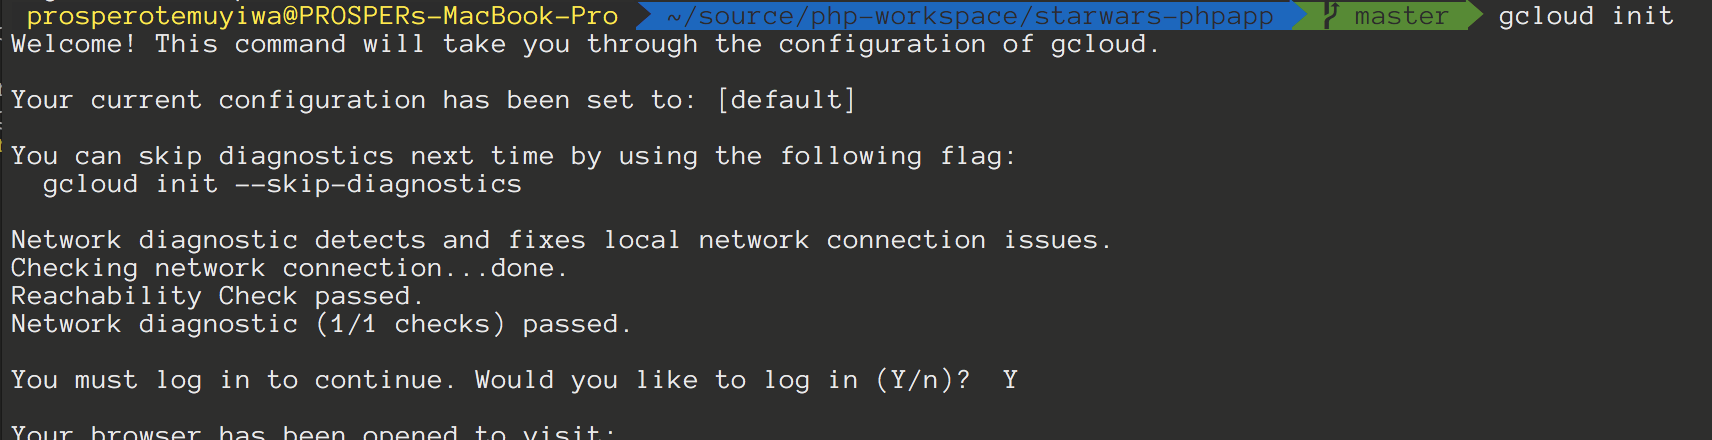
Running gcloud
运行gcloud
Go ahead and create an app.yaml file in the root of our project like so:
继续在我们项目的根目录中创建一个app.yaml文件,如下所示:
app.yaml
app.yaml
runtime: php
env: flex
So, our .env file has been pushed to Google Cloud. An alternative to using that is to add the environment variables to the app.yaml file like so:
因此,我们的.env文件已推送到Google Cloud。 使用该方法的另一种方法是将环境变量添加到app.yaml文件中,如下所示:
...
env_variables:
  # The values here will override those in ".env". This is useful for
  # production-specific configuration. However, feel free to set these
  # values in ".env" instead if you prefer.
  APP_LOG: errorlog
Now, deploy your application from your console by running gcloud app deploy.
现在,通过运行gcloud app deploy从控制台gcloud app deploy 。
Grab the URL, in my case it is https://starwars-166515.appspot.com/, and add to Allowed Origins(CORS) and Allowed Callback URLs in your Auth0 dashboard. Also add the URL to AUTH0_CALLBACK_URL in your .env file.
抓取该URL(在我的情况下为https://starwars-166515.appspot.com/ ,然后在Auth0仪表板中添加到Allowed Origins(CORS)和Allowed Callback URL 。 同时添加的网址AUTH0_CALLBACK_URL在.env文件。
Run gcloud app deploy again to provision a new version of the app. Check out your app now. It should be live like so:
再次运行gcloud app deploy以置备该应用程序的新版本。 立即查看您的应用。 它应该像这样活着:

Live App
实时应用
数据库,缓存和Cron作业 (Database, Caching & Cron Jobs)
Google Cloud provides a Cloud SQL Instance platform. Check out how to configure, connect and create MySQL instances for your app here.
Google Cloud提供了Cloud SQL实例平台。 在此处查看如何为您的应用配置,连接和创建MySQL实例 。
You can also use phpMyAdmin on Google App Engine.
您还可以在Google App Engine上使用phpMyAdmin 。
Google App Engine includes implementations of the standard Memcache and Memcached APIs. Check out how to use Memcache in your app on Google Cloud.
Google App Engine包含标准Memcache和Memcached API的实现。 了解如何在Google Cloud的应用程序中使用Memcache 。
The App Engine Cron Service allows you to configure regularly scheduled tasks that operate at defined times or regular intervals. Check out how to schedule cron jobs and use task queues with PHP on Google Cloud.
通过App Engine Cron服务,您可以配置定期执行的任务,这些任务在定义的时间或固定的时间间隔运行。 了解如何安排cron作业以及如何在Google Cloud上通过PHP使用任务队列 。
It’s relatively easy to deploy Laravel, Symfony and WordPress apps to the Google Cloud Platform.
将Laravel , Symfony和WordPress应用程序部署到Google Cloud Platform相对容易。
IBM BlueMix (IBM BlueMix)
IBM Bluemix allows you to easily configure, deploy and scale on a powerful, high performance global cloud infrastructure. Let’s jump into deploying our famous Star Wars app to IBM Bluemix.
IBM Bluemix使您可以轻松地在功能强大的高性能全局云基础架构上进行配置,部署和扩展。 让我们开始将著名的《星球大战》应用程序部署到IBM Bluemix。
Sign up on Bluemix like so:
像这样注册Bluemix :
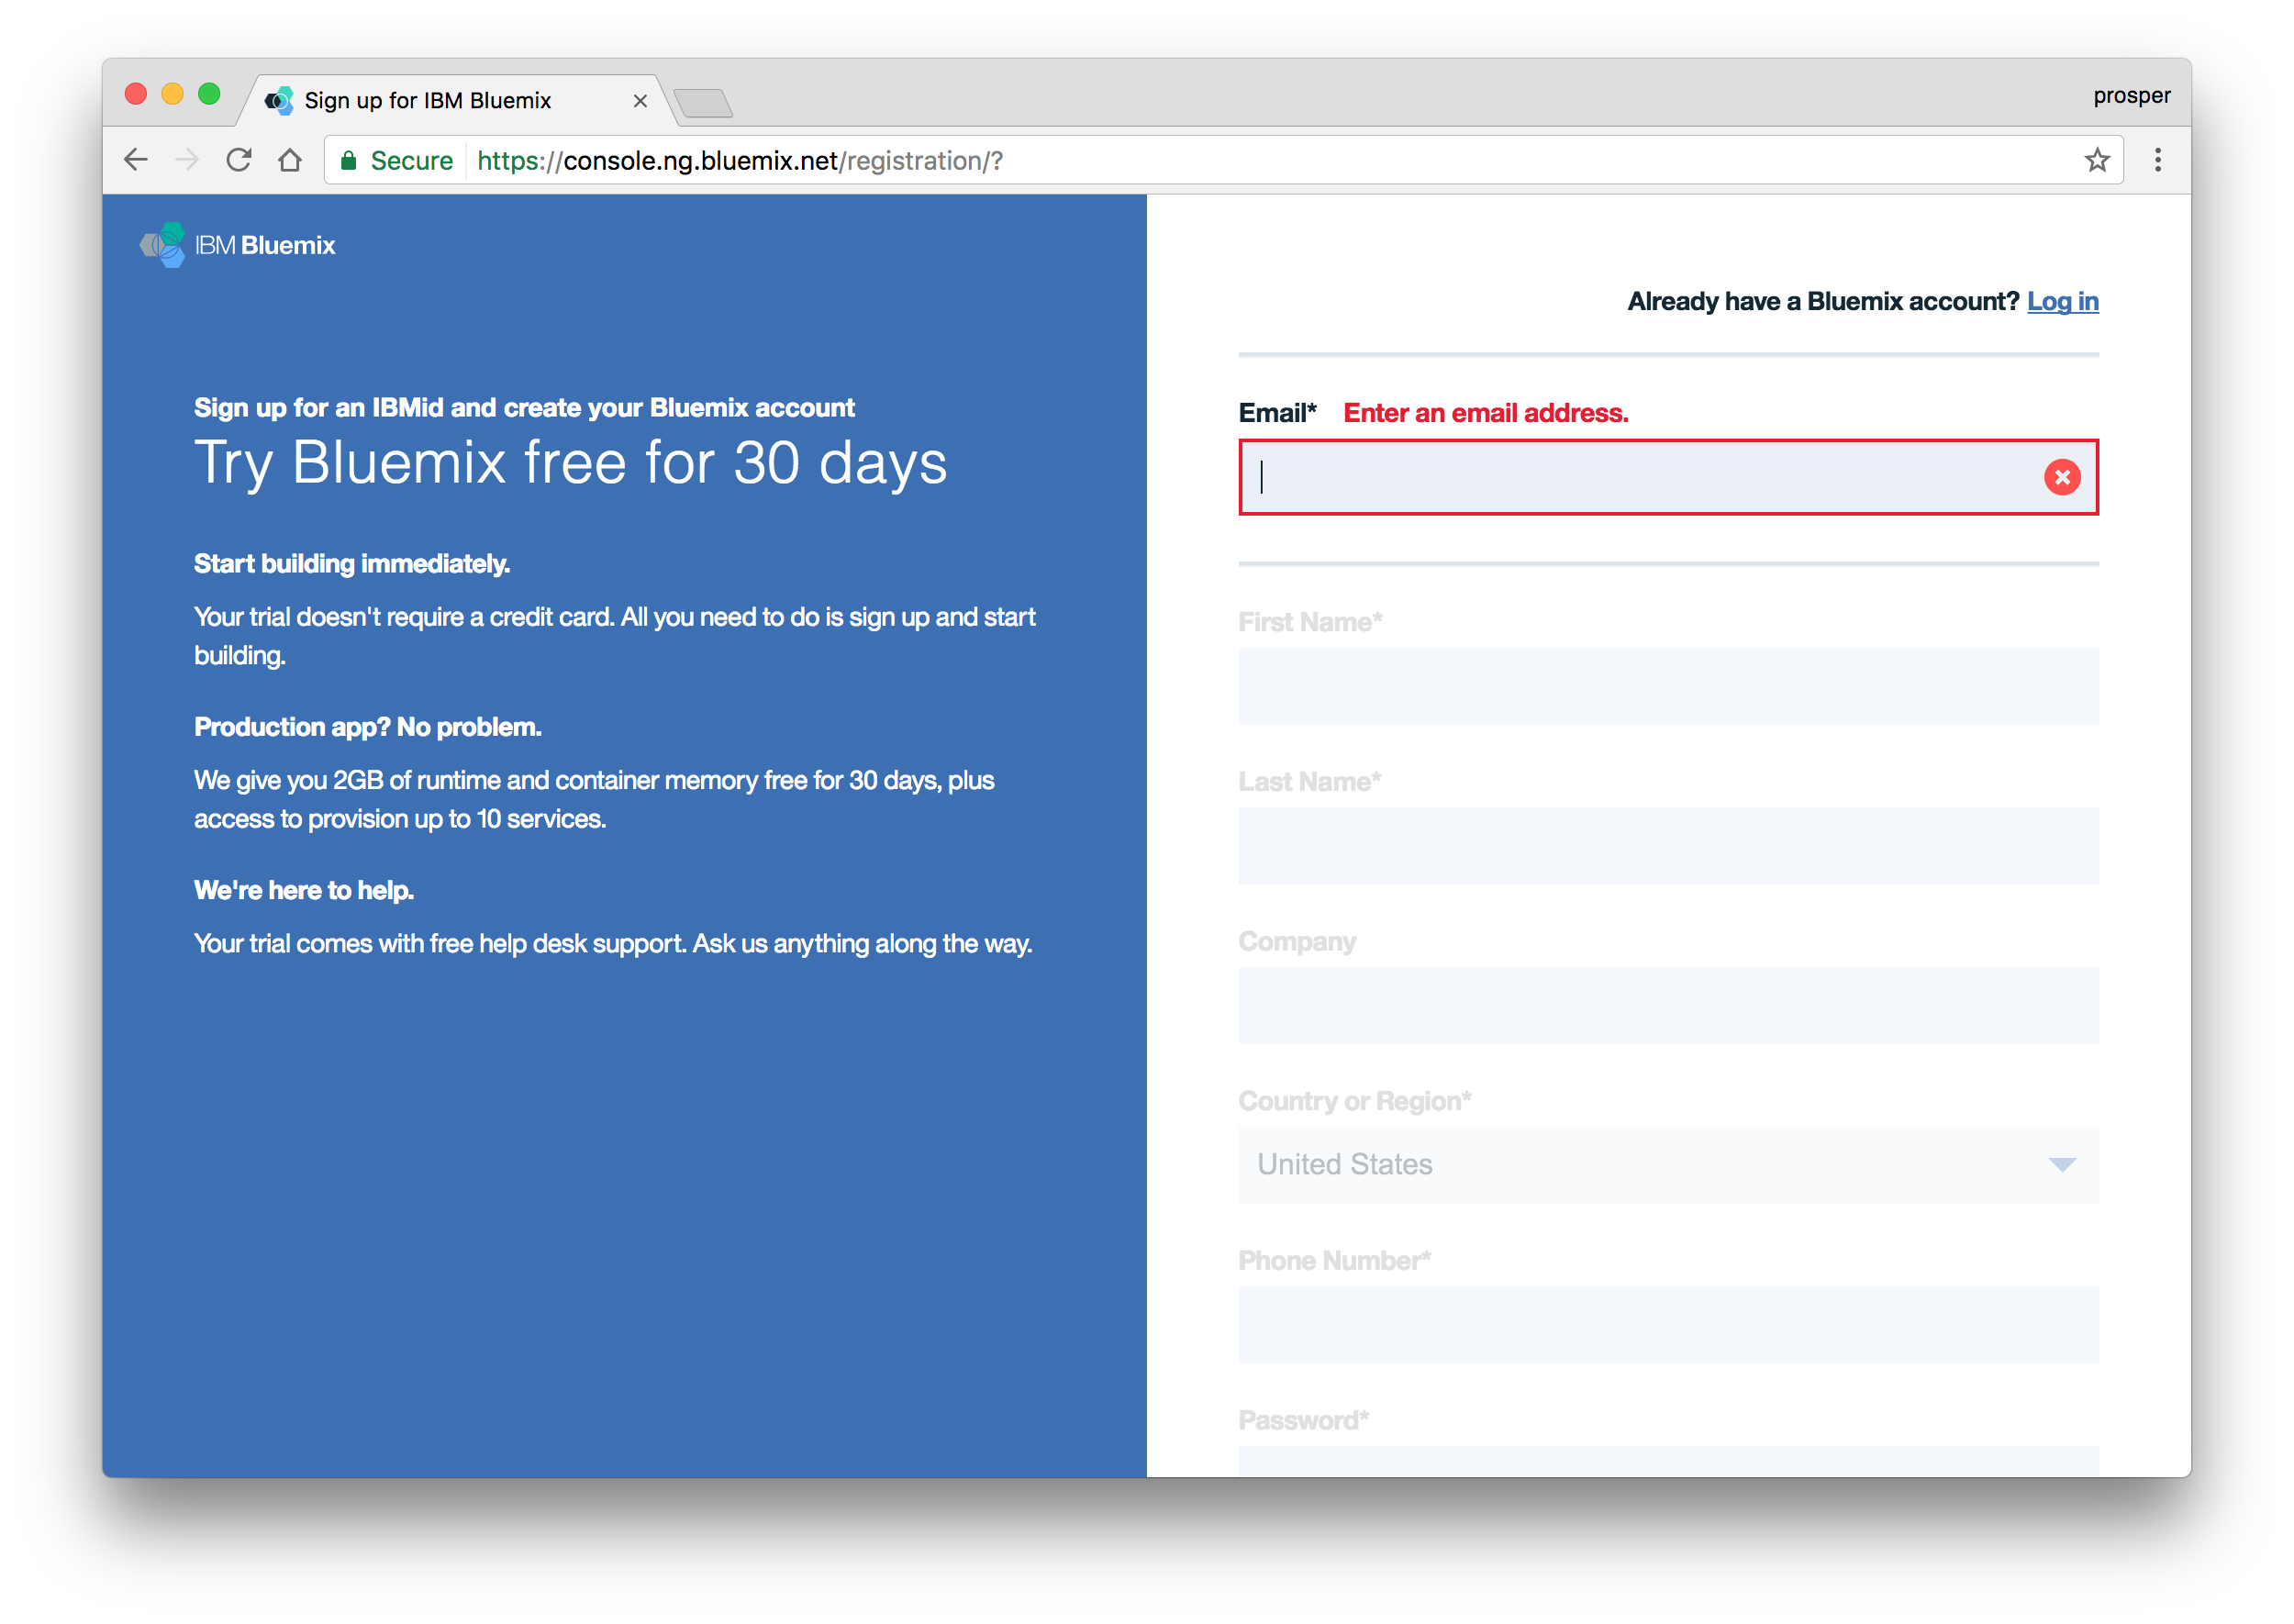
Signup on Bluemix
在Bluemix上注册
Note: The Bluemix platform offers a 30-day free trial so you have a chance to try deploying your own application before handing over your credit card details.
注意: Bluemix平台提供30天的免费试用期,因此您有机会在部署信用卡详细信息之前尝试部署自己的应用程序。
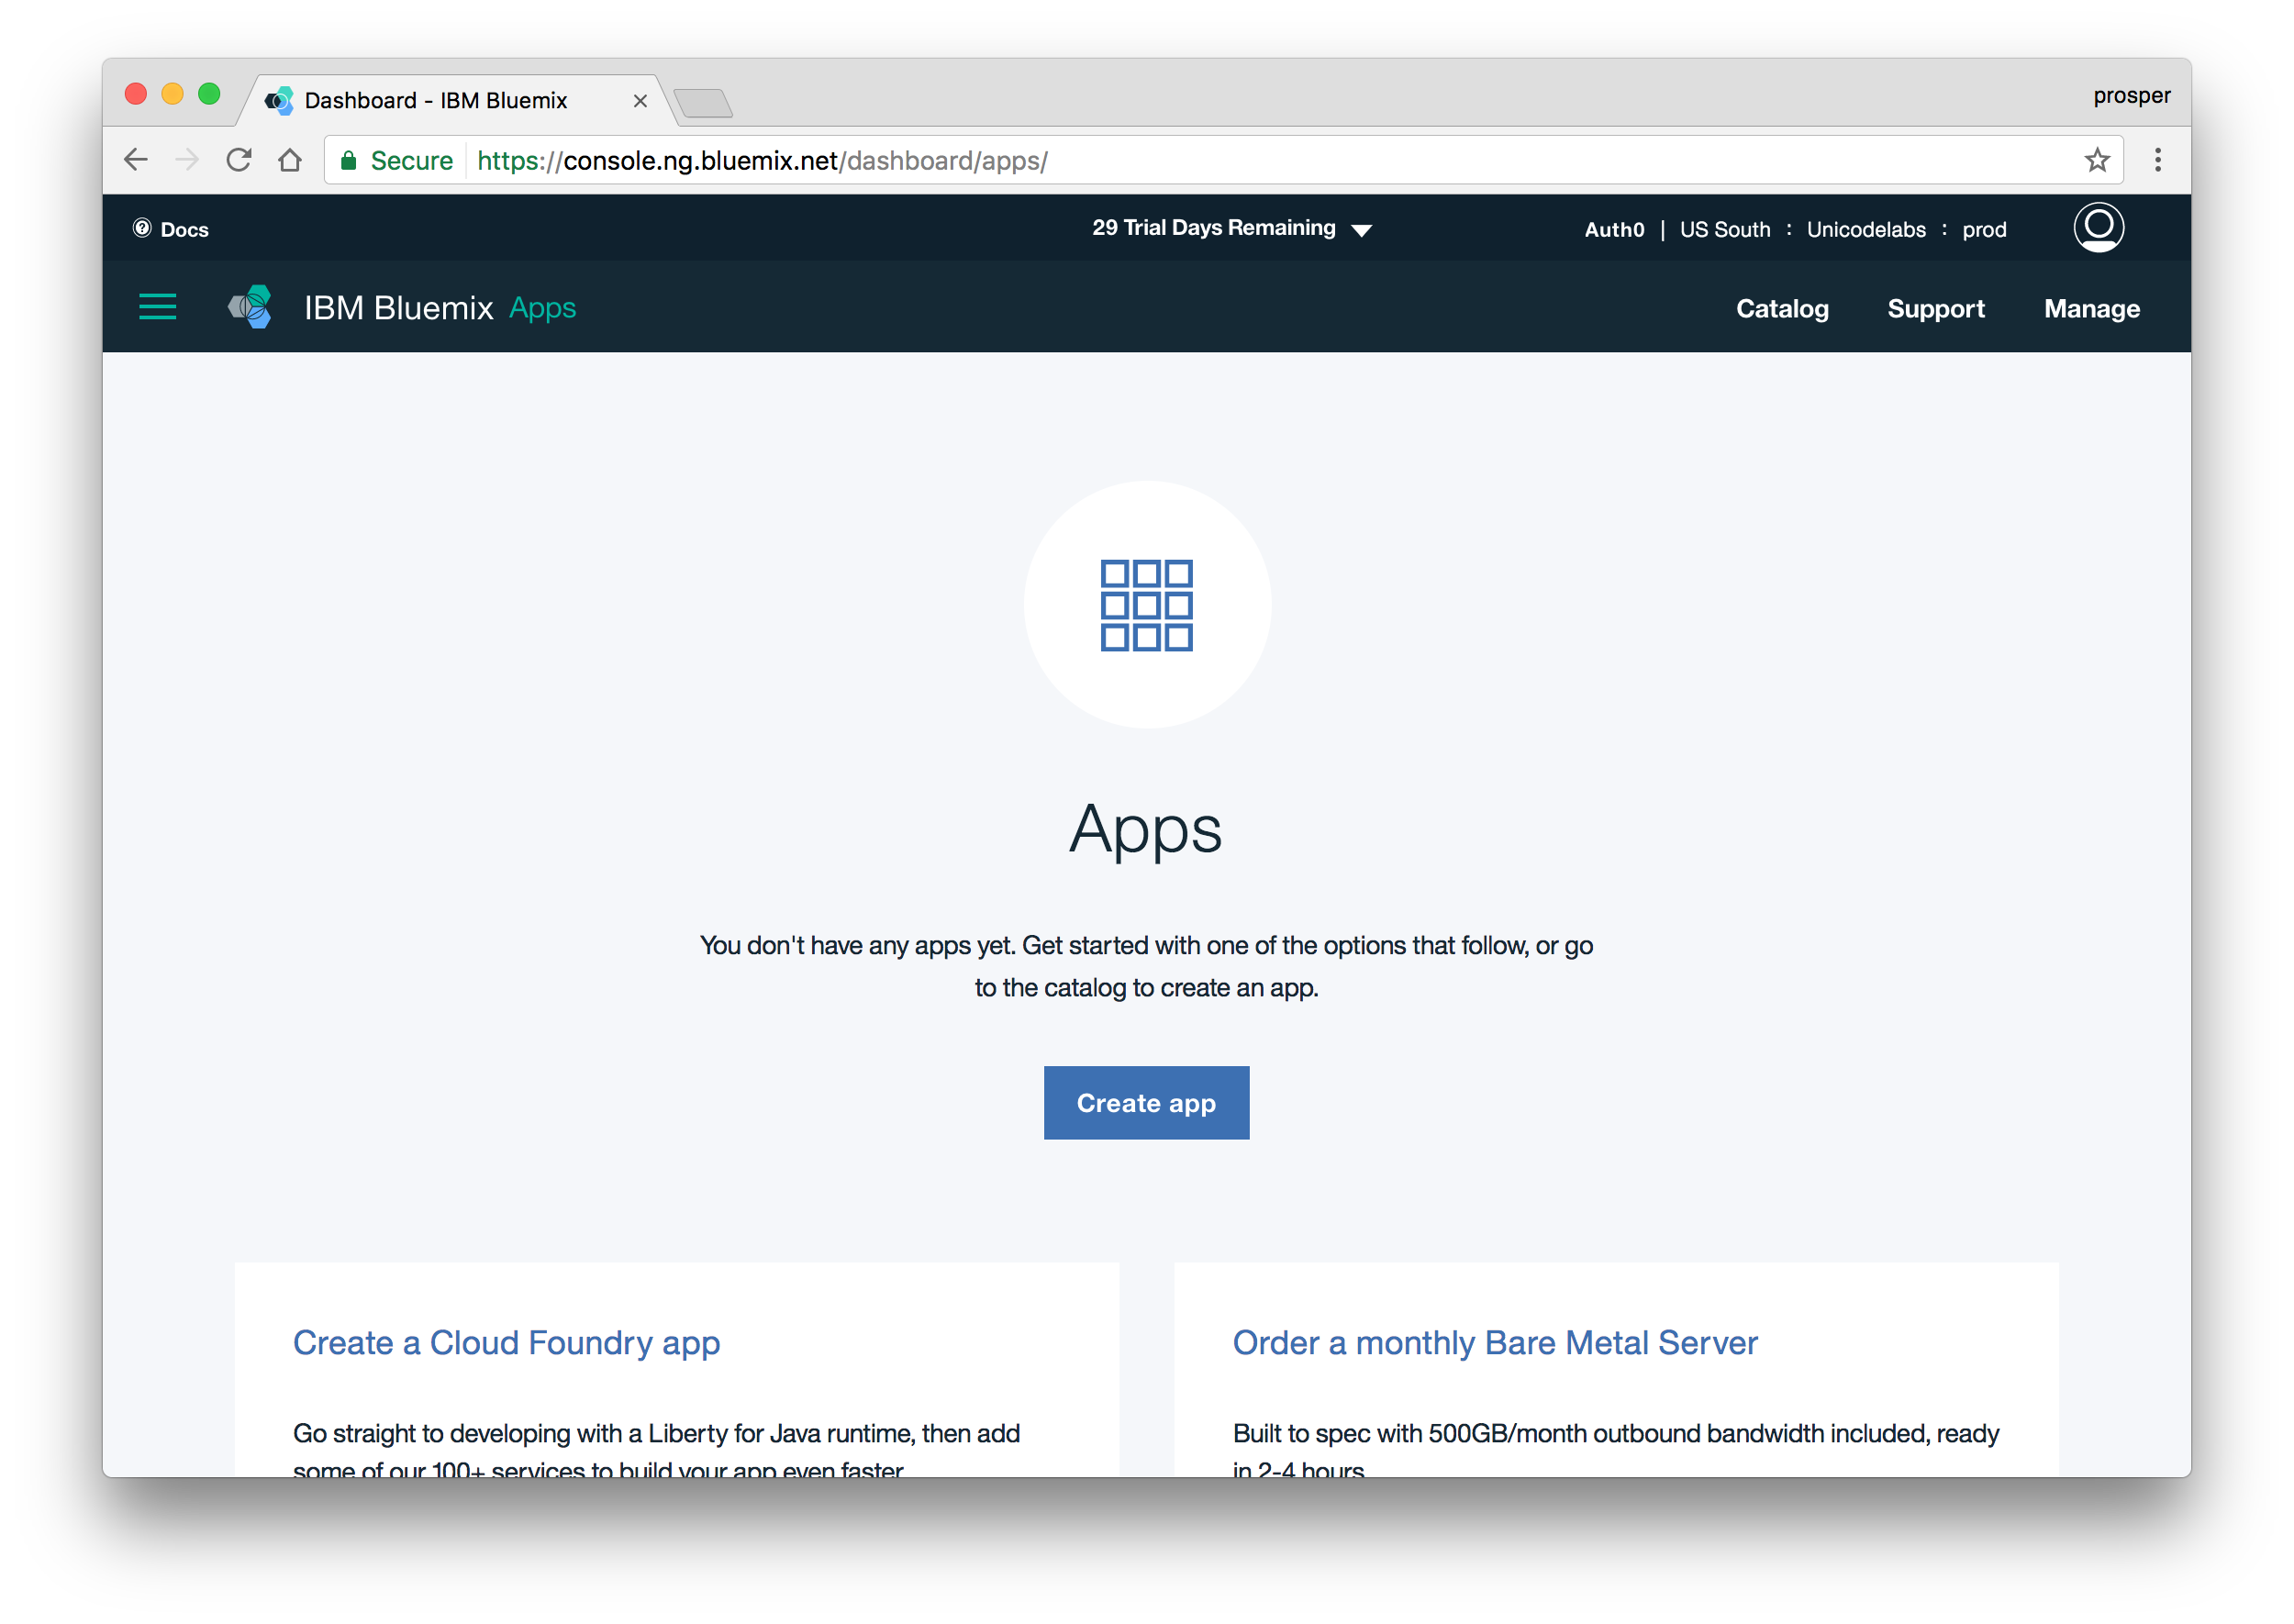
Go ahead and create an organization and space. I named my space prod.
继续创建组织和空间。 我命名了太空prod 。
Now, go ahead and install the Cloud Foundry CLI. Once you have done that, log in from your terminal like so:
现在,继续安装Cloud Foundry CLI 。 完成此操作后,请从终端登录,如下所示:
cf api https://api.ng.bluemix.net/
cf login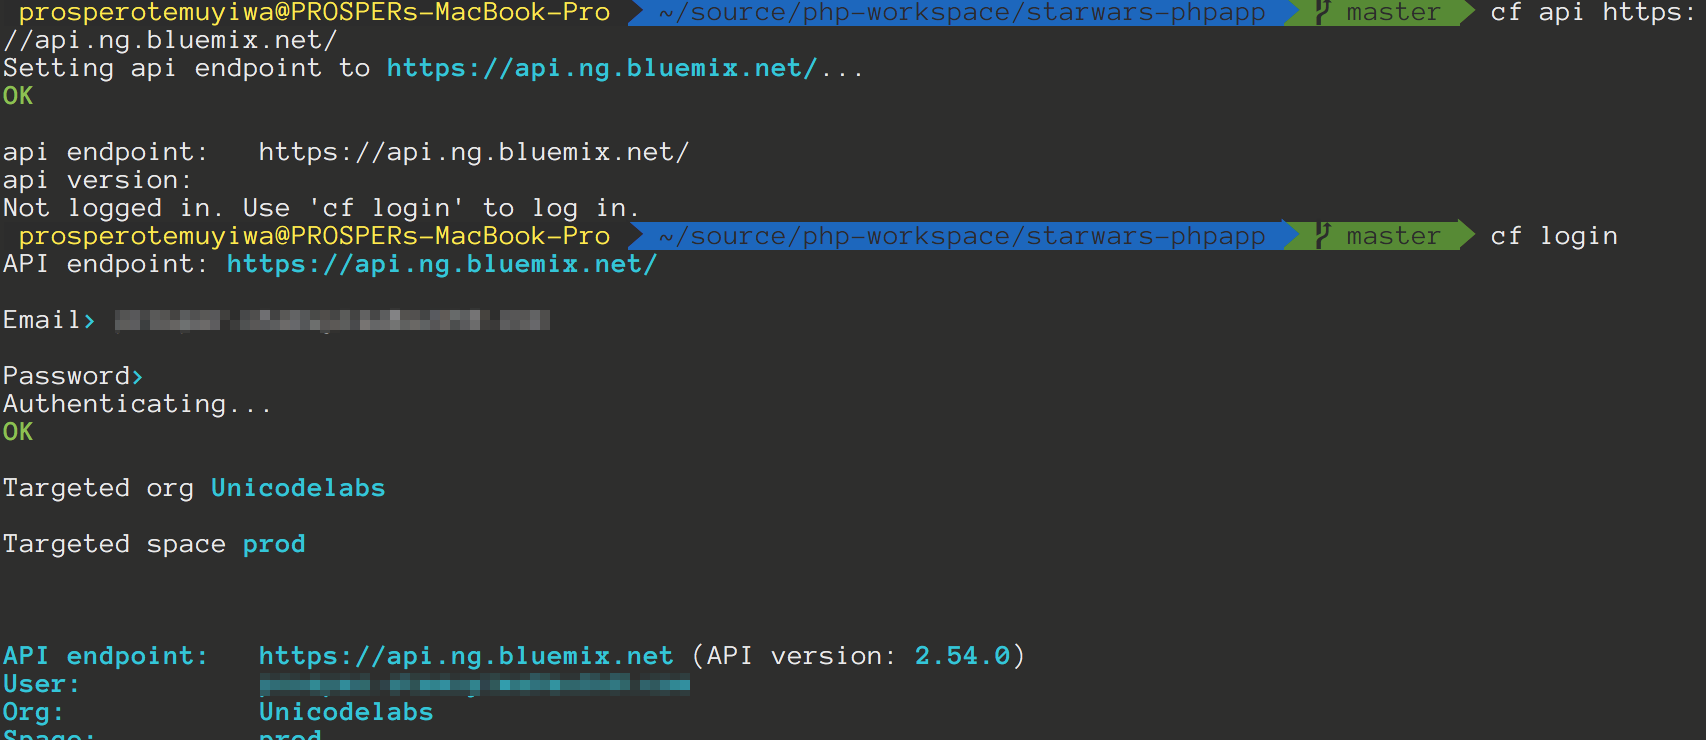
Log in to Bluemix
登录到Bluemix
The next step is to create a manifest.yml file in the root directory of the app. The manifest.yml file includes basic information about your app, such as the name, how much memory to allocate for each instance, and the route. Our manifest file should look like this:
下一步是在应用程序的根目录中创建manifest.yml文件。 manifest.yml文件包含有关您的应用程序的基本信息,例如名称,为每个实例分配的内存量以及路由。 我们的清单文件应如下所示:
---
applications:
  - name: starwarsapp
    memory: 512M
    instances: 1
    host: starwarsapp
You can also explicitly specify the buildpack in the manifest file. Thankfully, Cloud Foundry automatically detects which buildpack is required when you push an app.
您还可以在清单文件中显式指定buildpack。 幸运的是,当您推送应用程序时,Cloud Foundry会自动检测到需要哪个buildpack 。
Buildpacks provide framework and runtime support for your applications. Buildpacks typically examine user-provided artefacts to determine what dependencies to download and how to configure applications to communicate with bound services.
Buildpacks为您的应用程序提供框架和运行时支持。 Buildpacks通常会检查用户提供的伪像,以确定要下载的依赖项以及如何配置应用程序以与绑定的服务进行通信。
Finally, deploy your app by running the following command like so:
最后,通过运行以下命令来部署您的应用程序,如下所示:
cf push <yourapp><yourapp> has to be a unique name.
<yourapp>必须是唯一名称。
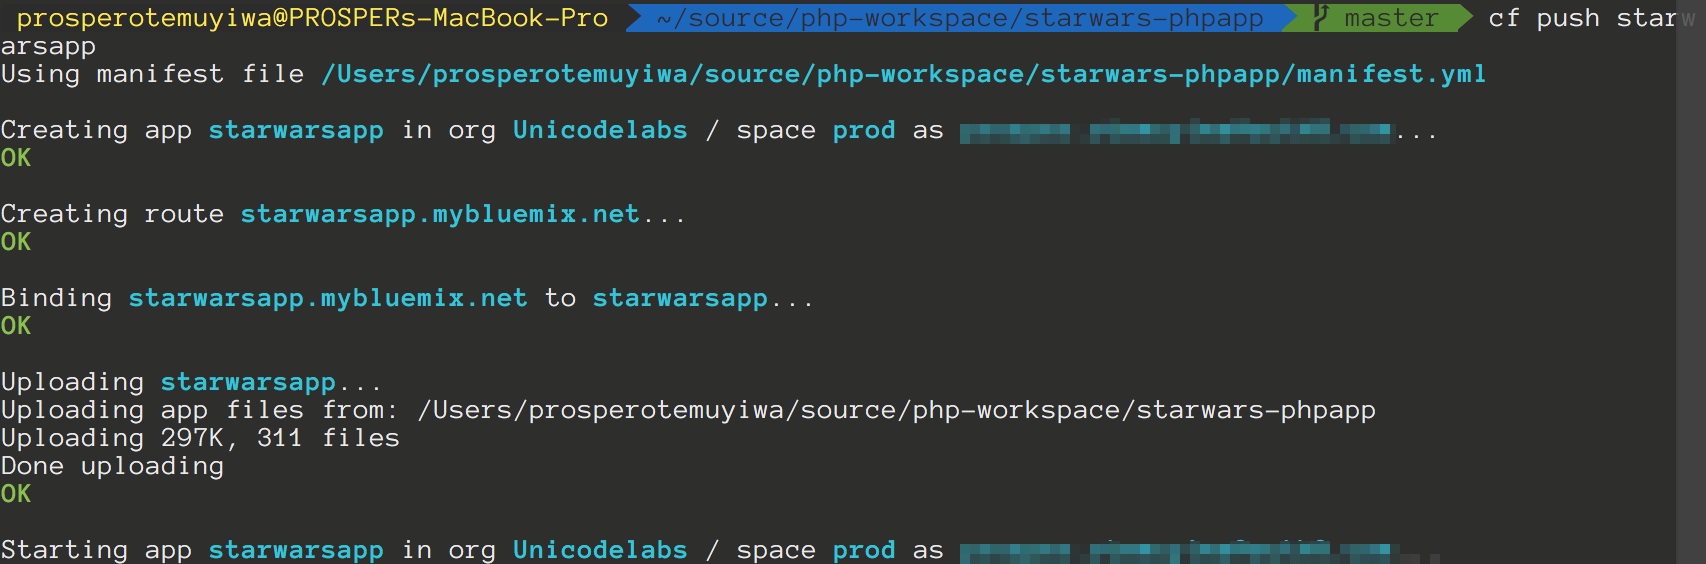
Starting Deploy
开始部署
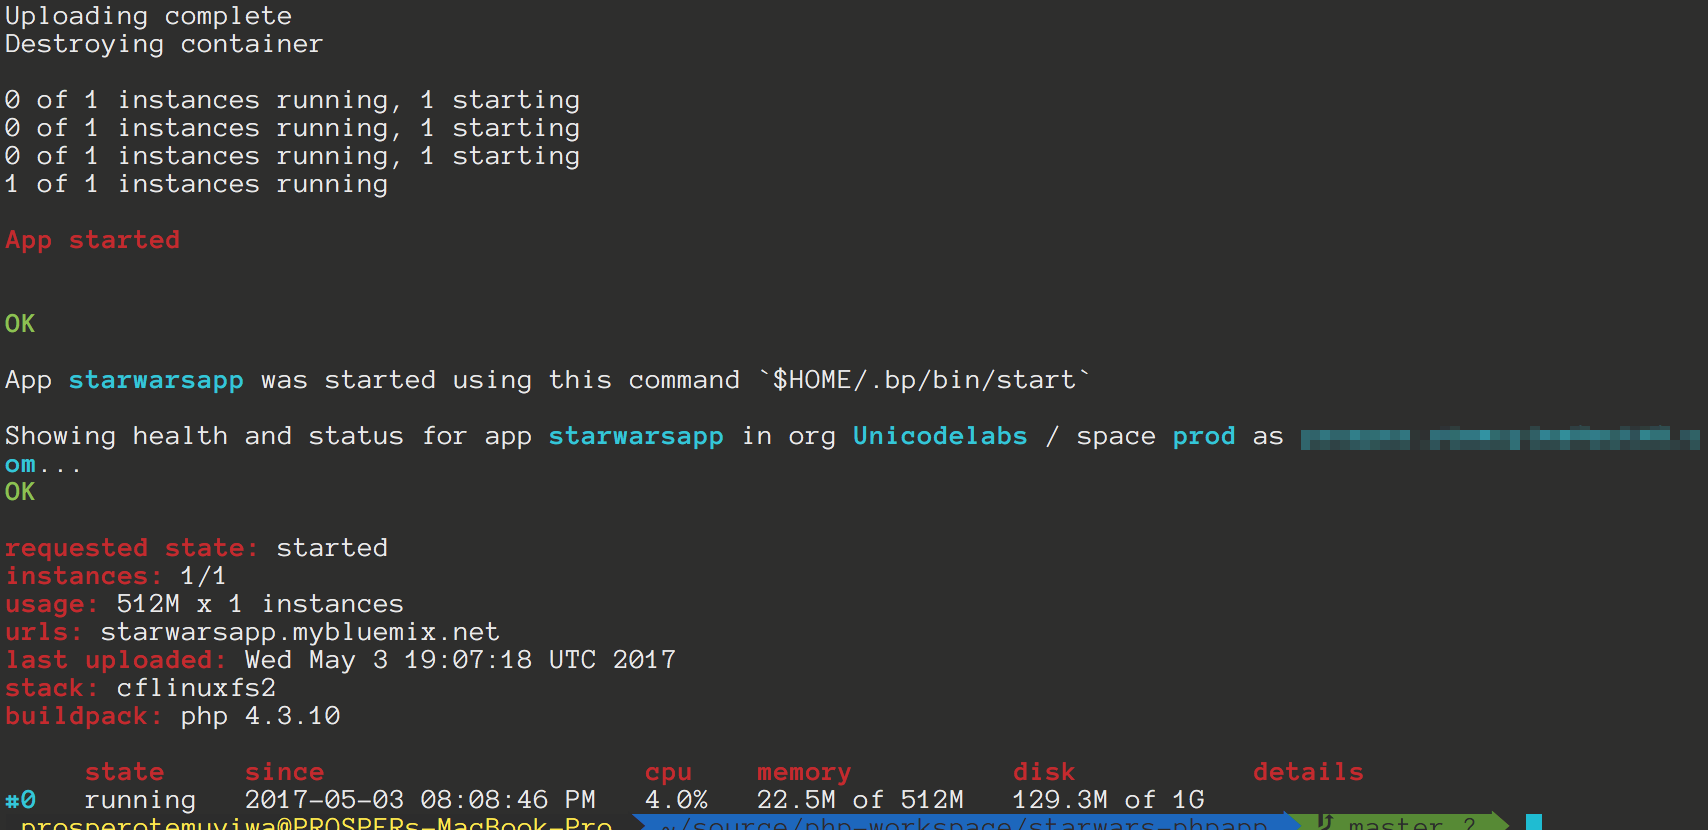
Ending Deploy
结束部署
Try to run the app now. In my case, the url is starwarsapp.mybluemix.net. Oops, a 500 error. We haven’t loaded our environment variables yet. How do we do that with Bluemix?
尝试立即运行该应用程序。 在我的情况下,URL是starwarsapp.mybluemix.net 。 糟糕,出现500错误。 我们尚未加载环境变量。 我们如何使用Bluemix做到这一点?
You can either use the Cloud Foundry CLI or the Bluemix user interface to set environment variables. Let’s use the Bluemix user interface. So, follow the steps below:
您可以使用Cloud Foundry CLI或Bluemix用户界面来设置环境变量。 让我们使用Bluemix用户界面。 因此,请按照以下步骤操作:
Open the Bluemix dashboard.
打开Bluemix 仪表板 。

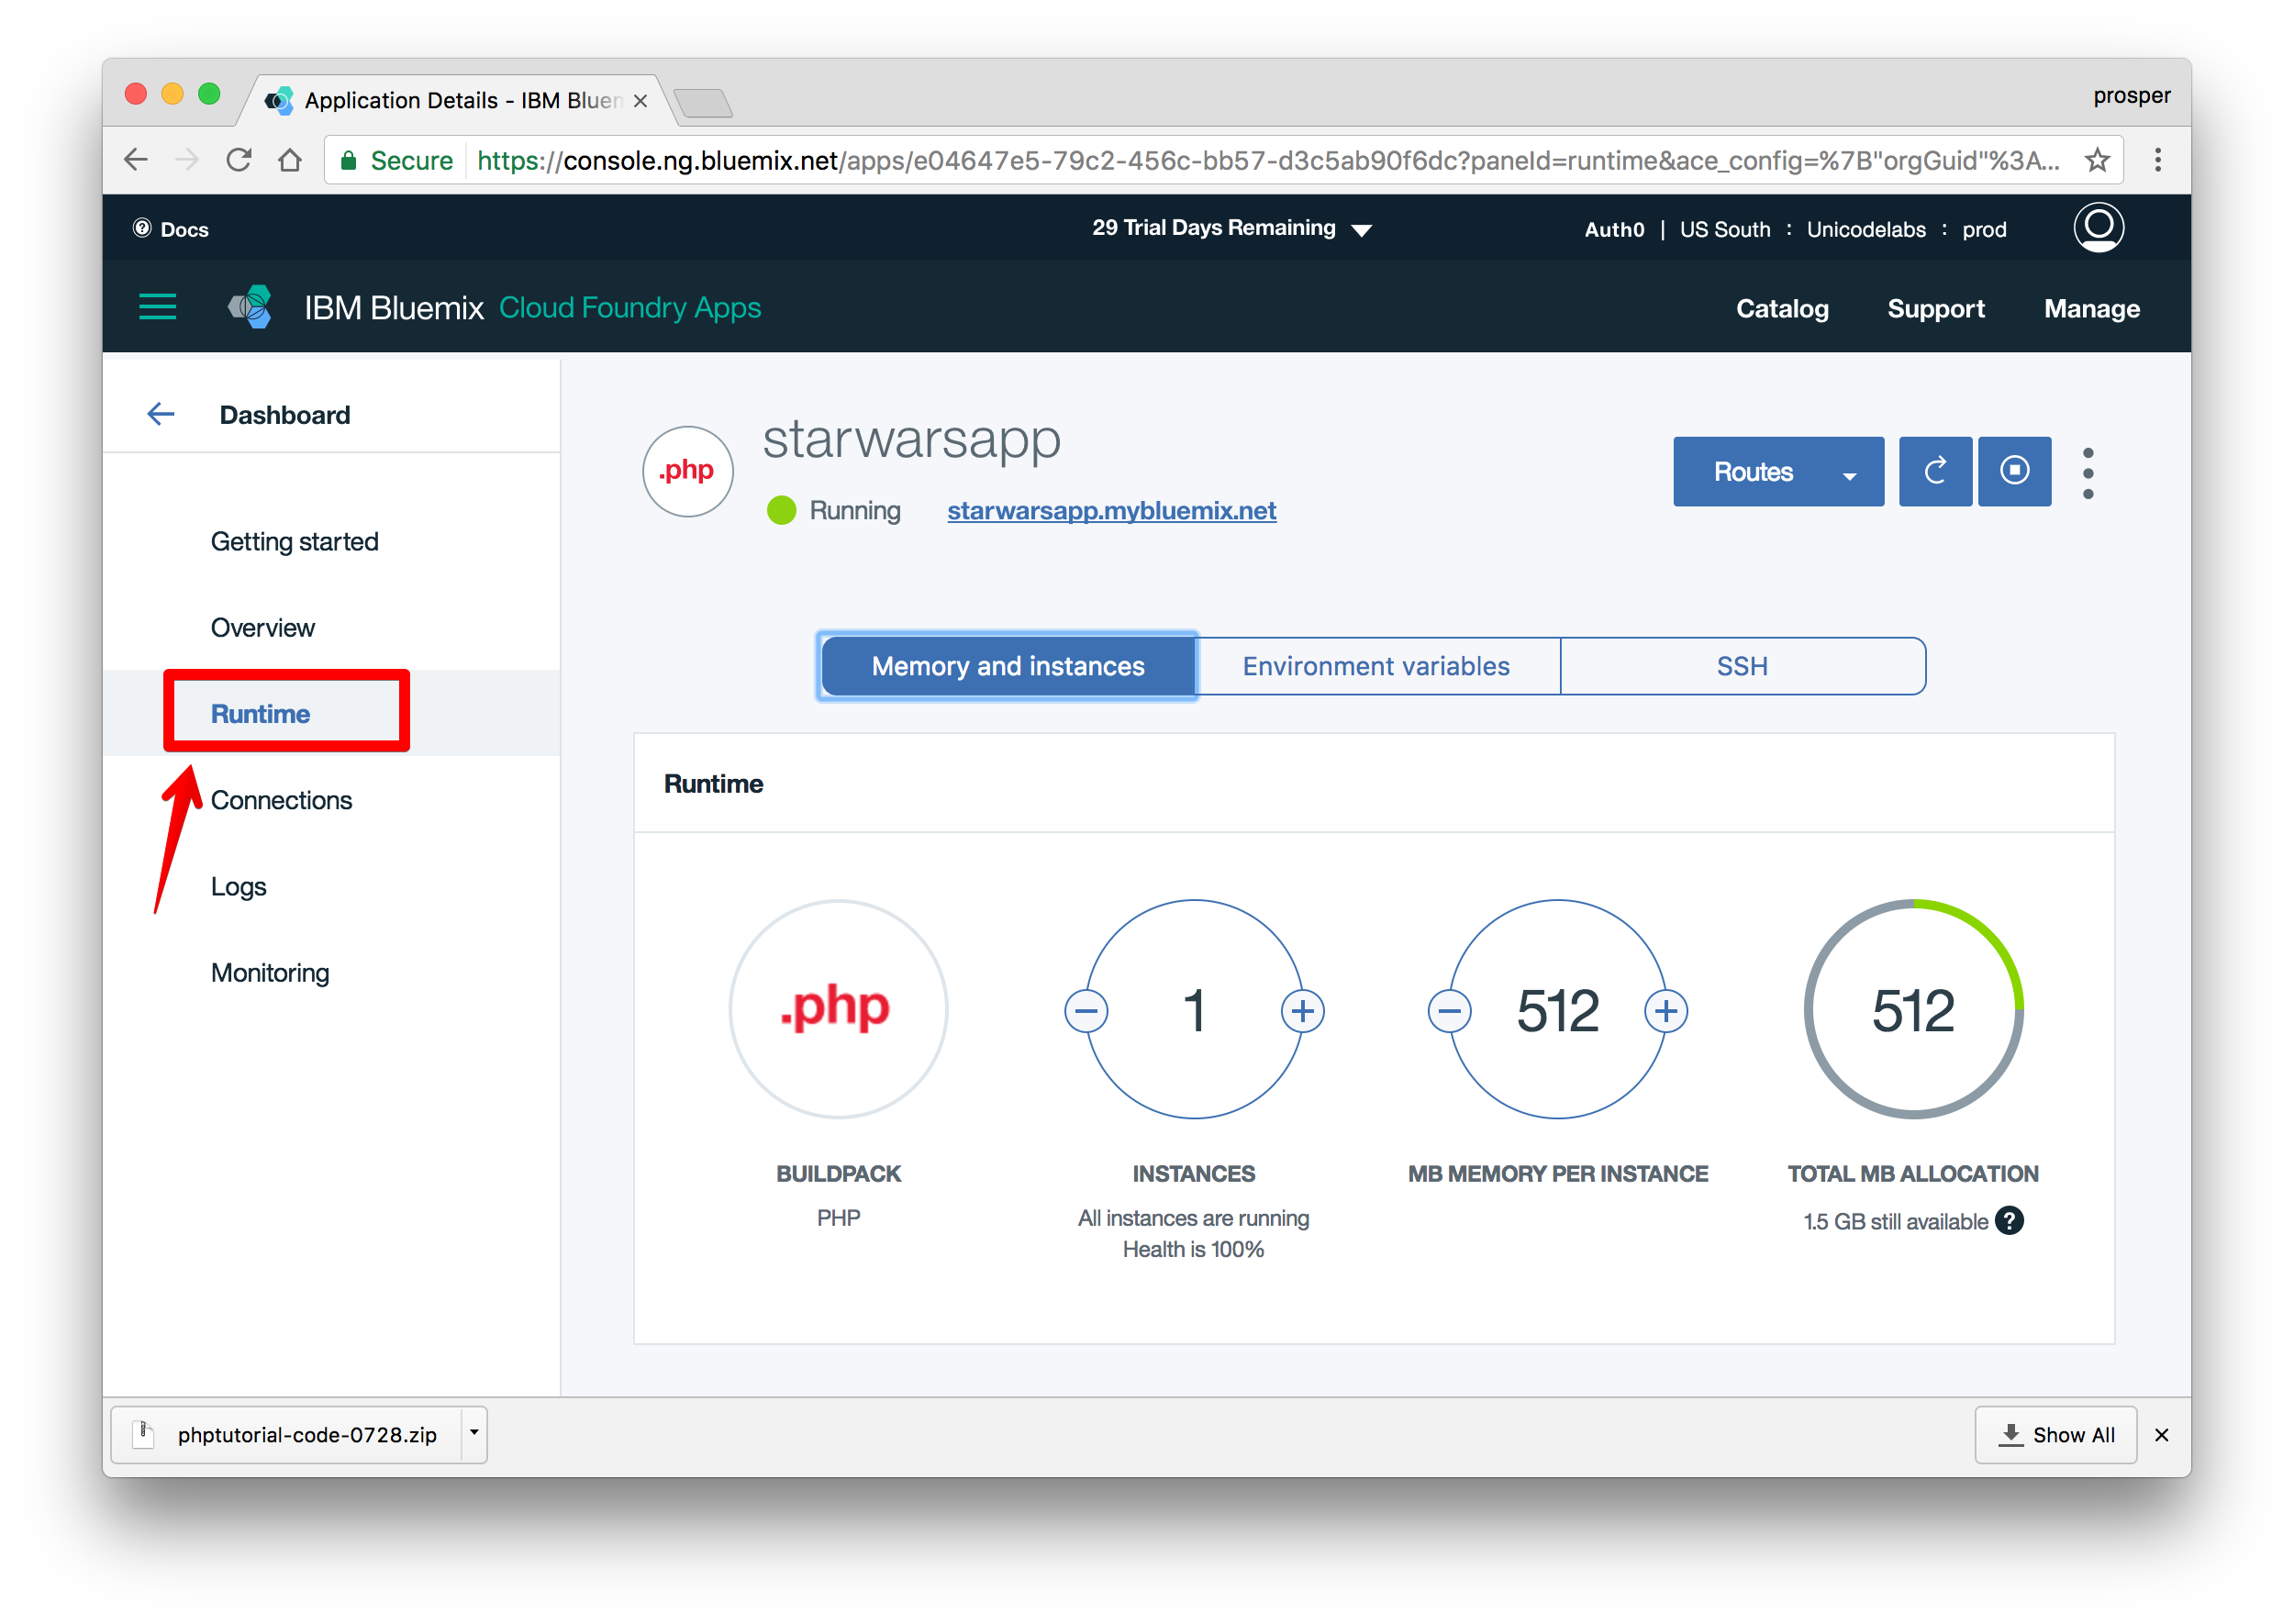
Click on the app. You’ll be redirected to another page with more details about the app.
点击该应用。 您将被重定向到另一个页面,其中包含有关该应用程序的更多详细信息。
Select Runtime from the left panel.
从左侧面板中选择运行时 。
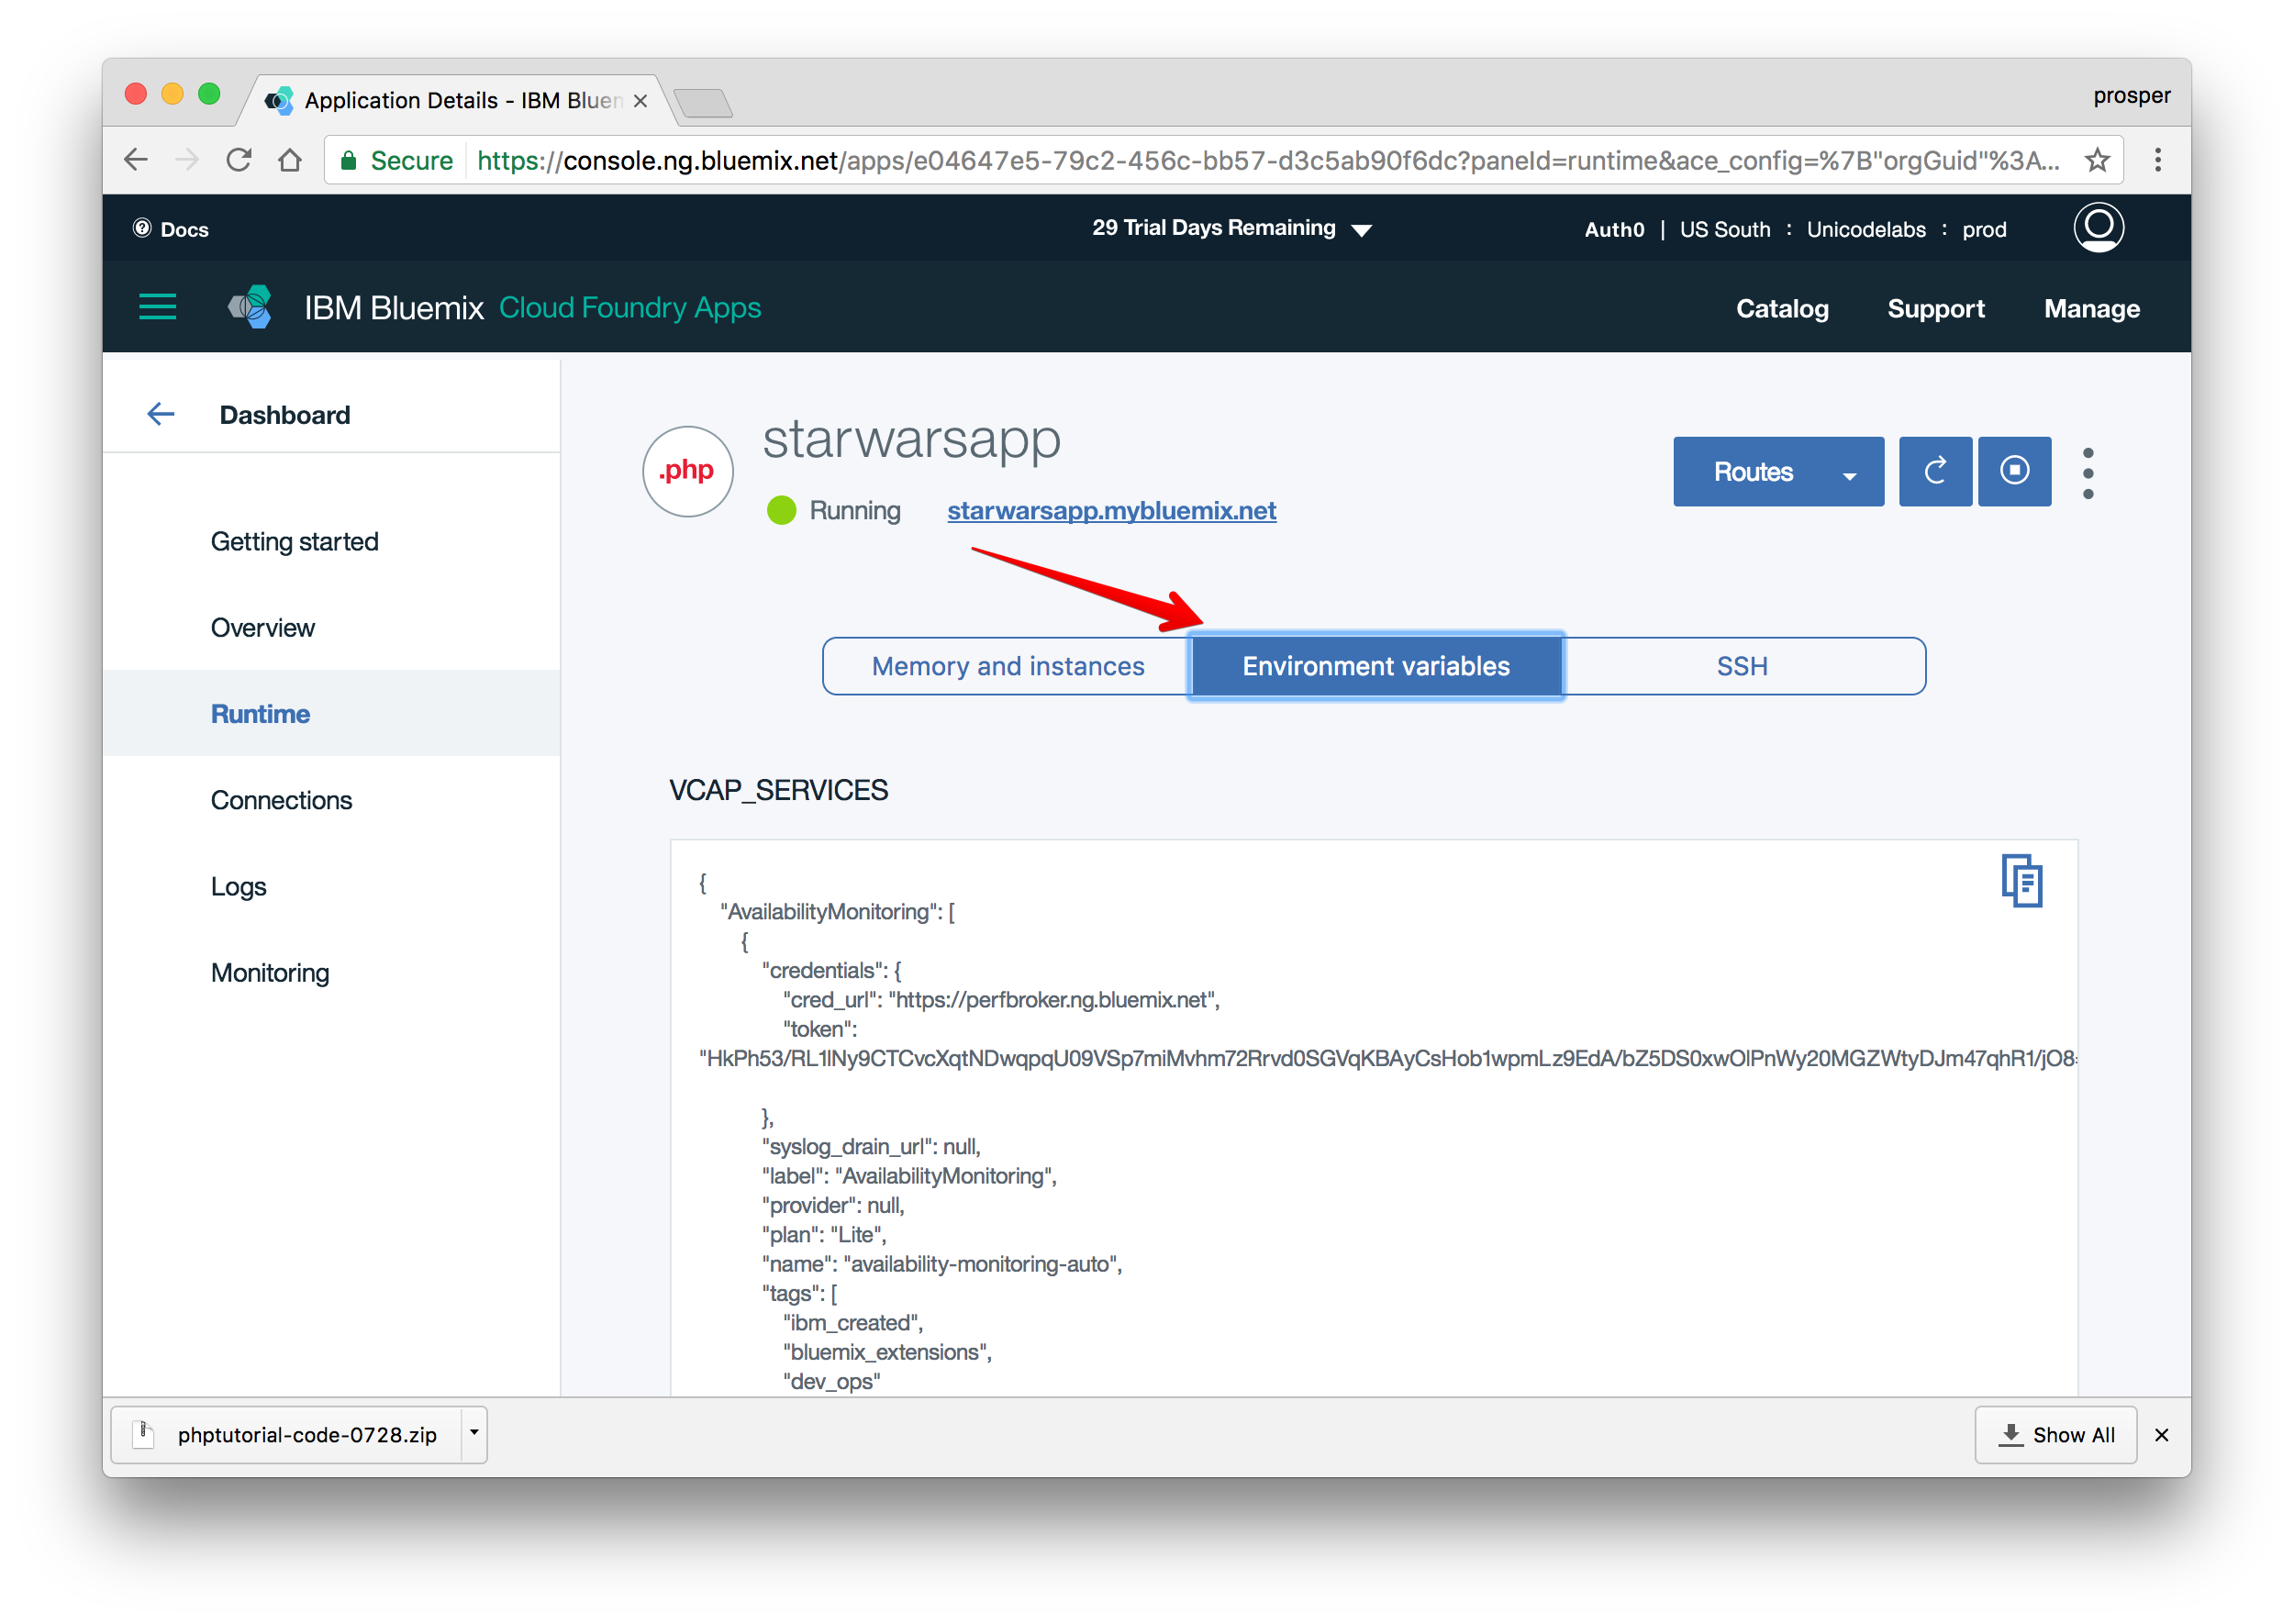
Now, click on Environment variables
现在,单击环境变量
Scroll down and click the Add button to add the environment variables like so
向下滚动并单击“ 添加”按钮以添加环境变量,如下所示
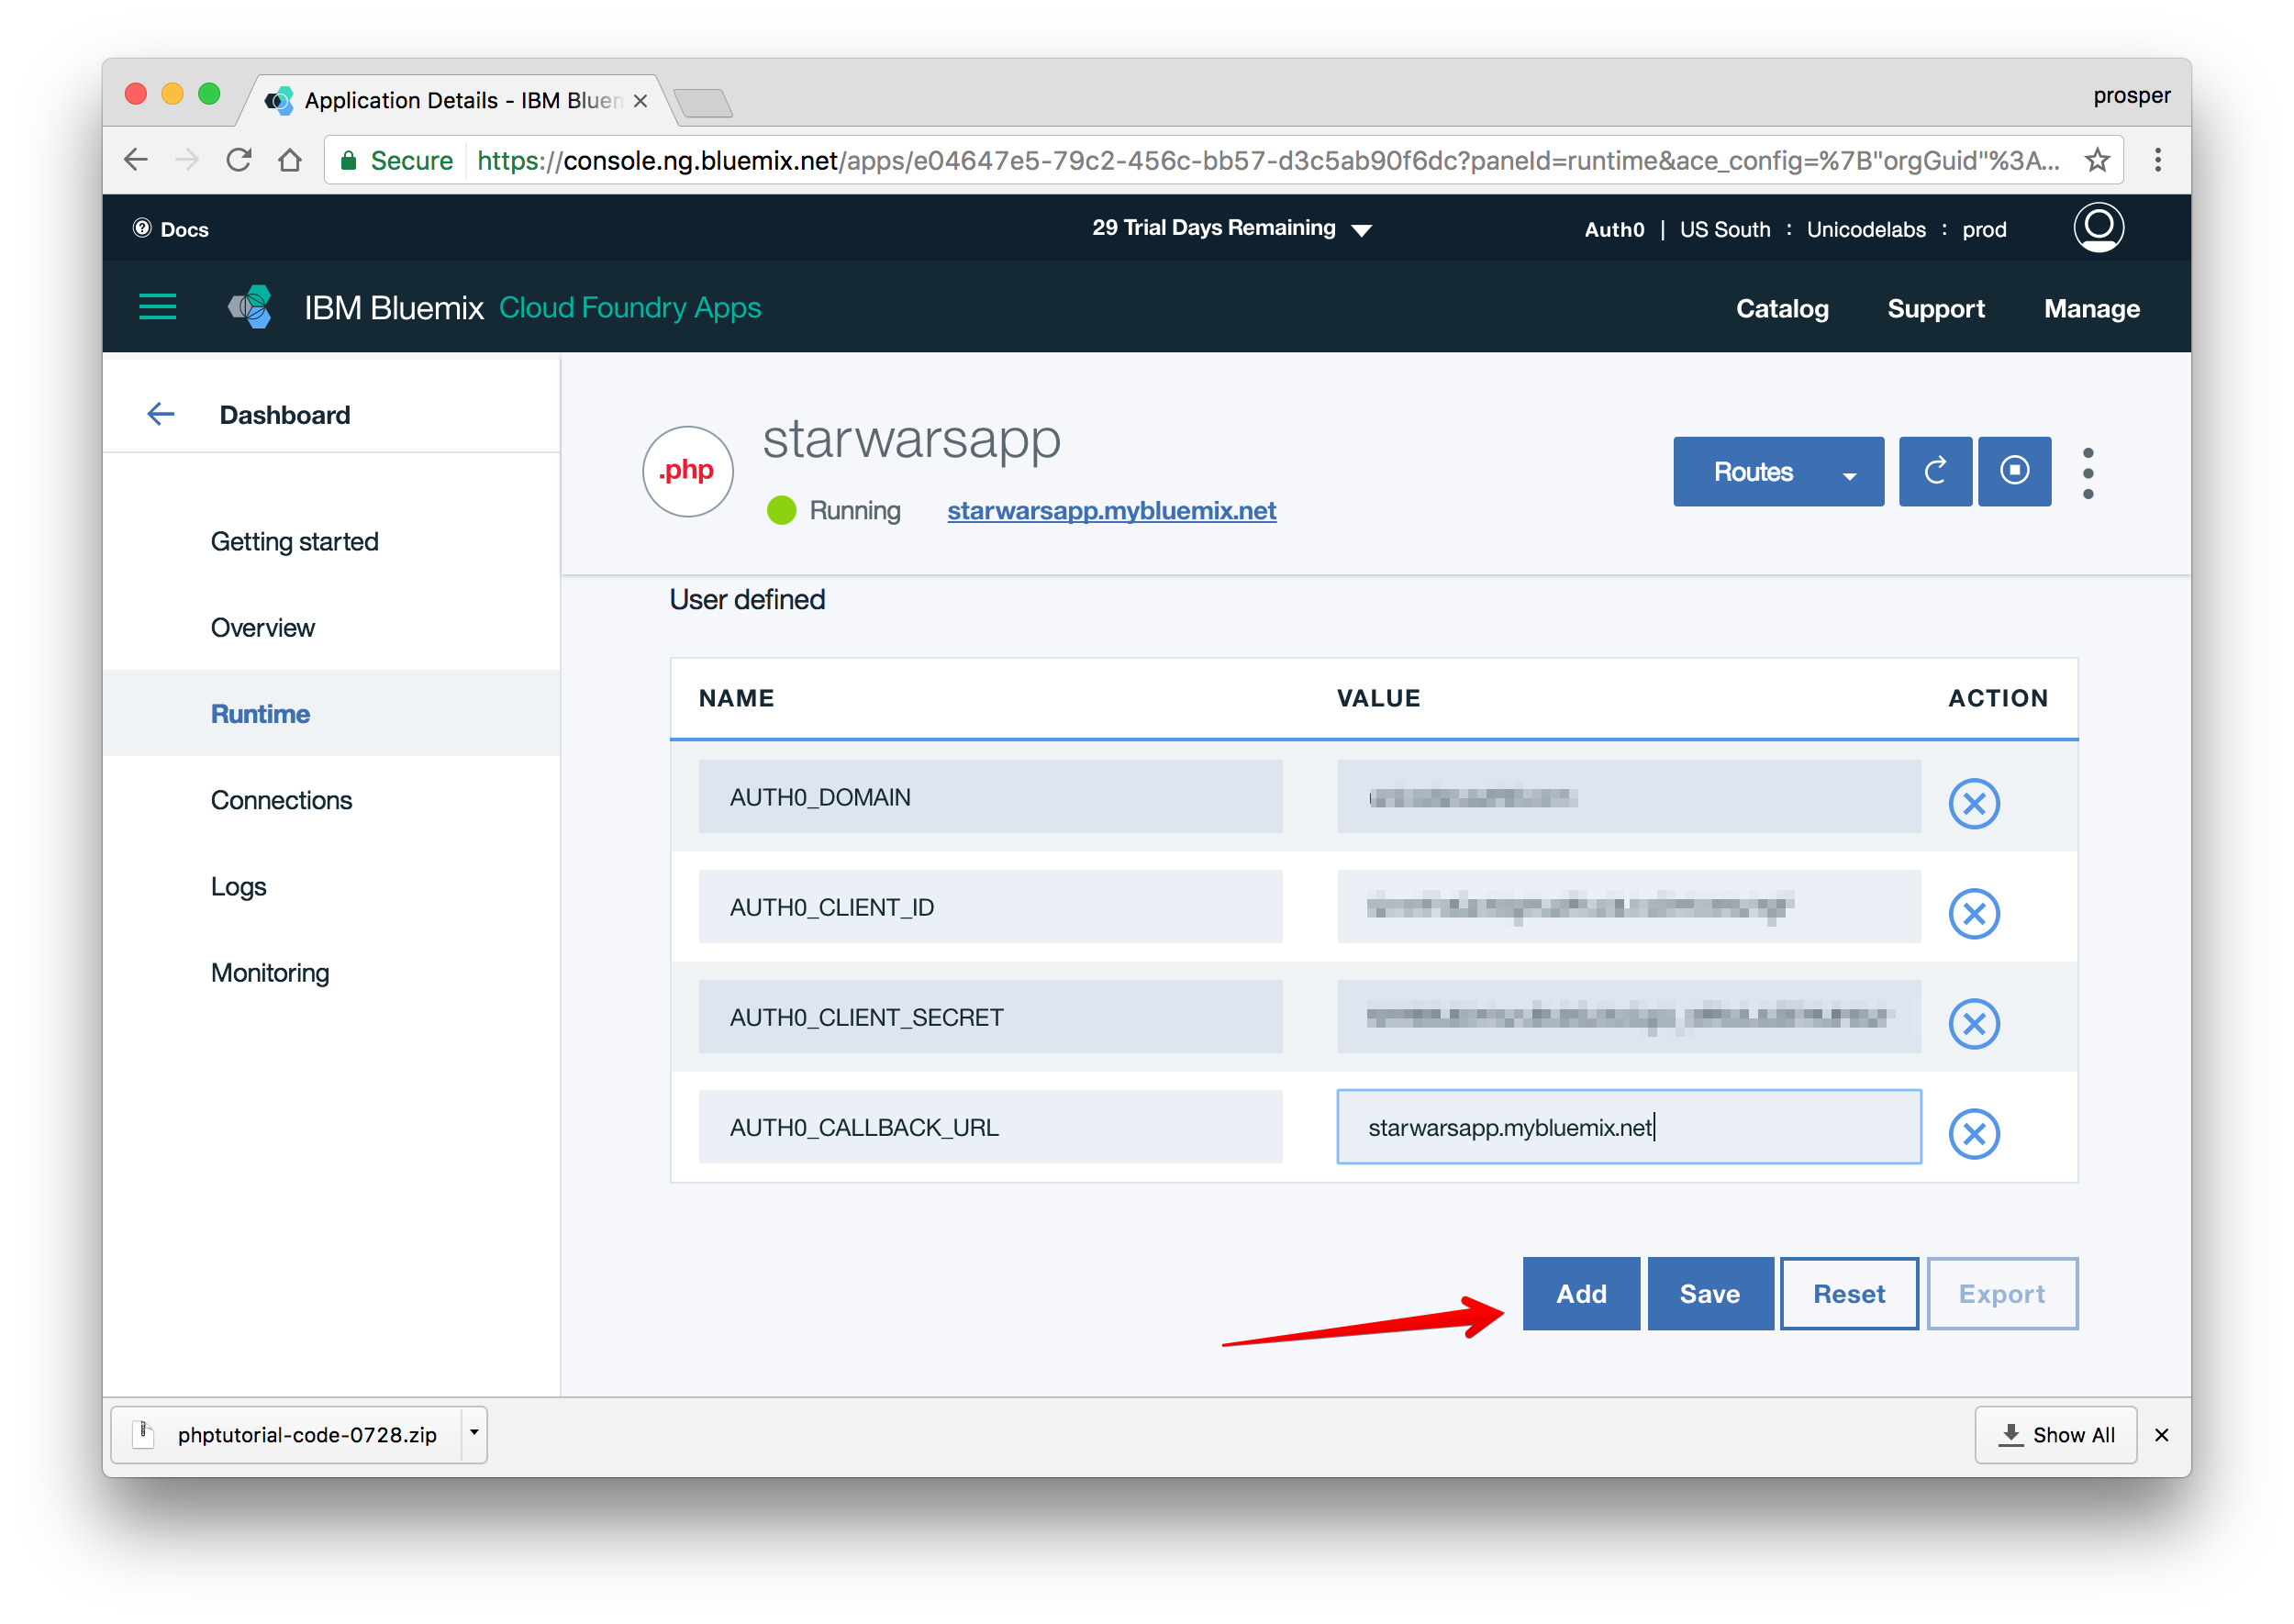
Click the
Savebutton. Once you do that, your app will restart automatically.单击
Save按钮。 完成后,您的应用将自动重启。
Now grab the URL, in my case it is https://starwarsapp.mybluemix.net/, and add it to Allowed Origins(CORS) and Allowed Callback URLs in your Auth0 dashboard.
现在获取URL,在我的情况下为https://starwarsapp.mybluemix.net/ ,并将其添加到Auth0仪表板中的 Allowed Origins(CORS)和Allowed Callback URLs中。
Now check out your app – it should be live!
现在检查您的应用程序-它应该已经上线了!
数据库,缓存和Cron作业 (Database, Caching & Cron Jobs)
Cloud Foundry provides the ability to create services. IBM Bluemix offers the Cloudant NoSQL database (the Bluemix name for CouchDB). You can use the cf tool to create database services like so:
Cloud Foundry提供了创建服务的能力。 IBM Bluemix提供了Cloudant NoSQL数据库(CouchDB的Bluemix名称)。 您可以使用cf工具来创建数据库服务,如下所示:
cf create-service cloudantNoSQLDB Lite starwarsappIBM Bluemix also offers the ClearDB MySQL service. So, you can use the cf tool to create one like so:
IBM Bluemix还提供ClearDB MySQL服务。 因此,您可以使用cf工具创建一个这样的工具:
cf create-service cleardb spark starwarsappThey offer MongoDB, PostgreSQL, and RethinkDB.
他们提供MongoDB , PostgreSQL和RethinkDB 。
You can always use the Cloud Foundry tool to check out a lot of things such as logs, environment variables, etc. like so:
您始终可以使用Cloud Foundry工具签出很多内容,例如日志,环境变量等,如下所示:
cf logs --recent yourapp– Shows the logs of your app.cf logs --recent yourapp–显示应用程序的日志。cf env yourapp– Shows the environment variables associated with your app.cf env yourapp–显示与您的应用程序关联的环境变量。cf marketplace– Shows all the services that Bluemix has to offer.cf marketplace–显示Bluemix必须提供的所有服务。
IBM Bluemix also offers Redis Cloud, a fully-managed cloud service for hosting and running your Redis dataset in BlueMix in a highly-available and scalable manner.
IBM Bluemix还提供Redis Cloud ,这是一种完全托管的云服务,用于以高可用性和可扩展的方式在BlueMix中托管和运行您的Redis数据集。
IBM Bluemix provides the Workload Scheduler service. This service allows you to integrate your application with the capability to schedule workflows. Far beyond cron, exploit job scheduling within and outside Bluemix. Easily create workflows in your application to run on a regular basis, at a specific time, on events (for example, when a file is deleted or updated), according to your needs. You can either use the Workload Scheduler User Interface or use the APIs.
IBM Bluemix提供了Workload Scheduler服务。 此服务使您可以将应用程序与计划工作流的功能集成在一起。 除了cron之外,还可以利用Bluemix内部和外部的作业调度。 根据您的需要,可以轻松地在应用程序中创建工作流,以便在特定时间定期在事件(例如,删除或更新文件)上定期运行。 您可以使用Workload Scheduler用户界面或使用API。
Get started with Scheduling Jobs here.
Also, here is how to deploy your Laravel app on IBM Bluemix.
另外,这是如何在IBM Bluemix上部署Laravel应用程序 。
微软Azure (Microsoft Azure)
Microsoft Azure is another massive cloud platform that allows you to scale your apps easily. Let’s get started with deploying our Star Wars app on Azure.
Microsoft Azure是另一个庞大的云平台,可让您轻松扩展应用程序。 让我们开始在Azure上部署“星球大战”应用程序。
With Microsoft Azure, you can deploy via:
使用Microsoft Azure,可以通过以下方式进行部署:
- FTP. FTP。
- Syncing with a cloud folder. 与云文件夹同步。
- Local Git. 本地Git。
- Cloud based source control service such as GitHub or Bitbucket. 基于云的源代码控制服务,例如GitHub或Bitbucket。
In our case, we’ll set up deployment with Git.
在本例中,我们将使用Git进行部署。
First, create an account with Microsoft Azure.
首先, 使用Microsoft Azure创建一个帐户 。

Dashboard
仪表板
Click on New on the left panel.
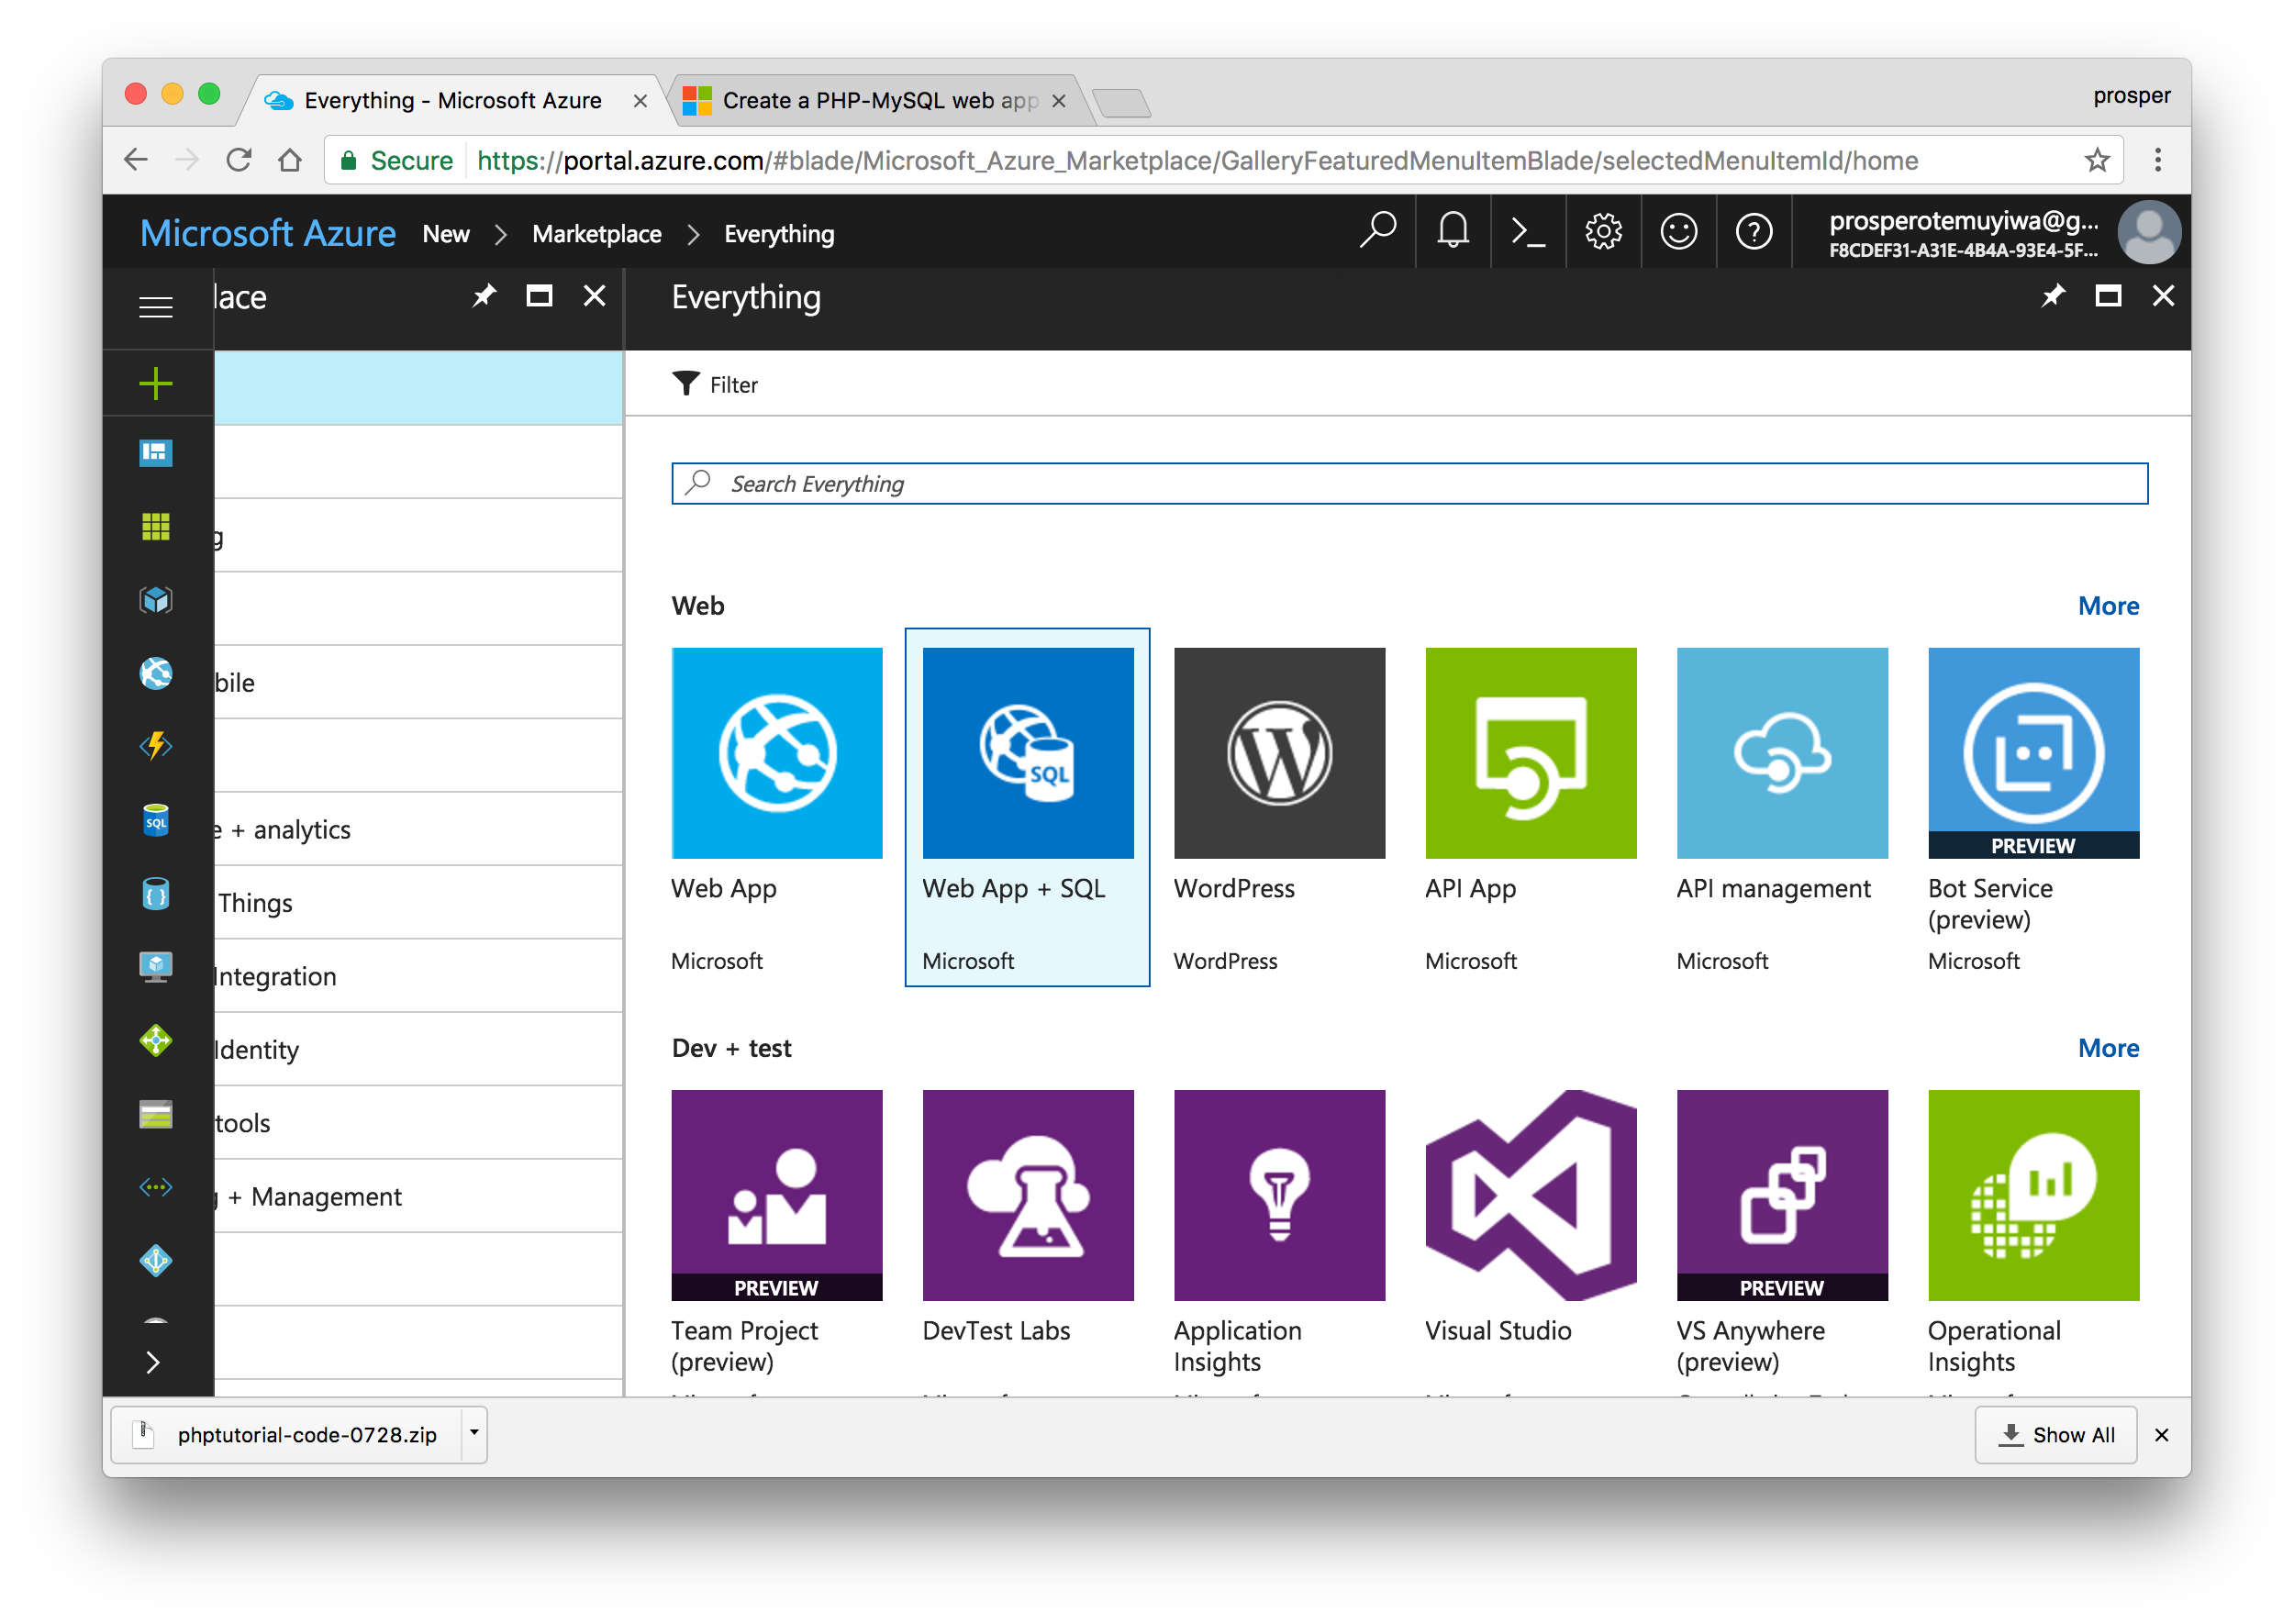
单击左侧面板上的新建 。
Click See all just next to Marketplace.
点击查看市场旁边的全部 。
Click Web + SQL, then go ahead and create.
单击Web + SQL ,然后继续进行创建。
You’ll be prompted to select an offer for the type of subscription you are comfortable with. I chose Free Trial. With that, you’ll be given a $200 Azure Credit.
系统将提示您为您喜欢的订阅类型选择要约。 我选择了免费试用 。 这样,您将获得200美元的Azure信用额。
Give your app a name, then create an SQL database. Well, it’s not needed for our app but for some reason Azure forces you to create it.
为您的应用命名,然后创建一个SQL数据库。 好吧,我们的应用程序不需要它,但是由于某种原因,Azure迫使您创建它。
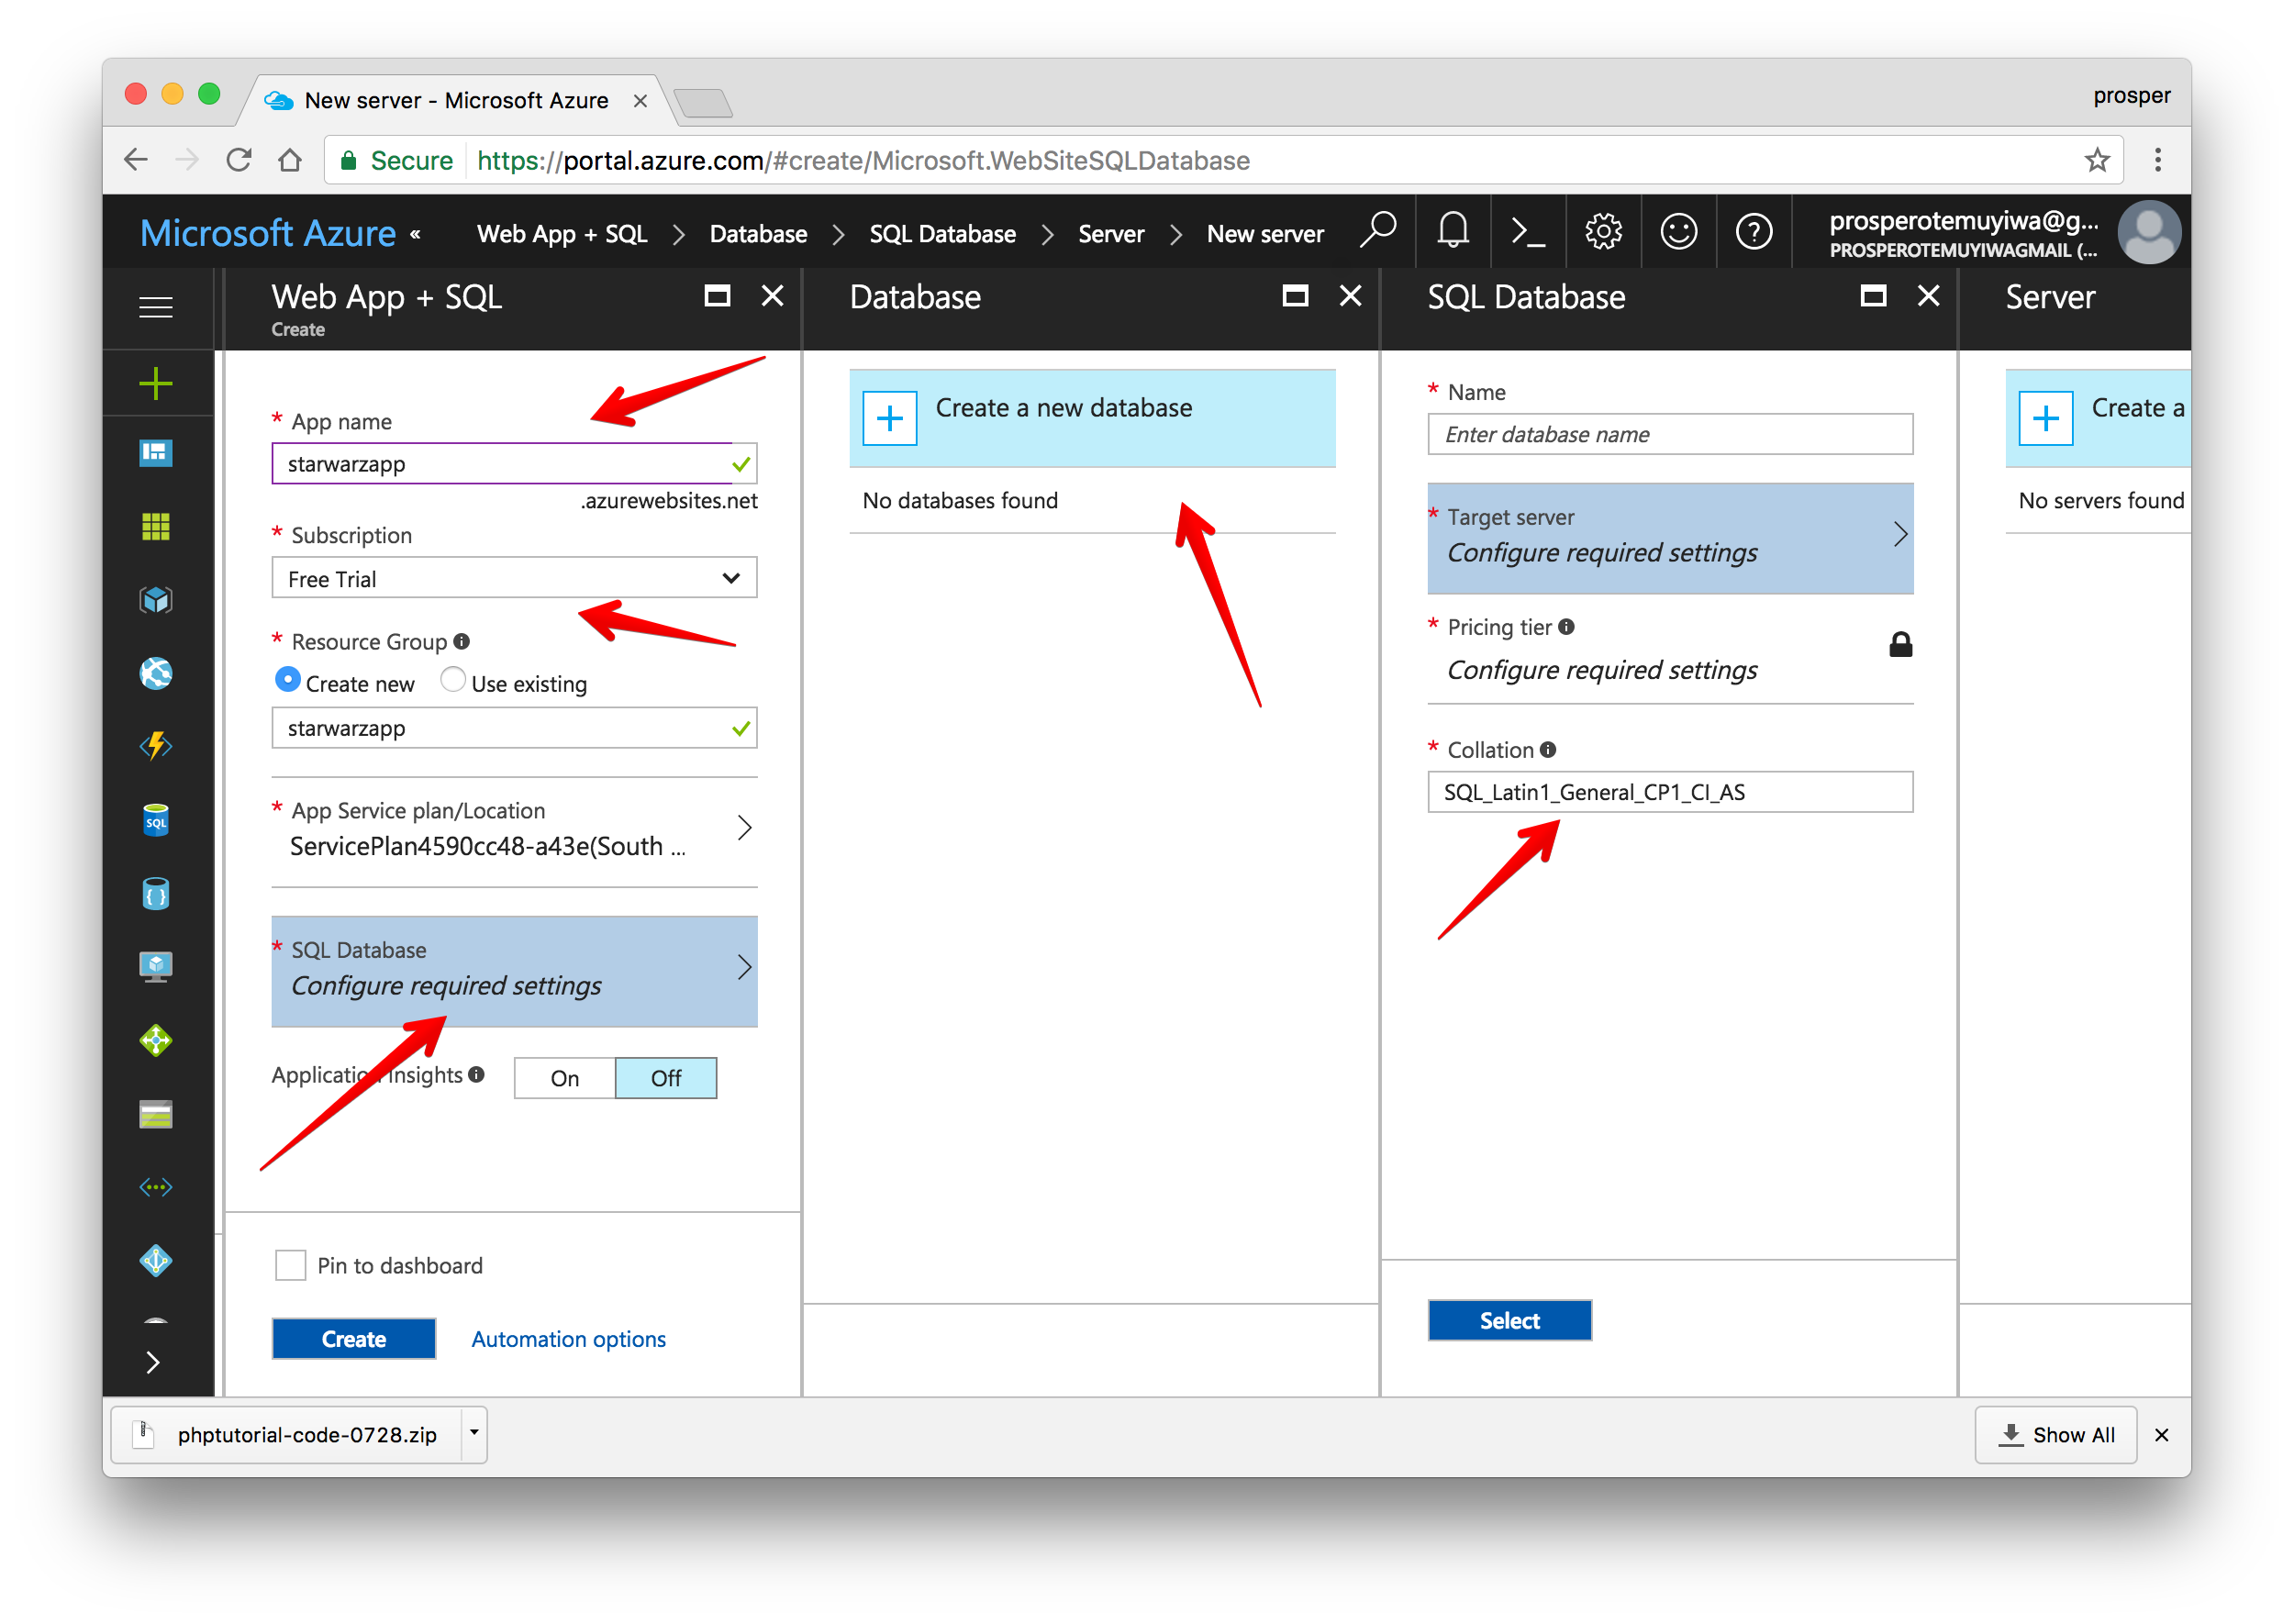
Create a new app
创建一个新的应用程序
Now that our app has been created, click on App Services by the left panel to see your app.
现在我们的应用程序已创建,请单击左侧面板上的“ 应用程序服务 ”以查看您的应用程序。
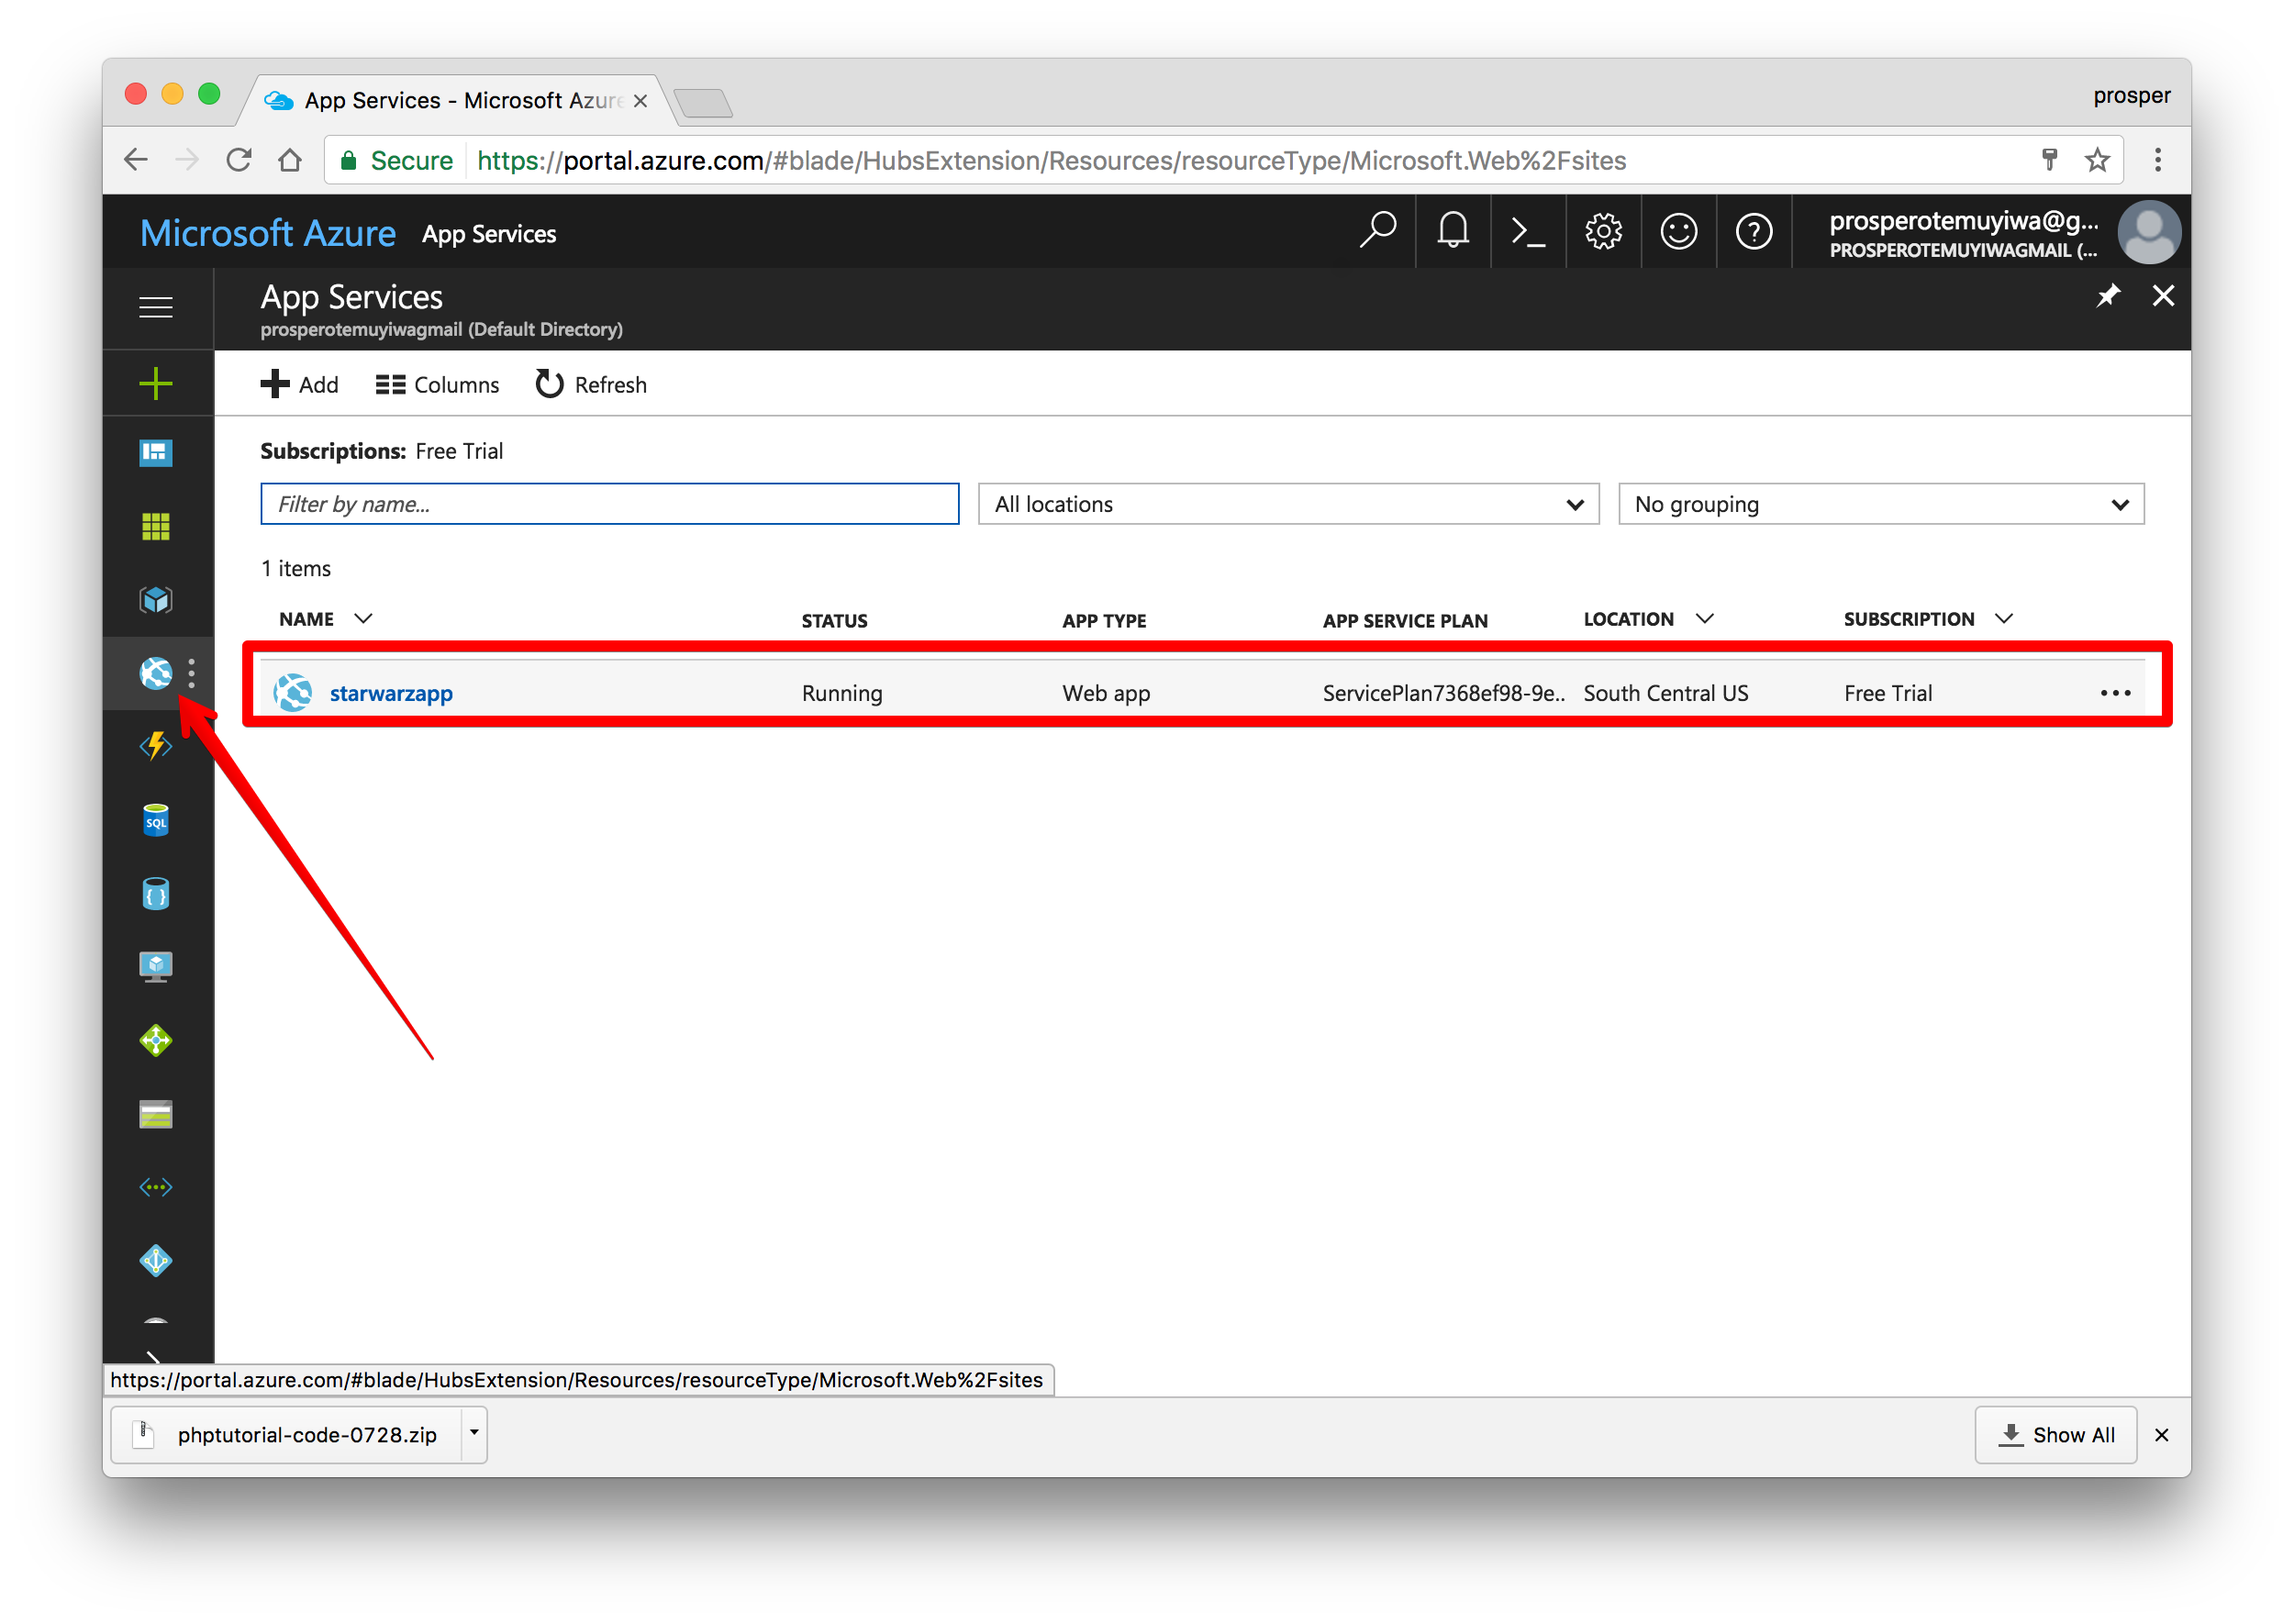
New app
新应用
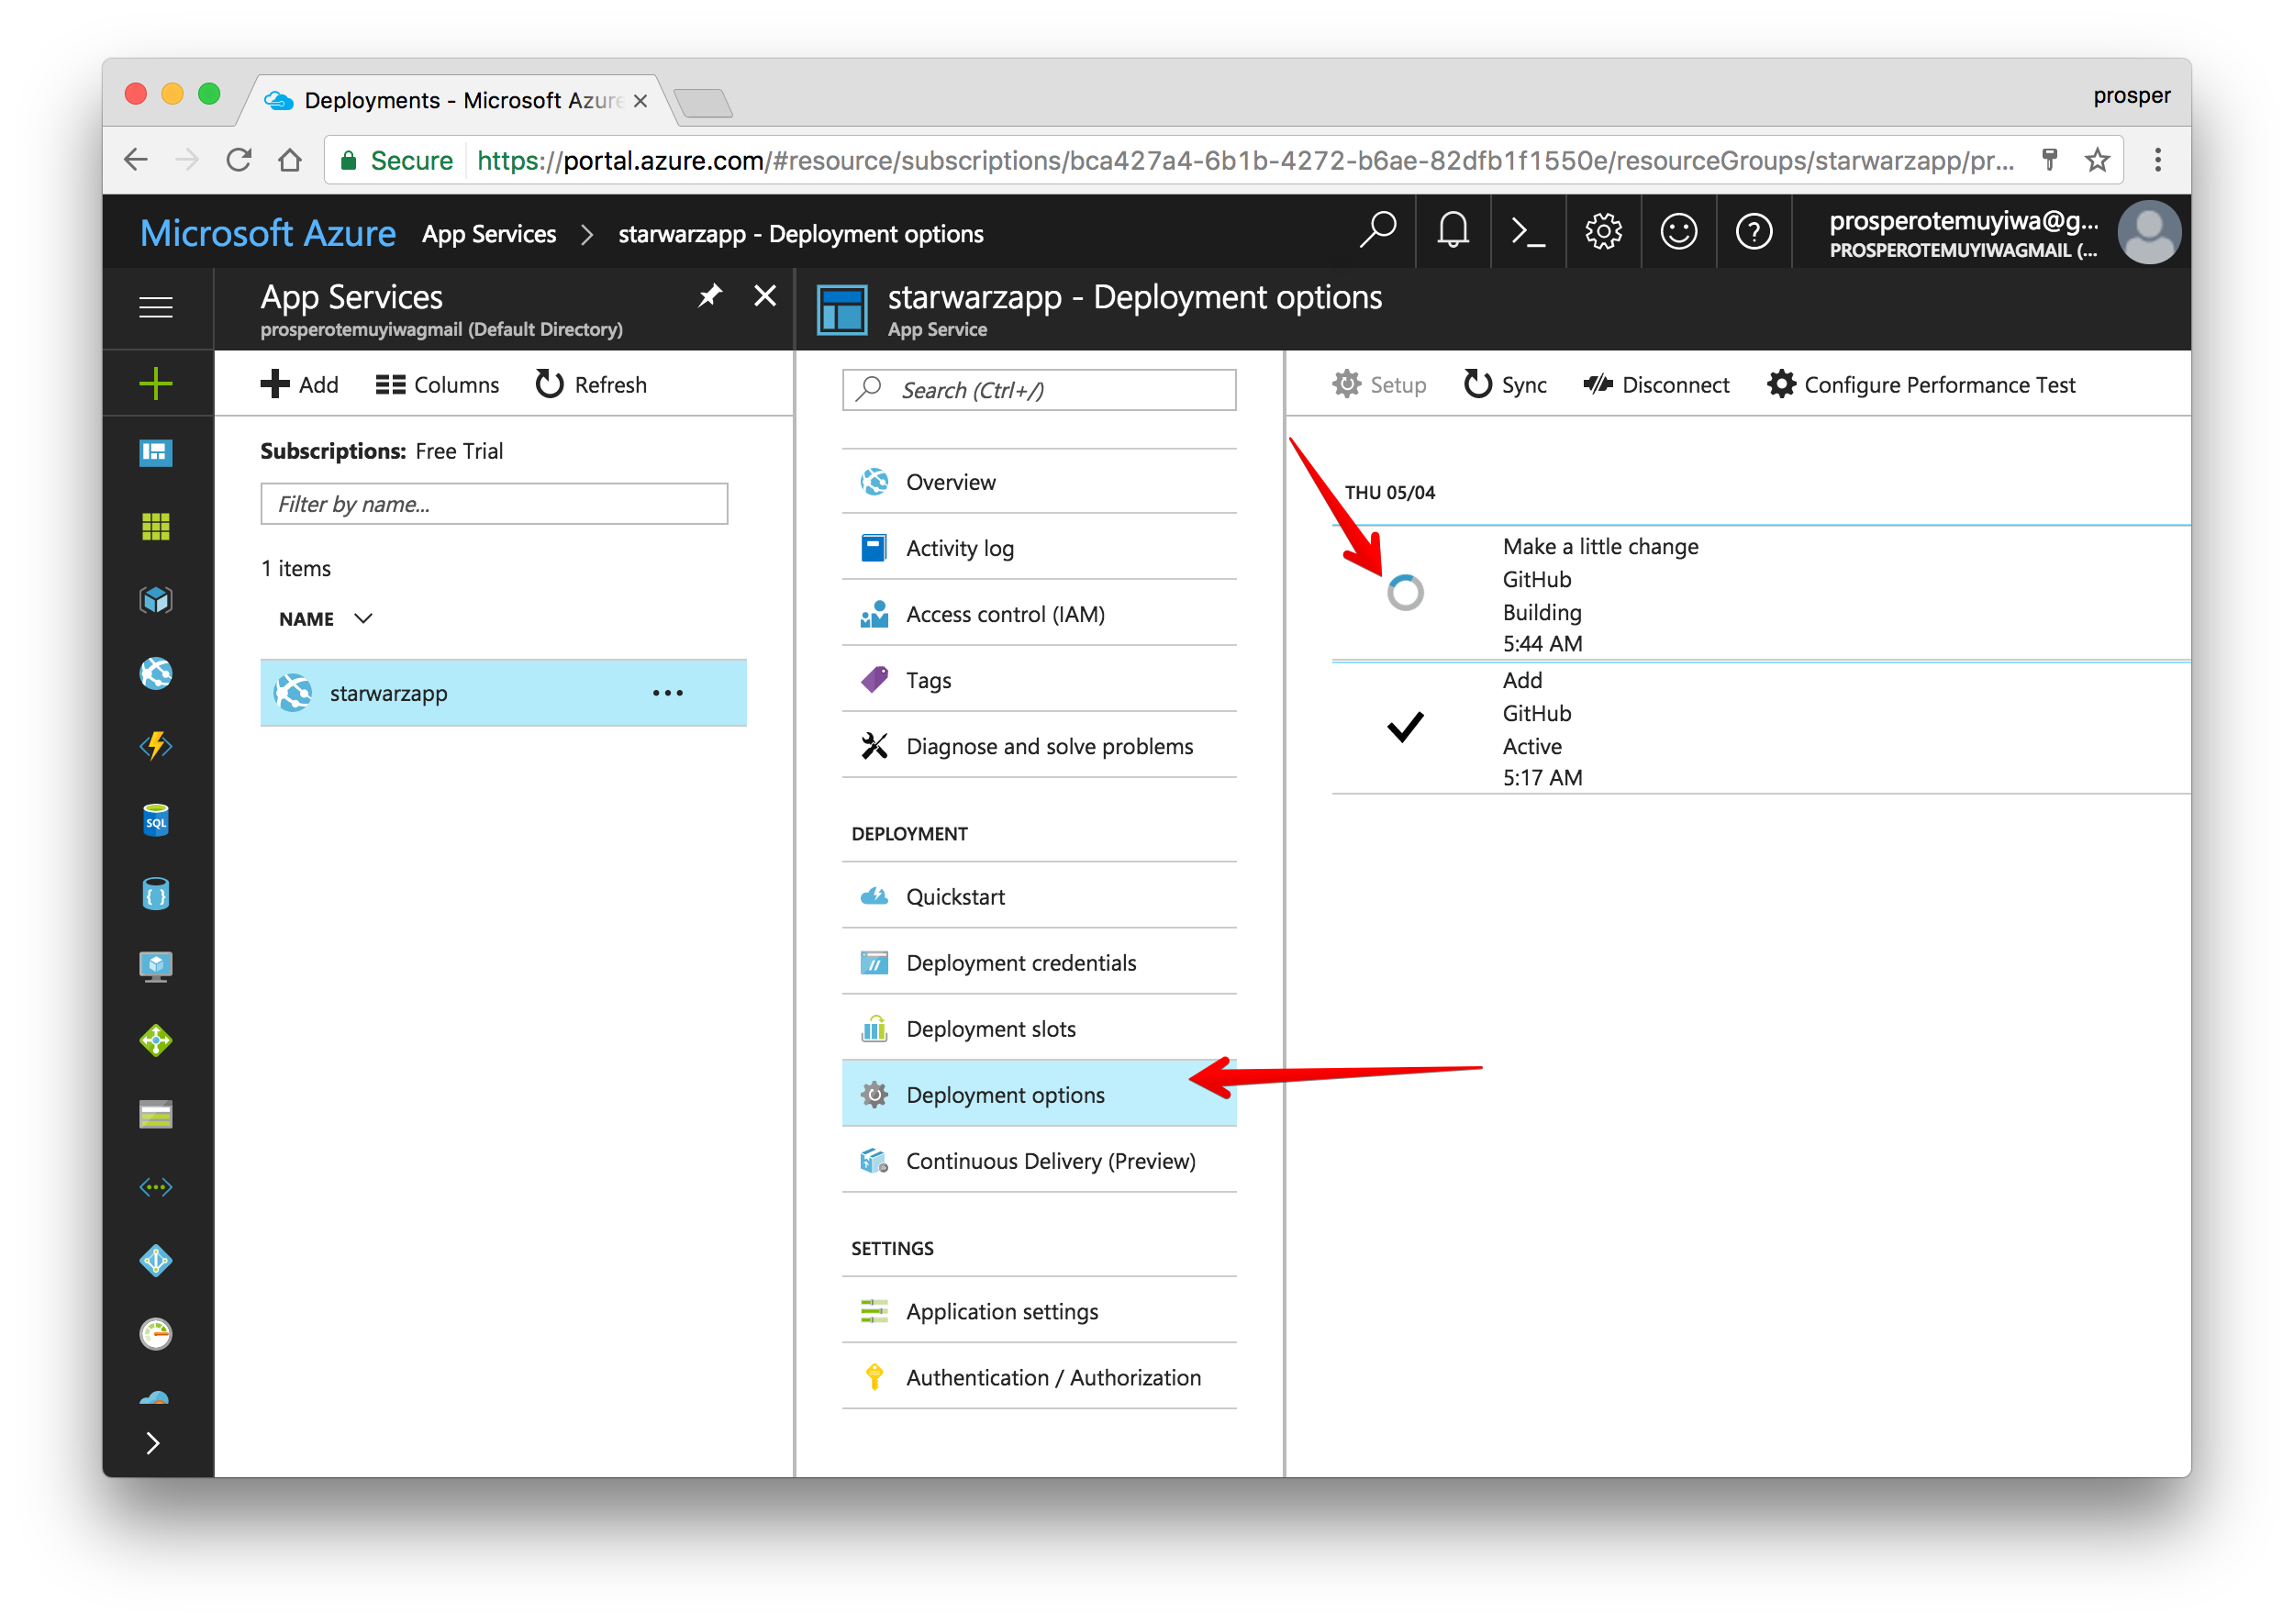
Click on the app, choose Deployment options, then click on
GitHub.单击该应用程序,选择“ 部署选项” ,然后单击“
GitHub。Authorize access to your repo, choose the project and branch. In my case, I have an
azurebranch. That’s the branch I’ll use for deploying my code to the Azure platform.授权访问您的仓库,选择项目和分支。 就我而言,我有一个
azure分支。 那就是我将用于将代码部署到Azure平台的分支。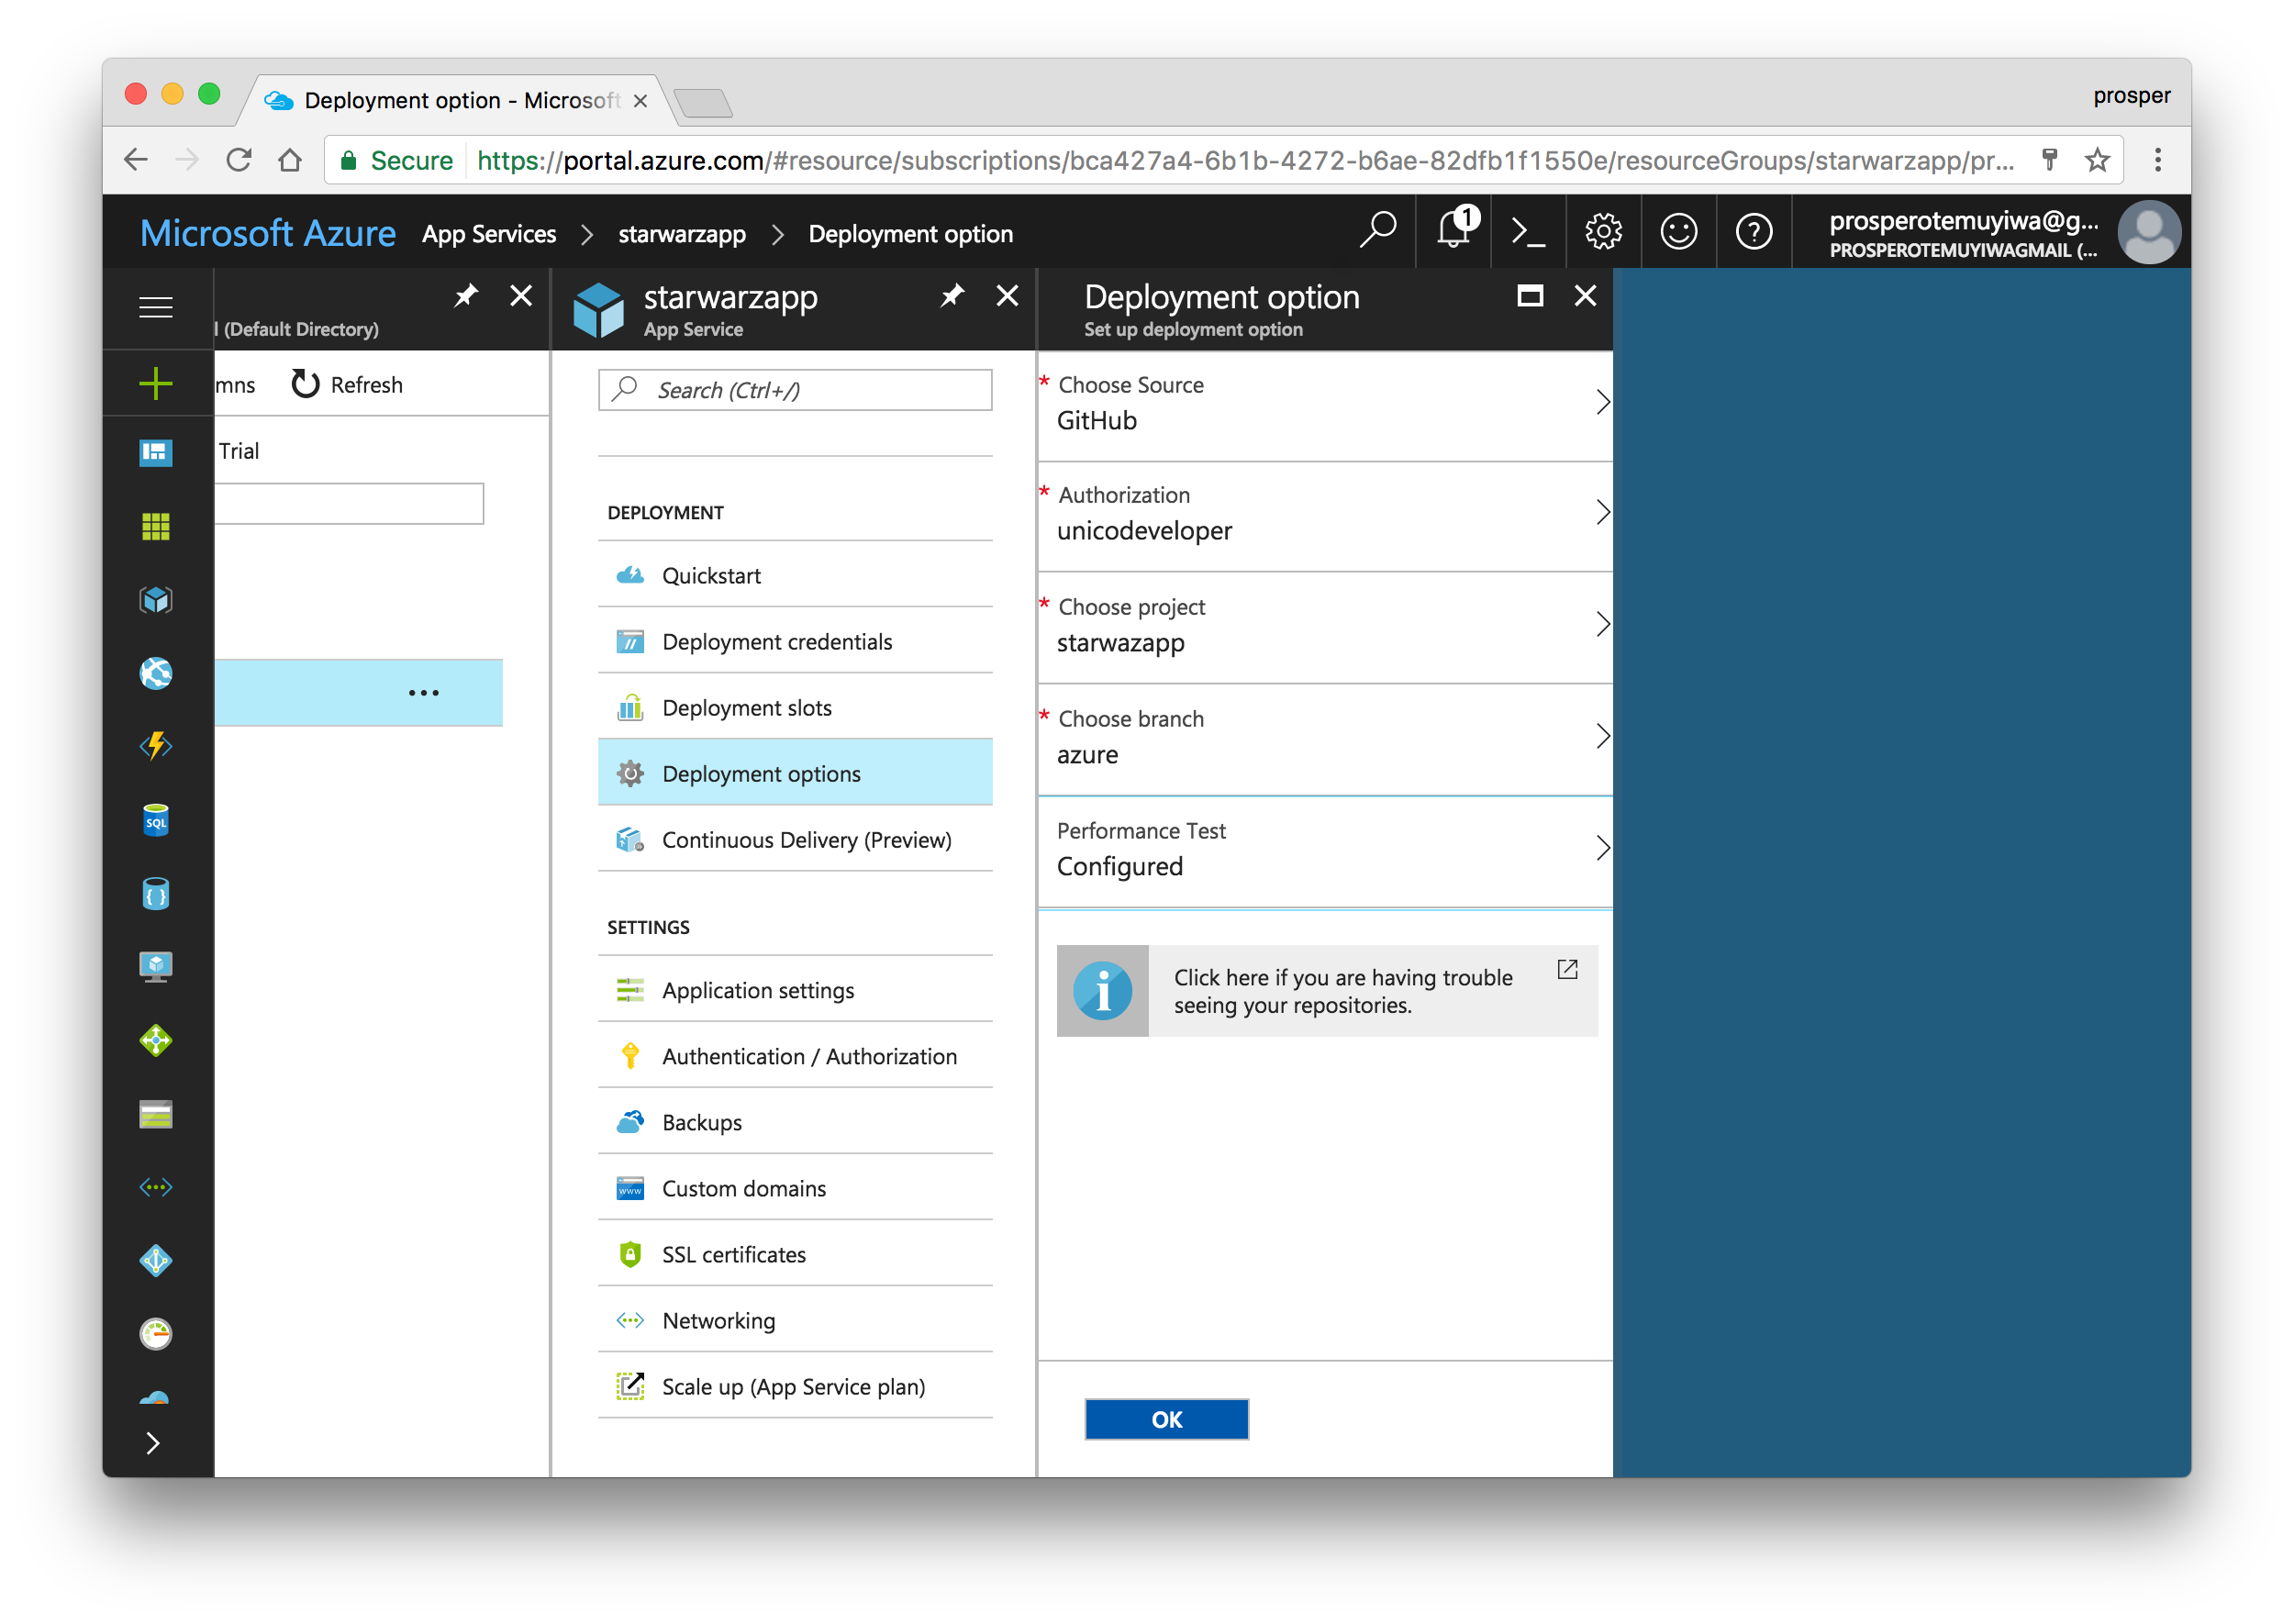
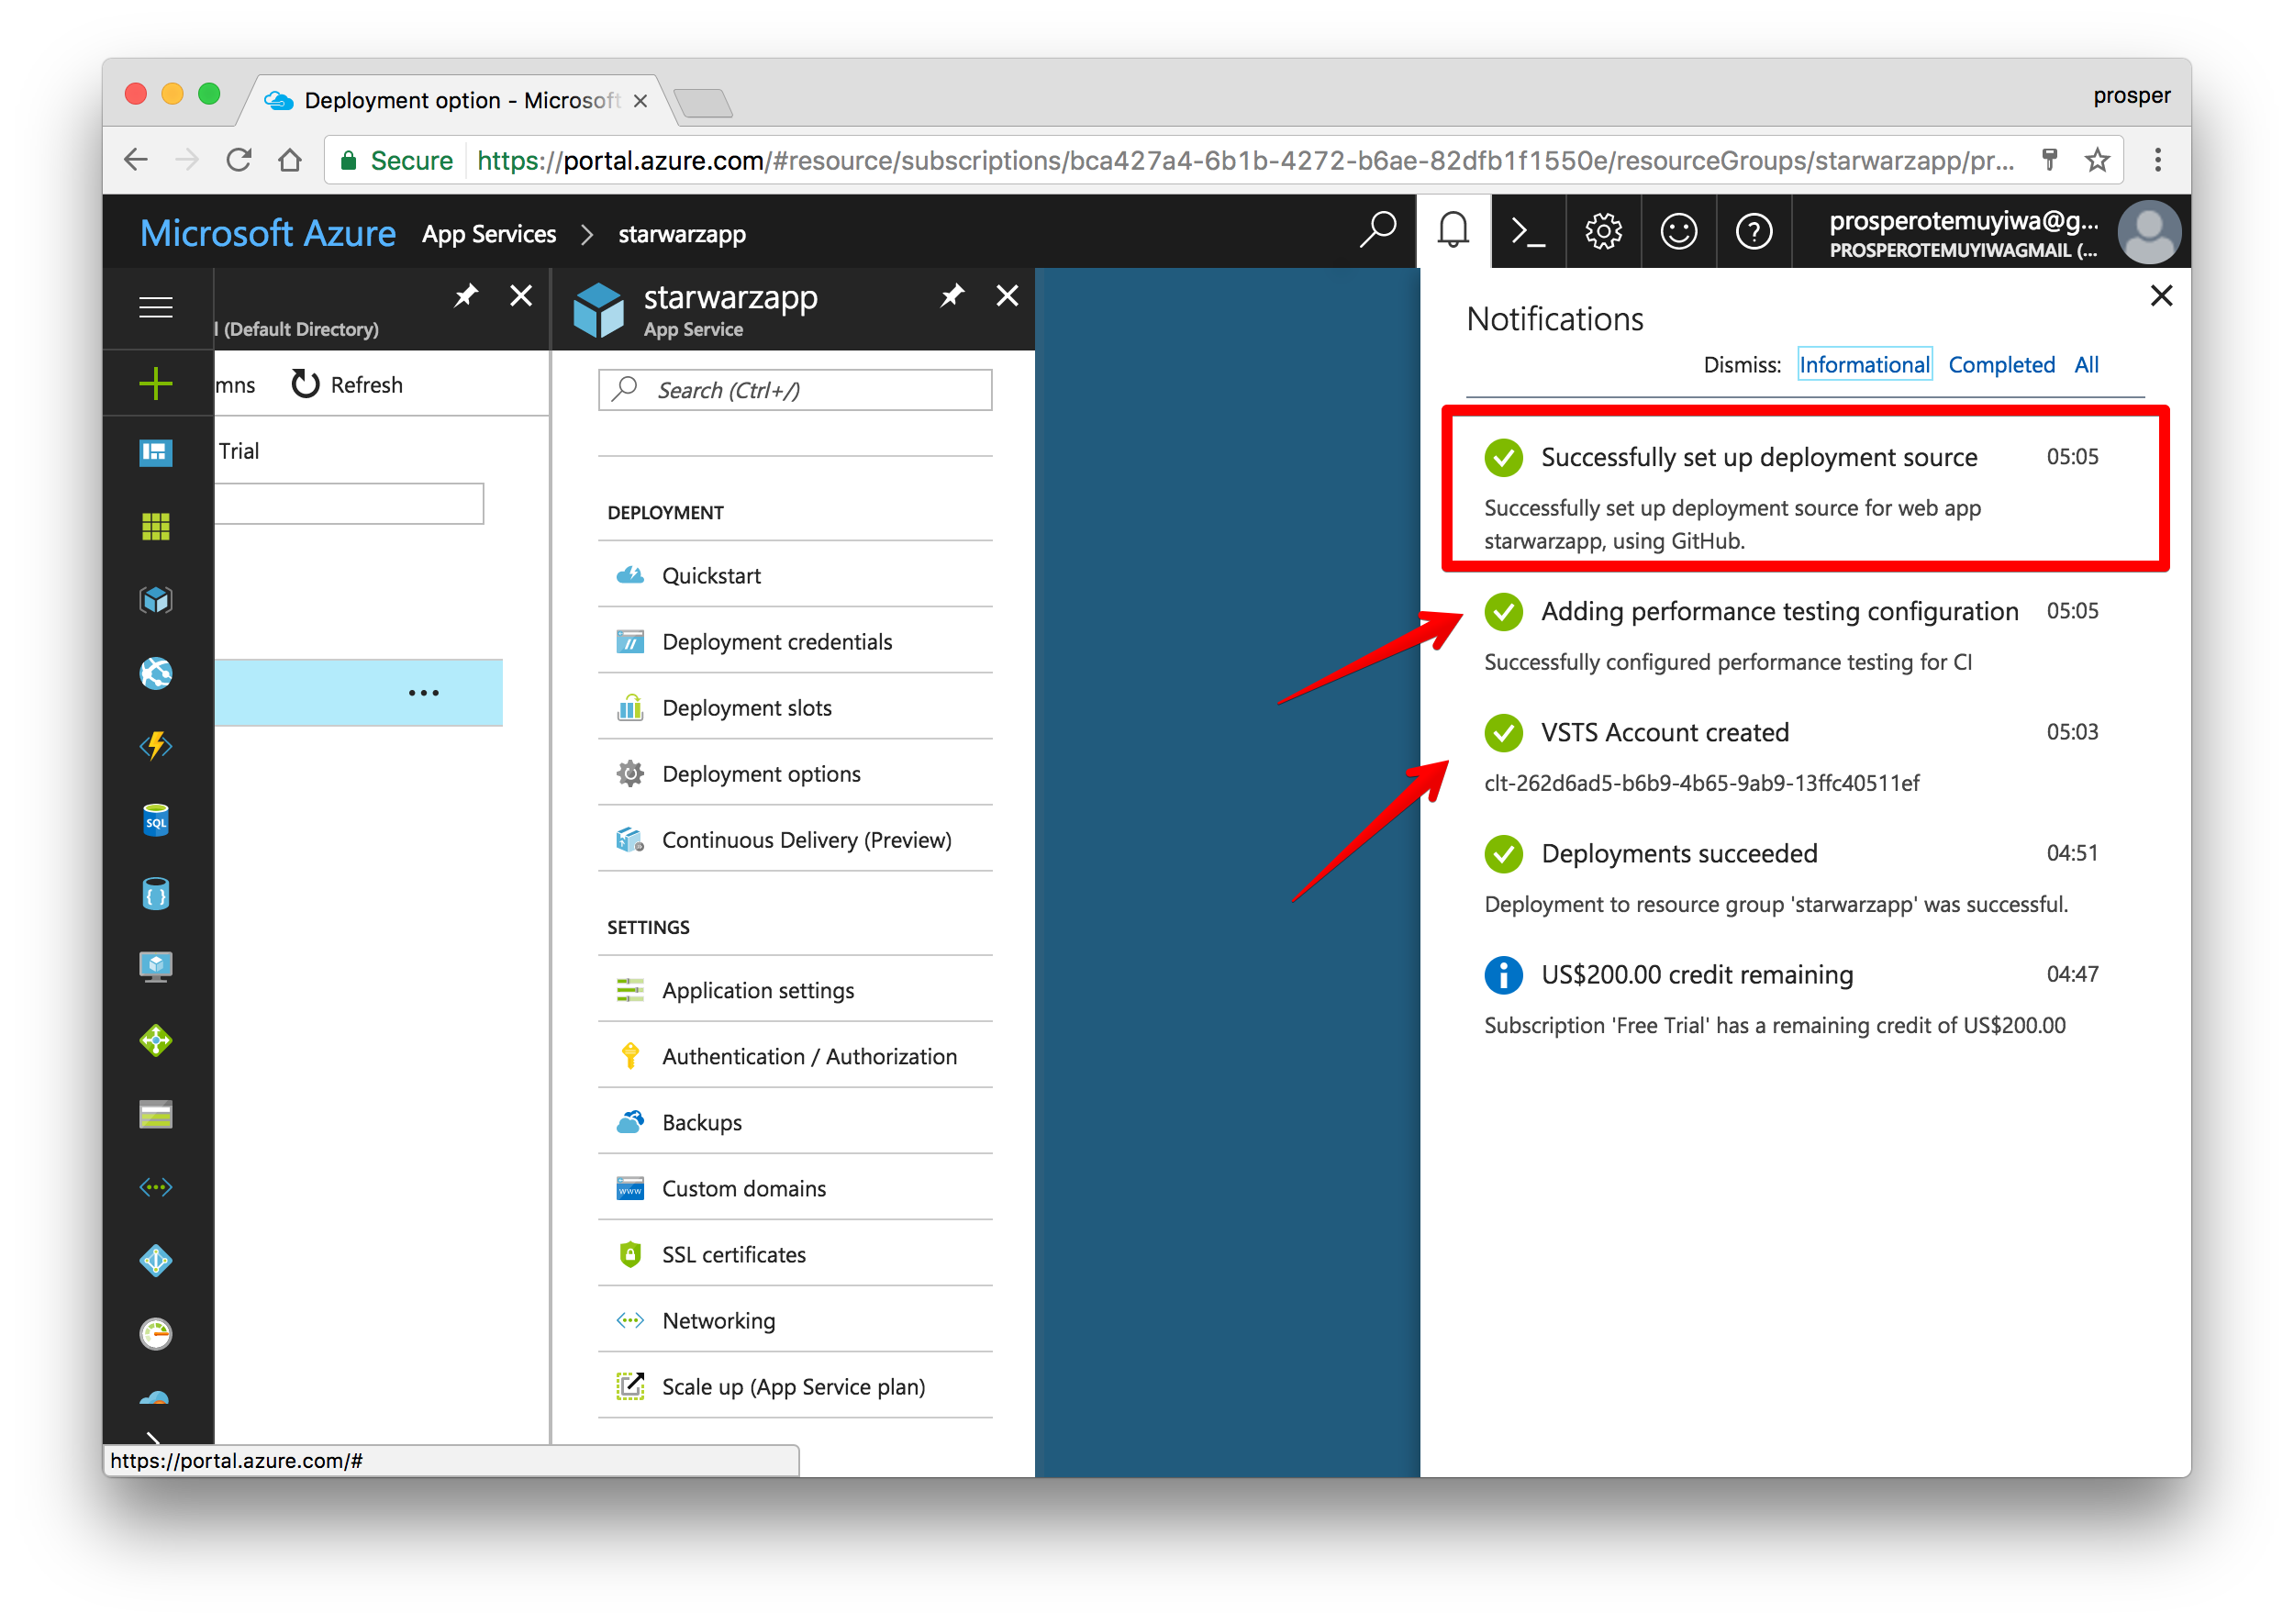
Check out the deployment notifications.
查看部署通知。
Now, browse to
http://[yoursitename].azurewebsites.net. In my case, it ishttp://starwarzapp.azurewebsites.net.现在,浏览至
http://[yoursitename].azurewebsites.net。 就我而言,它是http://starwarzapp.azurewebsites.net。Oops!, there is an HTTP 500 error. What’s happening? Okay, we need to set the environment variables again.
糟糕!HTTP 500错误。 发生了什么? 好的,我们需要再次设置环境变量。
Go to your app in App Services, click on Application Settings, and then add the environment variables to the right.
在App Services中转到您的应用程序 ,单击“ 应用程序设置” ,然后在右侧添加环境变量。
Now grab the app URL, in my case it is http://starwarzapp.azurewebsites.net/ and add to Allowed Origins(CORS) and Allowed Callback URLs in your Auth0 dashboard.
现在获取应用程序URL(在我的情况下为http://starwarzapp.azurewebsites.net/ ),并在Auth0仪表板中添加到Allowed Origins(CORS)和Allowed Callback URLs 。
By default, azure deployment doesn’t do anything with our
composer.jsonorcomposer.lockfile. So, no package is getting installed. Now go back to App Services, click on your app, then go to Development Tools and select Extension. Choose theComposerextension and agree to the legal conditions.默认情况下,azure部署对我们的
composer.json或composer.lock文件不执行任何操作。 因此,没有安装任何软件包。 现在回到App Services ,点击您的应用程序,然后转到Development Tools并选择Extension 。 选择Composer扩展程序并同意法律条件。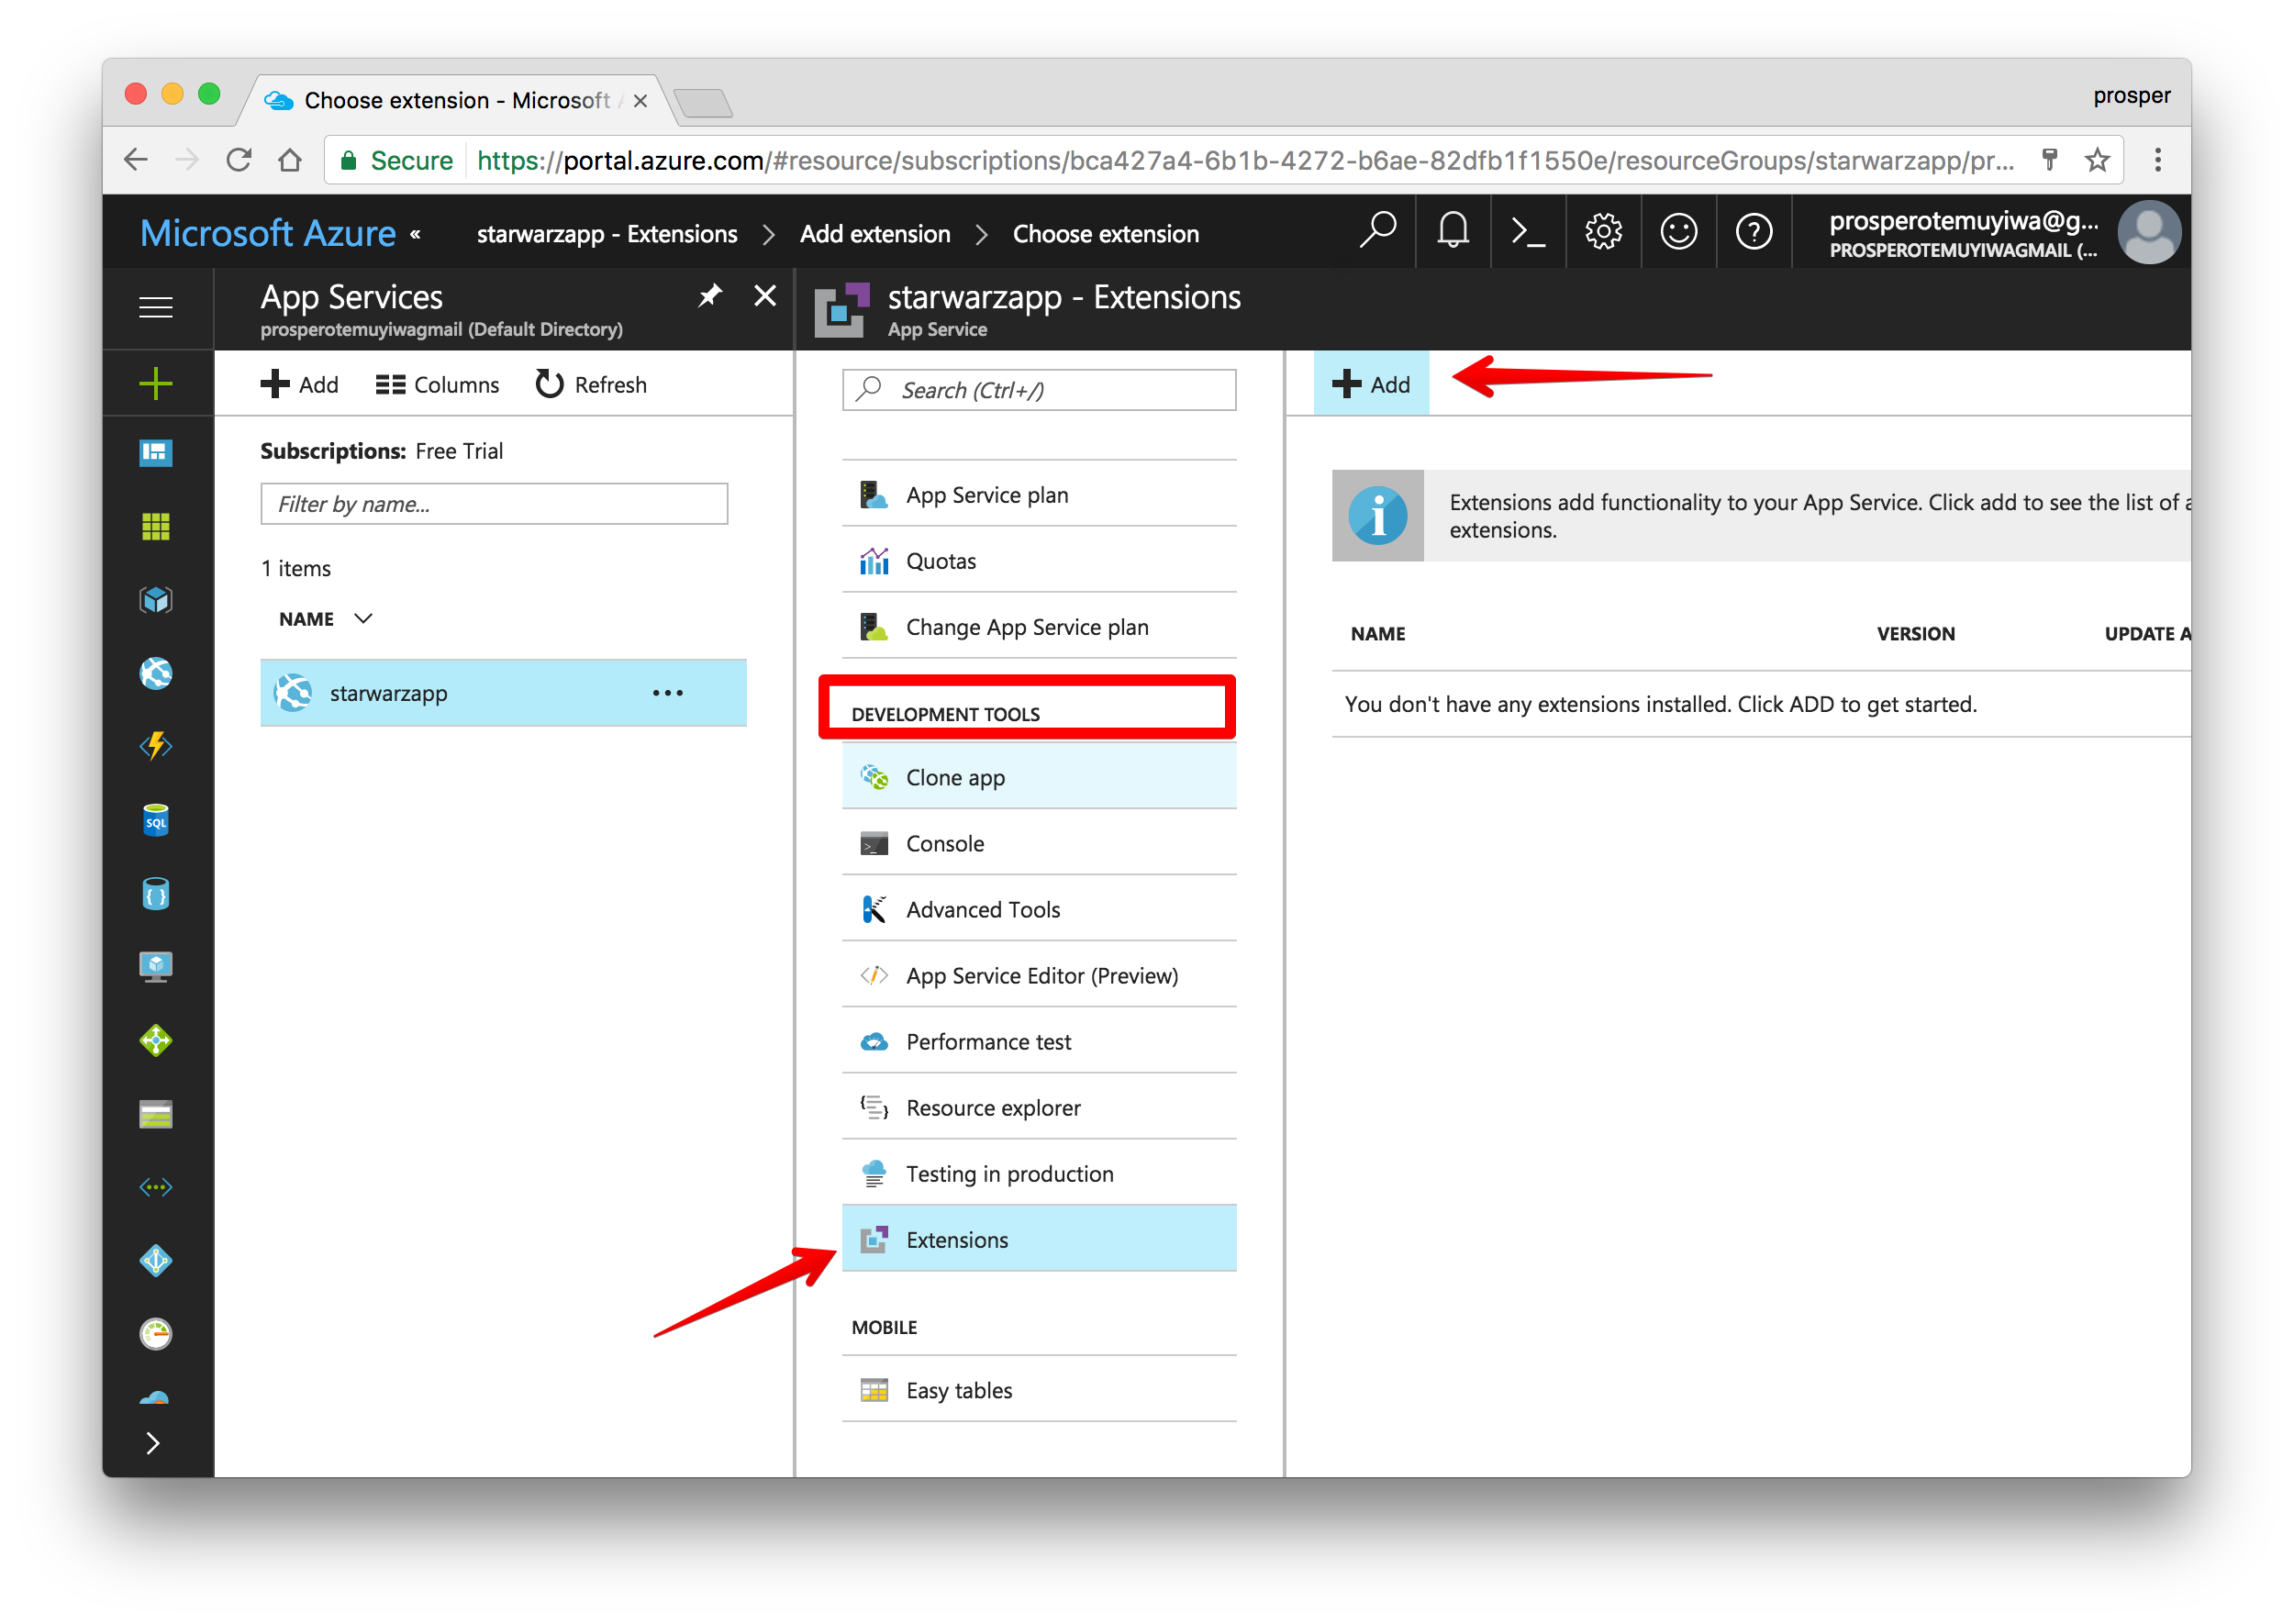
Now, make a little change to your app and push again to GitHub. You should see it deploying like so:
现在,对您的应用程序进行一些更改,然后再次推送到GitHub。 您应该看到它像这样部署:
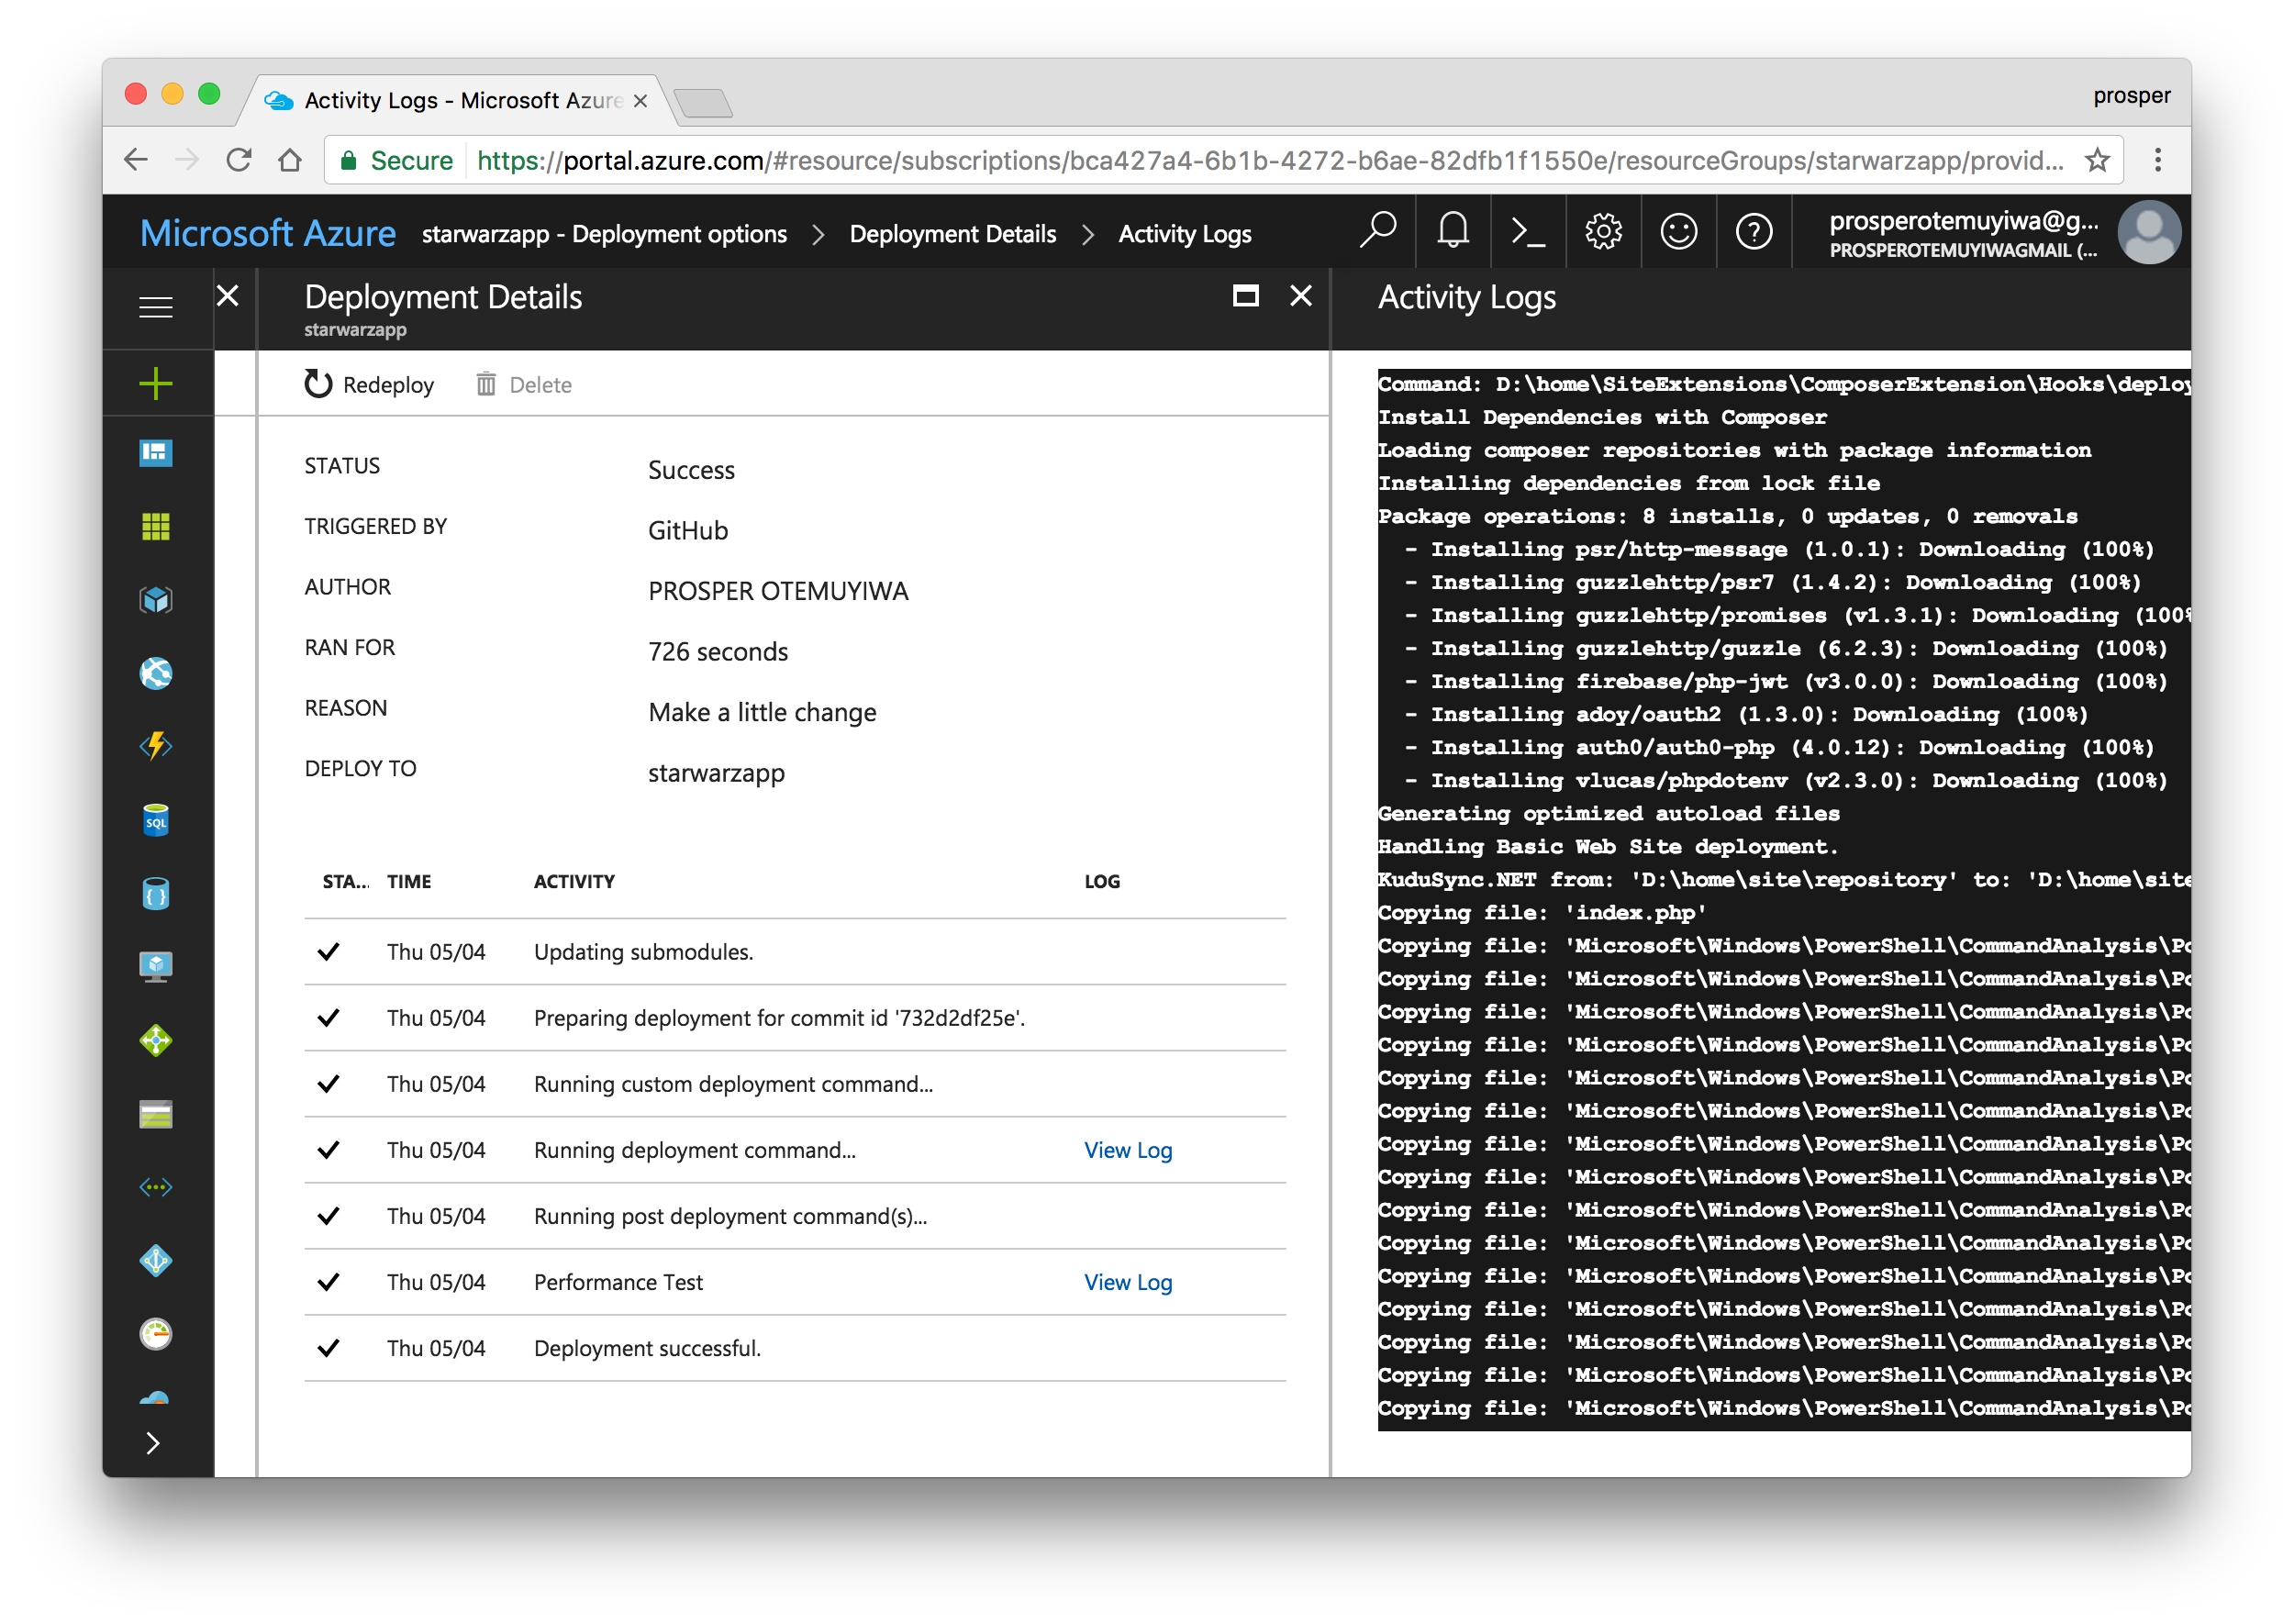
Now check out your app again. It should be live and working!
现在,再次检查您的应用程序。 它应该是活着的 !

数据库,缓存和Cron作业 (Database, Caching & Cron Jobs)
Microsoft Azure offers Azure Redis Cache. It is based on the popular open source Redis cache. It’s easy to create and use like so:
Microsoft Azure提供了Azure Redis缓存 。 它基于流行的开源Redis缓存。 这样很容易创建和使用:
Click New > Data + Storage > Redis Cache.
单击新建>数据+存储> Redis缓存 。
- Enter the name of the cache, select the region and create it. 输入缓存的名称,选择区域并创建它。
Check out the documentation on how to use it.
查看有关如何使用它的文档 。
For scheduling and running tasks, Azure offers a Scheduler. It allows you to:
对于计划和运行任务,Azure提供了Scheduler 。 它允许您:
- Call services inside or outside of Azure. 在Azure内部或外部调用服务。
- Run jobs on any schedule. 按任何时间表运行作业。
- Use Azure Storage queues for long-running or offline jobs. 将Azure存储队列用于长期运行或脱机作业。
- Invoke Azure Service Bus queues. 调用Azure Service Bus队列。
Check out how to create and manage jobs using the Scheduler.
We already talked a little about setting up a database while we were deploying our app, but let’s quickly look at how to set up a MySQL database.
在部署应用程序时,我们已经讨论了有关建立数据库的问题,但让我们快速了解一下如何建立MySQL数据库。
Log into the Azure Portal.
登录到Azure门户。
Click New in the left panel of the dashboard. Choose Data + Storage in the Marketplace, then select MySQL database.
单击仪表板左侧面板中的“ 新建 ”。 在市场中选择“ 数据+存储 ”,然后选择“ MySQL数据库”。
Go ahead and configure your new MySQL database. Enter a name, choose your subscription, location and fill the required fields. Create!
继续并配置新MySQL数据库。 输入名称,选择您的订阅,位置并填写必填字段。 创造!
Connect to the database.
连接到数据库。
Laravel developers can easily configure a MySQL database for their apps on Azure.
Laravel开发人员可以轻松地在Azure上为其应用程序配置MySQL数据库 。
亚马逊网络服务 (Amazon Web Services)
More companies use AWS (Amazon Web Services) for storing all sorts of data ranging from images and mp3 files to videos than any other cloud platform. In fact, a lot of organizations like Uber, Spotify, or Salesforce use Amazon Web Services completely – for hosting, deployment, and infrastructure. AWS has a ton of developer products.
与任何其他云平台相比,更多的公司使用AWS(Amazon Web Services)存储从图像,mp3文件到视频的各种数据。 实际上,Uber,Spotify或Salesforce等许多组织完全将Amazon Web Services用作托管,部署和基础架构。 AWS有大量的开发人员产品。
The service we’ll use for deploying our famous StarWars app is Amazon Elastic Beanstalk. Let’s get started.
我们将用于部署著名的StarWars应用程序的服务是Amazon Elastic Beanstalk 。 让我们开始吧。
Sign up for an AWS account if you don’t have one.
如果您没有,请注册一个AWS账户 。
Head over to Elastic Beanstalk console.
Create a new app.
创建一个新的应用程序。
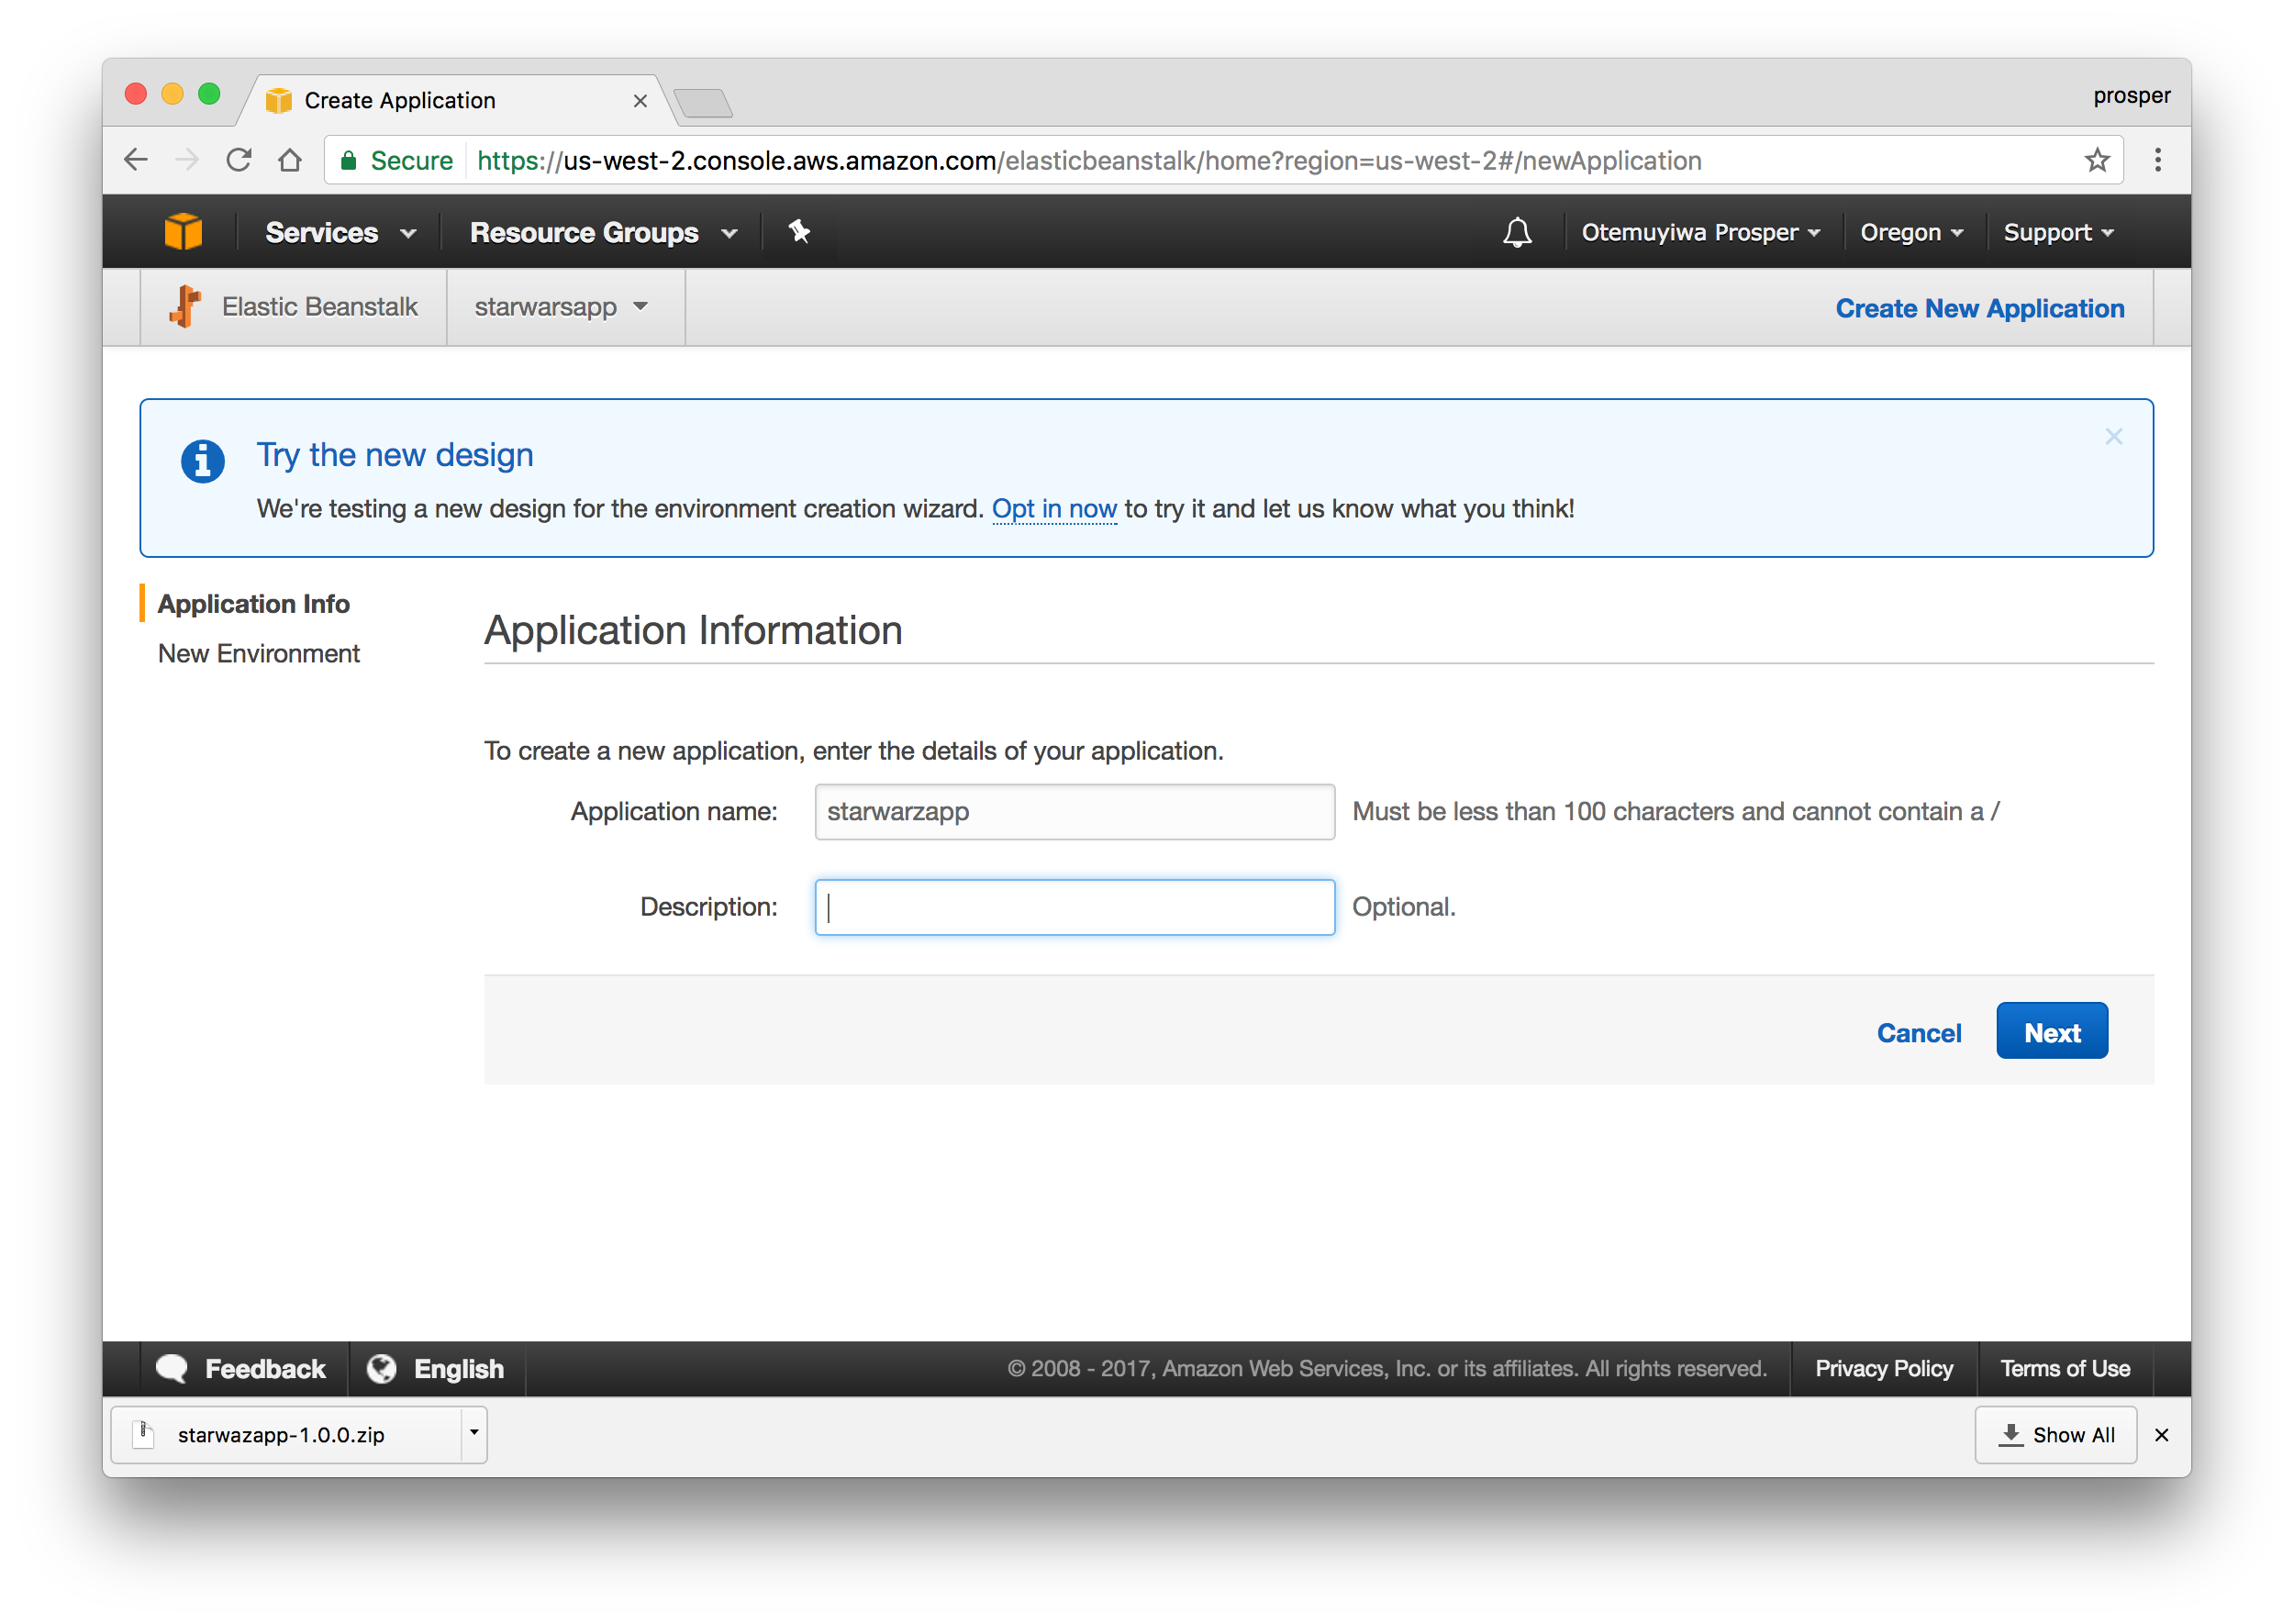
Create a new app.
创建一个新的应用程序。
Click on
create web server.单击
create web server。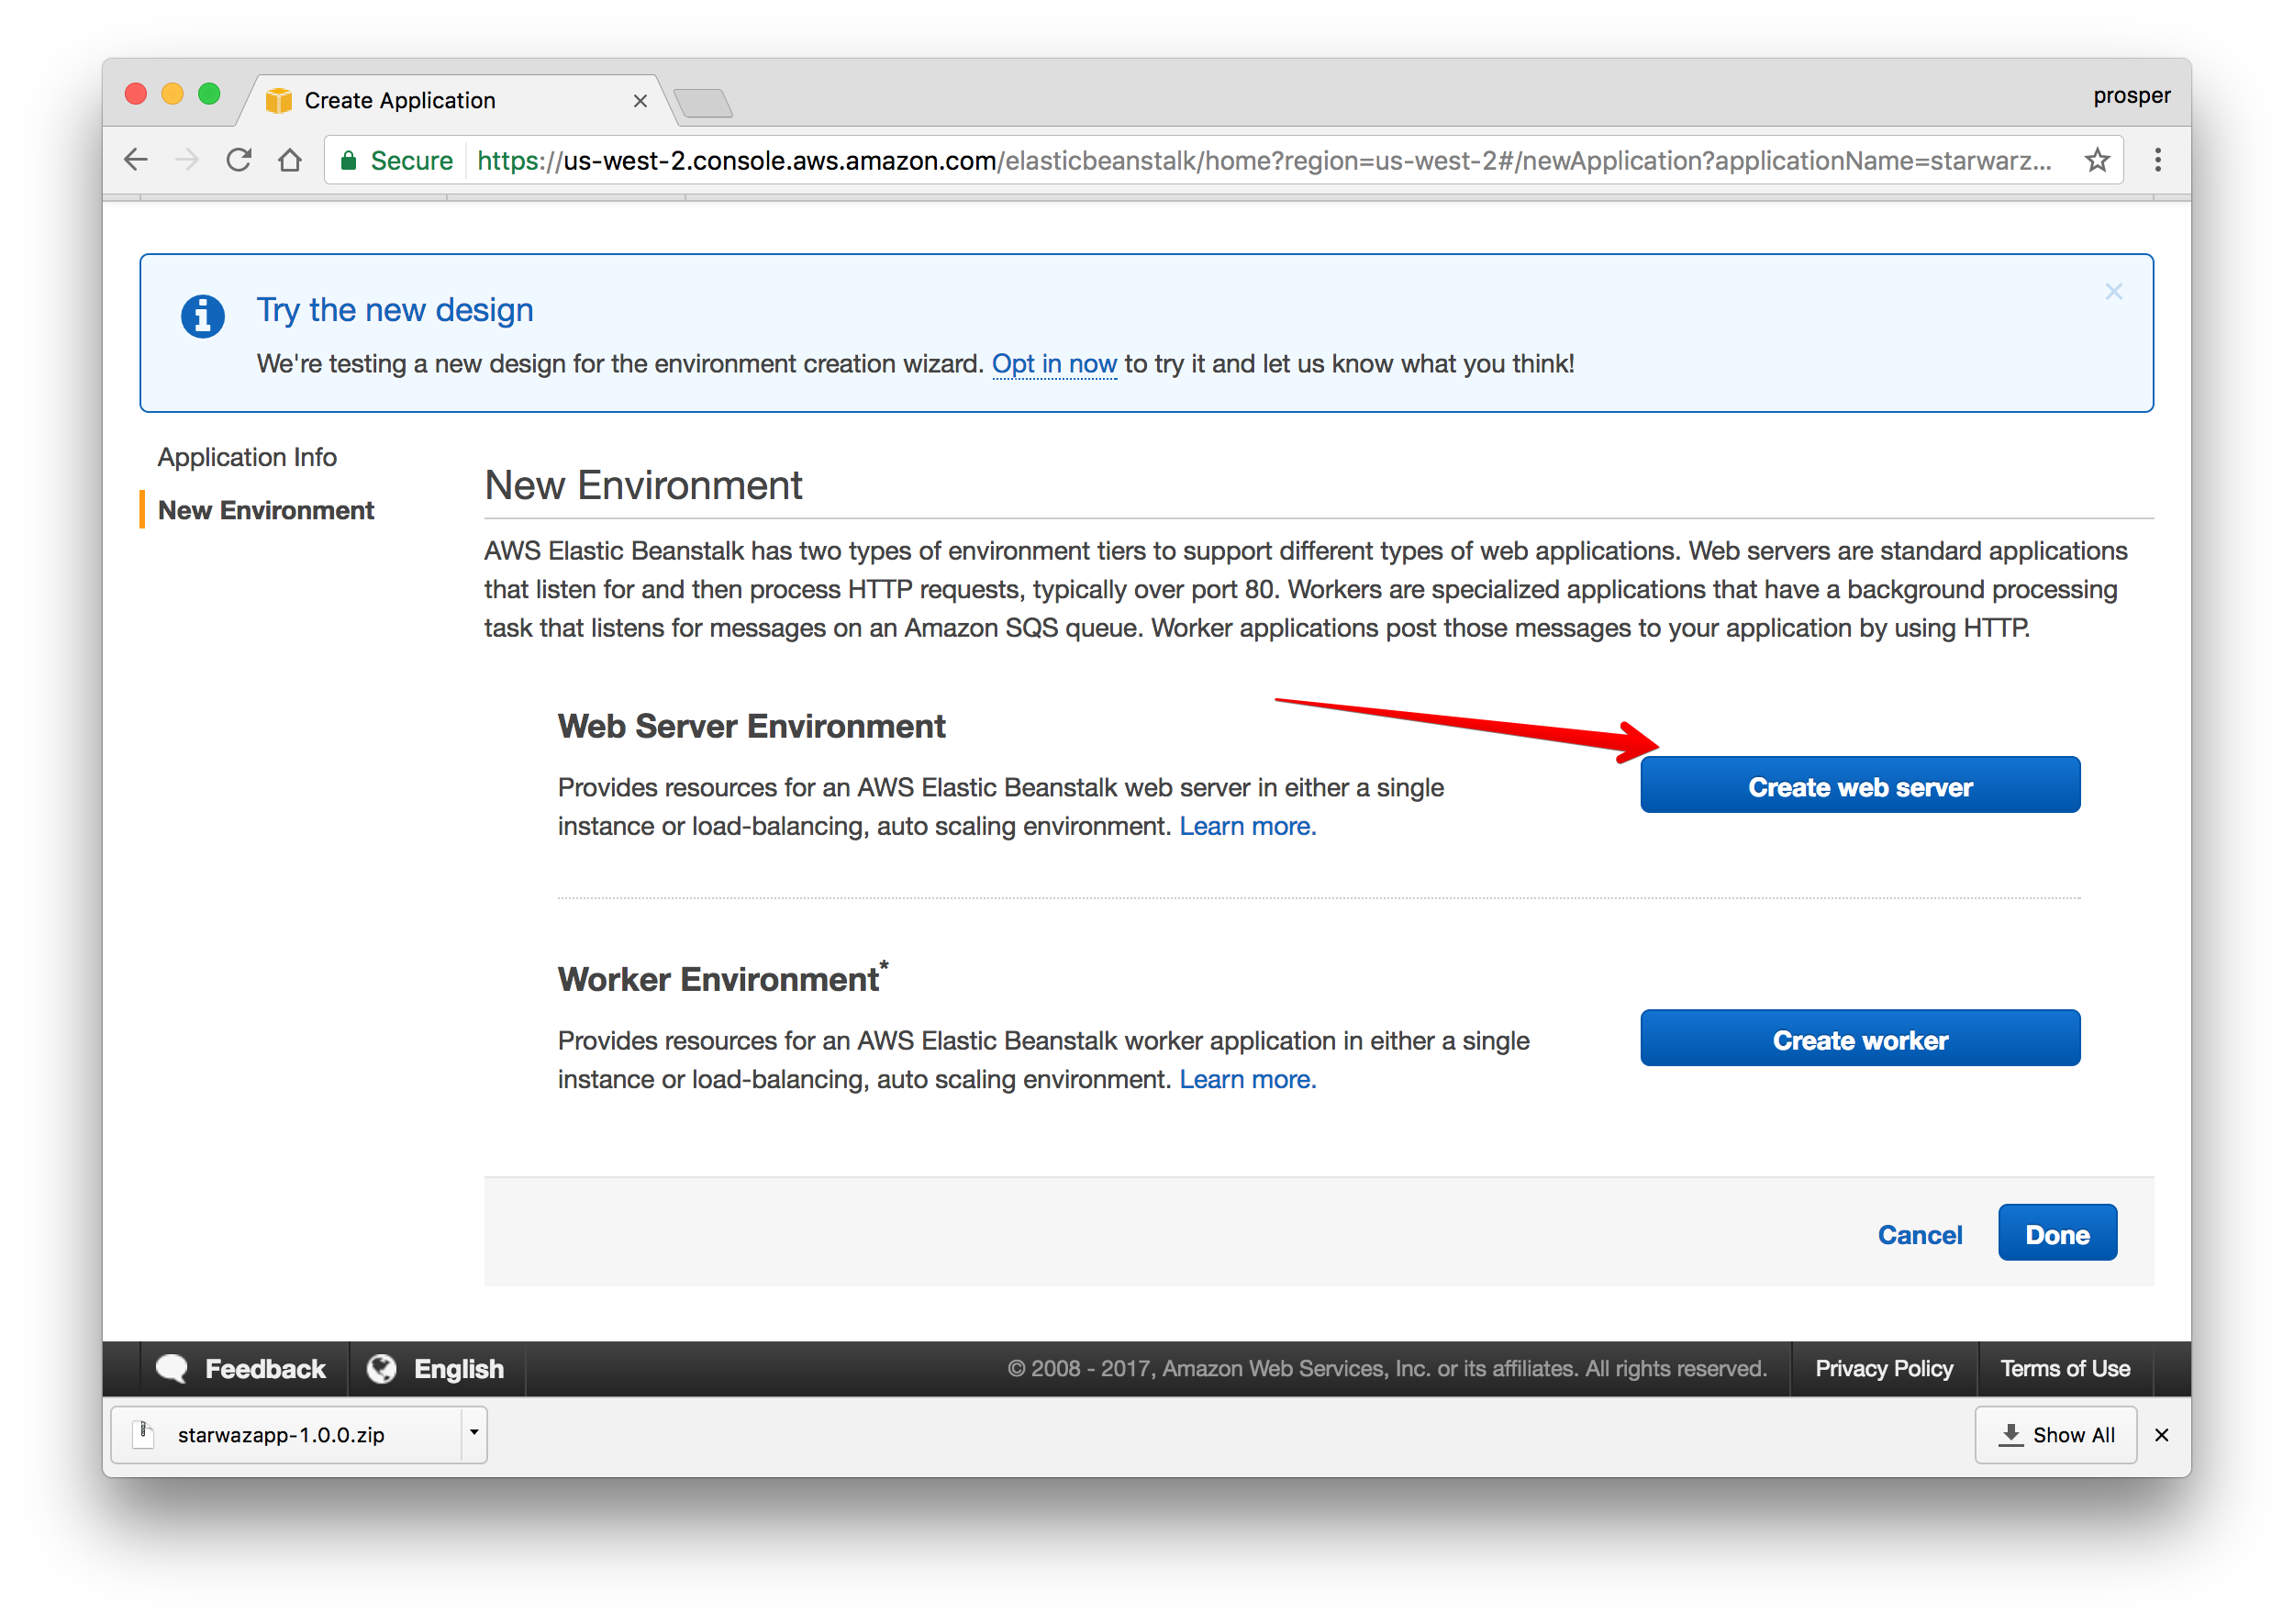
Click on
create web server.单击
create web server。Create the webserver environment.
创建Web服务器环境。
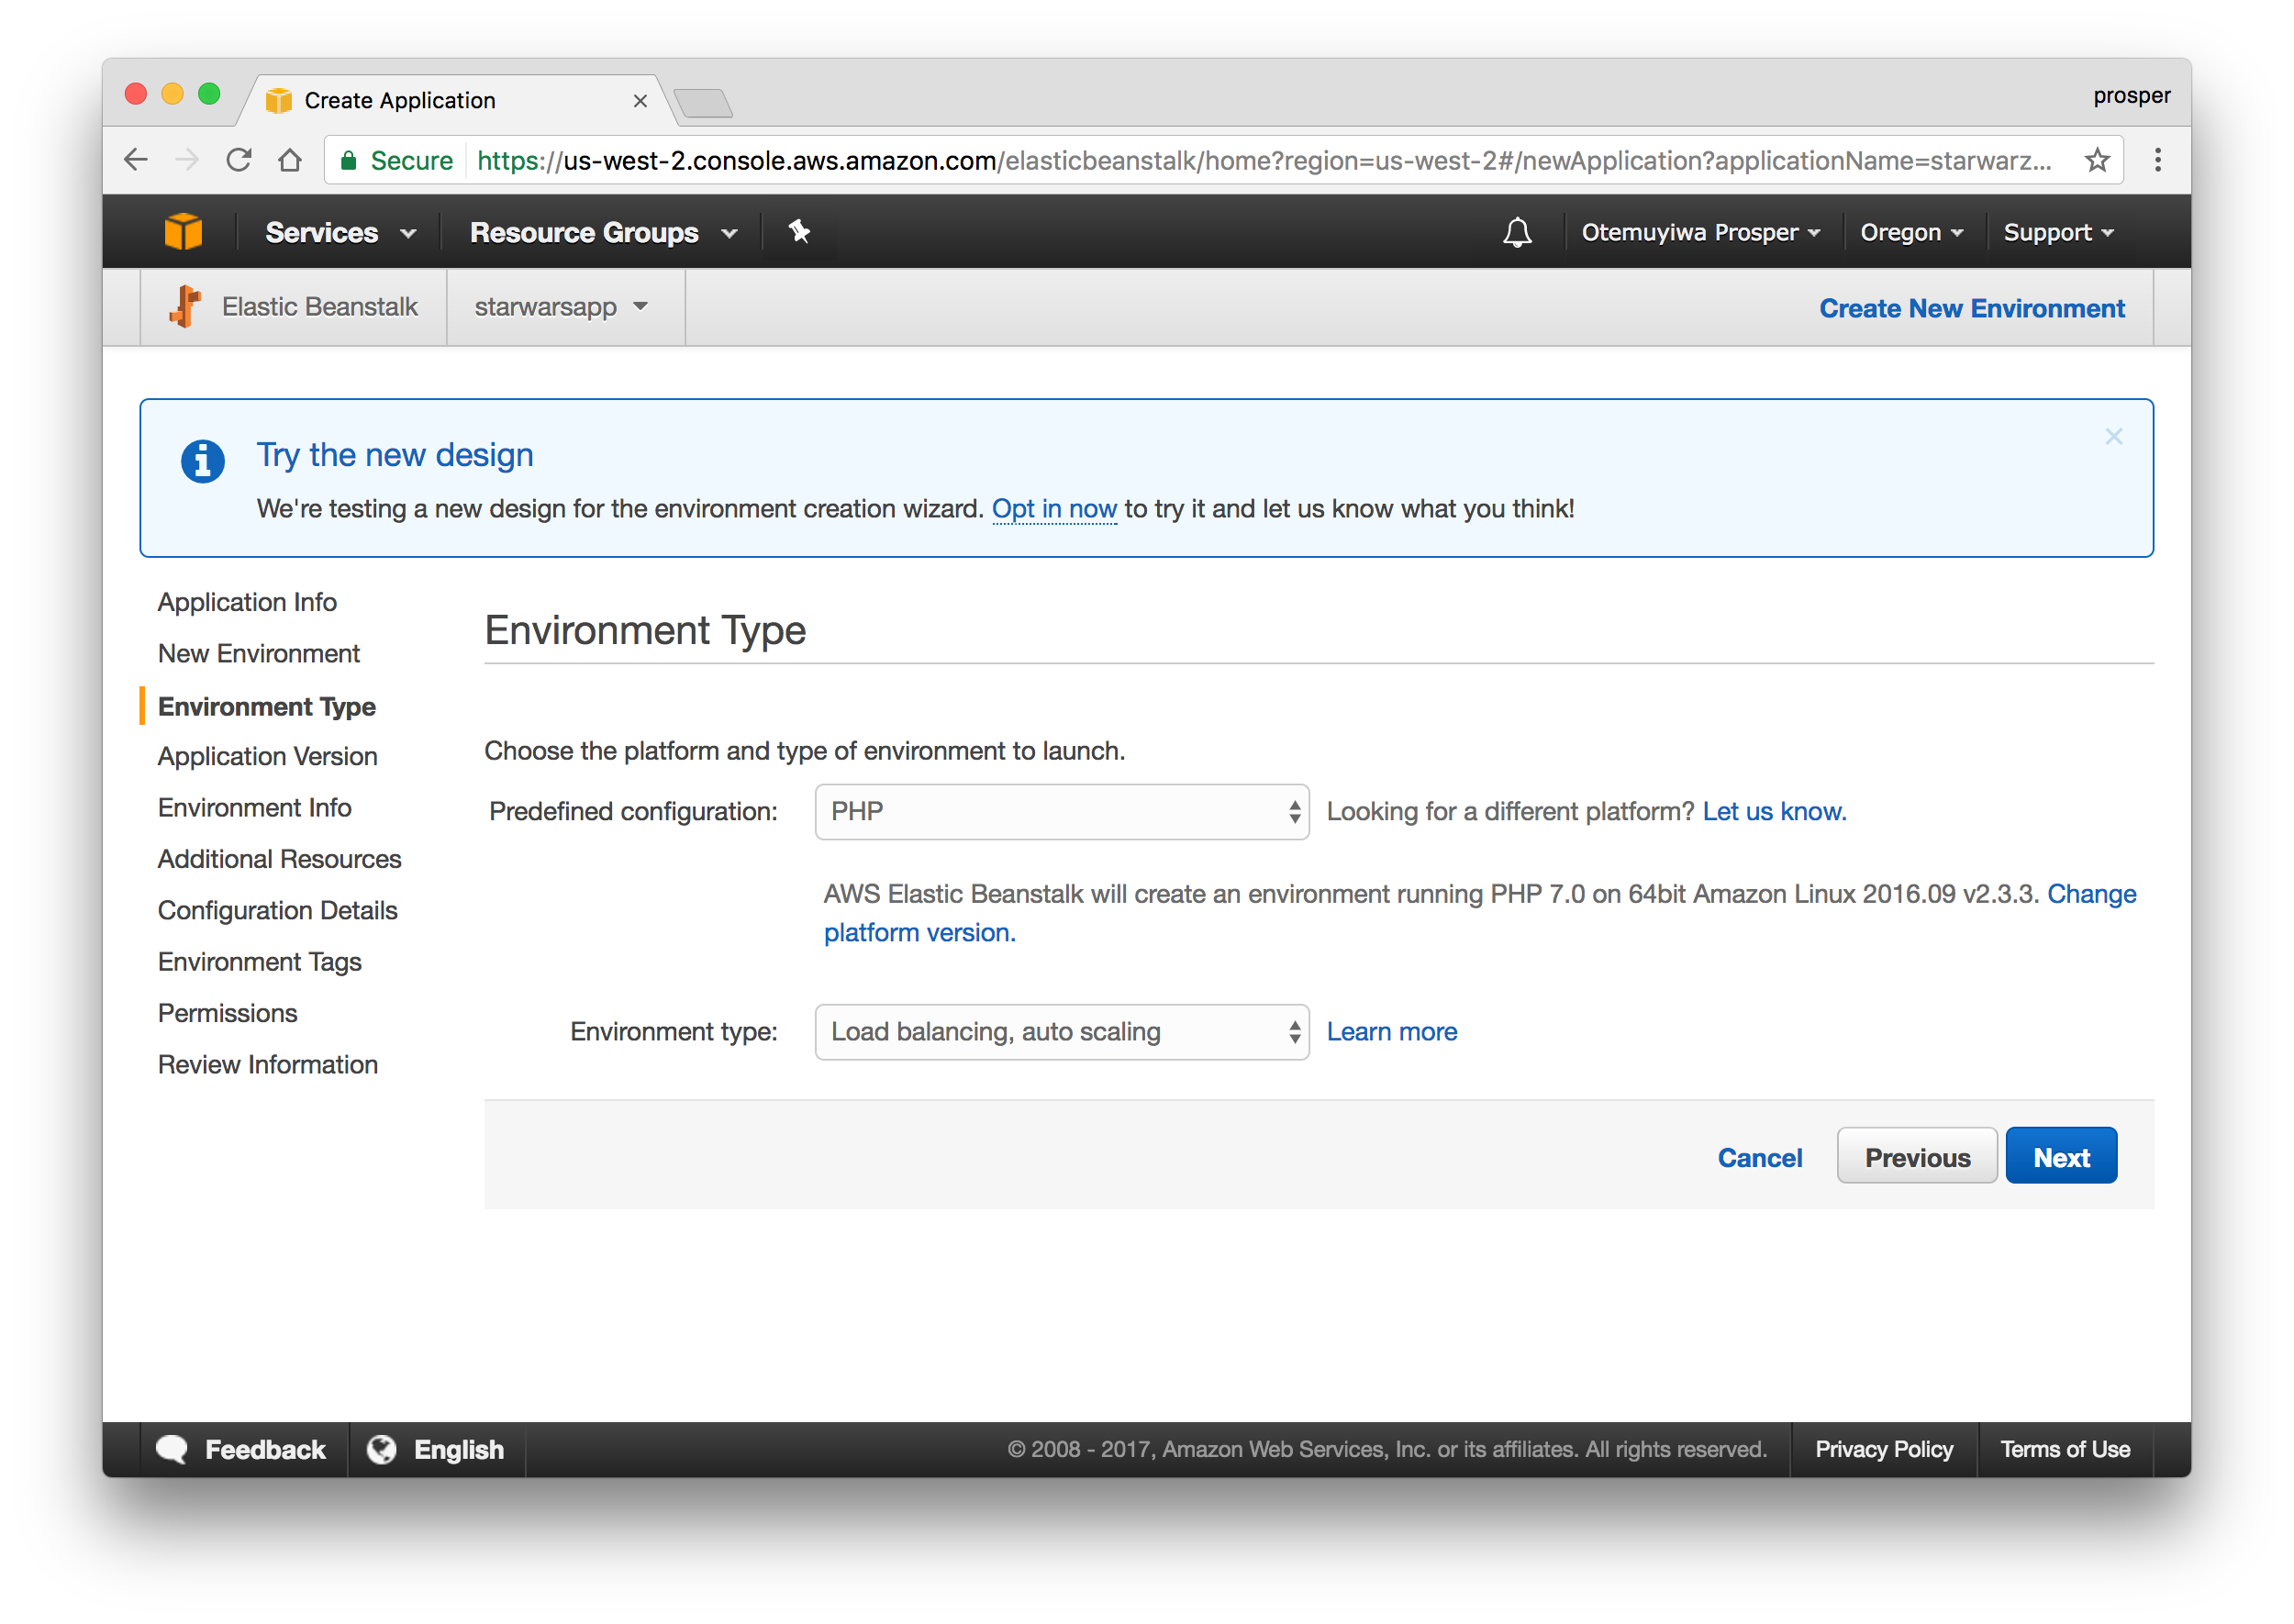
Create the webserver environment.
创建Web服务器环境。
Upload your code. Elastic Beanstalk requires that you upload a zip file of your codebase. You can manually zip it up, but I prefer to do that from my terminal like so:
zip ../starwarsapp.zip -r * .[^.]*上载您的代码。 Elastic Beanstalk要求您上载代码库的zip文件。 您可以手动将其压缩,但是我更喜欢从终端这样做,例如:
zip ../starwarsapp.zip -r * .[^.]*Now, upload it to AWS like so:
现在,将其上传到AWS,如下所示:
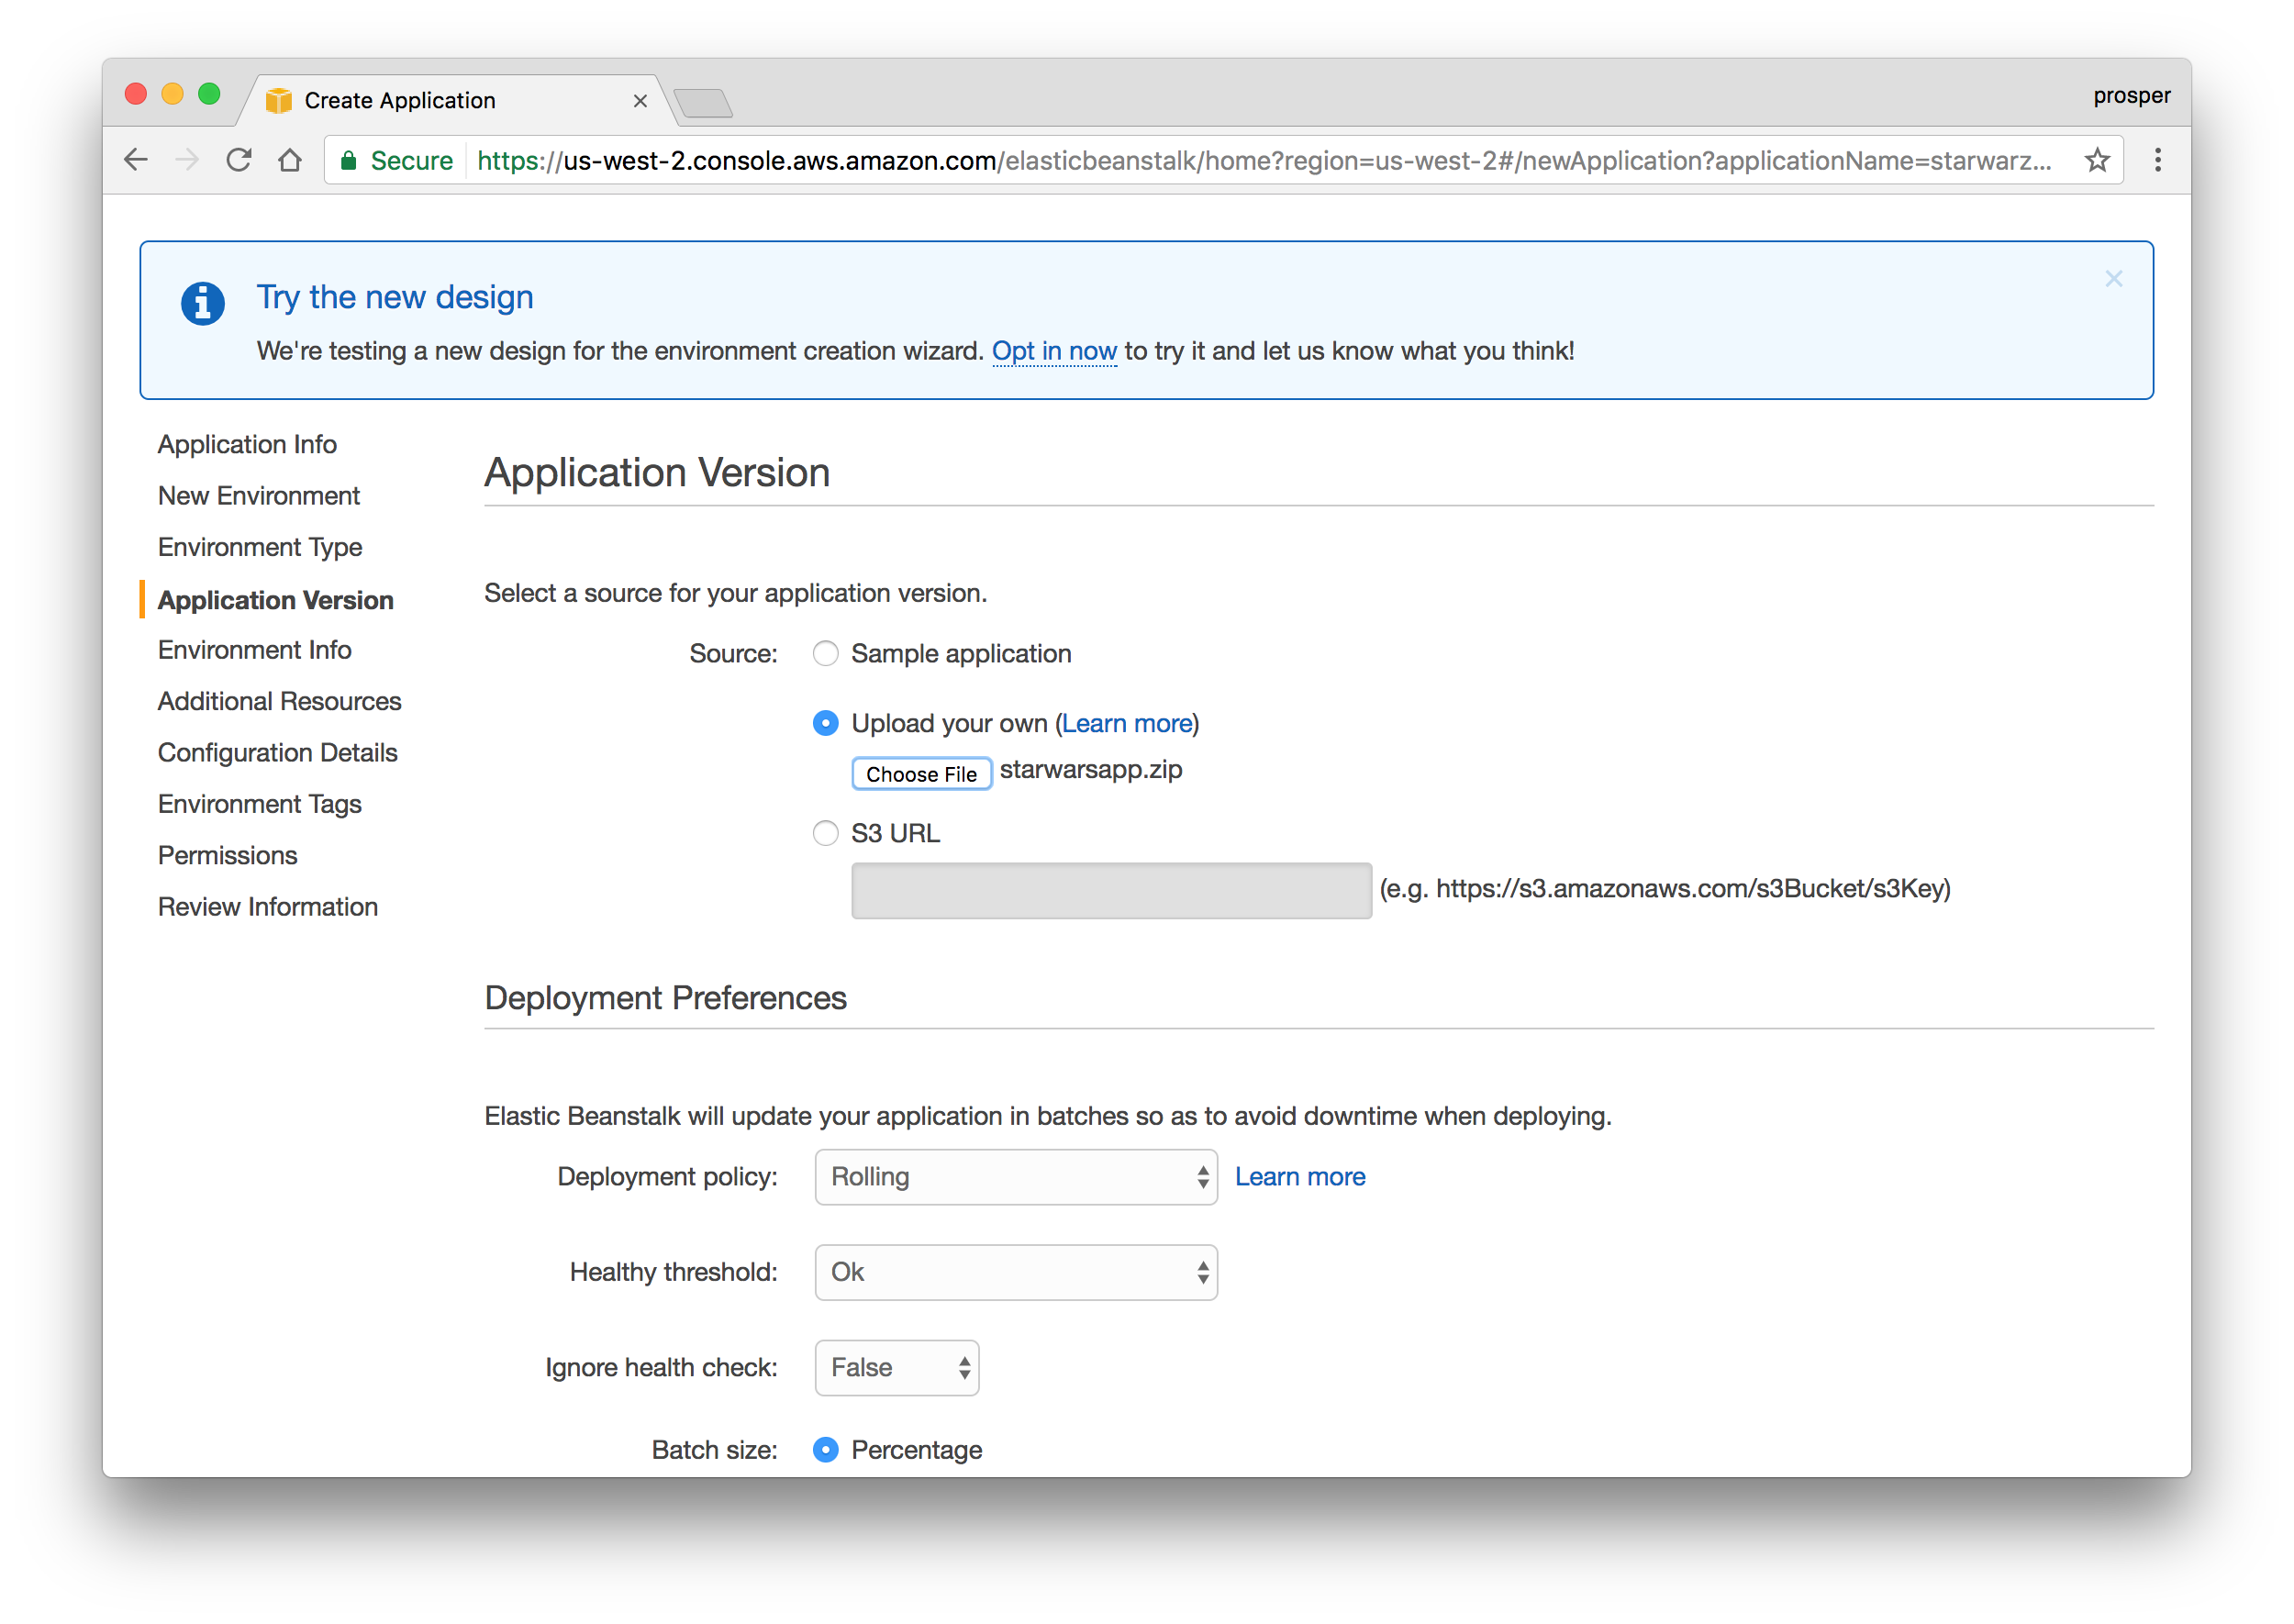
Now, upload it to AWS like so:
现在,将其上传到AWS,如下所示:
Check availability for the app URL. Mine looks like this:
检查应用程序URL的可用性。 我的看起来像这样:
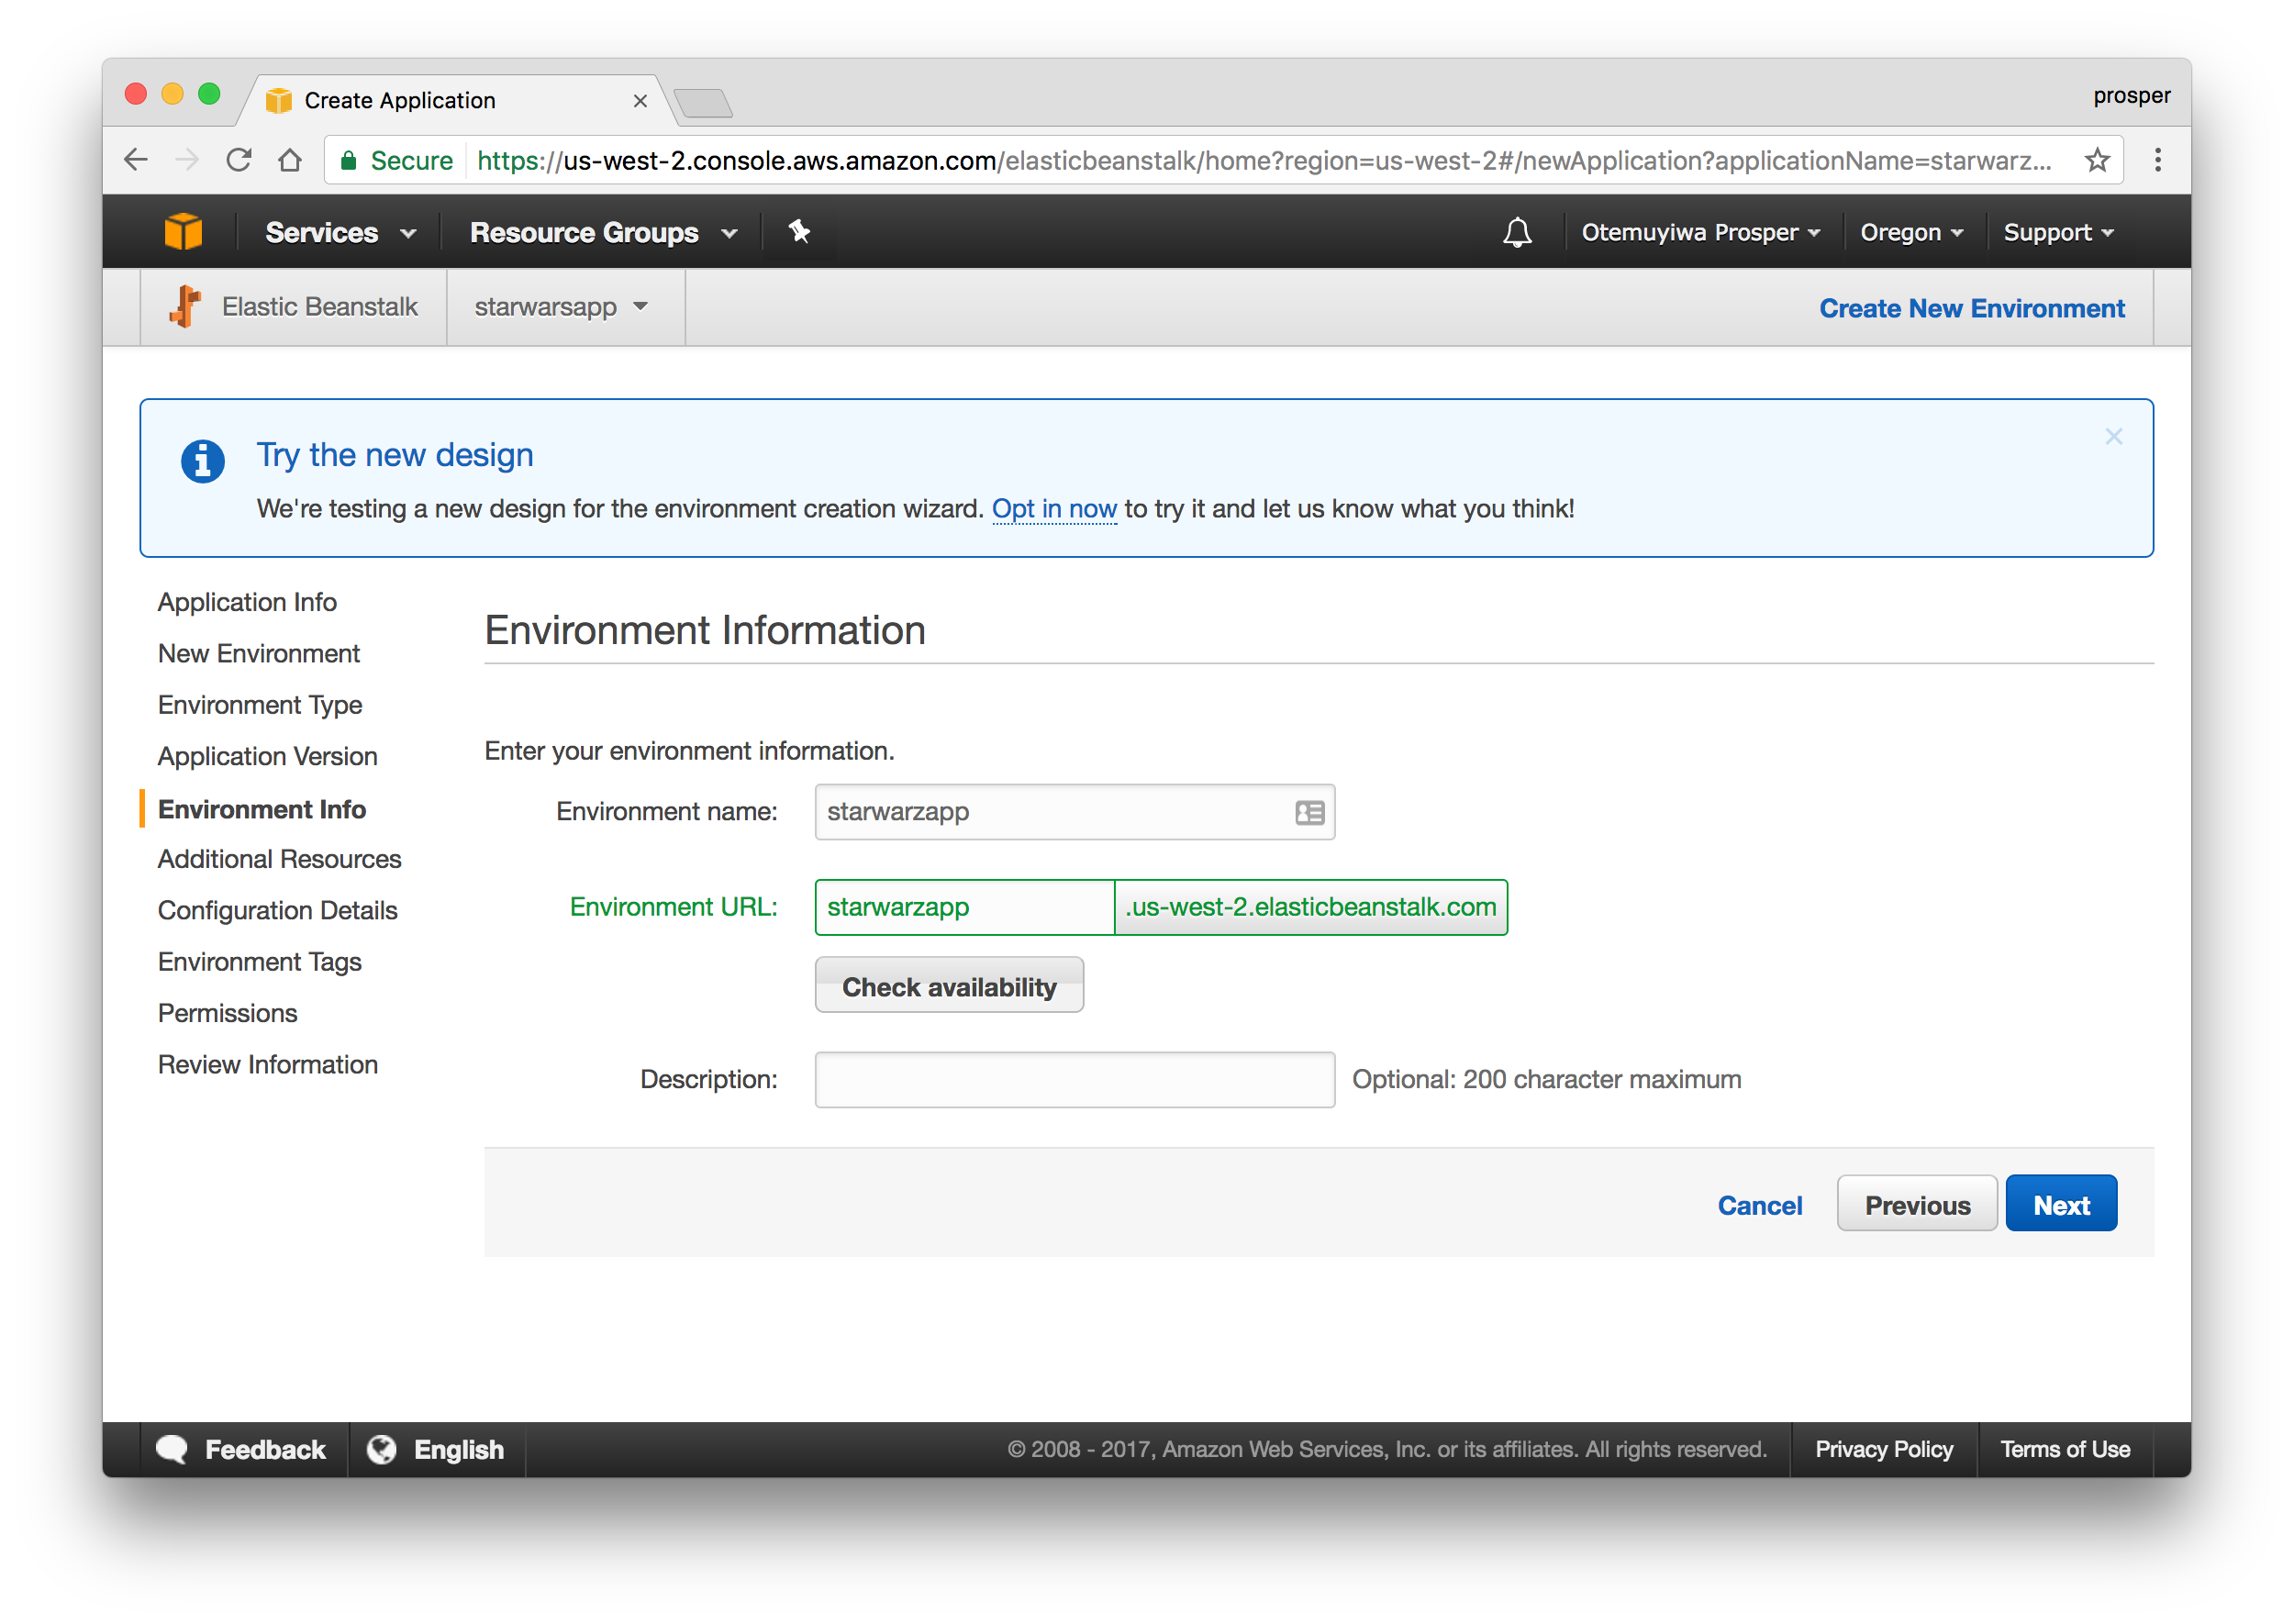
Check availability for the app URL. Mine looks like this:
检查应用程序URL的可用性。 我的看起来像这样:
The next page allows us to configure a database Instance. Our app doesn’t require one, so we can skip this.
下一页允许我们配置数据库实例。 我们的应用程序不需要一个,因此我们可以跳过这一步。
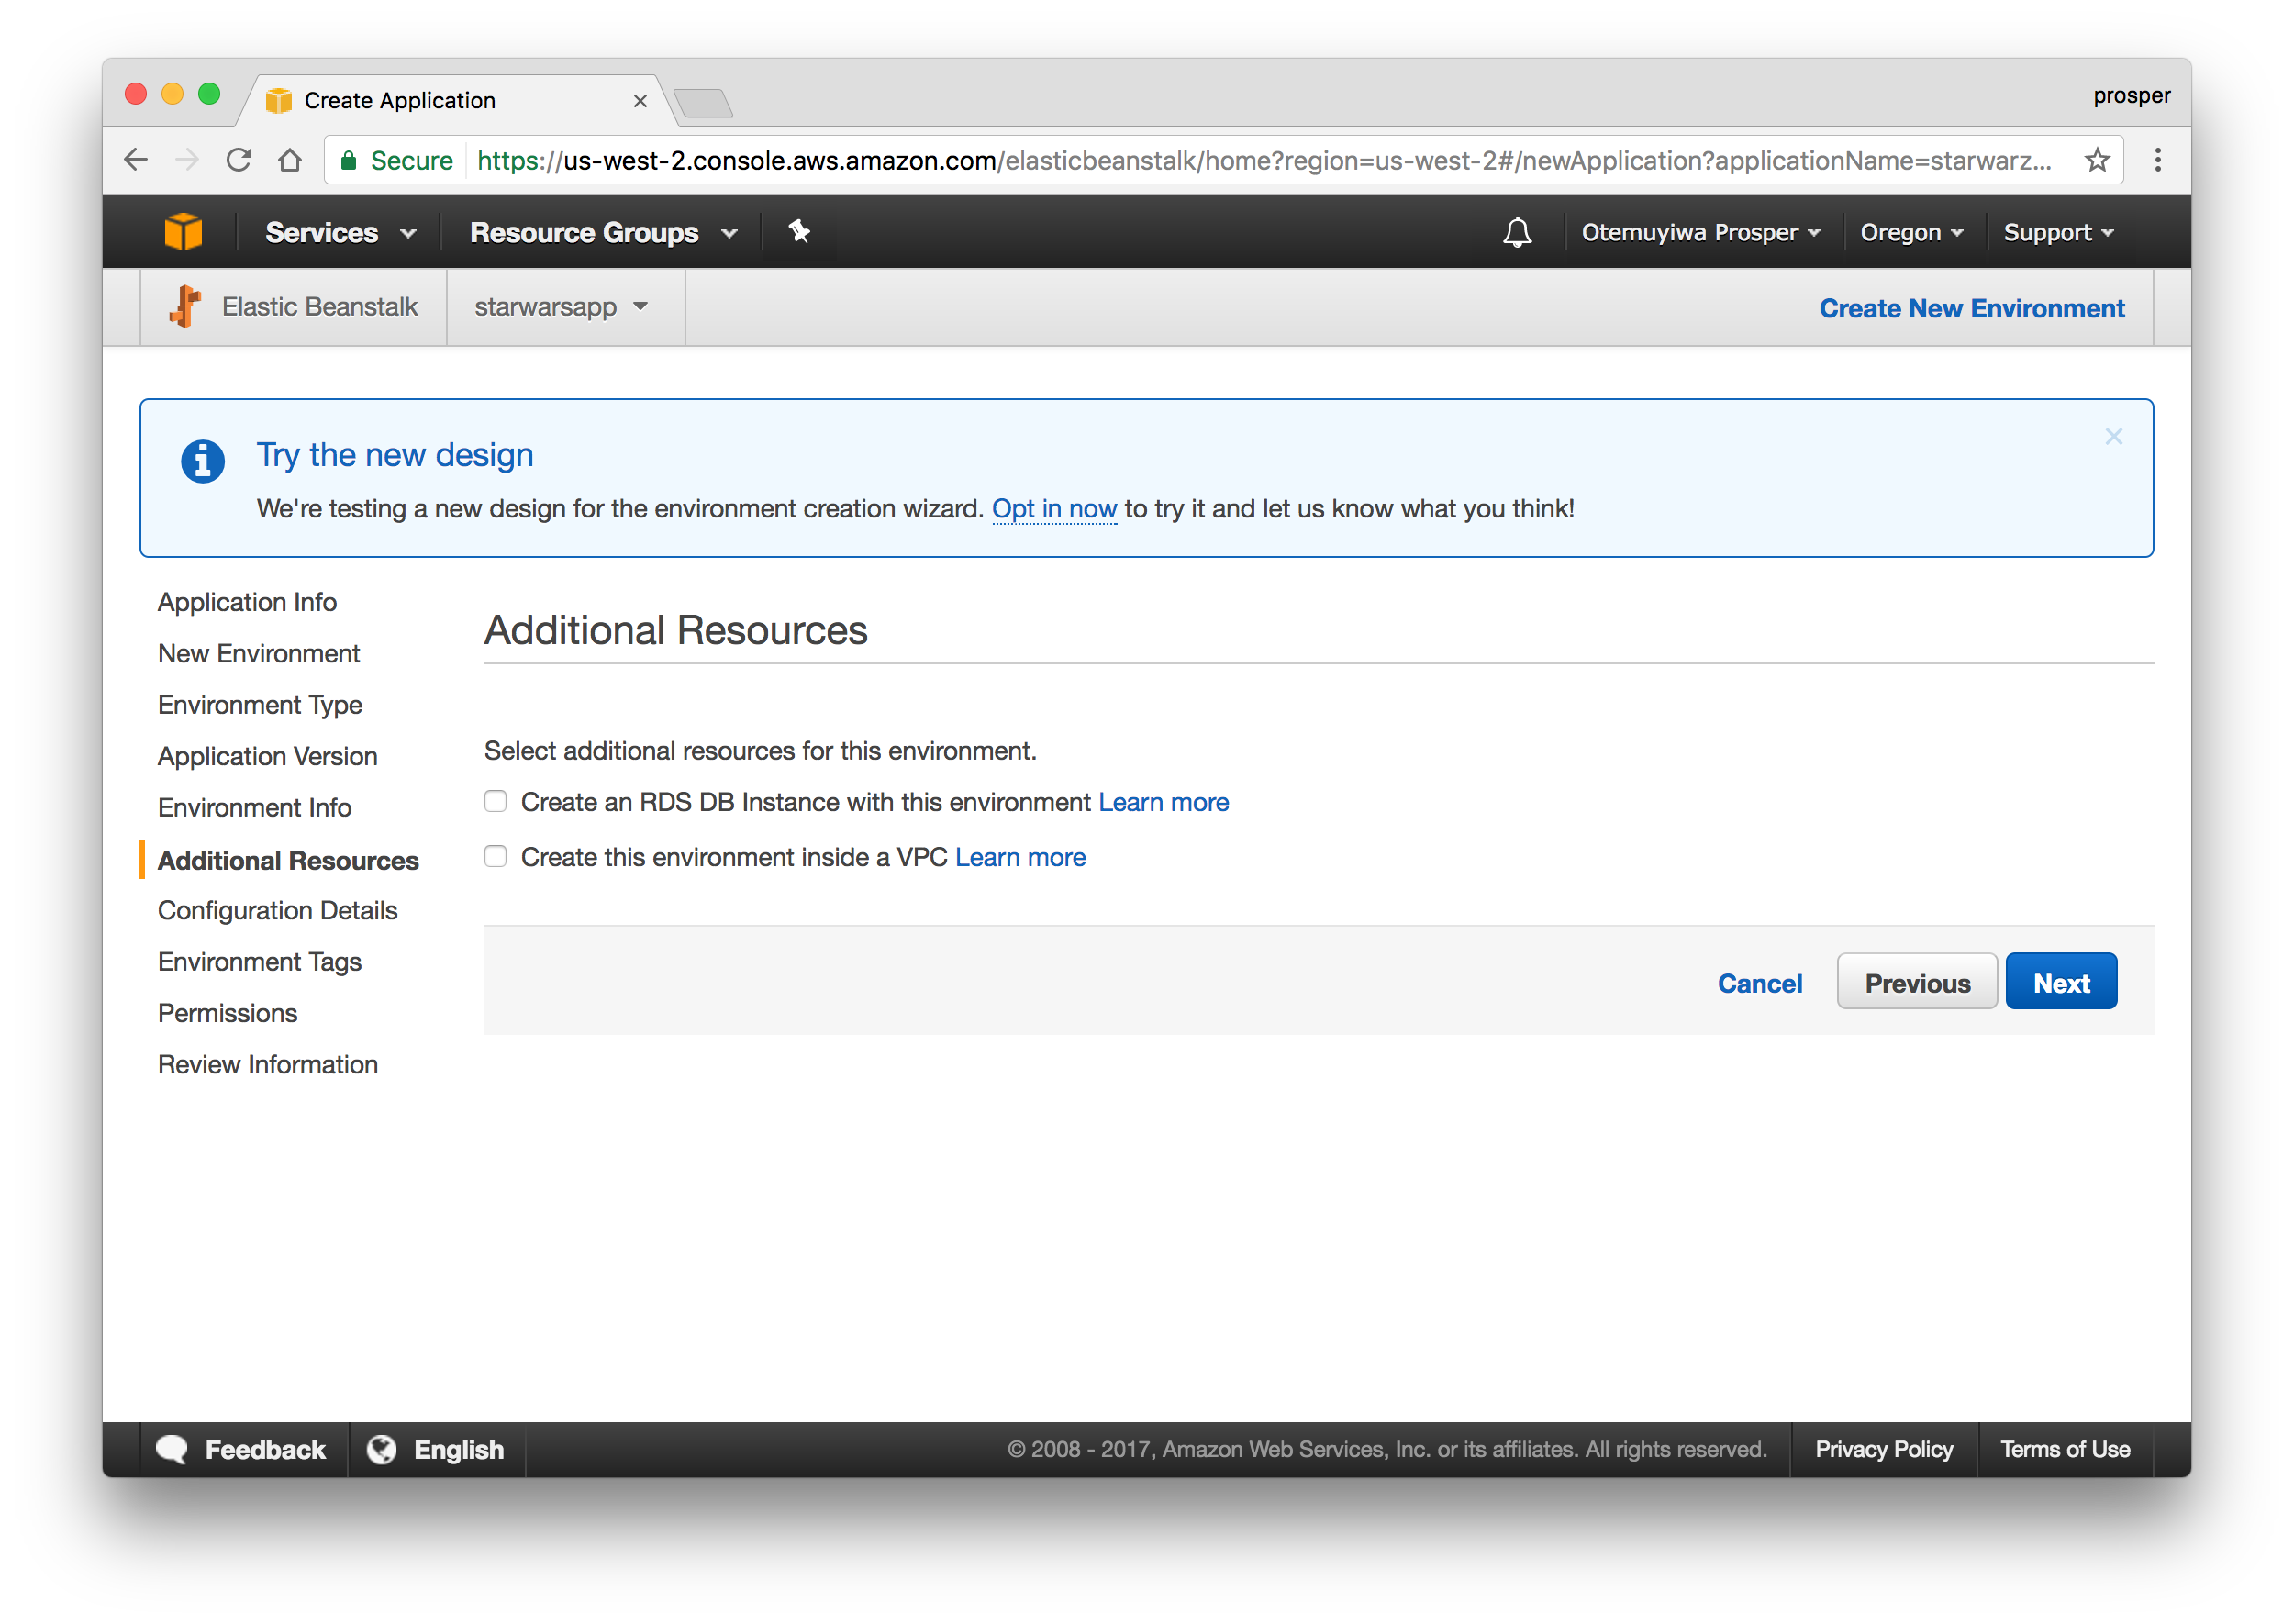
The next page allows us to configure a database Instance. Our app doesn’t require one, so we can skip this.
下一页允许我们配置数据库实例。 我们的应用程序不需要一个,因此我们可以跳过这一步。
This step allows us to modify our configuration details. The default one is okay for our app.
此步骤使我们可以修改配置详细信息。 对于我们的应用,默认设置是可以的。
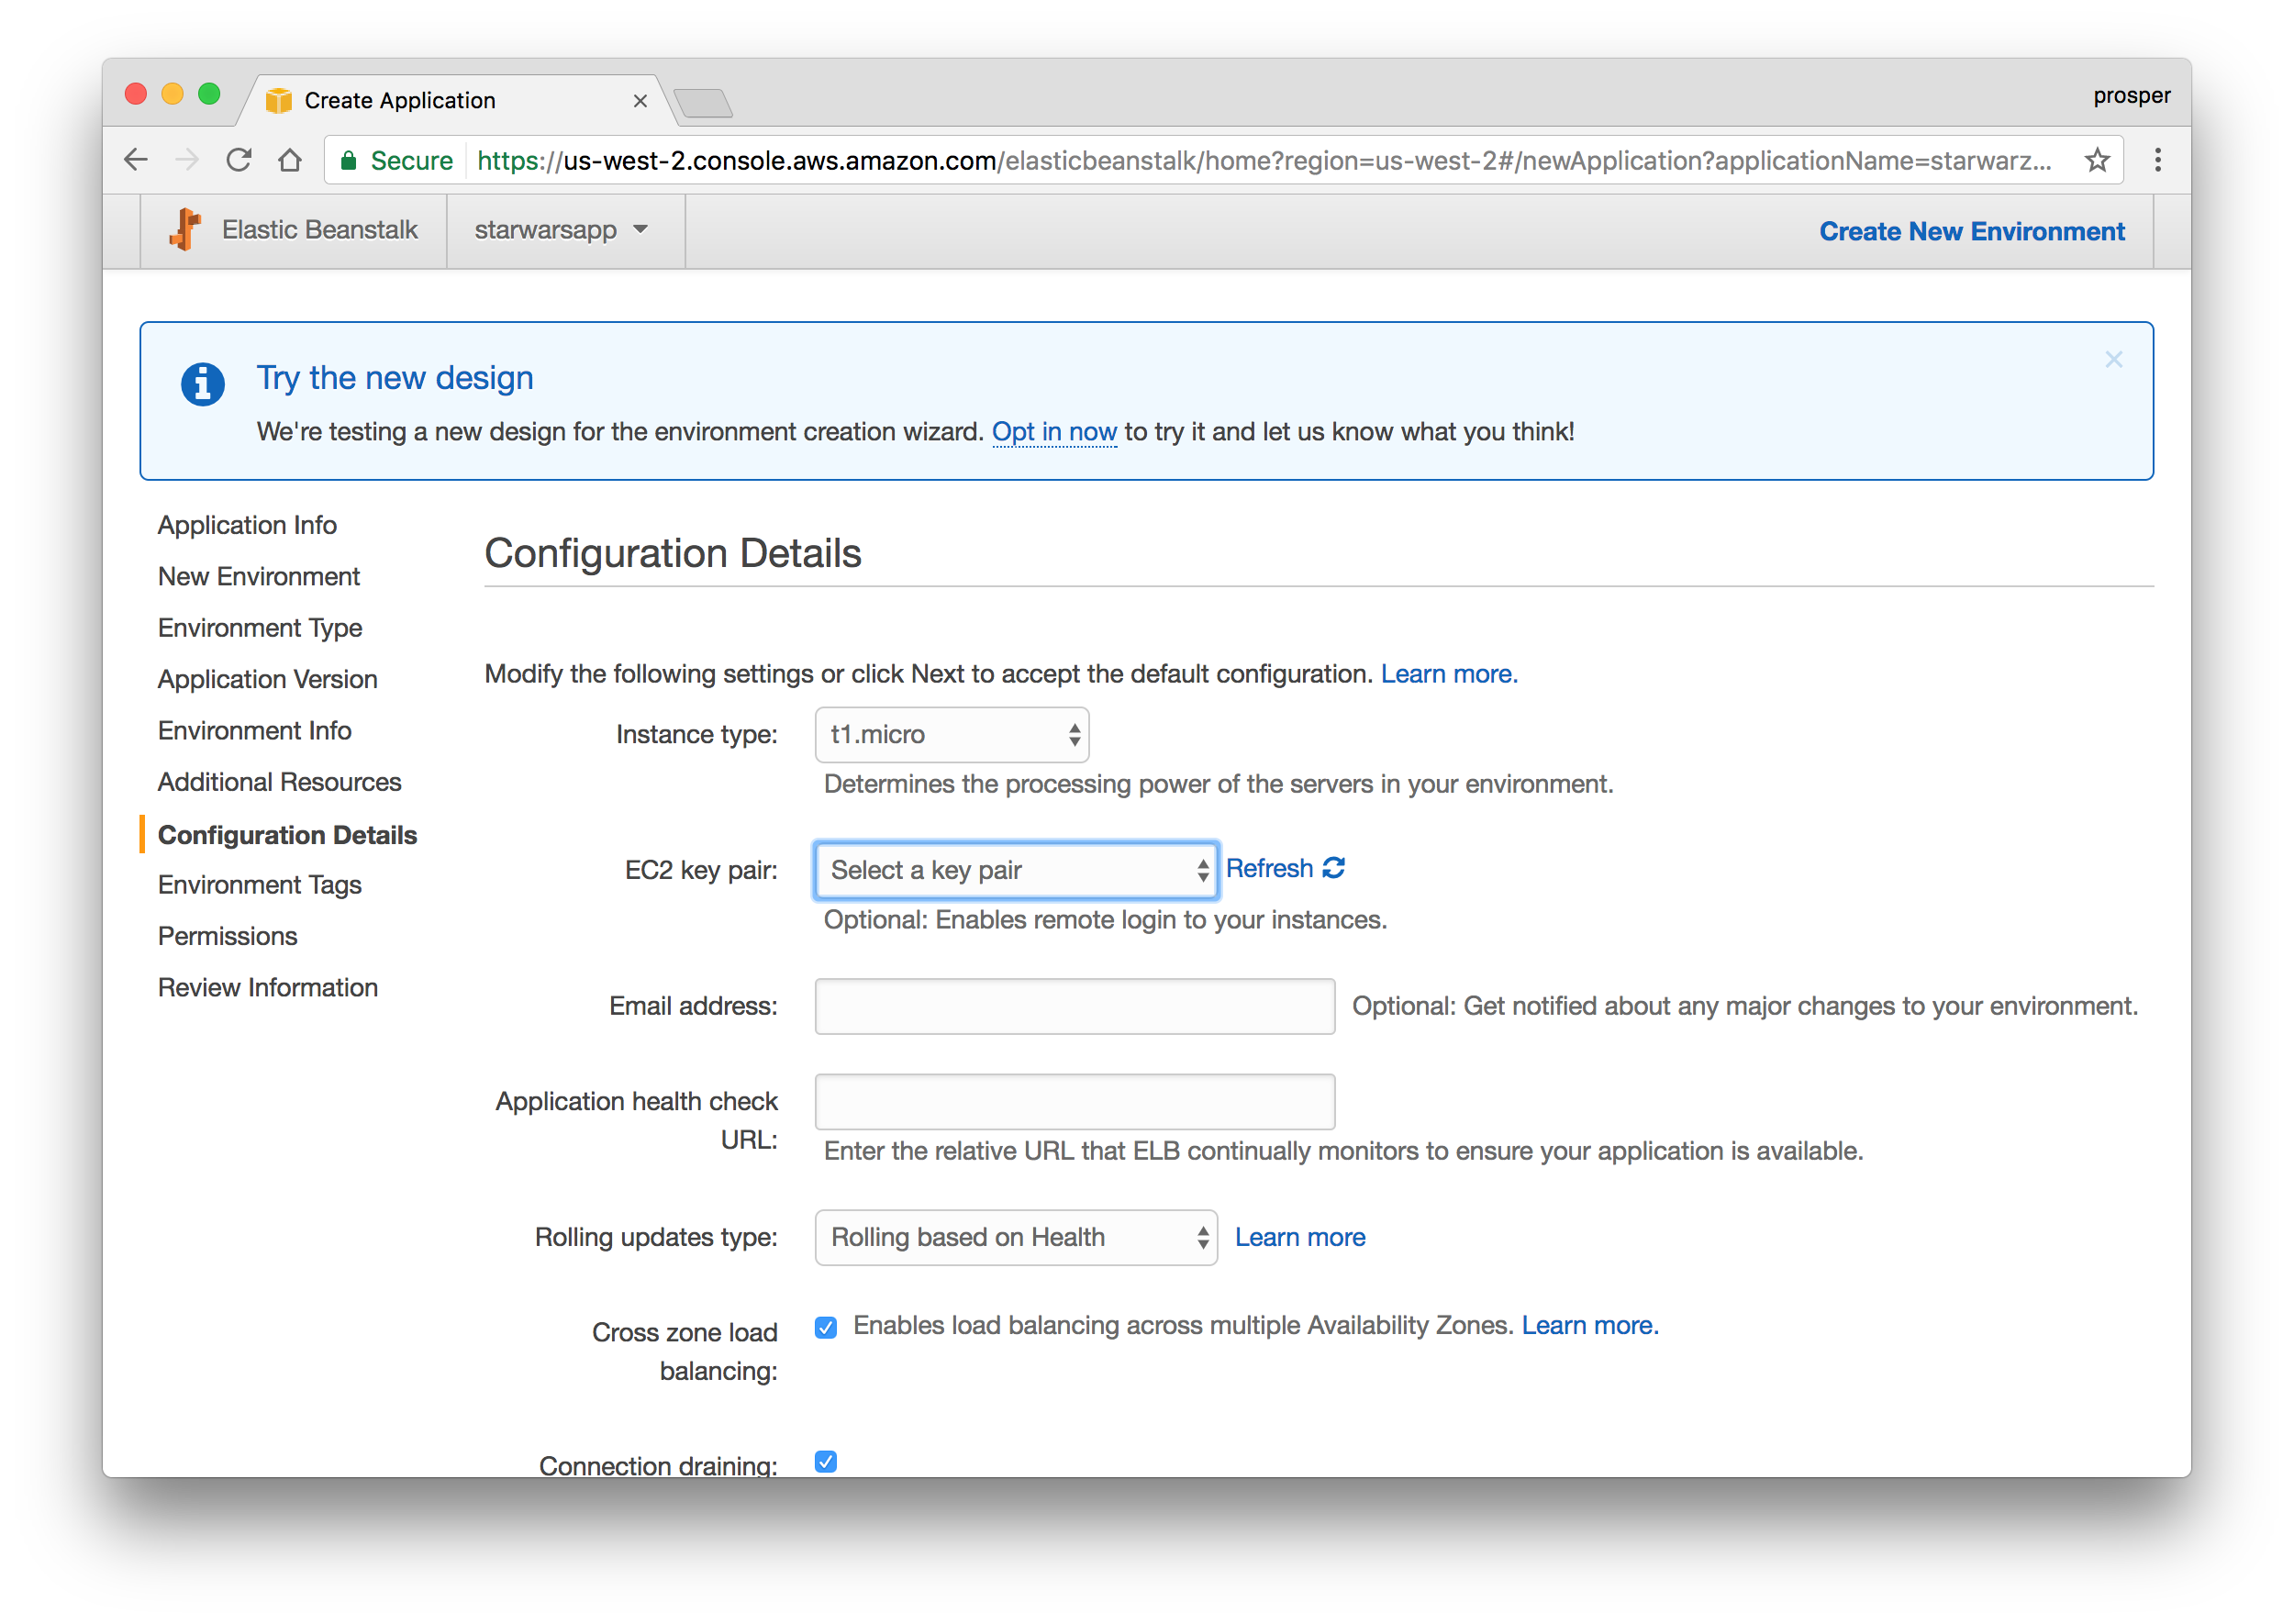
This step allows us to modify our configuration details. The default one is okay for our app.
此步骤使我们可以修改配置详细信息。 对于我们的应用,默认设置是可以的。
Now, add your environment variables like so:
现在,添加您的环境变量,如下所示:
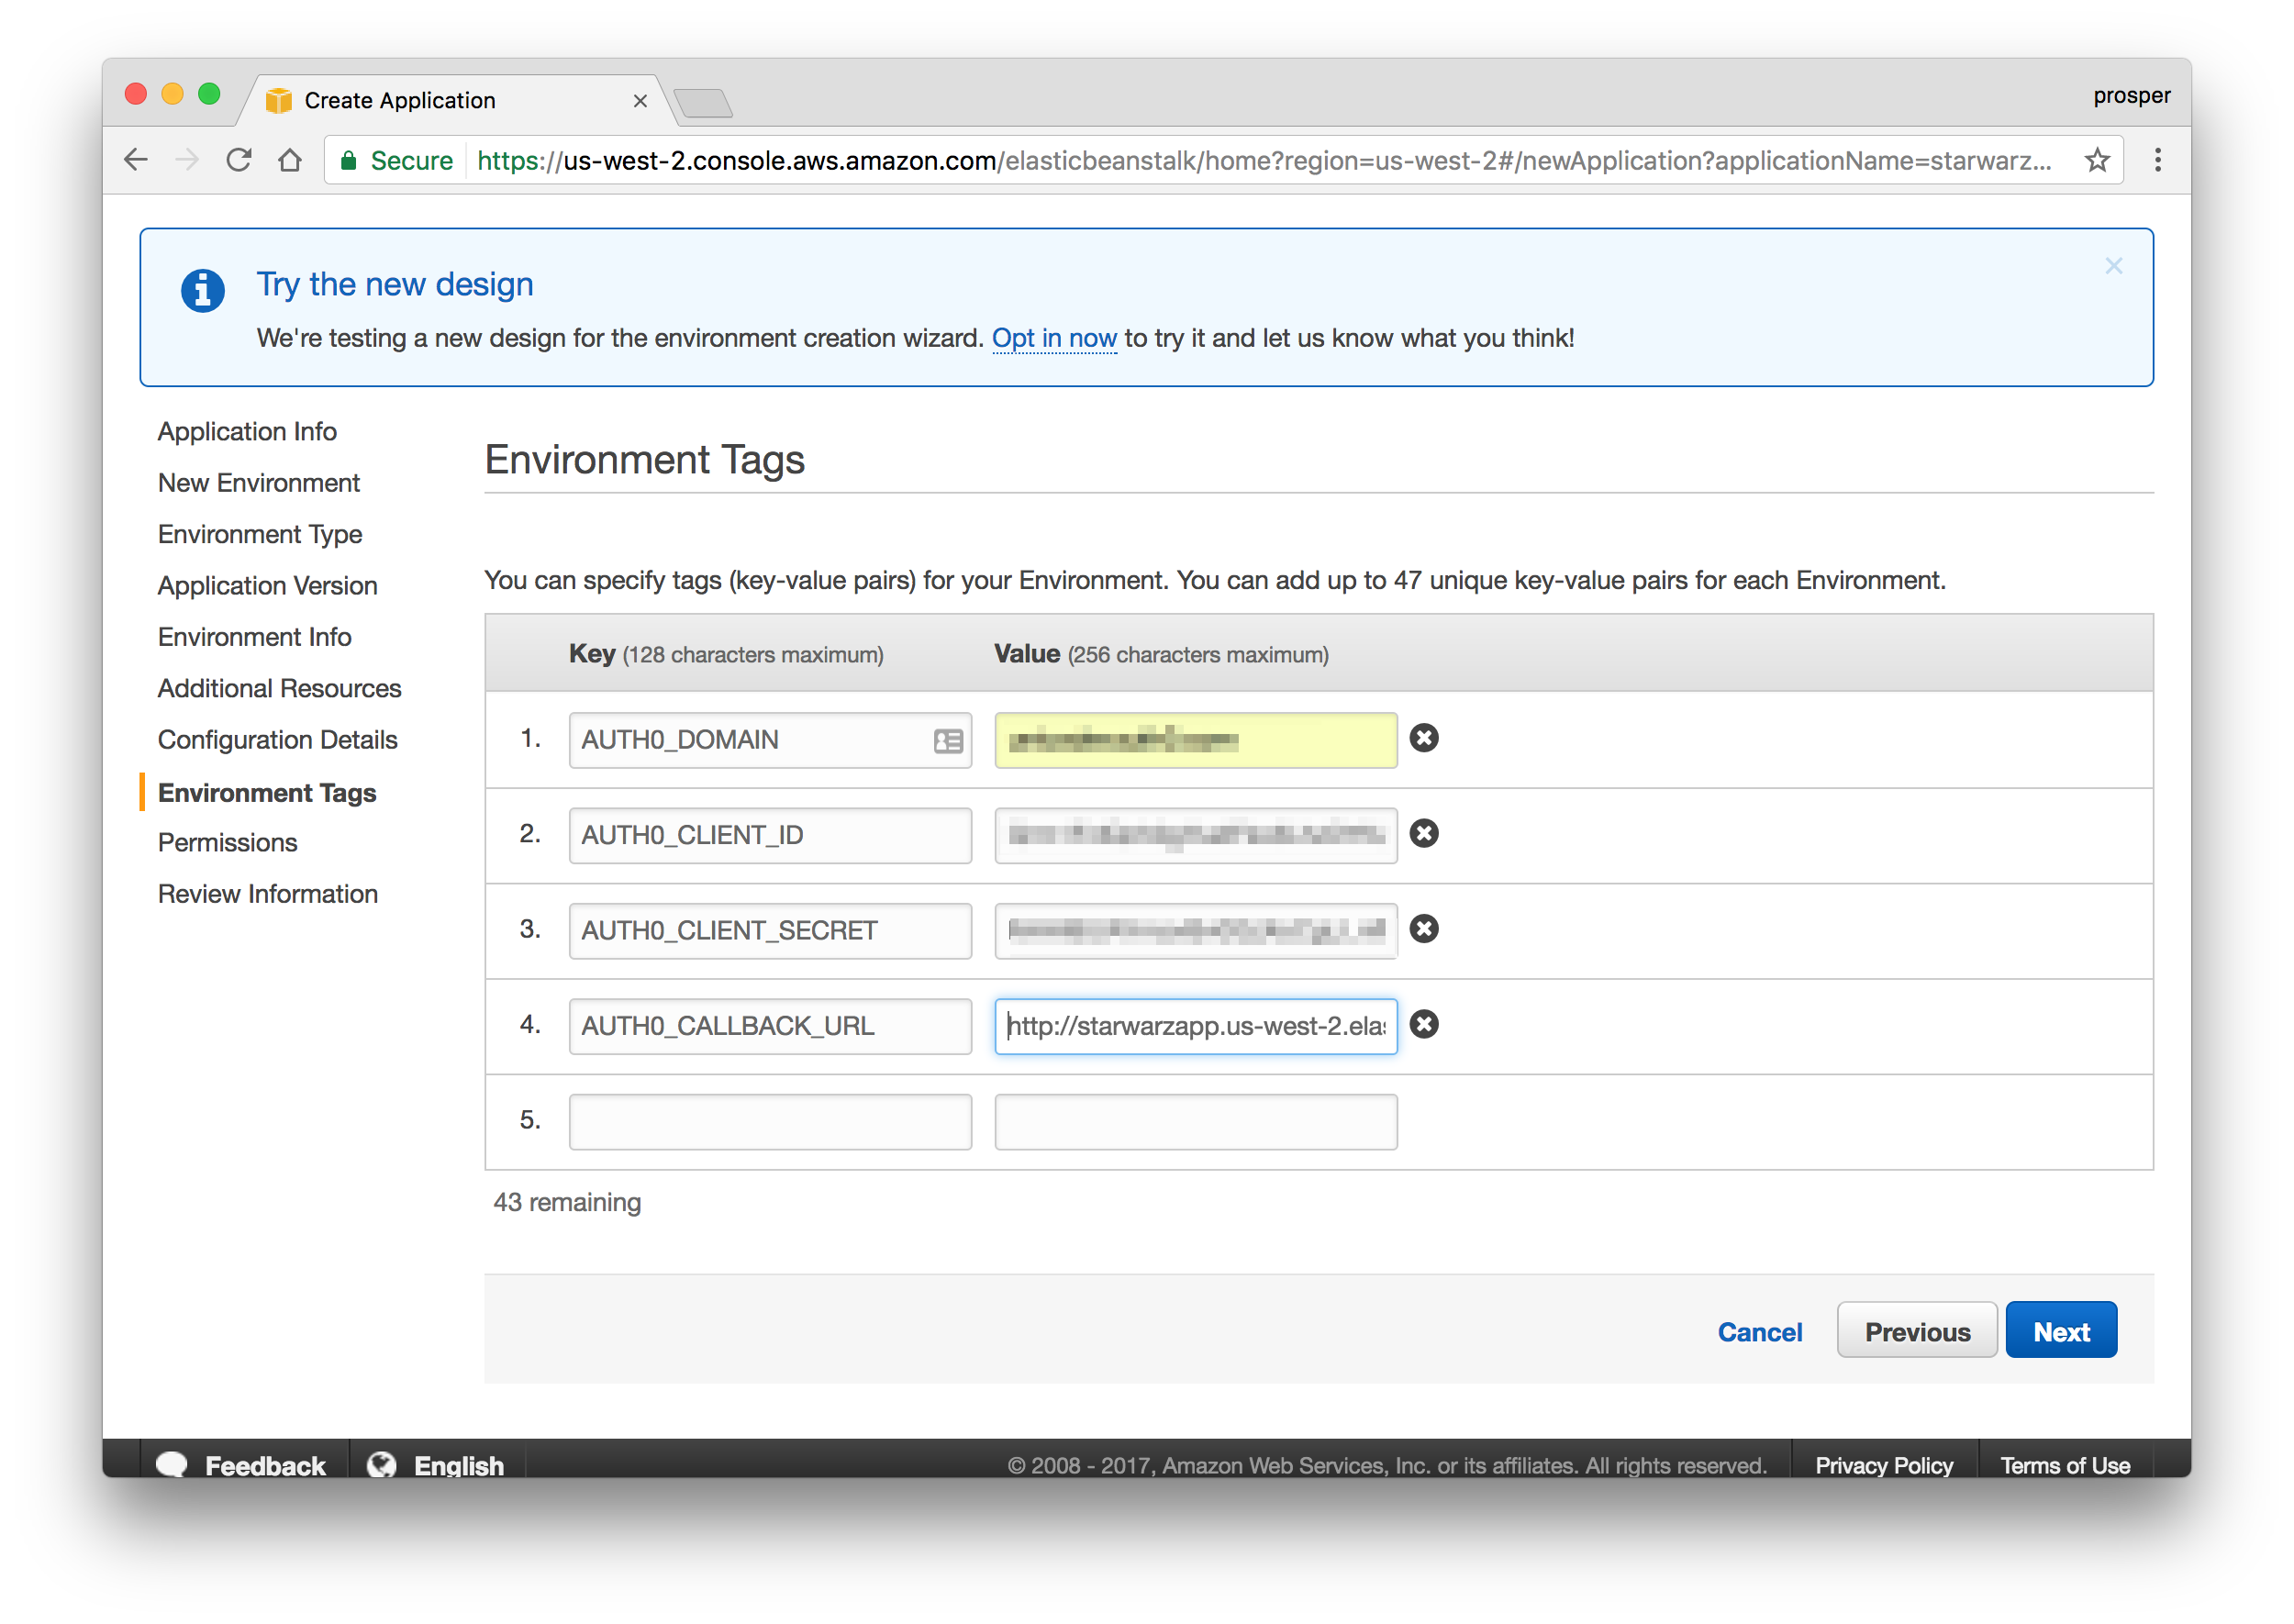
Now, add your environment variables like so:
现在,添加您的环境变量,如下所示:
Now grab the URL, in my case it is http://starwarzapp.us-west-2.elasticbeanstalk.com and add to Allowed Origins(CORS) and Allowed Callback URLs in your Auth0 dashboard. Ensure that you add it as an environment variable in Elastic Beanstalk too.
现在,获取URL(在我的情况下为http://starwarzapp.us-west-2.elasticbeanstalk.com ),并在Auth0仪表板中添加到Allowed Origins(CORS)和Allowed Callback URL 。 确保也将其添加为Elastic Beanstalk中的环境变量。
Add Permission like so:
像这样添加权限:

Add Permission like so:
像这样添加权限:
Review the information before launching.
启动之前,请查看信息。
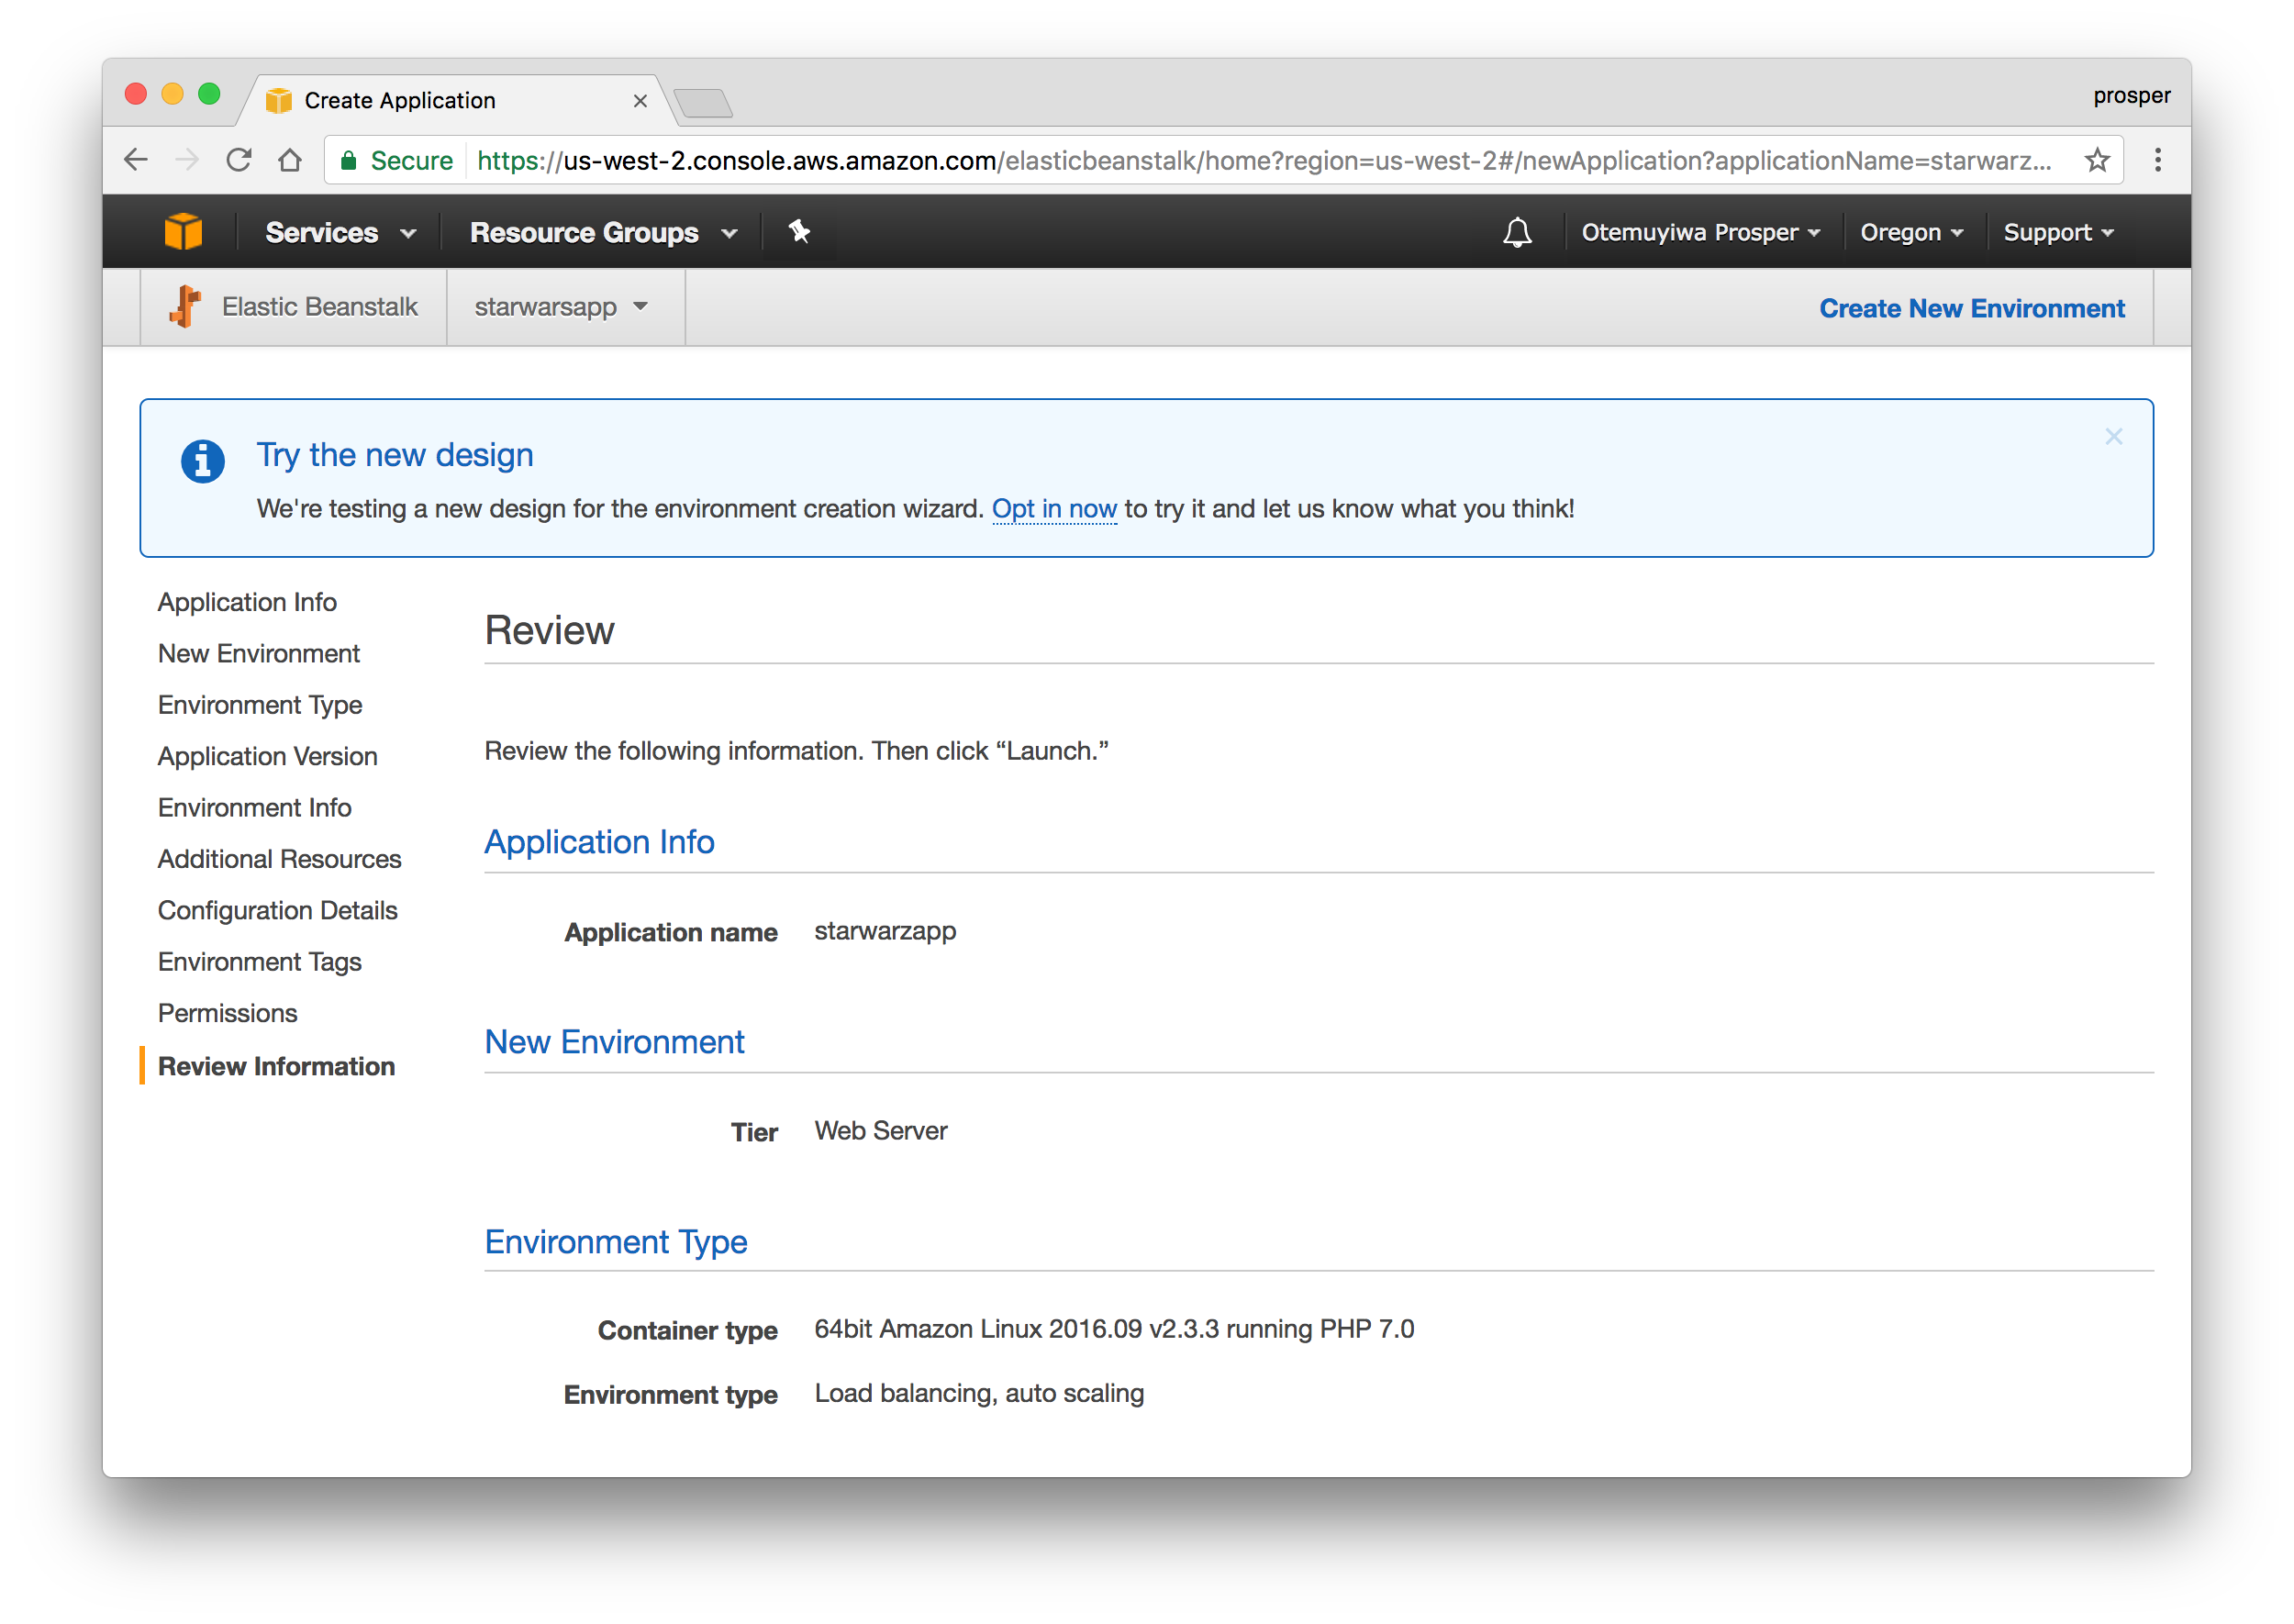
Review the information before launching.
启动之前,请查看信息。
- Launch. 发射。
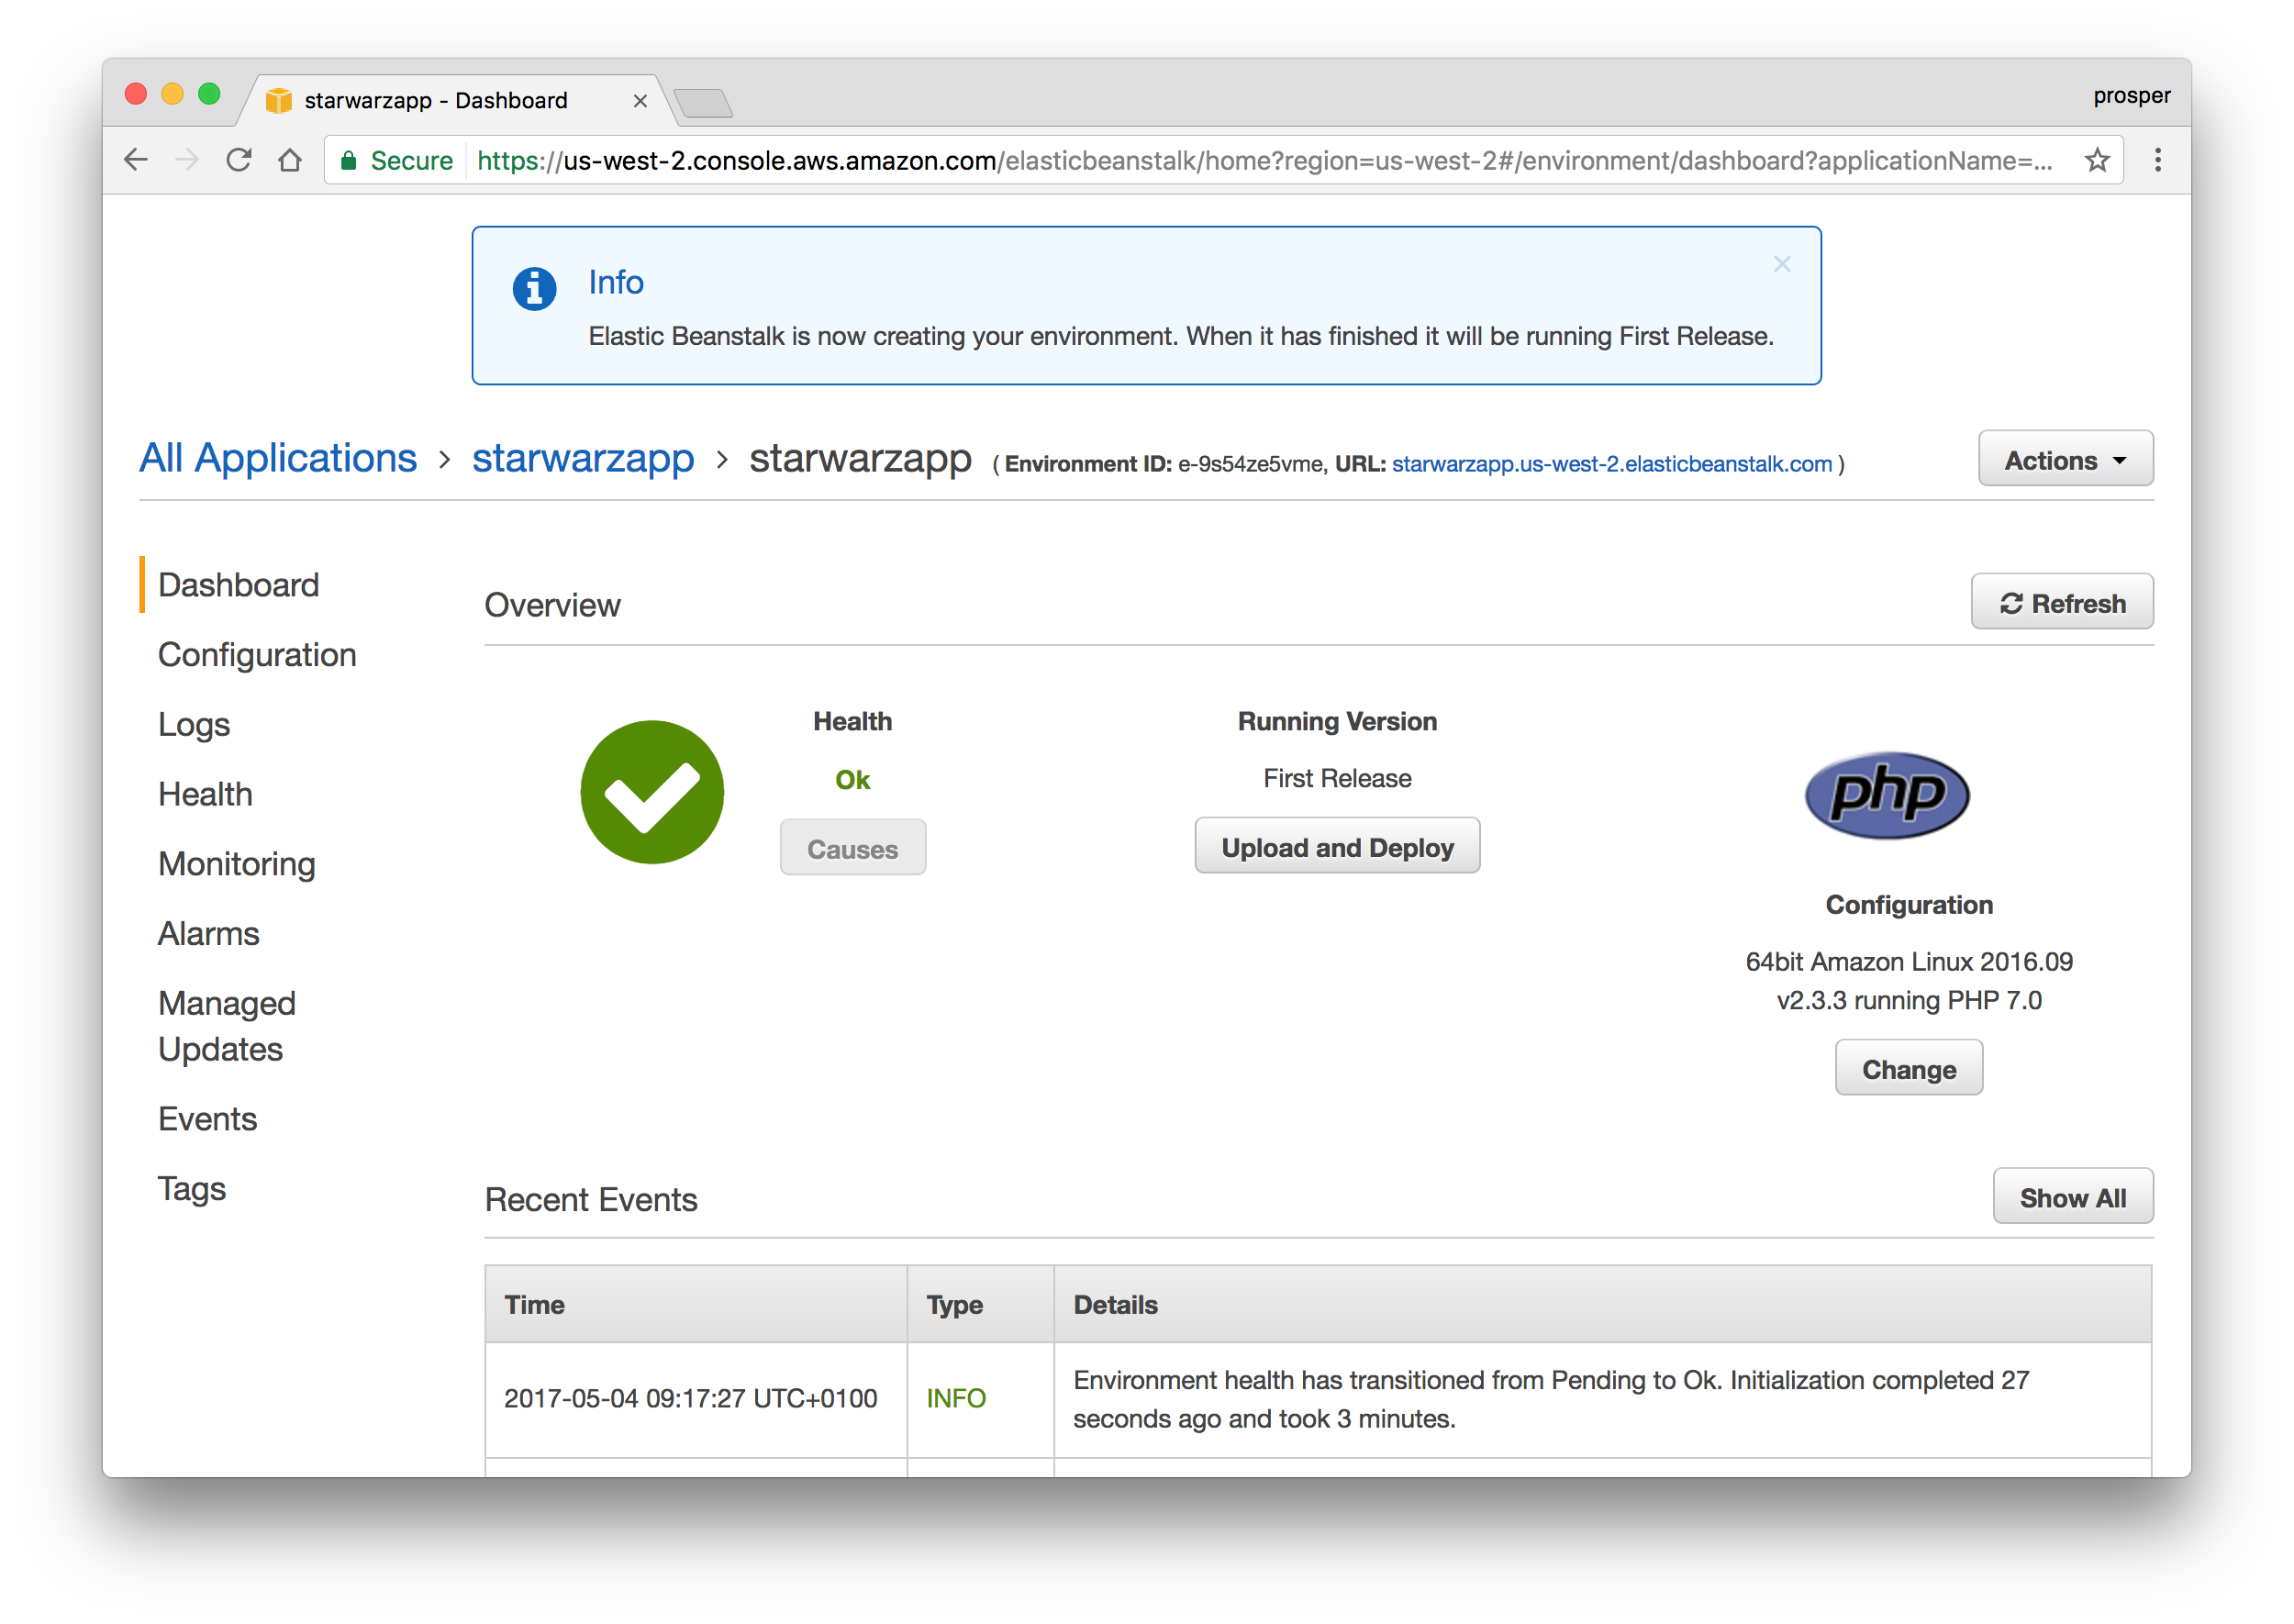

Live app
实时应用
Check out how to deploy:
了解如何部署:
数据库,缓存和Cron作业 (Database, Caching and Cron Jobs)
You can use an Amazon Relational Database Service (Amazon RDS) DB instance to store data gathered and modified by your application. The database can be attached to your environment and managed by Elastic Beanstalk, or created and managed externally. Check out how to easily add a DB instance to your app.
您可以使用Amazon Relational Database Service(Amazon RDS)数据库实例存储应用程序收集和修改的数据。 该数据库可以附加到您的环境并由Elastic Beanstalk进行管理,或者在外部创建和管理。 了解如何轻松地将数据库实例添加到您的应用程序 。
For caching, Amazon Web Services offers ElastiCache. It is a web service that makes it easy to deploy, operate, and scale an in-memory data store or cache in the cloud. Amazon ElastiCache supports two open-source in-memory engines:
对于缓存,Amazon Web Services提供了ElastiCache 。 它是一项Web服务,可轻松部署,操作和扩展云中的内存数据存储或缓存。 Amazon ElastiCache支持两个开源内存引擎:
Amazon ElastiCache automatically detects and replaces failed nodes, reducing the overhead associated with self-managed infrastructures and provides a resilient system that mitigates the risk of overloaded databases, which slow down websites and increase application load times. Through integration with Amazon CloudWatch, Amazon ElastiCache provides enhanced visibility into key performance metrics associated with your Redis or Memcached nodes.
Amazon ElastiCache自动检测并替换发生故障的节点,从而减少了与自助式基础架构相关的开销,并提供了一个弹性系统,可减轻数据库过载的风险,从而降低网站速度并延长应用程序加载时间。 通过与Amazon CloudWatch集成,Amazon ElastiCache增强了对与Redis或Memcached节点关联的关键性能指标的可视性。
Companies like AirBnb, Healthguru, PlaceIQ and Tokyo Data Network use ElastiCache for caching at multiple layers spanning HTML fragments, results of expensive DB queries, ephemeral session data, and search results.
AirBnb , Healthguru , PlaceIQ和Tokyo Data Network等公司都使用ElastiCache在跨越HTML片段,昂贵的数据库查询结果,临时会话数据和搜索结果的多层缓存。
Check out how to install the ElastiCache Cluster Client for PHP here.
Here is an excellent post on building a PHP visitor counter with ElastiCache and Elastic Beanstalk
这是有关使用ElastiCache和Elastic Beanstalk构建PHP访问者计数器的出色文章。
You can set up a cron job on Elastic Beanstalk. Learn how to run cron jobs on Amazon Web Services(AWS) Elastic Beanstalk.
您可以在Elastic Beanstalk上设置cron作业。 了解如何在Amazon Web Services(AWS)Elastic Beanstalk上运行cron作业。
拉拉夫(Laravel)Forge (Laravel Forge)
Laravel Forge , created by Taylor Otwell is a platform that helps you deploy and launch your application in minutes. It does the heavy-lifting for you. Forge takes care of provisioning your servers on popular cloud hosting providers such as Linode, Digital Ocean and AWS. It was initially built for Laravel apps, but now it has support for virtually any PHP application.
由Taylor Otwell创建的Laravel Forge是一个平台,可帮助您在几分钟内部署和启动应用程序。 它为您完成了繁重的工作。 Forge负责在流行的云托管提供商(例如Linode,Digital Ocean和AWS)上配置服务器。 它最初是为Laravel应用程序构建的,但是现在它几乎支持所有PHP应用程序。
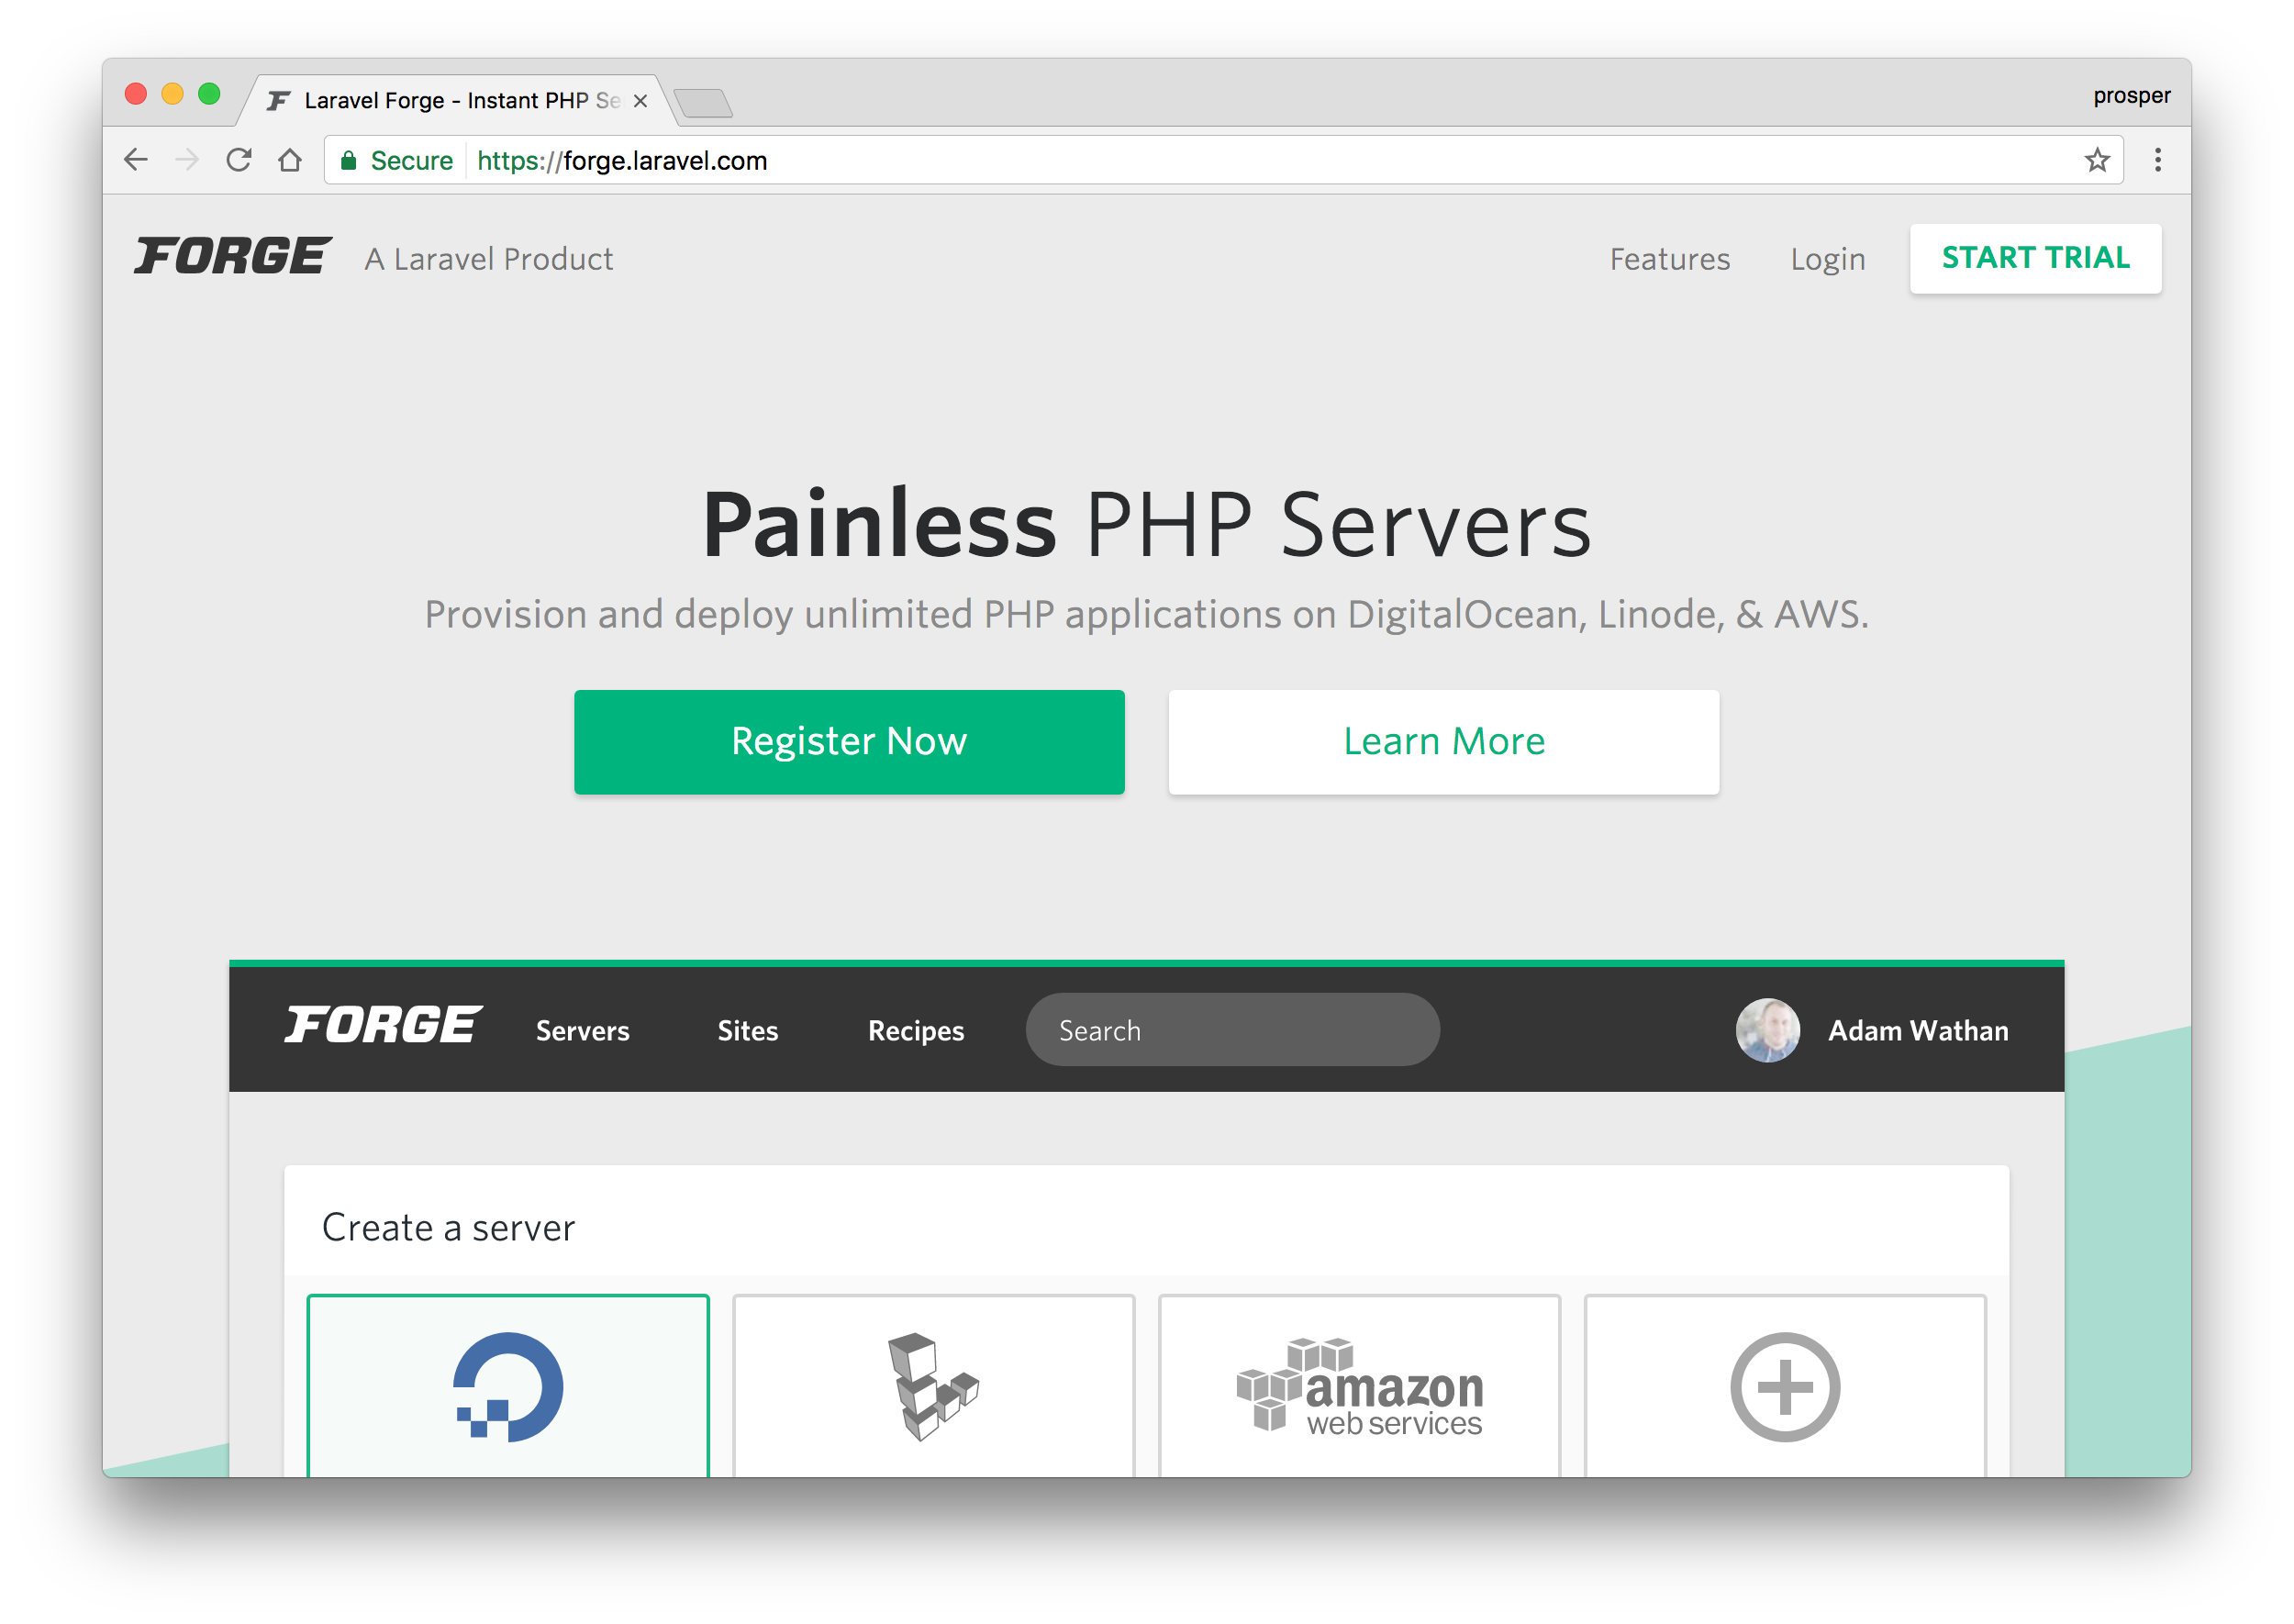
Laravel Forge
拉拉维尔·福奇
Laravel Forge allows you to easily do the following, apart from provisioning servers:
除了配置服务器,Laravel Forge还使您可以轻松地执行以下操作:
- It integrates with LetsEncrypt to generate Free SSL Certificates for your apps. 它与LetsEncrypt集成以为您的应用生成免费的SSL证书。
- Easily manage jobs and queues. 轻松管理作业和队列。
- Collaboration with your team by sharing your server’s management dashboard with co-workers. 通过与同事共享服务器的管理仪表板来与您的团队进行协作。
Matt Stauffer has an amazing post on deploying your first Laravel app to Forge.
Matt Stauffer 在将您的第一个Laravel应用程序部署到Forge上有一篇很棒的文章 。
James Fairhurst also has a great guide on using Laravel Forge to setup an AWS Server.
James Fairhurst 对于使用Laravel Forge设置AWS服务器也有很好的指导 。
The most popular educational PHP platform, laracasts.com has a series on server management with Forge.
最流行的教育性PHP平台laracasts.com提供了有关使用Forge进行服务器管理的系列文章 。
And of course, we mention it in our Laravel course, and also cover it in in-depth tutorials like these.
当然,我们提到它在我们的Laravel当然 ,也包括它在深入教程喜欢这些 。
使节 (Envoyer)
Envoyer is a platform that allows zero downtime PHP deployment – it’s the SaaS version of Envoy. It allows you integrate with various services such as Gitlab, Slack, Bitbucket e.t.c.
Envoyer是允许零停机PHP部署的平台–它是Envoy的SaaS版本。 它允许您与各种服务集成,例如Gitlab,Slack,Bitbucket等
With Envoyer, you can perform:
使用Envoyer,您可以执行:
- Seamless Deployment rollbacks. 无缝部署回滚。
- Deploy to multiple servers. 部署到多个服务器。
- Monitor Cron Jobs. 监视Cron工作。
- Perform Application Health Checks. 执行应用程序运行状况检查。
部署者 (Deployer)
Deployer is a deployment tool for PHP. It allows you to do the following:
Deployer是PHP的部署工具。 它允许您执行以下操作:
- Run tasks in parallel. 并行运行任务。
- Atomic deploys. 原子部署。
- Rollbacks. 回滚。
- Create deployment scripts in form of recipes. 以配方形式创建部署脚本。
It works with Laravel, Symfony, CakePHP, Yiiframework, Zend, FuelPHP, Drupal, WordPress, and Magento. Check out this excellent article on deploying PHP applications with Deployer.
它可与Laravel , Symfony , CakePHP , Yiiframework , Zend , FuelPHP , Drupal , WordPress和Magento一起使用 。 查阅这篇有关使用Deployer部署PHP应用程序的优秀文章 。
结论 (Conclusion)
There is no way we can cover all the different options available for deploying PHP applications. PHP is an enterprise language that has evolved over the years, thus calling for more efficient ways for deploying PHP apps from one’s local machine to production. Hopefully, this guide covers all your basic needs for deploying your PHP apps to all the major cloud providers. However, there is another resource I recommend for extensive knowledge in learning to deploy PHP applications.
我们无法涵盖可用于部署PHP应用程序的所有不同选项。 PHP是一种经过多年发展的企业语言,因此需要更有效的方法来将PHP应用程序从本地计算机部署到生产环境。 希望本指南涵盖了将PHP应用程序部署到所有主要云提供商的所有基本需求。 但是,我建议您使用另一种资源,以获取有关学习部署PHP应用程序的广泛知识。
How have you been handling your deployments? Please, let me know in the comments section below!
您最近如何处理部署? 请在下面的评论部分中告诉我!
翻译自: https://www.sitepoint.com/ultimate-guide-deploying-php-apps-cloud/
owin 怎么部署在云中


 657
657


 被折叠的 条评论
为什么被折叠?
被折叠的 条评论
为什么被折叠?
 到【灌水乐园】发言


