


In my previous articles on Docker and WordPress, we’ve seen how to setup WordPress and Docker using plain commands on the terminal, then we moved on to automated tools like Docker Compose. Finally we deployed the Docker Compose configuration to DigitalOcean. If you haven’t read these articles yet, you can find them below:
在我以前关于Docker和WordPress的文章中,我们已经了解了如何使用终端上的简单命令设置WordPress和Docker,然后我们转向了Docker Compose等自动化工具。 最后,我们将Docker Compose配置部署到了DigitalOcean。 如果您还没有阅读这些文章,可以在下面找到它们:
In this article I’ll show you how we can setup WordPress with Docker in yet another way. We’ll use a tool called Wocker (WCKR) to simplify our workflow.
在本文中,我将向您展示如何通过另一种方式使用Docker设置WordPress。 我们将使用一个名为Wocker (WCKR)的工具来简化我们的工作流程。
沃克 (Wocker)
Wocker is different to the tools I’ve covered previously. If you’ve used Vagrant before, you should find this easy to use. Wocker is essentially Vagrant that uses CoreOS and Docker. You might not see much evidence of Docker, but the underlying technology is Docker. To setup Wocker, it’s as easy as executing two commands:
Wocker与我之前介绍的工具不同。 如果您以前使用过Vagrant,则应该发现它易于使用。 Wocker本质上是使用CoreOS和Docker的 Vagrant。 您可能不会看到很多有关Docker的证据,但是底层技术是Docker。 要设置Wocker,只需执行两个命令即可:
git clone https://github.com/wckr/wocker.git && cd wocker
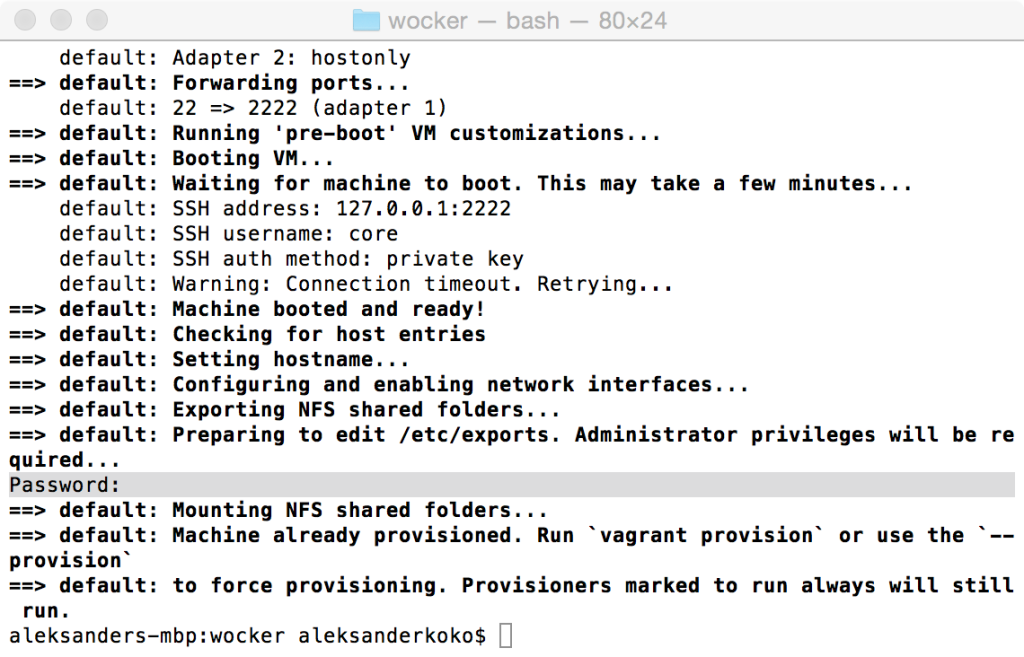
vagrant upThe first command clones Wocker from its GitHub repository and the second is just our standard vagrant up command that builds (provisions) the machine. If you’d like to follow along, make sure you’ve installed VirtualBox and Vagrant if you haven’t already.
第一个命令从Wocker的GitHub存储库中克隆Wocker,第二个命令只是我们用于构建(配置)机器的标准vagrant up命令。 如果您想继续,请确保已安装VirtualBox和Vagrant(如果尚未安装)。
A quick note here, in most nix* systems, you may have to execute sudo or pass sudo a password when you run vagrant up.
快速注意这里,在大多数* nix的系统,你可能要执行sudo或通过sudo密码,当您运行vagrant up 。
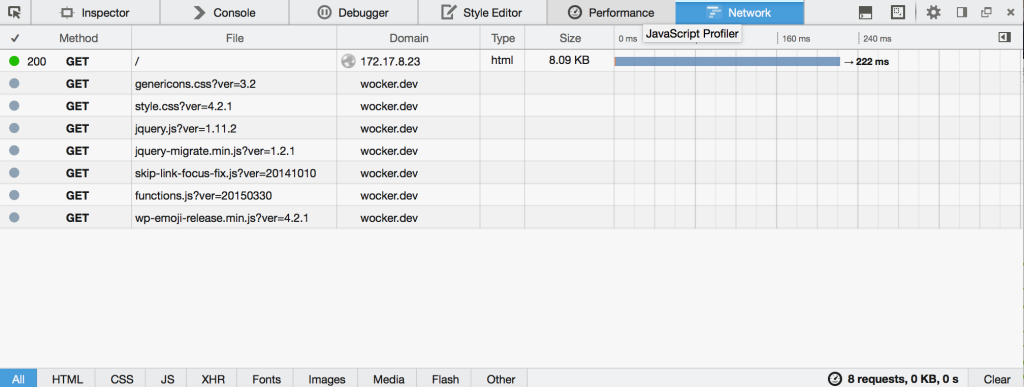
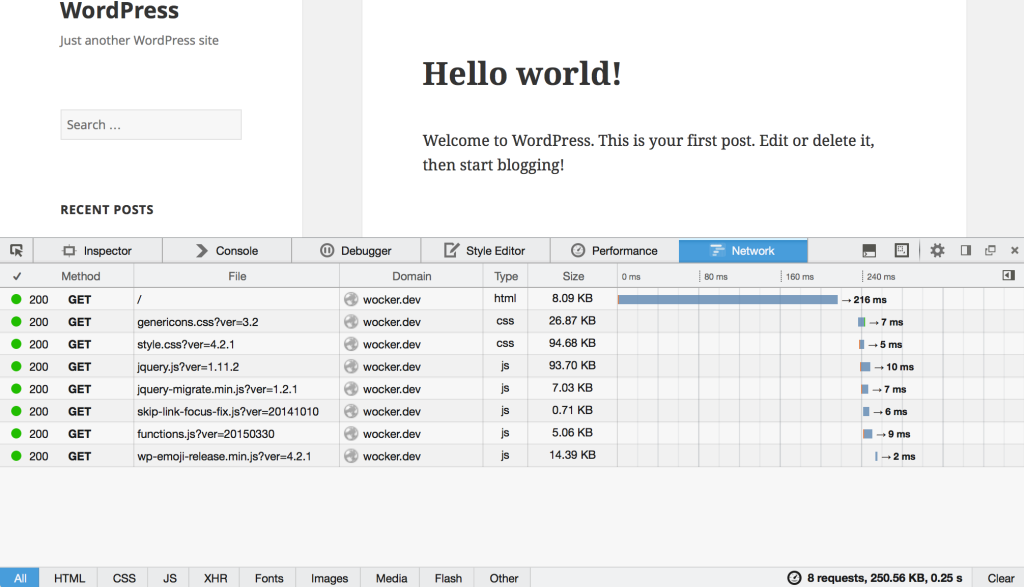
The IP of this Vagrant box is 172.17.8.23, but it’s not working yet. If you check the network data, you’ll see that the HTML content has been downloaded, but the other files (CSS, JavaScript) have not been downloaded. That’s because all of our files are being requested from Wocker.dev. Wocker helps by setting everything up for us, we have a few options here.
该Vagrant框的IP为172.17.8.23 ,但尚不172.17.8.23 。 如果检查网络数据,则会看到HTML内容已下载,但其他文件(CSS,JavaScript)尚未下载。 这是因为我们的所有文件都是从Wocker.dev请求的。 Wocker通过为我们进行所有设置为您提供帮助,我们在此处提供了一些选择。
You can manipulate the wp-config.php that lives under data/wocker/ by adding these two lines:
您可以通过添加以下两行来操纵位于data/wocker/下的wp-config.php :
define('WP_HOME','http://172.17.8.23/');
define('WP_SITEURL','http://172.17.8.23/');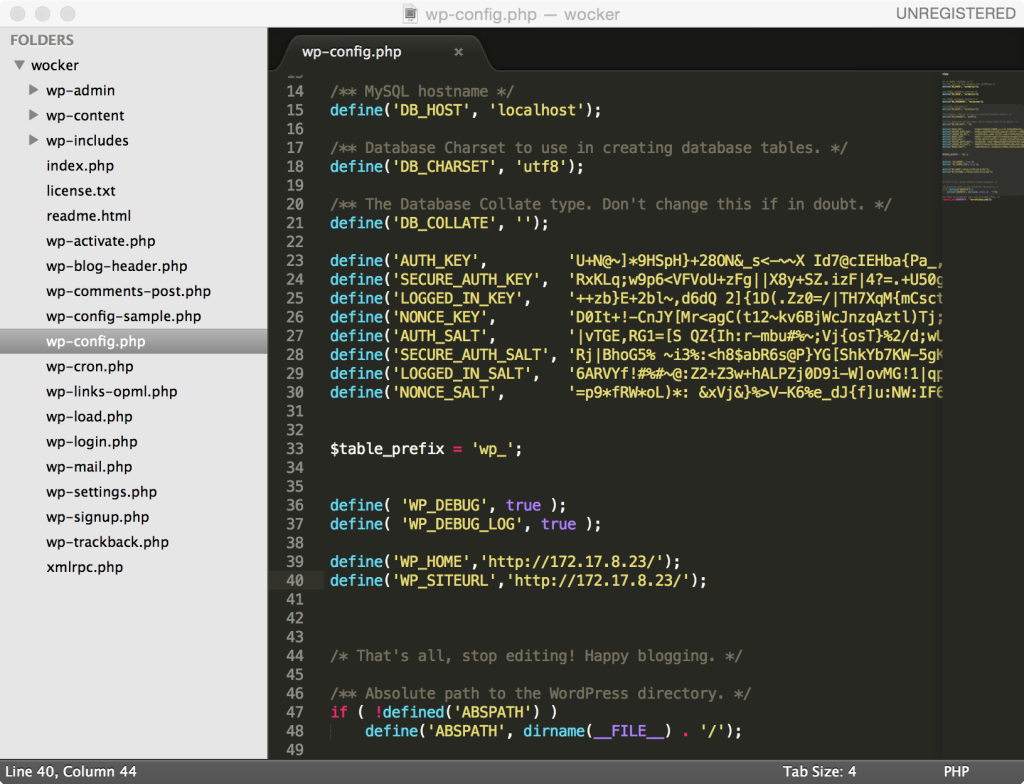
You can manually add 172.17.8.23 wocker.dev to your hosts file.
您可以手动将172.17.8.23 wocker.dev添加到hosts文件。
sudo nano /etc/hosts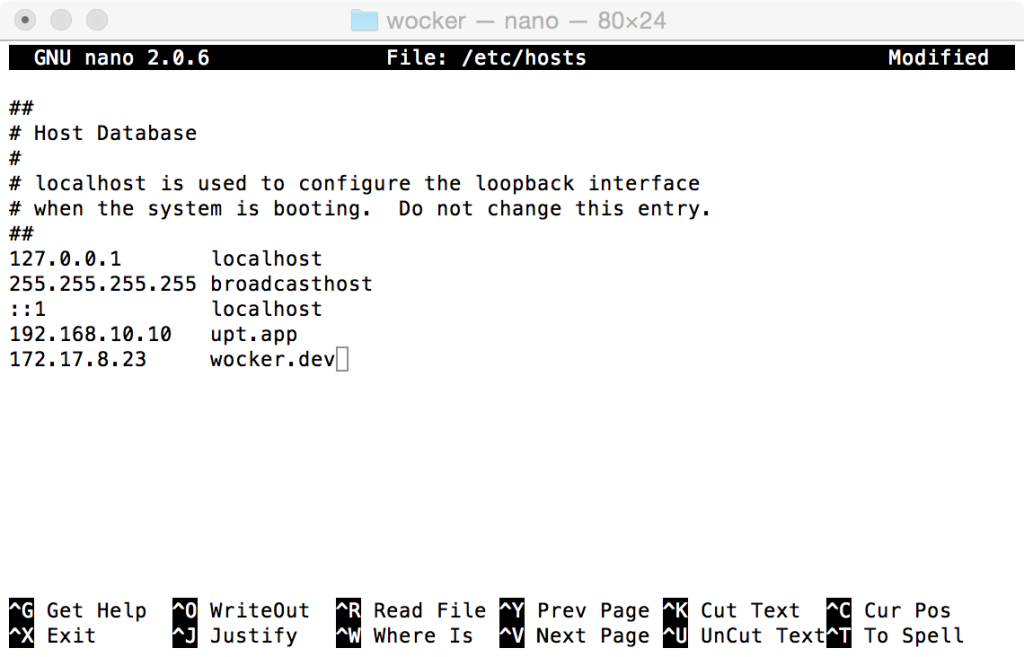
This line will depend on your OS.
此行将取决于您的操作系统。
The easies way of all is to install the ‘host updater’ plugin.
最简单的方法是安装“主机更新程序”插件。
vagrant plugin install vagrant-hostsupdater
vagrant plugin install vagrant-hostsupdater
This plugin makes the job of updating our hosts file much easier.
该插件使更新主机文件的工作变得更加容易。
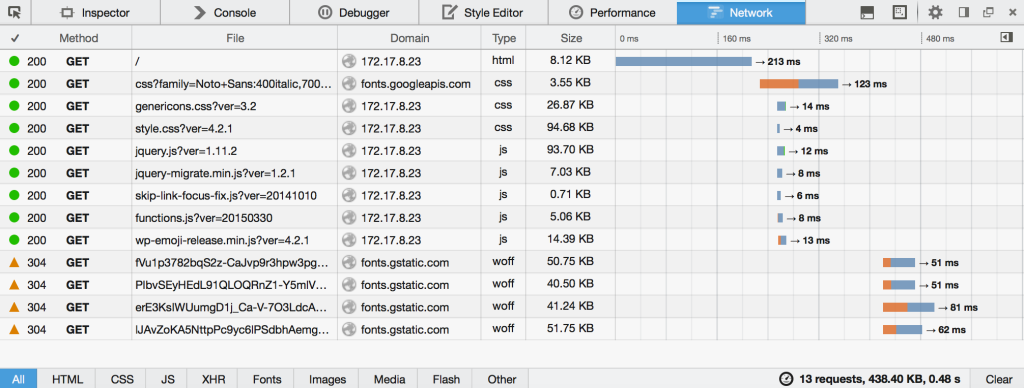
Now, you should be able to visit the IP or the hostname of your VM in your browser, both should work.
现在,您应该可以在浏览器中访问IP或VM的主机名,两者都可以使用。
Let’s look carefully at your folder. Besides the Wocker files that you cloned from Github, there’s also a folder called data. In this folder you’ll see everything from WordPress (including your themes and plugins etc.).
让我们仔细查看您的文件夹。 除了您从Github克隆的Wocker文件之外,还有一个名为data的文件夹。 在此文件夹中,您将看到WordPress的所有内容(包括主题和插件等)。
Wocker CLI (Wocker CLI)
Wocker also comes with a CLI. If you’ve worked with Docker, you will know that you need to execute a lot of commands to get a container running. You have to work with filesystem mapping, ports, linking containers and a lot more. Wocker CLI is an abstraction of Docker CLI. This doesn’t mean that you can’t use Docker CLI inside your VM. But if you’re starting out and want to get up and running with Docker and WordPress, it’s a nice tool. To access Wocker CLI you need to be inside the VM. In the project directory (the directory that has the Vagrantfile) execute:
Wocker还带有CLI。 如果您使用过Docker,您将知道需要执行很多命令才能使容器运行。 您必须使用文件系统映射,端口,链接容器等等。 Wocker CLI是Docker CLI的抽象。 这并不意味着您不能在VM内使用Docker CLI。 但是,如果您刚起步并想使用Docker和WordPress进行启动和运行,那么它是一个不错的工具。 要访问Wocker CLI,您需要位于VM内部。 在项目目录(具有Vagrantfile的目录)中执行:
vagrant sshNow execute:
现在执行:
wocker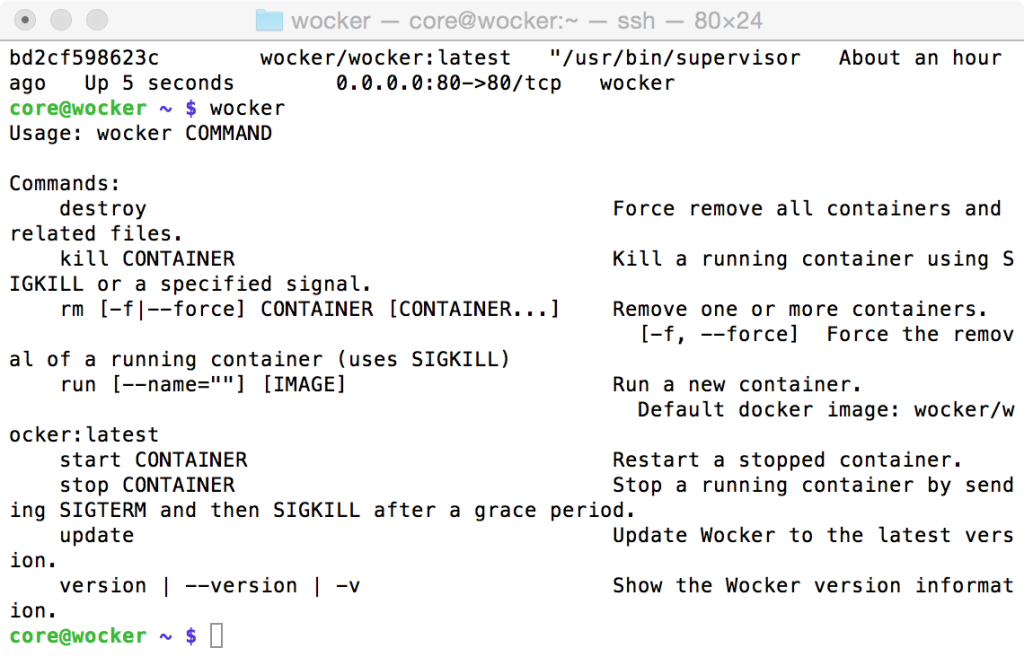
You’ll see some information on how to use this CLI. The commands are self explanatory, but feel free to experiment and practice. A note here about the commands that aren’t in the help information. If you execute a command that is part of Docker CLI and not part of Wocker, then Wocker will execute it. That’s because Wocker extends Docker.
您将看到有关如何使用此CLI的一些信息。 这些命令不言自明,但是随时可以尝试和练习。 此处有关帮助信息中未包含的命令的注释。 如果您执行的命令是Docker CLI的一部分,而不是Wocker的一部分,那么Wocker将执行它。 那是因为Wocker 扩展了 Docker。
wocker stop wocker
wocker start wocker
docker ps
wocker ps
The first command stops the container named wocker. The same thing can be done with docker stop docker and wocker start docker.
第一条命令停止名为wocker的容器。 使用wocker start docker docker stop docker wocker start docker和wocker start docker可以完成相同的操作。
Let’s say that you’ve finished your work and it’s now time to close the VM, we’d run:
假设您已经完成工作,现在该关闭虚拟机了,我们将运行:
exit
vagrant halt
Then, after a few hours, you want to work with your projects again. We would now run:
然后,几个小时后,您想再次使用您的项目。 现在,我们将运行:
cd /pathtoyourproject
vagrant up
There’s one more step, because you have to start wocker manually this time. The first time when you create the VM, you don’t need to start docker, but from then onwards you do.
还有一个步骤,因为这次您必须手动启动wocker。 第一次创建VM时,不需要启动docker,但是从那时起,您需要启动。
vagrant ssh
wocker start wocker
Check your browser, everything should now be working!
检查您的浏览器,一切都应该正常了!
深层发掘 (Digging Deeper)
Curiosity is a powerful tool. In our jobs as developers, it is even more important. My moto is to be curious about the tools I use. This way I understand how the tool works.
好奇心是一个强大的工具。 在我们作为开发人员的工作中,这一点尤为重要。 我的moto对我使用的工具感到好奇。 通过这种方式,我了解了该工具的工作原理。
The Wocker CLI is a simple tool. It’s actually a simple Bash script. You can check it out if you look at the Vagrantfile in the root directory of the project. Or, you can view it here.
Wocker CLI是一个简单的工具。 它实际上是一个简单的Bash脚本。 如果查看项目根目录中的Vagrantfile,则可以检查出来。 或者,您可以在此处查看 。
If you’re even more curious (I’m glad to hear that!), you can look into what Wocker uses for its containers. Wocker uses an image named wocker/wocker, we can find out more on Docker Hub. On the Wocker image page you’ll find a link to the Dockerfile. If you want to change it’s behaviour, you can fork Wocker repository.
如果您更好奇(我很高兴听到这个消息!),您可以研究Wocker对其容器使用什么。 Wocker使用名为wocker/wocker ,我们可以在Docker Hub上找到更多信息。 在Wocker映像页面上,您会找到Dockerfile的链接。 如果要更改其行为,可以派生Wocker存储库 。
改进空间 (Room for Improvement)
Before I talk about what I don’t like about this tool, I’d like to say that I really think it’s a great tool for those who have little or no experience with Docker.
在谈论我不喜欢这个工具之前,我想说一下,我真的认为它对于那些很少或没有Docker经验的人来说是一个很好的工具。
After working with Wocker for a while, here are a few areas that can be improved:
与Wocker合作一段时间后,可以在以下几个方面进行改进:
- No multiple WordPress installations 没有多个WordPress安装
- With every restart I have to manually ssh and start wocker 每次重新启动时,我都必须手动ssh并启动wocker
- Only one container, MySQL isn’t a separate container 只有一个容器,MySQL不是一个单独的容器
For the first issues there are a few solutions. The first is to manually modify the IP in our Vagrantfile and add these two lines on wp-config.php:
对于第一个问题,有一些解决方案。 首先是在我们的Vagrantfile中手动修改IP,然后在wp-config.php上添加这两行:
define('WP_HOME','http://172.17.8.23/');
define('WP_SITEURL','http://172.17.8.23/');
The MySQL problem is a big one if you think about the concept behind Docker. Docker was created to keep things separated and to build things with architecture in mind. Running Apache, PHP and MySQL in one container isn’t ideal. But Wocker was built with simplicity in mind and for new Docker and WordPress users and does its job very well.
如果考虑Docker背后的概念,MySQL问题将是一个大问题。 创建Docker的目的是使事物分离并在考虑架构的情况下构建事物。 在一个容器中运行Apache,PHP和MySQL并不理想。 但是Wocker的构建考虑到了简单性,并且是为Docker和WordPress新用户设计的,并且做得很好。
结论 (Conclusion)
In this article we’ve seen what Wocker is and how to get started using it. Wocker is easy to install and if you’re a new member of the Docker community, consider using this tool for your next WordPress project.
在本文中,我们了解了Wocker是什么以及如何开始使用它。 Wocker易于安装,如果您是Docker社区的新成员,请考虑将其用于下一个WordPress项目。
If you want to know more about Docker and how it works, check our previous articles on Docker and WordPress:
如果您想进一步了解Docker及其工作原理,请查看我们以前关于Docker和WordPress的文章:
I want to hear from you. What do you think about Wocker? Would you consider it on your next project? Have you used other similar tools that you can recommend?
我想和你联系。 您如何看待沃克? 您会在下一个项目中考虑吗? 您是否使用过其他可以推荐的类似工具?
翻译自: https://www.sitepoint.com/wocker-easy-dockerized-wordpress/


 1011
1011

 被折叠的 条评论
为什么被折叠?
被折叠的 条评论
为什么被折叠?
 到【灌水乐园】发言


