


api. feel.ai
If you’re keen to learn more on AI, check out our screencast Microsoft Cognitive Services and the Text Analytics API, for AI sentiment in your bot.
如果您想了解有关AI的更多信息,请查看我们的截屏视频Microsoft Cognitive Services和Text Analytics API ,了解您机器人中的AI情绪。

The world of artificially intelligent assistants is growing — Siri, Cortana, Alexa, Ok Google, Facebook M, Bixby — all the big players in technology have their own. However, many developers don’t realize that it’s quite easy to build your own AI assistant too! You can customise it to your own needs, your own IoT connected devices, your own custom APIs. The sky’s the limit.
人工智能助手的世界正在发展-Siri,Cortana,Alexa,Ok Google,Facebook M,Bixby-所有技术大公司都有自己的。 但是,许多开发人员并没有意识到构建自己的AI助手也很容易! 您可以根据自己的需求,自己的IoT连接设备,自己的自定义API对其进行自定义。 天空是极限。
Note: this article was updated in 2017 to reflect recent changes to Api.ai.
注意:本文于2017年更新,以反映对Api.ai的最新更改。
Earlier, I put together a guide on five simple ways to build artificial intelligence in 2016, where I covered a few of the simple options out there for building an AI assistant. In this article, I’d like to look at one particular service that makes it incredibly simple to get quite a fully-featured AI assistant with very little initial set up — Api.ai.
早些时候,我在2016年就构建人工智能的五种简单方法汇总了一份指南,其中涵盖了构建AI助手的一些简单选项。 在本文中,我想看看一项特殊的服务,它使获得功能齐全的AI助手非常简单,而无需进行初始设置就非常简单-Api.ai。
使用Api.ai构建AI助手 (Building an AI Assistant with Api.ai)
This post is one of a series of articles aimed to help you get a simple personal assistant running with Api.ai:
这篇文章是旨在帮助您获得一个使用Api.ai运行的简单个人助手的系列文章之一:
- How to Build Your Own AI Assistant Using Api.ai (this one!) 如何使用Api.ai构建自己的AI助手(这一个!)
什么是Api.ai? (What is Api.ai?)
Api.ai is a service that allows developers to build speech-to-text, natural language processing, artificially intelligent systems that you can train up with your own custom functionality. They have a range of existing knowledge bases that systems built with Api.ai can automatically understand called “Domains” — which is what we’ll be focusing on in this article. Domains provide a whole knowledge base of encyclopedic knowledge, language translation, weather and more. In future articles, I’ll cover some of the more advanced aspects of Api.ai that allow you to personalize your assistant further.
Api.ai是一项服务,允许开发人员构建语音到文本,自然语言处理,人工智能系统,您可以使用自己的自定义功能进行培训。 他们拥有一系列现有的知识库,使用Api.ai构建的系统可以自动理解这些称为“域”的知识,这就是我们将在本文中重点介绍的领域。 域提供了一个完整的知识库,包括百科知识,语言翻译,天气等。 在以后的文章中,我将介绍Api.ai的一些更高级的方面,这些方面使您可以进一步个性化您的助手。
Api.ai入门 (Getting Started With Api.ai)
To get started, we’ll head to the Api.ai website and click either the “Get Started for Free” button or the “Sign Up Free” button in the top right hand corner.
首先,我们将前往Api.ai网站 ,然后单击右上角的“免费入门”按钮或“免费注册”按钮。
We’re then taken to a registration form which is pretty straightforward: enter your name, email and password and click “Sign up”. For those avoiding yet another set of login credentials, you can also sign up using your GitHub or Google account using the buttons to the right.
然后,我们将获得一个非常简单的注册表:输入您的姓名,电子邮件和密码,然后单击“注册”。 对于那些避免使用另一套登录凭据的用户,您也可以使用右侧的按钮使用GitHub或Google帐户进行注册。
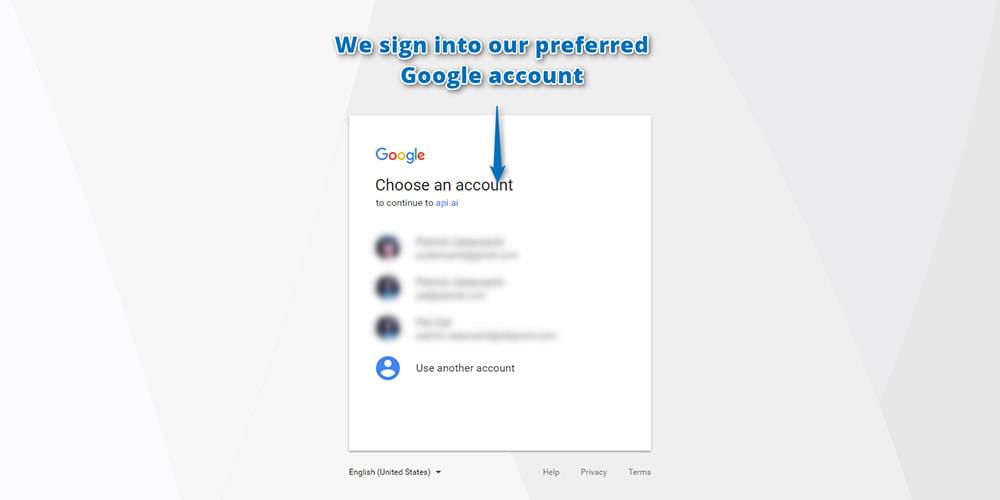
As Api.ai was bought by Google, it’s migrated towards solely using Google accounts to log in. So if you’re new to Api.ai, you’ll need to sign in with your Google account:
由于Api.ai被Google收购,因此已迁移为仅使用Google帐户登录。因此,如果您不熟悉Api.ai,则需要使用Google帐户登录:
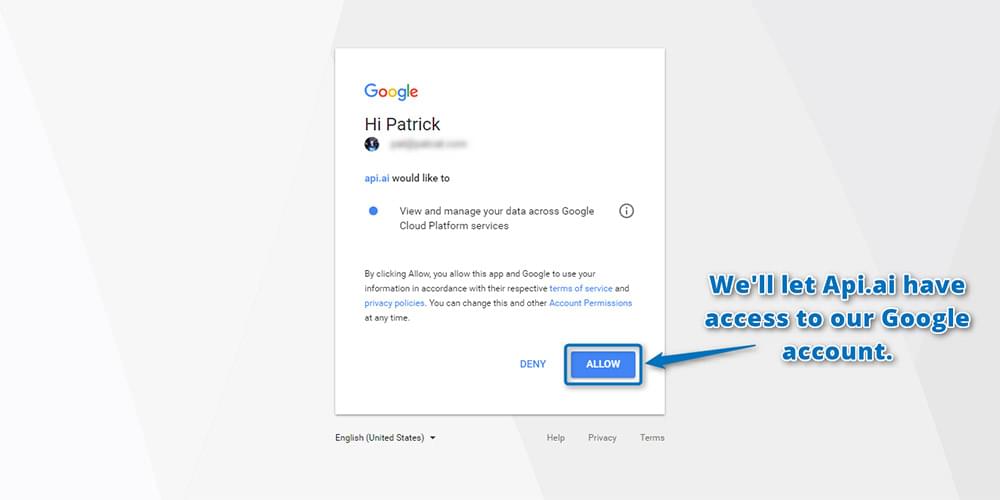
Click Allow to grant Api.ai access to your Google account in the screen that follows:
在下面的屏幕中,单击允许以授予Api.ai访问您的Google帐户的权限:
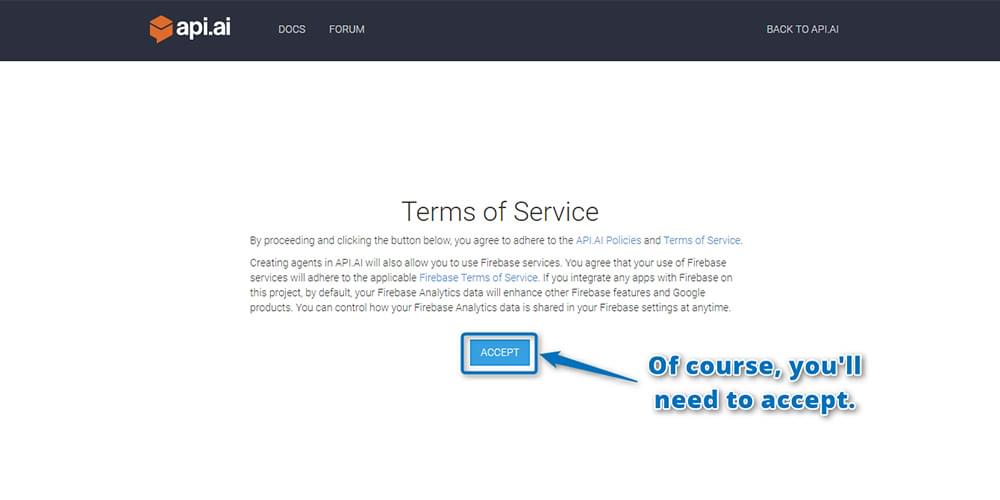
You’ll also need to read through and agree to their terms of service:
您还需要通读并同意他们的服务条款:
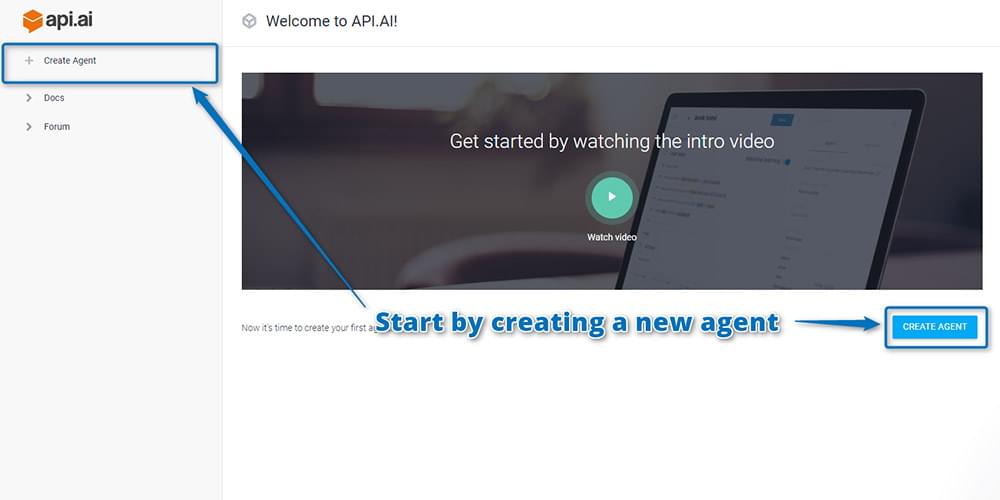
Once you’ve signed up, you’ll be taken straight to the Api.ai interface where you can create your virtual AI assistant. Each assistant you create and teach specific skills to is called an “agent” in Api.ai. So, to begin, you create your first agent by clicking the “Create Agent” button on the top left hand side:
注册后,将直接进入Api.ai界面,您可以在其中创建虚拟AI助手。 您创建并教授特定技能的每个助手在Api.ai中都称为“代理”。 因此,首先,您需要通过单击左上角的“创建代理”按钮来创建您的第一个代理:
You may need to authorize Api.ai again to have additional permissions for your Google account. This is normal and a-okay! Click “Authorize” to continue:
您可能需要再次授权Api.ai才能拥有您的Google帐户的其他权限。 这是正常的,还可以! 点击“授权”继续:
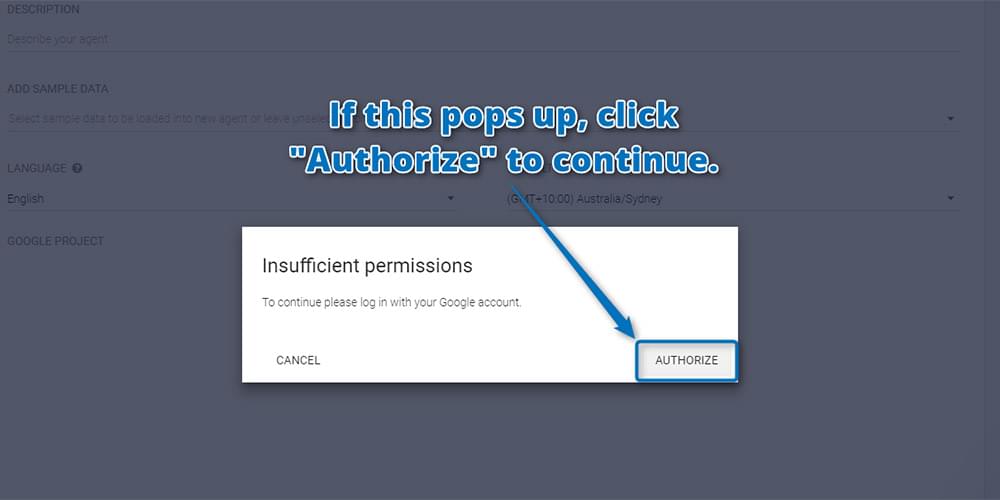
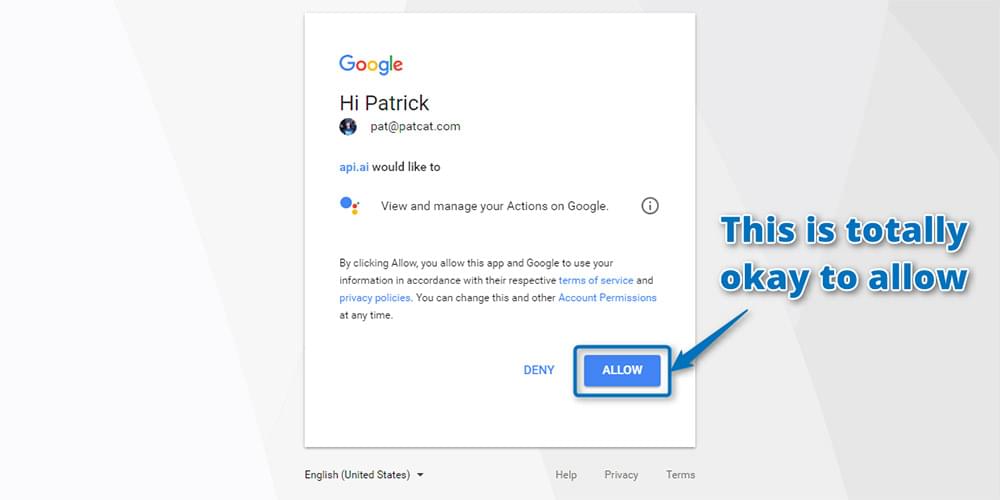
And allow:
并允许:
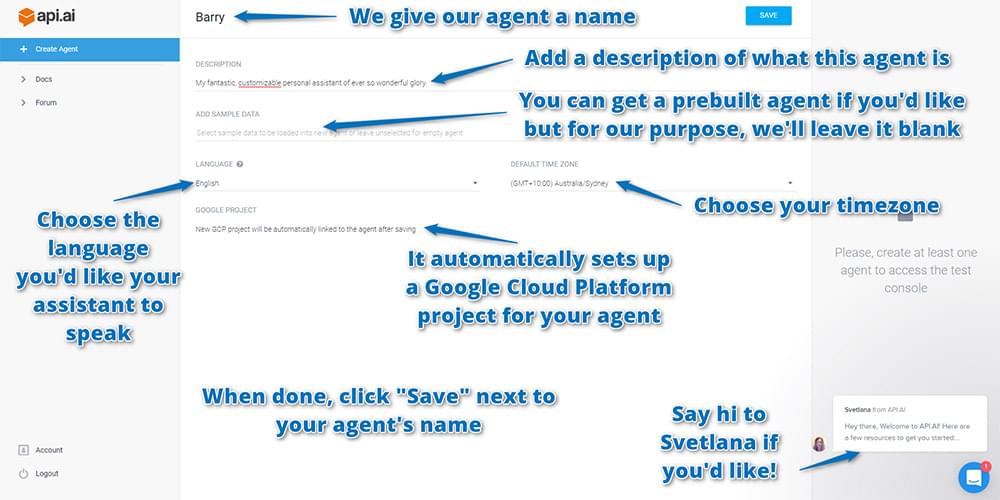
On the next screen, enter in your agent’s details, including:
在下一个屏幕上,输入代理商的详细信息,包括:
Name: This is just for your own reference to differentiate agents in the api.ai interface. You could call the agent anything you like — either a person’s name (I chose Barry) or a name that represents the tasks they’re helping out with (e.g. light-controller).
名称:这仅供您参考,以在api.ai界面中区分代理。 您可以随便给代理人打电话-一个人的名字(我选择了Barry)或一个代表他们正在帮助完成的任务的名字(例如,灯光控制器)。
Description: A human readable description so you can remember what the agent’s responsible for. This is optional and might not be needed if your agent’s name is self-explanatory.
描述:易于理解的描述,因此您可以记住代理的职责。 这是可选的,如果您的座席姓名不言自明,则可能不需要。
Language: The language which the agent works in. This cannot be changed once you’ve chosen it — so choose wisely! For this tutorial, choose English, as English has access to the most Api.ai domains. You can see which domains are available for each language in the Languages table in the Api.ai docs.
语言:座席使用的语言。 一旦选择,便无法更改,因此请明智地选择! 对于本教程,请选择英语,因为英语可以访问最多的Api.ai域。 您可以在Api.ai docs的Languages表中查看每种语言可用的域。
Timezone: As you’d expect, it’s the timezone for your agent. Chances are it’ll already have detected your current timezone.
时区:正如您所期望的,这是您的业务代表的时区。 很有可能已经检测到您当前的时区。
It will also automatically set up a Google Cloud Platform project for your agent, so you don’t need to do anything in this regard; it’s all automated! It’s good to know this is happening, though, so if you go through a lot of testing and creating many agents, just know there are a lot of Google Cloud Platform projects being created which you might want to clean up some day.
它还会自动为您的代理设置一个Google Cloud Platform项目,因此您无需为此做任何事情; 都是自动化的! 不过,很高兴知道这种情况正在发生,因此,如果您进行了大量的测试并创建了许多代理,那么就知道有很多Google Cloud Platform项目正在创建中,您可能希望有一天清理一下。
When you have input your agent’s settings, choose “Save” next to the agent’s name to save everything:
输入座席设置后,选择座席名称旁边的“保存”以保存所有内容:
测试控制台 (The Test Console)
Once your agent has been created, you can test it out with the test console on the right. You can enter in queries at the top and it will send these to your agent, showing you what would be returned after it hears those statements. Enter in a question such as “How are you?” and see what it returns. Your results should appear below it:
创建代理后,可以使用右侧的测试控制台对其进行测试。 您可以在顶部输入查询,它将查询发送给您的代理,向您显示在听到这些陈述后将返回什么。 输入诸如“你好吗”之类的问题。 并查看返回的结果。 您的结果应显示在下面:
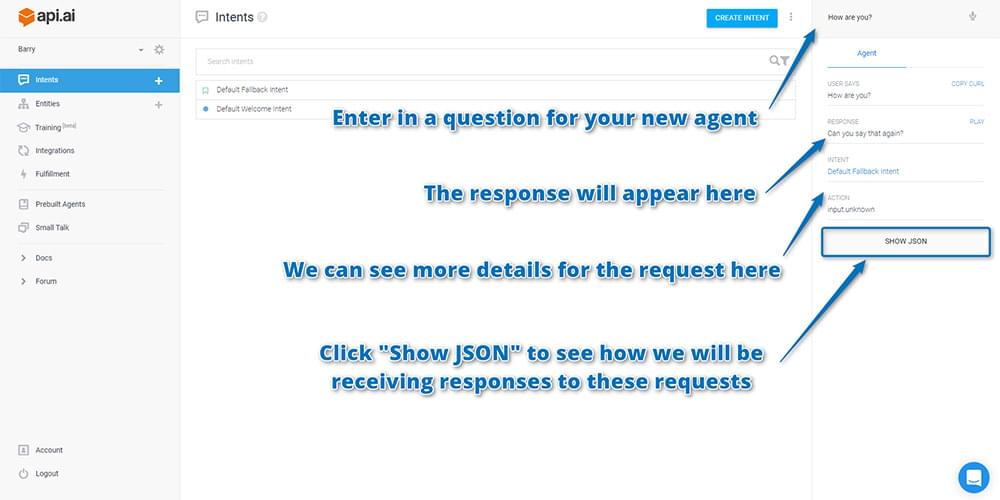
If you scroll down on the right hand side of results, you’ll see more details for how Api.ai interpreted your request (as seen in the screenshot above). Below that, there’s a button called “Show JSON”. Click that to see how the API will return this sort of response to you in your app.
如果向下滚动结果的右侧,您将看到有关Api.ai如何解释您的请求的更多详细信息(如上面的屏幕截图所示)。 在其下方,有一个名为“显示JSON”的按钮。 单击该按钮,以查看API如何在您的应用中将这种响应返回给您。
Api.ai will open up the JSON viewer and show you a JSON response that looks similar to this one:
Api.ai将打开JSON查看器,并向您显示类似于此的JSON响应:
{
  "id": "21345678",
  "timestamp": "2017-05-12T08:04:49.031Z",
  "lang": "en",
  "result": {
    "source": "agent",
    "resolvedQuery": "How are you?",
    "action": "input.unknown",
    "actionIncomplete": false,
    "parameters": {},
    "contexts": [],
    "metadata": {
      "intentId": "6320071",
      "webhookUsed": "false",
      "webhookForSlotFillingUsed": "false",
      "intentName": "Default Fallback Intent"
    },
    "fulfillment": {
      "speech": "Sorry, can you say that again?",
      "messages": [
        {
          "type": 0,
          "speech": "Sorry, could you say that again?"
        }
      ]
    },
    "score": 1
  },
  "status": {
    "code": 200,
    "errorType": "success"
  },
  "sessionId": "243c"
}
As you’ll see … your agent doesn’t know how to respond! Right now, it’s not exactly “intelligent” artificial intelligence: it still needs the intelligence bit to be added in. The input.unknown value in the action field tells you that it’s not sure how to proceed. Above, it’s returning a message of “Sorry, can you say that again?”, which is one of its default fallbacks. Rather than telling the human that it doesn’t understand, it just asks them to say it again … over and over. This isn’t ideal, and I’d prefer to change it to something that makes it clear when the bot doesn’t understand. If you’re picky about this sort of thing too and want to change what it says here, you can find that on the “Intents” page by clicking the “Default Fallback Intent” item there.
如您所见…… 您的代理人不知道该如何回应! 眼下,它不完全的“智能”人工智能:它仍然需要在添加智能位的。 input.unknown中值action字段告诉你,这是不知道如何着手。 在上方,它返回一条消息“抱歉,您能再说一遍吗?”,这是其默认后备之一。 与其告诉人类它不理解,不如说是……一遍又一遍。 这不是理想的选择,我更喜欢将其更改为在机器人不了解时可以清楚显示的内容。 如果您也对这种事情很挑剔,并且想要更改此处所说的内容,则可以在“意图”页面上单击“默认后备意图”项,以找到它。
A note for those who’ve used Api.ai a little while ago (or had seen it in action): you may have actually been expecting it to have a bit more available out of the box. Previously, it was able to answer queries like “Who is Steve Jobs?” by default. This is no longer the case! You’ve got to add your own integrations with third party APIs to take action and source information. Api.ai provides the sentence parsing and interpreting side of things.
给那些不久前使用Api.ai(或已经在实际中使用过)的人的注释:您可能实际上一直期望它提供了更多可用的功能。 以前,它能够回答“谁是史蒂夫·乔布斯”之类的查询。 默认。 这已不再是这种情况! 您必须添加自己的与第三方API的集成,以采取措施并获取源信息。 Api.ai提供了事物的句子解析和解释功能。
增加闲聊 (Adding Small Talk)
There’s one bit of default functionality you can add which gives your bot a little hint of intelligence — the “Small Talk” feature. This provides a range of answers to commonly asked questions … including “How are you?” from above. This isn’t on by default though. To turn it on, go to the “Small Talk” menu item on the left and click “Enable”:
您可以添加一点默认功能,从而使您的漫游器具有一些智能提示-“ Small Talk”功能。 这为常见问题提供了一系列答案……包括“你好吗?” 从上面。 默认情况下,此功能未启用。 要打开它,请转到左侧的“ Small Talk”菜单项,然后单击“ Enable”:

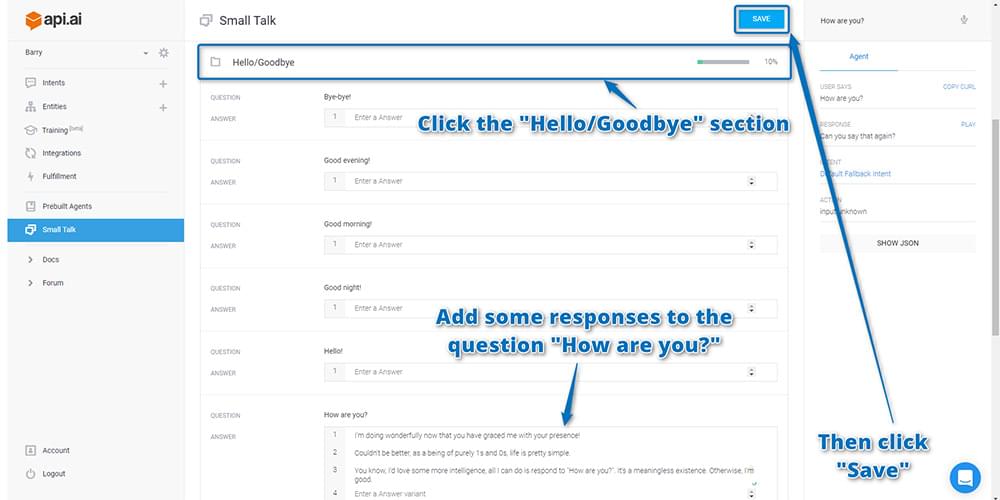
After enabling, if you scroll down you can see a range of categories of common small talk phrases. Find the “Hello/Goodbye” section and click on it to expand it out. Add some different responses to the Question “How are you?” and then click “Save” at the top right. Upon adding phrases, you’ll see the percentage figure next to the “Hello/Goodbye” section increase to show you how much you’ve customized your chatbot.
启用后,如果向下滚动,您会看到一系列常见的简短交谈短语类别。 找到“ Hello / Goodbye”部分,然后单击以将其展开。 在问题“您好吗?”中添加一些不同的答案。 然后点击右上角的“保存”。 添加短语后,您会看到“ Hello / Goodbye”部分旁边的百分比数字增加,以显示您对聊天机器人的自定义程度。
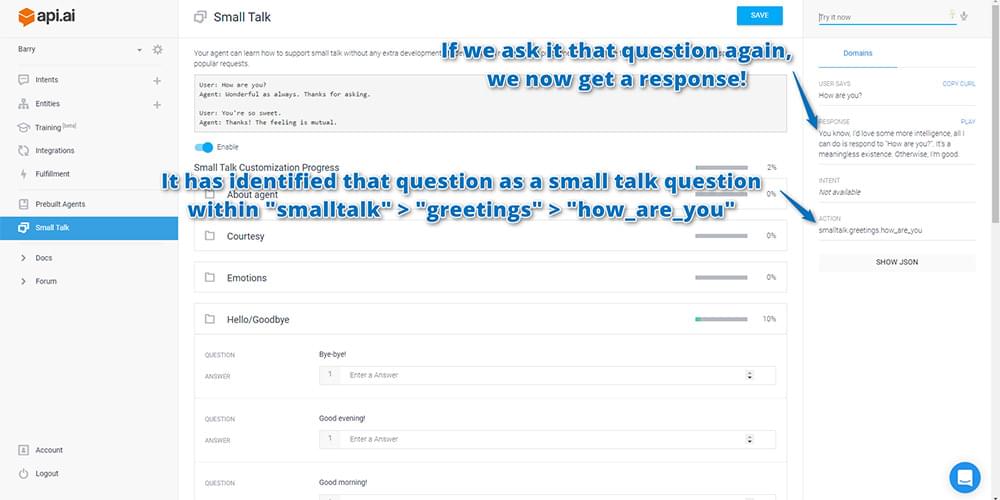
If you then go to the test console and ask it “How are you?” again, it should now answer with one of the responses that you entered in!
如果您随后转到测试控制台并询问“您好吗?” 再次,它现在应该用您输入的答案之一回答!
If it doesn’t respond correctly, check that you did actually click “Save” before giving that a go! It doesn’t save automatically.
如果响应不正确,请在执行该操作之前检查您是否确实单击了“保存”! 它不会自动保存。
Ideally, you’ll want to customize as much of your small talk responses as you can: this is what will give your Api.ai bot a more unique personality. You can choose the tone and structure of its responses. Is it a grumpy chatbot that hates humans talking to it? Is it a chatbot obsessed with cats? Or maybe a chatbot that responds in pre-teen internet/text talk? You get to decide!
理想情况下,您将要尽可能地自定义闲聊内容:这将使您的Api.ai机器人更具个性。 您可以选择其响应的语气和结构。 它是一个讨厌人类的脾气暴躁的聊天机器人吗? 它是痴迷于猫的聊天机器人吗? 还是一个聊天机器人在青春期前的互联网/文字对话中做出回应? 您可以决定!
Now that you at least have some small talk elements going on, your agent is now ready for you to integrate them into your own web app interface. To do so, you’ll need to get your API keys to give you remote access to your agent.
现在您至少已经有了一些闲聊元素,您的代理现在可以将它们集成到您自己的Web应用程序界面中了。 为此,您需要获取API密钥以使您可以远程访问代理。
查找您的Api.ai API密钥 (Finding your Api.ai API keys)
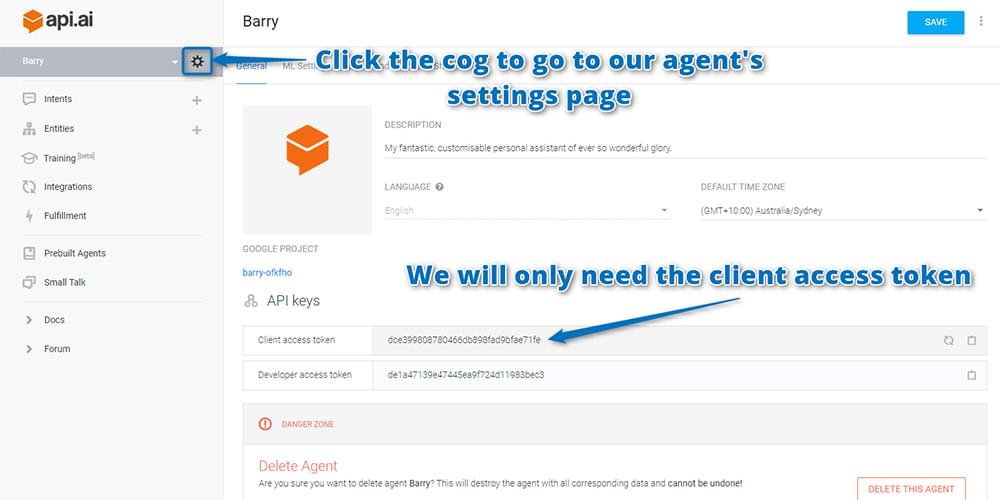
The API keys you’ll need are on the agent’s settings page. To find that, click on the cog icon next to your agent’s name. On the page that appears, copy and paste the “Client access token” somewhere safe. That’s what we’ll need to make queries to Api.ai’s service:
您需要的API密钥位于代理的设置页面上。 要找到该地址,请单击代理商名称旁边的齿轮图标。 在出现的页面上,将“客户端访问令牌”复制并粘贴到安全的位置。 这就是我们需要查询Api.ai服务的内容:
代码 (The Code)
If you’d like to take a look at the working code and play around with it, it’s available on GitHub. Feel free to use it and expand on the idea for your own AI personal assistant.
如果您想看一下工作代码并进行试用 ,可以在GitHub上找到它 。 随时使用它,并为您自己的AI个人助理扩展想法。
If you’d like to try it out, I have Barry running right here. Enjoy!
如果您想尝试一下,请让我在这里运行Barry 。 请享用!
使用JavaScript连接到Api.ai (Connecting to Api.ai Using JavaScript)
You currently have a working personal assistant that’s running in Api.ai’s cloud somewhere. You now need a way to speak to your personal assistant from your own interface. Api.ai has a range of platform SDKs that work with Android, iOS, web apps, Unity, Cordova, C++ and more. You can even integrate it into a Slack bot or Facebook Messenger bot! For this example, you’ll be using HTML and JavaScript to make a simple personal assistant web app. My demo builds off the concepts shown in Api.ai’s HTML + JS gist.
您目前有一个正在工作的个人助理,该助理正在Api.ai的云中某处运行。 您现在需要一种从自己的界面与您的私人助理交谈的方法。 Api.ai有一系列平台SDK ,可与Android,iOS,Web应用,Unity,Cordova,C ++等一起使用。 您甚至可以将其集成到Slack机器人或Facebook Messenger机器人中! 对于此示例,您将使用HTML和JavaScript制作一个简单的个人助理Web应用程序。 我的演示基于Api.aiHTML + JS gist中显示的概念。
Your app will do the following:
您的应用将执行以下操作:
- Accept a written command in an input field, submitting that command when you hit the Enter key. 在输入字段中接受书面命令,然后按Enter键提交该命令。
- OR, using the HTML5 Speech Recognition API (this only works on Google Chrome 25 and above), if the user clicks “Speak”, they can speak their commands and have them written into the input field automatically. 或者,使用HTML5语音识别API(仅在Google Chrome 25及更高版本上有效),如果用户单击“语音”,则他们可以说出自己的命令并将其自动写入输入字段。
- Once the command has been received, you can use jQuery to submit an AJAX POST request to Api.ai. Api.ai will return its knowledge as a JSON object, as you saw above in the test console. 收到命令后,您可以使用jQuery向Api.ai提交AJAX POST请求。 如您在测试控制台中所见,Api.ai将以JSON对象的形式返回其知识。
- You’ll read in that JSON file using JavaScript and display the results on your web app. 您将使用JavaScript读取该JSON文件,并将结果显示在您的网络应用中。
- If available, your web app will also use the Web Speech API (available in Google Chrome 33 and above) to respond back to you verbally. 如果可用,您的网络应用程序还将使用Web Speech API(在Google Chrome 33及更高版本中可用)以口头方式回复您。
The whole web app is available on GitHub at the link above. Feel free to refer to that to see how I’ve styled things and structured the HTML. I won’t be explaining every piece of how it’s put together in this article, focusing mainly on the Api.ai SDK side of things. I’ll also point out and explain briefly which bits are using the HTML5 Speech Recognition API and Web Speech API.
整个Web应用程序可在GitHub的上面的链接上找到。 随意参考它,看看我如何设置样式并构造HTML。 我不会在本文中解释它的所有组成部分,主要集中在Api.ai SDK方面。 我还将指出并简要解释哪些位正在使用HTML5语音识别API和Web语音API。
Your JavaScript contains the following variables:
您JavaScript包含以下变量:
var accessToken = "YOURACCESSTOKEN",
    baseUrl = "https://api.api.ai/v1/",
    $speechInput,
    $recBtn,
    recognition,
    messageRecording = "Recording...",
    messageCouldntHear = "I couldn't hear you, could you say that again?",
    messageInternalError = "Oh no, there has been an internal server error",
    messageSorry = "I'm sorry, I don't have the answer to that yet.";
Here’s what each of these is for:
这些是每个的目的:
accessToken. This is the API key that you copied over from the Api.ai interface. These give you permission to access the SDK and also say which agent it is you’re accessing. I want to access Barry, my personal agent.accessToken。 这是您从Api.ai界面复制过来的API密钥。 这些授予您访问SDK的权限,并说明您正在访问哪个代理。 我想访问我的私人经纪人Barry。baseUrl. This is the base URL for all calls to the Api.ai SDK. If a new version of the SDK comes out, you can update it here.baseUrl。 这是对Api.ai SDK的所有调用的基本URL。 如果有新版本的SDK,您可以在此处进行更新。$speechInput. This stores your<input>element so you can access it in your JavaScript.$speechInput。 这将存储您的<input>元素,以便您可以在JavaScript中访问它。$recBtn. This stores your<button>element that you’ll be using when the user wants to click and speak to the web app instead.$recBtn。 它存储您的<button>元素,当用户想单击并与Web应用程序对话时将使用该元素。recognition. You store yourwebkitSpeechRecognition()functionality in this variable. This is for the HTML5 Speech Recognition API.recognition。 您将webkitSpeechRecognition()功能存储在此变量中。 这是针对HTML5语音识别API的。messageRecording,messageCouldntHear,messageInternalErrorandmessageSorry. These are messages to show when the app is recording the user’s voice, can’t hear their voice, when you have an internal error, and if your agent doesn’t understand. You store these as variables so that you can change them easily at the top of your script, and also so that you can specify which ones you don’t want the app to speak out loud later on.messageRecording,messageCouldntHear,messageInternalError和messageSorry。 这些消息是在应用录制用户声音,听不到他们的声音,出现内部错误以及您的座席不理解时显示的消息。 您将它们存储为变量,以便可以在脚本顶部轻松更改它们,还可以指定不希望应用程序稍后大声说出来的变量。
In these lines of code, look for when the user presses the Enter key in the input field. When that happens, run the send() function to send off the data to Api.ai:
在这些代码行中,查找用户何时在输入字段中按Enter键。 发生这种情况时,请运行send()函数将数据发送到Api.ai:
$speechInput.keypress(function(event) {
  if (event.which == 13) {
    event.preventDefault();
    send();
  }
});
Next, watch for if the user clicks the recording button to ask the app to listen to them (or if it is listening, to pause listening). If they click it, run the switchRecognition() function to switch from recording to not recording and vice versa:
接下来,查看用户是否单击了录制按钮以要求应用程序收听它们(如果正在收听,则暂停播放)。 如果单击它们,请运行switchRecognition()函数从录制切换为不录制,反之亦然:
$recBtn.on("click", function(event) {
  switchRecognition();
});
Finally, for your initial jQuery setup, you set up a button which will be on the bottom right of your screen to show and hide the JSON response. This is just to keep things clean: most of the time you won’t want to see the JSON data that comes through, but every now and then if something unexpected happens, you can click this button to toggle whether the JSON is viewable or not:
最后,对于您的初始jQuery设置,您将设置一个按钮,该按钮将位于屏幕的右下角,以显示和隐藏JSON响应。 这只是为了保持环境整洁:大多数情况下,您不希望看到传入的JSON数据,但是如果偶尔发生意外情况,可以单击此按钮来切换JSON是否可见。 :
$(".debug__btn").on("click", function() {
  $(this).next().toggleClass("is-active");
  return false;
});
使用HTML5语音识别API (Using the HTML5 Speech Recognition API)
As mentioned above, you’ll be using the HTML5 Speech Recognition API to listen to the user and transcribe what they say. This only works in Google Chrome at the moment.
如上所述,您将使用HTML5语音识别API收听用户并抄录他们说的话。 目前,这仅适用于Google Chrome。
Our startRecognition() function looks like so:
我们的startRecognition()函数如下所示:
function startRecognition() {
  recognition = new webkitSpeechRecognition();

  recognition.onstart = function(event) {
    respond(messageRecording);
    updateRec();
  };
  recognition.onresult = function(event) {
    recognition.onend = null;

    var text = "";
    for (var i = event.resultIndex; i
This is what runs the HTML5 Speech Recognition API. It all uses functions within webkitSpeechRecognition(). Here are a few pointers for what’s going on:
这就是运行HTML5语音识别API的功能。 所有这些都使用webkitSpeechRecognition()函数。 以下是发生情况的一些提示:
recognition.onstart. Runs when recording from the user’s microphone begins. You use a function calledrespond()to display your message telling the user you’re listening to them. I’ll cover therespond()function in more detail soon.updateRec()switches the text for your recording button from “Stop” to “Speak”.recognition.onstart。启动。 从用户的麦克风开始录制时运行。 您使用一个名为respond()的函数来显示您的消息,告诉用户您正在收听它们。 我将在稍后详细介绍respond()函数。updateRec()将录制按钮的文本从“停止”切换为“说”。recognition.onresult. Runs when you have a result from the voice recognition. You parse the result and set your text field to use that result viasetInput()(this function just adds the text to the input field and then runs yoursend()function).recognition.onresult。 当您从语音识别中获得结果时运行。 您解析结果并设置文本字段以通过setInput()使用该结果(此函数只是将文本添加到输入字段中,然后运行send()函数)。recognition.onend. Runs when the voice recognition ends. You set this tonullinrecognition.onresultto prevent it running if you have a successful result. This way, ifrecognition.onendruns, you know the voice recognition API hasn’t understood the user. If the function does run, you respond to the user to tell them you didn’t hear them correctly.recognition.onend。 在语音识别结束时运行。 您将其设置为null在recognition.onresult,以防止它在运行,如果你有一个成功的结果。 这样,如果recognition.onend运行,您就会知道语音识别API无法理解用户。 如果该功能确实运行,您将响应用户以告知他们您没有正确听到他们的声音。recognition.lang. Sets the language you’re looking for. In the demo’s case, it’s looking for US English.recognition.lang。 设置您要寻找的语言。 在演示的情况下,它正在寻找美国英语。recognition.start(). Starts that whole process!recognition.start()。 开始整个过程!
Your stopRecognition() function is much simpler. It stops your recognition and sets it to null. Then, it updates the button to show that you’re not recording anymore:
您的stopRecognition()函数要简单得多。 它将停止您的recognition并将其设置为null 。 然后,它更新按钮以显示您不再录制:
function stopRecognition() {
  if (recognition) {
    recognition.stop();
    recognition = null;
  }
  updateRec();
}
switchRecognition() toggles whether you’re starting or stopping recognition by checking the recognition variable. This lets your button toggle the recognition on and off:
switchRecognition()通过检查recognition变量来切换是开始识别还是停止识别。 这使您的按钮可以切换识别的打开和关闭:
function switchRecognition() {
  if (recognition) {
    stopRecognition();
  } else {
    startRecognition();
  }
}
与Api.ai交流 (Communicating With Api.ai)
To send off your query to Api.ai, you use the send() function which looks like so:
要将查询发送到Api.ai,请使用send()函数,如下所示:
function send() {
  var text = $speechInput.val();
  $.ajax({
    type: "POST",
    url: baseUrl + "query",
    contentType: "application/json; charset=utf-8",
    dataType: "json",
    headers: {
      "Authorization": "Bearer " + accessToken
    },
    data: JSON.stringify({query: text, lang: "en", sessionId: "runbarry"}),

    success: function(data) {
      prepareResponse(data);
    },
    error: function() {
      respond(messageInternalError);
    }
  });
}
This is a typical AJAX POST request using jQuery to https://api.api.ai/v1/query. You make sure you’re sending JSON data to it and are expecting JSON data from it. You also need to set two headers — Authorization and ocp-apim-subscription-key — to be your API keys for Api.ai. You send your data in the format {q: text, lang: "en"} to Api.ai and wait for a response.
这是使用jQuery到https://api.api.ai/v1/query的典型AJAX POST请求。 您确保要向其发送JSON数据,并期望从中获得JSON数据。 您还需要设置两个头- Authorization和ocp-apim-subscription-key -成为Api.ai.您的API密钥 您以{q: text, lang: "en"}格式将数据发送到Api.ai,然后等待响应。
When you receive a response, you run prepareResponse(). In this function, you format the JSON string you’ll put into your debug section of the web app and you take out the result.speech part of Api.ai’s response which provides you with your assistant’s text response. You display each message via respond() and debugRespond():
收到响应后,请运行prepareResponse() 。 在此功能中,您将格式化将放入Web应用程序的调试部分的JSON字符串,并取出Api.ai响应的result.speech部分,该部分为您提供助手的文本响应。 你显示经由每个消息respond()和debugRespond()
function prepareResponse(val) {
  var debugJSON = JSON.stringify(val, undefined, 2),
      spokenResponse = val.result.speech;

  respond(spokenResponse);
  debugRespond(debugJSON);
}
Your debugRespond() function puts text into your field for a JSON response:
您的debugRespond()函数将文本放入字段中以进行JSON响应:
function debugRespond(val) {
  $("#response").text(val);
}
Your respond() function has a few more steps to it:
您的respond()函数还有更多步骤:
function respond(val) {
  if (val == "") {
    val = messageSorry;
  }

  if (val !== messageRecording) {
    var msg = new SpeechSynthesisUtterance();
    var voices = window.speechSynthesis.getVoices();
    msg.voiceURI = "native";
    msg.text = val;
    msg.lang = "en-US";
      window.speechSynthesis.speak(msg);
  }

  $("#spokenResponse").addClass("is-active").find(".spoken-response__text").html(val);
}
At the beginning, you check to see if the response value is empty. If so, you set it to say that it isn’t sure of the answer to that question, as Api.ai hasn’t returned a valid response to you:
首先,您检查响应值是否为空。 如果是这样,则将其设置为不确定该问题的答案,因为Api.ai尚未向您返回有效的答复:
if (val == "") {
  val = messageSorry;
}
If you do have a message to output and it isn’t the one saying that you’re recording, then you use the Web Speech API to say the message out loud using the SpeechSynthesisUtterance object. I found that without setting voiceURI and lang, my browser’s default voice was German! This made its speech rather tough to understand until I changed it. To actually speak the message, you use the window.speechSynthesis.speak(msg) function:
如果确实有一条消息要输出,而不是说正在录制,则可以使用Web Speech API通过SpeechSynthesisUtterance对象大声说出该消息。 我发现没有设置voiceURI和lang ,浏览器的默认语音是德语! 在我更改之前,这使得它的语音很难理解。 要实际说出消息,请使用window.speechSynthesis.speak(msg)函数:
if (val !== messageRecording) {
  var msg = new SpeechSynthesisUtterance();
  msg.voiceURI = "native";
  msg.text = val;
  msg.lang = "en-US";
  window.speechSynthesis.speak(msg);
}
Note: it’s important not to have it speak the “Recording…” bit of text: if you do, the microphone will pick up that speech and add it into the recorded query.
注意:重要的是不要让其说“ Recording…”(录音)文本:如果您这样做,麦克风将接听该语音并将其添加到已记录的查询中。
Finally, display your response box and add that text to it so that the user can read it too:
最后,显示您的响应框并添加该文本,以便用户也可以阅读它:
$("#spokenResponse").addClass("is-active").find(".spoken-response__text").html(val);托管您的Web界面 (Hosting Your Web Interface)
For the best results, you may need to host it on a web server with HTTPS enabled. Your requests to Api.ai are over HTTPS, so it’s much better to also host your web interface on HTTPS. If you’re looking to just use this as a prototype and don’t have an HTTPS secured web server readily available, try Glitch.com! It’s a new service that can host code snippets that contain both front-end and back-end (Node.js) code.
为了获得最佳结果,您可能需要将其托管在启用HTTPS的Web服务器上。 您对Api.ai的请求是通过HTTPS进行的,因此最好在HTTPS上托管您的Web界面。 如果您只是想将其用作原型,并且没有随时可用的HTTPS安全的Web服务器,请尝试Glitch.com ! 这是一项新服务,可以托管包含前端和后端(Node.js)代码的代码段。
As an example, I’ve got Barry also hosted at https://barry.glitch.me. Glitch hosting at the moment is totally free! It’s a great service and I highly recommend giving it a go.
例如,我也将Barry托管在https://barry.glitch.me上 。 目前,小故障托管是完全免费的! 这是一项很棒的服务,我强烈建议您尝试一下。
If you’re looking to make this a bigger project, consider either Let’s Encrypt for a free SSL/TLS certificate, or look into purchasing one from your web host.
如果您想使这个项目更大,请考虑让我们加密以获得免费的SSL / TLS证书,或者考虑从您的网络主机上购买一个。
行动中 (In Action)
If you run the web app using my styles within the GitHub repo, it looks something like this:
如果您在GitHub存储库中使用我的样式来运行Web应用,则它看起来像这样:
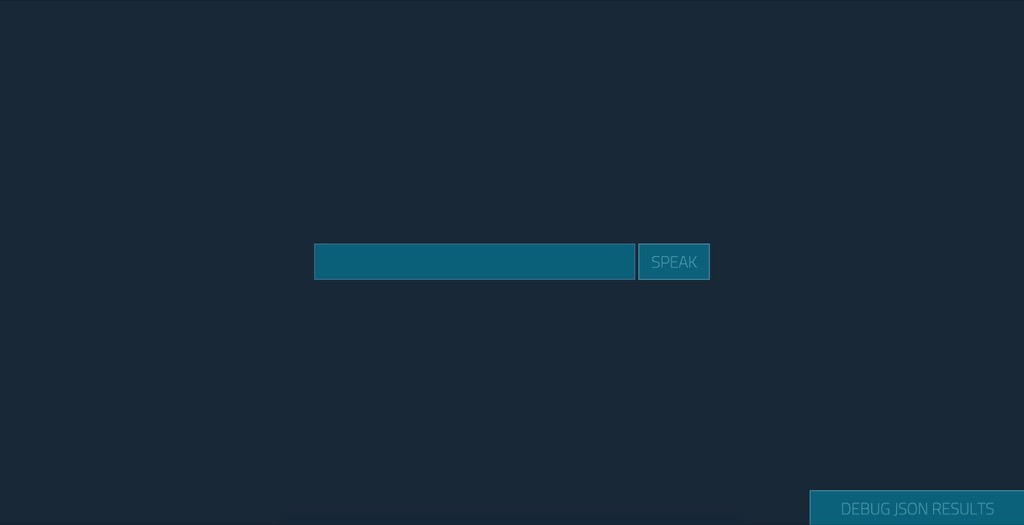
If you ask it a question by clicking “Speak” and saying “How are you?”, it initially shows that you’re recording:
如果您通过单击“说”并说“您好吗?”来提问,则最初表明您正在录制:
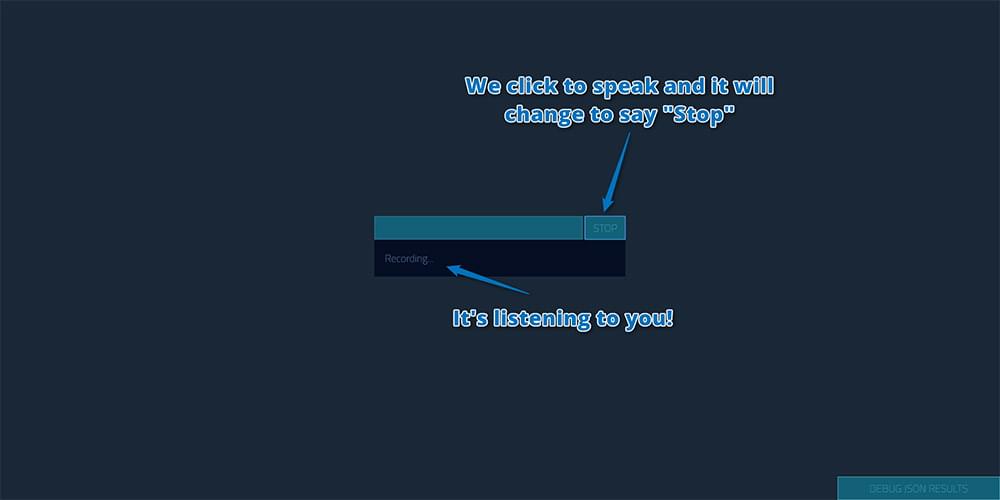
(You may need to give Chrome permission to access your microphone when you click that button. Apparently this will happen every time unless you serve the page as HTTPS.)
(单击该按钮时,您可能需要授予Chrome浏览器访问麦克风的权限。显然,除非您将该页面用作HTTPS,否则每次都会发生。)
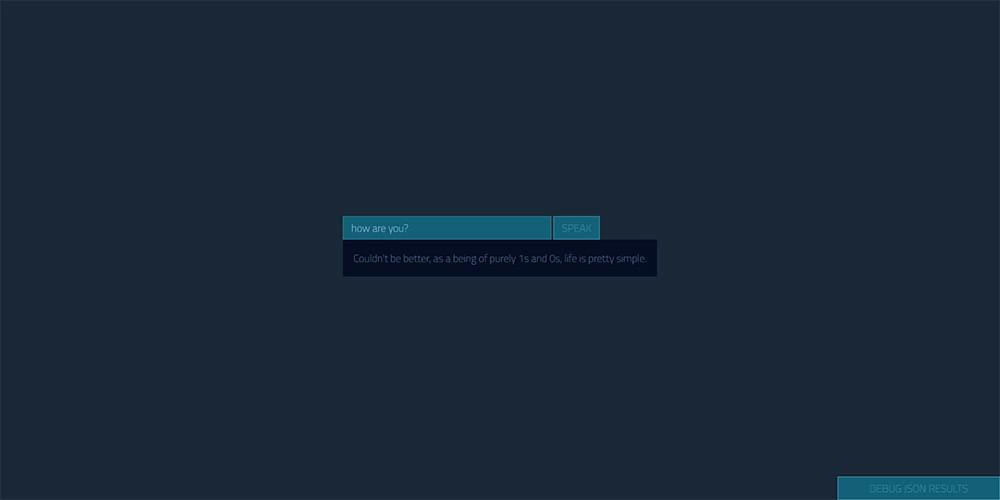
It then responds visually (and speaks it too, which is difficult to show in a screenshot) like so:
然后,它会在视觉上做出响应(并说出来,这很难在屏幕截图中显示),如下所示:
You can also click the button in the bottom right to see the JSON response Api.ai gave you, just in case you’d like to debug the result:
您也可以单击右下角的按钮以查看Api.ai给您的JSON响应,以防万一您想调试结果:

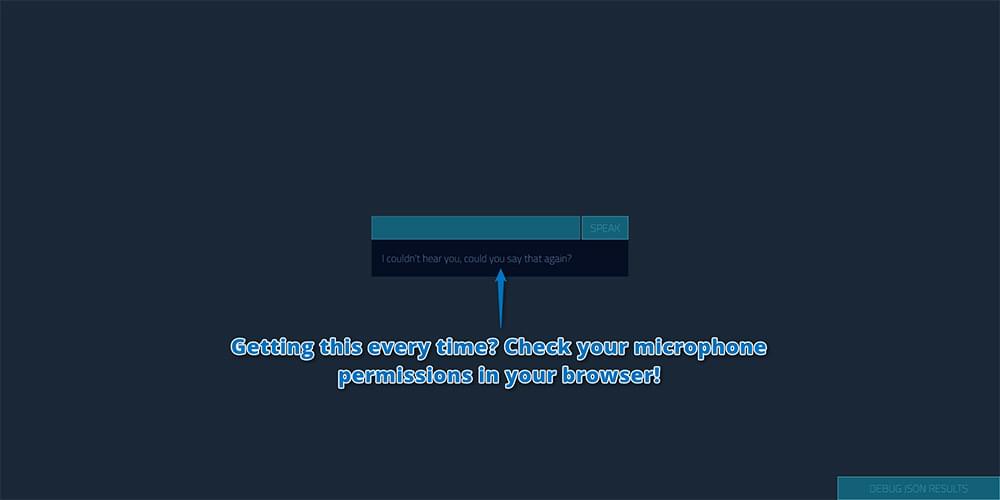
If you seem to mainly be getting the “I couldn’t hear you, could you say that again?” message, check your microphone permissions in your browser. If you’re loading the page locally (e.g. if your address bar starts with file:///), Chrome doesn’t seem to give any access to the microphone at all, and thus you’ll end up with this error no matter what! You’ll need to host it somewhere. (Try Glitch.com as mentioned above.)
如果您似乎主要是在听到“我听不到您的声音,您能再说一遍吗?” 消息,请在浏览器中检查您的麦克风权限。 如果您是在本地加载页面(例如,如果地址栏以file:///开头),Chrome似乎根本无法提供对麦克风的任何访问权限,因此无论如何您都会遇到此错误什么! 您需要将其托管在某个地方。 (如上所述,请尝试Glitch.com。)
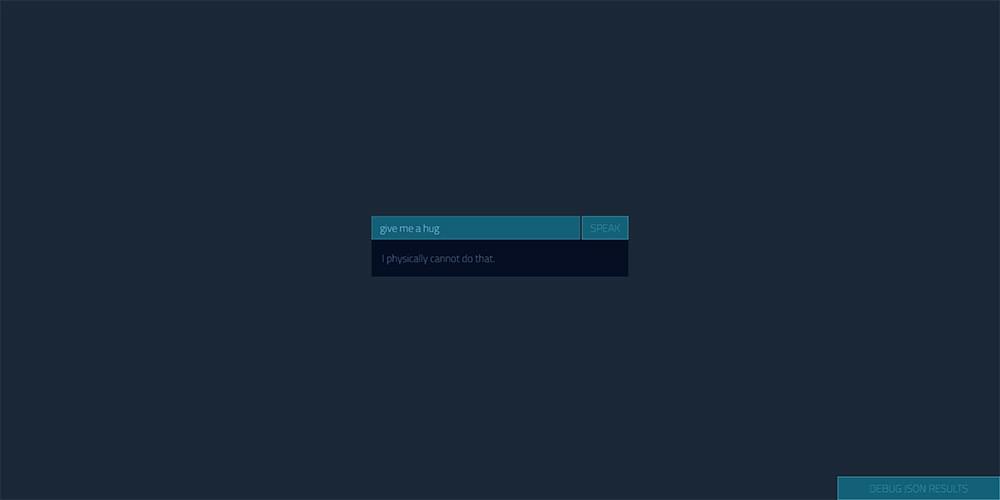
Personally, I’m not a fan of some of the default phrases in small talk, like this one:
就个人而言,我不喜欢闲聊中的一些默认短语,例如:

I’ve customized a bunch of them in those settings we looked at earlier. For example, I found this small talk statement in the list quite odd and decided to customize it like so:
在我们之前介绍的设置中,我已经自定义了一堆。 例如,我发现列表中的这个闲聊声明很奇怪,因此决定像这样自定义它:
So get out there and customize your own chatbot! Make it unique and have fun!
因此,走出去,自定义您自己的聊天机器人! 让它变得独一无二,玩得开心!
有问题吗? (Having Issues?)
I found that occasionally, if the Web Speech API tried to say something too long, Chrome’s speech stops working. If this is the case for you, close the tab and open a new one to try again.
我发现有时候,如果Web Speech API试图说的话太长,Chrome的语音就会停止工作。 如果您是这种情况,请关闭标签并打开一个新标签,然后重试。
结论 (Conclusion)
As I’m sure you can see, Api.ai is a really simple way to get a chatbot-style AI personal assistant up and running.
如您所知,Api.ai是启动并运行聊天机器人式AI个人助理的一种非常简单的方法。
Want to keep developing your Api.ai bot? There’s more that can be done: here’s the whole series I’ve written here at SitePoint!
是否想继续开发您的Api.ai机器人? 还有更多可以做的事情: 这是我在SitePoint上写的整个系列 !
If you build your own personal assistant using Api.ai, I’d love to hear about it! Did you name yours Barry too? What questions have you set up for it? Let me know in the comments below, or get in touch with me on Twitter at @thatpatrickguy.
如果您使用Api.ai建立自己的私人助理,我很想听听它! 您也给巴里起名字了吗? 您为此设置了哪些问题? 在下面的评论中让我知道,或者在Twitter上通过@thatpatrickguy与我联系 。
Give your AI the human touch with a sentiment tool. Check out our screencasts on the Microsoft Cognitive Services and the Text Analytics API.
使用情感工具让您的AI具有人性化的感觉。 查看我们有关Microsoft Cognitive Services和Text Analytics API的截屏视频。
翻译自: https://www.sitepoint.com/how-to-build-your-own-ai-assistant-using-api-ai/
api. feel.ai


 2万+
2万+

 被折叠的 条评论
为什么被折叠?
被折叠的 条评论
为什么被折叠?
 到【灌水乐园】发言


