


When choosing a PHP framework you need to make sure that it emphasizes features which are the most important to you. If you are looking for something fast, simple, and easy to learn than PHPixie may be a perfect choice.
选择PHP框架时,需要确保它强调对您来说最重要的功能。 如果您正在寻找快速,简单且易于学习的东西,那么PHPixie可能是一个理想的选择。
To illustrate the basics of developing with PHPixie we will create a small polling application. By the end of this tutorial you will have a working poll application and an understanding of how easy it is to code projects using PHPixie.
为了说明使用PHPixie开发的基础知识,我们将创建一个小型轮询应用程序。 在本教程结束时,您将拥有一个有效的民意调查应用程序,并且了解使用PHPixie编写项目的简单性。
Before going on, make sure you download PHPixie from the project’s website and extract the downloaded archive into the root web directory of your web server. Visit http://localhost/ (or other address as appropriate) in your browser and you should see the ‘Have fun coding!’ welcome message.
在继续之前,请确保从项目的网站下载PHPixie,并将下载的档案解压缩到Web服务器的根Web目录中。 在浏览器中访问http:// localhost / (或其他适当的地址),您应该会看到“祝您编码愉快!” 欢迎留言。
创建数据库 (Creating the Database)
First we’ll need to create two tables in the database: polls will store the topic we would like to get opinions for, and options will contain possible answers for each poll and the amount of votes each received.
首先,我们需要在数据库中创建两个表: polls将存储我们希望征询其意见的主题, options将包含每次民意测验的可能答案以及所获得的票数。
Open up your MySQL client and run these queries:
打开您MySQL客户端并运行以下查询:
CREATE TABLE polls (
    id INTEGER UNSIGNED NOT NULL AUTO_INCREMENT,
    topic VARCHAR(255) NOT NULL,
    PRIMARY KEY (id)
);

CREATE TABLE options (
    id INTEGER NOT NULL AUTO_INCREMENT,
    name VARCHAR(255) DEFAULT NULL,
    poll_id INTEGER UNSIGNED NOT NULL,
    votes INTEGER NOT NULL DEFAULT 0,
    PRIMARY KEY (id),
    FOREIGN KEY (poll_id) REFERENCES polls(id)
);
To configure the database connection, we edit the database.php file inside the application/config directory:
要配置数据库连接,我们在application/config目录中编辑database.php文件:
<?php
return array(
    'default' => array(
        'user' => 'dbuser',
        'password' => 'dbpassword',
        'driver' => 'pdo',

        // 'Connection' is required if we use the PDO driver
        'connection' => 'mysql:host=localhost;dbname=polls',

        // 'db' and 'host' are required if we use Mysql driver
        'db' => 'polls',
        'host' => 'localhost'
    )
);
PHPixie can be configured to use multiple database connections, but since we are working with just the single database we specify it as default. That’s all the configuration required, so we can move to writing code now.
可以将PHPixie配置为使用多个数据库连接,但是由于我们仅使用单个数据库,因此将其指定为默认数据库。 这就是所需的全部配置,因此我们现在就可以开始编写代码。
楷模 (Models)
A common way to describe the Model-View-Controller architecture is as follows:
描述模型-视图-控制器体系结构的常用方法如下:
- Models represent data objects we work with (polls and options in our case) 模型代表我们使用的数据对象(本例中的轮询和选项)
- Controllers handle user requests and are the heart of our application 控制器处理用户请求,是我们应用程序的核心
- Views are templates that controllers use to display the response 视图是控制器用于显示响应的模板
Typically, models handle operations like retrieving data from the database and saving it. PHPixie takes care of these operations using an ORM layer so we don’t need to write any database queries at all. We just need to define our models like this:
通常,模型处理诸如从数据库检索数据并保存之类的操作。 PHPixie使用ORM层处理这些操作,因此我们根本不需要编写任何数据库查询。 我们只需要这样定义我们的模型:
<?php
class Poll_Model extends ORM {
    // Each poll can have many options
    public $has_many = array('options');

    // This way we can define some additional
    // dynamic properties for a model.
    // Later on we will be able to access it via $poll->total_votes
    public function get($property) {
        if ($property == 'total_votes') {
            $total = 0;
            foreach ($this->options->find_all() as $option) {
                $total += $option->votes;
            }
            return $total;
        }
    }
}
The above code should be placed in application/classes/model/poll.php.
上面的代码应该放在application/classes/model/poll.php 。
Relationships may be defined using 3 arrays: belongs_to, has_one, and has_many. The first (belongs_to) defines a one-to-one relationship when a table references another table using a foreign key, in our case options belongs to polls using the poll_id field. The foreign key is automatically guessed using model names by PHPixie. On the other side of the belongs to relationship falls has_many, in our case each poll has many options. has_one is a special case of has_many, limiting the amount of referenced objects to one. To define a relationship, we just need to add the name of the model we want to the appropriate array. A more thorough relationship configuration is possible, with the ability to specify which field to use for the relationship, set a different name for it, or to create a many-to-many relationship via a linking table, but in our case using this simple approach is enough.
可以使用3个数组定义关系: belongs_to , has_one和has_many 。 当一个表使用外键引用另一个表时,第一个( belongs_to )定义一对一关系,在我们的示例中, options 属于使用poll_id字段进行的polls 。 PHPixie使用模型名称自动猜测外键。 在属关系的另一侧属于has_many ,在我们的例子中,每个民意测验都有很多选择。 has_one是has_many的特例,将引用对象的数量限制为一个。 要定义关系,我们只需要将所需模型的名称添加到适当的数组即可。 可以进行更彻底的关系配置,可以指定用于关系的字段,为其设置其他名称,或通过链接表创建多对多关系,但是在我们的情况下,使用这种简单方法方法就足够了。
The find_all() method looks up records in the database. When we reference the options property, ORM is silently building a database query to select all of the options for the current poll. Calling find_all() subsequently executes that query and returns these options also as ORM models.
find_all()方法在数据库中查找记录。 当我们引用options属性时,ORM会静默构建数据库查询以选择当前民意测验的所有选项。 调用find_all()随后将执行该查询,并以ORM模型的形式返回这些选项。
Overriding the get() method allows us to add properties to our model dynamically. If a property we are trying to access is not found in the model class, ORM will call the class’ get() method passing the name of the property as an argument. Any result that get() will return will be considered the value for that property and stored inside the model, so that when we access the property once more we will get the cached value. As internal model operations usually invoke some kind of database action, it is preferable to have data cached, so that’s why we’re overriding get().
覆盖get()方法使我们可以动态地向模型添加属性。 如果在模型类中找不到我们尝试访问的属性,则ORM将调用该类的get()方法,并将属性名称作为参数传递。 get()将返回的任何结果都将被视为该属性的值,并存储在模型中,这样,当我们再次访问该属性时,我们将获得缓存的值。 由于内部模型操作通常会调用某种数据库操作,因此最好缓存数据,因此这就是我们重写get() 。
Note that while get() is often used to cache data from find_all(), it is not meant only for that. For example, we could use get() to define a property that we would access multiple times but should only be retrieved once.
请注意,虽然get()通常用于从find_all()缓存数据,但并不仅仅意味着这样做。 例如,我们可以使用get()定义一个属性,该属性可以多次访问,但只能被检索一次。
This internal cache persists only for the current object. Of course if you don’t want this behavior at all it is always possible to add your own total_votes() method to the model that will recalculate the votes each time it is called.
此内部缓存仅对于当前对象持久存在。 当然,如果您根本不希望这种行为,总是可以向模型添加自己的total_votes()方法,该方法将在每次调用时重新计算票数。
The code for the options model is placed in application/classes/model/option.php:
选项模型的代码位于application/classes/model/option.php :
<?php
class Option_Model extends ORM {
    public $belongs_to = array('poll');

    public function get($property) {
        if ($property == 'percent') {
            if ($this->poll->total_votes == 0) {
                return 0;
            }
            return floor($this->votes / $this->poll->total_votes * 100);
        }
    }
}
This model follows similar logic as the previous one. We define a belongs_to relationship with polls and a percent property, the only difference being that for one-to-one relationships it is not necessary to call the find_all() method, so we can access the poll that this option belongs to just as if it was a property.
此模型遵循与上一个相似的逻辑。 我们用民意测验和一个percent属性定义一个belongs_to关系,唯一的区别是对于一对一的关系,不需要调用find_all()方法,因此我们可以访问该选项所属的民意测验,就像这是一个财产。
PHPixie relies heavily on naming conventions to save us time when creating models, although it doesn’t force us to name everything according to these conventions (it’s easy to alter this behavior). Here we’re following the convention of using the plural form when naming tables in the database and singular form when naming models.
PHPixie很大程度上依赖命名约定来节省创建模型的时间,尽管它不会强迫我们根据这些约定来命名所有内容(更改此行为很容易)。 在这里,我们遵循在数据库中命名表时使用复数形式以及在命名模型时使用单数形式的约定。
基本控制器 (Basic Controller)
The URL for a specific action by default is /
/
/
e.g. http://localhost/polls/add. It is also possible to pass an extra ID parameter after the action which we will use to access individual polls.
默认情况下,特定操作的URL是/ / /
/

     /

      /
/ / /
例如http:// localhost / polls / add 。 也可以在操作之后传递一个额外的ID参数,我们将使用该参数访问各个民意调查。
Our controller will have to know how to display three types of pages:
我们的控制器将必须知道如何显示三种类型的页面:
- Main page with all the polls listed 主页上列出了所有民意调查
- A single poll page where we can see current results and cast a vote 一个投票页面,我们可以在其中查看当前结果并进行投票
- A form to add a new poll 用于添加新民意测验的表格
Each page must have an action defined for it inside the controller and we will need a HTML template for every page too. So, a simple Controller that just displays the templates would look like this:
每个页面都必须在控制器内为其定义一个动作,我们也需要为每个页面提供一个HTML模板。 因此,一个仅显示模板的简单Controller如下所示:
<?php
class Polls_Controller extends Controller
{
    public function action_index() {
        // This is how we load up a template
        $view = View::get('index');
        $this->response->body = $view->render();
    }

    public function action_poll() {
        $view = View::get('poll');
        $this->response->body = $view->render();
    }

    public function action_add() {
        $view = View::get('add');
        $this->response->body = $view->render();
    }
}
A big issue with this setup is that there would be a lot of code repeated inside the templates because every page needs a header and footer. The solution is to create one general template and then include subtemplates inside it. We can do this using the before() and after() methods defined inside the controller and they will execute respectively before and after an action is called. Now our controller will look like this (save the following as application/classes/controller/polls.php):
此设置的一个大问题是,模板中将重复很多代码,因为每个页面都需要页眉和页脚。 解决方案是创建一个通用模板,然后在其中包含子模板。 我们可以使用在控制器内定义的before()和after()方法来执行此操作,它们将分别在调用动作之前和之后执行。 现在我们的控制器将如下所示(将以下内容保存为application/classes/controller/polls.php ):
<?php
class Polls_Controller extends Controller
{
    protected $view;

    public function before() {
        // We load up the main view and
        $this->view = View::get('main');

        // Now we find a full path to a view that has
        // the same names as the action to be excuted
        $template = Misc::find_file('views', $this->request->param('action'));

        // We pass the view we located to our main template.
        // All properties assigned to a view will be available
        // as variables inside the template
        $this->view->template = $template;
    }

    public function after() {
        // After an action completes we render the view
        $this->response->body = $this->view->render();
   }

   public function action_index(){
        $view = View::get('index');
        $this->response->body = $view->render();
    }

    public function action_poll() {
        $view = View::get('poll');
        $this->response->body = $view->render();
    }

    public function action_add() {
        $view = View::get('add');
        $this->response->body = $view->render();
    }
}
We can pass any variables we like to the view just by assigning them as properties. Now before we add any more code to the controller, let’s take a look at the views themselves.
只需将它们分配为属性,就可以将我们喜欢的任何变量传递给视图。 现在,在向控制器添加更多代码之前,让我们看一下视图本身。
使用视图HTML布局 (HTML Layouts Using Views)
Views are basically HTML files with inserted PHP code to display the values assigned to place-holder variables from inside the controller. Our main view is quite small as all it has to do is present some common HTML and include a correct subtemplate. The following is application/views/main.php:
视图基本上是带有插入PHP代码HTML文件,以显示从控制器内部分配给占位符变量的值。 我们的主要视图很小,因为它所要做的只是呈现一些常见HTML并包括正确的子模板。 以下是application/views/main.php :
<!DOCTYPE html>
<html>
 <head>
  <title>PHPixie polls</title>
  <link href="https://netdna.bootstrapcdn.com/twitter-bootstrap/2.2.2/css/bootstrap-combined.min.css" rel="stylesheet">
  <link href="/style.css" rel="stylesheet">
  <script src="https://ajax.googleapis.com/ajax/libs/jquery/1.9.0/jquery.min.js"></script>
 </head>
 <body>
  <div class="container">
   <div class="span4"></div>
   <div class="span4">
    <h2>PHPixie Polls</h2>
    <!-- Here is where we include a subtemplate -->
<?php include($template);?>
   </div>
   <div class="span4"></div>
  </div>
 </body>
</html>
We’ll use Bootstrap as a base for our page styles so we don’t have to concentrate too much on the design. The only modifications we need to make to the CSS are in the web/style.css file.
我们将以Bootstrap作为页面样式的基础,因此我们不必在设计上投入太多精力。 我们需要对CSS进行的唯一修改是在web/style.css文件中。
.nav .muted {
    float: right;
}

td form {
    margin-bottom: 0px;
}

.filled {
    background: #08C;
    height: 20px;
}

.bar {
    width: 100px;
}
Now we can create the individual pages.
现在我们可以创建各个页面。
创建单个页面 (Creating Individual Pages)
The polls page should just present a list of available polls. It only requires a slight modification to controller/polls.php.
民意调查页面应仅显示可用民意调查列表。 它只需要对controller/polls.php进行一点修改。
<?php
//...
public function action_index() {
    // We pass all stored polls to the view
    $this->view->polls = ORM::factory('poll')->find_all();
}
The view will for the page will be a simple list with a link to the poll creation page. The following is code for views/index.php:
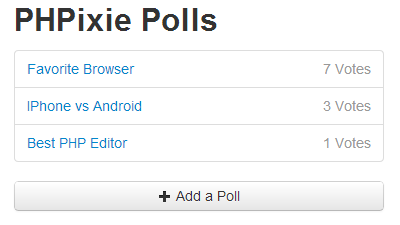
该页面的视图将是一个简单列表,其中包含指向民意调查创建页面的链接。 以下是views/index.php代码:
<ul class="nav nav-tabs nav-stacked">
<?php
foreach($polls as $poll) {
?>
 <li>
  <!-- This is how a link to a single poll will look like -->
  <a href="/polls/poll/<?=$poll->id;?>"><?=$poll->topic;?>
   <div class="muted"><?=$poll->total_votes; ?> Votes</div>
  </a>
 </li>
<?php
}
?>
</ul>
<a class="btn btn-block" href="/polls/add"><i class="icon-plus"></i> Add a Poll</a>
If we were to add some data to the database at this point we would see the following when accessing http://localhost/polls/index (index can be omitted from the URL as it is the default action):
如果此时要向数据库中添加一些数据,则在访问http:// localhost / polls / index时会看到以下内容(可以从URL中省略index ,因为这是默认操作):
Creating polls requires a bit more work. We have to check if the form was submitted, if so we save a poll and redirect the user back to the listing, otherwise we display the form. Add the following update to controller/polls.php:
创建民意调查需要更多的工作。 我们必须检查表单是否已提交,如果保存,则保存民意调查并将用户重定向回列表,否则我们将显示表单。 将以下更新添加到controller/polls.php :
<?php
//...
public function action_add() {
    // We only need to perform this if the form was submitted
    if ($this->request->method == 'POST') {

        // Creating a new poll
        $poll = ORM::factory('poll');

        // This is how you access POST form data
        $poll->topic = $this->request->post('topic');

        // Save the poll to the database
        $poll->save();

        // Similarly we create and save options specified for this poll
        foreach($this->request->post('options') as $name) {
            if (empty($name)) {
                continue;
            }
            $option = ORM::factory('option');
            $option->name = $name;
            $option->save();

            // We add each option to the 'options' relation we defined for the poll
            $poll->add('options', $option);
        }

        // This will prevent after() from executing
        // we need to do this because there is no point of returning any data
        // if we redirect the user
        $this->execute=false;
        $this->response->redirect('/polls/');
        return;
    }

    // If the form was not submitted the after() method will
    // take care of showing the creation form
}
There is nothing special about the template for poll creation. Use the following to create views/add.php:
创建民意测验的模板没有什么特别的。 使用以下命令创建views/add.php :
<script>
$(function() {
$('#addOption').click(function(evt) {
evt.preventDefault();
var newOption = $('.option:eq(0)').clone();
newOption.find('input').val('').attr('placeholder', 'Option #'+($('.option').length + 1));
$('#options').append(newOption);
})
})
</script>
<form method="POST">
<fieldset>
<legend>Add a new poll</legend>
<label>Topic</label>
<input type="text" placeholder="Type your topic here..." name="topic">
<label>Options</label>
<div id="options">
<div class="option">
<input type="text" name="options[]" placeholder="Option #1">
</div>
<div class="option">
<input type="text" name="options[]" placeholder="Option #2">
</div>
<div class="option">
<input type="text" name="options[]" placeholder="Option #3">
</div>
</div>
<button class="btn" id="addOption"><i class="icon-plus"></i> Add option</button>
<button class="btn btn-primary"><i class="icon-ok icon-white"></i> Save poll</button>
</fieldset>
</form>
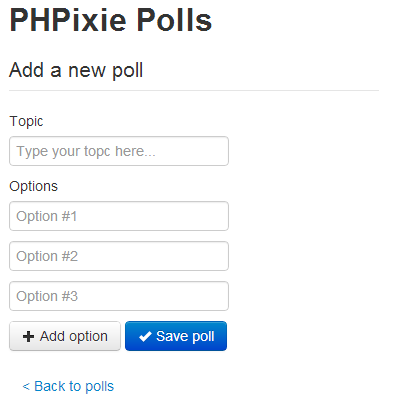
<a class="btn btn-link" href="/polls">< Back to polls</a>Note that we specified the name for the option text input like options[], this way it will be passed as array of options to PHP. We also added a convenient Add Option button to add additional rows. The result should look as follows:
请注意,我们为选项文本输入指定了名称,例如options[] ,这样会将其作为选项数组传递给PHP。 我们还添加了一个方便的“添加选项”按钮来添加其他行。 结果应如下所示:
I hope at this point you can already predict some of the code you will see here. This controller has to fetch the poll specified by the ID in the URL, and it should also handle users voting for an option. Again, make the following updates to controller/polls.php:
我希望到现在为止,您已经可以预测这里将看到的一些代码。 该控制器必须获取URL中ID所指定的民意调查,并且还应处理对选项进行投票的用户。 再次,对controller/polls.php进行以下更新:
<?php
//...
public function action_poll() {

    // Handle voting
    if ($this->request->method == 'POST') {

        // If an option is was supplied via POST we increment
        // its votes field by 1
        $option_id = $this->request->post('option');
        $option = ORM::factory('option')->where('id', $option_id)->find();
        $option->votes += 1;
        $option->save();

        // Now we redirect the user back to current polls' page
        // This is done so that refreshing a browser window will not
        // produce multiple votes
        $this->response->redirect('/polls/poll/' . $option->poll->id);
        $this->execute = false;
        return;
    }

    // You can get the url id parameter using param()
    $id = $this->request->param('id');
    $this->view->poll = ORM::factory('poll')->where('id', $id)->find();
}
The find() method acts just like find_all() but it returns only the first result. Inside the view we want to draw bars that would depict the relative amount of votes, and this is why we added that percent property to the options model earlier. The following code is for views/poll.php:
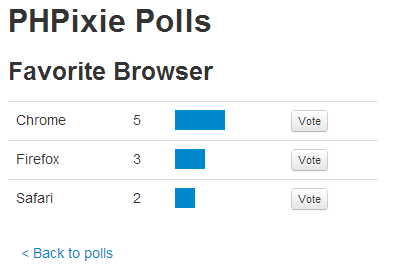
find()方法的行为与find_all()相似,但它仅返回第一个结果。 在视图内部,我们想绘制一些条形图来描述相对票数,这就是为什么我们将百分比属性添加到选项模型中的原因。 以下代码用于views/poll.php :
<h3><?=$poll->topic;?></h3>
<table class="table">
<?php
foreach ($poll->options->find_all() as $option) {
?>
<tr>
<td><?=$option->name;?></td>
<td><?=$option->votes;?></td>
<td class="bar">
<div class="filled" style="width:<?=$option->percent;?>%;"></div>
</td>
<td>
<form method="POST">
<input type="hidden" name="option" value="<?=$option->id;?>">
<button class="btn btn-mini">Vote</button>
</form>
</td>
</tr>
<?php
}
?>
</table>
<a class="btn btn-link" href="/polls">< Back to polls</a>And this is how it will look like:
这就是它的样子:
差不多完成了 (Almost Done)
Before we declare our application complete we still need to make sure it is available by visiting http://localhost/. To do this, we have to change the default controller in the application/config/core.php configuration file from ‘home’ to ‘polls’ like this:
在声明应用程序完整之前,我们仍然需要通过访问http:// localhost /来确保其可用。 为此,我们必须将application/config/core.php配置文件中的默认控制器从“ home”更改为“ polls”,如下所示:
<?php
return array(
    'routes' => array(
        array('default', '(/<controller>(/<action>(/<id>)))', array(
            'controller' => 'polls',
            'action' => 'index'
            )
        )
    ),
    'modules' => array('database', 'orm')
);
Now we have a fully functional poll application as well as a grasp on how PHPixie handles things and how easy it is to develop with it. If you’d like to download the code for this article to explore, you can find it on GitHub.
现在,我们有了功能齐全的民意测验应用程序,并且掌握了PHPixie如何处理事物以及使用它进行开发的难易程度。 如果您想下载本文的代码进行探索,可以在GitHub上找到它。
There is still a lot to learn though. Things like custom routes and complex ORM relationship can help you tailor your project even more. Learn more about them by visiting the PHPixie website.
虽然还有很多东西要学习。 诸如定制路线和复杂的ORM关系之类的东西可以帮助您进一步定制项目。 通过访问PHPixie网站了解有关它们的更多信息。
Image via Fotolia
图片来自Fotolia


 286
286

 被折叠的 条评论
为什么被折叠?
被折叠的 条评论
为什么被折叠?
 到【灌水乐园】发言


