


Everyone’s Twittering! In this series of articles, we’ll investigate how to build an attractive, functional Flash front end for Twitter, using the new beta version of Adobe’s Flash Builder 4, Flash Catalyst Beta, and PHP. We’ll start with basic functionality, and later parts will deal with sharing images with your friends.
大家都在推特! 在本系列文章中,我们将研究如何使用Adobe的Flash Builder 4,Flash Catalyst Beta和PHP的新Beta版为Twitter构建具有吸引力的功能性Flash前端。 我们将从基本功能开始,以后的部分将处理与您的朋友共享图像。
To follow along with this series, you’ll need:
要遵循此系列,您需要:
the code archive for this article: download it here
本文的代码档案: 在此处下载
- Photoshop or Illustrator, if you want to create your own design Photoshop或Illustrator,如果要创建自己的设计
Flash Catalyst beta, available from Adobe Labs
Flash Catalyst beta, 可从Adobe Labs获得
Flash Builder, also available from Adobe Labs
Flash Builder,也可以从Adobe Labs获得
the phptwitterlib library, available from its project page on GitHub
phptwitterlib库, 可从GitHub上的项目页面获得
a web host where you can use PHP, configured with support for curl (curl is required for phptwitterlib’s API calls)
一个可以使用PHP的Web主机,配置了对curl的支持(phptwitterlib的API调用需要curl)
In this article we’ll assume that you’ve already spent some time in Flash Catalyst, and become familiar with how it works – the techniques we’ll be using in this article are covered in Flash Catalyst: Mockup to Masterpiece, Part I and Part II.
在本文中,我们假定您已经花了一些时间在Flash Catalyst中,并且已经熟悉了它的工作原理– Flash Catalyst:第一篇为Mockup to Masterpiece编写了本文将使用的技术。 第二部分
Note: A huge thanks to SitePoint’s Raena Jackson Armitage for her help with writing the PHP parts of this tutorial.
注意:非常感谢SitePoint的Raena Jackson Armitage在编写本教程PHP部分方面的帮助。
转换界面 (Converting the Interface)
We’ve asked a designer to create the application’s interface for us, which we received as a PSD. Here’s how it turned out:
我们已经要求设计师为我们创建应用程序的界面,该界面以PSD的形式收到。 结果是这样的:

Our mockup (View larger image in a new window.)
我们的模型( 在新窗口中查看大图。 )
You’ll find this file in the code archive, in the folder called PSD.
您可以在代码档案库的 PSD文件夹中找到此文件。
The quickest way to convert a design like this into a Flex project is by using Flash Catalyst. Catalyst is Adobe’s new interaction design tool that’s been recently released as a public beta. The interface for our application was created for us by our designer in Photoshop, imported into Flash Catalyst, and converted into a Flex project. Flash Catalyst preserves most of the elements in the original Photoshop file so that it can be reopened in Photoshop for later adjustment.
将这样的设计转换为Flex项目的最快方法是使用Flash Catalyst。 Catalyst是Adobe的新交互设计工具,最近已作为公共Beta发布。 应用程序的界面是由我们的设计师在Photoshop中为我们创建的,导入到Flash Catalyst中,然后转换为Flex项目。 Flash Catalyst保留了原始Photoshop文件中的大多数元素,因此可以在Photoshop中重新打开它以便以后进行调整。
While Catalyst is stable enough to be used, it’s important to remember that it is beta software and its feature set is incomplete; that’s why it’s best to do most of the design work in Illustrator or Photoshop, where you have the most appropriate tools.
尽管Catalyst足够稳定,可以使用,但重要的是要记住它是Beta版软件,并且功能集不完整。 因此,最好在拥有最合适工具的Illustrator或Photoshop中进行大多数设计工作。
The interface for our Twitter application is simple: its main components are a scrolling list of Twitter posts and a text input field within a form to submit user posts.
我们的Twitter应用程序的界面很简单:其主要组件是Twitter帖子的滚动列表以及表单中用于提交用户帖子的文本输入字段。
We’ll convert the scrollbar design into a vertical scrollbar component using the Convert Artwork to Component tool in Catalyst. I found that Catalyst had a little trouble with the arrows, so I had to tweak its design so that the up and down buttons sat outside of the scrollbar’s track. That’s easy enough to do; simply grab the arrows and move them out.
我们将使用Catalyst中的“ 将图稿转换为组件”工具将滚动条设计转换为垂直滚动条组件。 我发现Catalyst的箭头有点麻烦,因此我不得不调整其设计,使上下按钮位于滚动条的轨道之外。 这很容易做到; 只需抓住箭头并将其移出即可。
Next, we’ll address the list of tweets – we’ll delete all but the first of the tweets, since Catalyst only needs one to determine what every row should look like. Then, select the first row in the data list design plus the vertical scrollbar, and convert these into a Data List component. At the bottom of the design, we’ll turn the form elements into Text Input and Button components.
接下来,我们将处理推文列表–我们将删除除第一个推文之外的所有推文,因为Catalyst仅需要一个即可确定每行的外观。 然后,选择数据列表设计中的第一行以及垂直滚动条,然后将它们转换为“数据列表”组件。 在设计的底部,我们将表单元素转换为Text Input和Button组件。
There’s a missing element in our design, however: we need to create a state for the login screen. To do this, we’ll duplicate the whole design for the UI and remove the list of tweets and posting form, and replace these with a login form. It’s easy enough to draw these using Catalyst’s tools. The two states should have names so that it’s easy to tell them apart later in code; I’ve called mine twitterLogin and twitterDisplay.
但是,我们的设计中缺少一个元素:我们需要为登录屏幕创建一个状态。 为此,我们将复制UI的整个设计,并删除tweet和发布表单的列表,并将其替换为登录表单。 使用Catalyst的工具绘制这些图形非常容易。 这两个州应有名称,以便在稍后的代码中轻松区分它们。 我称我的twitterLogin和twitterDisplay 。
We can define how Flash displays the change between the two states by adding animation to the timeline. Let’s add a cross-fade effect after the user has submitted the login form. We can do this in the Timeline area, located below the design canvas.
我们可以通过在时间轴上添加动画来定义Flash如何显示两种状态之间的变化。 让我们在用户提交登录表单后添加淡入淡出效果。 我们可以在设计画布下方的“ 时间轴”区域中执行此操作。
That’s all we need to do in Catalyst. Save your Catalyst work as a Flex project, and make yourself a cup of tea. Our version of the freshly converted file is in your code archive, named cheepcheep_flashbuilder.fxp.
这就是我们在Catalyst中需要做的所有事情。 将Catalyst的工作另存为Flex项目,并让自己喝杯茶。 新版本的新转换文件位于您的代码归档中,名为cheepcheep_flashbuilder.fxp。
The next part is to prepare our PHP proxy.
下一部分是准备我们PHP代理。
构建一个PHP代理 (Building a PHP Proxy)
Our Twitter tool needs to be able to communicate with Twitter in order to send and receive tweets. However, the Flash Player’s security model prevents a Flash file from accessing data from another domain; that is, a Flash movie hosted on a page at www.example.com is unable to retrieve data from www.example.net – unless permission is explicitly granted by that domain with a file called a cross-domain policy file. You can read more about the cross-domain policy file at Adobe here.
我们的Twitter工具需要能够与Twitter通信才能发送和接收推文。 但是,Flash Player的安全模型阻止Flash文件访问另一个域中的数据。 也就是说,托管在www.example.com页面上的Flash电影无法从www.example.net检索数据- 除非该域通过名为跨域策略文件的文件明确授予许可。 您可以在此处阅读有关跨域策略文件的更多信息。
Looking at Twitter’s cross-domain policy file, we can see that it will only accept calls from Flash movies hosted at twitter.com:
查看Twitter的跨域策略文件 ,我们可以看到它仅接受来自twitter.com上托管的Flash电影的呼叫:
<?xml version="1.0" encoding="UTF-8"?>
<cross-domain-policy
  xsi:noNamespaceSchemaLocation="http://www.adobe.com/xml/schemas/PolicyFile.xsd">
  <allow-access-from domain="twitter.com"/>
  <allow-access-from domain="api.twitter.com"/>
  <allow-access-from domain="search.twitter.com"/>
  <allow-access-from domain="static.twitter.com"/>
  <site-control permitted-cross-domain-policies="master-only"/>
  <allow-http-request-headers-from
     domain="*.twitter.com" headers="*" secure="true"/>
</cross-domain-policy>
That means any Flash movies hosted elsewhere – such as our site – are unable to retrieve data.
这意味着托管在其他地方(例如我们的网站)的任何Flash电影都无法检索数据。
Instead, we’ll create a PHP-based proxy to run on our own server. We’ll set it up to accept POST requests from the Flash movie, send them on to Twitter, and then pass Twitter’s response back to the Flash movie.
相反,我们将创建一个基于PHP的代理以在我们自己的服务器上运行。 我们将其设置为接受来自Flash电影的POST请求,将其发送到Twitter,然后将Twitter的响应传递回Flash电影。
We could write an entire Twitter API suite, but why reinvent the wheel? Twitter’s API Wiki helpfully lists a number of pre-built libraries we can use. In this example, we’ll include the twitterlibphp library to form the basis of our proxy. The class inside it, Twitter, contains functions for every conceivable Twitter action, such as updating your location or following new people – for a full list of Twitter’s API methods, see the API documentation on Twitter’s API wiki. Our app is fairly simple for now, but we’d like to make sure we have the ability to grow in the future, so twitterlibphp is a good choice.
我们可以编写一个完整的Twitter API套件,但是为什么要重新发明轮子呢? Twitter的API Wiki有助于列出我们可以使用的许多预构建库。 在此示例中,我们将包括twitterlibphp库以构成我们的代理的基础。 Twitter的类Twitter包含所有可能的Twitter操作的功能,例如更新位置或关注新朋友-有关Twitter API方法的完整列表,请参阅Twitter API Wiki上的API文档。 目前,我们的应用程序还很简单,但是我们想确保我们将来有增长的能力,因此twitterlibphp是一个不错的选择。
First, then, we need to include the twitterlibphp library within our script:
首先,然后,我们需要在脚本中包含twitterlibphp库:
require("twitter.lib.php");At the moment, the Flash movie only sends updates and retrieves the user’s friends’ timeline, so we can expect to receive a username, a password, and possibly a message. There’s a fourth variable that we’d like to receive from the Flash app, which will define the type of action we want to perform.
目前,Flash电影仅发送更新并检索用户朋友的时间轴,因此我们可以期望收到用户名,密码以及可能的消息。 我们要从Flash应用程序中接收第四个变量,该变量将定义我们要执行的操作的类型。
Since we’ll be expecting the Flash movie to use POST to send us the data we need, we may wind up receiving some unwanted backslashes (); this can occur when magic_quotes_gpc is configured in your copy of PHP. Magic quotes are now deprecated in PHP, but there are still plenty of web hosts out there with them switched on, so it’s always worth checking for this configuration when you accept POST submissions. Here’s a simple function to strip slashes in case magic quotes are enabled:
由于我们希望Flash电影使用POST向我们发送所需的数据,因此我们可能会收到一些不需要的反斜杠(); 在PHP副本中配置magic_quotes_gpc时, magic_quotes_gpc会发生这种情况。 如今,PHP中已不再使用魔术引号,但仍然有许多Web主机处于启用状态,因此当您接受POST提交时,始终值得检查此配置。 这是一个简单的函数,用于在启用魔术引号的情况下去除斜杠:
function tidyslashes($text) {
  if (get_magic_quotes_gpc()) {
    $cleantext = stripslashes($text);
  }
  else {
    $cleantext = $text;
  }
  return $cleantext;
}
We’ll use that function to clean up the tweet-related variables we expect to receive, which are declared as global variables:
我们将使用该函数清除我们希望接收的与tweet相关的变量,这些变量被声明为全局变量:
$username = tidyslashes($_POST['username']);
$password = tidyslashes($_POST['password']);
$message = tidyslashes($_POST['message']);
We’ll also need three functions – one to update, one to retrieve tweets from the user’s friends, and one to view the public timeline. Each function is fairly similar; we’ll just take a look at one for now. Here’s the update function:
我们还需要三个功能-一个用于更新,一个用于从用户朋友那里检索推文,另一个用于查看公共时间轴。 每个功能都非常相似。 我们现在只看一个。 这是update功能:
function update() {
  global $username, $password, $message;
  $twitter = new Twitter($username, $password);
  $update = $twitter->updateStatus($message);
  print_r($update);
}
What’s happening here? First, we grab the username, password, and message variables. Next, we specify a new instance of the Twitter class from twitterlibphp, passing the username and password along. Third, we specify the variable update as the result of the Twitter class’ updateStatus function, and simply print the result, which will be in XML format.
这里发生了什么事? 首先,我们获取username , password和message变量。 接下来,我们从twitterlibphp指定一个Twitter类的新实例,并传递用户名和密码。 第三,我们将变量update指定为Twitter类的updateStatus函数的result ,并仅打印XML格式的结果。
Additionally, we’ll have received a variable, named type, from the Flash movie to tell us which action we want to perform. We’ll use a switch statement to execute the appropriate function. If type was not specified, or says anything other than update, friends, or public, the script will die with a message:
此外,我们将从Flash电影中收到一个名为type的变量,以告诉我们要执行的操作。 我们将使用switch语句执行适当的功能。 如果未指定type,或者未指定update , friends或public ,则脚本将死并显示一条消息:
switch($_POST['type']) {
  case 'update':
     update();
     break;
  case 'public':
     getpublictimeline();
     break;
  case 'friends':
     getfriends();
     break;
  default:
     die("died: not called properly");
     break;
}
You can view the script in full here, and there’s a copy in the code archive too.
您可以在此处完整查看脚本,并且代码档案中也有一个副本。
Copy the completed script, along with twitter.lib.php to a web server, and note the URL for later – we’ll need to tell our Flash application where this lives. If you downloaded our version of the script, you’ll find a very basic form you can use to test the updates function of your proxy. If all went well, you should be able to post to a Twitter account using that form!
将完成的脚本以及twitter.lib.php一起复制到Web服务器,并记下URL,以备以后使用-我们需要告诉Flash应用程序将其保存在哪里。 如果您下载了该脚本的版本,则会发现一个非常基本的表格,可用于测试代理的更新功能。 如果一切顺利,您应该可以使用该表格发布到Twitter帐户!
If your web server is not running locally, your next step is to include a cross-domain policy file on your web server, so that it’s easier to run the app later. Here’s a permissive example policy file that will permit access from anywhere:
如果您的Web服务器不在本地运行,则下一步是在Web服务器上包括一个跨域策略文件,以便以后运行该应用程序更加容易。 以下是允许的示例策略文件,该文件允许从任何位置进行访问:
<?xml version="1.0"?>
<!DOCTYPE cross-domain-policy
SYSTEM "http://www.macromedia.com/xml/dtds/cross-domain-policy.dtd">
<cross-domain-policy>
  <site-control permitted-cross-domain-policies="all" />
  <allow-access-from domain="*" />
  <allow-http-request-headers-from domain="*" headers="*" secure="false"/>
</cross-domain-policy>
You’ll need to upload that file to the root of your domain, and name it crossdomain.xml.
您需要将该文件上传到您域的根目录,并将其命名为crossdomain.xml。
Now that we’ve prepared this proxy, we can begin to add functionality to our Flash project and start testing.
现在我们已经准备好该代理,我们可以开始向Flash项目添加功能并开始测试。
在Flash Builder中编码应用程序 (Coding the Application in Flash Builder)
From the Flex project in Flash Builder, open Main.mxml from the default package folder in the project’s src directory. This is the root of the application, indicated by the green arrow and blue dot symbols; these mean that the root element of this file contains an Application tag, and that the compiler will treat this as the root file of the project.
在Flash Builder的Flex项目中,从项目src目录中的默认包文件夹中打开Main.mxml 。 这是应用程序的根,由绿色箭头和蓝色圆点符号表示; 这意味着该文件的根元素包含一个Application标记,并且编译器会将其视为项目的根文件。
Towards the bottom of this code you’ll see a List tag – this is the data list that you created in Flash Catalyst. For now, it contains dummy data inserted by Catalyst inside an ArrayCollection, which we’ll need to tweak. Look at each of these rows of data and you’ll see that there are values for each of the images used. Only one of these will be dynamic later on, which is the profile picture for Twitter users. The others are part of the interface, and will be static.
在此代码的底部,您将看到一个List标记-这是您在Flash Catalyst中创建的数据列表。 目前,它包含Catalyst在ArrayCollection插入的伪数据,我们需要对其进行调整。 查看这些数据的每一行,您将看到所使用的每个图像都有值。 这些中只有其中之一稍后将是动态的,这是Twitter用户的个人资料图片。 其他是接口的一部分,并且将是静态的。
Open the components folder, and you’ll see that one of the components that it contains is called RepeatedItem1.mxml – in that file you’ll find a number of BitmapImage tags towards the bottom of the code. Switching between this and Main.mxml, copy and paste the image location values for image2, image3, image4, and image5 from the first row of the repeated list data respectively, overwriting the source attribute for the first four BitmapImage tags.
打开components文件夹,您将看到其中包含的一个组件称为RepeatedItem1.mxml –在该文件中,您将在代码底部找到许多BitmapImage标记。 在this和Main.mxml之间切换, image5从重复列表数据的第一行复制并粘贴image2 , image3 , image4和image5的图像位置值,覆盖前四个BitmapImage标签的source属性。

Replacing BitmapImages (View larger image in a new window.)
替换BitmapImages( 在新窗口中查看大图。 )
Next, we need to modify the custom component containing the login form elements. Locate and open CustomComponent1.mxml from the components directory, and look for the richtext1 RichText component. This is the login error message that we’ll display, so here, we need to set the visible property of this component to false – it can be switched on when there’s an unsuccessful login attempt.
接下来,我们需要修改包含登录表单元素的自定义组件。 从组件目录中找到并打开CustomComponent1.mxml ,然后查找richtext1 RichText组件。 这是我们将显示的登录错误消息,因此,在这里,我们需要将此组件的visible属性设置为false –如果登录尝试失败,则可以将其打开。
We’d also like to ensure that the password field behaves as expected, displaying asterisks instead of characters, so we’ll add an attribute to that field. Look for the textinput0 TextInput component; we’ll add a displayAsPassword attribute with a value of true. The Script block at the top of this component’s code was placed there by Catalyst to switch to the list state when the user logs in. Right now this is called as soon as the user clicks on the Log In button. However, we only want to show that state if the user’s login was correct, so we’ll need to alter the code here.
我们还要确保密码字段的行为符合预期,显示星号而不是字符,因此我们将向该字段添加属性。 寻找textinput0 TextInput组件; 我们将添加一个值为true的displayAsPassword属性。 当用户登录时,Catalyst将该组件代码顶部的Script块放置在此处,以切换到列表状态。现在,只要用户单击“ 登录”按钮,就会调用此状态。 但是,我们只想在用户登录正确的情况下显示该状态,因此我们需要在此处更改代码。
The function in the Script block uses a call to the path mx.core.FlexGlobals.topLevelApplication to refer to Main.mxml. The remainder of that code changes the visual state of the application to the one called twitterDisplay – that’s the state with our list of tweets. Instead of switching states here, we’re going to do that in another part of the application. We’ll use the path to set the value of variables in that file to the user login and password details when they’re entered into the form; then call a function to fetch the user’s friends’ timeline data from Twitter via our PHP proxy. We’ll do that by adding the following lines to the existing function:
Script块中的函数使用对路径mx.core.FlexGlobals.topLevelApplication的调用来引用Main.mxml 。 该代码的其余部分将应用程序的可视状态更改为一种称为twitterDisplay的状态-这就是我们的推文列表的状态。 而不是在这里切换状态,我们将在应用程序的另一部分中执行此操作。 我们将使用该路径将文件中变量的值设置为在表单中输入用户登录名和密码的详细信息; 然后调用一个函数,以通过我们PHP代理从Twitter获取用户朋友的时间轴数据。 我们将通过在现有函数中添加以下几行来做到这一点:
mx.core.FlexGlobals.topLevelApplication.userLogin=textinput4.text; mx.core.FlexGlobals.topLevelApplication.userPassword=textinput0.text; mx.core.FlexGlobals.topLevelApplication.fetchFriendsTimeline();
mx.core.FlexGlobals.topLevelApplication.userLogin=textinput4.text; mx.core.FlexGlobals.topLevelApplication.userPassword=textinput0.text; mx.core.FlexGlobals.topLevelApplication.fetchFriendsTimeline();
The first two take the text values of the two input fields in the form and set the values to variables in Main.mxml, while the third line calls a function we’ll write to call the PHP proxy. Switch back to Main.mxml, where we’ll add a Script block to the top of the code:
前两个采用表单中两个输入字段的文本值,并将值设置为Main.mxml中的变量,而第三行调用我们编写的函数来调用PHP代理。 切换回Main.mxml ,我们将在代码顶部添加一个Script块:
<fx:Script> <![CDATA[ ]]> </fx:Script>
<fx:Script> <![CDATA[ ]]> </fx:Script>
The CDATA comments are necessary so that the compiler knows that the contents of the script block should not be evaluated as XML. Inside those tags we’ll create an ArrayCollection to store the data returned from the PHP proxy and populate the data list. We’ve added the Bindable compiler directive so that these three variables will broadcast any changes to their values during the operation of the application. We’ll also add another variable, twitterCallType, to use later as a switch for processing Twitter results within a function:
CDATA注释是必需的,以便编译器知道不应将脚本块的内容评估为XML。 在这些标记内,我们将创建一个ArrayCollection来存储从PHP代理返回的数据并填充数据列表。 我们添加了Bindable编译器指令,以便这三个变量将在应用程序运行期间广播对其值的任何更改。 我们还将添加另一个变量twitterCallType ,以后用作在函数中处理Twitter结果的开关:
import mx.collections.ArrayCollection;
private var twitterCallType:String;
[Bindable] private var twitterAC:ArrayCollection;
[Bindable] public var userLogin:String;
[Bindable] public var userPassword:String;
We’ll add a dataProvider attribute to the List tag towards the bottom of the code and set it to the ArrayCollection, binding it to that variable by surrounding it with curly braces. By now we’ve removed the ArrayCollection from the list that was created by Catalyst. In this example, we used an XML-style self-closing element – that’s why there’s no closing List tag:
我们将在代码底部的List标记处添加一个dataProvider属性,并将其设置为ArrayCollection ,并用花括号将其绑定到该变量。 到目前为止,我们已经从Catalyst创建的列表中删除了ArrayCollection 。 在此示例中,我们使用了XML样式的自动关闭元素-这就是为什么没有关闭List标签的原因:
<s:List x="99" y="124" skinClass="components.DataList1"
  d:userLabel="Data List"
  visible.twitterLogin="false"
  id="list1" dataProvider="{twitterAC}" />
Next up, we’ll add our call to the PHP proxy.
接下来,我们将调用添加到PHP代理中。
连接到数据服务 (Connecting to Data Services)
We’ll next add a HTTPService tag to call the PHP proxy. First, we create an instance of the tag, define its properties, then call it later from either an event or function as we’ll be doing for our application.
接下来,我们将添加一个HTTPService标记来调用PHP代理。 首先,我们创建标签的实例,定义标签的属性,然后稍后通过事件或函数对其进行调用,就像我们为应用程序所做的那样。
Flex 4 requires service tags to be nested within the new Declarations tag. Our PHP proxy was built to receive calls via the POST method, so we’ll add that attribute to the HTTPService tag along with the URL for the proxy. We name the instance with the id attribute. When you use the result event of the tag to call a function, Flash Builder will prompt with an offer to build a basic function when you add result to the tag. Add the showBusyCursor attribute to the tag, which will tell the user that we’re waiting for a response from the server:
Flex 4要求将服务标签嵌套在新的Declarations标签中。 我们PHP代理旨在通过POST方法接收呼叫,因此我们将该属性以及代理的URL添加到HTTPService标记中。 我们用id属性命名实例。 当您使用标签的result事件调用函数时,将结果添加到标签时,Flash Builder会提示您提供构建基本功能的提示。 将showBusyCursor属性添加到标签中,该属性将告诉用户我们正在等待服务器的响应:
<fx:Declarations>
<mx:HTTPService id="twitterService" method="POST" url="http://localhost/twitterapp/twittery.php" result="httpservice1_resultHandler(event)" showBusyCursor="true"/>
</fx:Declarations>
That fetchFriendsTimeline function called earlier by the login form needs to be built. This function will be defined as public to make it available to other components in the application. Within the function, call the send method of the HTTPService instance, using an object to pass the parameters required by the PHP proxy. Using curly braces, we’ll make a comma-separated list of name/value pairs for each of the parameters.
需要构建登录表单之前调用的fetchFriendsTimeline函数。 该功能将定义为公共功能,以使其可用于应用程序中的其他组件。 在该函数内,使用对象传递PHP代理所需的参数,调用HTTPService实例的send方法。 使用花括号,我们将为每个参数创建一个用逗号分隔的名称/值对列表。
Remember the variables we created in our PHP script? We’ll use those now. In this case, we need to send username and password, which are the details we received from the login form, as well as a type of call: at the moment, this could contain a value of update or friends:
还记得我们在PHP脚本中创建的变量吗? 我们现在将使用它们。 在这种情况下,我们需要发送username和password ,这是我们从登录表单中收到的详细信息,以及一种呼叫type :目前,它可以包含update或friends的值:
public function fetchFriendsTimeline():void {
  twitterService.send({username:userLogin,password:userPassword,type:"friends"});
  twitterCallType = "friends";
}
Results from the Twitter API call are handled by a function created by Flash Builder when we added the result event to the HTTPService tag. This is currently empty, so we need to add logic to that now. Notice that the httpservice1_resulthandler function has an event parameter typed as ResultEvent: an import statement for this class was created when the function was added by Flash Builder. We’ve written conditional logic to test the value of twitterCallType; we’ll process the results of the HTTPService call if its value is friends.
当我们将结果事件添加到HTTPService标记时,Twitter API调用的结果由Flash Builder创建的函数处理。 当前为空,因此我们现在需要为其添加逻辑。 请注意, httpservice1_resulthandler函数的事件参数类型为ResultEvent:Flash Builder添加该函数时,为该类创建了一个导入语句。 我们已经编写了条件逻辑来测试twitterCallType的值; 如果HTTPService调用的值是friends我们将对其进行处理。
调试数据结果 (Debugging the Data Results)
At this stage, the structure of the result to be returned by the PHP proxy call is an unknown, so we’re going to check that out before writing the rest of this function. Here, we’ll set a breakpoint in the code and debug the application. We’ll insert our breakpoint in httpservice1_resulthandler, at the line where we initialize twitterAC:
在此阶段,PHP代理调用返回的结果的结构尚不清楚,因此我们将在编写此函数的其余部分之前先进行检查。 在这里,我们将在代码中设置一个断点并调试应用程序。 我们将在httpservice1_resulthandler中将断点插入到初始化twitterAC的行:
protected function httpservice1_resultHandler(event:ResultEvent):void {
  if (twitterCallType == "friends") {
    twitterAC = new ArrayCollection();
  }
}
Set a breakpoint by double-clicking on the line number next to where we’ve initialized twitterAC and run the application by clicking on the Debug button – it’s the button on the toolbar with an icon resembling a bug.
通过双击我们初始化twitterAC位置旁边的行号来设置断点,然后通过单击“ 调试”按钮运行调试应用程序–这是工具栏上的按钮,带有类似于错误的图标。
Now run the code: if all went well, we should receive a response from Twitter via the PHP proxy, the app will pause at the breakpoint, and Flash Builder will prompt you to switch back to Flash Builder and enter the debug perspective. This is a different set of panels or views that include the Variables view, located as a tab at the top right of Flash Builder. Double-click on the Variables tab to expand it and you’ll see that event is listed there. Expand that, then expand the default result property: in here you’ll see there’s a statuses property that Twitter has returned.
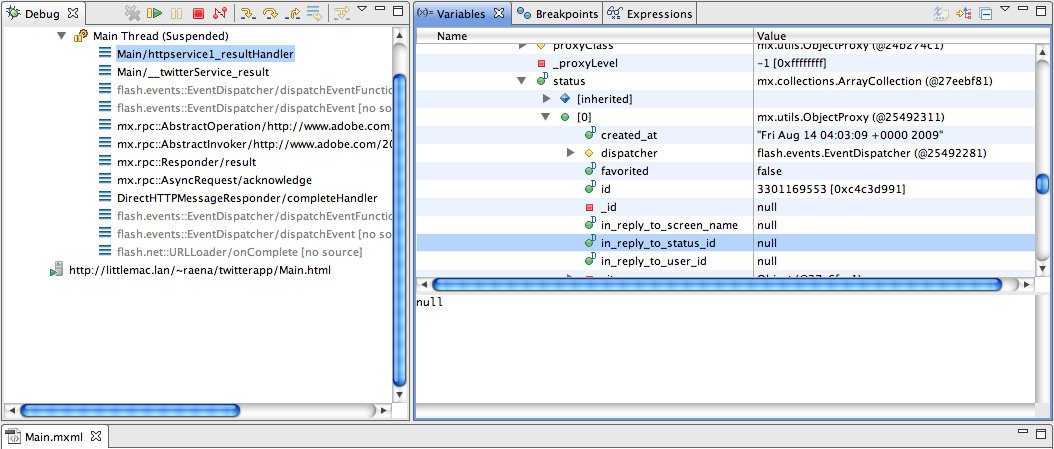
现在运行代码:如果一切顺利,我们将通过PHP代理从Twitter收到响应,该应用程序将在断点处暂停,Flash Builder将提示您切换回Flash Builder并进入调试透视图。 这是一组不同的面板或视图,其中包括“ 变量”视图,位于Flash Builder右上方的选项卡中。 双击“ 变量”选项卡将其展开,您将看到该event在此处列出。 展开该内容,然后展开默认的result属性:在这里,您将看到Twitter返回的statuses属性。

Figure 3: A portion of the debugger perspective (View larger image in a new window.)
图3:调试器透视图的一部分( 在新窗口中查看大图。 )
This was originally an XML response, and the HTTPService tag has automatically interpreted into a native object for you. One of the statuses properties is an ArrayCollection called status, with each item inside representing a Twitter post. Each post includes information about the post itself, with a nested user property containing details about the Twitter user who generated the post.
这最初是XML响应,并且HTTPService标记已自动为您解释为本机对象。 statuss属性之一是一个名为status的ArrayCollection ,其中的每个项目都代表一个Twitter帖子。 每个帖子都包含有关帖子本身的信息,并带有一个嵌套的user属性,其中包含有关生成该帖子的Twitter用户的详细信息。
We’ll be using some of these variables to populate the items in our list of tweets, which has spots for the user’s screen name, real name, the text of the tweet, and the tweet’s date and time. Normally you’ll need to make note of their positions within the structure of the data. We’re looking for variables called name, screenName, profile_image_url, text, and created_at. If you see them, great – it means you’ve successfully retrieved your friends’ timeline from Twitter!
我们将使用其中一些变量来填充我们的tweet列表中的项目,其中包含用户的屏幕名称,真实姓名,tweet的文本以及tweet的日期和时间的位置。 通常,您需要记录它们在数据结构中的位置。 我们正在寻找名为name , screenName , profile_image_url , text和created_at变量。 如果您看到它们,那就太好了–这意味着您已经从Twitter成功检索了朋友的时间表!
Double-click on the Variables tab again to restore Flash Builder to the way that it was. Exit the debug session by clicking on the terminate button, which is a red square (like your DVD remote’s Stop button) at the top of Flash Builder. It’s important to exit Flash Builder debugging sessions whenever you’re finished, otherwise you’ll find your browser locks up.
再次双击“变量”选项卡,将Flash Builder恢复到原来的状态。 通过单击终止按钮(在Flash Builder顶部是一个红色正方形(如DVD遥控器的“停止”按钮))退出调试会话。 完成操作后退出Flash Builder调试会话非常重要,否则您将发现浏览器已锁定。
We also need to debug what will happen if the user enters an incorrect username and password. Start debugging again, and this time, use login details that you know to be wrong. You should see via the Values panel in the debug perspective that the data returned is quite different – unlike the collection of status updates received on a successful login, we can now see an event.result.hash.error property instead.
我们还需要调试如果用户输入错误的用户名和密码会发生什么情况。 再次开始调试,这次,使用您知道错误的登录详细信息。 您应该在调试透视图中的“ 值”面板上看到返回的数据完全不同-与成功登录时收到的状态更新的集合不同,我们现在可以看到event.result.hash.error属性。
We can now exit the debugger. Let’s also remove the breakpoint from Flash Builder by double-clicking on it in the line numbers.
现在我们可以退出调试器。 我们还通过双击行号从Flash Builder中删除该断点。
用结果填充应用程序 (Populating the Application with the Results)
Armed with the knowledge of what Twitter’s response looks like, we’re now going to use this data to populate the twitterAC ArrayCollection that we created earlier. ArrayCollections are a kind of wrapper class that expose an array as a collection of objects that have additional methods and properties. A neat feature of ArrayCollections is that they can be used as data providers for components, and are able to broadcast changes to their contents.
了解了Twitter的响应后,我们现在将使用这些数据来填充我们先前创建的twitterAC ArrayCollection 。 ArrayCollections是一种包装器类,它将数组公开为具有其他方法和属性的对象的集合。 ArrayCollections一个巧妙功能是它们可以用作组件的数据提供程序,并能够广播对其内容的更改。
First, we’ll need to add some logic to the httpservice1_resultHandler function to handle an incorrect Twitter login. We’re going to check if there is an event.result.hash property; if so, we’ll display an error, otherwise, we’ll process the data and display the list. We do this by surrounding all the code in the function with the test if (!event.result.hash), with an else condition to show the error.
首先,我们需要向httpservice1_resultHandler函数添加一些逻辑以处理错误的Twitter登录。 我们将检查是否有一个event.result.hash属性; 如果是这样,我们将显示错误,否则,我们将处理数据并显示列表。 为此,我们通过用if (!event.result.hash)包围函数中的所有代码,并使用else条件显示错误。
Within the first part of the if statement, we nest another test to check the current state. If its value is twitterLogin, we’ll swap the state to twitterDisplay.
在if语句的第一部分中,我们嵌套了另一个测试以检查当前状态。 如果其值为twitterLogin ,则将状态交换为twitterDisplay 。
Next, we loop over the status ArrayCollection nested in the result. With each iteration we create an object from the values we want to use in the data list repeated item, pointing to the values using a mixture of array and dot notation. Each object is then pushed into the twitterAC ArrayCollection using the addItem method.
接下来,我们遍历嵌套在结果中的状态ArrayCollection 。 每次迭代时,我们都会根据要在数据列表重复项中使用的值创建一个对象,并使用数组和点表示法的混合物指向这些值。 然后使用addItem方法将每个对象推送到twitterAC ArrayCollection 。
Let’s see the full function:
让我们看看完整的功能:
protected function httpservice1_resultHandler(event:ResultEvent):void { if ( !event.result.hash ) { if (currentState == "twitterLogin") { currentState = "twitterDisplay"; } if (twitterCallType == "friends") { twitterAC = new ArrayCollection(); var resultsLen:Number = event.result.statuses.status.length; for (var i:Number=0;i<resultsLen;i++) { twitterAC.addItem({userName:event.result.statuses.status[i]. user.name, screenName:event.result.statuses.status[i].user.screen_name, profileImage:event.result.statuses.status[i].user.profile_image_url, tweetText:event.result.statuses.status[i].text, tweetDate:dateFormatter.format(new Date(event.result.statuses.status[i].created_at))}); } } else { fetchFriendsTimeline(); } } else { customcomponent11.richtext1.visible = true; } }
protected function httpservice1_resultHandler(event:ResultEvent):void { if ( !event.result.hash ) { if (currentState == "twitterLogin") { currentState = "twitterDisplay"; } if (twitterCallType == "friends") { twitterAC = new ArrayCollection(); var resultsLen:Number = event.result.statuses.status.length; for (var i:Number=0;i<resultsLen;i++) { twitterAC.addItem({userName:event.result.statuses.status[i]. user.name, screenName:event.result.statuses.status[i].user.screen_name, profileImage:event.result.statuses.status[i].user.profile_image_url, tweetText:event.result.statuses.status[i].text, tweetDate:dateFormatter.format(new Date(event.result.statuses.status[i].created_at))}); } } else { fetchFriendsTimeline(); } } else { customcomponent11.richtext1.visible = true; } }
We’ve used a Flex tag to format the created_at variable that we’ve extracted from the XML file received from Twitter via the PHP proxy. The formatString attribute of the DateFormatter tag allows us to create a date string similar to the one our designer provided in the Photoshop file. Look at the last value in the data object that we’re creating in the httpservice1_resultHandler function and you’ll see the date formatter in action:
我们使用了一个Flex标记来格式化我们通过PHP代理从Twitter接收的XML文件中提取的created_at变量的格式。 使用DateFormatter标记的formatString属性,我们可以创建一个日期字符串,该日期字符串与设计人员在Photoshop文件中提供的日期字符串相似。 查看我们在httpservice1_resultHandler函数中创建的数据对象中的最后一个值,您会看到实际的日期格式化程序:
<mx:DateFormatter id="dateFormatter" formatString="MMM DD YYYY H:NN"/>That date string is case sensitive, so the date and time values must be capital letters.
When you add the
DateFormatter, Flash Builder will add an additional namespace for you into theApplicationtag for the MX tag collection.Displaying the Results
The
twitterAC ArrayCollectionis bound to thedataProviderproperty of the List component. When theArrayCollectionis repopulated, it will broadcast that its values have changed and cause the list to refresh itself. It will then loop over thedataProvider, passing the value from each iteration to theRepeatedItemcomponent. That component will receive the value each time in a default object calleddata. We need to assign the properties ofdatato their respective components for display.Open the
RepeatedItemcomponent again and take a look at the variousRichTextcomponents used to display text; default values were assigned to the text properties of these components using curly braces for binding. We're going to replace those values with the properties of the object that we created each time we looped over the result data in thehttpservice1_resultHandlerfunction.Going through those components, replace the text value
{data.text2}with{data.tweetDate},{data.text3}with{data.userName}({data.screenName}), and{data.text4}with{data.tweetText}.There's a small gotcha with the code Flash Catalyst created for us: the
BitmapImagetags Catalyst added to display images in the repeated item are unable to accept a data binding as a value for its source. The user icon needs to display that dynamic information, so we'll need to change that to anImagetag. Back in RepeatedItem1.mxml, look for the set of images and replace the user iconBitmapImagewith anImage, like so:Updating the User Status
Posting a status to Twitter is quite straightforward. The username and password that we received from the user at the beginning are needed again to call the
updatefunction of the PHP proxy, and this time we'll also need to send the text value from the tweet posting area as the text for our message. To do this, we can reuse theHTTPServicetag that we used to fetch our friends' timeline, callingupdateinstead offriends.Look at the
httpservice1_resultHandlerfunction again and you'll see that this will be caught by anelse, which will callfetchFriendsTimelineagain. The updated friends list will also show our new status:public function postStatus():void {
twitterService.send({username:userLogin,password:userPassword,message:textinput1.text,type:"update"});
twitterCallType = "update";
}Conclusion
So far we've created a simple app that can read and post tweets. Some simple Twitter functionality, like replies and direct messaging are missing for now; we'll cover these later in the series, and then add some nifty image uploading and image manipulation features.
The fact that the application doesn't store username and password locally or securely is probably a good topic for future discussion; we've chosen to skip that for now for brevity's sake, and you may treat this as an exercise for the reader. Your PHP proxy should also, ideally, contain some logic to determine whether the request has actually been received from the Flash movie, and fail if the request comes from elsewhere.
For now, save your work and relax - we'll see you again in Part 2!
Note: Remember to grab the code archive for this article, so you can experiment at home some more.
Feeling confident? Test your knowledge of what you've learned here today in our quiz, sponsored by Adobe.


 22万+
22万+

 被折叠的 条评论
为什么被折叠?
被折叠的 条评论
为什么被折叠?
 到【灌水乐园】发言


