


wordpress插件
In the second part of this series, we prepared simple admin facing functionality for our plugin. We provided the users with an options page where they can tweak the plugin according to their preferences.
在本系列的第二部分中,我们为插件准备了简单的面向管理员功能。 我们为用户提供了一个选项页面,他们可以在其中根据自己的喜好来调整插件。
If you missed part 1 and 2, please find them below:
如果您错过了第1部分和第2部分,请在下面找到它们:
The WordPress Plugin Boilerplate Part 1: Speed up Development Using the WordPress Plugin Boilerplate
The WordPress Plugin Boilerplate Part 2: Developing a WordPress Plugin
For this article, we’re going to implement the public facing functionality of the plugin. This means that we’re going to retrieve the user preferences, determine whether that specific post is outdated or not, and display the notice accordingly on its single post view. Let’s get started!
对于本文,我们将实现该插件的面向公众的功能。 这意味着我们将检索用户首选项,确定该特定帖子是否过时,并在其单个帖子视图上相应地显示通知。 让我们开始吧!
准备主题 (Preparing the Theme)
We need to prepare our theme so that we can test it out later. We are going to use the Twenty Fifteen theme that is shipped by default with WordPress. Rather than populating the posts manually, we are going to use the theme unit test data provided by the Theme Review team to populate the posts.
我们需要准备主题,以便稍后进行测试。 我们将使用WordPress默认随附的二十一十五主题。 与其手动填充帖子,不如使用主题审查团队提供的主题单元测试数据填充帖子。
We need to download the theme-unit-test-data.xml provided on the above Codex page and import it into our WordPress installation. The WordPress built-in import functionality can be found by navigating to Tools > Import from the sidebar.
我们需要下载上述Codex页面上提供的theme-unit-test-data.xml并将其导入到我们的WordPress安装中。 可以通过导航至侧边栏中的工具>导入来找到WordPress内置的导入功能。
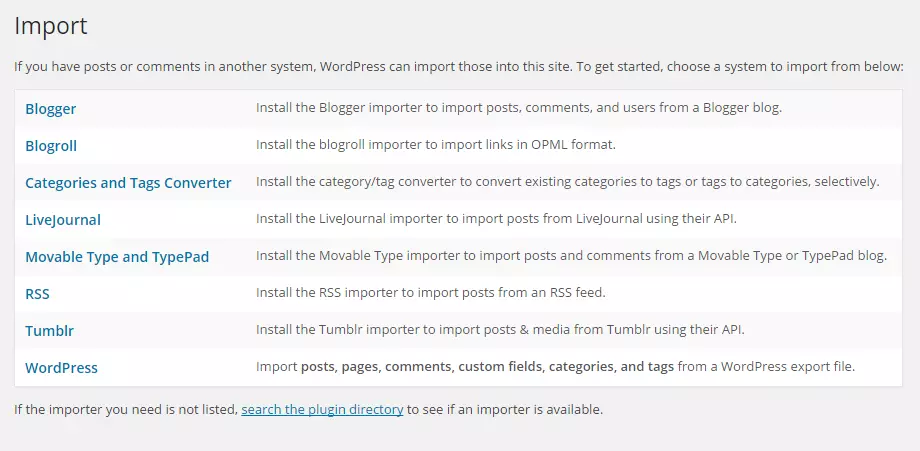
We will be presented with various choices, and since we are importing the WordPress export file, we are going to choose WordPress. Depending on the WordPress installation, a plugin popup will be displayed if we do not have the WordPress Importer plugin installed. Just go ahead and install the plugin first if you do not have it and we will proceed with the actual importing process once it is done.
我们将看到各种各样的选择,并且由于我们正在导入WordPress导出文件,因此我们将选择WordPress。 如果我们没有安装WordPress导入程序插件,则根据WordPress的安装,将显示一个插件弹出窗口。 如果没有插件,请先安装插件,然后完成实际导入过程。
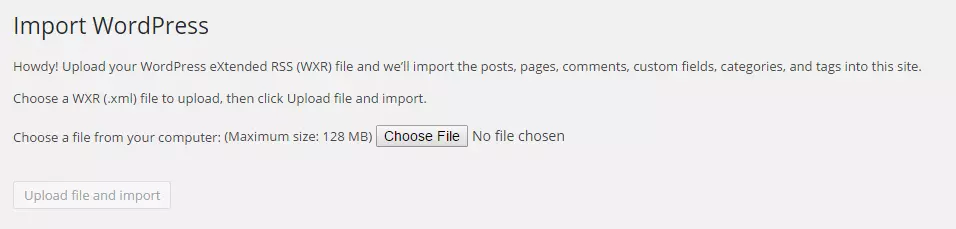
This is the default WordPress import page, so we will need to choose the theme-unit-test-data.xml downloaded previously and click on the “Upload file and import” button.
这是默认的WordPress导入页面,因此我们需要选择以前下载的theme-unit-test-data.xml ,然后单击“上传文件并导入”按钮。
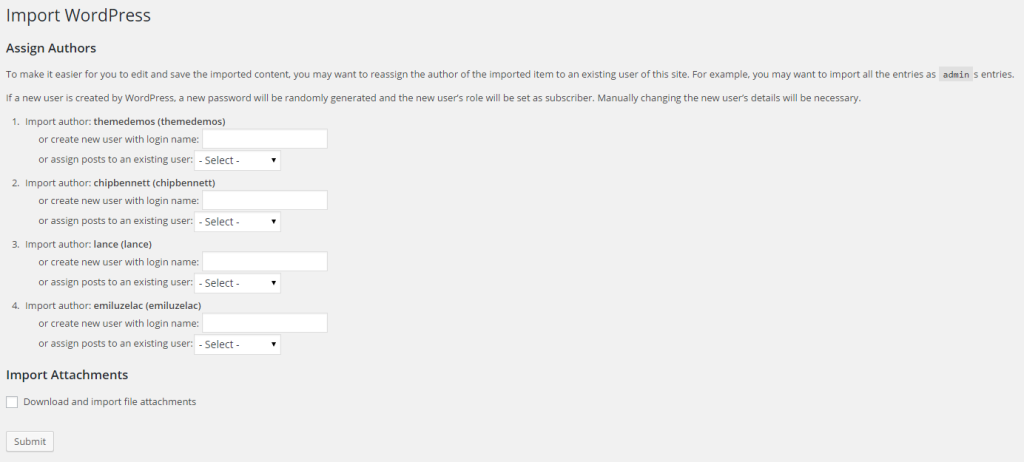
A second screen will then be presented. Don’t worry much about the “Assign Authors” section as we can leave it as default. In the “Import Attachments” section, make sure to tick the checkbox “Download and import file attachments” so that all the external attachments will be downloaded and imported into the media library.
然后将显示第二个屏幕。 不必担心“分配作者”部分,因为我们可以将其保留为默认设置。 在“导入附件”部分中,确保选中“下载并导入文件附件”复选框,以便所有外部附件都将被下载并导入到媒体库中。
Press the “Submit” button and wait until the importing process is done successfully.
按下“提交”按钮,然后等待直到导入过程成功完成。
Now we are ready to write the code that displays our notice.
现在,我们准备编写显示通知的代码。
挂钩the_content过滤器 (Hooking into the_content Filter)
Using the_content filter is the perfect way to alter the content of the posts displayed to the user. As per the previous tutorial, we are going to add the hook to the Boilerplate class loader, with the only difference being that the define_public_hooks method will be used instead of define_admin_hooks.
使用the_content过滤器是更改显示给用户的帖子内容的理想方法。 按照之前的教程,我们将把钩子添加到Boilerplate类加载器中,唯一的区别是将使用define_public_hooks方法而不是define_admin_hooks 。
Add this line of code into the method:
将以下代码行添加到方法中:
$this->loader->add_action( 'the_content', $plugin_public, 'the_content' );This means, we are going to need to implement a public the_content method into our Outdated_Notice_Public class. Open up public/class-outdated-notice-public.php and modify it accordingly.
这意味着,我们将需要在Outdated_Notice_Public类中实现公共的the_content方法。 打开public/class-outdated-notice-public.php并进行相应的修改。
有条件地修改内容 (Conditionally Modifying the Content)
Because the the_content filter is used by various plugins, and the internal WordPress core, we need to be cautious in inserting our custom content into it.
由于the_content过滤器由各种插件和内部WordPress核心使用,因此在向其中插入自定义内容时需要谨慎。
We need to make sure that we are only inserting the outdated notice text whenever a single post is displayed, not on the blog post index. In order to do that, we can filter it by using the is_main_query function. This function is useful whenever we need to determine whether the running query is the main one or a secondary/custom query.
我们需要确保仅在显示单个帖子时才插入过时的通知文本,而不是在博客帖子索引上插入。 为此,我们可以使用is_main_query函数对其进行过滤。 每当我们需要确定正在运行的查询是主要查询还是辅助/自定义查询时,此功能就很有用。
Another thing that we need to consider is that we are only going to display the notice text for a single view of post type post, so is_singular( 'post' ) validation will be perfect for the job.
我们需要考虑的另一件事是,我们将仅显示帖子类型post的单个视图的通知文本,因此is_singular( 'post' )验证将非常适合此工作。
This is the updated the_content method contained inside the Outdated_Notice_Public class.
这是Outdated_Notice_Public类中包含的更新的the_content方法。
public function the_content( $post_content ) {

		if ( is_main_query() && is_singular('post') ) {
			// do something
		}

        return $post_content;
	}
计算天差 (Calculating the Days Difference)
Before we begin, let’s set our position for the notice to appear as “before” the post, and the number of days threshold to 30.
在开始之前,让我们将通知的位置设置为在帖子“之前”显示,并且将天数阈值设置为30。
First, we need to retrieve the stored settings of our plugin. The get_option function will do the job, and as a safe measure, we are going to pass a default value as a second argument to get_option.
首先,我们需要检索插件的存储设置。 get_option函数将完成此工作,作为一种安全措施,我们将默认值作为第二个参数传递给get_option 。
$position  = get_option( 'outdated_notice_position', 'before' );
	$days      = (int) get_option( 'outdated_notice_day', 0 );
To calculate the days difference between current time and the post last modified time, we are going to instantiate two DateTime objects. We can get an accurate measurement of time difference using the diff method that is built in to the DateTime class. Note that the DateTime class is only available on PHP >= 5.3.0.
为了计算当前时间和发布的最后修改时间之间的天差,我们将实例化两个DateTime对象。 我们可以使用内置在DateTime类中的diff方法来准确地测量时差。 请注意, DateTime类仅在PHP> = 5.3.0上可用。
$date_now  = new DateTime( current_time('mysql') );
	$date_old  = new DateTime( get_the_modified_time('Y-m-d H:i:s') );
	$date_diff = $date_old->diff( $date_now );
$date_diff is an instance of the DateInterval class so we are going to have a range of data available with regards to time differences. If we are to var_dump the $date_diff variable, this is what we should get, depending on the post that you are currently viewing.
$date_diff是DateInterval类的实例,因此我们将提供有关时差的一系列数据。 如果我们要var_dump $date_diff变量,这是我们应该得到的,具体取决于您当前正在查看的帖子。
object(DateInterval)#286 (8) {
	  ["y"]=>
	  int(0)
	  ["m"]=>
	  int(0)
	  ["d"]=>
	  int(12)
	  ["h"]=>
	  int(23)
	  ["i"]=>
	  int(17)
	  ["s"]=>
	  int(22)
	  ["invert"]=>
	  int(0)
	  ["days"]=>
	  int(12)
	}
We are only interested in the days value as it will be used as a comparison against our days threshold. As I said before, we are going to compare them so that we can apply the specific class to our notice div element to style it differently between posts.
我们仅对days数值感兴趣,因为它将与我们的天数阈值进行比较。 正如我之前说过的,我们将比较它们,以便可以将特定类应用于我们的notify div元素,以在帖子之间对其进行不同的样式设置。
if ( $date_diff->days > $days ) {
		$class = 'is-outdated';
	} else {
		$class = 'is-fresh';
	}
This simple comparison block is enough to determine which class to use for our div. The only thing left now is to actually construct the HTML to be added to the post content.
这个简单的比较块足以确定要为div使用哪个类。 现在剩下的唯一一件事就是实际构造要添加到帖子内容中HTML。
For better translation ready text, we are going to use the _n function to selectively choose the proper text to be used depending of the number of days since the post was last updated. Then, we are going to wrap the notice text in its own div so that we can style it later. Feel free to tweak the notice text to your own liking.
为了获得更好的翻译准备文本,我们将使用_n函数根据自上次更新帖子以来的天数有选择地选择要使用的适当文本。 然后,我们将把通知文本包装在其自己的div以便以后进行样式设置。 可以根据自己的喜好随意调整通知文本。
// Filter the text
	$notice = sprintf(
				_n(
					'This post was last updated %s day ago.',
					'This post was last updated %s days ago.',
					$date_diff->days,
					'outdated-notice'
				),
				$date_diff->days
			);

	// Add the class
	$notice = '<div class="outdated-notice %s">' . $notice . '</div>';
	$notice = sprintf( $notice, $class );
The $notice variable should now contain the markup that we are going to be inserting in to our post content. The only thing left to do is to add it in.
现在, $notice变量应包含我们要插入到帖子内容中的标记。 剩下要做的唯一一件事就是添加它。
if ( 'after' == $position ) {
		$post_content .= $notice;
	} else {
		$post_content = $notice . $post_content;
	}
As a recap, this is how the the_content method inside Outdated_Notice_Public should finally look.
回顾一下,这就是Outdated_Notice_Public内部的the_content方法应该最终看起来的样子。
public function the_content( $post_content ) {
if ( is_main_query() && is_singular('post') ) {
$position = get_option( 'outdated_notice_position', 'before' );
$days = (int) get_option( 'outdated_notice_day', 0 );
$date_now = new DateTime( current_time('mysql') );
$date_old = new DateTime( get_the_modified_time('Y-m-d H:i:s') );
$date_diff = $date_old->diff( $date_now );
if ( $date_diff->days > $days ) {
$class = 'is-outdated';
} else {
$class = 'is-fresh';
}
// Filter the text
$notice = sprintf(
_n(
'This post was last updated %s day ago.',
'This post was last updated %s days ago.',
$date_diff->days,
'outdated-notice'
),
$date_diff->days
);
// Add the class
$notice = '<div class="outdated-notice %s">' . $notice . '</div>';
$notice = sprintf( $notice, $class );
if ( 'after' == $position ) {
$post_content .= $notice;
} else {
$post_content = $notice . $post_content;
}
}
return $post_content;
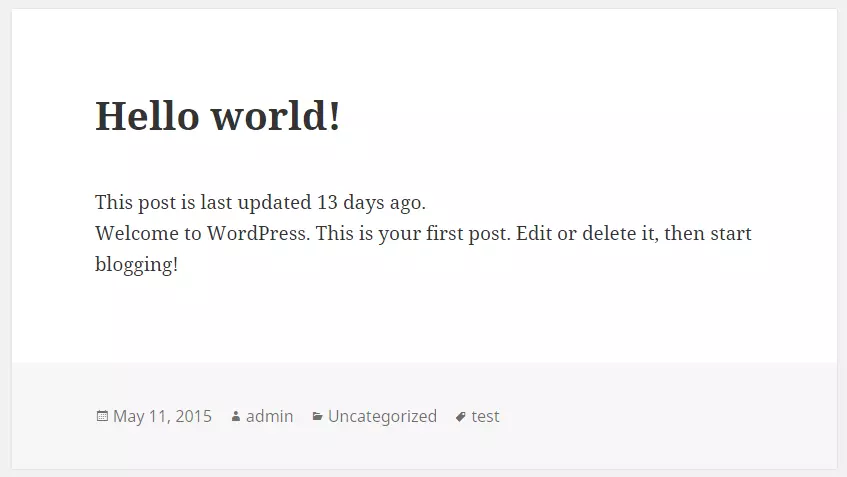
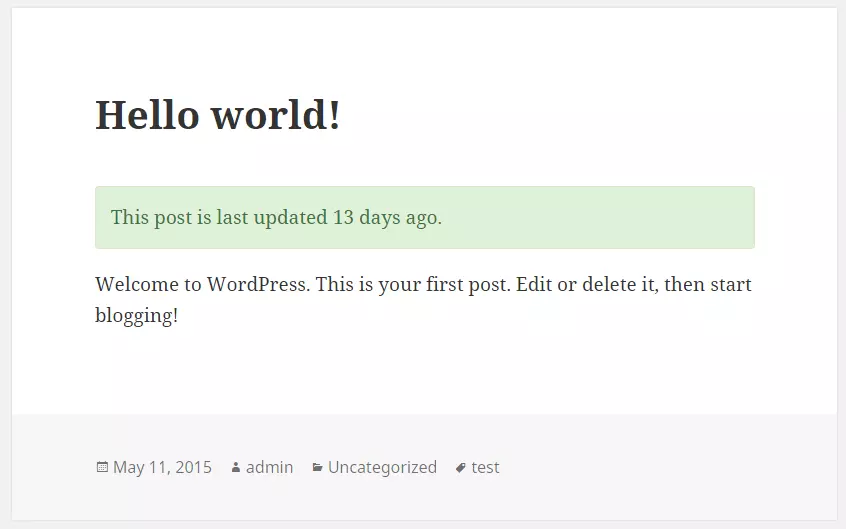
}Try browsing to a few pages to see if our plugin is working as intended. This is what I’m seeing when browsing to the “Hello World” post on url <site-url>/2015/05/11/hello-world/.
尝试浏览几页以查看我们的插件是否按预期工作。 这是我浏览到URL <site-url>/2015/05/11/hello-world/上的“ Hello World”帖子时看到的内容。
设置通知文字的样式 (Styling the Notice Text)
We are going to apply some simple styling to the .outdated-notice div that is going to match well with the overall theme design without being intrusive. In order to do that, we are not going to change anything with regards to the font size or font family that is already used. Plus, we are going to borrow the Bootstrap color scheme and styling for now.
我们将对.outdated-notice div应用一些简单的样式,该样式将与整个主题设计很好地匹配,而不会造成干扰。 为此,我们不会对已使用的字体大小或字体系列进行任何更改。 另外,我们现在将借用Bootstrap配色方案和样式 。
Open up the outdated-notice-public.css file contained inside the public/css folder and add this rule.
打开public/css文件夹中包含的outdated-notice-public.css文件,并添加此规则。
.outdated-notice {
	    border: 1px solid transparent;
	    border-radius: 4px;
	    margin-bottom: 20px;
	    padding: 15px;
	}
We also need two different styles to represent the post-freshness, which is one style for .is-fresh and another one for .is-outdated. This snippet should do the trick, giving us a nice green color scheme for a fresh post, and red color scheme for an outdated post.
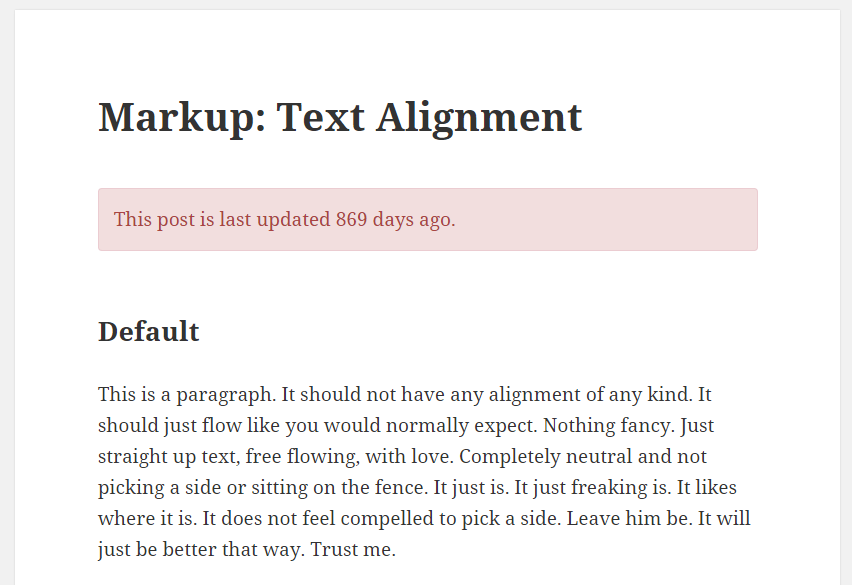
我们还需要两种不同的样式来表示后新鲜度,这是.is-fresh一种样式,而.is-outdated另一种样式。 这个片段应该可以解决问题,为我们提供一个不错的绿色方案(用于新帖子)和红色方案(用于过期的帖子)。
.outdated-notice.is-fresh {
	    background-color: #dff0d8;
	    border-color: #d6e9c6;
	    color: #3c763d;
	}

	.outdated-notice.is-outdated {
	    background-color: #f2dede;
	    border-color: #ebccd1;
	    color: #a94442;
	}
Let’s refresh the post view and see how it is styled. Examples of a fresh and an outdated post:
让我们刷新帖子视图并查看其样式。 新鲜和过时的帖子示例:
That is it! We now have our fully functional plugin developed based on the WordPress Plugin Boilerplate.
这就对了! 现在,我们有了基于WordPress插件模板开发的功能齐全的插件。
改进措施 (Improvements)
There are various things that can be improved based on what we’ve done so far. Among them are:
根据我们到目前为止所做的事情,有很多事情可以改进。 其中包括:
- Dynamic text for different contexts, where we can use different text for the outdated notice. 针对不同上下文的动态文本,其中我们可以将不同的文本用于过时的通知。
Remove the enqueuing of
outdated-notice-public.jsscript since it is not used.删除未使用的
outdated-notice-public.js脚本的排队。- Dismissible notice so that it won’t interrupt the user experience when reading the post. 免责声明,以免打扰阅读文章时的用户体验。
结论 (Conclusion)
The WordPress Plugin Boilerplate provides a perfect starting point to develop any plugin from scratch. In this last part of the series, we finished up by developing the public facing functionality of our plugin. The modifications though quite simple, are done in little time, while still maintaining the OOP pattern established by the Boilerplate itself and adhering to standards and best practices.
WordPress插件样板为从头开始开发任何插件提供了一个完美的起点。 在本系列的最后一部分中,我们通过开发插件的面向公众的功能来完成。 修改虽然很简单,但是可以在很短的时间内完成,同时仍然保持样板本身建立的OOP模式并遵守标准和最佳实践。
A full copy of the code is available as usual at GitHub on the part-3 branch.
可以在GitHub的part-3分支上像往常一样获得代码的完整副本。
翻译自: https://www.sitepoint.com/the-wordpress-plugin-boilerplate-part-3-the-last-steps/
wordpress插件


 198
198

 被折叠的 条评论
为什么被折叠?
被折叠的 条评论
为什么被折叠?
 到【灌水乐园】发言


