


表格嵌套表格css
In this tutorial we are going to create two HTML5 forms that will switch between login and registration using the CSS3 pseudo class :target. We will style it using CSS3 and an icon font. The idea behind this demo is to show the user the login form and provide a link to “switch” to the registration form.
在本教程中,我们将创建两个HTML5表单,这些表单将使用CSS3伪类:target在登录和注册之间切换。 我们将使用CSS3和图标字体为其设置样式。 该演示背后的想法是向用户显示登录表单并提供“切换”到注册表单的链接。
Note that this is for demo purpose only, it will only work in browser supporting the :target pseudo class, and you should not use this code on a live website without providing solid fallback.
请注意,这仅是出于演示目的,它将仅在支持:target伪类的浏览器中工作,并且在未提供可靠后备的情况下,请勿在实时网站上使用此代码。
In the following, we will be going through Demo 1.
在下文中,我们将进行演示1。
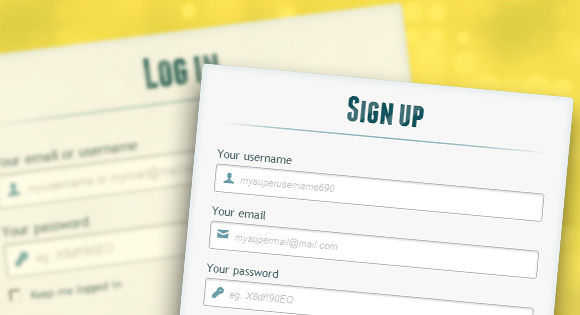
HTML (The HTML)
In the HTML, we will put both forms, hiding the second one with CSS. Here is the code, I’ll explain some of the interesting parts later.
在HTML中,我们将放置两种形式,并用CSS隐藏第二种形式。 这是代码,稍后我将解释一些有趣的部分。
<div id="container_demo" >
	<!-- hidden anchor to stop jump http://www.css3create.com/Astuce-Empecher-le-scroll-avec-l-utilisation-de-target#wrap4  -->
	<a class="hiddenanchor" id="toregister"></a>
	<a class="hiddenanchor" id="tologin"></a>
	<div id="wrapper">
		<div id="login" class="animate form">
			<form  action="mysuperscript.php" autocomplete="on">
				<h1>Log in</h1>
				<p>
					<label for="username" class="uname" data-icon="u" > Your email or username </label>
					<input id="username" name="username" required="required" type="text" placeholder="myusername or mymail@mail.com"/>
				</p>
				<p>
					<label for="password" class="youpasswd" data-icon="p"> Your password </label>
					<input id="password" name="password" required="required" type="password" placeholder="eg. X8df!90EO" />
				</p>
				<p class="keeplogin">
					<input type="checkbox" name="loginkeeping" id="loginkeeping" value="loginkeeping" />
					<label for="loginkeeping">Keep me logged in</label>
				</p>
				<p class="login button">
					<input type="submit" value="Login" />
				</p>
				<p class="change_link">
					Not a member yet ?
					<a href="#toregister" class="to_register">Join us</a>
				</p>
			</form>
		</div>

		<div id="register" class="animate form">
			<form  action="mysuperscript.php" autocomplete="on">
				<h1> Sign up </h1>
				<p>
					<label for="usernamesignup" class="uname" data-icon="u">Your username</label>
					<input id="usernamesignup" name="usernamesignup" required="required" type="text" placeholder="mysuperusername690" />
				</p>
				<p>
					<label for="emailsignup" class="youmail" data-icon="e" > Your email</label>
					<input id="emailsignup" name="emailsignup" required="required" type="email" placeholder="mysupermail@mail.com"/>
				</p>
				<p>
					<label for="passwordsignup" class="youpasswd" data-icon="p">Your password </label>
					<input id="passwordsignup" name="passwordsignup" required="required" type="password" placeholder="eg. X8df!90EO"/>
				</p>
				<p>
					<label for="passwordsignup_confirm" class="youpasswd" data-icon="p">Please confirm your password </label>
					<input id="passwordsignup_confirm" name="passwordsignup_confirm" required="required" type="password" placeholder="eg. X8df!90EO"/>
				</p>
				<p class="signin button">
					<input type="submit" value="Sign up"/>
				</p>
				<p class="change_link">
					Already a member ?
					<a href="#tologin" class="to_register"> Go and log in </a>
				</p>
			</form>
		</div>

	</div>
</div>
We’ve added some HTML5 goodness here and used some of the new inputs. The input type=password automatically hides what the user is typing and replaces it with dots (depending on browser). The input type=email enables the browser to check if what the user entered has the format of a valid email address. We’ve also used the require=required attribute; browsers that support this attribute will not let the user submit the form until this field is filled, no JavaScript required. The autocomplete=on attribute will prefill values based on earlier user input. We also used some nice placeholders for the inputs that will show some guiding value when the input is not filled.
我们在此处添加了一些HTML5优点,并使用了一些新输入。 输入的type = password自动隐藏用户输入的内容,并用点代替(取决于浏览器)。 输入type = email使浏览器可以检查用户输入的内容是否具有有效电子邮件地址的格式。 我们还使用了require = required属性; 支持此属性的浏览器将不允许用户提交表单,除非填写此字段,并且不需要JavaScript。 autocomplete = on属性将根据先前的用户输入来预填充值。 我们还为输入使用了一些不错的占位符,当输入未填充时,占位符将显示一些指导值。
Now the two tricky parts. You might have noticed the two <a href> links at the top of the form. This is a little trick that will make our form behave nicely when playing with anchors, so that it won’t “jump” on long pages when we click on the switching link and trigger the :target pseudo-class.
现在这两个棘手的部分。 您可能已经注意到表单顶部的两个<a href>链接。 这是一个小技巧,它将使我们的表单在使用锚点播放时表现良好,因此当我们单击切换链接并触发:target伪类时,它不会在较长的页面上“跳转”。
The second little trick is related to the use of the icon font. We will be using a data-attribute to display the icons. By setting data-icon=”icon_character” with the according character in the HTML we will just need one CSS attribute selector to style all the icons. Read more about this technique on 24 Ways: Displaying Icons with Fonts and Data- Attributes.
第二个小技巧与图标字体的使用有关。 我们将使用数据属性来显示图标。 通过在HTML中用相应的字符设置data-icon =” icon_character” ,我们只需要一个CSS属性选择器即可设置所有图标的样式。 在24种方法中了解有关此技术的更多信息:显示带有字体和数据属性的图标。
CSS (The CSS)
For the clearness of the code in this tutorial, I will omit all the vendor prefixes, but you will, of course, find them in the files. Once again, I’m using some pretty advanced CSS3 tricks that might not work in all browsers. Let’s get started.
为了使本教程中的代码清晰,我将省略所有供应商前缀,但是您当然会在文件中找到它们。 再一次,我使用了一些相当高级CSS3技巧,这些技巧可能无法在所有浏览器中使用。 让我们开始吧。
使用CSS3样式化这两种形式 (Styling both forms using CSS3)
First, let’s give our two forms some general styling for the container.
首先,让我们为这两种形式提供容器的一般样式。
#subscribe,
#login{
	position: absolute;
	top: 0px;
	width: 88%;
	padding: 18px 6% 60px 6%;
	margin: 0 0 35px 0;
	background: rgb(247, 247, 247);
	border: 1px solid rgba(147, 184, 189,0.8);
	box-shadow:
		0pt 2px 5px rgba(105, 108, 109,  0.7),
		0px 0px 8px 5px rgba(208, 223, 226, 0.4) inset;
	border-radius: 5px;
}
#login{
	z-index: 22;
}
We’ve added a nice box shadow that’s made of two shadows: an inset one to create the inner blue glow, and an outside shadow. We’ll explain the z-index in a bit.
我们添加了一个不错的盒子阴影,它由两个阴影组成:一个用于创建内部蓝色发光的嵌入式阴影和一个外部阴影。 我们将稍微解释一下z-index。
In the following we will style the header with some background clipping:
在下面的代码中,我们将使用一些背景裁剪来设置标题:
/**** general text styling ****/
#wrapper h1{
	font-size: 48px;
	color: rgb(6, 106, 117);
	padding: 2px 0 10px 0;
	font-family: 'FranchiseRegular','Arial Narrow',Arial,sans-serif;
	font-weight: bold;
	text-align: center;
	padding-bottom: 30px;
}

/** For the moment only webkit supports the background-clip:text; */
#wrapper h1{
	background:
	-webkit-repeating-linear-gradient(-45deg,
		rgb(18, 83, 93) ,
		rgb(18, 83, 93) 20px,
		rgb(64, 111, 118) 20px,
		rgb(64, 111, 118) 40px,
		rgb(18, 83, 93) 40px);
	-webkit-text-fill-color: transparent;
	-webkit-background-clip: text;
}

#wrapper h1:after{
	content:' ';
	display:block;
	width:100%;
	height:2px;
	margin-top:10px;
	background:
		linear-gradient(left,
			rgba(147,184,189,0) 0%,
			rgba(147,184,189,0.8) 20%,
			rgba(147,184,189,1) 53%,
			rgba(147,184,189,0.8) 79%,
			rgba(147,184,189,0) 100%);
}
Note that at this moment only webkit browsers support background-clip: text, so we will create a stripped background only for webkit here, and clip it to the text to add the stripes to the H1 title. Since the background-clip: text property currently only works in Webkit browsers, I decided to go only with the webkit prefix. That’s the reason why I split the CSS declaration into two parts, and use a webkit prefixed gradient only. Only using the –webkit- prefix is bad practice, it’s only for demo purpose, and you should never do this on real a website! That’s also where the -webkit-text-fill-color: transparent comes in handy: it enables us to only have a transparent background on the webkit browsers, all the other ones will ignore it and give us the provided text color fallback.
请注意,目前只有Webkit浏览器支持background-clip:text ,因此我们将在此处仅为webkit创建剥离的背景,并将其裁剪为文本以将条纹添加到H1标题中。 由于background-clip:text属性当前仅在Webkit浏览器中可用,因此我决定仅使用webkit前缀。 这就是为什么我将CSS声明分为两部分,并仅使用带前缀的webkit渐变的原因。 仅使用–webkit-前缀是不好的做法,这仅是出于演示目的,您绝对不应在真实的网站上这样做! 这也是-webkit-text-fill-color:透明派上用场的地方:它使我们仅在webkit浏览器中具有透明背景,所有其他浏览器都将忽略它,并为我们提供所提供的文本颜色备用。
We also created a fading line under the title with the help of the :after pseudo-class. We use a 2px height gradient and fade the background to 0 opacity at both ends.
我们还通过:after伪类在标题下创建了一条衰落线。 我们使用2px的高度渐变,并在两端将背景渐变为0不透明度。
Now let’s style our inputs and give them a nicer look.
现在,让我们对输入进行样式设置,并为它们提供更好的外观。
/**** advanced input styling ****/
/* placeholder */
::-webkit-input-placeholder  {
	color: rgb(190, 188, 188);
	font-style: italic;
}
input:-moz-placeholder,
textarea:-moz-placeholder{
	color: rgb(190, 188, 188);
	font-style: italic;
}
input {
  outline: none;
}
First we style the inputs, and remove the outline. But be careful here; the outline helps the user know which input is focused, so if you remove it, you should provide some :active and :focus states for the inputs.
首先,我们对输入进行样式设置,然后删除轮廓。 但是请注意这里; 轮廓帮助用户知道哪个输入聚焦,因此,如果删除它,则应为输入提供一些:active和:focus状态。
/* all the input except submit and checkbox */
#wrapper input:not([type="checkbox"]){
	width: 92%;
	margin-top: 4px;
	padding: 10px 5px 10px 32px;
	border: 1px solid rgb(178, 178, 178);
	box-sizing : content-box;
	border-radius: 3px;
	box-shadow: 0px 1px 4px 0px rgba(168, 168, 168, 0.6) inset;
	transition: all 0.2s linear;
}
#wrapper input:not([type="checkbox"]):active,
#wrapper input:not([type="checkbox"]):focus{
	border: 1px solid rgba(91, 90, 90, 0.7);
	background: rgba(238, 236, 240, 0.2);
	box-shadow: 0px 1px 4px 0px rgba(168, 168, 168, 0.9) inset;
}
Here we used the :not pseudo class, to style all inputs, except the checkbox. I provided a :focus and :active state, since I decided to remove the outline.
在这里,我们使用:not伪类来设置所有输入的样式,复选框除外。 因为我决定删除轮廓,所以我提供了:focus和:active状态。
And now the fun part: the icon font. Since we can’t use :before and :after pseudo classes on inputs, we’ll have to cheat a little bit: we’ll add the icon to the label, and then place it in the input. I’m using the fontomas library which puts together some nice icons. You can rearrange them to set the icon to a specific letter. Remember the data-icon attribute? It’s where you should put the letter. I used data-icon=’u’ for user, ‘e’ for email, ‘p’ for password. Once I chose the letters, I downloaded the font, and used the fontsquirrel font generator to transform it into a @font-face compatible format.
现在最有趣的部分是:图标字体。 由于我们不能在输入中使用:before和:after伪类,因此我们必须作弊:将图标添加到标签中,然后将其放置在输入中。 我正在使用fontomas库,该库汇集了一些不错的图标。 您可以重新排列它们以将图标设置为特定字母。 还记得data-icon属性吗? 这是您应该放信的地方。 我为用户使用data-icon ='u' ,为电子邮件使用'e',为密码使用'p'。 选择字母后,我下载了字体,并使用fontsquirrel字体生成器将其转换为@ font-face兼容格式。
@font-face {
    font-family: 'FontomasCustomRegular';
    src: url('fonts/fontomas-webfont.eot');
    src: url('fonts/fontomas-webfont.eot?#iefix') format('embedded-opentype'),
         url('fonts/fontomas-webfont.woff') format('woff'),
         url('fonts/fontomas-webfont.ttf') format('truetype'),
         url('fonts/fontomas-webfont.svg#FontomasCustomRegular') format('svg');
    font-weight: normal;
    font-style: normal;
}

/** the magic icon trick ! **/
[data-icon]:after {
    content: attr(data-icon);
    font-family: 'FontomasCustomRegular';
    color: rgb(106, 159, 171);
    position: absolute;
    left: 10px;
    top: 35px;
	width: 30px;
}
Yeah, that’s it folks, you don’t need to have a class for each icon. We used content: attr(data-icon) to retrieve the letter from the data-icon attribute, so we only have to declare the font, choose a nice color and position it.
是的,仅此而已,您不需要为每个图标设置一个类。 我们使用内容:attr(data-icon)从data-icon属性中检索字母,因此我们只需要声明字体,选择一种漂亮的颜色并将其定位。
Now let’s style the submit button for both forms.
现在,为两种表单设置“提交”按钮的样式。
/*styling both submit buttons */
#wrapper p.button input{
	width: 30%;
	cursor: pointer;
	background: rgb(61, 157, 179);
	padding: 8px 5px;
	font-family: 'BebasNeueRegular','Arial Narrow',Arial,sans-serif;
	color: #fff;
	font-size: 24px;
	border: 1px solid rgb(28, 108, 122);
	margin-bottom: 10px;
	text-shadow: 0 1px 1px rgba(0, 0, 0, 0.5);
	border-radius: 3px;
	box-shadow:
		0px 1px 6px 4px rgba(0, 0, 0, 0.07) inset,
		0px 0px 0px 3px rgb(254, 254, 254),
		0px 5px 3px 3px rgb(210, 210, 210);
	transition: all 0.2s linear;
}
#wrapper p.button input:hover{
	background: rgb(74, 179, 198);
}
#wrapper p.button input:active,
#wrapper p.button input:focus{
	background: rgb(40, 137, 154);
	position: relative;
	top: 1px;
	border: 1px solid rgb(12, 76, 87);
	box-shadow: 0px 1px 6px 4px rgba(0, 0, 0, 0.2) inset;
}
p.login.button,
p.signin.button{
	text-align: right;
	margin: 5px 0;
}
The trick here is to use the box-shadow in order to create some extra borders. You can only use one border, but as many box-shadows as you want. We will use the length value to create a “fake” second white border, 3px wide, with no blur.
这里的窍门是使用盒子阴影来创建一些额外的边框。 您只能使用一个边框,但可以使用任意多个框阴影。 我们将使用长度值创建一个“伪”第二个白色边框,宽度为3px,没有模糊。
Then we’ll style the checkbox, nothing very special here:
然后,我们将对复选框进行样式设置,这里没有什么特别之处:
/* styling the checkbox "keep me logged in"*/
.keeplogin{
	margin-top: -5px;
}
.keeplogin input,
.keeplogin label{
	display: inline-block;
	font-size: 12px;
	font-style: italic;
}
.keeplogin input#loginkeeping{
	margin-right: 5px;
}
.keeplogin label{
	width: 80%;
}
We will style the bottom of the form using repeating linear gradients to create a striped background.
我们将使用重复的线性渐变来样式化表单的底部以创建条纹背景。
p.change_link{
	position: absolute;
	color: rgb(127, 124, 124);
	left: 0px;
	height: 20px;
	width: 440px;
	padding: 17px 30px 20px 30px;
	font-size: 16px	;
	text-align: right;
	border-top: 1px solid rgb(219, 229, 232);
	border-radius: 0 0  5px 5px;
	background: rgb(225, 234, 235);
	background: repeating-linear-gradient(-45deg,
	rgb(247, 247, 247) ,
	rgb(247, 247, 247) 15px,
	rgb(225, 234, 235) 15px,
	rgb(225, 234, 235) 30px,
	rgb(247, 247, 247) 30px
	);
}
#wrapper p.change_link a {
	display: inline-block;
	font-weight: bold;
	background: rgb(247, 248, 241);
	padding: 2px 6px;
	color: rgb(29, 162, 193);
	margin-left: 10px;
	text-decoration: none;
	border-radius: 4px;
	border: 1px solid rgb(203, 213, 214);
	transition: all 0.4s  linear;
}
#wrapper p.change_link a:hover {
	color: rgb(57, 191, 215);
	background: rgb(247, 247, 247);
	border: 1px solid rgb(74, 179, 198);
}
#wrapper p.change_link a:active{
	position: relative;
	top: 1px;
}
Now you’ll notice that we’ve got two nice forms, but we really want only one to show at a time. So now is time for some animations!!
现在您会注意到我们有两种不错的形式,但我们确实希望一次只显示一种形式。 所以现在是时候制作一些动画了!
创建切换动画 (Creating the switching animation)
The first thing to do is to hide the second form by setting the opacity to 0:
首先要做的是通过将不透明度设置为0来隐藏第二种形式:
#register{
	z-index: 21;
	opacity: 0;
}
Remember that our login form had a z-index of 22? We will give the second form a z-index of 21, to put it “under” the login form.
还记得我们的登录表单的z-index为22吗? 我们将给第二个表单的z-index为21,以使其位于登录表单的“下方”。
And now the really good part: switching the forms using the :target pseudo class. What you really have to understand about :target, is that we will use anchors to make the transition. The normal behavior of an anchor link, is to jump to the target in the page. But we don’t want to jump anywhere, we only want to switch the forms. And here comes our trick using the two links at the top of the page. Instead of directly linking to the second form, and risking getting a “jumping” effect, we actually put the two links at the top of the page and give them display: none. This will avoid any page jump. Credit where credit’s due: I found this trick on CSS3 create (in French).
现在真正的好处是:使用:target伪类切换表单。 您真正要了解的:target是,我们将使用锚点进行过渡。 锚链接的正常行为是跳转到页面中的目标。 但是我们不想跳到任何地方,我们只想切换表格。 这就是使用页面顶部的两个链接的技巧。 实际上,我们没有直接链接到第二种形式,而冒着产生“跳跃”效果的风险,我们实际上将这两个链接放在页面顶部并显示:none 。 这将避免任何页面跳转。 应归功于信誉:我在CSS3 create上发现了这个技巧(法语)。
#toregister:target ~ #wrapper #register,
#tologin:target ~ #wrapper #login{
	z-index: 22;
	animation-name: fadeInLeft;
	animation-delay: .1s;
}
So this is what happens: when we click on the Join us button, we trigger the #toregister. We then do the animation, by using the sibling selector ~ to find our #register element. We use an animation called fadeInLeft. Since we “hide” the form using zero opacity, we will use an animation that fades in, to make it appear. We’ve also changed the z-index, to make it appear on top of the other form. The same happens for the other form.
这就是发生的情况:当我们单击“加入我们”按钮时,我们触发#toregister。 然后,我们通过使用同级选择器〜查找#register元素来制作动画。 我们使用一个名为fadeInLeft的动画。 由于我们使用零不透明度“隐藏”表单,因此我们将使用淡入淡出的动画使其显示。 我们还更改了z-index,使其显示在其他表单的顶部。 其他形式也一样。
And here is the code for the animation. We are using the CSS3 animation framework from Dan Eden and adapted it for this tutorial.
这是动画的代码。 我们正在使用Dan Eden的CSS3动画框架,并对其进行了改编。
.animate{
	animation-duration: 0.5s;
	animation-timing-function: ease;
	animation-fill-mode: both;
}
@keyframes fadeInLeft {
	0% {
		opacity: 0;
		transform: translateX(-20px);
	}

	100% {
		opacity: 1;
		transform: translateX(0);
	}
}
The form that is “disappearing” will have another animation which will make it fade out to the left:
“消失”的窗体将具有另一个动画,该动画将使其淡出至左侧:
#toregister:target ~ #wrapper #login,
#tologin:target ~ #wrapper #register{
	animation-name: fadeOutLeftBig;
}

@keyframes fadeOutLeft {
	0% {
		opacity: 1;
		transform: translateX(0);
	}

	100% {
		opacity: 0;
		transform: translateX(-20px);
	}
}
You can now use other animations from Dan Eden’s animate.css: just adjust your .animate class and replace the animation names. You will also find some custom animations at the end of the animate-custom.css file.
现在,您可以使用Dan Eden的animate.css中的其他动画:只需调整.animate类并替换动画名称即可。 您还将在animate-custom.css文件的末尾找到一些自定义动画。
Well, that’s it folks. I hope you enjoyed the tutorial!
好吧,就是这样。 希望您喜欢本教程!
Please note, that in some browsers background-clip: text is not supported. In Internet Explorer 9 the transitions and animations don’t work, so there will be no fancy form switching. In Internet Explorer 8 and below the :target pseudo-class is not supported, so it won’t work at all (you’ll just see the login form).
请注意,在某些浏览器中, background-clip:不支持文本。 在Internet Explorer 9中,过渡和动画不起作用,因此不会进行花哨的表单切换。 在Internet Explorer 8及以下版本中,不支持:target伪类,因此它根本不起作用(您只会看到登录表单)。
演示版 (Demos)
翻译自: https://tympanus.net/codrops/2012/03/27/login-and-registration-form-with-html5-and-css3/
表格嵌套表格css


 4305
4305

 被折叠的 条评论
为什么被折叠?
被折叠的 条评论
为什么被折叠?
 到【灌水乐园】发言


