


three.js创建光线
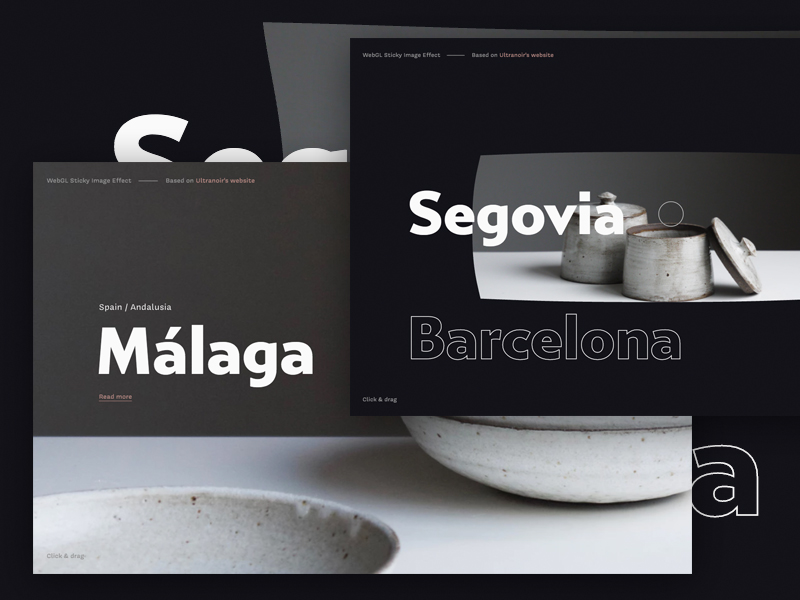
If you recently browsed Awwwards or FWA you might have stumbled upon Ultranoir’s website. An all-round beautifully crafted website, with some amazing WebGL effects. One of which is a sticky effect for images in their project showcase. This tutorial is going to show how to recreate this special effect.
如果您最近浏览过Awwwards或FWA,则可能会偶然发现Ultranoir的网站。 一个全面精美的网站,具有令人惊叹的WebGL效果。 其中之一是项目展示中图像的粘性效果。 本教程将展示如何重新创建此特殊效果。
The same kind of effect can be seen on the amazing website of MakeReign.
在令人惊叹的MakeReign网站上可以看到相同的效果。
了解效果 (Understanding the effect)
When playing with the effect a couple of times we can make a very simple observation about the “stick”.
多次播放效果时,我们可以对“摇杆”进行非常简单的观察。
In either direction of the effect, the center always reaches its destination first, and the corners last. They go at the same speed, but start at different times.
在效果的任何一个方向上,中心总是首先到达其目的地,而拐角最后。 它们以相同的速度运行,但是在不同的时间开始。
With this simple observation we can extrapolate some of the things we need to do:
通过这个简单的观察,我们可以推断出我们需要做的一些事情:
- Differentiate between the unsticky part of the image which is going to move normally and the sticky part of the image which is going to start with an offset. In this case, the corners are sticky and the center is unsticky. 区分将要正常移动的图像的不粘部分和将要偏移的图像的粘部分。 在这种情况下,拐角处发粘而中心不发粘。
Sync the movements
同步动作
- Move the unsticky part to the destination while not moving the sticky part.不移动粘性部分的同时将不粘性部分移动到目的地。
- When the unsticky part reaches its destination, start moving the sticky part 当不粘部分到达目的地时,开始移动粘部分
入门(Getting started)
For this recreation we’ll be using three.js, and Popmotion’s Springs. But you can implement the same concepts using other libraries.
对于此娱乐,我们将使用three.js和Popmotion的Springs 。 但是您可以使用其他库来实现相同的概念。
We’ll define a plane geometry with its height as the view height, and its width as 1.5 of the view width.
我们将定义一个平面几何图形,其高度为视图高度,其宽度为视图宽度的1.5。
const camera = new THREE.PerspectiveCamera(45, 1, 0.1, 10000);
const fovInRadians = (camera.fov * Math.PI) / 180;
// Camera aspect ratio is 1. The view width and height are equal.
const viewSize = Math.abs(camera.position.z * Math.tan(fovInRadians / 2) * 2);
const geometry = new THREE.PlaneBufferGeometry(viewSize *1.5,viewSize,60,60)
Then we’ll define a shader material with a few uniforms we are going to use later on:
然后,我们将定义带有一些均匀度的着色器材质,我们将在以后使用它们:
u_progressElapsed progress of the complete effect.u_progress完整效果所u_progress进度。u_directionDirection to which u_progress is moving.u_directionu_progress的移动方向。u_offsetLargest z displacementu_offset最大z位移
const material = new THREE.ShaderMaterial({
	uniforms: {
		// Progress of the effect
		u_progress: { type: "f", value: 0 },
		// In which direction is the effect going
		u_direction: { type: "f", value: 1 },
		u_waveIntensity: { type: "f", value: 0 }
	},
	vertexShader: vertex,
	fragmentShader: fragment,
	side: THREE.DoubleSide
});
We are going to focus on the vertex shader since the effect mostly happens in there. If you have an interest in learning about the things that happen in the fragment shader, check out the GitHub repo.
由于效果主要发生在顶点着色器中,因此我们将重点关注它。 如果您有兴趣了解片段着色器中发生的事情,请查看GitHub repo 。
入棒 (Into the stick)
To find which parts are going to be sticky we are going to use a normalized distance from the center. Lower values mean less stickiness, and higher values mean more sticky. Since the corners are the farthest away from the center, they end up being most sticky.
为了确定哪些部分会发粘,我们将使用距中心的标准化距离。 较低的值表示较少的粘性,较高的值表示较多的粘性。 由于拐角距离中心最远,因此最终变得最粘。
Since our effect is happening in both directions, we are going to have it stick both ways. We have two separate variables:
由于我们的效果是双向发生的,因此我们将使它双向粘合。 我们有两个单独的变量:
- One that will stick to the front. Used when the effect is moving away from the screen. 一个会坚持到前面。 当效果远离屏幕时使用。
- And a second one that will stick to the back. Used when the effect is moving towards the viewer. 第二个将贴在后面。 当效果朝向观看者移动时使用。
uniform float u_progress;
uniform float u_direction;
uniform float u_offset;
uniform float u_time;
void main(){
	vec3 pos = position.xyz;
	float distance = length(uv.xy - 0.5 );
	float maxDistance = length(vec2(0.5,0.5));
	float normalizedDistance = distance/sizeDist;
	// Stick to the front
	float stickOutEffect = normalizedDistance ;
	// Stick to the back
	float stickInEffect = -normalizedDistance ;
	float stickEffect = mix(stickOutEffect,stickInEffect, u_direction);
	pos.z += stickEffect * u_offset;
	gl_Position =
	projectionMatrix *
	modelViewMatrix *
	vec4(pos, 1.0);
}
Depending on the direction, we are going to determine which parts are not going to move as much. Until we want them to stop being sticky and move normally.
根据方向,我们将确定哪些部分不会移动太多。 直到我们希望它们不再发粘并正常移动。
动画(The Animation)
For the animation we have a few options to choose from:
对于动画,我们有几个选项可供选择:
- Tween and timelines: Definitely the easiest option. But we would have to reverse the animation if it ever gets interrupted which would look awkward. 补间和时间轴:绝对是最简单的选择。 但是,如果动画被打断了,看起来就很尴尬,我们将不得不反转动画。
- Springs and vertex-magic: A little bit more convoluted. But springs are made so they feel more fluid when interrupted or have their direction changed. 弹簧和顶点魔术:有点复杂。 但是弹簧是制成的,因此当它们被打断或改变方向时,它们会感觉更柔软。
In our demo we are going to use Popmotion’s Springs. But tweens are also a valid option and ultranoir’s website actually uses them.
在我们的演示中,我们将使用Popmotion的Springs。 但是补间也是有效的选择,而Ultranoir的网站实际上使用了补间。
Note: When the progress is either 0 or 1, the direction will be instant since it doesn’t need to transform.
注意:当进度为0或1时,方向将是即时的,因为它不需要转换。
function onMouseDown(){
	...
	const directionSpring = spring({
		from: this.progress === 0 ? 0 : this.direction,
		to: 0,
		mass: 1,
		stiffness: 800,
		damping: 2000
	});
	const progressSpring = spring({
		from: this.progress,
		to: 1,
		mass: 5,
		stiffness: 350,
		damping: 500
	});
	parallel(directionSpring, progressSpring).start((values)=>{
		// update uniforms
	})
	...
}

function onMouseUp(){
	...
	const directionSpring = spring({
		from: this.progress === 1 ? 1 : this.direction,
		to: 1,
		mass: 1,
		stiffness: 800,
		damping: 2000
	});
	const progressSpring = spring({
		from: this.progress,
		to: 0,
		mass: 4,
		stiffness: 400,
		damping: 70,
		restDelta: 0.0001
	});
	parallel(directionSpring, progressSpring).start((values)=>{
		// update uniforms
	})
	...
}
And we are going to sequence the movements by moving through a wave using u_progress.
我们将通过使用u_progress在波浪中移动来对运动进行u_progress 。
This wave is going to start at 0, reach 1 in the middle, and come back down to 0 in the end. Making it so the stick grows in the beginning and decreases in the end.
此波将从0开始,在中间到达1,最后回到0。 这样一来,棍子在开始时会增长,而在结束时会减少。
void main(){
	...
	float waveIn = u_progress*(1. / stick);
	float waveOut = -( u_progress - 1.) * (1./(1.-stick) );
	float stickProgress = min(waveIn, waveOut);
	pos.z += stickEffect * u_offset * stickProgress;
	gl_Position =
	projectionMatrix *
	modelViewMatrix *
	vec4(pos, 1.0);
}
Now, the last step is to move the plane back or forward as the stick is growing.
现在,最后一步是随着操纵杆的增长使飞机前后移动。
Since the stick grow starts in different values depending on the direction, we’ll also move and start the plane offset depending on the direction.
由于摇杆的生长会根据方向以不同的值开始,因此我们还将根据方向移动并开始平面偏移。
void main(){
	...
	float offsetIn = clamp(waveIn,0.,1.);
	// Invert waveOut to get the slope moving upwards to the right and move 1 the left
	float offsetOut = clamp(1.-waveOut,0.,1.);
	float offsetProgress = mix(offsetIn,offsetOut,u_direction);
	pos.z += stickEffect * u_offset * stickProgress - u_offset * offsetProgress;
	gl_Position =
	projectionMatrix *
	modelViewMatrix *
	vec4(pos, 1.0);
}
And here is the final result:
这是最终结果:
结论 (Conclusion)
Simple effects like this one can make our experience look and feel great. But they only become amazing when complemented with other amazing details and effects. In this tutorial we’ve covered the core of the effect seen on ultranoir’s website, and we hope that it gave you some insight on the workings of such an animation. If you’d like to dive deeper into the complete demo, please feel free to explore the code.
像这样的简单效果可以使我们的体验看起来很棒。 但是只有与其他惊人的细节和效果相辅相成,它们才会变得惊人。 在本教程中,我们介绍了在Ultranoir网站上看到的效果的核心,我们希望它能使您对这种动画的工作有一些了解。 如果您想深入了解完整的演示,请随时浏览代码。
We hope you enjoyed this tutorial, feel free to share your thoughts and questions in the comments!
我们希望您喜欢本教程,并随时在评论中分享您的想法和问题!
翻译自: https://tympanus.net/codrops/2019/04/10/how-to-create-a-sticky-image-effect-with-three-js/
three.js创建光线


 157
157

 被折叠的 条评论
为什么被折叠?
被折叠的 条评论
为什么被折叠?
 到【灌水乐园】发言


