


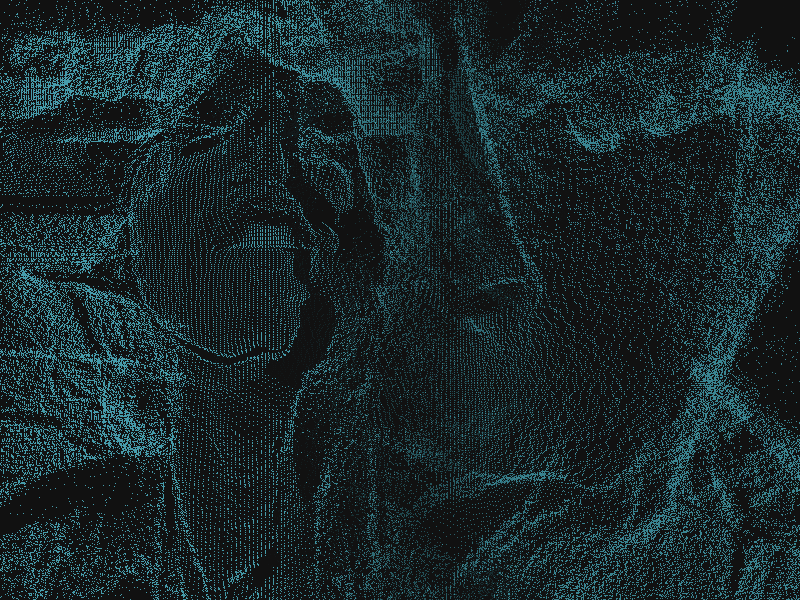
In this tutorial you’ll learn how to create an interesting looking audio visualizer that also takes input from the web camera. The result is a creative visualizer with a depth distortion effect. Although the final result looks complex, the Three.js code that powers it is straightforward and easy to understand.
在本教程中,您将学习如何创建一个外观有趣的音频可视化器,该可视化器还可以从网络摄像头获取输入。 结果是具有深度失真效果的创意可视化工具。 尽管最终结果看起来很复杂,但支持它的Three.js代码却简单明了。
So let’s get started.
因此,让我们开始吧。
处理流程 (Processing flow)
The processing flow of our script is going to be the following:
我们的脚本的处理流程如下:
- Create a vertex from every pixel of the image we get from the web camera input 从我们从网络摄像机输入中获取的图像的每个像素创建一个顶点
- Use the image data from the web camera and apply the magnitude value of the sound frequency to the Z coordinate of each particle使用来自网络摄像机的图像数据,并将声频的幅度值应用于每个粒子的Z坐标
- Draw画
- Repeat point 2 and 3重复第2点和第3点
Now, let’s have a look at how we can get and use the data from the web camera.
现在,让我们看一下如何从网络摄像机获取和使用数据。
网络摄像头 (Web camera)
First of all, let’s see how to access the web camera and get an image from it.
首先,让我们看看如何访问网络摄像机并从中获取图像。
摄像头访问 (Camera access)
For camera access in the browser, simply use getUserMedia().
要在浏览器中访问相机,只需使用getUserMedia() 。
<video id="video" autoplay style="display: none;"></video>video = document.getElementById("video");
const option = {
video: true,
audio: false
};
// Get image from camera
navigator.getUserMedia(option, (stream) => {
video.srcObject = stream; // Load as source of video tag
video.addEventListener("loadeddata", () => {
// ready
});
}, (error) => {
console.log(error);
});将相机图像绘制到画布 (Draw camera image to canvas)
After camera access succeeded, we’ll get the image from the camera and draw it on the canvas.
成功访问摄像机后,我们将从摄像机中获取图像并将其绘制在画布上。
const getImageDataFromVideo = () => {
    const w = video.videoWidth;
    const h = video.videoHeight;

    canvas.width = w;
    canvas.height = h;

    // Reverse image like a mirror
    ctx.translate(w, 0);
    ctx.scale(-1, 1);

    // Draw to canvas
    ctx.drawImage(image, 0, 0);

    // Get image as array
    return ctx.getImageData(0, 0, w, h);
};
关于获取的imageData (About acquired imageData)
ctx.getImageData() returns an array which RGBA is in order.
ctx.getImageData()返回RGBA顺序排列的数组。
[0]  // R
[1]  // G
[2]  // B
[3]  // A

[4]  // R
[5]  // G
[6]  // B
[7]  // A...
And this is how you can access the color information of every pixel.
这就是您可以访问每个像素的颜色信息的方式。
for (let i = 0, len = imageData.data.length; i < len; i+=4) {
    const index = i * 4;  // Get index of "R" so that we could access to index with 1 set of RGBA in every iteration.?0, 4, 8, 12...?
    const r = imageData.data[index];
    const g = imageData.data[index + 1];
    const b = imageData.data[index + 2];
    const a = imageData.data[index + 3];
}
访问图像像素 (Accessing image pixels)
We are going to calculate the X and Y coordinates so that the image can be placed in the center.
我们将计算X和Y坐标,以便可以将图像放置在中心。
const imageData = getImageDataFromVideo();
for (let y = 0, height = imageData.height; y < height; y += 1) {
    for (let x = 0, width = imageData.width; x < width; x += 1) {
        const vX = x - imageData.width / 2;  // Shift in X direction since origin is center of screen
        const vY = -y + imageData.height / 2;  // Shift in Y direction in the same way (you need -y)
    }
}
从图像像素创建粒子 (Create particles from image pixels)
For creating a particle, we can use THREE.Geometry() and THREE.PointsMaterial().
为了创建粒子,我们可以使用THREE.Geometry()和THREE.PointsMaterial() 。
Each pixel is added to the geometry as a vertex.
每个像素都作为顶点添加到几何中。
const geometry = new THREE.Geometry();
geometry.morphAttributes = {};
const material = new THREE.PointsMaterial({
    size: 1,
    color: 0xff0000,
    sizeAttenuation: false
});

const imageData = getImageDataFromVideo();
for (let y = 0, height = imageData.height; y < height; y += 1) {
    for (let x = 0, width = imageData.width; x < width; x += 1) {
        const vertex = new THREE.Vector3(
            x - imageData.width / 2,
            -y + imageData.height / 2,
            0
        );
        geometry.vertices.push(vertex);
    }
}
particles = new THREE.Points(geometry, material);
scene.add(particles);
画 (Draw)
In the drawing stage, the updated image is drawn using particles by getting the image data from the camera and calculating a grayscale value from it.
在绘制阶段,通过从相机获取图像数据并从中计算灰度值,使用粒子绘制更新后的图像。
By calling this process on every frame, the screen visual is updated just like a video.
通过在每一帧上调用此过程,屏幕视觉效果就像视频一样进行更新。
const imageData = getImageDataFromVideo();
for (let i = 0, length = particles.geometry.vertices.length; i < length; i++) {
    const particle = particles.geometry.vertices[i];
    let index = i * 4;

    // Take an average of RGB and make it a gray value.
    let gray = (imageData.data[index] + imageData.data[index + 1] + imageData.data[index + 2]) / 3;

    let threshold = 200;
    if (gray < threshold) {
        // Apply the value to Z coordinate if the value of the target pixel is less than threshold.
        particle.z = gray * 50;
    } else {
        // If the value is greater than threshold, make it big value.
        particle.z = 10000;
    }
}
particles.geometry.verticesNeedUpdate = true;
音讯 (Audio)
In this section, let’s have a look at how the audio is processed.
在本节中,让我们看一下音频的处理方式。
加载音频文件并播放 (Loading of the audio file and playback)
For audio loading, we can use THREE.AudioLoader().
对于音频加载,我们可以使用THREE.AudioLoader() 。
const audioListener = new THREE.AudioListener();
audio = new THREE.Audio(audioListener);

const audioLoader = new THREE.AudioLoader();
// Load audio file inside asset folder
audioLoader.load('asset/audio.mp3', (buffer) => {
    audio.setBuffer(buffer);
    audio.setLoop(true);
    audio.play();  // Start playback
});
For getting the average frequency analyser.getAverageFrequency() comes in handy.
为了获得平均频率, analyser.getAverageFrequency()派上了用场。
By applying this value to the Z coordinate of our particles, the depth effect of the visualizer is created.
通过将此值应用于粒子的Z坐标,可以创建可视化器的深度效果。
获取音频 (Getting the audio frequency)
And this is how we get the audio frequency:
这就是我们获得音频的方式:
// About fftSize https://developer.mozilla.org/en-US/docs/Web/API/AnalyserNode/fftSize
analyser = new THREE.AudioAnalyser(audio, fftSize);

// analyser.getFrequencyData() returns array of half size of fftSize.
// ex. if fftSize = 2048, array size will be 1024.
// data includes magnitude of low ~ high frequency.
const data = analyser.getFrequencyData();

for (let i = 0, len = data.length; i < len; i++) {
    // access to magnitude of each frequency with data[i].
}
结合网络摄像头输入和音频 (Combining web camera input and audio)
Finally, let’s see how the drawing process works that uses both, the camera image and the audio data.
最后,让我们看看同时使用摄像机图像和音频数据的绘制过程如何工作。
通过对音频做出React来处理图像 (Manipulate the image by reacting to the audio)
By combining the techniques we’ve seen so far, we can now draw an image of the web camera with particles and manipulate the visual using audio data.
通过结合到目前为止已经看到的技术,我们现在可以绘制带有粒子的网络摄像机图像,并使用音频数据来操纵视觉效果。
const draw = () => {
    // Audio
    const data = analyser.getFrequencyData();
    let averageFreq = analyser.getAverageFrequency();

    // Video
    const imageData = getImageData();
    for (let i = 0, length = particles.geometry.vertices.length; i < length; i++) {
        const particle = particles.geometry.vertices[i];

        let index = i * 4;
        let gray = (imageData.data[index] + imageData.data[index + 1] + imageData.data[index + 2]) / 3;
        let threshold = 200;
        if (gray < threshold) {
            // Apply gray value of every pixels of web camera image and average value of frequency to Z coordinate of particle.
            particle.z = gray * (averageFreq / 255);
        } else {
            particle.z = 10000;
        }
    }
    particles.geometry.verticesNeedUpdate = true;  // Necessary to update

    renderer.render(scene, camera);

    requestAnimationFrame(draw);
};
And that’s all. Wasn’t that complicated, was it? Now you know how to create your own audio visualizer using web camera and audio input.
就这样。 那不是很复杂吗? 现在您知道了如何使用网络摄像头和音频输入创建自己的音频可视化器。
We’ve used THREE.Geometry and THREE.PointsMaterial here but you can take it further and use Shaders. Demo 2 shows an example of that.
我们在这里使用了THREE.Geometry和THREE.PointsMaterial ,但是您可以进一步使用Shaders。 演示2显示了一个示例。
We hope you enjoyed this tutorial and get inspired to create something with it.
我们希望您喜欢本教程,并从中获得启发以创建一些东西。
翻译自: https://tympanus.net/codrops/2019/09/06/how-to-create-a-webcam-audio-visualizer-with-three-js/


 3670
3670


 被折叠的 条评论
为什么被折叠?
被折叠的 条评论
为什么被折叠?
 到【灌水乐园】发言


