


 这个教程展示了如何使用PixiJS创建一个视觉独特、可用和可访问的水下样式导航。从简单的HTML导航开始,通过JavaScript构建PixiJS应用,添加着色器以实现屏幕扭曲和按钮悬停效果,同时保持可访问性。
水下机器人使用
This demo shows one way to make a navigation that is visually distinct, usable and accessible. Using the provided code, you can create all sorts of variations on this theme. I encourage you to try your hand at modifying it in interesting ways.
该演示演示了一种制作视觉上独特,可用和可访问的导航的方法。 使用提供的代码,您可以为此主题创建各种变体。 我鼓励您尝试以有趣的方式进行修改。
The inspiration for this demo comes from the Dribbble shot Holidays Menu by BestServedBold.
该演示的灵感来自BestServedBold的Dribbble Shots Holidays Menu 。
工作原理:一般方法(How it works: General Approach)
In this demo we start with a simple HTML navigation:
在此演示中,我们从简单HTML导航开始:
<label class="main-nav-open nav-toggle" for="main-nav-toggle" tabindex="0">
  Menu
</label>
<input type="checkbox" id="main-nav-toggle" />
<nav class="main-nav">
  <ul class="main-nav__fallback">
    <li>
      <a href="/">Home</a>
    </li>
    <li>
      <a href="/about">About</a>
    </li>
    <li>
      <a href="/work">Our Work</a>
    </li>
    <li>
      <a href="/team">The Team</a>
    </li>
    <li>
      <a href="/contact">Contact Us</a>
    </li>
  </ul>
  <label class="main-nav__close nav-toggle" for="main-nav-toggle" tabindex="0" />
</nav>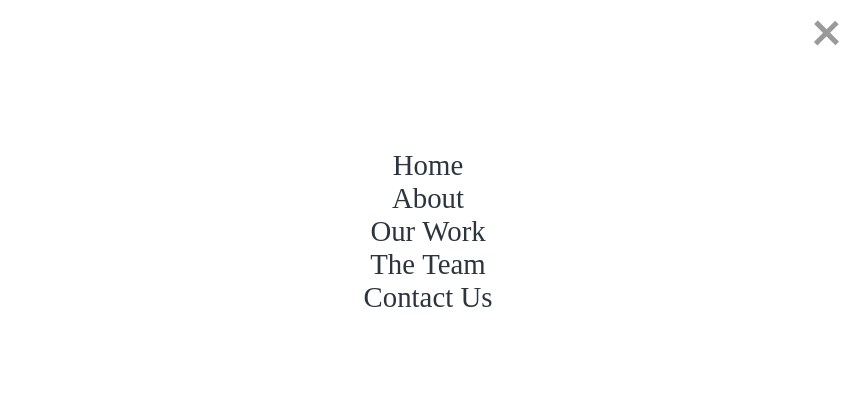
With this basic setup we end up with a navigation that looks like this:
通过此基本设置,我们最终得到如下导航:
You can view the demo for this step here: Demo of step 1
您可以在此处查看此步骤的演示:步骤1的演示
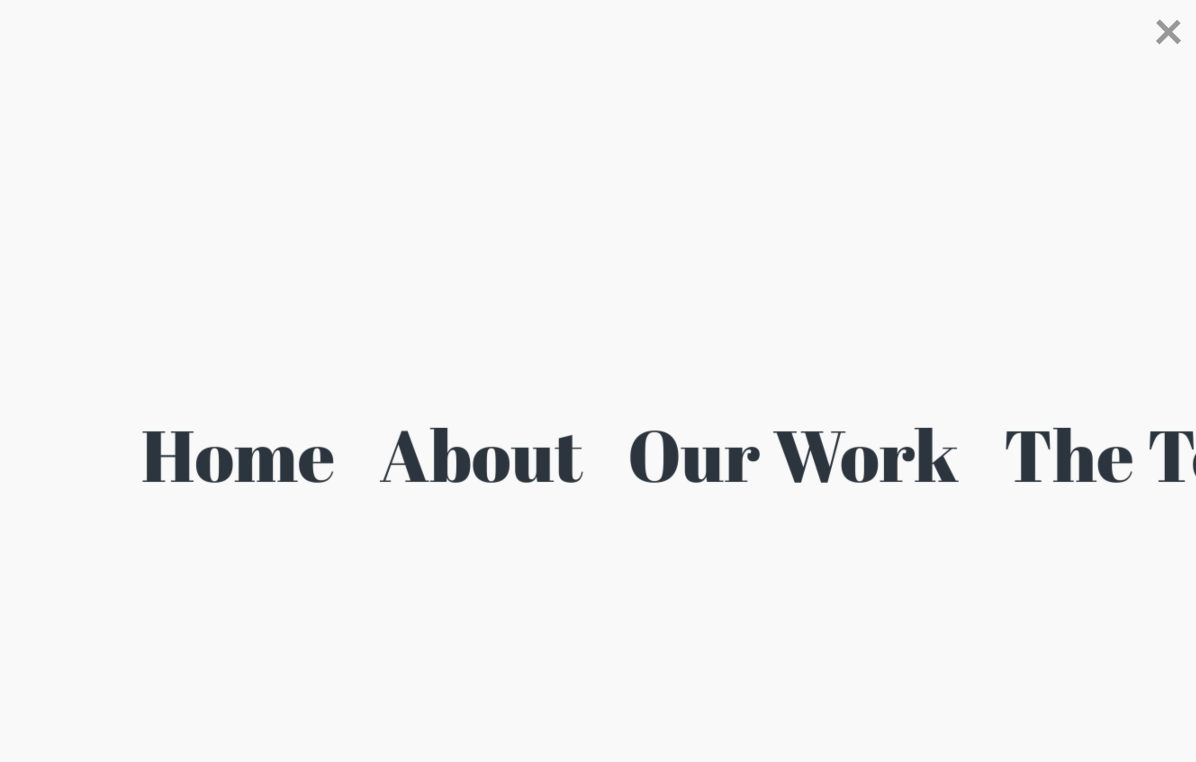
Given this, we will write some JavaScript that builds out the navigation elements, and builds out a PixiJS application. At that point it looks something like this:
鉴于此,我们将编写一些JavaScript来构建导航元素,并构建一个PixiJS应用程序。 那时看起来像这样:
Once we have this fundamental functionality in place, we can add the really fun stuff: shaders.
一旦有了基本功能,就可以添加真正有趣的东西:着色器。
We’ll be building out two different shaders (or, in PixiJS’s nomenclature: filters). One for the screen as a whole that distorts and blurs the navigation. The second is the shader that renders the buttons on hover or focus.
我们将构建两个不同的着色器(或以PixiJS的名称命名:滤镜)。 整个屏幕的扭曲和模糊导航。 第二个是着色器,用于在悬停或焦点上渲染按钮。
So, with our general approach in place, let’s dive in.
因此,有了我们的一般方法,让我们开始吧。
建立导航类 (Building the navigation class)
For this tutorial, I’m going to focus on the JavaScript. In the source you’ll find the fully commented JavaScript and shader code. I will not be covering the fundamentals of GLSL or fragment shader programming here, for that please see The Book of Shaders.
在本教程中,我将重点介绍JavaScript。 在源代码中,您将找到带有完整注释JavaScript和着色器代码。 我不会在这里介绍GLSL或片段着色器编程的基础知识,为此,请参阅《着色器之书》 。
初始化 (Initialisation)
The very first thing we want to do is set up the basic initialisation functionality. In the main.js file you’ll find the following:
我们要做的第一件事就是设置基本的初始化功能。 在main.js文件中,您将找到以下内容:
// Create the navigation based on the nav element
const nav = new Navigation(document.querySelector('.main-nav'));

// Load the web font and, once it's loaded, initialise the nav.
WebFont.load({
  google: {
    families: ['Abril Fatface']
  },
  active: () => {
    nav.init();
    nav.focusNavItemByIndex(0);
  }
});
The above code creates the Navigation instance, supplying it with the navigation HTML element – document.querySelector('.main-nav'). Then it initialises the font load for Abril Fatface and, once that’s loaded, initialises the navigation.
上面的代码创建了Navigation实例,并为其提供了导航HTML元素– document.querySelector('.main-nav') 。 然后,它初始化Abril Fatface的字体加载,并在加载后初始化导航。
导航类结构 (Navigation class structure)
Following is the basic class structure for the Navigation class:
以下是Navigation类的基本类结构:
/**
 * This class provides encapsulates the navigation as a whole. It is provided the base
 * navigation element which it reads and recreates in the Pixi application
 *
 * @class Navigation
 * @author Liam Egan
 * @version 1.0.0
 * @created Mar 20, 2019
 */
class Navigation {

  /**
   * The Navigation constructor saves the navigation element and binds all of the
   * basic listener methods for the class.
   *
   * The provided nav element should serve as both a container to the pixi canvas
   * as well as containing the links that will become the navigation. It's important
   * to understand that any elements within the navigation element that might appear
   * will be covered by the application canvas, so it should serve only as a
   * container for the navigation links and the application canvas.
   *
   * @constructor
   * @param {HTMLElement} nav         The navigation container.
   */
  constructor(nav) { }

  /**
   * Initialises the navigation. Creates the navigation items, sets up the pixi
   * application, and binds the various listeners.
   *
   * @public
   * @return null
   */
  init() { }

  /**
   * Initialises the Navigation item elements, initialising their canvas
   * renditions, their pixi sprites and initialising their interactivity.
   *
   * @public
   * @return null
   */
  makeNavItems() { }

  /**
   * Public methods
   */

  /**
   * Initialises the Navigation item as a canvas element. This takes a string and renders it
   * to the canvas using fillText.
   *
   * @public
   * @param {String} title      The text of the link element
   * @return {Canvas}           The canvas alement that contains the text rendition of the link
   */
  makeNavItem(title) { }

  /**
   * Initialises the PIXI application and appends it to the nav element
   *
   * @public
   * @return null
   */
  setupWebGLContext() { }

  /**
   * Given a numeric index, this calculates the position of the
   * associated nav element within the application and simulates
   * a mouse move to that position.
   *
   * @public
   * @param {Number} index      The index of the navigation element to focus.
   * @return null
   */
  focusNavItemByIndex(index) { }

  /**
   * Removes all of the event listeners and any association of
   * the navigation object, preparing the instance for garbage
   * collection.
   *
   * This method is unused in this demo, but exists here to
   * provide somewhere for you to remove all remnents of the
   * instance from memory, if and when you might need to.
   *
   *
   * @public
   * @return null
   */
  deInit() { }

  /**
   * Redraws the background graphic and the container mask.
   *
   * @public
   * @return null
   */
  setupBackground() { }

  /**
   * Coerces the mouse position as a vector with units in the 0-1 range
   *
   * @public
   * @param {Array} mousepos_px      An array of the mouse's position on screen in pixels
   * @return {Array}
   */
  fixMousePos(mousepos_px) { }


  /**
   * Event callbacks
   */

  /**
   * Responds to the window resize event, resizing the stage and redrawing
   * the background.
   *
   * @public
   * @param {Object} e     The event object
   * @return null
   */
  onResize(e) { }

  /**
   * Responds to the window pointer move event, updating the application's mouse
   * position.
   *
   * @public
   * @param {Object} e     The event object
   * @return null
   */
  onPointerMove(e) { }

  /**
   * Responds to the window pointer down event, creating a timeout that checks,
   * after a short period of time, whether the pointer is still down, after
   * which it sets the dragging property to true.
   *
   * @public
   * @param {Object} e     The event object
   * @return null
   */
  onPointerDown(e) { }

  /**
   * Responds to the window pointer up event, sets pointer down to false and,
   * after a short time, sets dragging to false.
   *
   * @public
   * @param {Object} e     The event object
   * @return null
   */
  onPointerUp(e) { }


  /**
   * Getters and setters (properties)
   */

  /**
   * (getter/setter) The colour of the application background. This can take
   * a number or an RGB hex string in the format of '#FFFFFF'. It stores
   * the colour as a number
   *
   * @type {number/string}
   * @default 0xF9F9F9
   */
  set backgroundColour(value) { }
  get backgroundColour() { }

  /**
   * (getter/setter) The position of the mouse/pointer on screen. This
   * updates the position of the navigation in response to the cursor
   * and fixes the mouse position before passing it to the screen
   * filter.
   *
   * @type {Array}
   * @default [0,0]
   */
  set mousepos(value) { }
  get mousepos() { }

  /**
   * (getter/setter) The amount of padding at the edge of the screen. This
   * is sort of an arbitrary value at the moment, so if you start to see
   * tearing at the edge of the text, make this value a little higher
   *
   * @type {Number}
   * @default 100
   */
  set maskpadding(value) { }
  get maskpadding() { }
}
The Navigation constructor is given the nav HTML element and it initialises all of the basic properties of the class
向Navigation构造函数提供了nav HTML元素,它初始化了该类的所有基本属性
constructor(nav) {
    // Save the nav
    this.nav = nav;

    // Set up the basic object property requirements.
    this.initialised = false;   // Whether the navigation is already initialised
    this.navItems = [];         // This will contain the generic nav item objects
    this.app = null;            // The PIXI application
    this.container = null;      // The PIXI container element that will contain the nav elements
    this.screenFilter = null;   // The screen filter to be appliced to the container
    this.navWidth = null;       // The full width of the navigation
    this.background = null;     // The container for the background graphic
    this.pointerdown = false;   // Indicates whether the user's pointer is currently down on the page
    this.dragging = false;      // Indicates whether the nav is currently being dragged. This is here to allow for both the dragging of the nav and the tapping of elements.

    // Bind the listener methods to the class instance
    this.onPointerMove = this.onPointerMove.bind(this);
    this.onPointerDown = this.onPointerDown.bind(this);
    this.onPointerUp = this.onPointerUp.bind(this);
    this.onResize = this.onResize.bind(this);
  }
构建导航元素 (Building the navigation elements)
Once the class is constructed and the fonts are loaded, we initialise the navigation. The first part of building out the PixiJS application is to create the navigation items. PixiJS uses specialised objects for the display of various elements that, at their root, are images. So the first thing we need to do is initialise an array of all of the nav items that we want. Within our init method, we see the following:
构造好类并加载字体后,我们将初始化导航。 构建PixiJS应用程序的第一步是创建导航项。 PixiJS使用专门的对象来显示从根本上讲就是图像的各种元素。 因此,我们需要做的第一件事是初始化我们想要的所有导航项的数组。 在我们的init方法中,我们看到以下内容:
// Find all of the anchors within the nav element and create generic object
    // holders for them.
    const els = this.nav.querySelectorAll('a');
    els.forEach((el) => {
      this.navItems.push({
        rootElement:  el,             // The anchor element upon which this nav item is based
        title:        el.innerText,   // The text of the nav item
        element:      null,           // This will be a canvas representation of the nav item
        sprite:       null,           // The PIXI.Sprite element that will be appended to stage
        link:         el.href         // The link's href. This will be used when clicking on the button within the nav
      });
    });
This code loops through the anchor elements within the navigation and initialises the basic objects for use by the navigation class. Once this is done we can move onto actually creating the basic nav elements:
此代码循环浏览导航中的锚点元素,并初始化供导航类使用的基本对象。 完成此操作后,我们可以继续实际创建基本的nav元素:
makeNavItem(title) {
    if(!this.initialised) return;

    const c = document.createElement('canvas');
    const ctx = c.getContext('2d');

    const font = 'Abril Fatface';
    const fontSize = 80;

    ctx.font = `${fontSize}px ${font}`; // This is here purely to run the measurements

    c.width = ctx.measureText(title).width + 50;
    c.height = fontSize*1.5;

    ctx.font = `${fontSize}px ${font}`;
    ctx.textAlign="center";
    ctx.textBaseline="bottom";
    ctx.fillStyle = "rgba(40,50,60,1)";
    ctx.fillText(title, c.width*.5, c.height-fontSize*.2);

    return c;
  }
The above code takes a title (provided by a loop in the makeNavItems method), it creates a canvas element, initialises the font, and writes out the text onto the canvas.
上面的代码带有一个标题(由makeNavItems方法中的循环提供),它创建一个canvas元素,初始化字体,并将文本写到画布上。
The reason we do this instead of writing the text directly into PixiJS is that font rendition in canvas is more predictable and reliable. Doing so also provides us with the opportunity to add other canvas styling such as text strokes, or shadows.
我们这样做而不是直接将文本写到PixiJS中的原因是,画布中的字体呈现更加可预测和可靠。 这样做还为我们提供了添加其他画布样式的机会,例如文本笔触或阴影。
初始化PixiJS应用程序 (Initialising the PixiJS application)
Following is the method uses to initialise the PixiJS application:
以下是用于初始化PixiJS应用程序的方法:
setupWebGLContext() {
    if(!this.initialised) return;

    // Create the pixi application, setting the background colour, width and
    // height and pixel resolution.
    this.app = new PIXI.Application({
      backgroundColor: this.backgroundColour,
      width: window.innerWidth,
      height: window.innerHeight,
      resolution: 2
    });
    // Ofsetting the stage to the middle of the page. I find it easier to
    // position things to a point in the middle of the window, so I do this
    // but you might find it easier to position to the top left.
    this.app.stage.x = window.innerWidth * .5;
    this.app.stage.y = window.innerHeight * .5;
This initialises the application and rearranges the stage to the middle of the window.
这将初始化应用程序,并将阶段重新安排到窗口的中间。
// Create the container and apply the screen filter to it.
    this.container = new PIXI.Container();
    this.screenFilter = new ScreenFilter(2);
    this.app.stage.filters = [this.screenFilter];
This creates the object that contains the navigation itself and applies to it the screen filter.
这将创建包含导航本身的对象,并将其应用于屏幕过滤器。
// Measure what will be the full pixel width of the navigation
    // Then loop through the nav elements and append them to the containter
    let ipos = 0;                                 // The tracked position for each element in the navigation
    this.navWidth = 0;                            // The full width of the navigation
    this.navItems.forEach((item) => {
      this.navWidth += item.sprite.width;
    });
    this.navItems.forEach((item) => {
      item.sprite.x = this.navWidth * -.5 + ipos; // Calculate the position of the nav element to the nav width
      ipos += item.sprite.width;                  // update the ipos
      this.container.addChild(item.sprite);       // Add the sprite to the container
    });
This code loops through the navigation items and calculates their positions inside the PixiJS application.
该代码遍历导航项并计算它们在PixiJS应用程序中的位置。
// Create the background graphic
    this.background = new PIXI.Graphics();
    this.setupBackground();

    // Add the background and the container to the stage
    this.app.stage.addChild(this.background);
    this.app.stage.addChild(this.container);
Sets up the background and attaches it and the container to the stage.
设置背景并将其和容器附加到舞台上。
// Set the various necessary attributes and class for the canvas
    // elmenent and append it to the nav element.
    this.app.view.setAttribute('aria-hidden', 'true');    // This just hides the element from the document reader (for sight-impaired people)
    this.app.view.setAttribute('tab-index', '-1');        // This takes the canvas element out of tab order completely (tabbing will be handled programatically using the actual links)
    this.app.view.className = 'main-nav__canvas';         // Add the class name
    this.nav.appendChild(this.app.view);                  // Append the canvas to the nav element
  }
Finally we set some basic properties to the application’s canvas element and we attach it to the nav element that was provided to the class constructor.
最后,我们为应用程序的canvas元素设置了一些基本属性,并将其附加到提供给类构造函数的nav元素上。
使其互动 (Making it interactive)
makeNavItems() {
    if(!this.initialised) return;

    // Loop through the navItems object
    this.navItems.forEach((navItem, i) => {
      // Make the nav element (the canvas rendition of the anchor) for this item.
      navItem.element = this.makeNavItem(navItem.title, navItem.link);

      // Create the PIXI sprite from the canvas
      navItem.sprite = PIXI.Sprite.from(navItem.element);

      // Turn the sprite into a button and initialise the various event listeners
      navItem.sprite.interactive = true;
      navItem.sprite.buttonMode = true;
      const filter = new HoverFilter();
      // This provides a callback for focus on the root element, providing us with
      // a way to cause navigation on tab.
      navItem.rootElement.addEventListener('focus', ()=> {
        this.focusNavItemByIndex(i);
        navItem.sprite.filters = [filter];
      });
      navItem.rootElement.addEventListener('blur', ()=> {
        navItem.sprite.filters = [];
      });
      // on pointer over, add the filter
      navItem.sprite.on('pointerover', (e)=> {
        navItem.sprite.filters = [filter];
      });
      // on pointer out remove the filter
      navItem.sprite.on('pointerout', (e)=> {
        navItem.sprite.filters = [];
      });
      // On pointer up, if we're not dragging the navigation, execute a click on
      // the root navigation element.
      navItem.sprite.on('pointerup', (e)=> {
        if(this.dragging) return;
        navItem.rootElement.click();
      });
    });
  }
This method loops through the navItems array creating the nav item canvas element, initialising the PixiJS Sprite element using this canvas, then attaching listeners to various interactions.
该方法遍历navItems数组,创建nav item canvas元素,使用此canvas初始化PixiJS Sprite元素,然后将侦听器附加到各种交互。
Note that in order for a PixiJS sprite to be able to react to mouse events in this way it needs to have its interactuve and buttonMode properties set to true
请注意,为了使PixiJS Sprite能够以这种方式对鼠标事件做出React,需要将其interactuve和buttonMode属性设置为true
The reasons and functions of the listeners here is as follows:
侦听器的原因和功能如下:
-
rootElement:focus
rootElement:focus
- This listens to the focus event of the anchor element that defines this button. It then tells the application to move to this nav item and add the filter we use for mouse hover.
- 这将侦听定义此按钮的锚元素的focus事件。 然后,它告诉应用程序移至该导航项,并添加用于鼠标悬停的过滤器。 rootElement:blur rootElement:blur
- Triggered when focus leaves the element. This simply removes the filter
- 当焦点离开元素时触发。 这只是删除过滤器 navItem.pointerover navItem.pointerover
- Adds the hover filter
- 添加悬停过滤器 navItem.pointerout navItem.pointerout
- Removes the hover filter
- 删除悬停过滤器 navItem.pointerup navItem.pointerup
- This listens to the pointer up event on the nav item and, if the user isn’t dragging the nav (this check is here for touch devices), then a click event is triggered on the root element.
- 这将侦听导航项上的指针向上事件,并且,如果用户未拖动导航(此检查在此处是针对触摸设备),则在根元素上触发单击事件。
In addition to the above, we also add stage-level listeners that provide the overall movement functionality to the navigation. The reasons and functions of the listeners here is as follows:
除上述内容外,我们还添加了阶段级侦听器,这些侦听器为导航提供了整体移动功能。 侦听器的原因和功能如下:
-
onPointerMove
onPointerMove
- This method updates the mouse position when the pointer moves and sends it to the application.
- 当指针移动并将其发送到应用程序时,此方法将更新鼠标位置。 onPointerDown onPointerDown
- This picks up when the pointer has been pressed and starts a timeout that determines whether the intention of the pointer being down was to drag the navigation. This makes sure that touch users can use both the navigation and buttons.
- 当按下指针时它将拾取并启动超时,该超时确定指针向下的意图是否是拖动导航。 这样可以确保触摸用户可以同时使用导航和按钮。 onPointerUp onPointerUp
- Resets both the pointerdown and dragging property
- 重置pointerdown和draging属性
PixiJS过滤器如何工作(How PixiJS filters work)
In PixiJs nomenclature, a filter is a class that is a wrapper around a fragment shader. The basic code to apply a filter to a PixiJS display object is:
在PixiJ的术语中,过滤器是一类,是片段着色器的包装器。 将过滤器应用于PixiJS显示对象的基本代码是:
const screenFilter = new ScreenFilter(2);
displayObject.filters = [this.screenFilter];
And for the whole time that filter sits in the array of that display object it will be rendered in place of the display object.
在整个时间内,过滤器都位于该显示对象的数组中,它将代替显示对象进行渲染。
There are many ways to write filters for PixiJS but for our purposes we’re going to write classes that extend PIXI.Filter because we want to run a little extra code during the render loop for the filter.
有很多方法可以为PixiJS编写过滤器,但出于我们的目的,我们将编写扩展PIXI.Filter类,因为我们希望在过滤器的渲染循环期间运行一些额外的代码。
The PixiJS filter itself creates a fragment shader and allows that shader to be run over any PixiJS display object, providing the ability to read the pixels that make up the object and limiting the render area to the bounds of that display object. This is very powerful as it limits the computational power required to run the shader.
PixiJS过滤器本身会创建片段着色器,并允许该着色器在任何PixiJS显示对象上运行,从而能够读取组成对象的像素,并将渲染区域限制为该显示对象的边界。 这非常强大,因为它限制了运行着色器所需的计算能力。
For this demo, I’ve written two filters. One will run over the buttons themselves as they’re hovered or focused, the other will run over the navigation container itself.
对于此演示,我编写了两个过滤器。 当它们悬停或聚焦时,一个将在按钮本身上方运行,另一个将在导航容器本身上方运行。
编写按钮悬停过滤器 (Writing the filter for button hover)
This filter runs only on the buttons and only when the buttons have been hovered or focused. It’s a reasonably straightforward filter that updates a time variable every frame for the purpose of animating some noise in the fragment shader. Please see the HoverFilter.fragmentSrc method for more information.
此筛选器仅在按钮上并且仅在按钮悬停或聚焦时运行。 这是一个相当简单明了的过滤器,它每帧都会更新一个时间变量,以动画化片段着色器中的一些噪声。 请参阅HoverFilter.fragmentSrc方法以获取更多信息。
编写过滤器以消除屏幕失真 (Writing the filter for the screen distortion)
This filter runs on the display object for the navigation group of elements itself. It distorts and blurs the navigation in a radius around the position of the user’s mouse and, in combination with the animation of the navigation itself, this provides a sense of refraction, and distortion like looking at the navigation under water. Please see the ScreenFilter.fragmentSrc method for more information.
此过滤器在元素本身导航组的显示对象上运行。 它会使导航在用户鼠标位置周围的半径范围内失真和模糊,并与导航本身的动画结合,从而提供折射感和扭曲感,就像在水下看导航一样。 请参阅ScreenFilter.fragmentSrc方法以获取更多信息。
使其可访问 (Making it accessible)
We should be making websites for everybody. So this demo attempts to make a functional element that can be used by anybody. Keyboard users and screen readers are able to consume this navigation as easily as they would a normal website navigation and this is in thanks to the use of focus listeners.
我们应该为所有人打造网站。 因此,此演示尝试制作一个可以被任何人使用的功能元素。 键盘用户和屏幕阅读器可以像正常的网站导航一样轻松地使用此导航,这要归功于使用了焦点侦听器。
总结思想 (Closing thoughts)
In this demo we see that the power of webGL is wonderful. With it we can create really new and exciting things, and it allows us to take old ideas and make them new again.
在此演示中,我们看到了webGL的强大功能。 有了它,我们可以创造出真正新颖和令人兴奋的东西,并且它使我们能够吸收旧的想法并将它们重新变得新颖。
In the source code for this demo you’ll be able to see how I’ve constructed the shaders that control the appearance of the navigation. In the process of building this I’ve tried to be as clear and straightforward as possible, so please try your hand at modifying the code. I would love to see what you can create with this basic setup, feel free to @me or message me on Twitter with anything you may think of.
在此演示的源代码中,您将能够看到我如何构造用于控制导航外观的着色器。 在构建此代码的过程中,我尝试尽可能清晰明了,因此请尝试修改代码。 我很想看看您可以使用此基本设置创建的内容,可以随时发送@me或在Twitter上向我发送任何您可能想到的信息。
翻译自: https://tympanus.net/codrops/2019/04/24/how-to-build-an-underwater-style-navigation-using-pixijs/
水下机器人使用


 3642
3642

 被折叠的 条评论
为什么被折叠?
被折叠的 条评论
为什么被折叠?
 到【灌水乐园】发言


