jquery 背景图片

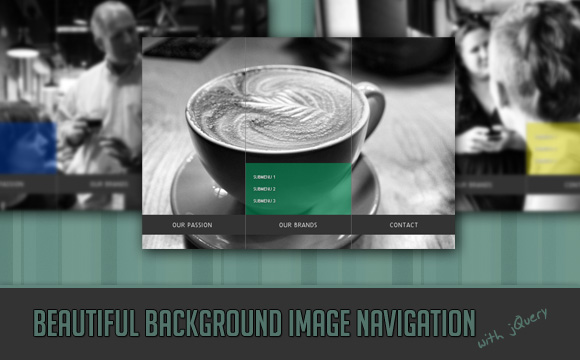
In this tutorial we are going to create a beautiful navigation that has a background image slide effect. The main idea is to have three list items that contain the same background image but with a different position. The background image for each item will be animated to slide into place in different times, creating a really nice effect. The background image sliding direction from the list item in the middle will depend on which item the user was before: coming from the right, it will slide from the left and vice versa.
在本教程中,我们将创建一个具有背景图像幻灯片效果的精美导航。 主要思想是使三个列表项包含相同的背景图像,但位置不同。 每个项目的背景图像将被动画化,以在不同的时间滑动到适当的位置,从而产生非常好的效果。 从中间的列表项开始的背景图像滑动方向将取决于用户之前在哪个项:从右侧进入,它将从左侧滑动,反之亦然。
On top of that we will have sub-menus that appear with their semi-transparent background sliding in. These backgrounds create an awesome effect of actually just being one element that slides into place, changing its color.
最重要的是,我们将显示带有其半透明背景滑入的子菜单。这些背景产生了令人敬畏的效果,实际上只是一个滑入到位并改变其颜色的元素。
Note: There is a new version which let’s you customize things better: Sliding Background Image Menu with jQuery
注意:有一个新版本,可让您更好地自定义内容:使用jQuery滑动背景图像菜单
We will be using the amazing Background-Position Animation Plugin by Alexander Farkas.
我们将使用Alexander Farkas令人惊叹的Background-Position动画插件。
The photos that we will be using are from Pat’s beautiful B&W collection on Flickr.
我们将使用的照片来自Pat在Flickr上漂亮的B&W系列。
There will be a little bit of CSS3 involved which absence will almost not be notable when using a browser that does not support its properties (like IE).
在使用不支持其属性的浏览器(例如IE)时,几乎不会出现CSS3的缺失。
We tried to make this one cross-browser compatible and voilà! It works beautifully in Google Chrome, Firefox, Opera, Safari, IE8, IE7 and guess what, it even works respectively in IE6. (We are using an adapted style sheet and you will have to apply some PNG fix if you want the sub-menu backgrounds to be semi-transparent. )
我们试图使这一跨浏览器兼容并且很流行! 它在Google Chrome,Firefox,Opera,Safari,IE8,IE7中可以很好地工作,并且猜猜它甚至在IE6中也可以工作。 (我们使用的是经过调整的样式表,如果您希望子菜单背景是半透明的,则必须应用一些PNG修复程序。)
OK, so let’s get started!
好的,让我们开始吧!
标记 (The Markup)
The HTML will consist of a wrapper div and an unordered list with three list items. We will initially set some “bg” classes that will have the respective background images. The “menuWrapper” will always have the “bg” class of the current list item so that we have the background image of the current list item.
HTML将由包装div和具有三个列表项的无序列表组成。 我们将首先设置一些具有各自背景图像的“ bg”类。 “ menuWrapper”将始终具有当前列表项的“ bg”类,以便我们具有当前列表项的背景图像。
<div id="menuWrapper" class="menuWrapper bg1">
	<ul class="menu" id="menu">
		<li class="bg1" style="background-position:0 0;">
			<a id="bg1" href="#">Our Passion</a>
			<ul class="sub1" style="background-position:0 0;">
				<li><a href="#">Submenu 1</a></li>
				<li><a href="#">Submenu 2</a></li>
				<li><a href="#">Submenu 3</a></li>
			</ul>
		</li>
		<li class="bg1" style="background-position:-266px 0px;">
			<a id="bg2" href="#">Our Brands</a>
			<ul class="sub2" style="background-position:-266px 0;">
				<li><a href="#">Submenu 1</a></li>
				<li><a href="#">Submenu 2</a></li>
				<li><a href="#">Submenu 3</a></li>
			</ul>
		</li>
		<li class="last bg1" style="background-position:-532px 0px;">
			<a id="bg3" href="#">Contact</a>
			<ul class="sub3" style="background-position:-266px 0;">
				<li><a href="#">Submenu 1</a></li>
				<li><a href="#">Submenu 2</a></li>
				<li><a href="#">Submenu 3</a></li>
			</ul>
		</li>
	</ul>
</div>
For the background animation plugin to work correctly we need to set the position of the background image as inline styles initially. We already set the right position for each background image, for example, the third item will have the background image positioned to the outer right.
为了使背景动画插件正常工作,我们需要首先将背景图像的位置设置为嵌入式样式。 我们已经为每个背景图像设置了正确的位置,例如,第三项将背景图像定位在右外。
As you can see, every list item has another sub-list with three more items. The background image position of these sublists is set to a value that hides the image. When we animate the background then, we will create the effect of sliding it in from the left or the right.
如您所见,每个列表项都有另一个带有三个项的子列表。 这些子列表的背景图像位置设置为隐藏图像的值。 然后,当我们对背景进行动画处理时,我们将产生从左或向右滑动背景的效果。
CSS (The CSS)
Let’s start by the general style of the the “menuWrapper” which will contain the font styles and the size of the whole element:
让我们从“ menuWrapper”的一般样式开始,它将包含字体样式和整个元素的大小:
.menuWrapper{
    font-family: "Trebuchet MS", Arial, sans-serif;;
    font-size: 15px;
    font-style: normal;
    font-weight: normal;
    text-transform:uppercase;
    letter-spacing: normal;
    line-height: 1.45em;
    position:relative;
    margin:20px auto;
    height:542px;
    width:797px;
    background-position:0 0;
    background-repeat:no-repeat;
    background-color:transparent;
}
The list and the list items of the first layer will have the following style:
第一层的列表和列表项将具有以下样式:
ul.menu{
    list-style:none;
    width:797px;
}
ul.menu > li{
    float:left;
    width:265px;
    height:542px;
    border-right:1px solid #777;
    background-repeat:no-repeat;
    background-color:transparent;
}
ul.menu > li.last{
    border:none;
}
The selector “>” addresses only the li elements of the first layer and will not be applied to the ones of the sub-menus. We will give the last li the class “last” in order to remove the right border.
选择器“>”仅处理第一层的li元素,不会应用于子菜单中的子元素。 我们将给最后一个li类“ last”,以删除右边界。
The following three classes define the background images. We will give these classes to all the li elements depending on which one we hover. So, if we hover the second li, we will give the “bg2” class to all the first layer list items:
以下三个类定义了背景图像。 我们将这些类赋予所有li元素,具体取决于我们将其悬停在哪一个元素上。 因此,如果将鼠标悬停在第二个li上,将为所有第一层列表项提供“ bg2”类:
.bg1{
    background-image: url(../images/1.jpg);
}
.bg2{
    background-image: url(../images/2.jpg);
}
.bg3{
    background-image: url(../images/3.jpg);
}
Let’s define the look of the link elements in the first layer list. Since the li elements have a big height, we need to push the link elements down. We do that by setting a high top margin:
让我们在第一层列表中定义链接元素的外观。 由于li元素的高度很大,因此我们需要将link元素向下推。 我们通过设置较高的最高利润来做到这一点:
ul.menu > li > a{
    float:left;
    width:265px;
    height:50px;
    margin-top:450px;
    text-align:center;
    line-height:50px;
    color:#ddd;
    background-color:#333;
    letter-spacing:1px;
    cursor:pointer;
    text-decoration:none;
    text-shadow:0px 0px 1px #fff;
}
To center the text of a link element vertically, you can give a line-height value equal to the height of the element. (I don’t know why, but when I started with learning CSS, I automatically always used paddings to adapt the height of the element and to center it. Using line-height was a real delight because you can control sizes much better like that.)
要使链接元素的文本垂直居中,可以提供等于元素高度的line-height值。 (我不知道为什么,但是当我开始学习CSS时,我总是自动使用padding来调整元素的高度并将其居中。使用line-height确实很有趣,因为您可以像这样更好地控制尺寸)
The second layer lists would naturally appear after the first layer list, so we use a negative top margin to “pull” them up:
第二层列表自然会出现在第一层列表之后,因此我们使用负的上边距来“拉”它们:
ul.menu > li ul{
    list-style:none;
    float:left;
    margin-top:-180px;
    width:100%;
    height:110px;
    padding-top:20px;
    background-repeat:no-repeat;
    background-color:transparent;
}
The li elements of the sub-menu will be initially hidden. In the script we will fade them in when we hover over their parent list item link:
子菜单的li元素最初将被隐藏。 在脚本中,当我们将鼠标悬停在其父列表项链接上时,它们将淡入:
ul.menu > li ul li{
    display:none;
}
Now we define the classes for the background images of the sub-menus:
现在,我们为子菜单的背景图像定义类:
ul.menu > li ul.sub1{
    background-image:url(../images/bg1sub.png);
}
ul.menu > li ul.sub2{
    background-image:url(../images/bg2sub.png);
}
ul.menu > li ul.sub3{
    background-image:url(../images/bg3sub.png);
}
The link elements of the li elements will have the following style:
li元素的link元素将具有以下样式:
ul.menu > li ul li a{
    color:#fff;
    text-decoration:none;
    line-height:30px;
    margin-left:20px;
    text-shadow:1px 1px 1px #444;
    font-size:11px;
}

ul.menu > li ul li a:hover{
    border-bottom:1px dotted #fff;
}
The first sub-list will be shown in the beginning:
第一个子列表将显示在开头:
ul.menu > li ul.sub1 li{
    display:block;
}
And that’s all the style. Take a look at the ZIP file for the IE6 style sheet. Now let’s take a look at the JavaScript.
这就是所有样式。 查看IE6样式表的ZIP文件。 现在让我们看一下JavaScript。
JavaScript (The JavaScript)
What we do in the script is the following: we first check where we are coming from and then we animate the background positions of the list elements in the first level and the backgrounds of the sub-menus accordingly:
我们在脚本中所做的工作如下:首先检查我们来自哪里,然后为第一层中的列表元素的背景位置和子菜单的背景设置动画:
$(function() {
	/* position of the <li> that is currently shown */
	var current = 0;

	$('#bg1,#bg2,#bg3').mouseover(function(e){

		var $this = $(this);
		/* if we hover the current one, then don't do anything */
		if($this.parent().index() == current)
			return;

		/* item is bg1 or bg2 or bg3, depending where we are hovering */
		var item = e.target.id;

		/*
		this is the sub menu overlay. Let's hide the current one
		if we hover the first <li> or if we come from the last one,
		then the overlay should move left -> right,
		otherwise right->left
		 */
		if(item == 'bg1' || current == 2)
			$('#menu .sub'+parseInt(current+1))
			    .stop()
				.animate({backgroundPosition:"(-266px 0)"},300,function(){
					$(this).find('li').hide();
				});
		else
			$('#menu .sub'+parseInt(current+1))
				.stop()
				.animate({backgroundPosition:"(266px 0)"},300,function(){
					$(this).find('li').hide();
				});

		if(item == 'bg1' || current == 2){
			/*
			if we hover the first <li> or if we come from
			the last one, then the images should move left -> right
			*/
			$('#menu > li')
				.animate({backgroundPosition:"(-800px 0)"},0)
				.removeClass('bg1 bg2 bg3')
				.addClass(item);
			move(1,item);
		}
		else{
			/*
			if we hover the first <li> or if we come
			from the last one, then the images should move
			right -> left
			*/
			$('#menu > li')
				.animate({backgroundPosition:"(800px 0)"},0)
				.removeClass('bg1 bg2 bg3')
				.addClass(item);
			move(0,item);
		}

		/*
		We want that if we go from the first one to the last one
		(without hovering the middle one), or from the last one
		to the first one, the middle menu's overlay should also
		slide, either from left to right or right to left.
		 */
		if(current == 2 && item == 'bg1'){
			$('#menu .sub'+parseInt(current))
			.stop()
			.animate({backgroundPosition:"(-266px 0)"},300);
		}
		if(current == 0 && item == 'bg3'){
			$('#menu .sub'+parseInt(current+2))
			.stop()
			.animate({backgroundPosition:"(266px 0)"},300);
		}

		/* change the current element */
		current = $this.parent().index();

		/* let's make the overlay of the current one appear */

		$('#menu .sub'+parseInt(current+1))
			.stop().animate({backgroundPosition:"(0 0)"},300,function(){
				$(this).find('li').fadeIn();
			});
	});
	/*
	dir:1 - move left->right
	dir:0 - move right->left
	 */
	function move(dir,item){
		if(dir){
			$('#bg1').parent()
					 .stop()
					 .animate({backgroundPosition:"(0 0)"},200);
			$('#bg2').parent()
					 .stop()
					 .animate({backgroundPosition:"(-266px 0)"},300);
			$('#bg3').parent()
					 .stop()
					 .animate({backgroundPosition:"(-532px 0)"},400,function(){
						$('#menuWrapper').removeClass('bg1 bg2 bg3')
										 .addClass(item);
					 });
		}
		else{
			$('#bg1').parent()
					 .stop()
					 .animate({backgroundPosition:"(0 0)"},400,function(){
						$('#menuWrapper').removeClass('bg1 bg2 bg3')
										 .addClass(item);
					 });
			$('#bg2').parent()
					 .stop()
					 .animate({backgroundPosition:"(-266px 0)"},300);
			$('#bg3').parent()
					 .stop()
					 .animate({backgroundPosition:"(-532px 0)"},200);
		}
	}
});
And that’s it! A beautiful cross-browser capable effect! I hope that you enjoyed the tutorial.
就是这样! 一个漂亮的跨浏览器功能! 我希望您喜欢本教程。
翻译自: https://tympanus.net/codrops/2010/05/05/beautiful-background-image-navigation-with-jquery/
jquery 背景图片


 262
262

 被折叠的 条评论
为什么被折叠?


