


d3.js随机取多个整数

The D3.js website describes itself as “a JavaScript library for manipulating documents based on data.” It is but one of many in the ever growing list of visual data JavaScript libraries. D3 was created by Mike Bostock who was the lead developer on Protovis, which D3.js builds on.
D3.js网站将自己描述为“一个JavaScript库,用于基于数据处理文档。” 它只是视觉数据JavaScript库不断增长的众多列表之一。 D3由Protovis的首席开发人员Mike Bostock创建,D3.js以此为基础。
The reason I focus on D3 is because it is one of the most robust frameworks available, while also remaining flexible and web standard agnostic. It’s ability to work in SVG, Canvas, or HTML (by taking data and generating HTML tables), allows you to decide what method the data should be presented in. SVG, Canvas and HTML all have their pros and cons and a framework shouldn’t force your hand into one or the other, which is what many frameworks do. This article won’t cover when to choose SVG or Canvas, as that would be an article unto its own. Instead, I’ll point you to a great article by Opera that discusses this question: http://dev.opera.com/articles/view/svg-or-canvas-choosing-between-the-two/.
我之所以关注D3,是因为它是可用的最健壮的框架之一,同时又保持了灵活性并且与Web标准无关。 它具有在SVG,Canvas或HTML中工作的能力(通过获取数据并生成HTML表),使您可以决定应以哪种方式呈现数据。SVG,Canvas和HTML都有其优缺点,并且不应使用框架。不要强迫您的一只手或另一只手,这是许多框架所做的。 本文不会介绍何时选择SVG或Canvas,因为那将是一篇单独的文章。 取而代之的是,我将为您指出Opera的一篇出色的文章,其中讨论了这个问题: http : //dev.opera.com/articles/view/svg-or-canvas-choosing-between-the-two/ 。
So what kind of visualizations can you create with D3? Almost anything you can imagine. It handles simple information charts, such as line, bar, and area, as well as more complex charts that use cartograms or trees. I thoroughly encourage you to look at the examples provided on the D3 website for some inspiration.
那么,您可以使用D3创建什么样的可视化? 您几乎可以想象得到的一切。 它处理简单的信息图表,例如折线图,条形图和面积图,以及处理使用制图法或树木的更复杂的图表。 我完全鼓励您查看D3网站上提供的示例以获取一些启发。
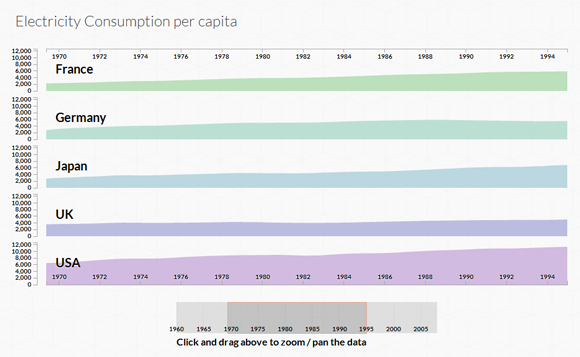
Since area charts are pretty common, it’s a great place to start. In this example we will go over the basics of how to create an infographic with multiple area charts along with a context tool to zoom and pan the data. The data for this chart was downloaded from Gapminder.org, which is a great resource if you need some data while learning D3.
由于面积图非常普遍,因此是一个很好的起点。 在此示例中,我们将介绍如何创建具有多个面积图的图表以及上下文工具来缩放和平移数据的基础知识。 该图表的数据是从Gapminder.org下载的,如果您在学习D3时需要一些数据,这是一个很好的资源。
The .CSV I downloaded from Gapminder contains electricity consumption per capita from 1960. I did modify this CSV slightly to make it easier to work with in the example. The CSV file contained data on 65 countries – not all of them had data for every year. I narrowed it down to five countries that had data for each year. I then switched the years and countries so that the columns were country based instead of year. This wasn’t necessary, however, it makes the example a little easier.
我从Gapminder下载的.CSV包含了1960年以来的人均用电量。我确实对此CSV进行了一些修改,以使其在示例中更易于使用。 CSV文件包含65个国家/地区的数据-并非所有国家都有每年的数据。 我将范围缩小到五个拥有每年数据的国家。 然后,我切换了年份和国家/地区,以使列基于国家/地区而不是年份。 这不是必需的,但是,它使示例更加容易。
With this data we will create 5 area charts. The y-axis will show the range of consumption, while the x-axis will show the years.
有了这些数据,我们将创建5个面积图。 y轴将显示消耗范围,而x轴将显示年份。
First thing we need to do is to set up an HTML page.
我们需要做的第一件事是建立一个HTML页面。
<!DOCTYPE html>
<html>
<head>
	<script src="http://d3js.org/d3.v2.js"></script>
</head>
<body>
	<div id="chart-container">
		<h1>Electricity Consumption per capita</h1>
	</div>
</body>
</html>
The majority of the code will now be in JavaScript, which can be in an external file or directly on the page. The first thing we’ll want to do in JavaScript is to set up some variables to size and position our chart.
现在,大多数代码将使用JavaScript,而JavaScript可以在外部文件中,也可以直接在页面上。 我们要在JavaScript中做的第一件事是设置一些变量来调整图表的大小和位置。
var margin = {top: 10, right: 40, bottom: 150, left: 60},
	width = 940 - margin.left - margin.right,
	height = 500 - margin.top - margin.bottom,
	contextHeight = 50;
	contextWidth = width * .5;
Next we will want to add an SVG tag to the page. D3’s select function conveniently uses CSS style string selectors.
接下来,我们将要在页面上添加SVG标签。 D3的选择功能方便地使用CSS样式字符串选择器。
In this example, I’m going to recommend using SVG for two reasons:
在此示例中,出于两个原因,我将建议使用SVG:
- SVG uses nodes in the markup that can be inspected with a browsers developer tools. This can make debugging a little easier. SVG使用标记中的节点,可以使用浏览器开发人员工具对其进行检查。 这样可以使调试更加容易。
- Because SVG uses nodes in the markup, it can also be styled with CSS. 由于SVG在标记中使用节点,因此也可以使用CSS设置样式。
var svg = d3.select("#chart-container")
			.append("svg")
			.attr("width", width + margin.left + margin.right)
			.attr("height", (height + margin.top + margin.bottom));

//d3.csv takes a file path and a callback function
d3.csv('data.csv', createChart);

function createChart(data){
	var countries = [],
		charts = [],
		maxDataPoint = 0;
After the CSV file loads, we’ll want to loop through the first row to grab each country. We’ll store it in an array to use later.
加载CSV文件后,我们要遍历第一行以获取每个国家/地区。 我们将其存储在数组中以备后用。
for (var prop in data[0]) {
	if (data[0].hasOwnProperty(prop)) {
		if (prop != 'Year') {
			countries.push(prop);
		}
	}
};

var countriesCount = countries.length,
	startYear = data[0].Year,
	endYear = data[data.length - 1].Year,
	chartHeight = height * (1 / countriesCount);
Lets also loop through the entire data set to ensure that every value is a number while converting the year value to a JavaScript Date object. We’ll also want to find the maximum data point. We’ll use this later to set the y-axis scale.
让我们还遍历整个数据集,以确保在将年份值转换为JavaScript Date对象时,每个值都是一个数字。 我们还希望找到最大数据点。 我们稍后将使用它来设置y轴比例。
data.forEach(function(d) {
	for (var prop in d) {
		if (d.hasOwnProperty(prop)) {
			d[prop] = parseFloat(d[prop]);

			if (d[prop] > maxDataPoint) {
				maxDataPoint = d[prop];
			}
		}
	}

	// D3 needs a date object, let's convert it just one time
	d.Year = new Date(d.Year,0,1);
});

for(var i = 0; i < countriesCount; i++){
	charts.push(new Chart({
		data: data.slice(), // copy the array
		id: i,
		name: countries[i],
		width: width,
		height: height * (1 / countriesCount),
		maxDataPoint: maxDataPoint,
		svg: svg,
		margin: margin,
		showBottomAxis: (i == countries.length - 1)
	}));
}
We'll create the context brush here. This is the tool that will allow users to zoom and pan the charts.
我们将在此处创建上下文画笔。 这是允许用户缩放和平移图表的工具。
var contextXScale = d3.time.scale()
				.range([0, contextWidth])
				.domain(charts[0].xScale.domain());

var contextAxis = d3.svg.axis()
			.scale(contextXScale)
			.tickSize(contextHeight)
			.tickPadding(-10)
			.orient("bottom");

var contextArea = d3.svg.area()
			.interpolate("monotone")
			.x(function(d) { return contextXScale(d.date); })
			.y0(contextHeight)
			.y1(0);

var brush = d3.svg.brush()
			.x(contextXScale)
			.on("brush", onBrush);

var context = svg.append("g")
		.attr("class","context")
		.attr("transform", "translate(" + (margin.left + width * .25) + "," + (height + margin.top + chartHeight) + ")");

context.append("g")
		.attr("class", "x axis top")
		.attr("transform", "translate(0,0)")
		.call(contextAxis);

context.append("g")
		.attr("class", "x brush")
		.call(brush)
		.selectAll("rect")
		.attr("y", 0)
		.attr("height", contextHeight);

context.append("text")
		.attr("class","instructions")
		.attr("transform", "translate(0," + (contextHeight + 20) + ")")
		.text('Click and drag above to zoom / pan the data');

function onBrush(){
	/*
	this will return a date range to pass into the chart object
	*/

	var b = brush.empty() ? contextXScale.domain() : brush.extent();

	for(var i = 0; i < countriesCount; i++){
		charts[i].showOnly(b);
	}
}
}

function Chart(options){
this.chartData = options.data;
this.width = options.width;
this.height = options.height;
this.maxDataPoint = options.maxDataPoint;
this.svg = options.svg;
this.id = options.id;
this.name = options.name;
this.margin = options.margin;
this.showBottomAxis = options.showBottomAxis;

var localName = this.name;
Next we need to create the scales. Scales can be time-based or quantitative (linear, logarithmic, or power). Since our x-axis is going to represent the years, we will use a time-based scale. The y-axis represents the consumption, so we'll use a linear scale.
接下来,我们需要创建比例。 刻度可以是基于时间的或定量的(线性,对数或幂)。 由于我们的x轴将代表年份,因此我们将使用基于时间的刻度。 y轴代表消耗量,因此我们将使用线性比例尺。
For scales to be useful, they need to have a range and a domain. Both range and domain accept an array of two or more numbers.
为了使比例尺有用,它们需要具有范围和域。 范围和域都接受两个或多个数字组成的数组。
The domain represents the minimum and maximum input values. For instance, for our x-axis this will be 1960 to 2008. For our y-axis it will be 0 (the minimum value) and the max data point we found earlier. If every chart references this max data point, we'll ensure that each y-axis is the same.
域代表最小和最大输入值。 例如,对于我们的x轴,这将是1960年到2008年。对于我们的y轴,它将是0(最小值),而我们之前发现的最大数据点。 如果每个图表都引用此最大数据点,则我们将确保每个y轴都相同。
The range is the minimum and maximum values for the output. We want the charts to be 840px (this.width). So if we set the range [0,this.width], D3 will use this as the out put for the domain. So 1960 will have an output of 0 while 2008 will have an output value of 840. If our domain was [200,400], then 2008 would have an output value of 400 and 1960 would have an output of 200.
范围是输出的最小值和最大值。 我们希望图表为840px(this.width)。 因此,如果我们将范围设置为[0,this.width],D3会将其用作域的输出。 因此,1960年的输出为0,而2008年的输出值为840。如果我们的域为[200,400],则2008年的输出值为400,而1960年的输出值为200。
/* XScale is time based */
this.xScale = d3.time.scale()
			.range([0, this.width])
			.domain(d3.extent(this.chartData.map(function(d) { return d.Year; })));

/* YScale is linear based on the maxData Point we found earlier */
this.yScale = d3.scale.linear()
			.range([this.height,0])
			.domain([0,this.maxDataPoint]);
The area call is what creates the chart. There are a number of interpolation options we can use. 'Basis' is the smoothest, however, when working with a lot of data it will also be the slowest.
区域调用是创建图表的原因。 我们可以使用许多插值选项。 “基础”是最平滑的,但是,当处理大量数据时,它也是最慢的。
var xS = this.xScale;
var yS = this.yScale;

this.area = d3.svg.area()
		.interpolate("basis")
		.x(function(d) { return xS(d.Year); })
		.y0(this.height)
		.y1(function(d) { return yS(d[localName]); });
We will create a definition with which to display the chart. In this example, it acts as a container for the chart. Without it, we would see the chart go off the left and under the y-axis when zooming and panning. It isn't a requirement, and this example would still work without it.
我们将创建一个用于显示图表的定义。 在此示例中,它充当图表的容器。 没有它,在缩放和平移时,我们会看到图表偏离左侧和y轴。 这不是必需的,没有它,该示例仍然可以工作。
this.svg.append("defs").append("clipPath")
			.attr("id", "clip-" + this.id)
			.append("rect")
			.attr("width", this.width)
			.attr("height", this.height);

/*
Assign it a class so we can assign a fill color
And position it on the page
*/

this.chartContainer = svg.append("g")
			.attr('class',this.name.toLowerCase())
			.attr("transform", "translate(" + this.margin.left + "," + (this.margin.top + (this.height * this.id) + (10 * this.id)) + ")");

/* We've created everything, let's actually add it to the page */

this.chartContainer.append("path")
			.data([this.chartData])
			.attr("class", "chart")
			.attr("clip-path", "url(#clip-" + this.id + ")")
			.attr("d", this.area);

this.xAxisTop = d3.svg.axis().scale(this.xScale).orient("bottom");
this.xAxisBottom = d3.svg.axis().scale(this.xScale).orient("top");

/* We only want a top axis if it's the first country */

if(this.id == 0){
	this.chartContainer.append("g")
			.attr("class", "x axis top")
			.attr("transform", "translate(0,0)")
			.call(this.xAxisTop);
}

/* Only want a bottom axis on the last country */

if(this.showBottomAxis){
	this.chartContainer.append("g")
		.attr("class", "x axis bottom")
		.attr("transform", "translate(0," + this.height + ")")
		.call(this.xAxisBottom);
}

this.yAxis = d3.svg.axis().scale(this.yScale).orient("left").ticks(5);

							this.chartContainer.append("g")
			.attr("class", "y axis")
			.attr("transform", "translate(-15,0)")
			.call(this.yAxis);
					this.chartContainer.append("text")
			.attr("class","country-title")
			.attr("transform", "translate(15,40)")
			.text(this.name);

}
The function showOnly is called when the chart is panned or zoomed. It's passed a start and end date. The chart will need to be redrawn to match these date limits. Therefore, we'll need to reset the xScale domain, reset the area path and update the axis.
平移或缩放图表时,将调用showOnly函数。 已经过了开始和结束日期。 该图表将需要重绘以匹配这些日期限制。 因此,我们需要重置xScale域,重置区域路径并更新轴。
Chart.prototype.showOnly = function(b){
	this.xScale.domain(b);
	this.chartContainer.select("path").data([this.chartData]).attr("d", this.area);
	this.chartContainer.select(".x.axis.top").call(this.xAxisTop);
	this.chartContainer.select(".x.axis.bottom").call(this.xAxisBottom);
}
Now we just need to style the chart a bit. As I mentioned above, SVG can be styled using CSS. While that is true, the css properties for SVG are a little different. For instance, instead of background-color, it's fill.
现在,我们只需要对图表进行一些样式设置。 如上所述,可以使用CSS设置SVG的样式。 确实如此,但SVG的css属性有些不同。 例如,它不是背景色,而是填充色。
Let's set up the container and the chart title.
让我们设置容器和图表标题。
#chart-container {
	width: 1000px;
	margin: 0 auto 50px auto;
	background: rgba(255,255,255,0.5);
	box-shadow: 1px 1px 4px rgba(0,0,0,0.2);
	padding: 20px 30px;
}

#chart-container h2 {
	color: #444;
	margin: 0 0 10px;
	font-weight: 300;
	padding: 10px;
	text-shadow: 0 1px 1px rgba(255,255,255,0.8);
	font-size: 24px;
}
Next, let's style the context tool by removing the border and making the axis lines almost transparent. Then we'll style what the tool looks like when you are interacting with it by giving it a semi transparent background along with white borders on the left and right. And finally, we'll give the whole tool a solid background color.
接下来,让我们通过删除边框并使轴线几乎透明来设置上下文工具的样式。 然后,通过为工具提供半透明的背景以及左右两侧的白色边框,来设置与该工具进行交互时的外观样式。 最后,我们将为整个工具提供纯色背景色。
g.context g.axis path{ stroke-opacity: 0;}
g.context g.axis line{ stroke-opacity: .1;}

g.context g.brush rect.background{ fill: rgba(0,0,0,.1);}
.brush .extent {
	stroke: #fff;
	fill-opacity: .125;
	shape-rendering: crispEdges;
}

g.context rect.background{
	fill: rgb(200,200,255);
	visibility: visible !important;
}
Finally, lets give a color to each country and remove the fills on the axis.
最后,为每个国家/地区提供颜色,然后删除轴上的填充。
g.france path.chart{ fill: rgba(127,201,127,0.5);}
g.germany path.chart{ fill: rgba(127,201,174,0.5);}
g.japan path.chart{ fill: rgba(127,183,201,0.5);}
g.uk path.chart{ fill: rgba(127,130,201,0.5);}
g.usa path.chart{ fill: rgba(171,127,201,0.5);}

.axis path, .axis line {
	fill: none;
	stroke: #aaa;
	shape-rendering: crispEdges;
}
If you’d like to learn more about D3, I encourage you to look at their website as it has a plethora of resources, including examples, tutorials, and documentation. There is also a d3.js tag on Stack Overflow.
如果您想了解有关D3的更多信息,建议您访问他们的网站,因为它拥有大量资源,包括示例,教程和文档。 Stack Overflow上还有一个d3.js标记。
Note that the demo should run in a web server environment.
请注意,该演示应在Web服务器环境中运行。
翻译自: https://tympanus.net/codrops/2012/08/29/multiple-area-charts-with-d3-js/
d3.js随机取多个整数


 被折叠的 条评论
为什么被折叠?
被折叠的 条评论
为什么被折叠?
 到【灌水乐园】发言


