


 这个教程介绍了如何使用HTML5 Canvas元素调整和裁剪图像,创建类似照片编辑应用的控件。在客户端调整图像大小可以提高上传效率。文章详细讲解了实现过程,包括标记、CSS、JavaScript代码,并提供了最终效果的演示和下载链接。

vue裁剪画布大小
In this tutorial we’re going to learn how to resize and crop an image using the HTML5 <canvas> element, and while we’re at it, let’s create some fancy controls for resizing, commonly seen in photo editing applications.
在本教程中,我们将学习如何使用HTML5 <canvas>元素调整图像大小和裁剪图像,而在此过程中,我们将创建一些精美的控件来调整大小,这在照片编辑应用程序中很常见。
In a real world example a website or app might use a technique like this to resize and frame a profile picture before uploading. Whilst we could do this on the server, it would require the transfer of a potentially large file, which is slow. Instead we can resize the image on the client side before uploading it, which is fast.
在真实的示例中,网站或应用可能会使用类似的技术在上传之前调整个人资料图片的大小并对其进行构图。 虽然我们可以在服务器上执行此操作,但它需要传输可能很大的文件,这很慢。 取而代之的是,我们可以在上传之前在客户端上调整图像的大小,这是很快的。
We do this by creating an HTML5 <canvas> element and drawing the image to the canvas at a particular size, then extracting the new image data from the canvas as a data URI. Most browsers have good support for these methods, so you can probably use this technique right now, however just be aware of some limitations unrelated to browser support such as quality and performance.
为此,我们创建一个HTML5 <canvas>元素,然后以特定大小将图像绘制到画布上,然后从画布中提取新的图像数据作为数据URI。 大多数浏览器都对这些方法提供了良好的支持,因此您可能现在可以使用此技术,但是请注意与浏览器支持无关的一些限制,例如质量和性能。
Resizing very large images can cause the browser to slow down or in some cases, even crash. It makes sense to set reasonable limits on the file size just as you would when uploading a file. If quality is important you may find the resized image looks undesirable due to how the browser resampled it. There are some techniques to improve the quality of images downscaled with canvas, but they are not covered in this tutorial.
调整非常大的图像大小可能会导致浏览器速度降低,甚至在某些情况下甚至崩溃。 就像上载文件一样,对文件大小设置合理的限制很有意义。 如果质量很重要,则由于浏览器如何对其进行重新采样,可能会发现调整大小后的图像看起来不理想。 有一些技术可以改善使用canvas缩小的图像的质量,但本教程未介绍它们。
Take a look at the final result in this demo or download the ZIP file.
With that in mind, let’s get started!
考虑到这一点,让我们开始吧!
标记 (The Markup)
In our demo we’re going to start with an existing image:
在我们的演示中,我们将从现有图像开始:
<img class="resize-image" src="image.jpg" alt="Image" />
That’s it! That’s all the HTML we need for this demo.
而已! 这就是本演示所需的所有HTML。
CSS (The CSS)
The CSS is also very minimal. First, define the styles for the resize-container and the image.
CSS也非常小。 首先,定义调整大小容器和图像的样式。
.resize-container {
    position: relative;
    display: inline-block;
    cursor: move;
    margin: 0 auto;
}

.resize-container img {
    display: block
}

.resize-container:hover img,
.resize-container:active img {
    outline: 2px dashed rgba(222,60,80,.9);
}
Next, define the position and style for each of the ‘resize handles’. These are the little squares at each corner of the image that we drag to resize.
接下来,为每个“调整大小手柄”定义位置和样式。 这些是我们拖动以调整大小的图像每个角上的小方块。
.resize-handle-ne,
.resize-handle-ne,
.resize-handle-se,
.resize-handle-nw,
.resize-handle-sw {
    position: absolute;
    display: block;
    width: 10px;
    height: 10px;
    background: rgba(222,60,80,.9);
    z-index: 999;
}

.resize-handle-nw {
    top: -5px;
    left: -5px;
    cursor: nw-resize;
}

.resize-handle-sw {
    bottom: -5px;
    left: -5px;
    cursor: sw-resize;
}

.resize-handle-ne {
    top: -5px;
    right: -5px;
    cursor: ne-resize;
}

.resize-handle-se {
    bottom: -5px;
    right: -5px;
    cursor: se-resize;
}
JavaScript(The JavaScript)
With the JavaScript start by defining some of the variables and initializing the Canvas and the target image.
使用JavaScript首先定义一些变量并初始化Canvas和目标图像。
var resizeableImage = function(image_target) {
    var $container,
    orig_src = new Image(),
    image_target = $(image_target).get(0),
    event_state = {},
    constrain = false,
    min_width = 60,
    min_height = 60,
    max_width = 800,
    max_height = 900,
    resize_canvas = document.createElement('canvas');
});

resizeableImage($('.resize-image'));
Next, we create the init function that will be called immediately. This function wraps the image with a container, creates resize handles and makes a copy of the original image used for resizing. We also assign the jQuery object for the container element to a variable so we can refer to it later and add a mousedown event listener to detect when someone begins dragging one of the handles.
接下来,我们创建将立即调用的init函数。 此功能使用容器包装图像,创建调整大小的句柄,并复制用于调整大小的原始图像。 我们还将容器元素的jQuery对象分配给变量,以便稍后可以引用它,并添加mousedown事件侦听器以检测何时有人开始拖动其中一个句柄。
var resizeableImage = function(image_target) {

// ...
    init = function(){

        // Create a new image with a copy of the original src
        // When resizing, we will always use this original copy as the base
        orig_src.src=image_target.src;

        // Add resize handles
        $(image_target).wrap('<div class="resize-container"></div>')
        .before('<span class="resize-handle resize-handle-nw"></span>')
        .before('<span class="resize-handle resize-handle-ne"></span>')
        .after('<span class="resize-handle resize-handle-se"></span>')
        .after('<span class="resize-handle resize-handle-sw"></span>');

        // Get a variable for the container
        $container =  $(image_target).parent('.resize-container');

        // Add events
        $container.on('mousedown', '.resize-handle', startResize);
    };

//...

    init();
}
The startResize and endResize functions do very little other than tell the browser to start paying attention to where the mouse is moving and when to stop paying attention.
除了告诉浏览器开始注意鼠标的移动位置以及何时停止注意, startResize和endResize函数几乎没有作用。
startResize = function(e){
    e.preventDefault();
    e.stopPropagation();
    saveEventState(e);
    $(document).on('mousemove', resizing);
    $(document).on('mouseup', endResize);
};

endResize = function(e){
    e.preventDefault();
    $(document).off('mouseup touchend', endResize);
    $(document).off('mousemove touchmove', resizing);
};
Before we start tracking the mouse position we want to take a snapshot of the container dimensions and other key data points. We store these in a variable named event_state and use them later as a point of reference while resizing to work out the change in height and width.
在开始跟踪鼠标位置之前,我们想对容器尺寸和其他关键数据点进行快照。 我们将它们存储在一个名为event_state的变量中,以后将其用作参考点,同时调整大小以计算高度和宽度的变化。
saveEventState = function(e){
  // Save the initial event details and container state
  event_state.container_width = $container.width();
  event_state.container_height = $container.height();
  event_state.container_left = $container.offset().left;
  event_state.container_top = $container.offset().top;
  event_state.mouse_x = (e.clientX || e.pageX || e.originalEvent.touches[0].clientX) + $(window).scrollLeft();
  event_state.mouse_y = (e.clientY || e.pageY || e.originalEvent.touches[0].clientY) + $(window).scrollTop();

  // This is a fix for mobile safari
  // For some reason it does not allow a direct copy of the touches property
  if(typeof e.originalEvent.touches !== 'undefined'){
	event_state.touches = [];
	$.each(e.originalEvent.touches, function(i, ob){
	  event_state.touches[i] = {};
	  event_state.touches[i].clientX = 0+ob.clientX;
	  event_state.touches[i].clientY = 0+ob.clientY;
	});
  }
  event_state.evnt = e;
}
The resizing function is where most of the action happens. This function is constantly invoked while the user is dragging one of the resize handles. Every time this function is called we work out the new width and height by taking the current position of the mouse relative to the initial position of the corner we are dragging.
resizing功能是大多数操作发生的地方。 用户拖动调整大小手柄之一时,会不断调用此功能。 每次调用此函数时,我们都会通过获取鼠标的当前位置(相对于我们拖动的角的初始位置)来计算新的宽度和高度。
resizing = function(e){
    var mouse={},width,height,left,top,offset=$container.offset();
    mouse.x = (e.clientX || e.pageX || e.originalEvent.touches[0].clientX) + $(window).scrollLeft();
    mouse.y = (e.clientY || e.pageY || e.originalEvent.touches[0].clientY) + $(window).scrollTop();

    width = mouse.x - event_state.container_left;
    height = mouse.y  - event_state.container_top;
    left = event_state.container_left;
    top = event_state.container_top;

    if(constrain || e.shiftKey){
        height = width / orig_src.width * orig_src.height;
    }

    if(width > min_width && height > min_height && width < max_width && height < max_height){
      resizeImage(width, height);
      // Without this Firefox will not re-calculate the the image dimensions until drag end
      $container.offset({'left': left, 'top': top});
    }
}
Next we add the option to constrain the image dimensions when toggled using the shift key or a variable.
接下来,我们添加使用Shift键或变量切换时限制图像尺寸的选项。
Finally, we resize the image, but only if the new width and height are not outside the bounds of the min and max variables we initially set.
最后,我们调整图像的大小,但前提是新的宽度和高度不在我们最初设置的min和max变量的范围之内。
Note: Because we’re actually resizing the image and not just changing the height and width attributes, you might consider limiting how often resizeImage is called to improve performance. This is called debouncing or throttling.
注意:因为我们实际上是在调整图像大小,而不仅仅是更改height和width属性,所以您可以考虑限制调用resizeImage以提高性能。 这称为反跳或节流。
实际调整图像大小 (Actually resizing the image)
Drawing an image to the Canvas is as easy as drawImage. We set the height and width of the canvas first and always use the original copy of the full-sized image. We then use toDataURL on the Canvas to get a Base64-encoded version of the newly resized image and place this on the page.
在画布上绘制图像与drawImage一样容易。 我们首先设置画布的高度和宽度,并始终使用原尺寸图像的原始副本。 然后,我们使用toDataURL上的toDataURL来获取新调整大小的图像的Base64编码版本,并将其放置在页面上。
There is a full explanation for all the parameters that can be used with the drawImage method in the cropping section of this tutorial.
在本教程的裁剪部分中,对可以与drawImage方法一起使用的所有参数进行了完整说明。
resizeImage = function(width, height){
    resize_canvas.width = width;
    resize_canvas.height = height;
    resize_canvas.getContext('2d').drawImage(orig_src, 0, 0, width, height);
    $(image_target).attr('src', resize_canvas.toDataURL("image/png"));
};
Too simple? There is one small proviso: the image must be on the same domain as the page or on a server with cross-origin resource sharing (CORS) enabled. If it’s not, you might run into problems with an error about a ‘tainted canvas’.
太简单? 有一个小的附加条件:映像必须与页面在同一域中,或者必须在启用了跨域资源共享(CORS)的服务器上。 如果不是,您可能会遇到有关“污点画布”的错误的问题。
从不同角度调整大小 (Resizing from different corners)
You should now have a working demo. But it’s not complete. At the moment, no matter which corner of the image we resize, it behaves as though we are resizing it from the bottom right. We want to be able to resize the image from any corner. To do this we need to understand how it should behave.
您现在应该有一个正常的演示。 但这还不完整。 此刻,无论我们调整图像的哪个角落的大小,其行为都好像我们是从右下角调整大小一样。 我们希望能够从任何角度调整图像的大小。 为此,我们需要了解其行为方式。
When resizing, the corner we’re dragging as well as its adjacent edges should move, while the corner directly opposite and its adjacent edges should remain fixed.
调整大小时,我们拖动的角及其相邻的边缘应移动,而角正好相对且相邻的边缘应保持固定。
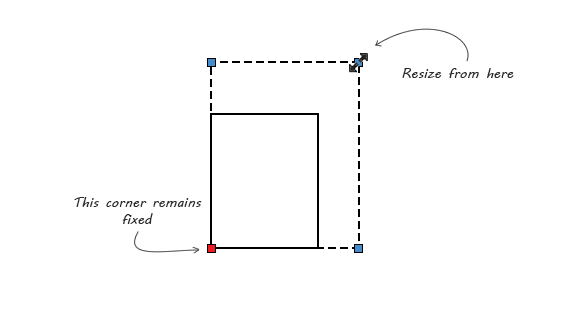
When we change the width and height of an image, the right and bottom edges move, while the top and left edges will stay the same. This means that by default, an image is resized from its bottom right corner.
当我们更改图像的宽度和高度时,左右边缘会移动,而上下边缘将保持不变。 这意味着默认情况下,图像会从其右下角调整大小。
We can’t change this default behavior, but when resizing from any corner other than the bottom right we can change the overall position of the image so that it appears as though the opposite corner and edges remain fixed. Let’s update our resizing function:
我们无法更改此默认行为,但是当从右下角以外的任何角度调整大小时,我们可以更改图像的整体位置,以使其看起来好像相对的角落和边缘保持固定。 让我们更新resizing功能:
resizing = function(e){
  var mouse={},width,height,left,top,offset=$container.offset();
  mouse.x = (e.clientX || e.pageX || e.originalEvent.touches[0].clientX) + $(window).scrollLeft();
  mouse.y = (e.clientY || e.pageY || e.originalEvent.touches[0].clientY) + $(window).scrollTop();

  // Position image differently depending on the corner dragged and constraints
  if( $(event_state.evnt.target).hasClass('resize-handle-se') ){
    width = mouse.x - event_state.container_left;
    height = mouse.y  - event_state.container_top;
    left = event_state.container_left;
    top = event_state.container_top;
  } else if($(event_state.evnt.target).hasClass('resize-handle-sw') ){
    width = event_state.container_width - (mouse.x - event_state.container_left);
    height = mouse.y  - event_state.container_top;
    left = mouse.x;
    top = event_state.container_top;
  } else if($(event_state.evnt.target).hasClass('resize-handle-nw') ){
    width = event_state.container_width - (mouse.x - event_state.container_left);
    height = event_state.container_height - (mouse.y - event_state.container_top);
    left = mouse.x;
    top = mouse.y;
    if(constrain || e.shiftKey){
      top = mouse.y - ((width / orig_src.width * orig_src.height) - height);
    }
  } else if($(event_state.evnt.target).hasClass('resize-handle-ne') ){
    width = mouse.x - event_state.container_left;
    height = event_state.container_height - (mouse.y - event_state.container_top);
    left = event_state.container_left;
    top = mouse.y;
    if(constrain || e.shiftKey){
      top = mouse.y - ((width / orig_src.width * orig_src.height) - height);
    }
  }

  // Optionally maintain aspect ratio
  if(constrain || e.shiftKey){
    height = width / orig_src.width * orig_src.height;
  }

  if(width > min_width && height > min_height && width < max_width && height < max_height){
    // To improve performance you might limit how often resizeImage() is called
    resizeImage(width, height);
    // Without this Firefox will not re-calculate the the image dimensions until drag end
    $container.offset({'left': left, 'top': top});
  }
}
We are now checking to see which resize-handle has been dragged and we’re moving the image while resizing it so that it appears as though the correct corner remains fixed.
现在,我们正在检查拖动了哪个resize-handle并在调整图像大小的同时移动图像,以使其看起来好像正确的角点保持不变。
移动影像 (Moving the image)
Now that we can resize the image from any of its corners you might have noticed we can inadvertently change its position on the page. We need to give users the ability to move the image back into the center of frame. In the init function let’s add another event listener similar to the one we did earlier.
现在我们可以从任何角度调整图像的大小,您可能已经注意到,我们可以无意中更改其在页面上的位置。 我们需要使用户能够将图像移回框架中心。 在init函数中,让我们添加另一个事件侦听器,该侦听器与我们之前所做的类似。
init = function(){

    //...

    $container.on('mousedown', 'img', startMoving);
}
We now add startMoving and endMoving functions similar to startResize and endResize.
现在,我们添加类似于startResize和endResize startMoving和endMoving函数。
startMoving = function(e){
    e.preventDefault();
    e.stopPropagation();
    saveEventState(e);
    $(document).on('mousemove', moving);
    $(document).on('mouseup', endMoving);
};

endMoving = function(e){
    e.preventDefault();
    $(document).off('mouseup', endMoving);
    $(document).off('mousemove', moving);
};
In the function moving we need to work out the new position of the top left edge of the container. This will be equal to the current position of the mouse, offset by the distance the mouse was from the top left corner when we started dragging the image.
在moving功能时moving我们需要确定容器左上边缘的新位置。 这将等于鼠标的当前位置,偏移量是当我们开始拖动图像时鼠标与左上角的距离。
moving = function(e){
    var  mouse={};
    e.preventDefault();
    e.stopPropagation();
    mouse.x = (e.clientX || e.pageX) + $(window).scrollLeft();
    mouse.y = (e.clientY || e.pageY) + $(window).scrollTop();
    $container.offset({
        'left': mouse.x - ( event_state.mouse_x - event_state.container_left ),
        'top': mouse.y - ( event_state.mouse_y - event_state.container_top )
    });
};
裁剪图像 (Cropping the image)
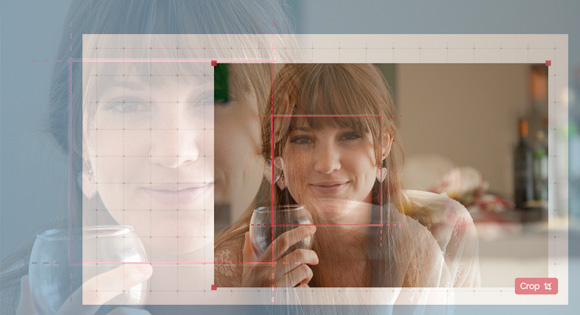
Now that we can resize the image we might want to crop it as well. Rather than allowing users to crop the image to any size and shape, let’s create a frame that is the exact dimensions we require and ask users to position the image inside that frame. This gives them control over the zoom and framing, yet ensures the final image always the same size and shape.
现在我们可以调整图像的大小,我们可能还希望对其进行裁剪。 与其允许用户将图像裁剪为任意大小和形状,不如创建一个框架,该框架正是我们所需的确切尺寸,并要求用户将图像放置在该框架内。 这使他们可以控制缩放和取景,同时确保最终图像始终具有相同的大小和形状。
To do this we need to add a the following HTML:
为此,我们需要添加以下HTML:
<div class="overlay">
    <div class="overlay-inner">
    </div>
</div>
<button class="btn-crop js-crop">Crop</button>
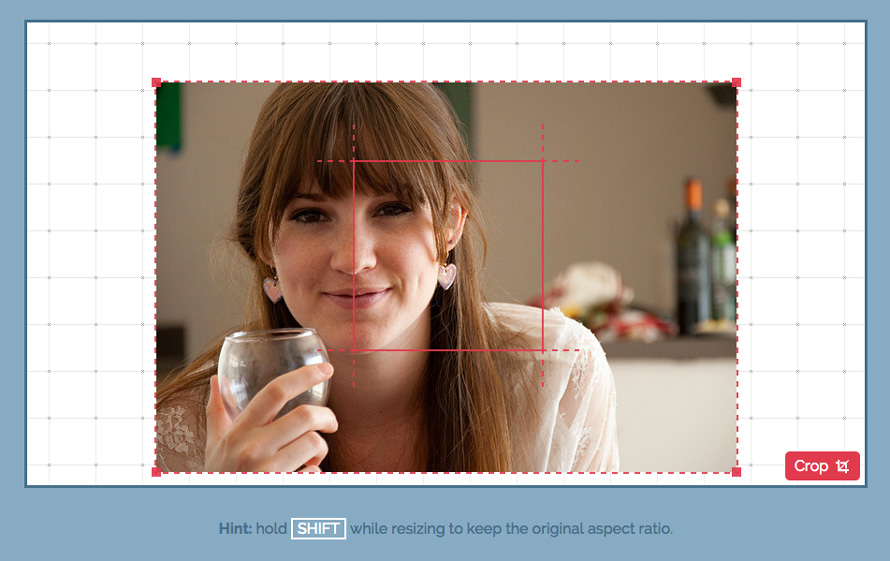
The styles for the overlay box are important, particularly it’s position, width and height as they are used to determine what part of the image is cropped. It’s also important to remember that the frame should always be visible on any background color. That is why I used a semi transparent white outline around the main box in my example.
覆盖框的样式很重要,尤其是其位置,宽度和高度,因为它们用于确定裁剪图像的哪个部分。 同样重要的是要记住,框架在任何背景颜色下均应始终可见。 这就是为什么在示例中,在主框周围使用半透明的白色轮廓。
.overlay {
    position: absolute;
    left: 50%;
    top: 50%;
    margin-left: -100px;
    margin-top: -100px;
    z-index: 999;
    width: 200px;
    height: 200px;
    border: solid 2px rgba(222,60,80,.9);
    box-sizing: content-box;
    pointer-events: none;
}

.overlay:after,
.overlay:before {
    content: '';
    position: absolute;
    display: block;
    width: 204px;
    height: 40px;
    border-left: dashed 2px rgba(222,60,80,.9);
    border-right: dashed 2px rgba(222,60,80,.9);
}

.overlay:before {
    top: 0;
    margin-left: -2px;
    margin-top: -40px;
}

.overlay:after {
    bottom: 0;
    margin-left: -2px;
    margin-bottom: -40px;
}

.overlay-inner:after,
.overlay-inner:before {
    content: '';
    position: absolute;
    display: block;
    width: 40px;
    height: 204px;
    border-top: dashed 2px rgba(222,60,80,.9);
    border-bottom: dashed 2px rgba(222,60,80,.9);
}

.overlay-inner:before {
    left: 0;
    margin-left: -40px;
    margin-top: -2px;
}

.overlay-inner:after {
    right: 0;
    margin-right: -40px;
    margin-top: -2px;
}

.btn-crop {
    position: absolute;
    vertical-align: bottom;
    right: 5px;
    bottom: 5px;
    padding: 6px 10px;
    z-index: 999;
    background-color: rgb(222,60,80);
    border: none;
    border-radius: 5px;
    color: #FFF;
}
Update the JavaScript with the following function and event listener:
使用以下函数和事件侦听器更新JavaScript:
init = function(){

    //...

    $('.js-crop').on('click', crop);

};

crop = function(){
    var crop_canvas,
        left = $('.overlay').offset().left - $container.offset().left,
        top =  $('.overlay').offset().top - $container.offset().top,
        width = $('.overlay').width(),
        height = $('.overlay').height();

    crop_canvas = document.createElement('canvas');
    crop_canvas.width = width;
    crop_canvas.height = height;

    crop_canvas.getContext('2d').drawImage(image_target, left, top, width, height, 0, 0, width, height);
    window.open(crop_canvas.toDataURL("image/png"));
}
The crop function is similar to the resizeImage function however instead of passing it height and width values we get the height and width from the overlay element.
crop函数类似于resizeImage函数,但是我们没有resizeImage传递高度和宽度值,而是从overlay元素获取高度和宽度。
For cropping, the canvas drawImage method requires nine parameters. The first parameter is the source image. The next four parameters indicate what part of the source image is used (the clipping box). The final four parameters indicate where on the canvas to start drawing the image and at what size.
为了进行裁剪,canvas drawImage方法需要九个参数。 第一个参数是源图像。 接下来的四个参数指示使用源图像的哪一部分(剪切框)。 最后四个参数指示在画布上的何处开始绘制图像以及以什么尺寸开始绘制图像。
添加触摸事件和手势检测 (Adding touch events and gesture detection)
We’ve added mouse events, now let’s add support for touch enabled devices.
我们添加了鼠标事件,现在让我们添加对启用触摸的设备的支持。
For mousedown and mouseup there are equivalent touch events, touchstart and touchend and for mousemove there is the equivalent touchmove. Someone obviously lacks a sense of humor because these events could have easily been named “touchdown” and “touchup”.
对于mousedown和mouseup ,具有等效的触摸事件, touchstart和touchend ;对于mousemove ,具有等效的touchmove 。 显然有人缺乏幽默感,因为这些事件很容易被称为“触地得分”和“触地得分”。
Let’s add touchstart and touchend everywhere we have a mousedown and mouseup event listener and touchmove everywhere we have mousemove.
让我们在有mousedown和mouseup事件监听touchmove任何地方添加touchstart和touchend在有mousemove任何地方添加touchstart 。
// In init()...
$container.on('mousedown touchstart', '.resize-handle', startResize);
$container.on('mousedown touchstart', 'img', startMoving);

//In startResize() ...
$(document).on('mousemove touchmove', moving);
$(document).on('mouseup touchend', endMoving);

//In endResize()...
$(document).off('mouseup touchend', endMoving);
$(document).off('mousemove touchmove', moving);

//In  startMoving()...
$(document).on('mousemove touchmove', moving);
$(document).on('mouseup touchend', endMoving);

//In endMoving()...
$(document).off('mouseup touchend', endMoving);
$(document).off('mousemove touchmove', moving);
Since we’re resizing an image it might be reasonable to expect that some users will try common gestures like pinch zoom. There is a library called Hammer that provides a lot of convenience when working with gestures. But since we only need pinch zoom, in our case, it might be a more like a sledge hammer. Let me show you how easy it is to detect pinch zoom without any library.
由于我们正在调整图像的大小,因此可以合理地预期某些用户会尝试常见的手势,例如捏缩放。 有一个称为Hammer的库,在处理手势时会提供很多便利。 但是由于我们只需要捏变焦,在我们的情况下,它可能更像是八角锤。 让我向您展示在没有任何库的情况下检测收缩缩放是多么容易。
You might have notice that in the saveEventState function we already stored the initial touch data; this will come in handy now.
您可能已经注意到,在saveEventState函数中,我们已经存储了初始触摸数据。 这将派上用场。
First we check if the event contains two “touches” and measure the distance between them. We note this as the initial distance and then constantly measure how much this distance changes while moving. Let’s update the moving function:
首先,我们检查事件是否包含两个“触摸”,并测量它们之间的距离。 我们将其记为初始距离,然后不断测量该距离在移动时发生了多少变化。 让我们更新moving功能:
moving = function(e){
  var  mouse={}, touches;
  e.preventDefault();
  e.stopPropagation();

  touches = e.originalEvent.touches;
  mouse.x = (e.clientX || e.pageX || touches[0].clientX) + $(window).scrollLeft();
  mouse.y = (e.clientY || e.pageY || touches[0].clientY) + $(window).scrollTop();
  $container.offset({
    'left': mouse.x - ( event_state.mouse_x - event_state.container_left ),
    'top': mouse.y - ( event_state.mouse_y - event_state.container_top )
  });
  // Watch for pinch zoom gesture while moving
  if(event_state.touches && event_state.touches.length > 1 && touches.length > 1){
    var width = event_state.container_width, height = event_state.container_height;
    var a = event_state.touches[0].clientX - event_state.touches[1].clientX;
    a = a * a;
    var b = event_state.touches[0].clientY - event_state.touches[1].clientY;
    b = b * b;
    var dist1 = Math.sqrt( a + b );

    a = e.originalEvent.touches[0].clientX - touches[1].clientX;
    a = a * a;
    b = e.originalEvent.touches[0].clientY - touches[1].clientY;
    b = b * b;
    var dist2 = Math.sqrt( a + b );

    var ratio = dist2 /dist1;

    width = width * ratio;
    height = height * ratio;
    // To improve performance you might limit how often resizeImage() is called
    resizeImage(width, height);
  }
};
We divide the current distance by initial distance to get the ratio and how much to scale the image. We work out the new width and height and then resize the image.
我们将当前距离除以初始距离,以获得比率和缩放图像的大小。 我们计算出新的宽度和高度,然后调整图像大小。
And that’s it. Take a look at the demo or download the ZIP file.
In my testing, Chrome prevented the default browser response for pinch zoom, which is to change the page zoom, but Firefox didn’t.
在我的测试中,Chrome阻止了默认浏览器对捏缩放的响应,即更改页面缩放,但Firefox却没有。
I hope you found this tutorial useful. I suggest further reading on drag and drop and file upload techniques and look forward to see how people might combine these techniques to create some beautiful user interfaces.
希望本教程对您有所帮助。 我建议进一步阅读拖放和文件上传技术,并期待着人们如何结合使用这些技术来创建一些漂亮的用户界面。
翻译自: https://tympanus.net/codrops/2014/10/30/resizing-cropping-images-canvas/
vue裁剪画布大小


 621
621

 被折叠的 条评论
为什么被折叠?
被折叠的 条评论
为什么被折叠?
 到【灌水乐园】发言


