


带缩略图的焦点图
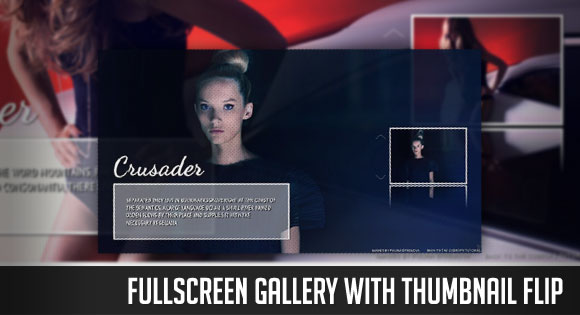
In this tutorial we will create a fullscreen gallery with jQuery. The idea is to have a thumbnail of the currently shown fullscreen image on the side that flips when navigating through the images. The big image will slide up or down depending where we are navigating to. We will add navigation controls for the mousewheel and for keys. The thumbnail will have a zoom and and a fullscreen option, making the image in the background appear in fullscreen mode or as a complete image, resized to fit in the page.
在本教程中,我们将使用jQuery创建全屏画廊。 想法是在当前显示的全屏图像的缩略图上具有在浏览图像时翻转的一侧的缩略图。 大图像将根据我们导航到的位置上下滑动。 我们将为鼠标滚轮和按键添加导航控件。 缩略图将具有缩放和全屏选项,使背景图像在全屏模式下显示为完整图像,或调整为适合页面大小的完整图像。
We will be using Flip!, a jQuery plugin by Lucca Manno that flips elements.
我们将使用Flip! ,这是Lucca Manno的jQuery插件,用于翻转元素。
And we will also be using the jQuery Mousewheel Plugin by Brandon Aaron.
我们还将使用Brandon Aaron的jQuery Mousewheel插件。
The beautiful images are by talented Polina Efremova. Visit her website and check out her profile on Behance.
精美的图像是由才华横溢的Polina Efremova拍摄的。 访问她的网站,并查看她在Behance上的个人资料。
Let’s get started with the markup!
让我们开始标记吧!
标记 (The Markup)
First, we will add a loading element that we want to show when the images are being loaded:
首先,我们将添加要在加载图像时显示的加载元素:
<div id="tf_loading" class="tf_loading"></div>
Then, we will create a container for all the images that will be shown in fullscreen:
然后,我们将为全屏显示的所有图像创建一个容器:
<div id="tf_bg" class="tf_bg">
	<img src="images/1.jpg" alt="Image 1" longdesc="images/thumbs/1.jpg" />
	<img src="images/2.jpg" alt="Image 2" longdesc="images/thumbs/2.jpg"/>
	<img src="images/3.jpg" alt="Image 3" longdesc="images/thumbs/3.jpg"/>
	<img src="images/4.jpg" alt="Image 4" longdesc="images/thumbs/4.jpg"/>
	<img src="images/5.jpg" alt="Image 5" longdesc="images/thumbs/5.jpg"/>
	<img src="images/6.jpg" alt="Image 6" longdesc="images/thumbs/6.jpg"/>
	<div class="tf_pattern"></div>
</div>
We will use the “longdesc” attribute to indicate the path to the respective thumbnail. The last div element will server as the overlay pattern.
我们将使用“ longdesc”属性来指示相应缩略图的路径。 最后一个div元素将作为重叠模式。
Next, we will add a container for the contents that are shown on the left bottom corner of the screen.
接下来,我们将为屏幕左下角显示的内容添加一个容器。
<div id="tf_content_wrapper" class="tf_content_wrapper">
	<div class="tf_content" id="content1" style="display:block;">
		<h2>Dreamer</h2>
		<p>Far far away, behind the word mountains, ... </p>
	</div>
	<div class="tf_content" id="content2">
		...
	</div>
	...
</div>
Each box with a heading will be inside of an element with the class “tf_content”.
每个带有标题的框都将在具有“ tf_content”类的元素内。
The structure for the thumbnail image on the right side of the screen we look as follows:
屏幕右侧缩略图的结构如下所示:
<div id="tf_thumbs" class="tf_thumbs">
	<span id="tf_zoom" class="tf_zoom"></span>
	<img src="images/thumbs/1.jpg" alt="Thumb1"/>
</div>
The span will either have the class “tf_zoom” or “tf_fullscreen” depending on in which mode we are in.
根据我们所处的模式,跨度将具有“ tf_zoom”或“ tf_fullscreen”类。
And finally, we will add some elements for the navigation:
最后,我们将为导航添加一些元素:
<div id="tf_next" class="tf_next"></div>
<div id="tf_prev" class="tf_prev"></div>
Let’s take a look at the style.
让我们看一下样式。
CSS (The CSS)
After doing a simple reset to the body and html, we will define the style for the full images container:
对主体和html进行简单的重置后,我们将定义完整图像容器的样式:
.tf_bg{
	width:100%;
	height:100%;
	position:fixed;
	top:0px;
	left:0px;
}
The container will be fixed and occupy the whole screen. The images inside will be of absolute positioning and the real width and height will be calculated dynamically in our jQuery function:
容器将被固定并占据整个屏幕。 里面的图像将绝对定位,并且实际的宽度和高度将在我们的jQuery函数中动态计算:
.tf_bg img{
	position:absolute;
	top:0px;
	left:0px;
	width:100%;
	z-index: 1;
	display:none;
}
The pattern will as well be absolute and have a repeated background image:
模式也将是绝对的,并具有重复的背景图像:
.tf_pattern{
	position:absolute;
	width:100%;
	height:100%;
	background:transparent url(../images/pattern.png) repeat top left;
	z-index:2;
}
We will position the content absolutely, too:
我们也将绝对定位内容:
.tf_content{
	position:absolute;
	bottom:50px;
	left:50px;
	z-index:10;
	display:none;
}
The heading of the content will have a different font, that we will embed using the Google Font API. We’ll come back to that later.
内容的标题将使用我们将使用Google Font API嵌入的不同字体。 我们待会儿再讲。
.tf_content h2{
	color:#fff;
	font-size:90px;
	padding:0;
	margin:0;
	font-family: 'Dancing Script', arial, serif;
	text-shadow:1px 1px 2px #000;
}
The paragraph of the content will have a repeated image as background and some nice box- and text-shadow:
内容的段落将有重复的图像作为背景,并带有一些漂亮的方框和文本阴影:
.tf_content p{
	color:#fff;
	padding:0;
	margin:0;
	background:transparent url(../images/bg_content.png) repeat top left;
	padding:40px;
	width:500px;
	font-family: 'PT Sans Narrow', arial, serif;
	font-size:20px;
	line-height:25px;
	text-transform:uppercase;
	text-shadow:2px 2px 1px #000;
	-moz-box-shadow:1px 1px 5px #202020;
	-webkit-box-shadow:1px 1px 5px #202020;
	box-shadow:1px 1px 5px #202020;
	border:4px solid #fff;
}
The thumbnail container will be positioned in the middle of the screen on the right side. We accomplish that with setting the top to 50% and the top margin to negative half of its height. We will give the container a reflection, that can be seen in Webkit browsers:
缩略图容器将位于屏幕中间的右侧。 通过将顶部设置为高度的50%,将顶部边距设置为高度的负一半来实现这一点。 我们将给容器一个反射,该反射可以在Webkit浏览器中看到:
.tf_thumbs{
	position:absolute;
	z-index:12;
	right:50px;
	top:50%;
	margin-top:-79px;
	border:4px solid #fff;
	-moz-box-shadow:1px 1px 5px #202020;
	-webkit-box-shadow:1px 1px 5px #202020;
	box-shadow:1px 1px 5px #202020;
	-webkit-box-reflect:
		below 5px
		-webkit-gradient(
			linear,
			left top,
			left bottom,
			from(transparent),
			color-stop(0.6, transparent),
			to(rgb(18, 18, 18))
		);
}
.tf_thumbs img{
	display:block;
}
The navigation elements will be placed next to the thumbnail container:
导航元素将放置在缩略图容器旁边:
.tf_next,
.tf_prev{
	width:35px;
	height:14px;
	position:absolute;
	top:50%;
	right:320px;
	z-index:100;
	cursor:pointer;
	background:transparent url(../images/nav.png) no-repeat top left;
	opacity:0.5;
}
.tf_next{
	background-position:0px -14px;
	margin-top:80px;
}
.tf_prev{
	background-position:0px 0px;
	margin-top:-55px;
}
.tf_next:hover,
.tf_prev:hover{
	opacity:0.9;
}
The little icons for zoom and fullscreen mode will appear at the right top corner of the thumbnail:
缩放和全屏模式的小图标将出现在缩略图的右上角:
.tf_zoom,
.tf_fullscreen{
	width:20px;
	height:20px;
	position:absolute;
	top:6px;
	right:6px;
	cursor:pointer;
	z-index:100;
	opacity:0.6;
	background:transparent url(../images/icons.png) no-repeat top left;
}
.tf_zoom{
	background-position:0px -20px;
}
.tf_fullscreen{
	background-position:0px 0px;
}
.tf_zoom:hover,
.tf_fullscreen:hover{
	opacity:0.9;
}
The loading element will be positioned in the center of the screen:
加载元素将位于屏幕的中央:
.tf_loading{
	position:fixed;
	top:50%;
	left:50%;
	margin:-30px 0px 0px -30px;
	width:60px;
	height:60px;
	background:#fff url(../images/loader.gif) no-repeat center center;
	z-index:999;
	opacity:0.7;
}
And that was all the style. Let’s take a look at the JavaScript.
这就是所有样式。 让我们看一下JavaScript。
JavaScript (The JavaScript)
First, we will include the following scripts:
首先,我们将包括以下脚本:
<script type="text/javascript" src="http://ajax.googleapis.com/ajax/libs/jquery/1.5.0/jquery.min.js"></script>
<script type="text/javascript" src="http://ajax.googleapis.com/ajax/libs/jqueryui/1.8.9/jquery-ui.min.js"></script>
<script type="text/javascript" src="js/jquery.flip.js"></script>
<script type="text/javascript" src="js/jquery-mousewheel-3.0.4/jquery.mousewheel.min.js"></script>
Then, we will add the preload function for the images:
然后,我们将为图像添加预加载功能:
(function($) {
	$.fn.preload = function(options) {
		var opts 	= $.extend({}, $.fn.preload.defaults, options);
		o			= $.meta ? $.extend({}, opts, this.data()) : opts;
		var c		= this.length,
			l		= 0;
		return this.each(function() {
			var $i	= $(this);
			$('<img/>').load(function(i){
				++l;
				if(l == c) o.onComplete();
			}).attr('src',$i.attr('src'));
		});
	};
	$.fn.preload.defaults = {
		onComplete	: function(){return false;}
	};
})(jQuery);
In our jQuery function, we will first cache some element and define some variables:
在我们的jQuery函数中,我们将首先缓存一些元素并定义一些变量:
var $tf_bg				= $('#tf_bg'),
	$tf_bg_images		= $tf_bg.find('img'),
	$tf_bg_img			= $tf_bg_images.eq(0),
	$tf_thumbs			= $('#tf_thumbs'),
	total				= $tf_bg_images.length,
	current				= 0,
	$tf_content_wrapper	= $('#tf_content_wrapper'),
	$tf_next			= $('#tf_next'),
	$tf_prev			= $('#tf_prev'),
	$tf_loading			= $('#tf_loading');
Then, we will preload the images:
然后,我们将预加载图像:
$tf_bg_images.preload({
	onComplete	: function(){
		$tf_loading.hide();
		init();
	}
});
The next function will show the first image and initialize some events:
下一个函数将显示第一个图像并初始化一些事件:
function init(){
	//get dimentions for the image, based on the windows size
	var dim	= getImageDim($tf_bg_img);
	//set the returned values and show the image
	$tf_bg_img.css({
		width	: dim.width,
		height	: dim.height,
		left	: dim.left,
		top		: dim.top
	}).fadeIn();

	//resizing the window resizes the $tf_bg_img
	$(window).bind('resize',function(){
		var dim	= getImageDim($tf_bg_img);
		$tf_bg_img.css({
			width	: dim.width,
			height	: dim.height,
			left	: dim.left,
			top		: dim.top
		});
	});

	//expand and fit the image to the screen
	$('#tf_zoom').live('click',
	function(){
		if($tf_bg_img.is(':animated'))
			return false;

		var $this	= $(this);
		if($this.hasClass('tf_zoom')){
			resize($tf_bg_img);
			$this.addClass('tf_fullscreen')
			.removeClass('tf_zoom');
		}
		else{
			var dim	= getImageDim($tf_bg_img);
			$tf_bg_img.animate({
				width	: dim.width,
				height	: dim.height,
				top		: dim.top,
				left	: dim.left
			},350);
			$this.addClass('tf_zoom')
			.removeClass('tf_fullscreen');
		}
	}
	);

	//click the arrow down, scrolls down
	$tf_next.bind('click',function(){
		if($tf_bg_img.is(':animated'))
			return false;
		scroll('tb');
	});

	//click the arrow up, scrolls up
	$tf_prev.bind('click',function(){
		if($tf_bg_img.is(':animated'))
			return false;
		scroll('bt');
	});

	//mousewheel events - down / up button trigger the scroll down / up
	$(document).mousewheel(function(e, delta) {
		if($tf_bg_img.is(':animated'))
			return false;

		if(delta > 0)
			scroll('bt');
		else
			scroll('tb');
		return false;
	});

	//key events - down / up button trigger the scroll down / up
	$(document).keydown(function(e){
		if($tf_bg_img.is(':animated'))
			return false;

		switch(e.which){
			case 38:
				scroll('bt');
				break;

			case 40:
				scroll('tb');
				break;
		}
	});
}
The next function takes care of showing the next or previous image:
下一个功能负责显示下一个或上一个图像:
function scroll(dir){
	//if dir is "tb" (top -> bottom) increment current,
	//else if "bt" decrement it
	current	= (dir == 'tb')?current + 1:current - 1;

	//we want a circular slideshow,
	//so we need to check the limits of current
	if(current == total) current = 0;
	else if(current < 0) current = total - 1;

	//flip the thumb
	$tf_thumbs.flip({
		direction	: dir,
		speed		: 400,
		onBefore	: function(){
			//the new thumb is set here
			var content	= '';
			content		+='<img src="' + $tf_bg_images.eq(current).attr('longdesc') + '" alt="Thumb' + (current+1) + '"/>';
			$tf_thumbs.html(content);
		}
	});

	//we get the next image
	var $tf_bg_img_next	= $tf_bg_images.eq(current),
	//its dimentions
	dim				= getImageDim($tf_bg_img_next),
	//the top should be one that makes the image out of the viewport
	//the image should be positioned up or down depending on the direction
	top	= (dir == 'tb')?$(window).height() + 'px':-parseFloat(dim.height,10) + 'px';

	//set the returned values and show the next image
	$tf_bg_img_next.css({
		width	: dim.width,
		height	: dim.height,
		left	: dim.left,
		top		: top
	}).show();

	//now slide it to the viewport
	$tf_bg_img_next.stop().animate({
		top 	: dim.top
	},1000);

	//we want the old image to slide in the same direction, out of the viewport
	var slideTo	= (dir == 'tb')?-$tf_bg_img.height() + 'px':$(window).height() + 'px';
	$tf_bg_img.stop().animate({
		top 	: slideTo
	},1000,function(){
		//hide it
		$(this).hide();
		//the $tf_bg_img is now the shown image
		$tf_bg_img	= $tf_bg_img_next;
		//show the description for the new image
		$tf_content_wrapper.children()
		.eq(current)
		.show();
	});
	//hide the current description
	$tf_content_wrapper.children(':visible')
	.hide()

}
The resize function will animate the image to a screen fitting size:
调整大小功能会将图像设置为适合屏幕大小的动画:
function resize($img){
	var w_w	= $(window).width(),
	w_h	= $(window).height(),
	i_w	= $img.width(),
	i_h	= $img.height(),
	r_i	= i_h / i_w,
	new_w,new_h;

	if(i_w > i_h){
		new_w	= w_w;
		new_h	= w_w * r_i;

		if(new_h > w_h){
			new_h	= w_h;
			new_w	= w_h / r_i;
		}
	}
	else{
		new_h	= w_w * r_i;
		new_w	= w_w;
	}

	$img.animate({
		width	: new_w + 'px',
		height	: new_h + 'px',
		top		: '0px',
		left	: '0px'
	},350);
}
The last function will give us the dimensions of an image and its correct positioning:
最后一个函数将为我们提供图像的尺寸及其正确的位置:
function getImageDim($img){
	var w_w	= $(window).width(),
	w_h	= $(window).height(),
	r_w	= w_h / w_w,
	i_w	= $img.width(),
	i_h	= $img.height(),
	r_i	= i_h / i_w,
	new_w,new_h,
	new_left,new_top;

	if(r_w > r_i){
		new_h	= w_h;
		new_w	= w_h / r_i;
	}
	else{
		new_h	= w_w * r_i;
		new_w	= w_w;
	}

	return {
		width	: new_w + 'px',
		height	: new_h + 'px',
		left	: (w_w - new_w) / 2 + 'px',
		top		: (w_h - new_h) / 2 + 'px'
	};
}
And that was all the jQuery. Now, we want to embed some fonts. For that we will include the following references in the head of our HTML:
这就是所有的jQuery。 现在,我们要嵌入一些字体。 为此,我们将在HTML头中包含以下参考:
<link href='http://fonts.googleapis.com/css?family=PT+Sans+Narrow' rel='stylesheet' type='text/css' />
<link href='http://fonts.googleapis.com/css?family=Dancing+Script' rel='stylesheet' type='text/css' />
And that’s all! We hope you enjoyed the tutorial and learning something new today!
就这样! 希望您喜欢本教程,并从今天开始学习新东西!
翻译自: https://tympanus.net/codrops/2011/02/09/fullscreen-gallery-with-thumbnail-flip/
带缩略图的焦点图


 154
154

 被折叠的 条评论
为什么被折叠?
被折叠的 条评论
为什么被折叠?
 到【灌水乐园】发言


