


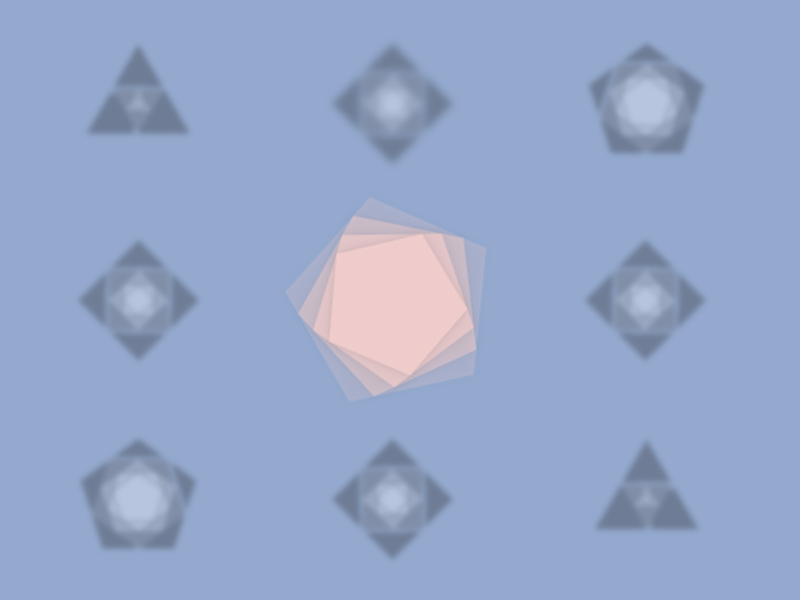
Today we’re going to create a loading spinner that’s animated with Rebound with a spring motion. We’ll be using Canvas to cover the whole page and to display the spinner made of polygonal shapes that inscribe in itself. Then we’ll make the motion interesting and playful with Rebound.
今天,我们将创建一个加载微调器,该加载微调器通过弹跳动作以弹跳动作进行动画处理。 我们将使用“画布”覆盖整个页面,并显示由本身内接的多边形形状制成的微调器。 然后,我们将通过Rebound使动作有趣且有趣。
The code presented in this tutorial is written in ES6 and compiled to ES5 using Babel, you’ll find the full gulp setup in the repository.
本教程中介绍的代码是用ES6编写的,并使用Babel编译为ES5,您可以在存储库中找到完整的gulp设置。
创建微调器 (Creating the Spinner)
Firstly, we need to create the logic of the spinner; let’s start by thinking of it as a simple triangle:
首先,我们需要创建微调器的逻辑; 让我们首先将其视为一个简单的三角形:
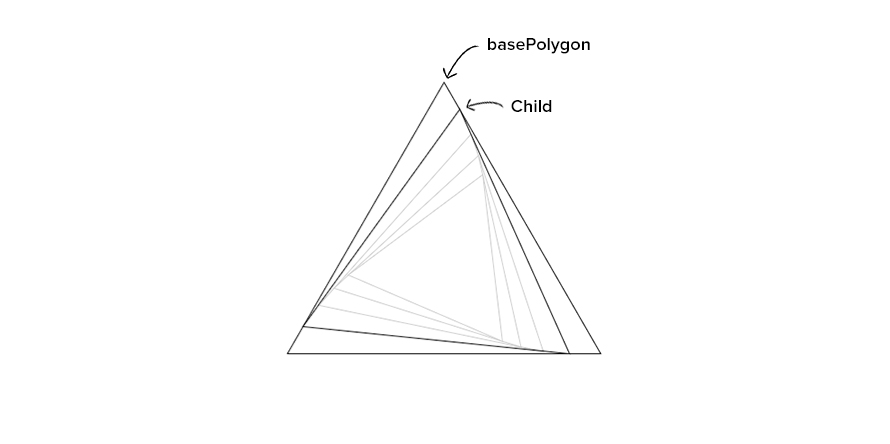
The idea is to draw a basePolygon and then draw a child so that it is inscribed in the original triangle. The Polygon.js method to compute the base points is the following:
这个想法是先绘制一个basePolygon ,然后再绘制一个孩子,以便将其刻在原始三角形中。 用于计算基点的Polygon.js方法如下:
/**
* Get the points of any regular polygon based on
* the number of sides and radius.
*/
_getRegularPolygonPoints() {
let points = [];
let i = 0;
while (i < this._sides) {
// Note that sin and cos are inverted in order to draw
// polygon pointing down.
let x = -this._radius * Math.sin(i * 2 * Math.PI / this._sides);
let y = this._radius * Math.cos(i * 2 * Math.PI / this._sides);
points.push({x, y});
i++;
}
return points;
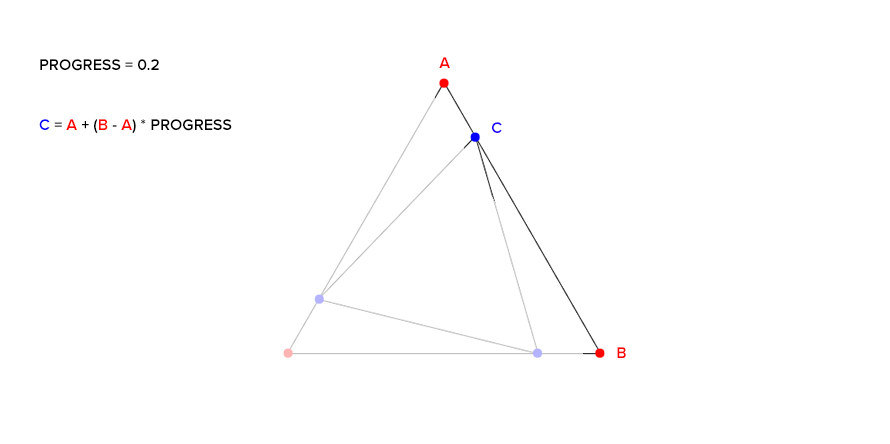
}To draw the child we simply need to calculate where the vertex will be on each side at a given progress. We’ll achieve this by using linear interpolation between the points of the basePolygon.
要绘制孩子,我们只需要计算给定progress下顶点在每一侧的位置。 我们将通过在basePolygon的点之间使用线性插值来实现此basePolygon 。
The Polygon.js methods to compute the inscribed points looks as follows:
用于计算内切点的Polygon.js方法如下所示:
/**
 * Get the inscribed polygon points by calling `getInterpolatedPoint`
 * for the points (start, end) of each side.
 */
_getInscribedPoints(points, progress) {

	let inscribedPoints = [];

	points.forEach((item, i) => {

		let start = item;
		let end = points[i + 1];

		if (!end) {
		end = points[0];
		}

		let point = this._getInterpolatedPoint(start, end, progress);

		inscribedPoints.push(point);
	});

	return inscribedPoints;
}

/**
 * Get interpolated point using linear interpolation
 * on x and y axis.
 */
_getInterpolatedPoint(start, end, progress) {

	let Ax = start.x;
	let Ay = start.y;

	let Bx = end.x;
	let By = end.y;

	// Linear interpolation formula:
	// point = start + (end - start) * progress;
	let Cx = Ax + (Bx - Ax) * progress;
	let Cy = Ay + (By - Ay) * progress;

	return {
		x: Cx,
		y: Cy
	};
}
Once done, we can simply use the methods provided by Polygon.js to repeat the process for each child until a certain depth is reached.
完成后,我们可以简单地使用Polygon.js提供的方法为每个孩子重复该过程,直到达到一定depth为止。
/**
 * Update children points array.
 */
_getUpdatedChildren(progress) {

	let children = [];

	for (let i = 0; i < this._depth; i++) {

		// Get basePolygon points on first lap
		// then get previous child points.
		let points = children[i - 1] || this.points;

		let inscribedPoints = this._getInscribedPoints(points, progress);

		children.push(inscribedPoints);
	}

	return children;
}

/**
 * Render children, first update children array,
 * then loop and draw each child.
 */
renderChildren(context, progress) {

	let children = this._getUpdatedChildren(progress);

	// child = array of points at a certain progress over the parent sides.
	children.forEach((points, i) => {

		// Draw child.
		context.beginPath();
		points.forEach((point) => context.lineTo(point.x, point.y));
		context.closePath();

		// Set colors.
		let strokeColor = this._colors.stroke;
		let childColor = this._colors.child;

		if (strokeColor) {
		context.strokeStyle = strokeColor;
		context.stroke();
		}

		if (childColor) {
			let rgb = rebound.util.hexToRGB(childColor);

			let alphaUnit = 1 / children.length;
			let alpha = alphaUnit + (alphaUnit * i);

			let rgba = `rgba(${rgb.r}, ${rgb.g}, ${rgb.b}, ${alpha})`;

			context.fillStyle = rgba;

			context.fill();
		}
	});
}
At this point we have the Spinner system and we can start thinking about the animation. Note that we can plug any animation engine into it, essentially from now on we just need to think about how to make the progress run from 0 to 1. In this case we’ll use Rebound, let’s see what it is and how to use it.
至此,我们有了Spinner系统,我们可以开始考虑动画了。 请注意,我们可以将任何动画引擎插入其中,基本上从现在开始,我们只需要考虑如何使progress从0运行到1。在这种情况下,我们将使用Rebound,让我们看看它是什么以及如何使用它。
反弹动画 (Animating with Rebound)
Rebound is a simple to use library from Facebook. The library takes inputs for a spring (tension and friction), then once the spring is accelerating, the library computes a value for that spring which we’ll apply to the Spinner progress to create a great springy animation.
Rebound是一个来自Facebook的易于使用的库。 库获取弹簧的输入(张力和摩擦力),然后,在弹簧加速后,库将为该弹簧计算一个值,我们将其应用于Spinner进度以创建出色的弹性动画。
使用反弹创建运动 (Creating the motion with Rebound)
Animating with Rebound is an easy 5-step process: 1. Create a SpringSystem (demo.js:45):
使用Rebound动画是一个简单的5个步骤: 1.创建一个SpringSystem(demo.js:45):
// Create a SpringSystem.
	let springSystem = new rebound.SpringSystem();
2. Add a spring to the system (demo.js:48)
2.向系统添加弹簧(demo.js:48)
// Add a spring to the system.
	demo.spring = springSystem.createSpring(settings.tension, settings.friction);
3. Add a SpringListener to the Spring (Spinner.js:92)
3.将SpringListener添加到Spring(Spinner.js:92)
_addSpringListener() {

	let ctx = this;

	// Add a listener to the spring. Every time the physics
	// solver updates the Spring's value onSpringUpdate will
	// be called.
	this._spring.addListener({
		// ...
	});
}
4. Set spring in motion from start value by giving it an end value (Spinner.js:160)
4.通过给它一个结束值使弹簧从开始值开始运动(Spinner.js:160)
this._spring.setEndValue((this._spring.getCurrentValue() === 1) ? 0 : 1);5. Use the value from the spring as it is updated in the onSpringUpdate callback to set progress (Spinner.js:100)
5.使用spring的值(在onSpringUpdate回调中对其进行更新)来设置进度(Spinner.js:100)
onSpringUpdate(spring) {

	let val = spring.getCurrentValue();

	// Input range in the `from` parameters.
	let fromLow = 0,
		fromHigh = 1,
		// Property animation range in the `to` parameters.
		toLow = ctx._springRangeLow,
		toHigh = ctx._springRangeHigh;

	val = rebound.MathUtil.mapValueInRange(val, fromLow, fromHigh, toLow, toHigh);

	// Note that the render method is
	// called with the spring motion value.
	ctx.render(val);
}
将微调器和弹簧运动放在一起 (Bring the Spinner and the Spring motion together)
First let’s write some settings to easily change the effect.
首先,让我们编写一些设置以轻松更改效果。
settings: {
	rebound: {
		tension: 2,
		friction: 5
	},
	spinner: {
		radius: 80,
		sides: 3,
		depth: 4,
		colors: {
			background: '#000000',
			stroke: '#000000',
			base: '#222222',
			child: '#FFFFFF'
		},
		alwaysForward: true, // When false the spring will reverse normally.
		restAt: 0.5, // A number from 0.1 to 0.9 || null for full rotation
		renderBase: true // Optionally render basePolygon
	}
}
Now we just need to make everything work together. In our main file (demo.js) we’ll instantiate Rebound and the Spinner with the settings, then we’ll start the animation either as autoSpin or based on the progress of an ajax request. By calling demo.spinner.setComplete() we’ll complete the animation.
现在,我们只需要使所有内容协同工作即可。 在我们的主文件(demo.js)中,将使用设置实例化“反弹”和“微调器”,然后以autoSpin或基于ajax请求的进度启动动画。 通过调用demo.spinner.setComplete()我们将完成动画。
/**
 * Initialize demo.
 */
init() {

	let spinnerTypeAutoSpin = true;

	// Instantiate animation engine and spinner system.
	demo.initRebound();
	demo.initSpinner();

	// Init animation with Rebound Spring System.
	demo.spinner.init(demo.spring, spinnerTypeAutoSpin);

	if (spinnerTypeAutoSpin) {
		// Fake loading time, in a real world just call demo.spinner.setComplete();
		// whenever the loading will be completed.
		setTimeout(() => {
			demo.spinner.setComplete();
		}, 6000);
	} else {
		// Perform real ajax request.
		demo.loadSomething();
	}
},
In the render method of Spinner.js we are going to update the progress using the spring value. Then, once the spring will be at rest we’ll call the spin method where we’ll set a new endValue for the spring so it will begin running and animate the spinner one more time. To make the spinner always move forward we’ll reset the spring value to 0 without any motion using setAtRest(). If a restThreshold is set, we’ll also switch the animation range values used to compute the spring val on each update, by doing this we’ll change the reverse animation and make the Spinner always progress forward with an half way animation at the restThreshold.
在Spinner.js的render方法中,我们将使用spring值更新进度。 然后,一旦spring静止,我们将调用spin方法,在其中我们将为弹簧设置一个新的endValue ,以便它将开始运行并为旋转器再设置一次动画。 为了使微调器始终向前移动,我们将使用setAtRest()将弹簧值重置为0,而无需进行任何运动。 如果restThreshold设置,我们也将转用于计算Spring动画范围值val每次更新,通过这样做,我们将改变反向动画,使微调总是在一个半动画的方式向前发展restThreshold 。
/**
 * Spin animation.
 */
_spin() {

	if (this._alwaysForward) {

		let currentValue = this._spring.getCurrentValue();

		// Switch the animation range used to compute the value
		// in the `onSpringUpdate`, so to change the reverse animation
		// of the spring at a certain threshold.
		if (this._restThreshold && currentValue === 1) {
		this._switchSpringRange();
		}

		// In order to keep the motion going forward
		// when spring reach 1 reset to 0 at rest.
		if (currentValue === 1) {
		this._spring.setCurrentValue(0).setAtRest();
		}
	}

	// Restart the spinner.
	this._spring.setEndValue((this._spring.getCurrentValue() === 1) ? 0 : 1);
}

_switchSpringRange() {

	let threshold = this._restThreshold;

	this._springRangeLow = (this._springRangeLow === threshold) ? 0 : threshold;
	this._springRangeHigh = (this._springRangeHigh === threshold) ? 1 : threshold;
}
To complete the animation we’ll simply call the setComplete method once the loading is finished. To keep things simple we’ll just fade out and remove the entire canvas as well as stopping the animation.
要完成动画,我们将在加载完成后简单地调用setComplete方法。 为了简单起见,我们将淡出并删除整个画布并停止动画。
/**
 * Start complete animation.
 */
setComplete() {
	this._isCompleting = true;
}

_completeAnimation() {

	// Fade out the canvas.
	this._canvasOpacity -= 0.1;
	this._canvas.style.opacity = this._canvasOpacity;

	// Stop animation and remove canvas.
	if (this._canvasOpacity <= 0) {
		this._isAutoSpin = false;
		this._spring.setAtRest();
		this._canvas.remove();
	}
}
We hope you enjoyed this tutorial and find it inspirational.
我们希望您喜欢本教程并从中获得启发。
Thank you for reading.
感谢您的阅读。
资源资源 (Resources)
Have a look at the following resources used:
看一下以下使用的资源:
翻译自: https://tympanus.net/codrops/2016/03/08/spring-loaders-rebound-canvas/


 被折叠的 条评论
为什么被折叠?
被折叠的 条评论
为什么被折叠?
 到【灌水乐园】发言


