


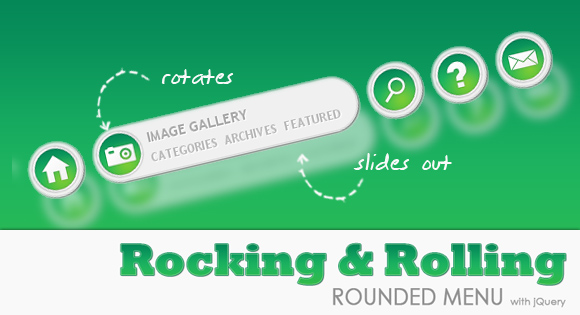
In this tutorial we are going to make use of the incredibly awesome rotating and scaling jQuery patch from Zachary Johnson that can be found here. We will create a menu with little icons that will rotate when hovering. Also, we will make the menu item expand and reveal some menu content, like links or a search box.
在本教程中,我们将使用Zachary Johnson提供的极其出色的旋转和缩放jQuery补丁,可以在此处找到。 我们将创建一个带有小图标的菜单,该图标会在悬停时旋转。 另外,我们将使菜单项展开并显示一些菜单内容,例如链接或搜索框。
Ok, so let’s get started, it’s less complicated than it looks.
好的,让我们开始吧,它看起来并不复杂。
标记 (The Markup)
For this menu we will not create a list, but div elements for each menu item. We will pack the menu items in a main div called menu. Each item will have an icon as link element and a content div with the heading and a paragraph where we will add links or a search box:
对于此菜单,我们将不会创建列表,但会为每个菜单项创建div元素。 我们将菜单项打包在名为menu的主div中。 每个项目都会有一个图标作为链接元素,以及一个带有标题和段落的内容div,我们将在其中添加链接或搜索框:
<div class="menu">
	<div class="item">
		<a class="link icon_mail"></a>
		<div class="item_content">
			<h2>Contact us</h2>
			<p>
				<a href="#">eMail</a>
				<a href="#">Twitter</a>
				<a href="#">Facebook</a>
			</p>
		</div>
	</div>
	<div class="item">
		<a class="link icon_help"></a>
		<div class="item_content">
			<h2>Help</h2>
			<p>
				<a href="#">FAQ</a>
				<a href="#">Live Support</a>
				<a href="#">Tickets</a>
			</p>
		</div>
	</div>
	<div class="item">
		<a class="link icon_find"></a>
		<div class="item_content">
			<h2>Search</h2>
			<p>
				<input type="text"></input>
				<a href="">Go</a>
			</p>
		</div>
	</div>
	<div class="item">
		<a class="link icon_photos"></a>
		<div class="item_content">
			<h2>Image Gallery</h2>
			<p>
				<a href="#">Categories</a>
				<a href="#">Archives</a>
				<a href="#">Featured</a>
			</p>
		</div>
	</div>
	<div class="item">
		<a class="link icon_home"></a>
		<div class="item_content">
			<h2>Start from here</h2>
			<p>
				<a href="#">Services</a>
				<a href="#">Portfolio</a>
				<a href="#">Pricing</a>
			</p>
		</div>
	</div>
</div>
Initially, the item div will be just as big to surround the icon, we will make it expand then and we will reveal the content afterward.
最初,div项将与图标一样大,然后将其展开,然后再显示内容。
CSS (The CSS)
The general style for the menu like the font will be defined as follows:
菜单的一般样式(如字体)将定义如下:
.menu{
    width:800px;
    height:52px;
    position:relative;
    top:200px;
    left:100px;
    font-family: "Trebuchet MS", sans-serif;
    font-size: 16px;
    font-style: normal;
    font-weight: bold;
    text-transform: uppercase;
}
The items inside of the menu will be floating right, since we want the items to expand to the left and push the other items away:
菜单内的项目将向右浮动,因为我们希望将项目向左扩展并推开其他项目:
.item{
    position:relative;
    background-color:#f0f0f0;
    float:right;
    width:52px;
    margin:0px 5px;
    height:52px;
    border:2px solid #ddd;
    -moz-border-radius:30px;
    -webkit-border-radius:30px;
    border-radius:30px;
    -moz-box-shadow:1px 1px 3px #555;
    -webkit-box-shadow:1px 1px 3px #555;
    box-shadow:1px 1px 3px #555;
    cursor:pointer;
    overflow:hidden;
}
Then we define the style of the icons (the link class) in the following way:
然后,我们通过以下方式定义图标的样式(链接类):
.link{
    left:2px;
    top:2px;
    position:absolute;
    width:48px;
    height:48px;
}
.icon_home{
    background:transparent url(../images/home.png) no-repeat top left;
}
.icon_mail{
    background:transparent url(../images/mail.png) no-repeat top left;
}
.icon_help{
    background:transparent url(../images/help.png) no-repeat top left;
}
.icon_find{
    background:transparent url(../images/find.png) no-repeat top left;
}
.icon_photos{
    background:transparent url(../images/photos.png) no-repeat top left;
}
The other content elements we will style as follows:
我们将按以下方式设置其他内容元素的样式:
.item_content{
    position:absolute;
    height:52px;
    width:220px;
    overflow:hidden;
    left:56px;
    top:7px;
    background:transparent;
    display:none;
}
.item_content h2{
    color:#aaa;
    text-shadow: 1px 1px 1px #fff;
    background-color:transparent;
    font-size:14px;
}
.item_content a{
    background-color:transparent;
    float:left;
    margin-right:7px;
    margin-top:3px;
    color:#bbb;
    text-shadow: 1px 1px 1px #fff;
    text-decoration:none;
    font-size:12px;
}
.item_content a:hover{
    color:#0b965b;
}
.item_content p {
    background-color:transparent;
    display:none;
}
.item_content p input{
    border:1px solid #ccc;
    padding:1px;
    width:155px;
    float:left;
    margin-right:5px;
}
With a white text-shadow we can create a nice engraved text effect. Ok, let’s add some magic.
使用白色文字阴影,我们可以创建精美的雕刻文字效果。 好吧,让我们添加一些魔术。
JavaScript (The JavaScript)
First, we need to add the script inclusions of jQuery and the other two scripts of Zachary. Then we will add the following functions:
首先,我们需要添加jQuery的脚本包含和Zachary的其他两个脚本。 然后,我们将添加以下功能:
$('.item').hover(
	function(){
		var $this = $(this);
		expand($this);
	},
	function(){
		var $this = $(this);
		collapse($this);
	}
);
function expand($elem){
	var angle = 0;
	var t = setInterval(function () {
		if(angle == 1440){
			clearInterval(t);
			return;
		}
		angle += 40;
		$('.link',$elem).stop().animate({rotate: '+=-40deg'}, 0);
	},10);
	$elem.stop().animate({width:'268px'}, 1000)
	.find('.item_content').fadeIn(400,function(){
		$(this).find('p').stop(true,true).fadeIn(600);
	});
}
function collapse($elem){
	var angle = 1440;
	var t = setInterval(function () {
		if(angle == 0){
			clearInterval(t);
			return;
		}
		angle -= 40;
		$('.link',$elem).stop().animate({rotate: '+=40deg'}, 0);
	},10);
	$elem.stop().animate({width:'52px'}, 1000)
	.find('.item_content').stop(true,true).fadeOut()
          .find('p').stop(true,true).fadeOut();
}
To make things easier, we created two functions, one for expanding an item and one for collapsing it. The expand function will make the icon rotate 4 times around itself (360 times 4 are 1440). We will also make the item expand by animating an increase in its width. Then, we let the content appear, first the whole div and then the paragraph element.
为了使事情变得容易,我们创建了两个函数,一个用于扩展项目,另一个用于折叠项目。 扩展功能将使图标围绕自身旋转4次(360乘以4为1440)。 我们还将通过动画化其宽度的增加来使该项目扩展。 然后,让内容显示,首先显示整个div,然后显示段落元素。
The collapse function will rotate the icon back, decrease the width of the item and make the content disappear.
折叠功能会将图标向后旋转,减小项目的宽度并使内容消失。
And that’s it! I hope you enjoyed it!
就是这样! 我希望你喜欢它!
翻译自: https://tympanus.net/codrops/2010/04/30/rocking-and-rolling-rounded-menu-with-jquery/


 471
471


 被折叠的 条评论
为什么被折叠?
被折叠的 条评论
为什么被折叠?
 到【灌水乐园】发言


