


macOS Catalina introduces new security controls. For example, apps are now required to ask your permission before accessing parts of the drive where documents and personal files are kept. Let’s take a look at what’s new for security in Catalina.
macOS Catalina引入了新的安全控制。 例如,现在要求应用程序在访问驱动器中保存文档和个人文件的部分之前,请征得您的许可。 让我们看一下Catalina中的安全性新功能。
某些应用程序需要访问文件的权限 (Some Apps Require Permission to Access Your Files)

Apps now have to request permission to access certain parts of your file system. This includes your Documents and Desktop folders, your iCloud Drive, and any external volumes that are currently connected to your Mac (including flash drives, memory cards, and so on). This is the change that’s been getting the most headlines.
应用现在必须请求权限才能访问文件系统的某些部分。 这包括“文档”和“桌面”文件夹,“ iCloud驱动器”以及当前连接到Mac的任何外部卷(包括闪存驱动器,存储卡等)。 这是引起最多关注的变化。
Apple has been pushing permission-based access for a while on iOS, and we’re seeing more of these security policies make their way into macOS. When you first upgrade to Catalina, this can result in a blizzard of permission request dialog boxes. This has led some to compare the feature to Windows Vista’s full-screen security prompts (but in reality, it’s nowhere near as egregious).
苹果已经在iOS上推动基于权限的访问已有一段时间了,我们看到越来越多的安全策略进入了macOS。 当您首次升级到Catalina时,这可能会导致权限请求对话框飞速增长。 这使一些人将该功能与Windows Vista的全屏安全提示进行了比较(但实际上,它远没有那么令人震惊)。
Unedited Catalina first-run experience.
未经编辑的Catalina首次体验。
And I haven't even begun to do actual work yet.
而且我还没有开始做实际的工作。
This could be Apple's shining Windows Vista moment. pic.twitter.com/CxuVhA3BxV
这可能是苹果公司闪亮的Windows Vista时刻。 pic.twitter.com/CxuVhA3BxV
— Tyler Hall (@tylerhall) October 7, 2019
-泰勒·霍尔(@tylerhall) 2019年10月7日
From a security standpoint, it’s a change to be welcomed, though it can take some time to get used to. Not every app will request access, either. In our tests, we were able to open and save files using markdown editor Typora, but navigating to the Documents folder in Terminal using the cd ~/Documents/ command prompted a request for permission.
从安全的角度来看,这是值得欢迎的更改,尽管要花一些时间才能习惯。 并非每个应用程序都会请求访问权限。 在我们的测试中,我们能够使用markdown编辑器Typora打开和保存文件,但是使用cd〜 cd ~/Documents/命令导航到Terminal中的Documents文件夹会提示您请求许可。
Head to System Preferences > Security and Privacy > Privacy and click on the “Files and Folders” option to see any apps that have requested access. You can also grant access to your whole disk by clicking “Full Disk Access.” Note that some apps, like duplicate file finders, will require that you allow access to your entire drive using this menu.
转到系统偏好设置>安全和隐私>隐私,然后单击“文件和文件夹”选项以查看所有已请求访问权限的应用程序。 您还可以通过单击“完整磁盘访问”来授予对整个磁盘的访问权限。 请注意,某些应用程序(例如重复文件查找器)将要求您允许使用此菜单访问整个驱动器。

To make changes, first, click on the lock icon in the bottom-left corner of the window, then input your admin password (or use Touch ID if you have a fingerprint reader). You can then check the box next to the app in question to grant access.
要进行更改,请首先单击窗口左下角的锁定图标,然后输入您的管理员密码(如果您有指纹读取器,请使用Touch ID)。 然后,您可以选中有问题的应用旁边的框以授予访问权限。
输入监视,屏幕记录和Safari (Input Monitoring, Screen Recording, and Safari)

Disk access isn’t the only change to permissions in macOS Catalina. Apple now requires that apps ask for permission to log keyboard input and make screen recordings. You will find options for each of these under “Input Monitoring” and “Screen Recording” in System Preferences > Security and Privacy > Privacy.
磁盘访问并不是macOS Catalina中权限的唯一更改。 Apple现在要求应用程序征求许可,以记录键盘输入和进行屏幕录制。 您可以在“系统偏好设置”>“安全性和隐私”>“隐私”中的“输入监视”和“屏幕录像”下找到每个选项。
Input Monitoring refers to any text input that isn’t handled by the operating system, just like the “Allow Full Access” setting on iOS for third-party keyboards. This could help protect against keyloggers. Screen Recording restrictions block apps from recording anything on your screen without permission. This restriction affects apps like Apple’s own QuickTime Player, prompting you to “Open System Preferences,” click the lock to authorize changes, and then manually grant permission.
输入监视是指操作系统未处理的任何文本输入,就像iOS上第三方键盘的“允许完全访问”设置一样。 这可以帮助防止键盘记录器。 屏幕录制限制可阻止应用程序未经许可在屏幕上录制任何内容。 此限制会影响Apple自己的QuickTime Player等应用程序,提示您“打开系统偏好设置”,单击该锁以授权更改,然后手动授予权限。
In Safari, you will also be asked to allow or deny requests to download files from specific domains or to share your screen. You can fine-tune your choices by launching the browser then clicking Safari > Preferences > Websites. You can permanently grant permission, deny outright, or prompt the website to ask you every time using the provided controls.
在Safari中,系统还会要求您允许或拒绝从特定域下载文件或共享屏幕的请求。 您可以通过启动浏览器,然后单击Safari>首选项>网站来微调您的选择。 您可以使用提供的控件永久授予权限,完全拒绝,或提示网站每次询问您。
macOS现在存储在单独的磁盘卷上 (macOS Is Now Stored on a Separate Disk Volume)

During the installation process for macOS Catalina, your main system volume is split in two: one read-only volume for core system files (your operating system) and another volume for data that allows both read and write access. You won’t need to do anything; the installer takes care of it for you.
在macOS Catalina的安装过程中,您的主系统卷分为两部分:一个用于核心系统文件(您的操作系统)的只读卷,以及一个用于同时允许读取和写入访问的数据的卷。 您无需执行任何操作; 安装程序会为您处理。
This places all of the operating system’s most important files in a single read-only volume that cannot be modified by you or any of your apps. You won’t be able to see the second volume unless you open Disk Utility. In the sidebar, you should find two volumes—a regular old “Macintosh HD” (your operating system) and a “Macintosh HD — Data” for everything else.
这会将所有操作系统最重要的文件放在一个只读卷中,您或您的任何应用都无法修改该只读卷。 除非打开“磁盘工具”,否则您将看不到第二卷。 在边栏中,您应该找到两个卷-常规的旧版“ Macintosh HD”(您的操作系统)和一个“ Macintosh HD-数据”,用于其他所有内容。
This change is something most users will not notice. It does not affect how your computer runs on a day-to-day basis, and the only time the read-only volume will be affected by anything is when you update your Mac. All you need to know is that the change makes it even more difficult for rogue apps to damage the part of your drive where the operating system’s most sensitive data is kept.
大多数用户不会注意到此更改。 它不会影响计算机的日常运行,并且只读卷唯一受任何事物影响的时间是您更新Mac时。 您需要知道的是,所做的更改使恶意应用程序更难以损坏驱动器中保留了操作系统最敏感数据的部分。
关守启动电源 (Gatekeeper Gets a Power Up)
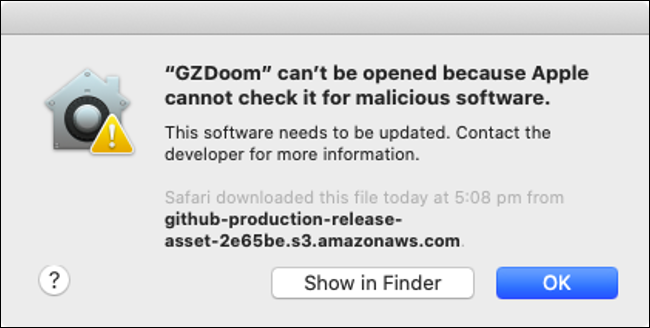
Gatekeeper is the technology that steps in whenever you try to run an app that isn’t from the Mac App Store and hasn’t been signed using an authorized developer certificate. Gatekeeper stops you running dodgy apps on your Mac, for better or worse, and in Catalina, it’s getting an upgrade.
每当您尝试运行不是来自Mac App Store且未使用授权的开发人员证书签名的应用程序时, Gatekeeper都会介入该技术。 Gatekeeper可以阻止您在Mac上运行狡猾的应用程序,无论是好是坏,在Catalina中,它都得到了升级。
Apps will now be checked for malware using Gatekeeper each time they run. Previously this only happened the first time you tried to open the app. To speed the process up, Apple has launched a new notarization process where developers must submit their apps to Apple to have them pre-approved as safe.
现在将在每次运行时使用Gatekeeper检查应用程序是否存在恶意软件。 以前,这仅在您首次尝试打开该应用程序时发生。 为了加快这一过程,苹果公司启动了一个新的公证程序 ,开发人员必须将其应用程序提交给苹果公司,以使其预先获得安全批准。
If Gatekeeper sees that an app has been notarized, it knows not to scan it for malware every time it is launched. As of macOS Catalina, any developer who has signed their app with an Apple Developer ID certificate must also submit their apps for notarization by Apple to pass Gatekeeper’s checks. This translates to more red tape and hoops for developers but more peace of mind for consumers.
如果Gatekeeper看到某个应用程序已经过公证,那么它将知道每次启动时都不会对其进行扫描。 从macOS Catalina开始,任何使用Apple Developer ID证书签署了其应用程序的开发人员也必须将其应用程序提交给Apple进行公证,以通过Gatekeeper的支票。 对于开发人员来说,这意味着更多的繁文节,但对于消费者而言,则是更省心的。
Remember, you can still install and run apps that aren’t signed with Developer certificates or downloaded from the Mac App Store:
请记住,您仍然可以安装和运行未使用开发者证书签名或未从Mac App Store下载的应用程序:
- Launch the app you’re trying to run and acknowledge the Gatekeeper warning that prevents the app from running. 启动您要运行的应用程序,并确认Gatekeeper警告,该警告会阻止该应用程序运行。
- Head to System Preferences > Security and Privacy > General and look for a note at the bottom of the screen about an app launch being denied. 转到系统偏好设置>安全和隐私>常规,然后在屏幕底部查找有关拒绝启动应用程序的注释。
- Click on “Open Anyway” to bypass Gatekeeper and launch the app. 单击“仍然打开”以绕过Gatekeeper并启动该应用程序。

带有T2芯片的Mac附带激活锁 (Activation Lock Comes to Macs with a T2 Chip)

Activation Lock was first added to iPhones to deter thieves. The feature locks any iOS device to your Apple ID, requiring that you log in using your credentials if you want to restore the device to factory settings. This is so that a thief can’t steal your phone or tablet, reset it to factory settings, then resell it as a used device.
首次将激活锁添加到iPhone中以阻止小偷。 该功能可将任何iOS设备锁定为Apple ID,如果要将设备恢复为出厂设置,则需要使用凭据登录。 这样一来,小偷就无法窃取您的手机或平板电脑,将其重置为出厂设置,然后再将其作为二手设备转售。
That same technology is now making its way into macOS Catalina. It only works if your Mac has Apple’s T2 chip, a custom piece of silicon that rolls the “System Management Controller, image signal processor, audio controller, and SSD controller” into a single piece of hardware. The T2 chip is currently found on the following Mac computers:
相同的技术现在正在进入macOS Catalina。 仅当您的Mac具有Apple的T2芯片(一种将“系统管理控制器,图像信号处理器,音频控制器和SSD控制器”集成到单个硬件中)的定制硅片时,该功能才有效。 当前在以下Mac计算机上可以找到T2芯片:
- MacBook Pro 2018 or later MacBook Pro 2018或更高版本
- MacBook Air 2018 or later MacBook Air 2018或更高版本
- iMac Pro (all models) iMac Pro(所有型号)
- Mac mini 2018 or later Mac mini 2018或更高版本
To take advantage of Activation Lock, make sure that the “Find My Mac” service is enabled under System Preferences > Apple ID > iCloud. If you intend to sell your Mac, make sure you disable the “Find My Mac” service before you do so. You should also reinstall macOS and wipe any personal data before you sell it.
要利用激活锁,请确保在“系统偏好设置”>“ Apple ID”>“ iCloud”下启用了“查找我的Mac”服务。 如果您打算出售Mac,请确保先禁用“查找我的Mac”服务。 您还应该重新安装macOS并擦除所有个人数据,然后再出售。
Not sure which Mac you have? Click on the Apple logo in the top-left corner and then choose “About This Mac” to see the year, model, and other technical specifications.
不确定您拥有哪台Mac? 单击左上角的Apple徽标,然后选择“关于本机”以查看年份,型号和其他技术规格。
“查找我”可帮助您找到设备和朋友 (“Find My” Helps You Locate Devices and Friends)

Apple has overhauled its “Find My iPhone” service and rebranded it as simply “Find My” instead. The service was previously only available via iCloud.com and through iPhone and iPad apps. But, in macOS Catalina, Apple has included a dedicated “Find My” app for keeping track of all of your devices.
苹果已经对其“ Find My iPhone”服务进行了全面改革,并将其更名为“ Find My”。 该服务以前只能通过iCloud.com以及通过iPhone和iPad应用程序使用。 但是,在macOS Catalina中,Apple包含了专用的“查找我”应用程序,用于跟踪您的所有设备。
The new app includes the ability to track not only devices linked to your Apple ID but also your friends. Previously Apple’s “Find My Friends” app was used for this purpose, but the “Find My” app will be pulling double duty going forward. You can share your location using this app by clicking on “Share My Location,” entering your email address, and clicking Send.
新的应用程序不仅可以跟踪链接到您的Apple ID的设备,还可以跟踪您的朋友。 以前,Apple的“ Find My Friends”应用程序已用于此目的,但“ Find My”应用程序将承担双重责任。 您可以使用此应用共享您的位置,方法是单击“共享我的位置”,输入您的电子邮件地址,然后单击发送。
Remember that “Find My” only works with other Apple users. The person you are sharing your location with will need an Apple ID and access to the “Find My” service either via an iPhone or iPad or a Mac to partake. You can also share your location using your iOS device from the Messages app, which is generally a better idea since most of us walk around with our phones rather than our MacBooks.
请记住,“查找我”仅适用于其他Apple用户。 与您共享位置的人需要一个Apple ID,并可以通过iPhone或iPad或Mac来访问“查找我”服务。 您还可以通过Messages应用程序使用iOS设备共享您的位置,通常,这是一个更好的主意,因为我们大多数人都随身携带手机而不是MacBooks。
Click on the “Devices” tab to see all of your devices, along with their current and last-known locations. Click on a device to select it then click the “i” information button to see more options. Depending on the device, you may be able to play a sound, mark the device as lost, and even erase the device remotely.
单击“设备”选项卡以查看所有设备以及它们的当前位置和最近的位置。 单击设备以将其选中,然后单击“ i”信息按钮以查看更多选项。 根据设备的不同,您可能可以播放声音,将设备标记为丢失,甚至可以远程擦除设备。
所有的小事情 (All the Small Things)
As is the case with every new macOS release, there are a lot of smaller changes that you might not notice at first. One of the best is the ability to approve admin requests on your Apple Watch. If you can use your Apple Watch to unlock your Mac, you can use it to grant admin permission to install apps, delete files, and more.
就像每个新的macOS版本一样,有许多较小的变化,您一开始可能不会注意到。 最好的功能之一就是可以在Apple Watch上批准管理请求。 如果可以使用Apple Watch解锁Mac ,则可以使用它授予管理员安装应用程序,删除文件等的权限。
Safari steps up its security game by letting you know if your passwords are too weak. Safari will also suggest new “strong” passwords and save them to your iCloud keychain. The Notes app will also now allow you to share read-only notes. Click on the “Add People” button then change the “Permission” field to “Only people you invite can view” to share a note without full write permissions.
Safari通过告诉您密码是否太弱来加强其安全性。 Safari还将建议新的“强”密码并将其保存到您的iCloud钥匙串中。 Notes应用程序现在还将允许您共享只读笔记。 单击“添加人员”按钮,然后将“权限”字段更改为“只有您邀请的人可以查看”,以共享没有完全写权限的笔记。
These are just a few of the changes in macOS Catalina, which is available now.
这些只是macOS Catalina中的部分更改,现已提供。
翻译自: https://www.howtogeek.com/443611/how-macos-catalinas-new-security-features-work/


 2646
2646

 被折叠的 条评论
为什么被折叠?
被折叠的 条评论
为什么被折叠?
 到【灌水乐园】发言


