


从头开始vue创建项目
Windows customization isn’t anything new, but with Windows 7, customization got a lot easier with theme packs. Here is how you can create your own theme pack from scratch.
Windows自定义并不是什么新鲜事物,但是在Windows 7中,主题包使自定义变得更加容易。 这是您可以从头开始创建自己的主题包的方法。
Creating a theme pack from scratch is a lot more work than using built in tools, but it gives you a lot more flexibility by allowing you to creating brand icons, RSS background feeds, and customizing every feature which may not be easy to do through Windows native tools. When you are going to create a theme that you can share with others you will want to take into account what exactly you will be able to change that others will be able to use. Windows 7 theme packs allow you to customize the desktop background (including “slide show” backgrounds, and RSS feed backgrounds), screen saver, system sounds, desktop icons, mouse pointers, and system colors.
从头开始创建主题包要比使用内置工具来做得多,但是通过允许您创建品牌图标,RSS背景供稿并自定义每个功能(通过Windows可能不容易),它为您提供了更大的灵活性。本机工具。 当您要创建可以与他人共享的主题时,您将需要考虑到您将能够确切地更改他人可以使用的主题。 Windows 7主题包允许您自定义桌面背景(包括“幻灯片放映”背景和RSS feed背景),屏幕保护程序,系统声音,桌面图标,鼠标指针和系统颜色。
Customize your theme
自定义主题
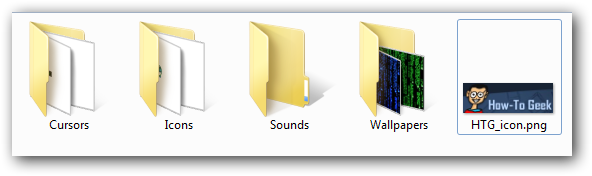
Start the theme pack by gathering all the files you want to use for your customization. Remember to get items for every part you are going to customize. If you do not specify parts to theme, the system will use the defaults that come with windows. So if you don’t find a mouse cursor you like, Windows will use the default cursor for the system. Once you have the files you want, put them all in a folder that you can easily get to. I am going to be building a theme based on the Matrix wallpapers we posted recently.
通过收集要用于自定义的所有文件来启动主题包。 记住要获取要定制的每个零件的物品。 如果您没有为主题指定零件,则系统将使用Windows随附的默认值。 因此,如果找不到所需的鼠标光标,Windows将使用系统的默认光标。 拥有所需的文件后,将所有文件都放在一个可以轻松访问的文件夹中。 我将基于我们最近发布的Matrix壁纸构建主题。
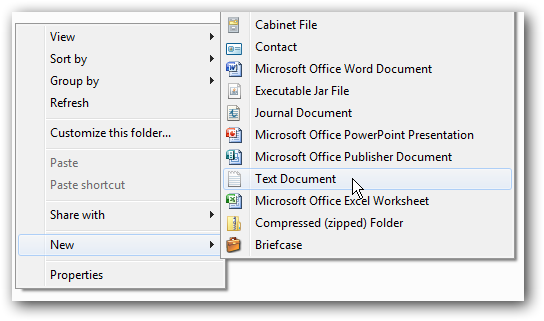
We will start the customization by generating the .theme file. This file is the heart of your theme pack and will tell Windows which media file to use where. The .theme file is really just a specially formatted text file so start by right clicking in your folder and creating a new text document. Name the file whatever you want and open it with your favorite text editor.
我们将通过生成.theme文件开始自定义。 该文件是主题包的核心,它将告诉Windows在哪个位置使用哪个媒体文件。 .theme文件实际上只是一种特殊格式的文本文件,因此首先右键单击您的文件夹并创建一个新的文本文档即可。 随意命名文件,然后使用您喜欢的文本编辑器将其打开。
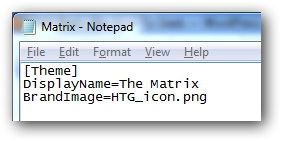
The .theme file is going to be broken up into sections. The first section is the [Theme] section. The [Theme] section only has two options, the theme display name, and the theme icon. The display name can be whatever you want the theme to be called in the control panel > personalize window, and the icon graphic must be a PNG file. The graphic will be scaled to 80×240 so use something close to that resolution or ratio.
.theme文件将分为几部分。 第一部分是[主题]部分。 [Theme]部分只有两个选项,主题显示名称和主题图标。 显示名称可以是您希望在控制面板>个性化窗口中调用主题的任何名称,并且图标图形必须是PNG文件。 图形将缩放为80×240,因此请使用接近该分辨率或比例的图像。
Note: The theme icon will only show up under the Control Panel > Personalization window so don’t worry if you don’t see the icon.
注意:主题图标只会显示在“控制面板”>“个性化设置”窗口下,因此如果您没有看到该图标,请不要担心。

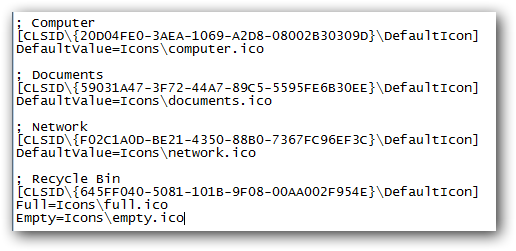
The rest of the [Theme] section will tell windows which icons to use for the desktop icons (Computer, Documents, Recycle Bin, Network). For icon files you can use either standalone .ico files, or you can use icons embedded in .exe or .dll files also. For .exe and .dll files you need to specify which icon to use with a comma and then say which icon you are going to use. (my.exe,0 or my.dll,-50). Each desktop item has a unique screen that identifies it so make sure you use the right string for each item.
[主题]部分的其余部分将告诉窗口哪些图标用于桌面图标(计算机,文档,回收站,网络)。 对于图标文件,您可以使用独立的.ico文件,也可以使用嵌入在.exe或.dll文件中的图标。 对于.exe和.dll文件,您需要指定要用逗号使用的图标,然后说出要使用的图标。 (my.exe,0或my.dll,-50)。 每个桌面项目都有一个唯一的屏幕来标识它,因此请确保为每个项目使用正确的字符串。
Computer = [CLSID\{20D04FE0-3AEA-1069-A2D8-08002B30309D}\DefaultIcon] Documents = [CLSID\{59031A47-3F72-44A7-89C5-5595FE6B30EE}\DefaultIcon] Network = [CLSID\{F02C1A0D-BE21-4350-88B0-7367FC96EF3C}\DefaultIcon] Recycle Bin = [CLSID\{645FF040-5081-101B-9F08-00AA002F954E}\DefaultIcon
计算机= [CLSID \ {20D04FE0-3AEA-1069-A2D8-08002B30309D} \ DefaultIcon]文档= [CLSID \ {59031A47-3F72-44A7-89C5-5595FE6B30EE} \ DefaultIcon]网络= [CLSID \ {F02C1A0D-BE21-4350- 88B0-7367FC96EF3C} \ DefaultIcon]回收站= [CLSID \ {645FF040-5081-101B-9F08-00AA002F954E} \ DefaultIcon
Below each item you will specify the icon with DefaultValue except the Recycle Bin which will use values Full and Empty.
在每个项目下方,您将使用DefaultValue指定图标,但“回收站”将使用“满”和“空”值。
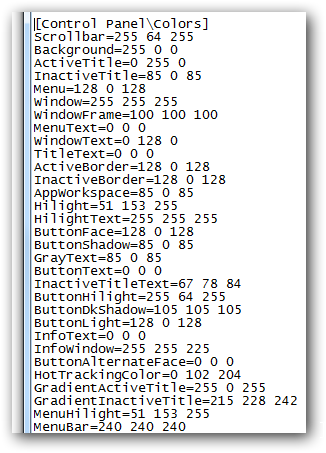
After the [Theme] section is the optional [Control Panel\Colors] and [Control Panel\Cursors] sections. The colors section would be extremely hard to adjust manually but if you really want to try it you can adjust the following items using RGB codes.
[主题]部分之后是可选的[控制面板\颜色]和[控制面板\光标]部分。 颜色部分将很难手动调整,但是如果您真的想尝试,可以使用RGB代码调整以下项目。
Note: RGB codes range from 0-255 and are separated by spaces. So black is 0 0 0 and white is 255 255 255.
注意:RGB代码范围为0-255,并用空格分隔。 因此,黑色为0 0 0,白色为255 255 255。
ActiveTitle, Background, Hilight, HilightText, TitleText, Window, WindowText, Scrollbar, InactiveTitle, Menu, WindowFrame, MenuText, ActiveBorder, InactiveBorder, AppWorkspace, ButtonFace, ButtonShadow, GrayText, ButtonText, InactiveTitleText, ButtonHilight, ButtonDkShadow, ButtonLight, InfoText, InfoWindow, GradientActiveTitle, GradientInactiveTitle
ActiveTitle,背景,Hilight,HilightText,TitleText,Window,WindowText,Scrollbar,InactiveTitle,菜单,WindowFrame,MenuText,ActiveBorder,InactiveBorder,AppWorkspace,ButtonFace,ButtonShadow,GrayText,ButtonText,InactiveTitleText,ButtonHilight,ButtonDkShadow,ButtonLight,InfoText,InfoWindow, GradientActiveTitle,GradientInactiveTitle
Instead of doing this section by hand you could also adjust the colors using the control panel > personalize > colors, and then save the theme file and then just copy and paste the colors section into the theme you want.
除了手动完成此部分,您还可以使用控制面板>个性化>颜色来调整颜色,然后保存主题文件,然后将颜色部分复制并粘贴到所需的主题中。
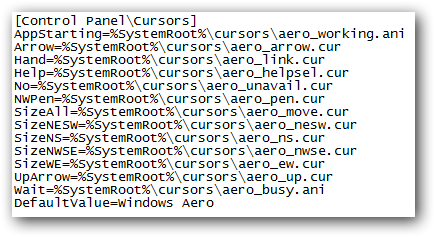
The [Control Panel\Cursors] section has an option for which .cur or .ani files you want to use for each cursor. The valid cursors you can replace are the following:
[Control Panel \ Cursors]部分具有一个选项,您要为每个光标使用.cur或.ani文件。 您可以替换的有效游标如下:
Arrow, Help, AppStarting, Wait, NWPen, No, Size, SizeWE, Crosshair, IBeam, SizeNWSE, SizeNESW, SizeAll, UpArrow
箭头,帮助,AppStarting,等待,NWPen,否,大小,SizeWE,十字线,IBeam,SizeNWSE,SizeNESW,SizeAll,UpArrow
If not cursor is defined the system defaults will be used.
如果未定义光标,将使用系统默认值。
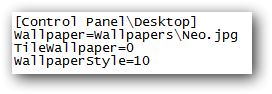
After these two sections comes the first mandatory section and that is the [Control Panel\Desktop] section. If you do not have this part of the file the theme will not be recognized as a valid theme. In here you will specify what the wallpaper image will be, how the image will be displayed and if the image is tiled or not. The three values you need are Wallpaper, TileWallpaper, and WallpaperStyle.
这两个部分之后是第一个必需部分,即[Control Panel \ Desktop]部分。 如果您没有文件的这一部分,则该主题将不会被识别为有效的主题。 在此处,您将指定墙纸图像,显示图像的方式以及是否将图像平铺。 您需要的三个值是Wallpaper,TileWallpaper和WallpaperStyle。
Wallpaper can be a .bmp, .gif, .jpg, .png, or .tif file. TileWallpaper is either a 1 or 0; 1 indicates the wallpaper should be tiled while 0 disables the tile. WallpaperStyle can be the following values. 0 means the image is centered, 2 means the image is stretched, 6 will fit the image to the screen, or 10 will will resize and crop the image to fit the screen.
墙纸可以是.bmp,.gif,.jpg,.png或.tif文件。 TileWallpaper是1或0; 1表示应平铺墙纸,而0则禁用平铺。 WallpaperStyle可以是以下值。 0表示图像居中,2表示图像被拉伸,6表示图像适合屏幕,或者10表示将调整大小并裁剪图像以适合屏幕。
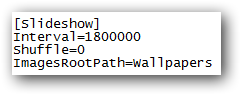
After you have the [Control Panel\Desktop] section defined you can move on to the next optional section [Slideshow]. [Slideshow] is how you can make rotating backgrounds for Windows 7. This section has the following attributes: Interval, Shuffle, RSSFeed, ImagesRootPath, Item*Path (* represents which pictures will be included in the slide show). The attributes can be defined with the following values: Interval shows the amount of time to wait before changing the wallpaper image (in milliseconds), Shuffle is a 1 or 0 to determine if images are displayed in alphabetical order or shuffled, RSSFeed points to the URL of the images RSS feed you want to use, ImagesRootPath is the folder containing your images, and Item*Path determines how many items are included in the slideshow. Each Item*Path entry points to one wallpaper image so you need to specify each image manually.
定义[控制面板\桌面]部分后,可以继续进行下一个可选部分[幻灯片显示]。 [Slideshow]是为Windows 7制作旋转背景的方式。本节具有以下属性:时间间隔,随机播放,RSSFeed,ImagesRootPath,Item * Path(*表示幻灯片中将包含哪些图片)。 可以使用以下值定义属性:“间隔”显示更改墙纸图像之前要等待的时间(以毫秒为单位),“随机播放”是1或0,用于确定图像是以字母顺序显示还是随机播放,RSSFeed指向您要使用的图像RSS feed的URL,ImagesRootPath是包含图像的文件夹,Item * Path确定幻灯片中包含多少个项目。 每个Item * Path条目都指向一个墙纸图像,因此您需要手动指定每个图像。
Note: ImagesRootPath and RSSFeed cannot be used together.
注意:ImagesRootPath和RSSFeed不能一起使用。
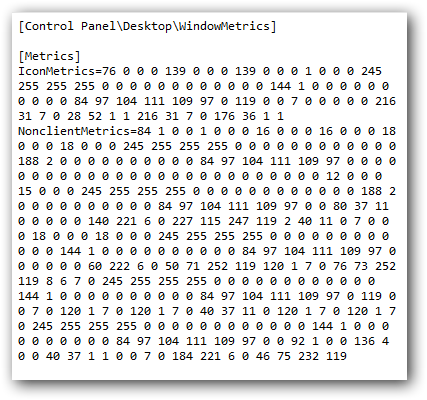
Following [SlideShow] is another optional section called [Metrics]. [Metrics] section shows dimensions of various display elements, such as the window border width, icon height, or scrollbar width. The NonclientMetrics and IconMetrics values are binary structures defined by NONCLIENTMETRICS and ICONMETRICS in winuser.h. In other words, you probably don’t want to edit this section by hand. If you are going to change the value of any window boarders I would suggest doing that through the control panel and saving the modified theme. Then export the [Metrics] section into your desired theme. Non-the-less, here is an example of a [Metrics] section.
[SlideShow]之后是另一个可选部分,称为[Metrics]。 [度量]部分显示了各种显示元素的尺寸,例如窗口边框宽度,图标高度或滚动条宽度。 NonclientMetrics和IconMetrics值是winuser.h中的NONCLIENTMETRICS和ICONMETRICS定义的二进制结构。 换句话说,您可能不想手动编辑此部分。 如果要更改任何窗口边框的值,我建议您通过控制面板进行操作并保存修改后的主题。 然后将[Metrics]部分导出到所需的主题中。 尽管如此,这是[Metrics]部分的示例。
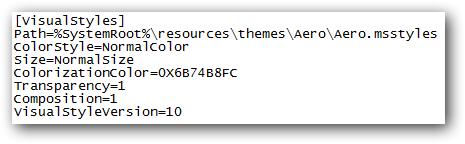
Next is the required [VisualStyles] section. This section allows you to point to a .msstyles file that can be modified for customization. If you use a .msstyles value in this section you will need to remove the [Metrics] and [Color] sections of your theme because the .msstyles will replace both of those sections. The valid attributes are Path, Color, Composition, Size, ColorizationColor, and Transparancy. These options makes it easier to customize an already existing theme. For example, if you set the path attribute to %SystemRoot%\resources\Themes\Aero\Aero.msstyles you can easily begin customizing the default Windows Aero theme.
接下来是必需的[VisualStyles]部分。 本部分允许您指向。 可以修改以进行自定义的msstyles文件。 如果在此部分中使用.msstyles值,则将需要删除主题的[Metrics]和[Color]部分,因为.msstyles将替换这两个部分。 有效属性是“路径”,“颜色”,“成分”,“大小”,“ ColorizationColor”和“透明性”。 这些选项使自定义现有主题变得更加容易。 例如,如果将路径属性设置为%SystemRoot%\ resources \ Themes \ Aero \ Aero.msstyles,则可以轻松地开始自定义默认的Windows Aero主题。
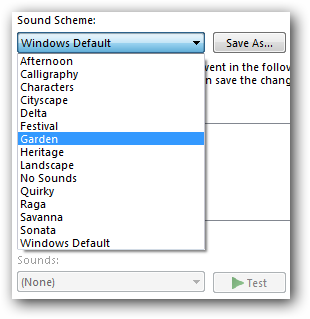
Following [VisualStyles] is the optional [Sounds] and [AppEvents] sections. For this section you can either specify each sound manually by using the path to a .wav file like so: [AppEvents\Schemes\Apps\.Default\SystemExclamation] DefaultValue=
[VisualStyles]之后是可选的[Sounds]和[AppEvents]部分。 对于此部分,您可以通过使用.wav文件的路径手动指定每种声音,如下所示:[AppEvents \ Schemes \ Apps \ .Default \ SystemExclamation] DefaultValue =
Or you can specify one of the built in sound schemes with SchemeName= You can use one of the built in sound schemes or specify the .dll file containing the theme.
或者,您可以使用SchemeName =指定一种内置声音方案。您可以使用一种内置声音方案或指定包含主题的.dll文件。
Following [Sounds] is the [Boot] section. The [Boot] section only has one value for SCRNSAVE.EXE point this value to whatever .scr file you want to use for your screensaver.
[声音]后面是[启动]部分。 [启动]部分只有一个SCRNSAVE.EXE值,将此值指向您要用于屏幕保护程序的任何.scr文件。
Finally is the required [MasterThemeSelector] which only has one attribute and you don’t have a choice for the value. The only thing that goes in this section is MTSM=DABJDKT which indicates that the theme is valid.
最后是必需的[MasterThemeSelector],它只有一个属性,您没有选择该值的方法。 本节中唯一要做的是MTSM = DABJDKT,它指示主题有效。
Once you have all of the required and optional sections in the file, save the file to whatever you want to call it and change the extension from .txt to .theme. Make sure you are viewing known file extensions when changing the extension otherwise the true extension will be hidden.
文件中包含所有必需和可选部分后,将文件保存到要调用的文件中,并将扩展名从.txt更改为.theme 。 更改扩展名时,请确保您正在查看已知的文件扩展名,否则真正的扩展名将被隐藏。
Packaging your theme pack
包装主题包
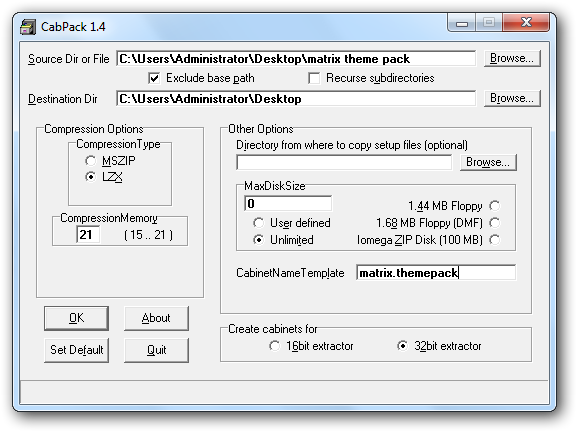
The final step it to package all of your media into a .themepack file. The .themepack file is simply a .cab file with an extension change. So if you already have software that can create a .cab file, simply use that software to compress your theme folder with all of your media in it and change the extension. If you don’t already have a cab packing program you can check out CabPack which is freeware.
最后一步,将所有媒体打包到.themepack文件中。 .themepack文件只是具有扩展名更改的.cab文件。 因此,如果您已经拥有可以创建.cab文件的软件,只需使用该软件压缩包含所有媒体的主题文件夹并更改扩展名即可。 如果您还没有出租车打包程序,可以签出免费的CabPack。
Here’s an example of the Matrix Theme we built from scratch.
这是我们从头开始构建的矩阵主题的示例。
![sshot-2010-08-11-[15-42-35]](https://i-blog.csdnimg.cn/blog_migrate/9a371569ac12a37dc9eb6aff2ff510fd.png "sshot-2010-08-11-[15-42-35]")
Conclusion
结论
Once you have your theme pack you can apply it to your own system before sharing it. If there is anything else that needs tweaking you can either go back and change it in your .theme file your you can change it through the Windows GUI and then re-save the theme for sharing. Now go out there and share your favorite theme tweaks with the rest of the world.
拥有主题包后,可以在共享主题包之前将其应用于自己的系统。 如果还有其他需要调整的地方,则可以返回并在.theme文件中进行更改,然后可以通过Windows GUI进行更改,然后重新保存主题以进行共享。 现在去那里,与世界其他地方分享您最喜欢的主题调整。
Links
链接
Microsoft theme pack reference CabPack
翻译自: https://www.howtogeek.com/howto/24609/create-a-windows-7-theme-pack-from-scratch/
从头开始vue创建项目


 1488
1488


 被折叠的 条评论
为什么被折叠?
被折叠的 条评论
为什么被折叠?
 到【灌水乐园】发言


