


 本文档介绍了如何在Ubuntu系统上使用'ifenslave'包设置802.3ad链路聚合,以增加网络带宽和弹性。通过在Linux和基础设施两方面进行配置,包括在交换机(如瞻博网络和惠普ProCurve交换机)上启用LACP,实现多个网络接口的绑定。

Do you need to pump large amounts of data to a multitude of clients simultaneously, while only using a single IP address? By using “link aggregation” we can join several separate network cards on the system into one humongous NIC.
您是否需要在仅使用一个IP地址的同时将大量数据同时泵送到多个客户端? 通过使用“链路聚合”,我们可以将系统上的多个独立网卡连接到一个大型NIC中。
总览 (Overview)
Link aggregation was designed to give you the option of increasing available network bandwidth and resiliency, without completely changing your infrastructure to do so (with the cost that such a move would entail).
链路聚合旨在为您提供增加可用网络带宽和弹性的选项,而无需完全更改您的基础结构(这样做会带来成本)。
Beyond that, as system administrators, we usually have little to no affect over the inner workings of the applications running on our servers. So if such a time comes that we need to increase the available network bandwidth to the application we may be facing a complete redesign of the system. You probably know that changing the client-server interaction, funding a targeted feature requests from the application’s vendor or upgrading to a new generation of network equipment, is either a lot of work or requires a budget or both. So a second before you fork out the time and $$$, consider that the upshot of using the “Link aggregation” technology, is that because this is done at the infrastructure level (OS, NICs and switches) the application can remain completely oblivious to the change while suddenly getting the combined bandwidth of multiple network connections.
除此之外,作为系统管理员,我们通常对服务器上运行的应用程序的内部运行几乎没有影响。 因此,如果到了这样的时刻,我们需要增加应用程序的可用网络带宽,那么我们可能会面临系统的全面重新设计。 您可能知道,更改客户端与服务器的交互,为来自应用程序供应商的目标功能请求提供资金或升级到新一代网络设备是一项繁重的工作,或者需要预算,或者两者兼而有之。 因此,在花费时间和资金之前,请先考虑一下使用“链路聚合”技术的结果,因为这是在基础架构级别(操作系统,NIC和交换机)完成的,因此应用程序可以完全忽略在突然获得多个网络连接的总带宽的同时进行更改。

Moreover, nowadays this technology is a standard part of most network equipment, you just have to be a “geek” to use it. So, “Remember the fires of hell that forged you!” and let show everyone what we’re made of by squeezing every ounce of performance available from the current infrastructure .
而且,如今,该技术已成为大多数网络设备的标准组成部分,您只需要成为“极客”即可使用它。 因此,“ 记住锻造你的地狱之火! 并通过压缩当前基础架构的每一分性能来向所有人展示我们的能力。
Image by renjith krishnan
先决条件 (Prerequisites)
- This guide was written using Ubuntu server9.10 x64, therefore it is assumed that you have a Debian based system to work with as well. 本指南是使用Ubuntu server9.10 x64编写的,因此假定您也可以使用基于Debian的系统。
- your system has more then one network card. 您的系统有一个以上的网卡。
- You will see me use VIM as the editor program, this is just because I’m used to it… you may use any other editor that you’d like. 您会看到我将VIM用作编辑器程序,这仅仅是因为我已经习惯了……您可以使用任何其他想要的编辑器。
Linux方面 (Linux side of things)
We will be using the “ifenslave” (interface enslave) package, which is able to take the system’s network cards and in the darkness bind them. One thing to note that while on windows this type of configuration is done at the NIC’s driver level and thus is limited to only the interfaces available on that card, with the ifenslave package it is possible to take any NIC in the system and bond it (assuming they are of the same speed grade i.e. 1000Mb/s).
我们将使用“ ifenslave ”(接口奴隶 )程序包,该程序包能够获取系统的网卡并在黑暗中绑定它们。 需要注意的一件事是,在Windows上,这种类型的配置是在NIC的驱动程序级别上完成的,因此仅限于该卡上可用的接口,使用ifenslave软件包,可以将系统中的任何NIC进行绑定(假设它们具有相同的速度等级,即1000Mb / s)。
While in this guide, we will be setting up the link to use the 802.3ad standard, on both the switch (using LACP) and the server, It is noteworthy to say that the “ifenslave” package enables aggregation modes that do not require the cooperation of the switch. However I had not personally used them yet so I can’t vouch for them. Just keep this in mind in case your unable to get the network infrastructure to cooperate or if your network card doesn’t have driver support for “Ethtool”.
在本指南中,我们将在交换机(使用LACP)和服务器上设置链接以使用802.3ad标准,值得注意的是,“ ifenslave”软件包启用了不需要合作的开关。 但是我还没有亲自使用过它们,所以我不能担保它们。 请记住这一点,以防万一您无法获得网络基础架构的支持,或者您的网卡不支持“ Ethtool ”的驱动程序。
Installing the ifenslave package
安装ifenslave软件包
This procedure was created on Ubuntu 9.10 which had an outstanding bug in the “ifenslave” package that doesn’t bring up the bonded interface on startup (documented here). If you install the ifenslave on a 10.10 release, you will automatically get the version with the bug fix. However for those of you not running the latest and greatest, you will need to manually install a newer version of the ifenslave package.
此过程是在Ubuntu 9.10上创建的,该过程在“ ifenslave”包中存在一个突出的错误,该错误在启动时不显示绑定接口( 在此处记录 )。 如果在10.10发行版上安装ifenslave,则将自动获得带有错误修复的版本。 但是,对于那些没有运行最新版本和最高版本的用户,则需要手动安装更新版本的ifenslave软件包。
*Thank you Alexander Usyskin for helping to figure this out.
*感谢Alexander Usyskin帮助您解决这一问题。
To normally install the package (for 10.10 and above users):
正常安装软件包(适用于10.10及以上版本的用户):
sudo aptitude install ifenslave
sudo aptitude install ifenslave
To manually install the newer version, download the version that suits your OS (x86 or x64), put it in the tmp directory and install using the dpkg command.
要手动安装较新的版本,请下载适合您的操作系统的版本( x86或x64 ),将其放在tmp目录中,然后使用dpkg命令进行安装。
For a 32-bit OS:
对于32位操作系统:
sudo dpkg -i /tmp/ifenslave-2.6_1.1.0-15ubuntu1_i386.deb
sudo dpkg -i /tmp/ifenslave-2.6_1.1.0-15ubuntu1_i386.deb
For a 64-bit OS:
对于64位操作系统:
sudo dpkg -i /tmp/ifenslave-2.6_1.1.0-15ubuntu1_amd64.deb
sudo dpkg -i /tmp/ifenslave-2.6_1.1.0-15ubuntu1_amd64.deb
Configure the bonded interface
配置绑定接口
Now that the ifenslave package has been installed we can configure a bonded interface. To do this, edit the interfaces configuration file:
现在已经安装了ifenslave软件包,我们可以配置绑定接口。 为此,请编辑接口配置文件:
sudo vim /etc/network/interfaces
sudo vim /etc/network/interfaces
Comment out all the interfaces that will be part of the bond and add the following:
注释掉将成为绑定一部分的所有接口,并添加以下内容:
auto bond0
iface bond0 inet dhcp
        bond-slaves all
        bond-mode 4
        bond-miimon 100
        bond-primary eth1 eth2 eth3 eth4 eth0
The above example sets the bond to: use mode 4 (802.3ad), get the IP from DHCP and use all the NICs on the server for the bond (the server in question had 4 interfaces from a quad-headed NIC and the on-board NIC).
上面的示例将绑定设置为:使用模式4(802.3ad) ,从DHCP获取IP并使用服务器上的所有NIC进行绑定(所涉及的服务器具有来自四头NIC的 4个接口,板NIC)。
基础设施方面 (Infrastructure side of things)
As said in the overview, we are using “mode 4” (802.3ad) in this guide, so we must set the switch on the receiving end to use aggregation on the ports we are connecting the server on.
如概述中所述,我们在本指南中使用的是“模式4”(802.3ad),因此我们必须将接收端的交换机设置为在连接服务器的端口上使用聚合。
Now obviously I can’t go over every conceivable device configuration out there, so I’ll give two examples and hope that it will give you enough to go on when looking for the information on the vendors documentation or Google for your specific device.
现在显然我无法覆盖所有可能的设备配置,因此我将举两个例子,希望它能为您提供足够的信息,以便查找有关特定设备的供应商文档或Google的信息。
瞻博网络 (Juniper J-web)
This segment explains how to configure interfaces (ports) on a Juniper device to use “Link aggregation” (LACP) using the J-web management GUI.
本部分说明了如何使用J-web管理GUI将Juniper设备上的接口(端口)配置为使用“链路聚合”(LACP)。
Note: I used the EX3200 for the screen captures and instructions detailed below, however the J-web is fairly similar for other Juniper devices that use JUNOS.
注意:我将EX3200用于以下屏幕截图和说明,但是对于使用 JUNOS的 其他Juniper设备,J-web非常相似 。
Dis-associate the interface
取消关联接口
This step is necessary because out-of-the-box, every interface on a Juniper device is associated with the default Vlan called “unit0”. While Juniper does have documentation on how you should configure link aggregation, I have found this first and basic step , to be missing. Without performing this step, the rest of the steps described by the documentation will simply not work and you will be scratching your head as to what are you missing.
此步骤是必需的,因为现成的Juniper设备上的每个接口都与默认Vlan(称为“ unit0”)关联。 尽管Juniper确实提供了有关如何配置链路聚合的文档,但我发现缺少这一第一步和基本步骤。 如果不执行此步骤,则文档中描述的其余步骤将无法正常工作,您将对丢失的内容scratch之以鼻。
Thanks for the Juniper support staff for providing this GUI solution (eventually).
感谢Juniper支持人员提供(最终)该GUI解决方案。
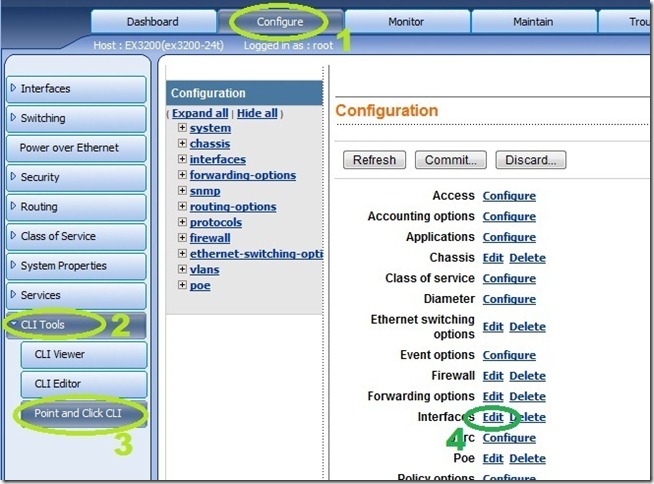
- On the J-web main screen, click Configure. 在J-web主屏幕上,单击“配置”。
- Then click “CLI tools”. 然后单击“ CLI工具”。
- Select “Point and Click CLI”. 选择“指向并单击CLI”。
Then click on “edit” near the “Interfaces” headline.
然后单击“接口”标题附近的“编辑”。
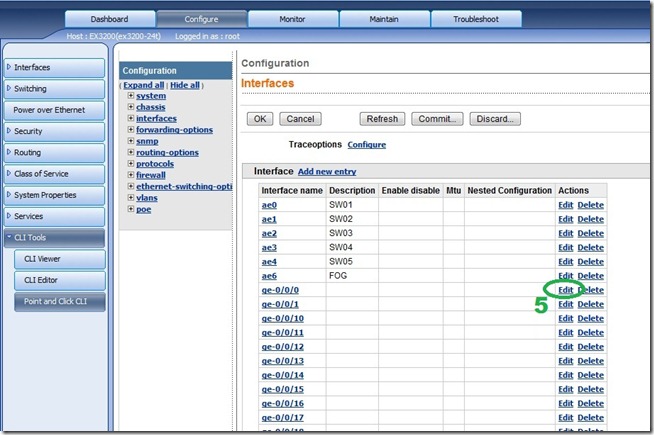
Select the interface you want to be part of the aggregation and click the “Edit” next to it.
Under the “Unit” section delete the association as shown in the picture.
如图所示,在“单元”部分下删除关联。
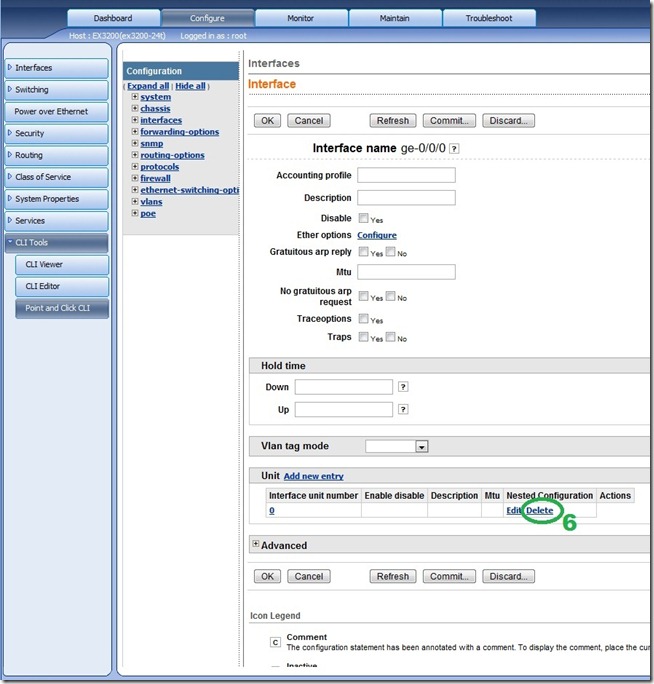
- Click OK. 单击确定。
- Repeat for all the interfaces that you want to be part of aggregations. 对要成为聚合一部分的所有接口重复上述步骤。
- When done use “Commit” to apply the changes. 完成后,使用“提交”应用更改。
Grouping interfaces into aggregations
将接口分组为聚合
Now that the interfaces have been dis-associated, we can create aggregation links by “grouping” them.
现在已经取消了接口的关联,我们可以通过“分组”它们来创建聚合链接。
- On the J-web main screen, click “Interfaces”. 在J-web主屏幕上,单击“接口”。
- Then click “Link Aggregation”. 然后单击“链接聚合”。
Select “Add”.
选择“添加”。
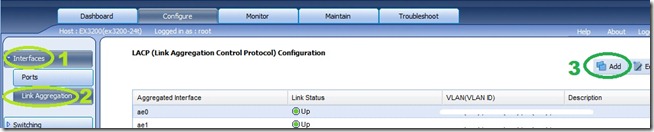
- When the pop-up window comes up, select “active”. 当弹出窗口出现时,选择“活动”。
Click on “Add”.
点击“添加”。
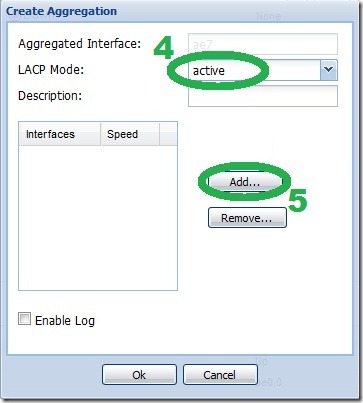
- In the sub-pop-up window, select the interfaces that will be part of the link (hold Ctrl for multiple). 在子弹出窗口中,选择将成为链接一部分的接口(按住Ctrl键可保留多个)。
- Click “OK” until all the configuration windows are gone. 单击“确定”,直到所有配置窗口都消失。
- Done. 做完了
惠普的网络管理ProCurve交换机 (HP’s web managed ProCurve switches)
Complimentary to the Juniper instructions, here are the instructions for HP’s ProCurve web managed devices.
这是对Juniper的补充说明,以下是HP ProCurve Web托管设备的说明。
HP 1800G
惠普1800G
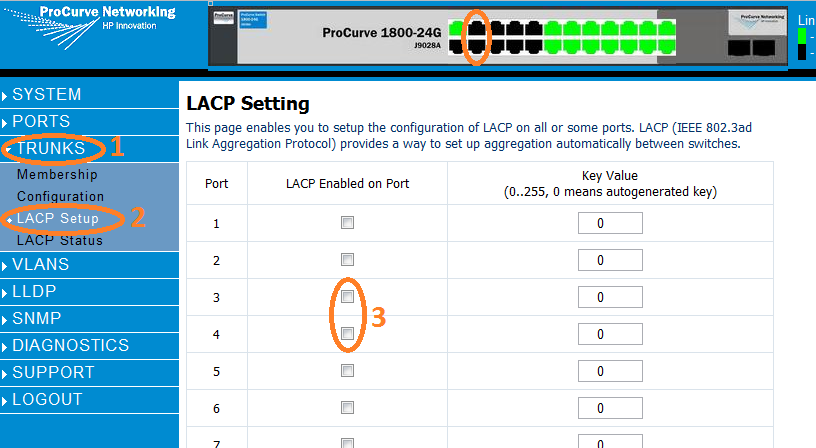
- Click on “Trunks”. 点击“树干”。
Click on “LACP Setup”
点击“ LACP设置”
Select the checkbox for ports that you want to be aggregation capable, in this example I used ports 3 and 4.
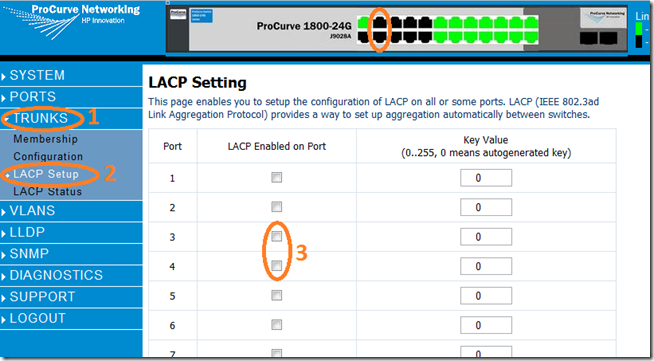
Click Apply at the bottom of the page.
单击页面底部的应用。
Done.
做完了
HP 1810G
惠普1810G
- Click on “Trunks”. 点击“树干”。
- Click on “Trunk Configuration”. 点击“中继配置”。
- Select the “Create” checkbox. 选择“创建”复选框。
- Give the Link a name. 为链接命名。
Click “Apply”.
点击“应用”。
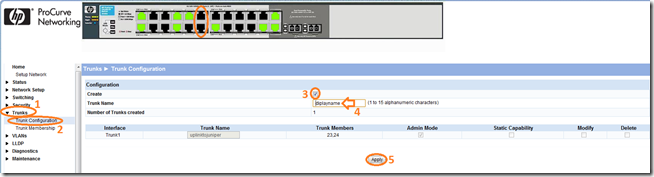
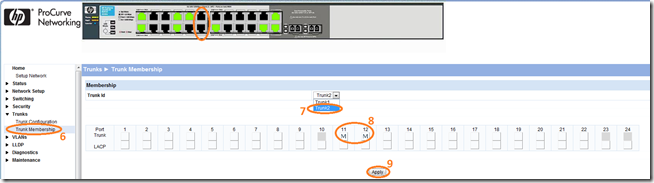
- Click on “Trunk Membership”. 单击“中继成员身份”。
- Select the “Trunk id” from the drop-down-list, in our example we use “Trunk2”. 从下拉列表中选择“ Trunk ID”,在我们的示例中,我们使用“ Trunk2”。
- Click on the Ports you want to be part of the aggregation, in our example we used ports 11 & 12. 单击要加入聚合的端口,在我们的示例中,我们使用端口11和12。
Click “Apply”.
点击“应用”。
- Make the changes permanent by going to “maintenance”. 转到“维护”,使更改永久生效。
- Then into the “Save configurations” sub-menu. 然后进入“保存配置”子菜单。
Click on the “Save Configuration” button.
点击“保存配置”按钮。
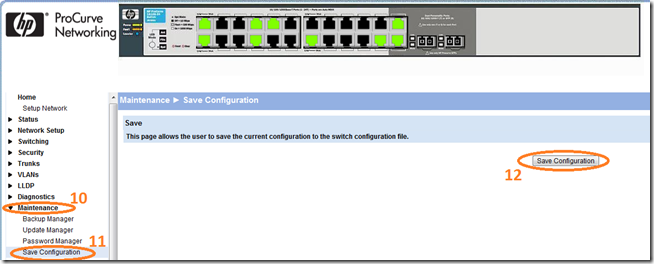
- Done. 做完了
Show’m the white light you’re made of
展现你的白光
翻译自: https://www.howtogeek.com/52068/how-to-setup-network-link-aggregation-802-3ad-on-ubuntu/


 6821
6821

 被折叠的 条评论
为什么被折叠?
被折叠的 条评论
为什么被折叠?
 到【灌水乐园】发言


