


plex 乱码

Why manually dim the lights during movie time when your media server can do it for you? With a little tweaking, you can set Plex Media Server to automatically adjust your Hue smart bulbs with custom lighting schemes for movie time, intermission, and the end of the film.
当您的媒体服务器可以为您做电影时,为什么在电影播放时间手动调暗灯光? 稍作调整,即可将Plex Media Server设置为使用针对电影时间,间歇时间和电影结尾的自定义照明方案自动调整Hue智能灯泡。
We’re pretty big media center fans here at How-To Geek, and we’re passionate about good lighting, especially during movies—you are watching TV with a bias light, right? So when we found out that we could tie our Plex Media Server experience together with our Hue smart bulb system, we set the system up the very same day, and we think you should too. After all, if you want to capture that perfect movies-at-home-experience you need more than just super cool automatic trailers, you need good lighting too.
我们是How-To Geek上相当大的媒体中心粉丝,我们对良好的照明充满热情,尤其是在电影拍摄期间- 您正在看带有偏光的电视 ,对吗? 因此,当我们发现可以将我们的Plex Media Server经验与Hue智能灯泡系统结合在一起时,我们会在同一天设置系统,我们认为您也应该这样做。 毕竟,如果您想在家中拍摄完美的电影,则不仅需要超酷的自动预告片 ,还需要良好的照明。
With Plex and Hue linked together, you can enjoy lighting integration that includes: dimming the lights (or shutting them off altogether) when your movie or TV show starts, dimmed lights when you pause the movie (so you can find your way to the bathroom or to get a snack), and a post-movie lights-up function to brighten the place back up. Even better yet, you can tweak the whole thing to only kick in if it is after dark (so your smart bulbs aren’t flicking on and off in the middle of the day when people watch TV).
通过将Plex和Hue链接在一起,您可以享受照明集成,其中包括:在电影或电视剧开始播放时将灯光调暗(或完全关闭),在电影暂停时使灯光变暗(以便您找到通往洗手间的方式)或获取小吃),以及电影放映后点亮功能,以使后备位置变亮。 甚至更好的是,您可以调整整个过程,使其仅在天黑后才开始播放(这样,您的智能灯泡就不会在人们看电视的中途闪烁)。
Sounds pretty great, yeah? If you’re already using Hue bulbs in the same room as a Plex client, adding this feature is a no-brainer. Let’s look at how to prepare, installing the plugin, and configuring it.
听起来不错,是吗? 如果您已经与Plex客户端在同一房间中使用Hue灯泡,那么添加此功能将是一件容易的事。 让我们看看如何准备,安装插件和配置它。
第一步:准备网络 (Step One: Prepare Your Network)
There are three things you want to do in advance that will make the entire setup process so much easier: assigning a static IP to your Hue Hub, checking the name of your Plex client, and writing down what you want to happen with your lighting scheme while before, during, and after you start a movie.
您需要预先做三件事,这将使整个设置过程变得更加容易:为Hue Hub分配静态IP,检查Plex客户端的名称以及写下您想要的照明方案在开始播放电影之前,之中和之后。
为您的Hue Hub提供静态IP (Give Your Hue Hub a Static IP)
Even if you don’t routinely use static IP addresses on your home network, this is a time you have to. Later in the tutorial, we’re going to tell the plugin where to find the Hue bridge—and if that Hue bridge gets a new address every time you reboot the router, you’ll be stuck updating that address in the plugin settings. To avoid that (very easily avoided) headache, you need to assign a static address to the bridge.
即使您不经常在家庭网络上使用静态IP地址 ,也必须这样做。 在本教程的后面,我们将告诉插件在哪里可以找到Hue桥-如果每次重新启动路由器时Hue桥都获得一个新地址,您将在插件设置中停留在更新该地址上。 为了避免这种麻烦(很容易避免),您需要为网桥分配一个静态地址。
How you assign a static IP address varies slightly from router to router, but before proceeding you need to give your Hue bridge a permanent address—you’ll find the bridge listed in your router’s assignment list as “Hue-Bridge”. If you’ve never set a static IP address assignment on your router before, check the manual for additional assistance and assign an address outside your router’s DHCP assignment pool to the bridge.
路由器之间分配静态IP地址的方式略有不同,但是在继续之前,您需要为Hue桥提供一个永久地址-您会在路由器的分配列表中找到称为“ Hue-Bridge”的桥。 如果您以前从未在路由器上设置静态IP地址分配,请查看手册以获取更多帮助,然后将路由器的DHCP分配池之外的地址分配给网桥。
检查您的Plex客户端的名称 (Check the Name of Your Plex Client)
In addition to telling the plugin where to find the Hue bridge, we also need to tell it which Plex clients it should respond to. Take a moment to look in the settings menus of every Plex client you intend to pair with the Hue lights (e.g. if you have a Raspberry Pi running RasPlex in your living room and bedroom, and both rooms have Hue lights, you’ll want to check both of those clients).
除了告诉插件在哪里可以找到Hue桥之外,我们还需要告诉它应该响应哪个Plex客户端。 花一点时间查看要与Hue灯配对的每个Plex客户端的设置菜单(例如,如果您的起居室和卧室中有运行RasPlex的Raspberry Pi,并且两个房间都有Hue灯,则需要检查这两个客户端)。
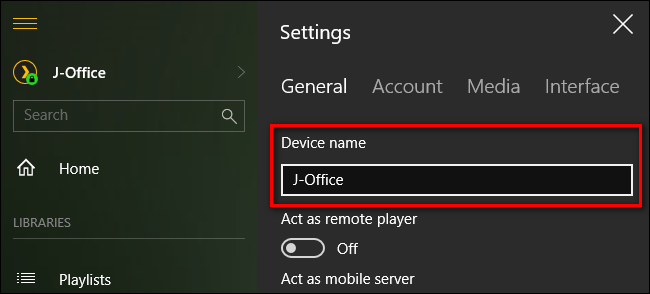
Unless you’ve changed the name within the client application itself, the name is usually the hostname of the device it is on (the Plex client on my home office computer is identified as J-Office, for example). Write the device name down, we’ll need it in a moment.
除非您在客户端应用程序本身中更改了名称,否则该名称通常是其所在设备的主机名(例如,家庭办公室计算机上的Plex客户端被标识为J-Office)。 写下设备名称,稍后我们将需要它。
计划您的照明方案 (Plan Your Lighting Scheme)
What lights do you have in the media room and what would you like them to do? Do you want all the lights to dim? All of them to turn off? Some of them to turn off and some of them to dim? The bias light behind the TV to turn on and set itself to a nice crisp white color temperature?
您在媒体室中拥有哪些照明灯,您希望它们做什么? 您是否希望所有的灯光都变暗? 全部关闭吗? 其中有些要关闭,有些要变暗? 电视后面的偏光灯可以打开并将其设置为良好的清晰白色温度?
What about when you pause or stop the media? Write down what you want to happen now, so when we get to the giant everything-in-one-menu configuration page for the plugin, you can…well, plug in all your choices in one swoop.
当您暂停或停止媒体时该怎么办? 写下您现在想要发生的事情,因此,当我们进入该插件的庞大的“一站式”菜单配置页面时,您可以…很好,一口气将所有选择插入。
第二步:安装HelloHue插件 (Step Two: Install the HelloHue Plugin)
Prep work behind us, it’s time to install the plugin. If you’ve never installed a Plex plugin before, don’t worry—the process is pretty straightforward. First things first, visit the GitHub page for the HelloHue plugin and click the green download button to grab a copy.
准备工作在我们后面,是时候安装插件了。 如果您以前从未安装过Plex插件,请不用担心-该过程非常简单。 首先,请访问GitHub页面上的HelloHue插件 ,然后单击绿色的下载按钮以获取副本。
Save the resulting .zip file to your computer and open it. Inside you’ll find a folder labeled “HelloHue.bundle-master”. Extract that folder to the plugins directory of your Plex Media Server. The location of the plugin directory varies by operating system:
将生成的.zip文件保存到计算机并打开。 在其中,您会找到一个标有“ HelloHue.bundle-master”的文件夹。 将该文件夹解压缩到Plex Media Server的plugins目录。 插件目录的位置因操作系统而异:
Windows:
%LOCALAPPDATA%\Plex Media Server\Plug-ins\Windows:
%LOCALAPPDATA%\Plex Media Server\Plug-ins\macOS:
~/Library/Application Support/Plex Media Server/Plug-insmacOS:
~/Library/Application Support/Plex Media Server/Plug-insLinux:
$PLEX_HOME/Library/Application Support/Plex Media Server/Plug-insLinux:
$PLEX_HOME/Library/Application Support/Plex Media Server/Plug-ins
Once you have copied the bundle, rename it to “HelloHue.bundle” by removing the “-master” suffix. Then restart your Plex Media Server.
复制捆绑软件后,通过删除“ -master”后缀将其重命名为“ HelloHue.bundle”。 然后重新启动Plex Media Server 。
After the server has restarted, head over to Plex’s web interface. Look in the left-hand sidebar for the “Channels” entry seen below and click on it.
服务器重新启动后,转到Plex的Web界面。 在左侧边栏中查找下面显示的“通道”条目,然后单击它。

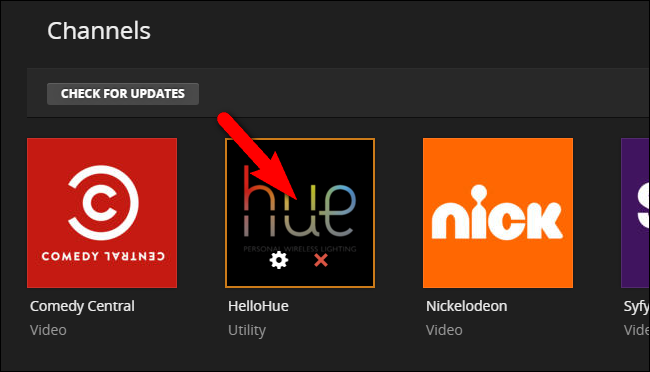
Even though the Hue control app isn’t a channel in the traditional sense (like the other media entries you see here, Comedy Central and Nickelodeon), the Channel system is a handy thing for hobby programmers to hijack because it’s got a nice interface we can use to adjust the plugin settings.
尽管Hue控制应用程序不是传统意义上的频道(就像您在此处看到的其他媒体条目,如Comedy Central和Nickelodeon),但频道系统对于业余程序员来说很容易劫持,因为它有一个很好的界面,可以用来调整插件设置。
There are two ways to access the HelloHue plugin. You can click on the general plugin icon (to access the setup mode), or you can hover and click on the little gear icon, as seen below (to access the settings menu). Even though this step is not included in the GitHub documentation for the project, we discovered that it was necessary to jump into the Settings menu ahead of schedule to tell the plugin what the static IP address of the hub was before the setup process could proceed. Click on the gear icon now.
有两种访问HelloHue插件的方法。 您可以单击常规插件图标(以访问设置模式),也可以将鼠标悬停并单击小齿轮图标,如下所示(以访问设置菜单)。 即使该步骤未包含在该项目的GitHub文档中,我们还是发现有必要提前进入设置菜单以告诉插件在进行设置过程之前该集线器的静态IP地址是什么。 现在点击齿轮图标。

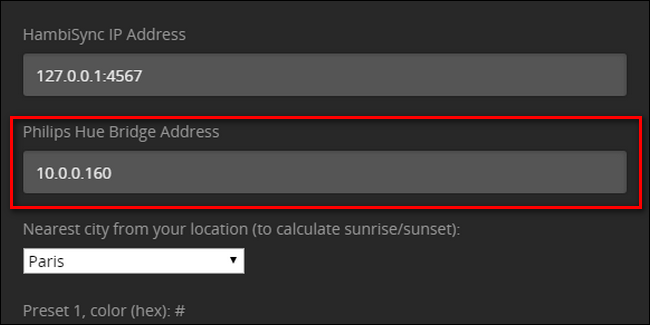
The Settings menu for HelloHue is very long, with tons of settings. Don’t panic. We’re going to make one tiny change now and then, when we come back to this menu, we’ll walk you through the process step-by-step. All you need to do now is look for the fifth entry from the top of the list, labeled “Philips Hue Bridge Address”, and enter the assigned static IP address. Our address is 10.0.0.160, but yours might be 192.168.0.101 or whatever you assigned it to in the first section of the tutorial.
对于HelloHue设置菜单很长, 吨设置。 不要惊慌 我们现在将做一个微小的更改,然后,当我们回到此菜单时,将逐步引导您完成该过程。 现在您需要做的就是从列表顶部查找第五个条目,标记为“ Philips Hue Bridge Address”,然后输入分配的静态IP地址。 我们的地址是10.0.0.160,但是您的地址可能是192.168.0.101或您在本教程第一部分中指定的地址。
Scroll way, way, down to the bottom and click “Save” to save your changes and return to the Channels screen. Back on the Channels screen, hover over the HelloHue icon and click anywhere but on the gear/”X” icon to open up the setup.
滚动方式, 方式 ,向下滚动至底部,然后单击“保存”以保存您的更改并返回到“通道”屏幕。 返回“频道”屏幕,将鼠标悬停在HelloHue图标上,然后单击除齿轮/“ X”图标以外的任何位置以打开设置。
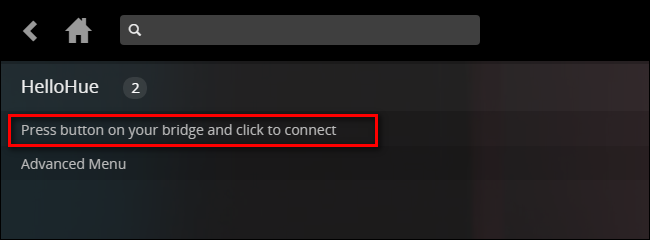
You’ll see this simple menu. Do as it says; click the physical link button in the center of your Phillips Hue bridge. After pressing the physical button, then click the link that reads “Press button on your bridge and click connect”.
您会看到这个简单的菜单。 照着说 请单击Phillips Hue桥中心的物理链接按钮。 按下物理按钮后,然后单击显示为“按下网桥上的按钮并单击连接”的链接。
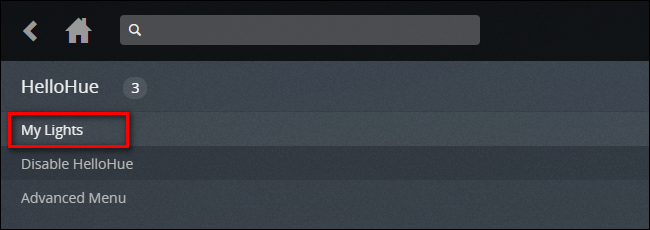
If done correctly you should, in a moment or two, see the HelloHue setup menu change to the following screen with “My Lights” at the top. If you do not see this entry, but you’re confident you did press the button on the bridge and then clicked the link properly, select “Advanced Menu” and then “Restart HelloHue”. This should, assuming your bridge is functioning as expected, resolve your issue. Even if the process appears to have failed, click on the house “Home” icon in your Plex Media Server to go back to the main screen and then open up the HelloHue channel again—the majority of the time, the error you see is meaningless and the plugin is actually loaded fine.
如果操作正确,请过一两分钟,将HelloHue设置菜单更改为以下屏幕,并在顶部显示“我的灯”。 如果您没有看到此条目,但是您确信确实按了网桥上的按钮,然后正确单击了链接,请选择“高级菜单”,然后选择“重新启动HelloHue”。 假设您的网桥运行正常,这应该可以解决您的问题。 即使该过程似乎失败了,也可以单击Plex Media Server中的房屋“主页”图标返回主屏幕,然后再次打开HelloHue频道-大多数情况下,您看到的错误是没有意义的并且插件实际上加载良好。
With “My Lights” visible, click on the link.
在“我的灯”可见的情况下,单击链接。
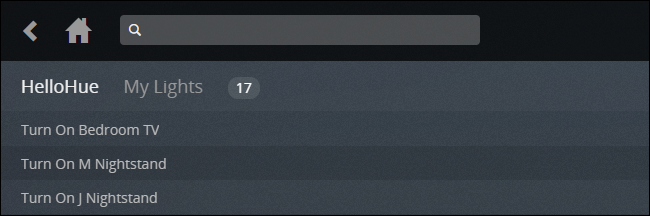
Inside, you’ll see all the Hue lights connected to your Hue bridge. Now is a great time to do two things. First, note the names of the lights you wish to use in your media setup (like, in our example here, “Bedroom TV”. Second, click on each of those lights to toggle them on and then off to confirm that HelloHue can control them.
在内部,您将看到所有连接到色相桥的色相灯。 现在是做两件事的好时机。 首先,记下您希望在媒体设置中使用的灯光的名称(例如,在我们的示例中为“ Bedroom TV”。其次,单击每个灯光以将其打开然后关闭,以确认HelloHue可以控制他们。
Now that we’ve got the plugin installed and properly linked, its time to get down to fun part: configure our super-futuristic-automatic lighting.
既然我们已经安装了插件并正确地链接了插件,那么接下来该介绍一下有趣的部分:配置我们的超未来自动照明。
第三步:配置HelloHue插件 (Step Three: Configure the HelloHue Plugin)
To configure the plugin, you’ll need to visit that dauntingly long Settings menu again. Click on the gear icon again to jump back into the HelloHue Settings menu. Remember our preparation in the first part of the tutorial? This is where that preparation pays off, as we’ll be able to rip through our setup in no time.
要配置插件,您需要再次访问该令人费解的冗长的“设置”菜单。 再次单击齿轮图标可跳回到HelloHue设置菜单。 还记得本教程第一部分中的准备工作吗? 这是准备工作的结果,因为我们将能够立即完成设置。
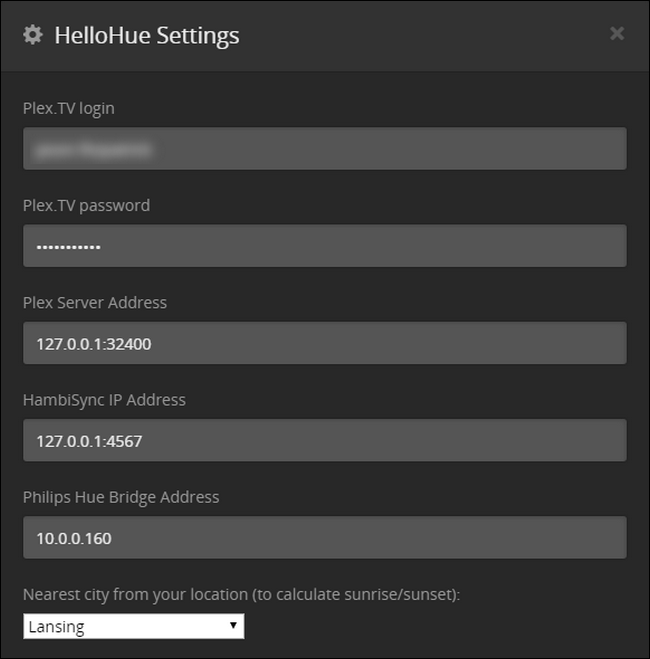
First things first, enter your Plex.TV login information and password at the top. Leave the “Plex Server Address” set up as the default, unless you have a pressing reason (and knowledge of an alternate IP address and port) you need to enter here. If you’ve never messed with your Plex server IP or port address, leave it alone. The “HambiSync IP Address” is specifically for a separate project related to the Phillips Ambilight ambient TV light system—feel free to check the very cool project out if you’re curious. We already filled in our Bridge address, so we’re good there. Finally, in this first chunk of the settings, pick a nearby city for the sunset/sunrise detection.
首先,请在顶部输入您的Plex.TV登录信息和密码。 保留“ Plex服务器地址”为默认设置,除非您有紧迫的理由(以及其他IP地址和端口的知识)需要在此处输入。 如果您从未与您的Plex服务器IP或端口地址混淆,请不要理会它。 “ HambiSync IP地址”专门用于与Phillips Ambilight环境电视照明系统有关的单独项目- 如果您感到好奇,请随时检查非常酷的项目 。 我们已经填写了我们的桥地址,所以我们在那里很好。 最后,在设置的第一部分中,选择附近的城市进行日落/日出检测。
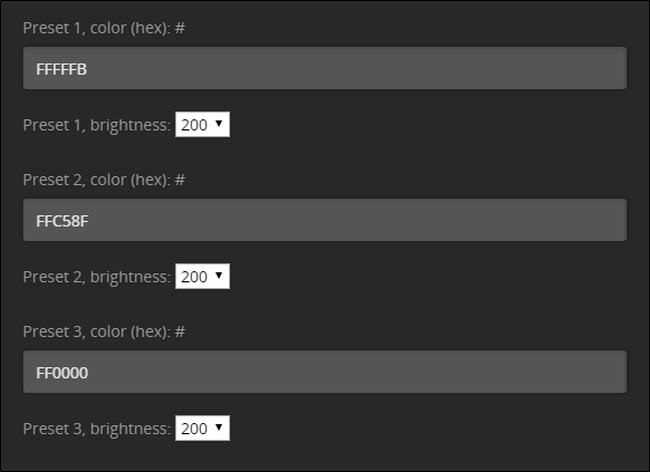
Next, you’ll need to set up your color presets. The preset color values must be in hexadecimal format, not RGB format. While you’re free to put in any value you want here (maybe you want the room to turn yellow-green when you pause the movie—hey, it’s your party) we’ve taken the liberty of listing some common colors you may wish to use below.
接下来,您需要设置颜色预设。 预设的颜色值必须为十六进制格式,而不是RGB格式。 尽管您可以在此处随意输入任何值(也许您希望在暂停播放电影时房间变成黄绿色-嘿,这是您的聚会),但我们还是自由列出了一些您可能希望的常用颜色在下面使用。
- FFFFFB: Pure white daylight. Great for TV back lights as it matches the color temperature of the white on your HDTV. FFFFFB:纯白色的日光。 非常适合电视背光源,因为它与HDTV上的白色色温匹配。
- FFC58F: Very warm incandescent glow. Good for late night watching, minimizing blue-light exposure. FFC58F:非常温暖的白炽灯。 适合深夜观看,最大程度减少蓝光照射。
- FF0000: Pure red. Useful as a “running light” shade to display while media is paused and you’re foraging for snacks. FF0000:纯红色。 当媒体暂停且正在寻找零食时,可作为“运行中的”阴影显示。
You can create up to 5 presets. The default brightness level is 200 (and can be adjusted up to 255 and all the way down to 0). In the screenshot below, you can see that we’ve used the three sample colors above as our first 3 presets:
您最多可以创建5个预设。 默认亮度级别为200(最高可调整为255,最低可调整为0)。 在下面的屏幕截图中,您可以看到我们已经使用了上面的三种示例颜色作为前三个预设:
Next, you’ll need to enable your first group. You can do so by scrolling down and checking the box “Activate HelloHue in room 1”. Name the room, put in the usernames of the people who can trigger the plugin (for 99% of people this will simply be their username as they are the ones who setup and administer the Plex server and all the clients), followed by the name of the lights you want to trigger. (You can ignore the “groups” function as the functionality doesn’t appear to be implemented yet). Then, all that’s left to do is pick what you want to have happen when you play, pause, or stop the media—your options are turn on, dim, turn off, or trigger a preset.
接下来,您需要启用第一个组。 您可以通过向下滚动并选中“激活1号房间的HelloHue”框来实现。 命名房间,并输入可以触发插件的用户的用户名(对于99%的用户,这将只是他们的用户名,因为他们是设置和管理Plex服务器及所有客户端的用户名),后跟名称您要触发的灯光。 (您可以忽略“组”功能,因为该功能似乎尚未实现)。 然后,剩下要做的就是选择在播放,暂停或停止媒体时想要发生的事情-您的选项处于打开,暗淡,关闭或触发预设状态。

One thing you may notice is that the on/off/dim/preset options are global, and apply to all the lights. If you want to turn off the lights in the room but turn on the light behind the TV to use as a bias light, you can’t do that with a single room. The solution then is to simply divide the lights in your single physical room into two virtual rooms. Repeat the process we outlined above, but instead of lumping all the lights together in, say, “Living Room” split them up into, say, “Living Room TV Lights” and “Living Room General Lights”. Then you can configure the two rooms to respond to the same client, but with different results. When you hit play in the living room, for example, you can configure it so the general lights turn off but the bias light behind the TV turns on and when you pause it, the TV light could turn off but the general reading lights could brighten to 50% brightness or the like.
您可能会注意到的一件事是,on / off / dim / preset选项是全局的,并且适用于所有灯光。 如果你想关灯的房间,但打开电视,以用作背景光背后的光,你不能这样做,有一个单间。 然后,解决方案是将单个物理房间中的灯光简单地分为两个虚拟房间。 重复我们上面概述的过程,但不要将所有的灯都混在一起,例如,“客厅”将它们分成例如“客厅电视灯”和“客厅普通灯”。 然后,您可以将两个房间配置为响应同一客户端,但结果不同。 例如,当您在客厅中打游戏时,您可以对其进行配置,以使普通灯熄灭,但电视后面的偏置灯打开;当您暂停它时,电视灯可以熄灭,但普通阅读灯可以变亮。亮度达到50%或类似水平。
You can also tweak the transition time for each function. By default it is set to 400 milliseconds, but we found that the system seemed to function more reliably if we tweaked it to 1 second.
您还可以调整每个功能的转换时间。 默认情况下,它设置为400毫秒,但是我们发现,如果将其调整为1秒,系统似乎可以更可靠地运行。
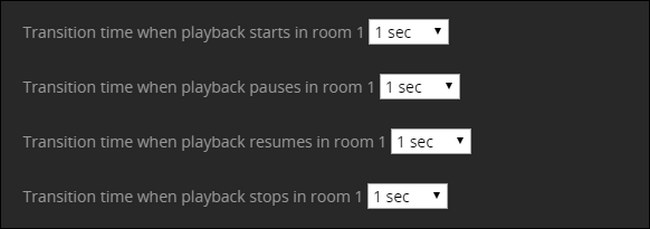
With most of these tweaks, you’ll want to keep the number on the low side, but you might prefer to turn up the wait time on the transition after playback stops: a few seconds of dim lighting after the end of the movie seems appropriate.
通过大多数这些调整,您可能希望将数字保持在较低的位置,但是您可能希望在播放停止后增加过渡时的等待时间:电影结尾后的几秒钟昏暗的灯光似乎合适。
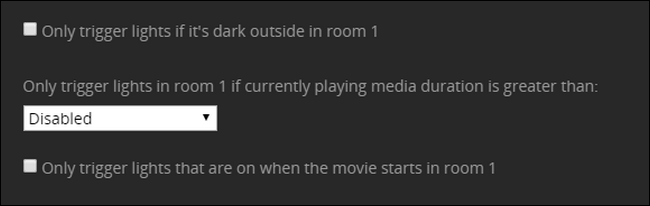
There are three final settings you might consider playing with. First, you can set the lights to only trigger if it is dark out (this is calculated based on the sunset time for the city we entered in the first section).
您可以考虑使用三个最终设置。 首先,您可以将灯光设置为仅在天黑时才触发(这是根据我们在第一部分中输入的城市的日落时间计算得出的)。
Second, you can configure HelloHue to trigger only if the media is a certain length (e.g. 1 minute, 5 minutes, 10 minutes, or other increasing increments of 5 minutes); this feature is handy if you don’t want it to trigger the dramatic movie mode for short clips (like when you show a friend a YouTube video you’ve clipped to your Plex Media Server).
其次,您可以将HelloHue配置为仅在媒体具有一定长度(例如1分钟,5分钟,10分钟或其他5分钟递增的增量)时触发; 如果您不希望它为短片触发戏剧性的电影模式(例如当您向朋友显示已剪辑到Plex Media Server的YouTube视频时),则此功能非常方便。
Finally, you can set HelloHue to only trigger lights that are on when the movie starts. While we’re sure there’s a good reason for using this last toggle, we’ll admit we’re at a loss—the whole point of having super-futuristic smart lights is to use them as much as possible, so we, naturally, left this one unchecked.
最后,您可以将HelloHue设置为仅在电影开始时触发打开的灯光。 虽然我们确定有充分的理由使用最后一个拨动开关,但我们承认我们很茫然-拥有超未来派智能灯的重点是尽可能多地使用它们,所以我们自然而然地保留了这一选择。
Be sure to scroll all the way to the bottom of the menu to save your setting when you’re done—and that’s it! After a bit of mucking about you’ve now got on-demand mood lighting for your movie watching needs with the kind of lights down, intermission dimming, and lights up automation a real movie house would be proud of.
完成后,请确保一直滚动至菜单底部,以保存您的设置!仅此而已! 经过一番嘲弄之后,您现在可以根据自己的电影观看需求来获得按需使用的心情照明,其中包括熄灯,间歇调光和自动照明等功能,真正的电影院将为此感到自豪。
plex 乱码


 5万+
5万+

 被折叠的 条评论
为什么被折叠?
被折叠的 条评论
为什么被折叠?
 到【灌水乐园】发言


